display FORD FLEX 2017 1.G Owners Manual
[x] Cancel search | Manufacturer: FORD, Model Year: 2017, Model line: FLEX, Model: FORD FLEX 2017 1.GPages: 496, PDF Size: 5.92 MB
Page 344 of 496
If you do not cancel the call, and SYNC
makes a successful call, a pre-recorded
message plays for the 911 operator, and
then the occupant(s) in your vehicle is able
to talk with the operator. Be prepared to
provide your name, phone number and
location immediately, because not all 911
systems are capable of receiving this
information electronically.
911 Assist May Not Work If
•
Your cellular phone or 911 Assist
hardware sustains damage in a crash.
• The vehicle's battery or the SYNC
system has no power.
• The phone(s) thrown from your vehicle
are the ones paired and connected to
the system.
911 Assist Privacy Notice
When you turn on 911 Assist, it may
disclose to emergency services that your
vehicle has been in a crash involving the
deployment of an airbag or activation of
the fuel pump shut-off. Certain versions or
updates to 911 Assist may also be capable
of electronically or verbally disclosing to
911 operators your vehicle location or other
details about your vehicle or crash to assist
911 operators to provide the most
appropriate emergency services. If you do
not want to disclose this information, do
not turn the feature on.
SYNC™ APPLINK ™
SYNC Mobile Apps
Note: You must pair and connect your
smartphone to SYNC to access AppLink.
Note: iPhone users need to connect the
phone to the USB port in order to start the
application. Note:
The AppLink feature is not available
if your vehicle is equipped with the MyFord
Touch system.
Note: Depending on your display type, you
can access AppLink from the media menu,
the phone menu, or by using voice
commands. Once an app is running through
AppLink, you can control main features of
the app through voice commands and
steering wheel controls.
To Access Using the Phone Menu
Press the phone button to access the
SYNC phone menu on-screen. You can
then scroll to: Menu item
Press OK to access a list
of available applications.
Mobile Apps
Scroll through the list of
available applications and
press OK to select a
particular app. Once an
app is running through
SYNC, you can access an
app’s menu by pressing the
MENU
button to first
access the SYNC menu.
Scroll until the app name followed by
"Menu", is displayed (such as, sticher
Menu), then press
OK. From here, you can
access an application's features, such as
Thumbs up and Thumbs down.
For more information, please visit: Website
www.SYNCMyRide.com
To Access Using the Media Menu
Press the
AUX button on the center
console.
341
Flex (), enUSA, First Printing SYNC™
Page 345 of 496
Press the Menu button to the SYNC menu and scroll to:
Action and description
Menu item
Press the OK button.
SYNC-Media
Press the
OK button and scroll through the list of available
applications and select your desired app.
Mobile Apps
Scroll until the app name followed by
"Menu", is displayed (such as, Stitcher
Menu), then press
OK. From here, you can
access an application's features, such as
Thumbs up and Thumbs down. For more information, please visit: Website
www.SYNCMyRide.com
To Access Using Voice Commands
Press the voice button and when prompted say: Action and description
Voice command
Say the name of the application after the tone.
The app should start. While an app is running through SYNC,
you can press the voice button and speak commands specific
to the app, for example, "Playlist Road Trip".
Mobile Apps
You can also say the following:
To discover the available voice commands.
The name of an app
(such as Stitcher)
followed by "help".
USING SYNC™ WITH YOUR
MEDIA PLAYER
You can access and play music from your
digital music player over your vehicle's
speaker system using the system's media
menu or voice commands. You can also
sort and play your music by specific
categories, for example artist and album.
Note: The system is capable of indexing up
to 6,000 songs. SYNC is capable of hosting nearly any
digital media player including: iPod®,
Zune
™, plays from device players, and
most USB drives. SYNC also supports the
following audio formats MP3, WMA, WAV
and ACC.
Connecting Your Digital Media
Player to the USB Port
Note: If your digital media player has a
power switch, make sure you switch it on
before plugging it in.
342
Flex (), enUSA, First Printing SYNC™
Page 346 of 496
To Connect Using Voice Commands
Plug the device into the USB port. See
USB Port (page 320).
Press the voice button and when prompted say:
Action and Description
Voice command
You can now play music by saying any of the appropriate
voice commands. See Media voice commands.
USB [1]
You do not need to say words that appear within square brackets. For example, for where
USB[1]appears, you can say USB or USB one.
To Connect Using the System Menu
Plug the device into the USB port. See
USB Port
(page 320). Press the
AUX button, then the Menu
button to enter the Media Menu.
You can then scroll to: Action and Description
Message
Press the
OK button.
SELECT SRC
Press the
OK button.
SYNC USB
Depending on how many digital media files are on your
connected device, the following message may appear in the
radio display.
Indexing\b
When indexing is complete, the screen returns to the Play menu. You can then
select one of the following:
PLAY ALL
ARTISTS
ALBUMS
GENRES
PLAYLISTS
TRACKS
EXPLORE USB
SIMILARMUSIC Exit the current menu.
RETURN
343
Flex (), enUSA, First Printing SYNC™E142599
Page 350 of 496
Action and Description
Message
Press the OK button to turn autoplay on to
listen to music processed during indexing.
Turn autoplay off to allow the indexing
process to finish before the system plays
any of your music.4
AUTOPLAY
Interact with SYNC-capable mobile applications on your
smartphone.
APPLICATIONS
Access available Bluetooth Device menu listings as well as
Advanced menu listings.
SYS SETTINGS
Press OK to exit the media menu.
EXIT MENU
1 The time required to complete this depends on the size of the media the system needs
to index. If autoplay is on, you can listen to media processed during indexing. If autoplay
is off, you cannot listen to music until the system finishes indexing media. SYNC is capable
of indexing thousands of average size media and notifies you if it reaches the maximum
indexing file size.
2 If you have already connected a device to the USB port, you cannot access the line in
feature. Some digital media players require both USB and line in ports to stream data
and music separately.
3 Some digital media players require both USB and line in ports to stream data and music
separately.
4 Indexing times can vary from device to device and with regard to the number of songs
the system needs to process.
Accessing Your Play Menu
This menu allows you to select and play
your media by artist, album, genre, playlist,
track, similar music or even to explore what
is on your USB device. Make sure that your device is plugged into
the USB port and is turned on.
Press the
AUX button, then the Menu
button to enter the Media Menu.
You can then scroll to select: Action and Description
Message
Press the
OK button.
PLAY MENU
If there are no media files to access, the display indicates there is no media. If there are
media files, you have the following options:
Press the
OK button. The first track title appears in the
display.
PLAY ALL
347
Flex (), enUSA, First Printing SYNC™
Page 353 of 496
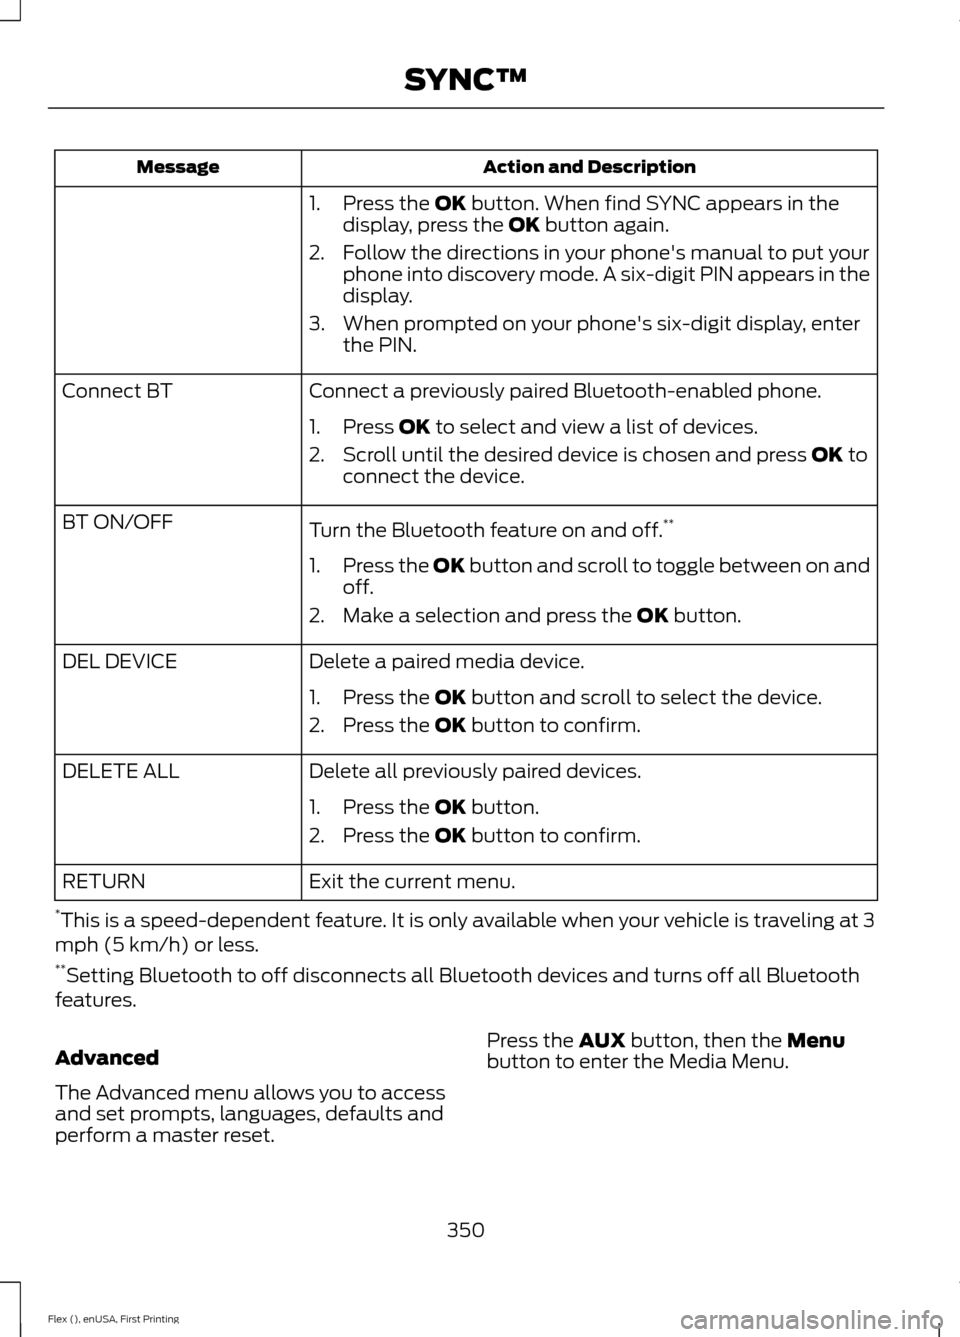
Action and Description
Message
1. Press the OK button. When find SYNC appears in the
display, press the OK button again.
2. Follow the directions in your phone's manual to put your phone into discovery mode. A six-digit PIN appears in the
display.
3. When prompted on your phone's six-digit display, enter the PIN.
Connect a previously paired Bluetooth-enabled phone.
Connect BT
1. Press
OK to select and view a list of devices.
2. Scroll until the desired device is chosen and press
OK to
connect the device.
Turn the Bluetooth feature on and off. **
BT ON/OFF
1.Press the OK button and scroll to toggle between on and
off.
2. Make a selection and press the
OK button.
Delete a paired media device.
DEL DEVICE
1. Press the
OK button and scroll to select the device.
2. Press the
OK button to confirm.
Delete all previously paired devices.
DELETE ALL
1. Press the
OK button.
2. Press the
OK button to confirm.
Exit the current menu.
RETURN
* This is a speed-dependent feature. It is only available when your vehicle is traveling at 3
mph (5 km/h) or less.
** Setting Bluetooth to off disconnects all Bluetooth devices and turns off all Bluetooth
features.
Advanced
The Advanced menu allows you to access
and set prompts, languages, defaults and
perform a master reset. Press the
AUX button, then the Menu
button to enter the Media Menu.
350
Flex (), enUSA, First Printing SYNC™
Page 354 of 496
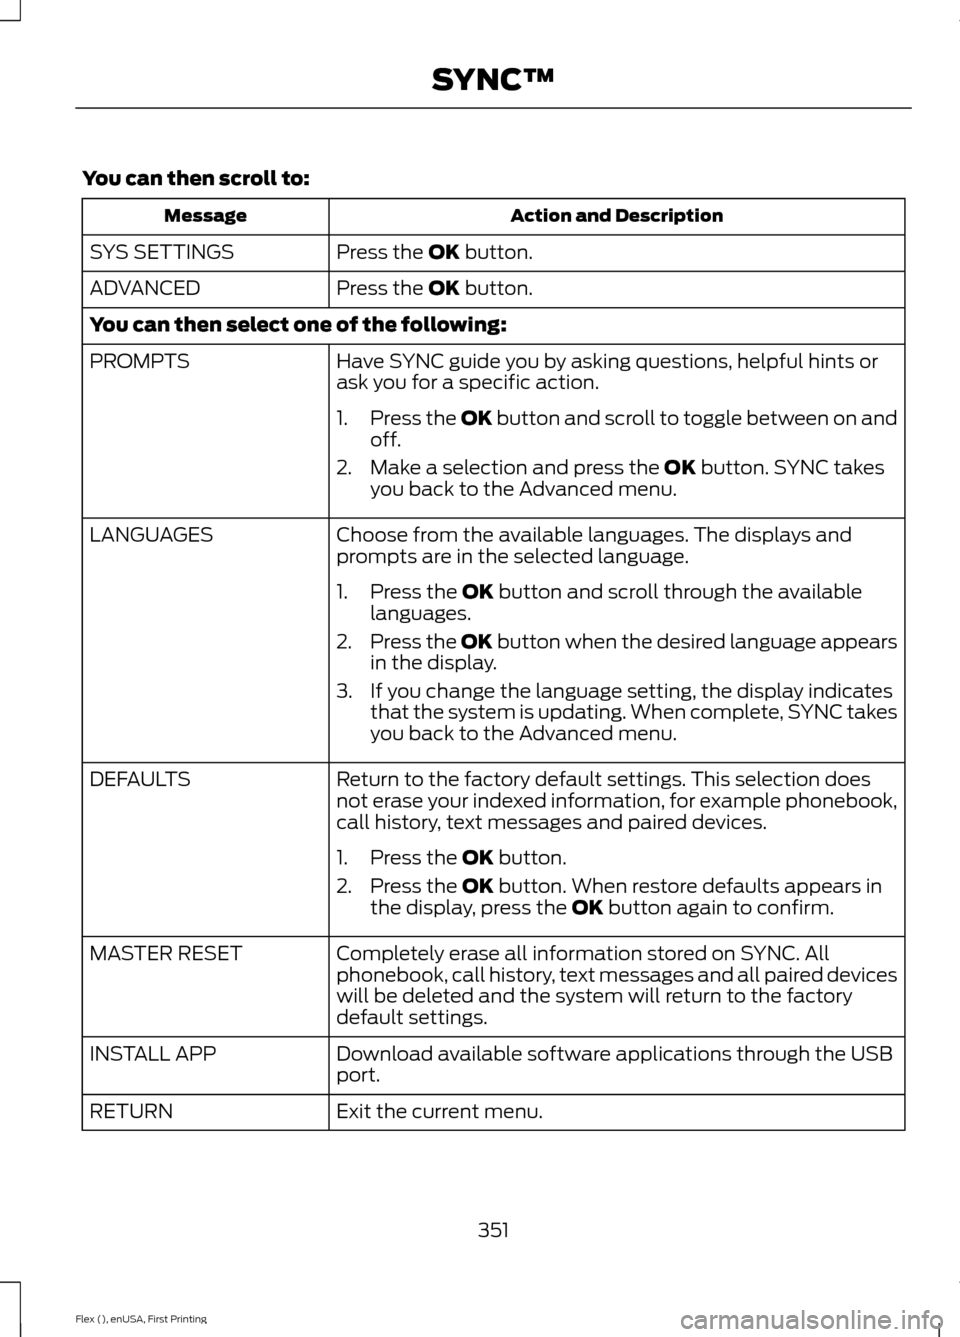
You can then scroll to:
Action and Description
Message
Press the OK button.
SYS SETTINGS
Press the
OK button.
ADVANCED
You can then select one of the following:
Have SYNC guide you by asking questions, helpful hints or
ask you for a specific action.
PROMPTS
1.Press the OK button and scroll to toggle between on and
off.
2. Make a selection and press the
OK button. SYNC takes
you back to the Advanced menu.
Choose from the available languages. The displays and
prompts are in the selected language.
LANGUAGES
1. Press the
OK button and scroll through the available
languages.
2. Press the OK button when the desired language appears
in the display.
3. If you change the language setting, the display indicates that the system is updating. When complete, SYNC takes
you back to the Advanced menu.
Return to the factory default settings. This selection does
not erase your indexed information, for example phonebook,
call history, text messages and paired devices.
DEFAULTS
1. Press the
OK button.
2. Press the
OK button. When restore defaults appears in
the display, press the OK button again to confirm.
Completely erase all information stored on SYNC. All
phonebook, call history, text messages and all paired devices
will be deleted and the system will return to the factory
default settings.
MASTER RESET
Download available software applications through the USB
port.
INSTALL APP
Exit the current menu.
RETURN
351
Flex (), enUSA, First Printing SYNC™
Page 364 of 496
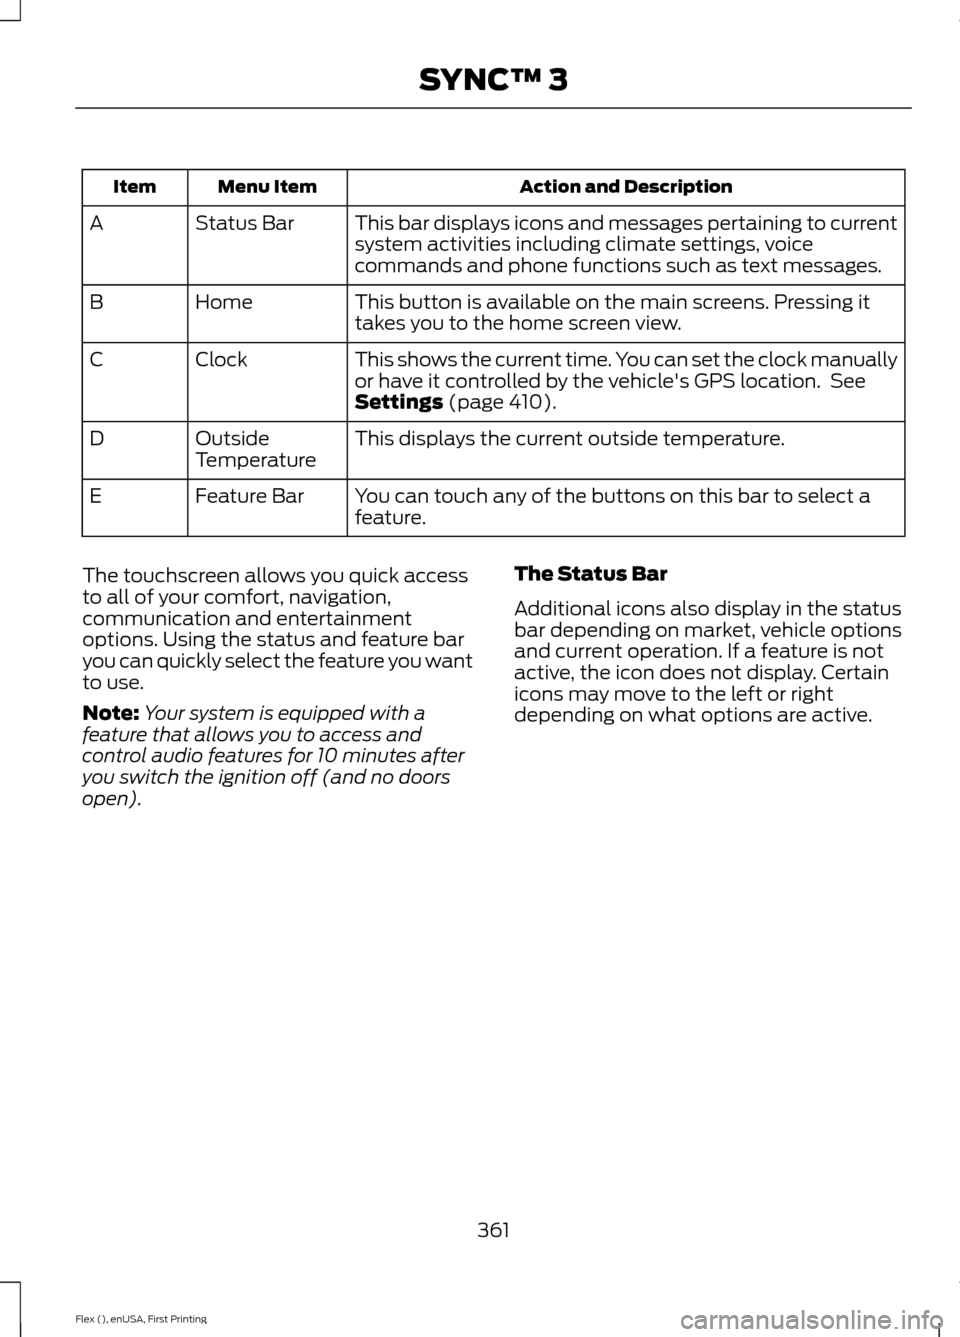
Action and Description
Menu Item
Item
This bar displays icons and messages pertaining to current
system activities including climate settings, voice
commands and phone functions such as text messages.
Status Bar
A
This button is available on the main screens. Pressing it
takes you to the home screen view.
Home
B
This shows the current time. You can set the clock manually
or have it controlled by the vehicle's GPS location. See
Settings (page 410).
Clock
C
This displays the current outside temperature.
Outside
Temperature
D
You can touch any of the buttons on this bar to select a
feature.
Feature Bar
E
The touchscreen allows you quick access
to all of your comfort, navigation,
communication and entertainment
options. Using the status and feature bar
you can quickly select the feature you want
to use.
Note: Your system is equipped with a
feature that allows you to access and
control audio features for 10 minutes after
you switch the ignition off (and no doors
open). The Status Bar
Additional icons also display in the status
bar depending on market, vehicle options
and current operation. If a feature is not
active, the icon does not display. Certain
icons may move to the left or right
depending on what options are active.
361
Flex (), enUSA, First Printing SYNC™ 3
Page 365 of 496
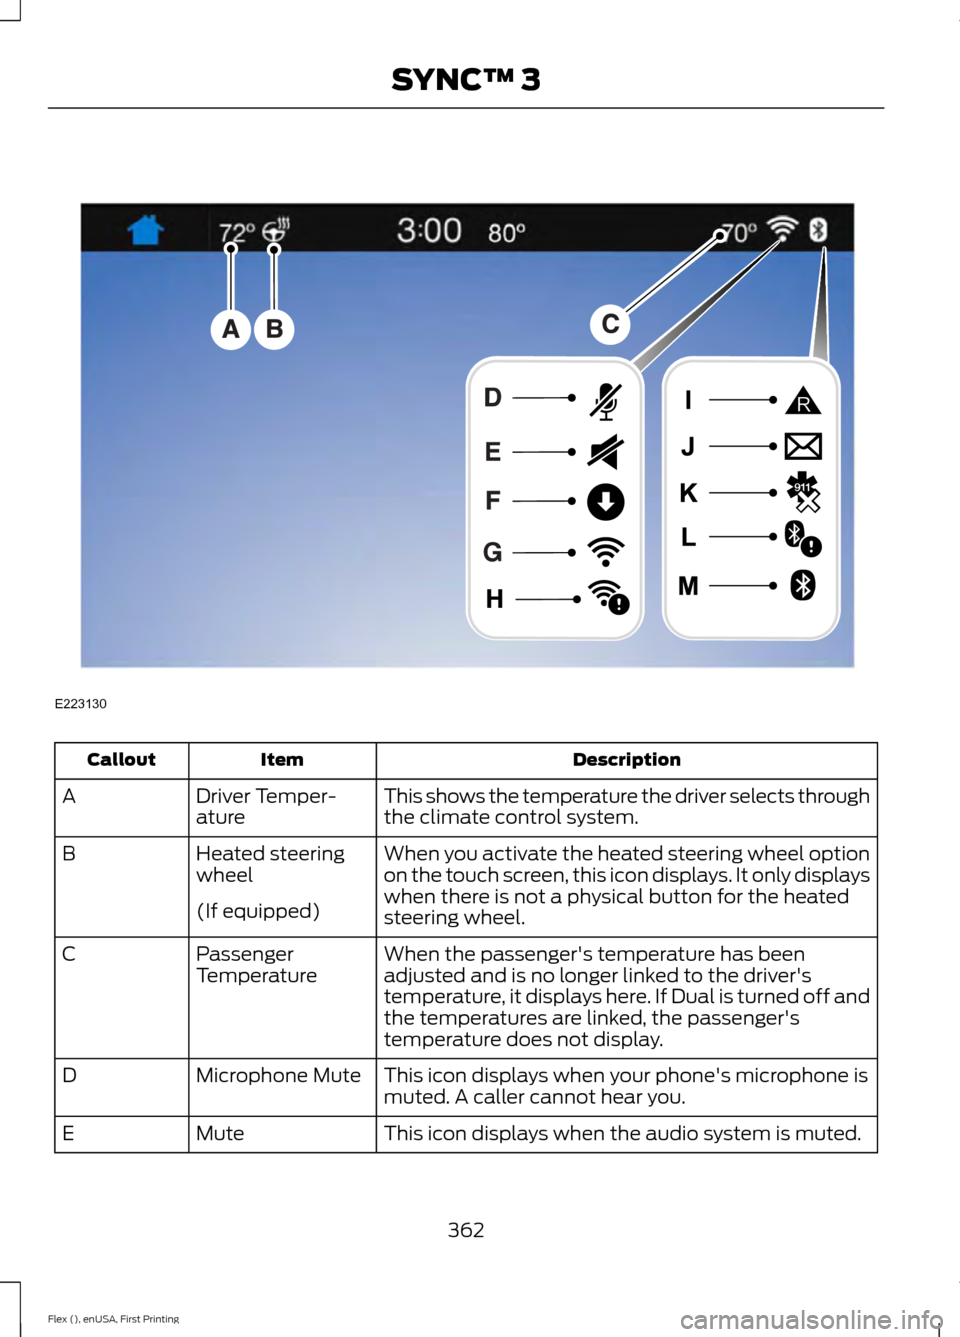
Description
Item
Callout
This shows the temperature the driver selects through
the climate control system.
Driver Temper-
ature
A
When you activate the heated steering wheel option
on the touch screen, this icon displays. It only displays
when there is not a physical button for the heated
steering wheel.
Heated steering
wheel
B
(If equipped) When the passenger's temperature has been
adjusted and is no longer linked to the driver's
temperature, it displays here. If Dual is turned off and
the temperatures are linked, the passenger's
temperature does not display.
Passenger
Temperature
C
This icon displays when your phone's microphone is
muted. A caller cannot hear you.
Microphone Mute
D
This icon displays when the audio system is muted.
Mute
E
362
Flex (), enUSA, First Printing SYNC™ 3E223130
Page 366 of 496
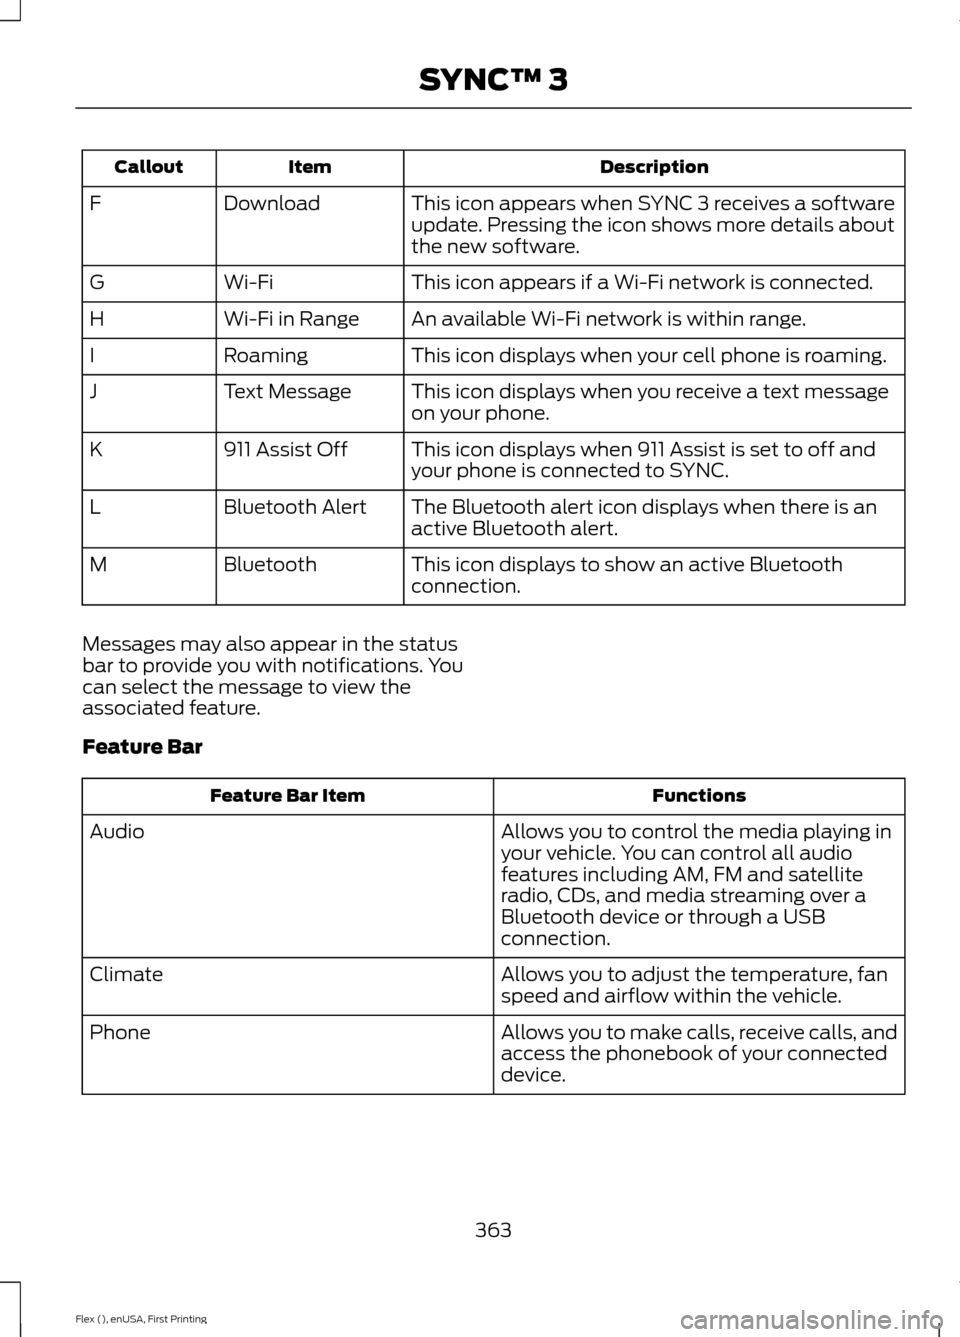
Description
Item
Callout
This icon appears when SYNC 3 receives a software
update. Pressing the icon shows more details about
the new software.
Download
F
This icon appears if a Wi-Fi network is connected.
Wi-Fi
G
An available Wi-Fi network is within range.
Wi-Fi in Range
H
This icon displays when your cell phone is roaming.
Roaming
I
This icon displays when you receive a text message
on your phone.
Text Message
J
This icon displays when 911 Assist is set to off and
your phone is connected to SYNC.
911 Assist Off
K
The Bluetooth alert icon displays when there is an
active Bluetooth alert.
Bluetooth Alert
L
This icon displays to show an active Bluetooth
connection.
Bluetooth
M
Messages may also appear in the status
bar to provide you with notifications. You
can select the message to view the
associated feature.
Feature Bar Functions
Feature Bar Item
Allows you to control the media playing in
your vehicle. You can control all audio
features including AM, FM and satellite
radio, CDs, and media streaming over a
Bluetooth device or through a USB
connection.
Audio
Allows you to adjust the temperature, fan
speed and airflow within the vehicle.
Climate
Allows you to make calls, receive calls, and
access the phonebook of your connected
device.
Phone
363
Flex (), enUSA, First Printing SYNC™ 3
Page 367 of 496
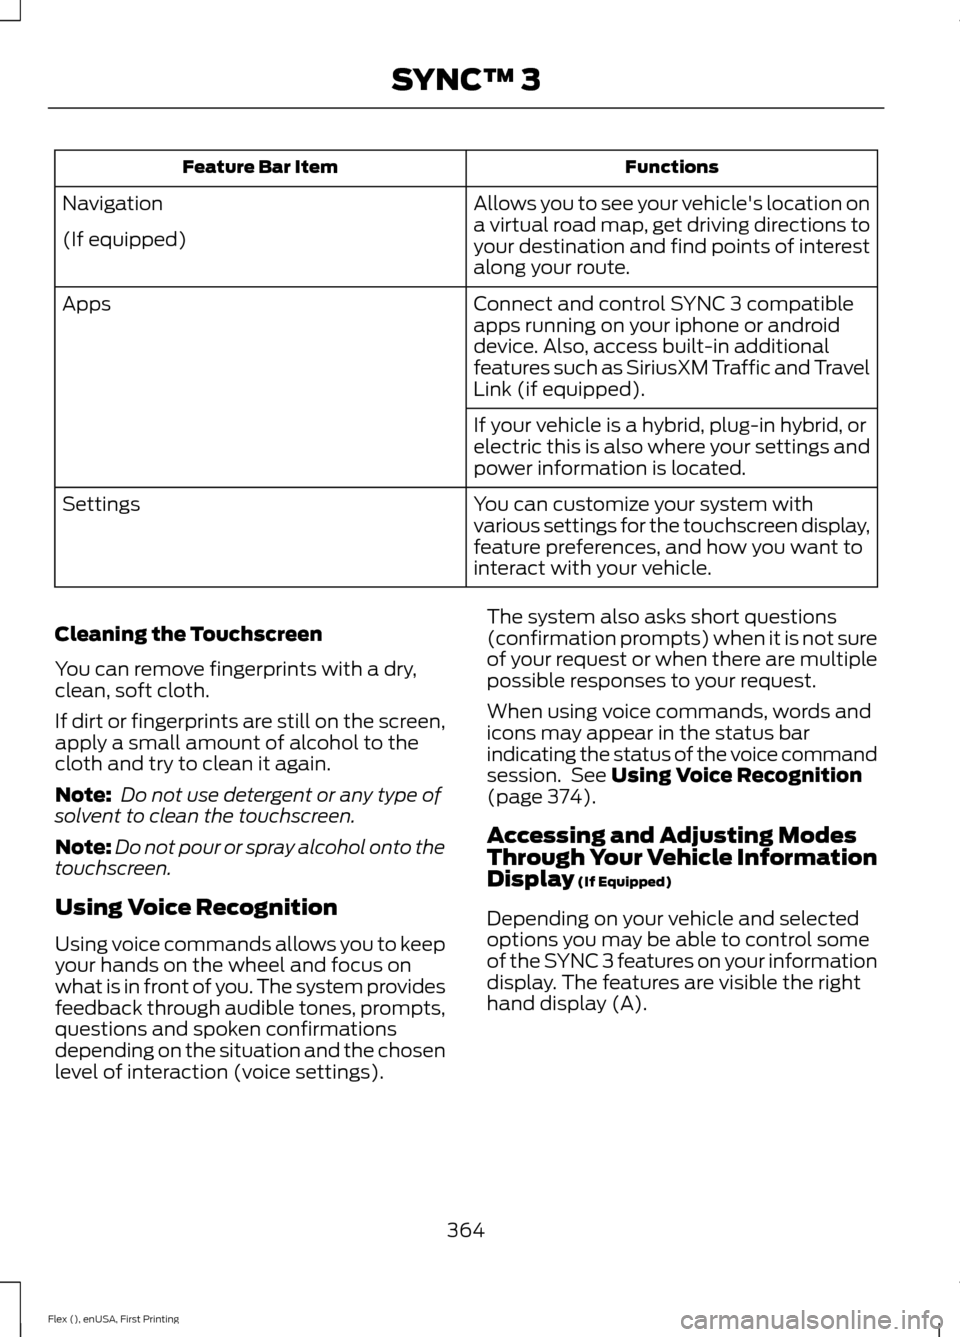
Functions
Feature Bar Item
Allows you to see your vehicle's location on
a virtual road map, get driving directions to
your destination and find points of interest
along your route.
Navigation
(If equipped)
Connect and control SYNC 3 compatible
apps running on your iphone or android
device. Also, access built-in additional
features such as SiriusXM Traffic and Travel
Link (if equipped).
Apps
If your vehicle is a hybrid, plug-in hybrid, or
electric this is also where your settings and
power information is located.
You can customize your system with
various settings for the touchscreen display,
feature preferences, and how you want to
interact with your vehicle.
Settings
Cleaning the Touchscreen
You can remove fingerprints with a dry,
clean, soft cloth.
If dirt or fingerprints are still on the screen,
apply a small amount of alcohol to the
cloth and try to clean it again.
Note: Do not use detergent or any type of
solvent to clean the touchscreen.
Note: Do not pour or spray alcohol onto the
touchscreen.
Using Voice Recognition
Using voice commands allows you to keep
your hands on the wheel and focus on
what is in front of you. The system provides
feedback through audible tones, prompts,
questions and spoken confirmations
depending on the situation and the chosen
level of interaction (voice settings). The system also asks short questions
(confirmation prompts) when it is not sure
of your request or when there are multiple
possible responses to your request.
When using voice commands, words and
icons may appear in the status bar
indicating the status of the voice command
session. See Using Voice Recognition
(page 374).
Accessing and Adjusting Modes
Through Your Vehicle Information
Display
(If Equipped)
Depending on your vehicle and selected
options you may be able to control some
of the SYNC 3 features on your information
display. The features are visible the right
hand display (A).
364
Flex (), enUSA, First Printing SYNC™ 3