headlamp FORD FLEX 2019 User Guide
[x] Cancel search | Manufacturer: FORD, Model Year: 2019, Model line: FLEX, Model: FORD FLEX 2019Pages: 513, PDF Size: 39.3 MB
Page 204 of 513
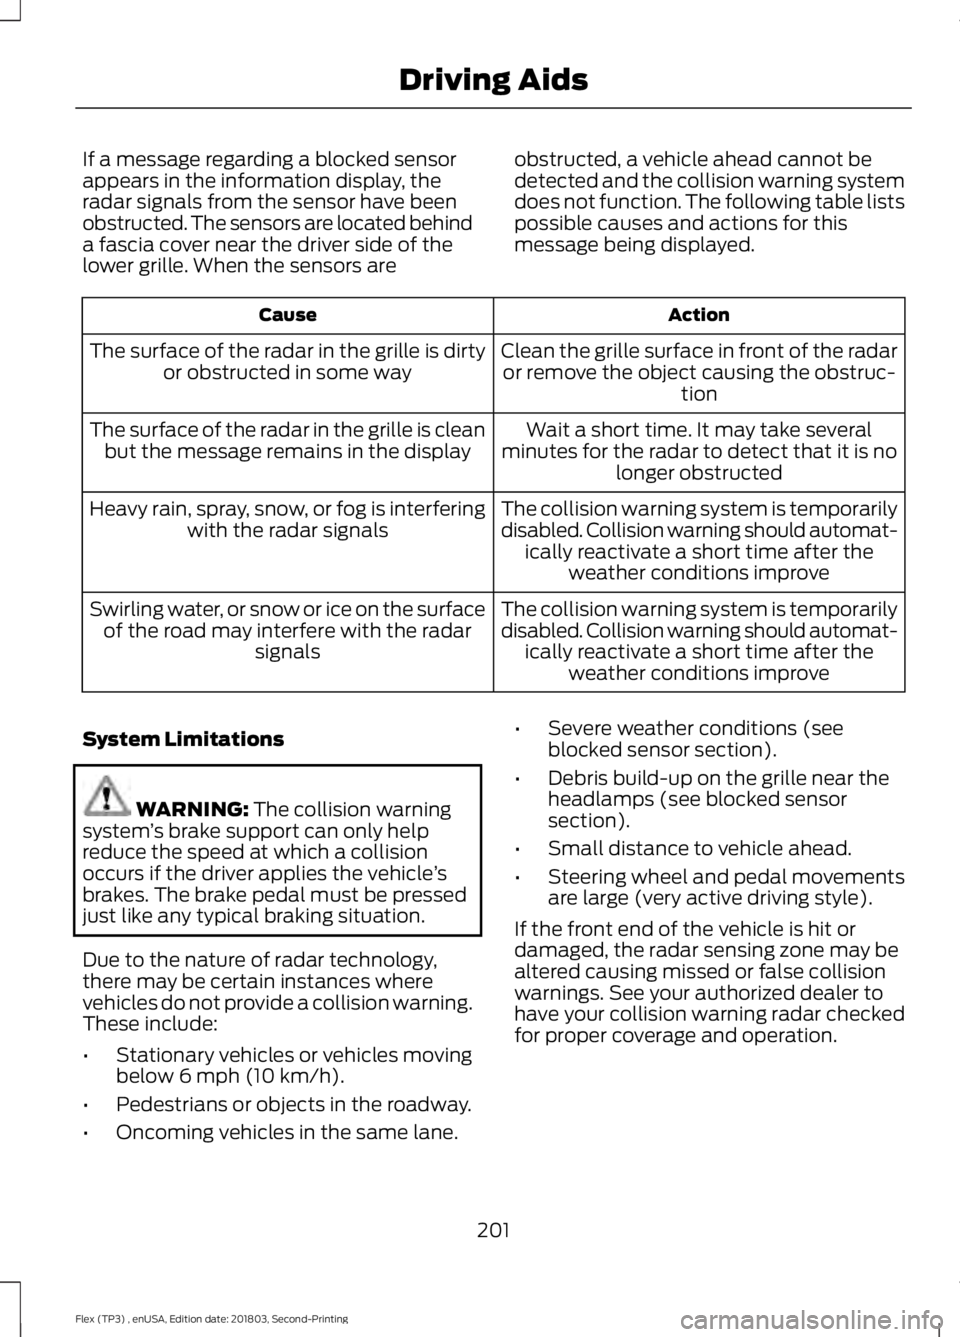
If a message regarding a blocked sensor
appears in the information display, the
radar signals from the sensor have been
obstructed. The sensors are located behind
a fascia cover near the driver side of the
lower grille. When the sensors are
obstructed, a vehicle ahead cannot be
detected and the collision warning system
does not function. The following table lists
possible causes and actions for this
message being displayed. Action
Cause
Clean the grille surface in front of the radaror remove the object causing the obstruc- tion
The surface of the radar in the grille is dirty
or obstructed in some way
Wait a short time. It may take several
minutes for the radar to detect that it is no longer obstructed
The surface of the radar in the grille is clean
but the message remains in the display
The collision warning system is temporarily
disabled. Collision warning should automat-ically reactivate a short time after the weather conditions improve
Heavy rain, spray, snow, or fog is interfering
with the radar signals
The collision warning system is temporarily
disabled. Collision warning should automat-ically reactivate a short time after the weather conditions improve
Swirling water, or snow or ice on the surface
of the road may interfere with the radar signals
System Limitations WARNING: The collision warning
system ’s brake support can only help
reduce the speed at which a collision
occurs if the driver applies the vehicle ’s
brakes. The brake pedal must be pressed
just like any typical braking situation.
Due to the nature of radar technology,
there may be certain instances where
vehicles do not provide a collision warning.
These include:
• Stationary vehicles or vehicles moving
below 6 mph (10 km/h).
• Pedestrians or objects in the roadway.
• Oncoming vehicles in the same lane. •
Severe weather conditions (see
blocked sensor section).
• Debris build-up on the grille near the
headlamps (see blocked sensor
section).
• Small distance to vehicle ahead.
• Steering wheel and pedal movements
are large (very active driving style).
If the front end of the vehicle is hit or
damaged, the radar sensing zone may be
altered causing missed or false collision
warnings. See your authorized dealer to
have your collision warning radar checked
for proper coverage and operation.
201
Flex (TP3) , enUSA, Edition date: 201803, Second-Printing Driving Aids
Page 239 of 513
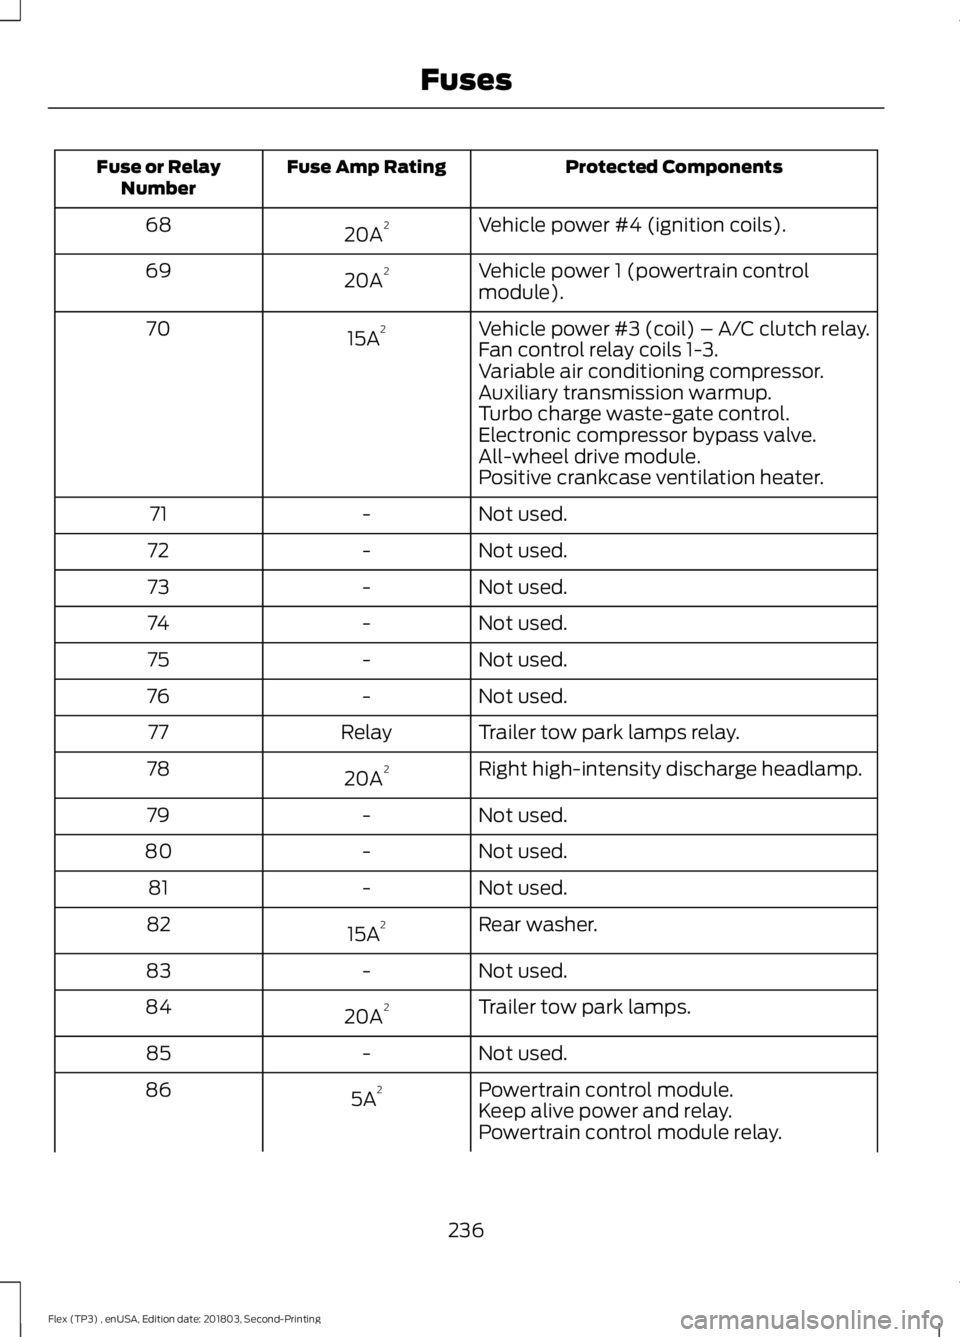
Protected Components
Fuse Amp Rating
Fuse or Relay
Number
Vehicle power #4 (ignition coils).
20A 2
68
Vehicle power 1 (powertrain control
module).
20A 2
69
Vehicle power #3 (coil) – A/C clutch relay.
15A 2
70
Fan control relay coils 1-3.
Variable air conditioning compressor.
Auxiliary transmission warmup.
Turbo charge waste-gate control.
Electronic compressor bypass valve.
All-wheel drive module.
Positive crankcase ventilation heater.
Not used.
-
71
Not used.
-
72
Not used.
-
73
Not used.
-
74
Not used.
-
75
Not used.
-
76
Trailer tow park lamps relay.
Relay
77
Right high-intensity discharge headlamp.
20A 2
78
Not used.
-
79
Not used.
-
80
Not used.
-
81
Rear washer.
15A 2
82
Not used.
-
83
Trailer tow park lamps.
20A 2
84
Not used.
-
85
Powertrain control module.
5A 2
86
Keep alive power and relay.
Powertrain control module relay.
236
Flex (TP3) , enUSA, Edition date: 201803, Second-Printing Fuses
Page 242 of 513
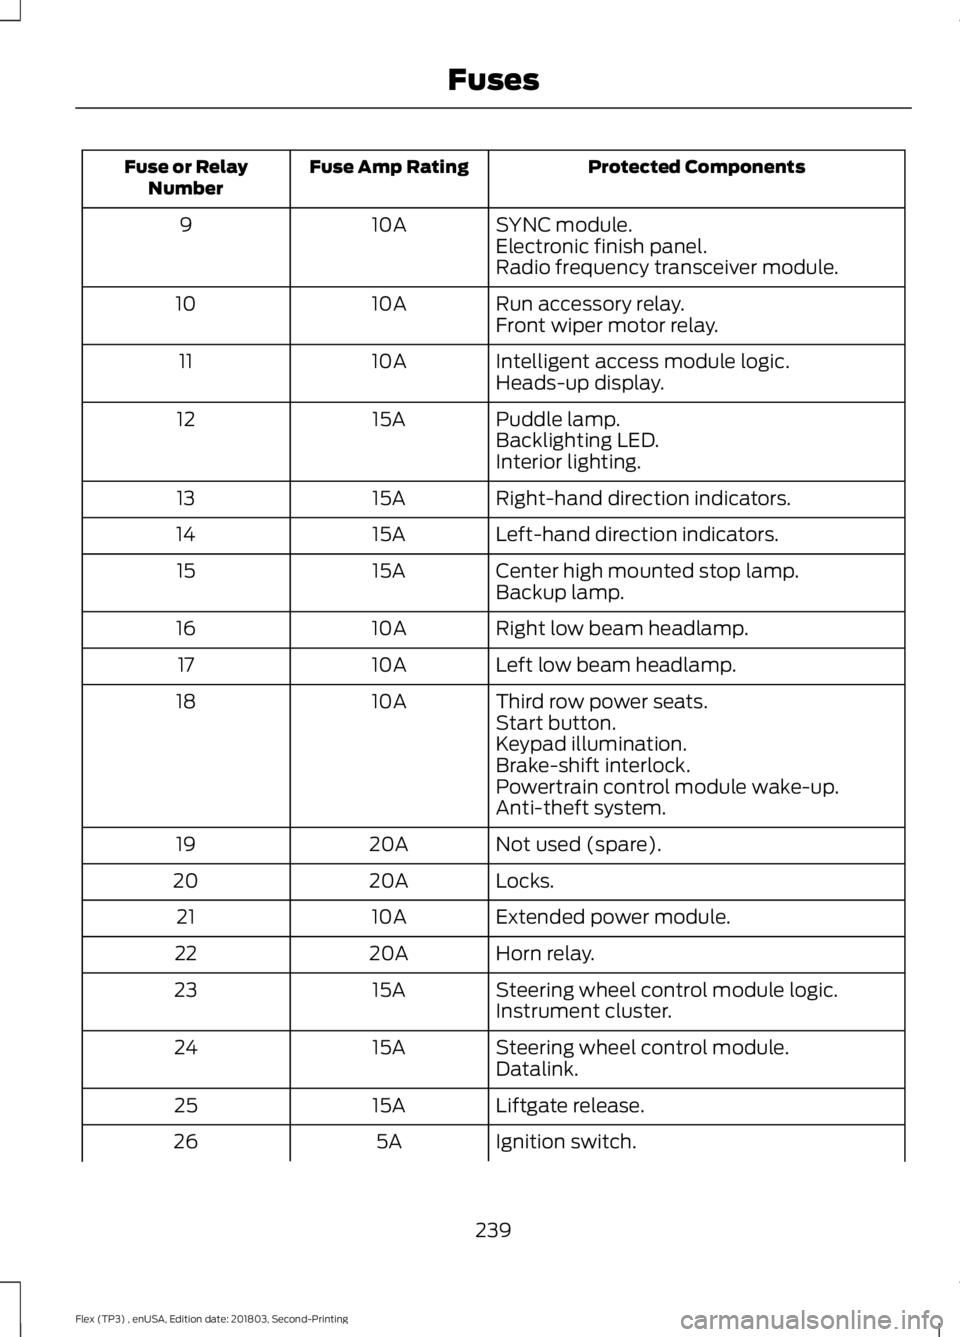
Protected Components
Fuse Amp Rating
Fuse or Relay
Number
SYNC module.
10A
9
Electronic finish panel.
Radio frequency transceiver module.
Run accessory relay.
10A
10
Front wiper motor relay.
Intelligent access module logic.
10A
11
Heads-up display.
Puddle lamp.
15A
12
Backlighting LED.
Interior lighting.
Right-hand direction indicators.
15A
13
Left-hand direction indicators.
15A
14
Center high mounted stop lamp.
15A
15
Backup lamp.
Right low beam headlamp.
10A
16
Left low beam headlamp.
10A
17
Third row power seats.
10A
18
Start button.
Keypad illumination.
Brake-shift interlock.
Powertrain control module wake-up.
Anti-theft system.
Not used (spare).
20A
19
Locks.
20A
20
Extended power module.
10A
21
Horn relay.
20A
22
Steering wheel control module logic.
15A
23
Instrument cluster.
Steering wheel control module.
15A
24
Datalink.
Liftgate release.
15A
25
Ignition switch.
5A
26
239
Flex (TP3) , enUSA, Edition date: 201803, Second-Printing Fuses
Page 262 of 513
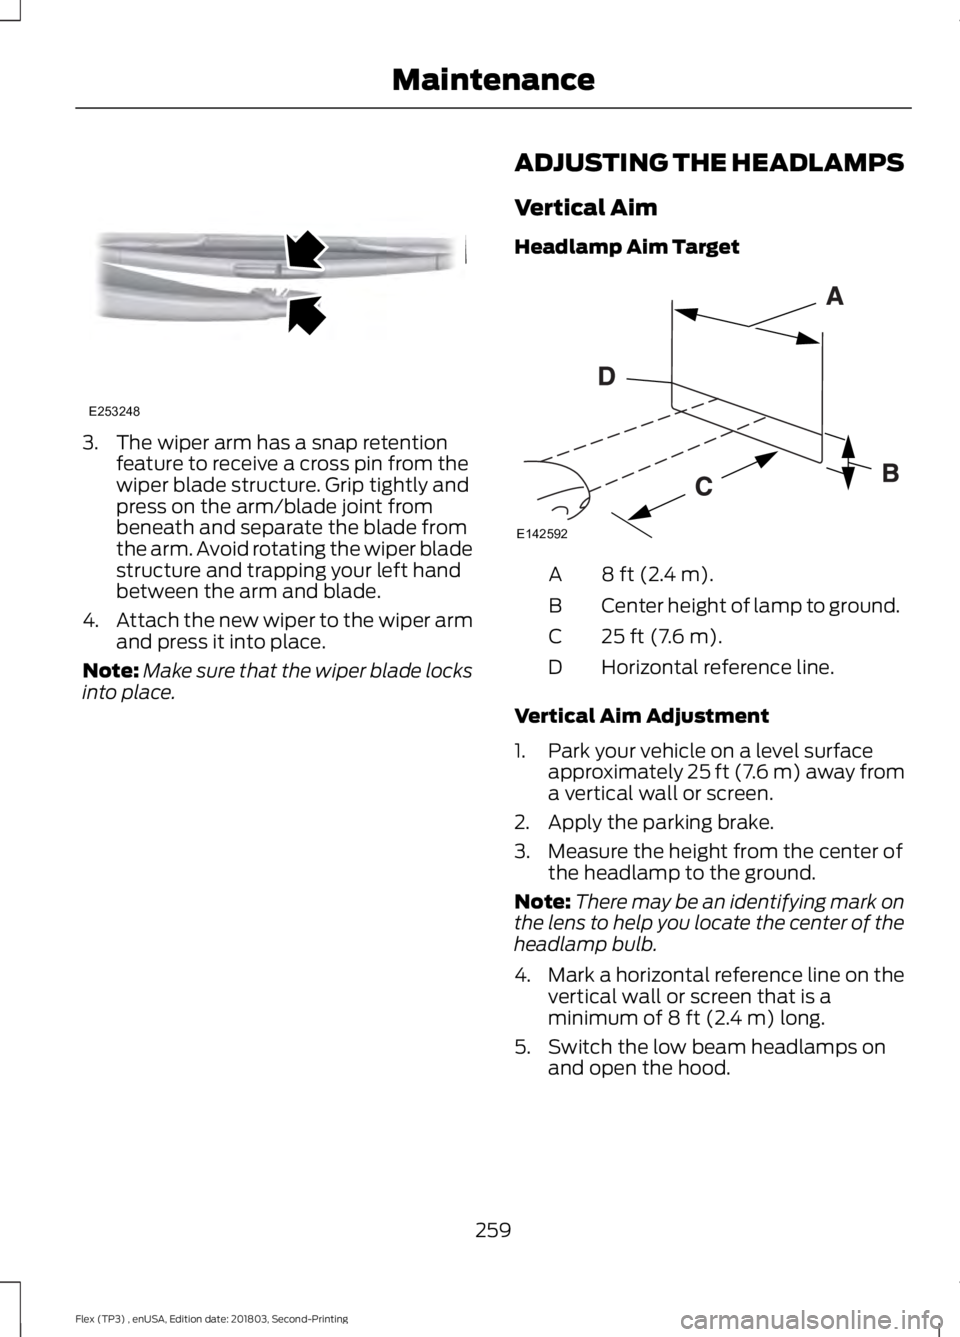
3. The wiper arm has a snap retention
feature to receive a cross pin from the
wiper blade structure. Grip tightly and
press on the arm/blade joint from
beneath and separate the blade from
the arm. Avoid rotating the wiper blade
structure and trapping your left hand
between the arm and blade.
4. Attach the new wiper to the wiper arm
and press it into place.
Note: Make sure that the wiper blade locks
into place. ADJUSTING THE HEADLAMPS
Vertical Aim
Headlamp Aim Target 8 ft (2.4 m).
A
Center height of lamp to ground.
B
25 ft (7.6 m).
C
Horizontal reference line.
D
Vertical Aim Adjustment
1. Park your vehicle on a level surface approximately 25 ft (7.6 m) away from
a vertical wall or screen.
2. Apply the parking brake.
3. Measure the height from the center of the headlamp to the ground.
Note: There may be an identifying mark on
the lens to help you locate the center of the
headlamp bulb.
4. Mark a horizontal reference line on the
vertical wall or screen that is a
minimum of
8 ft (2.4 m) long.
5. Switch the low beam headlamps on and open the hood.
259
Flex (TP3) , enUSA, Edition date: 201803, Second-Printing MaintenanceE253248 E142592
Page 263 of 513
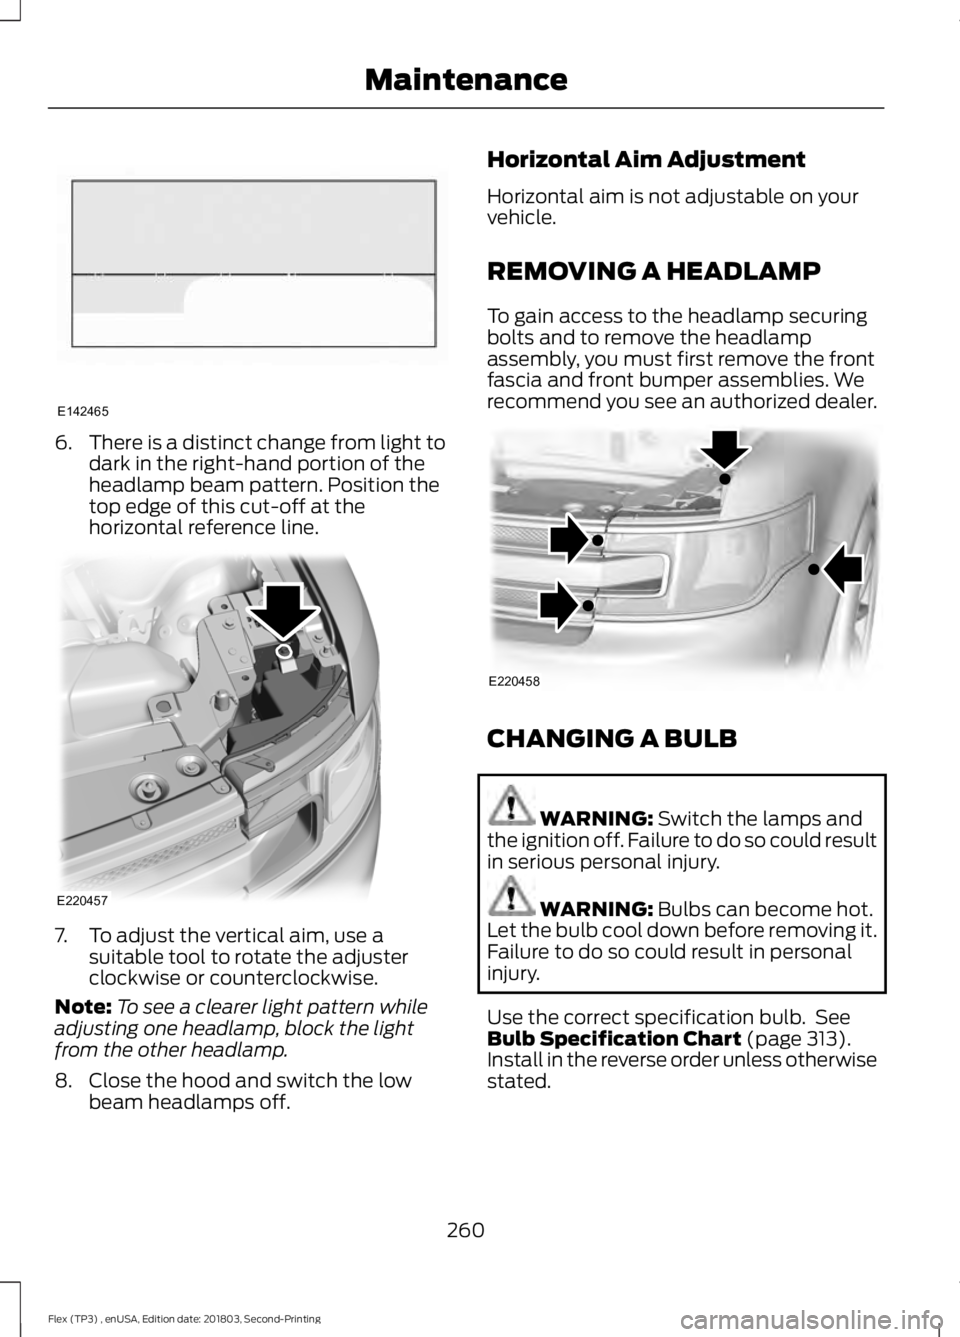
6.
There is a distinct change from light to
dark in the right-hand portion of the
headlamp beam pattern. Position the
top edge of this cut-off at the
horizontal reference line. 7. To adjust the vertical aim, use a
suitable tool to rotate the adjuster
clockwise or counterclockwise.
Note: To see a clearer light pattern while
adjusting one headlamp, block the light
from the other headlamp.
8. Close the hood and switch the low beam headlamps off. Horizontal Aim Adjustment
Horizontal aim is not adjustable on your
vehicle.
REMOVING A HEADLAMP
To gain access to the headlamp securing
bolts and to remove the headlamp
assembly, you must first remove the front
fascia and front bumper assemblies. We
recommend you see an authorized dealer.
CHANGING A BULB
WARNING: Switch the lamps and
the ignition off. Failure to do so could result
in serious personal injury. WARNING:
Bulbs can become hot.
Let the bulb cool down before removing it.
Failure to do so could result in personal
injury.
Use the correct specification bulb. See
Bulb Specification Chart
(page 313).
Install in the reverse order unless otherwise
stated.
260
Flex (TP3) , enUSA, Edition date: 201803, Second-Printing MaintenanceE142465 E220457 E220458
Page 264 of 513
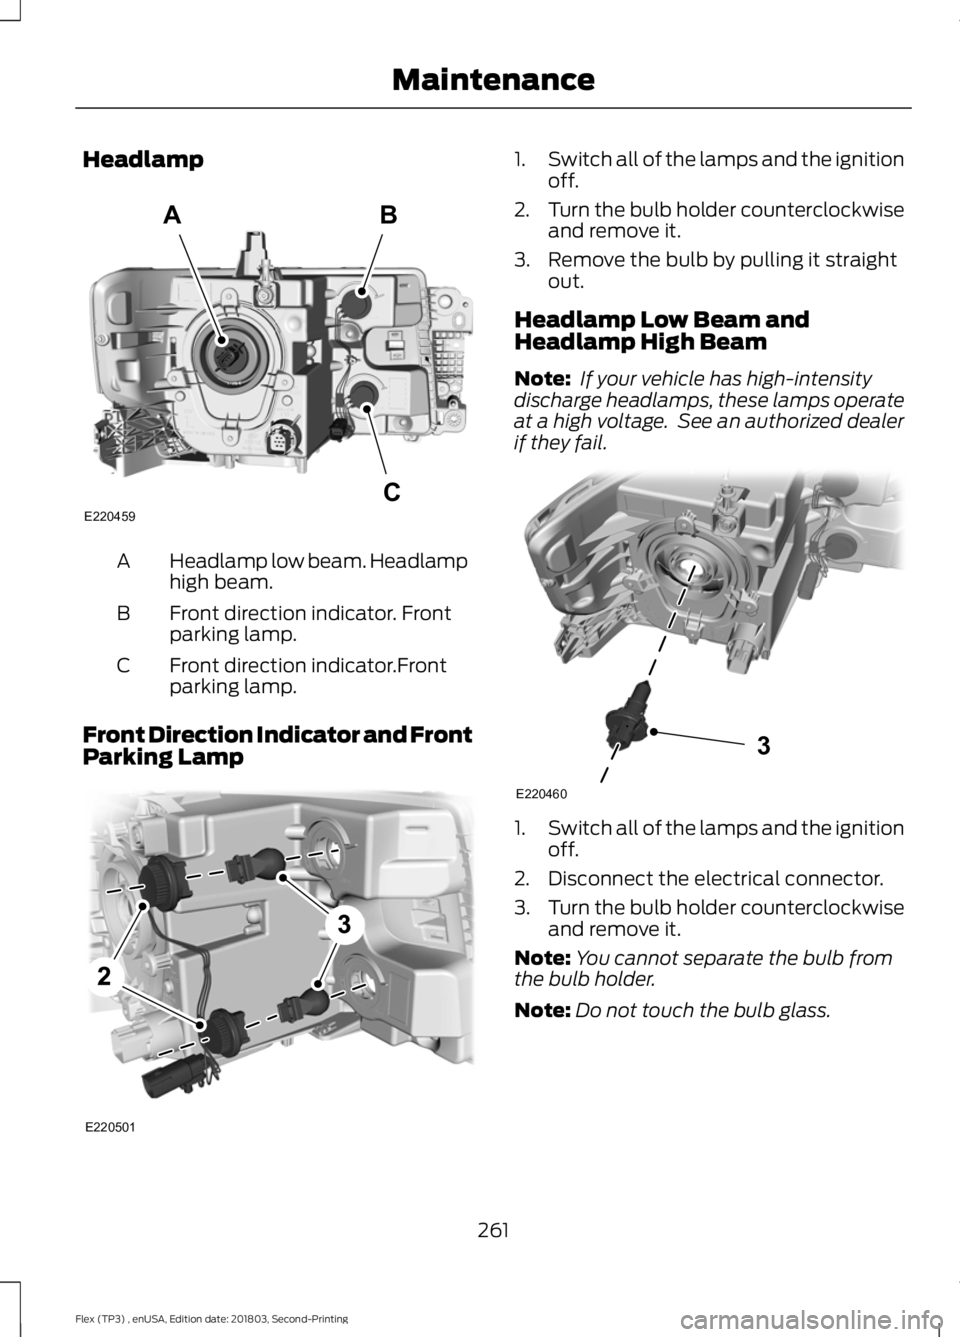
Headlamp
Headlamp low beam. Headlamp
high beam.
A
Front direction indicator. Front
parking lamp.
B
Front direction indicator.Front
parking lamp.
C
Front Direction Indicator and Front
Parking Lamp 1.
Switch all of the lamps and the ignition
off.
2. Turn the bulb holder counterclockwise
and remove it.
3. Remove the bulb by pulling it straight out.
Headlamp Low Beam and
Headlamp High Beam
Note: If your vehicle has high-intensity
discharge headlamps, these lamps operate
at a high voltage. See an authorized dealer
if they fail. 1.
Switch all of the lamps and the ignition
off.
2. Disconnect the electrical connector.
3. Turn the bulb holder counterclockwise
and remove it.
Note: You cannot separate the bulb from
the bulb holder.
Note: Do not touch the bulb glass.
261
Flex (TP3) , enUSA, Edition date: 201803, Second-Printing MaintenanceE220459
AB
C E220501 3
E220460
Page 269 of 513
•
Dry your vehicle with a chamois or soft
terry cloth towel to eliminate water
spotting.
• Immediately remove fuel spillages, bird
droppings, insect deposits and road tar.
These may cause damage to your
vehicle ’s paintwork or trim over time.
We recommend Motorcraft Bug and
Tar Remover.
• Remove any exterior accessories, for
example antennas, before entering a
car wash.
• When filling with AdBlue®, remove any
residue on painted surfaces
immediately.
Note: Suntan lotions and insect repellents
can damage painted surfaces. If these
substances come in contact with your
vehicle, wash the affected area as soon as
possible.
Cleaning the Headlamps
Note: Do not scrape the headlamp lenses
or use abrasives, alcoholic solvents or
chemical solvents to clean them.
Note: Do not wipe the headlamps when
they are dry.
Exterior Chrome Parts
• Apply a high quality-cleaning product
to bumpers and other chrome parts.
Follow the manufacturer ’s instructions.
We recommend Motorcraft Custom
Bright Metal Cleaner.
• Do not apply the cleaning product to
hot surfaces. Do not leave the cleaning
product on chrome surfaces longer
than the time recommended.
• Using non-recommended cleaners can
result in severe and permanent
cosmetic damage.
Note: Never use abrasive materials, for
example steel wool or plastic pads as they
can scratch the chrome surface. Note:
Do not use chrome cleaner, metal
cleaner or polish on wheels or wheel covers.
Exterior Plastic Parts
For routine cleaning we recommend
Motorcraft Detail Wash. If tar or grease
spots are present, we recommend
Motorcraft Bug and Tar Remover.
Stripes or Graphics (If Equipped)
Hand washing your vehicle is preferred
however, pressure washing may be used
under the following conditions:
• Do not use water pressure higher than
2,000 psi (14,000 kPa)
.
• Do not use water hotter than
179°F
(82°C).
• Use a spray with a
40° wide spray
angle pattern.
• Keep the nozzle at a
12 in (305 mm)
distance and 90° angle to your
vehicle's surface.
Note: Holding the pressure washer nozzle
at an angle to the vehicle's surface may
damage graphics and cause the edges to
peel away from the vehicle's surface.
Underbody
Regularly clean the underside of your
vehicle using water. Keep body and door
drain holes free of debris or foreign
material.
Under Hood
For removing black rubber marks from
under the hood we recommend Motorcraft
Wheel and Tire Cleaner or Motorcraft Bug
and Tar Remover.
266
Flex (TP3) , enUSA, Edition date: 201803, Second-Printing Vehicle Care
Page 316 of 513
BULB SPECIFICATION CHART
Replacement bulbs are specified in the
chart below. Headlamp bulbs must be
marked with an authorized D.O.T. marking
for North America to make sure they have
the proper lamp performance, light
brightness, light pattern and safe visibility.
The correct bulbs will not damage the
lamp assembly or void the lamp assembly
warranty and will provide quality bulb
illumination time.
Exterior Lamps
Power (Watt)
Specification
Lamp
LED
LED
Front side marker lamps.
27/9
3157NA
Front direction indicator.
Front parking lamps.
55/65
9008 H13
Headlamp low beam.
Headlamp high beam.
55
H11
Front fog lamps.
LED
LED
Side direction indicator.
5
194
Rear side marker lamp.
5
194
Rear lamp.
313
Flex (TP3) , enUSA, Edition date: 201803, Second-Printing Capacities and SpecificationsE240523
Page 502 of 513
A
A/C
See: Climate Control........................................... 112
About This Manual...........................................7
ABS See: Brakes............................................................ 173
ABS driving hints See: Hints on Driving With Anti-Lock
Brakes................................................................. 174
Accessories....................................................438 Exterior Style....................................................... 438
Interior Style........................................................ 438
Lifestyle................................................................. 438
Peace of Mind..................................................... 438
Accessories See: Replacement Parts
Recommendation............................................ 12
ACC See: Using Adaptive Cruise Control............188
Active Park Assist.........................................179 Automatic Steering into Parking
Space.................................................................. 181
Deactivating the Park Assist Feature..........182
Troubleshooting the System.......................... 182
Using Active Park Assist.................................. 180
Adjusting the Headlamps
........................259
Horizontal Aim Adjustment.......................... 260
Vertical Aim......................................................... 259
Adjusting the Pedals......................................77
Adjusting the Steering Wheel - Vehicles With: Manual Adjustable Steering
Column............................................................74
Adjusting the Steering Wheel - Vehicles With: Power Adjustable Steering
Column............................................................73
End of Travel Position......................................... 73
Memory Feature.................................................... 73
Airbag Disposal................................................51
Air Conditioning See: Climate Control........................................... 112
Air Filter See: Changing the Engine Air Filter.............263
Alarm See: Anti-Theft Alarm......................................... 72
All-Wheel Drive.............................................166
Ambient Lighting...........................................84 Adjusting the Brightness................................... 84Changing the Color.............................................
84
Switching Ambient Lighting Off..................... 84
Switching Ambient Lighting On..................... 84
Anti-Theft Alarm
.............................................72
Arming the Alarm................................................. 72
Disarming the Alarm............................................ 72
Appendices...................................................460
Apps.................................................................408 ........................................................................\
......... 408
SiriusXM Traffic and Travel Link................... 410
At a Glance........................................................15
Audible Warnings and Indicators
.............94
Headlamps On Warning Chime..................... 94
Key in Ignition Warning Chime........................ 94
Keyless Warning Alert........................................ 94
Parking Brake On Warning Chime.................94
Audio Control
...................................................74
Seek, Next or Previous........................................ 74
Audio System
.................................................315
General Information.......................................... 315
Audio Unit - Vehicles With: AM/FM/CD/ SYNC/Satellite Radio
..............................316
Accessing the Auxiliary Media
Sources.............................................................. 316
Accessing the Clock Settings......................... 316
Accessing the Menu........................................... 317
Accessing the Phone Features....................... 317
Accessing the Sound Settings....................... 317
Adjusting the Volume........................................ 317
Changing Radio Stations.................................. 317
Ejecting the CD..................................................... 317
Listening to a CD................................................. 317
Listening to Satellite Radio............................. 317
Listening to the Radio........................................ 317
Menu Structure................................................... 318
Muting the Audio................................................ 318
Playing or Pausing Media................................ 318
Switching the Audio Unit On and Off.........318
Using Seek, Fast Forward and Reverse.............................................................. 318
Using the Display Control................................ 318
Using the Number Block.................................. 318
Audio Unit - Vehicles With: Premium AM/FM/CD...................................................321
Adjusting the Volume........................................ 321
Changing Radio Stations................................. 321
Ejecting the CD.................................................... 321
Inserting a CD....................................................... 321
499
Flex (TP3) , enUSA, Edition date: 201803, Second-Printing Index
Page 503 of 513
Switching the Audio Unit On and Off..........321
Using Seek, Fast Forward and
Reverse............................................................... 321
Audio Unit - Vehicles With: Sony AM/ FM/CD...........................................................322
Accessing the Sound Settings...................... 322
Adjusting the Volume....................................... 322
Changing Radio Stations................................ 322
Selecting the Audio Modes............................ 322
Switching the Audio Unit On and Off.........322
Using Seek, Fast Forward and Reverse.............................................................. 323
Autolamps.........................................................81
Windshield Wiper Activated
Headlamps......................................................... 81
Automatic Climate Control - Vehicles With: Premium AM/FM/CD.....................113
Setting the Blower Motor Speed................... 113
Setting the Temperature.................................. 114
Switching Auto Mode On and Off.................114
Switching Defrost On and Off........................ 114
Switching Dual Zone Mode On and Off........................................................................\
. 114
Switching Maximum Air Conditioning On and Off................................................................ 114
Switching Recirculated Air On and Off........................................................................\
. 114
Switching the Air Conditioning On and Off........................................................................\
. 114
Switching the Climate Control On and Off........................................................................\
. 114
Automatic Climate Control - Vehicles With: Sony Audio System
........................115
Setting the Blower Motor Speed................... 115
Setting the Temperature................................... 115
Switching Auto Mode On and Off.................115
Switching Defrost On and Off........................ 115
Switching Maximum Air Conditioning On and Off................................................................ 115
Switching Recirculated Air On and Off........................................................................\
116
Switching the Air Conditioning On and Off........................................................................\
. 115
Switching the Climate Control On and Off........................................................................\
. 115
Automatic Transmission
............................162
Automatic Transmission Adaptive
Learning............................................................. 165Brake-Shift Interlock.........................................
164
If Your Vehicle Gets Stuck In Mud or Snow.................................................................. 165
SelectShift Automatic ™
Transmission................................................... 162
Understanding the Positions of Your Automatic Transmission............................. 162
Automatic Transmission Fluid Check
.............................................................253
Adding Transmission Fluid ............................ 254
Checking the Transmission Fluid Level................................................................... 253
Autowipers........................................................78
Auxiliary Power Points.................................141 110 Volt AC Power Point.................................... 141
12 Volt DC Power Point...................................... 141
Locations................................................................ 141
AWD See: All-Wheel Drive......................................... 166
B
Battery See: Changing the 12V Battery..................... 256
Blind Spot Information System..............194 Switching the System Off and On...............195
System Errors....................................................... 195
System Limitations............................................ 195
Using the System............................................... 194
BLIS See: Blind Spot Information System..........194
Body Styling Kits
...........................................272
Bonnet Lock See: Opening and Closing the Hood..........243
Booster Seats..................................................28 Types of Booster Seats...................................... 29
Brake Fluid Check........................................255
Brakes................................................................173 General Information........................................... 173
Breaking-In......................................................216
Bulb Specification Chart
............................313
C
Cabin Air Filter...............................................120
500
Flex (TP3) , enUSA, Edition date: 201803, Second-Printing Index