remote control FORD FLEX 2019 Owner's Manual
[x] Cancel search | Manufacturer: FORD, Model Year: 2019, Model line: FLEX, Model: FORD FLEX 2019Pages: 513, PDF Size: 39.3 MB
Page 101 of 513
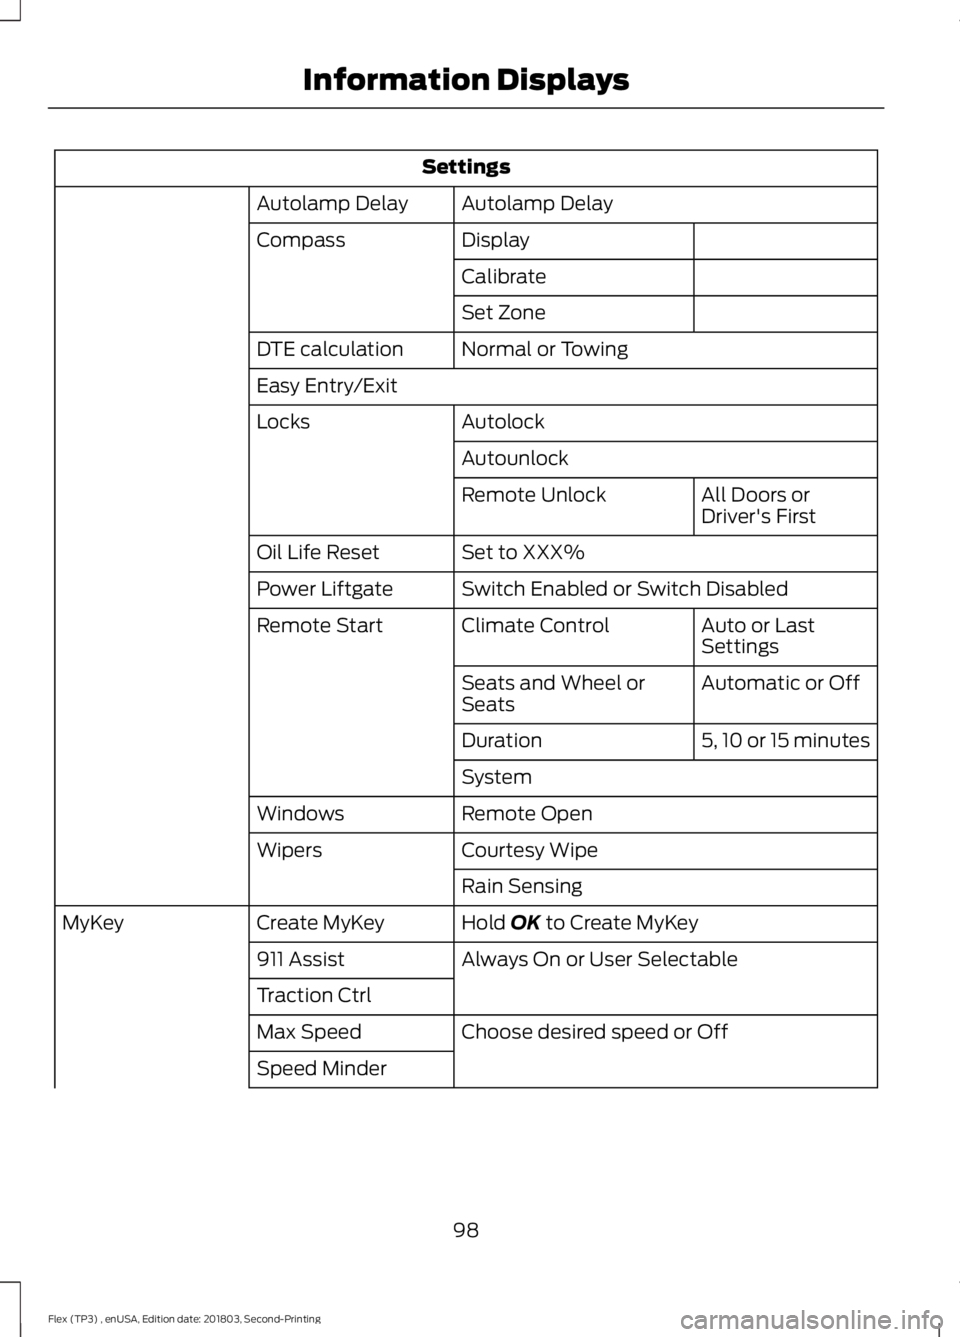
Settings
Autolamp Delay
Autolamp Delay
Display
Compass
Calibrate
Set Zone
Normal or Towing
DTE calculation
Easy Entry/Exit
Autolock
Locks
Autounlock All Doors or
Driver's First
Remote Unlock
Set to XXX%
Oil Life Reset
Switch Enabled or Switch Disabled
Power Liftgate
Auto or Last
Settings
Climate Control
Remote Start
Automatic or Off
Seats and Wheel or
Seats
5, 10 or 15 minutes
Duration
System
Remote Open
Windows
Courtesy Wipe
Wipers
Rain Sensing
Hold OK to Create MyKey
Create MyKey
MyKey
Always On or User Selectable
911 Assist
Traction Ctrl
Choose desired speed or Off
Max Speed
Speed Minder
98
Flex (TP3) , enUSA, Edition date: 201803, Second-Printing Information Displays
Page 105 of 513
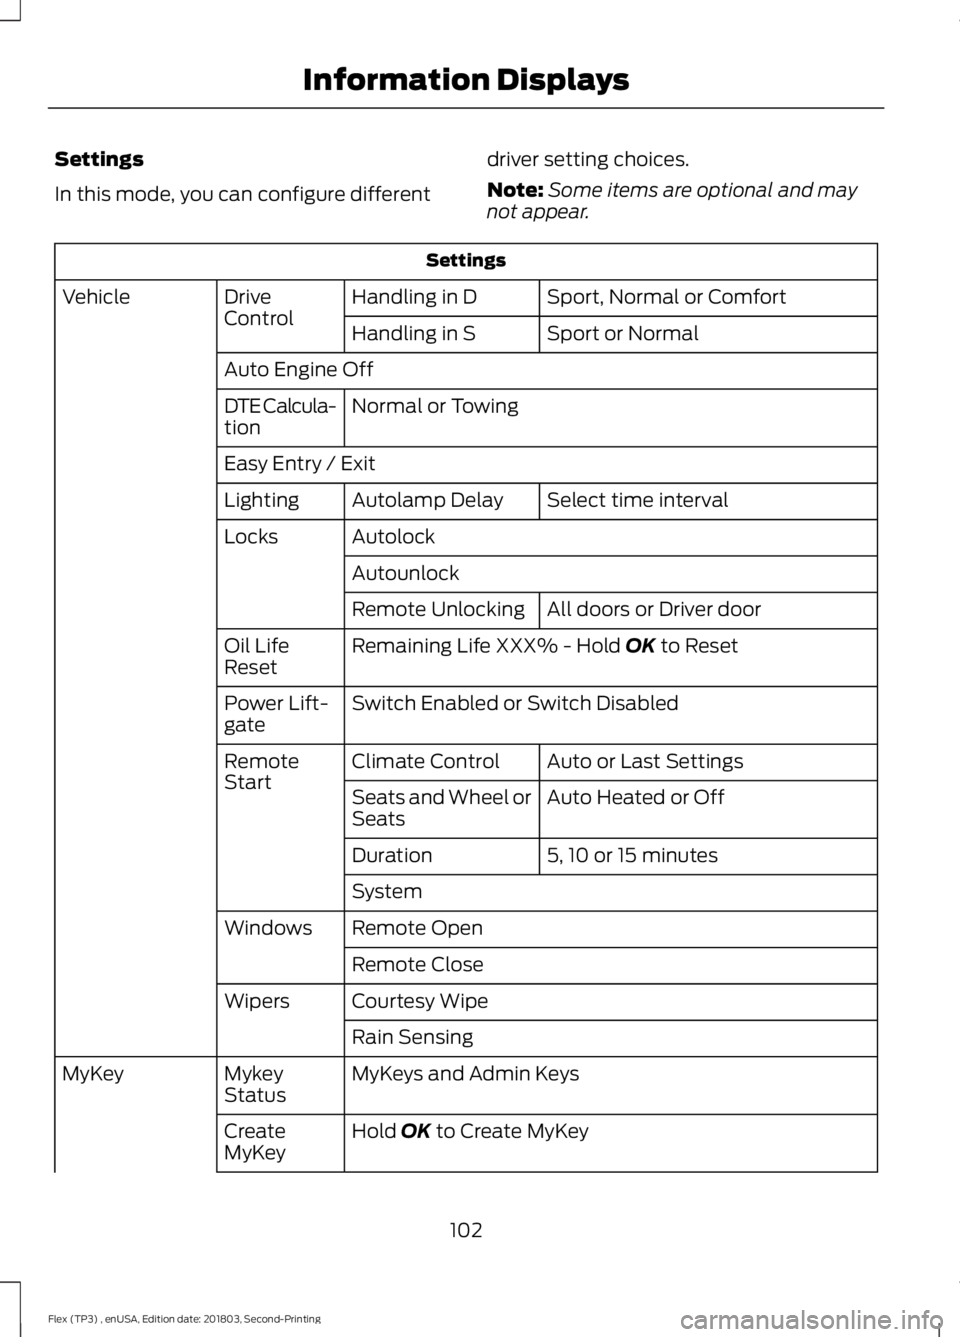
Settings
In this mode, you can configure different
driver setting choices.
Note:
Some items are optional and may
not appear. Settings
Sport, Normal or Comfort
Handling in D
Drive
Control
Vehicle
Sport or Normal
Handling in S
Auto Engine Off Normal or Towing
DTE Calcula-
tion
Easy Entry / Exit
Select time interval
Autolamp Delay
Lighting
Autolock
Locks
Autounlock All doors or Driver door
Remote Unlocking
Remaining Life XXX% - Hold OK to Reset
Oil Life
Reset
Switch Enabled or Switch Disabled
Power Lift-
gate
Auto or Last Settings
Climate Control
Remote
Start
Auto Heated or Off
Seats and Wheel or
Seats
5, 10 or 15 minutes
Duration
System
Remote Open
Windows
Remote Close
Courtesy Wipe
Wipers
Rain Sensing
MyKeys and Admin Keys
Mykey
Status
MyKey
Hold
OK to Create MyKey
Create
MyKey
102
Flex (TP3) , enUSA, Edition date: 201803, Second-Printing Information Displays
Page 123 of 513
CABIN AIR FILTER
Your vehicle is equipped with a cabin air
filter, which gives you and your passengers
the following benefits:
•
It improves your driving comfort by
reducing particle concentration.
• It improves the interior compartment
cleanliness.
• It protects the climate control
components from particle deposits.
You can locate the cabin air filter behind
the glove box.
Note: Make sure you have a cabin air filter
installed at all times. This prevents foreign
objects from entering the system. Running
the system without a filter in place could
result in degradation or damage to the
system.
Replace the filter at regular intervals. See
Scheduled Maintenance (page 442).
For additional cabin air filter information,
or to replace the filter, see an authorized
dealer.
REMOTE START
(If Equipped)
The system adjusts the interior
temperature depending on your chosen
settings during remote start.
You cannot adjust the climate control
setting during remote start operation.
When you switch the ignition on, the
climate control system returns to the
previous settings. You can now make
adjustments.
Some features may remain on if they turn
on during remote start:
• Driver heated seat.
• Driver cooled seat.
• Heated steering wheel. •
Heated mirrors.
• Heated rear window.
Note: If the passenger heated or cooled
seats are on when you switch the vehicle
off, they default to the driver setting when
you switch the vehicle on.
You can adjust the default remote start
settings using the information display
controls. See
Information Displays
(page 95).
Automatic Settings
In hot weather, the system is set to
72°F
(22°C). The cooled seats are set to high
(if available, and you select AUTO in the
information display).
In moderate weather, the system either
heats or cools (based on pre-selected
settings). The rear defroster, heated
mirrors and heated or cooled seats do not
turn on.
In cold weather, the system is set to
72°F
(22°C). The heated seats and heated
steering wheel are set to high (if available,
and you select
AUTO in the information
display). The rear defroster and heated
mirrors turn on.
120
Flex (TP3) , enUSA, Edition date: 201803, Second-Printing Climate Control
Page 129 of 513
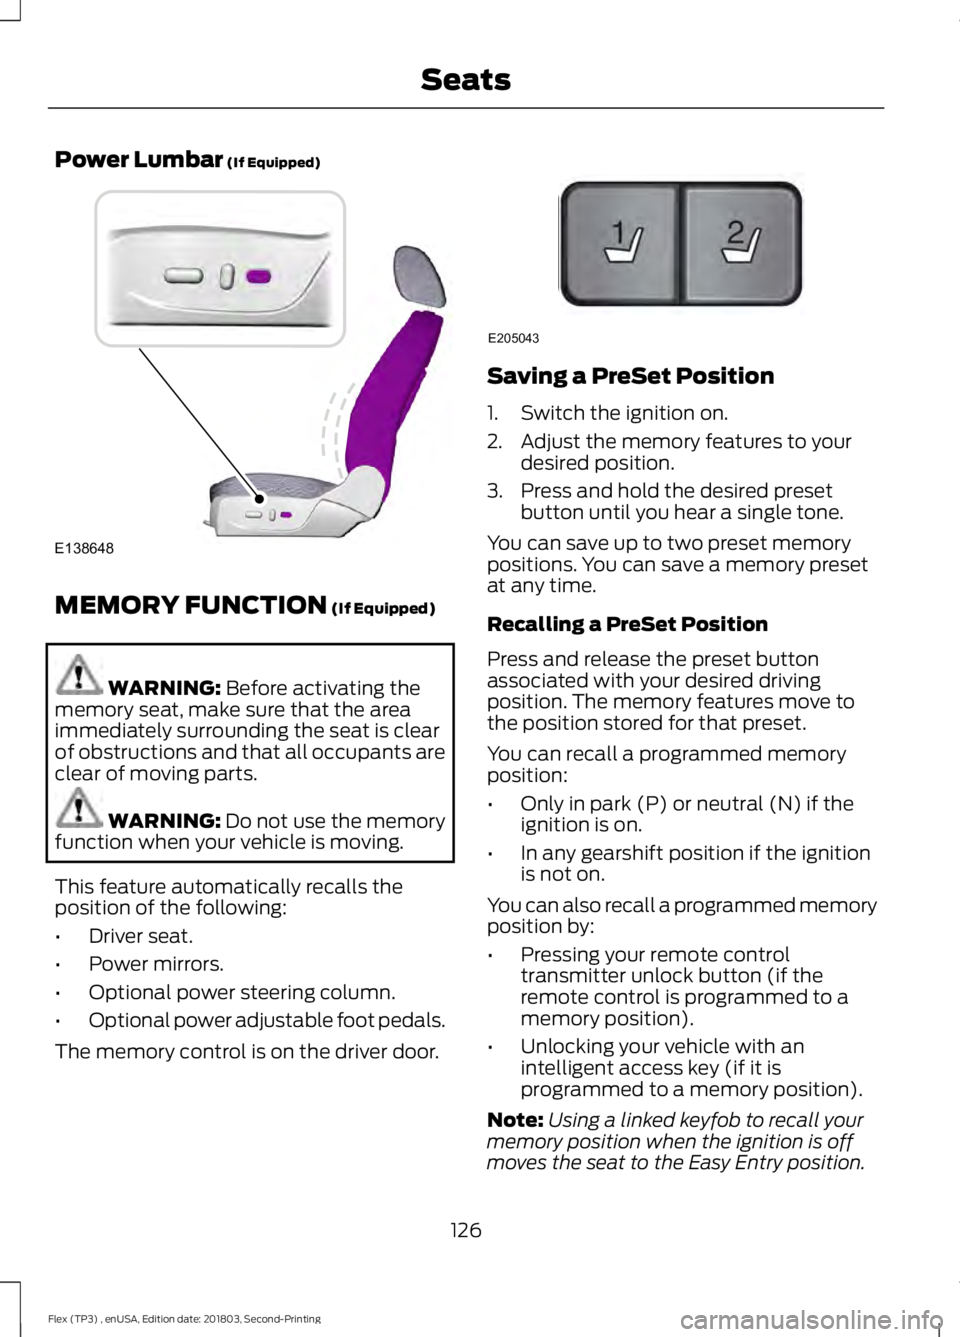
Power Lumbar (If Equipped)
MEMORY FUNCTION
(If Equipped)
WARNING:
Before activating the
memory seat, make sure that the area
immediately surrounding the seat is clear
of obstructions and that all occupants are
clear of moving parts. WARNING:
Do not use the memory
function when your vehicle is moving.
This feature automatically recalls the
position of the following:
• Driver seat.
• Power mirrors.
• Optional power steering column.
• Optional power adjustable foot pedals.
The memory control is on the driver door. Saving a PreSet Position
1. Switch the ignition on.
2. Adjust the memory features to your
desired position.
3. Press and hold the desired preset button until you hear a single tone.
You can save up to two preset memory
positions. You can save a memory preset
at any time.
Recalling a PreSet Position
Press and release the preset button
associated with your desired driving
position. The memory features move to
the position stored for that preset.
You can recall a programmed memory
position:
• Only in park (P) or neutral (N) if the
ignition is on.
• In any gearshift position if the ignition
is not on.
You can also recall a programmed memory
position by:
• Pressing your remote control
transmitter unlock button (if the
remote control is programmed to a
memory position).
• Unlocking your vehicle with an
intelligent access key (if it is
programmed to a memory position).
Note: Using a linked keyfob to recall your
memory position when the ignition is off
moves the seat to the Easy Entry position.
126
Flex (TP3) , enUSA, Edition date: 201803, Second-Printing SeatsE138648 21
E205043
Page 130 of 513
Note:
Adjusting any active memory feature
or pressing a memory switch during a
memory recall cancels the operation.
Linking a PreSet Position to your
Remote Control or Intelligent
Access Key Fob
Your vehicle can save the preset memory
positions for up to two remote controls.
1. With the ignition on, move the memory
features to the desired positions.
2. Press and hold the desired preset button for about five seconds. A tone
sounds after about two seconds.
Continue holding until you hear a
second tone.
3. Within three seconds, press the lock button on the remote control you are
linking.
To unlink a remote control, follow the
same procedure – except in step 3, press
the unlock button on the remote control.
Note: If more than one linked remote
control or intelligent access key is in range,
the memory function moves to the settings
of the first key to initiate a memory recall.
Easy Entry and Exit Feature
This feature adjusts the position of the seat
and steering column to allow easier exit
and entry to the vehicle.
The driver seat automatically moves 2 in
(5 cm) rearward when the transmission is
in park (P) and you remove the key from
the ignition or you switch the ignition off.
The driver seat and steering wheel return
to their previous positions when you put
the key in the ignition or switch the ignition
on.
You can enable or disable this feature
through the information display. See
Information Displays
(page 95). REAR SEATS
Adjusting the Rear Seats
Second Row Seats
WARNING:
Always drive and ride
with your seatback upright and the lap belt
snug and low across the hips. WARNING:
Reclining the seatback
can cause an occupant to slide under the
seat's seatbelt, resulting in severe personal
injuries in the event of a crash.
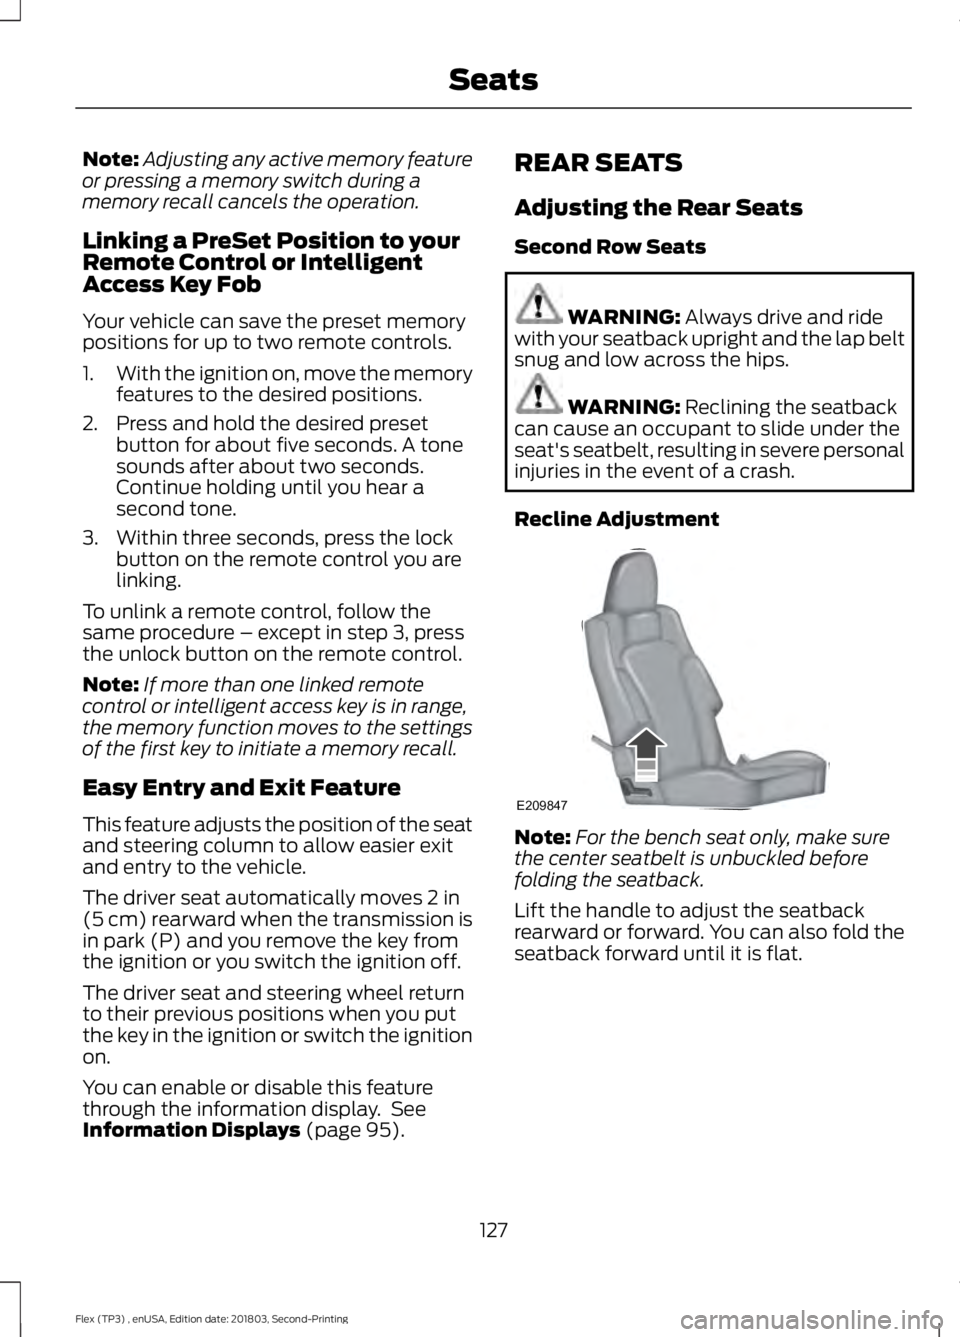
Recline Adjustment Note:
For the bench seat only, make sure
the center seatbelt is unbuckled before
folding the seatback.
Lift the handle to adjust the seatback
rearward or forward. You can also fold the
seatback forward until it is flat.
127
Flex (TP3) , enUSA, Edition date: 201803, Second-Printing SeatsE209847
Page 131 of 513
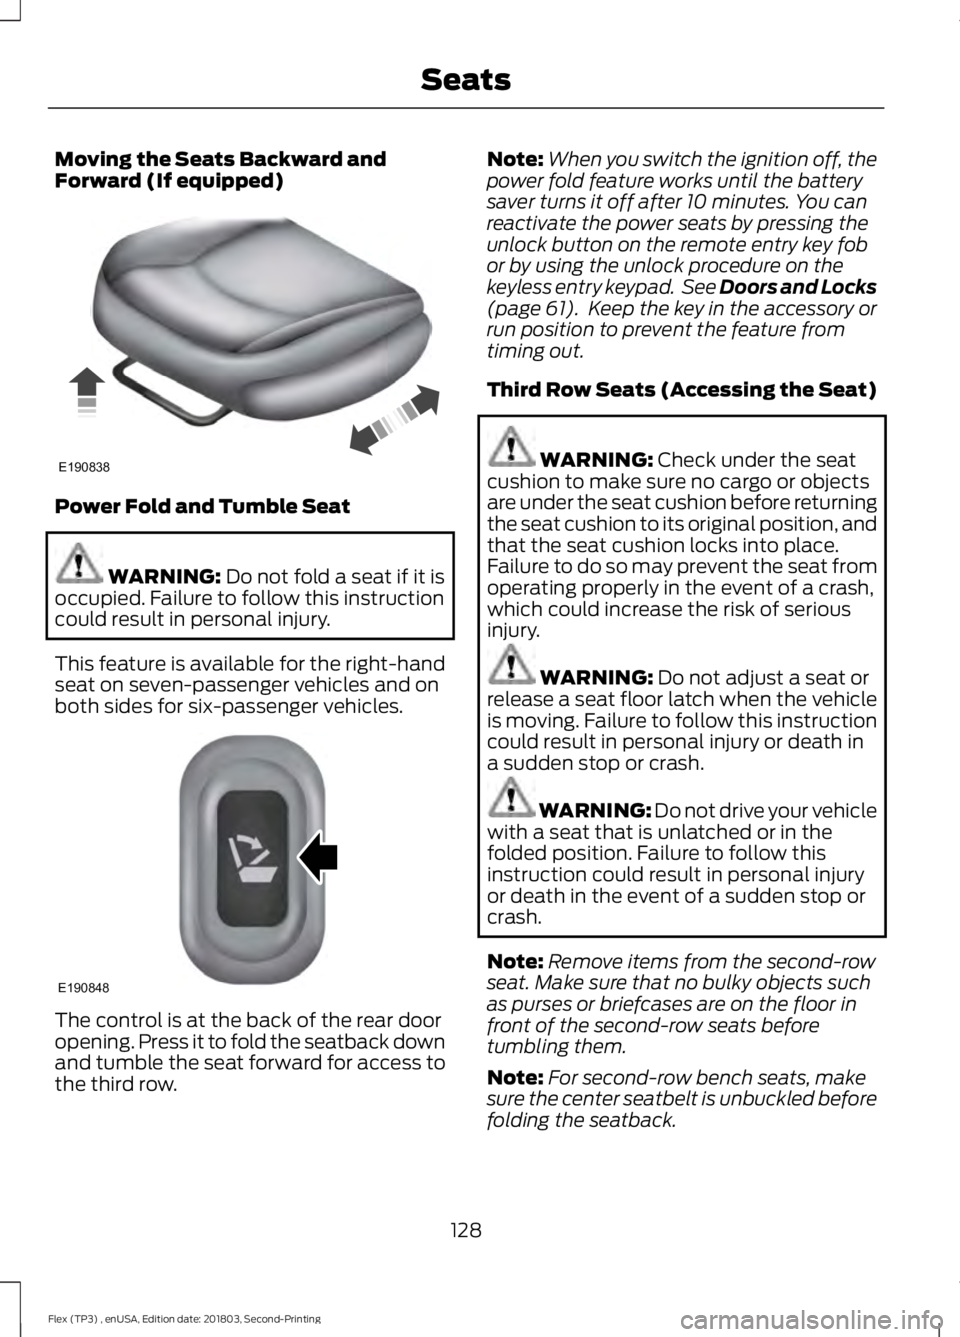
Moving the Seats Backward and
Forward (If equipped)
Power Fold and Tumble Seat
WARNING: Do not fold a seat if it is
occupied. Failure to follow this instruction
could result in personal injury.
This feature is available for the right-hand
seat on seven-passenger vehicles and on
both sides for six-passenger vehicles. The control is at the back of the rear door
opening. Press it to fold the seatback down
and tumble the seat forward for access to
the third row. Note:
When you switch the ignition off, the
power fold feature works until the battery
saver turns it off after 10 minutes. You can
reactivate the power seats by pressing the
unlock button on the remote entry key fob
or by using the unlock procedure on the
keyless entry keypad. See Doors and Locks
(page 61). Keep the key in the accessory or
run position to prevent the feature from
timing out.
Third Row Seats (Accessing the Seat) WARNING:
Check under the seat
cushion to make sure no cargo or objects
are under the seat cushion before returning
the seat cushion to its original position, and
that the seat cushion locks into place.
Failure to do so may prevent the seat from
operating properly in the event of a crash,
which could increase the risk of serious
injury. WARNING:
Do not adjust a seat or
release a seat floor latch when the vehicle
is moving. Failure to follow this instruction
could result in personal injury or death in
a sudden stop or crash. WARNING: Do not drive your vehicle
with a seat that is unlatched or in the
folded position. Failure to follow this
instruction could result in personal injury
or death in the event of a sudden stop or
crash.
Note: Remove items from the second-row
seat. Make sure that no bulky objects such
as purses or briefcases are on the floor in
front of the second-row seats before
tumbling them.
Note: For second-row bench seats, make
sure the center seatbelt is unbuckled before
folding the seatback.
128
Flex (TP3) , enUSA, Edition date: 201803, Second-Printing SeatsE190838 E190848
Page 139 of 513
HomeLink Wireless Control
System
WARNING: Do not use the system
with any garage door opener that does not
have the safety stop and reverse feature
as required by U.S. Federal Safety
Standards (this includes any garage door
opener manufactured before April 1, 1982).
A garage door opener which cannot detect
an object, signaling the door to stop and
reverse, does not meet current federal
safety standards. Using a garage door
opener without these features increases
the risk of serious injury or death.
Note: Make sure that the garage door and
security device are free from obstruction
when you are programming. Do not program
the system with the vehicle in the garage.
Note: Make sure you keep the original
remote control transmitter for use in other
vehicles as well as for future system
programming.
Note: We recommend that upon the sale
or lease termination of your vehicle, you
erase the programmed function buttons for
security reasons. See Erasing the Function
Button Codes
.
Note: You can program a maximum of
three devices. To change or replace any of
the three devices after it has been initially
programmed, you must first erase the
current settings. See Erasing the Function
Button Codes
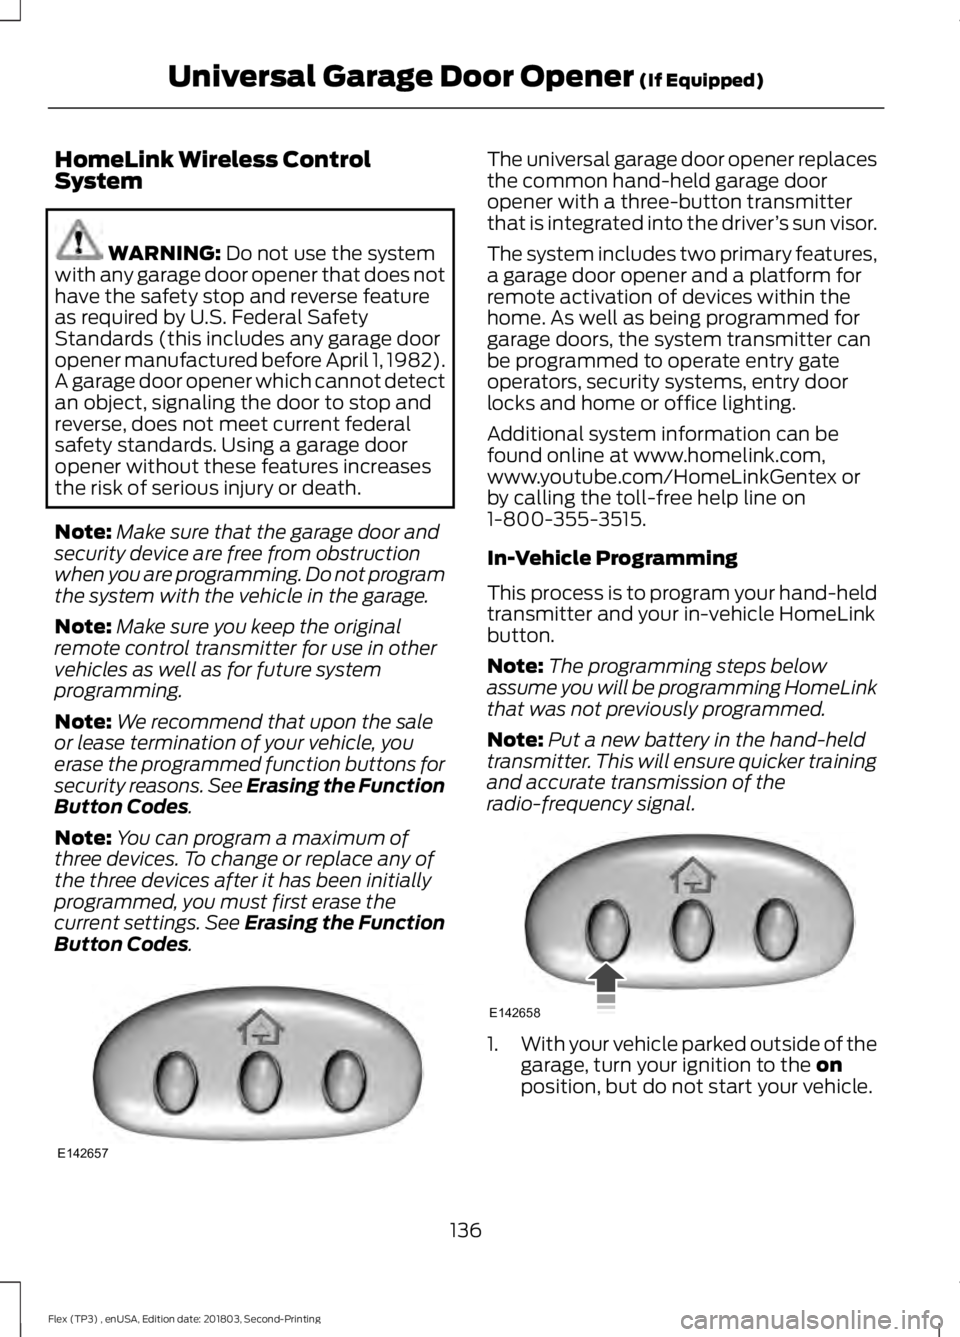
. The universal garage door opener replaces
the common hand-held garage door
opener with a three-button transmitter
that is integrated into the driver
’s sun visor.
The system includes two primary features,
a garage door opener and a platform for
remote activation of devices within the
home. As well as being programmed for
garage doors, the system transmitter can
be programmed to operate entry gate
operators, security systems, entry door
locks and home or office lighting.
Additional system information can be
found online at www.homelink.com,
www.youtube.com/HomeLinkGentex or
by calling the toll-free help line on
1-800-355-3515.
In-Vehicle Programming
This process is to program your hand-held
transmitter and your in-vehicle HomeLink
button.
Note: The programming steps below
assume you will be programming HomeLink
that was not previously programmed.
Note: Put a new battery in the hand-held
transmitter. This will ensure quicker training
and accurate transmission of the
radio-frequency signal. 1.
With your vehicle parked outside of the
garage, turn your ignition to the
on
position, but do not start your vehicle.
136
Flex (TP3) , enUSA, Edition date: 201803, Second-Printing Universal Garage Door Opener
(If Equipped)E142657 E142658
Page 196 of 513
Possible Causes and Actions for This Message Displaying:
Action
Cause
Clean the grille surface in front of the radar
or remove the object causing the obstruc-
tion.
The surface of the radar is dirty or
obstructed.
Wait a short time. It may take several
minutes for the radar to detect that it is free
from obstruction.
The surface of the radar is clean but the
message remains in the display.
Do not use the system in these conditions
because it may not detect any vehicles
ahead.
Heavy rain or snow is interfering with the
radar signals.
Do not use the system in these conditions
because it may not detect any vehicles
ahead.
Water, snow or ice on the surface of the
road may interfere with the radar signals.
Wait a short time or switch to normal cruise
control.
You are in a desert or remote area with no
other vehicles and no roadside objects.
Due to the nature of radar technology, it is possible to get a blockage warning with no
actual block. A false blocked condition either self clears, or clears after you restart your
vehicle.
Switching to Normal Cruise
Control WARNING: Normal cruise control
will not brake when your vehicle is
approaching slower vehicles. Always be
aware of which mode you have selected
and apply the brakes when necessary. The cruise control indicator light
replaces the adaptive cruise
control indicator light if you
select normal cruise control. The gap
setting does not display, and the system
does not respond to lead vehicles.
Automatic braking remains active to
maintain set speed. You can change from adaptive cruise
control to normal cruise control through
the information display.
193
Flex (TP3) , enUSA, Edition date: 201803, Second-Printing Cruise ControlE71340
Page 226 of 513
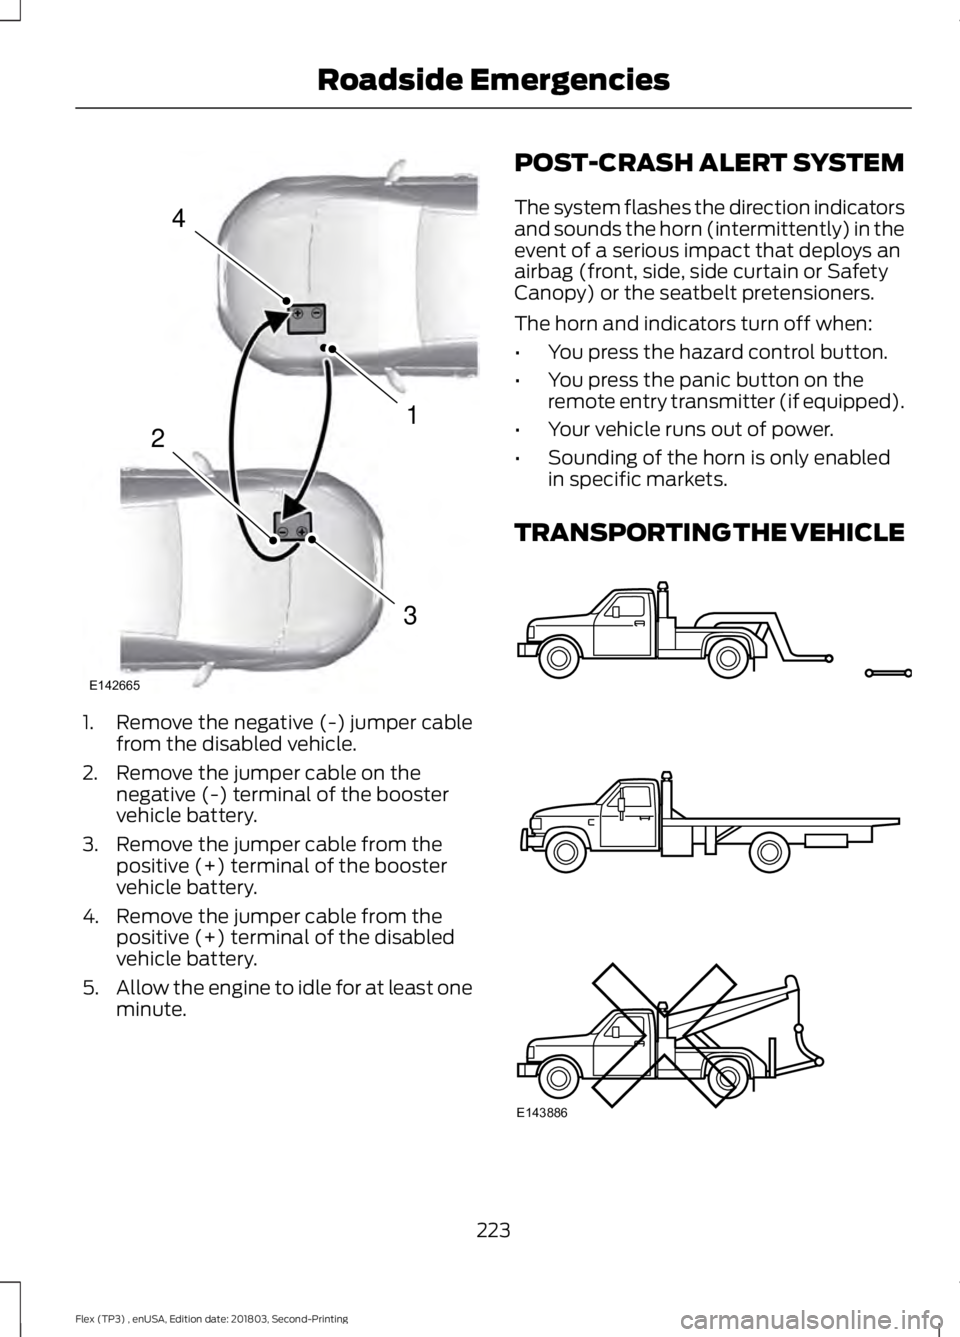
1. Remove the negative (-) jumper cable
from the disabled vehicle.
2. Remove the jumper cable on the negative (-) terminal of the booster
vehicle battery.
3. Remove the jumper cable from the positive (+) terminal of the booster
vehicle battery.
4. Remove the jumper cable from the positive (+) terminal of the disabled
vehicle battery.
5. Allow the engine to idle for at least one
minute. POST-CRASH ALERT SYSTEM
The system flashes the direction indicators
and sounds the horn (intermittently) in the
event of a serious impact that deploys an
airbag (front, side, side curtain or Safety
Canopy) or the seatbelt pretensioners.
The horn and indicators turn off when:
•
You press the hazard control button.
• You press the panic button on the
remote entry transmitter (if equipped).
• Your vehicle runs out of power.
• Sounding of the horn is only enabled
in specific markets.
TRANSPORTING THE VEHICLE 223
Flex (TP3) , enUSA, Edition date: 201803, Second-Printing Roadside Emergencies4
1
3
2
E142665 E143886
Page 507 of 513
Hints on Driving With Anti-Lock
Brakes.............................................................174
Home Screen.................................................374
Hood Lock See: Opening and Closing the Hood..........243
I
Ignition Switch
...............................................145
In California (U.S. Only).............................226
Information Display Control.......................75
Information Displays.....................................95
General Information............................................ 95
Information Messages
................................103
Adaptive Cruise Control................................... 104
AdvanceTrac ™.................................................... 104
Alarm...................................................................... 104
Automatic Engine Shutdown........................ 104
AWD
........................................................................\
105
Battery and Charging System........................ 105
Blind Spot Information and Cross Traffic Alert System.................................................... 106
Brake System....................................................... 106
Collision Warning System................................ 107
Doors and Locks.................................................. 107
Fuel........................................................................\
... 107
Keys and Intelligent Access............................ 108
Maintenance........................................................ 108
MyKey..................................................................... 109
Park Aid.................................................................. 109
Power Steering..................................................... 110
Seats........................................................................\
110
Tire Pressure Monitoring System.................. 110
Towing....................................................................... 111
Traction Control..................................................... 111
Transmission.......................................................... 111
Installing Child Restraints
............................18
Child Restraints...................................................... 18
Using Lap and Shoulder Belts.......................... 19
Using Lower Anchors and Tethers for CHildren (LATCH)........................................... 24
Using Tether Straps............................................. 26
Instrument Cluster
........................................90
Instrument Lighting Dimmer.....................82
Instrument Panel Overview
.........................15
Interior Lamps.................................................83
Second Row Reading Lamps.......................... 83
Third Row Dome Lamps................................... 84Interior Mirror...................................................88
Auto-Dimming Mirror......................................... 88
Introduction.........................................................7
J
Jump Starting the Vehicle..........................221 Connecting the Jumper Cables..................... 221
Jump Starting...................................................... 222
Preparing Your Vehicle...................................... 221
Removing the Jumper Cables....................... 222
K
Keyless Entry
...................................................64
SECURICODE™ Keyless Entry
Keypad................................................................ 64
Keyless Starting............................................146 Ignition Modes..................................................... 146
Keys and Remote Controls.........................52
L
Liftgate...............................................................67
Lighting Control
..............................................80
Flashing the Headlamp High Beam...............81
Headlamp High Beam....................................... 80
Lighting
..............................................................80
General Information........................................... 80
Load Carriers See: Roof Racks and Load Carriers.............202
Load Carrying
................................................202
Load Limit.......................................................202
Special Loading Instructions for Owners of
Pick-up Trucks and Utility-type
Vehicles............................................................. 207
Vehicle Loading - with and without a Trailer................................................................. 202
Locking and Unlocking..................................61 Activating Intelligent Access............................ 62
Autolock................................................................... 63
Autounlock ............................................................ 63
Battery Saver......................................................... 64
Enabling or Disabling Autounlock.................63
Illuminated Entry.................................................. 64
Illuminated Exit..................................................... 64
Locking and Unlocking the Doors with the Key Blade............................................................. 61
504
Flex (TP3) , enUSA, Edition date: 201803, Second-Printing Index