key FORD FLEX 2019 Service Manual
[x] Cancel search | Manufacturer: FORD, Model Year: 2019, Model line: FLEX, Model: FORD FLEX 2019Pages: 513, PDF Size: 39.3 MB
Page 164 of 513
Your vehicle may not pass the I/M test if
the service engine soon indicator is on or
not working properly (bulb is burned out),
or if the OBD-II system has determined
that some of the emission control systems
have not been properly checked. In this
case, the vehicle is not ready for I/M
testing.
If the vehicle
’s engine or transmission has
just been serviced, or the battery has
recently run down or been replaced, the
OBD-II system may indicate that the
vehicle is not ready for I/M testing. To
determine if the vehicle is ready for I/M
testing, turn the ignition key to the on
position for 15 seconds without cranking
the engine. If the service engine soon
indicator blinks eight times, it means that
the vehicle is not ready for I/M testing; if
the service engine soon indicator stays on
solid, it means that your vehicle is ready
for I/M testing.
The OBD-II system checks the emission
control system during normal driving. A
complete check may take several days.
If the vehicle is not ready for I/M testing,
you can perform the following driving cycle
consisting of mixed city and highway
driving:
1. 15 minutes of steady driving on an expressway or highway followed by 20
minutes of stop-and-go driving with at
least four 30-second idle periods.
2. Allow your vehicle to sit for at least eight hours with the ignition off. Then,
start the vehicle and complete the
above driving cycle. The vehicle must
warm up to its normal operating
temperature. Once started, do not turn
off the vehicle until the above driving
cycle is complete.
If the vehicle is still not ready for I/M
testing, you need to repeat the above
driving cycle.
161
Flex (TP3) , enUSA, Edition date: 201803, Second-Printing Engine Emission Control
Page 165 of 513
AUTOMATIC TRANSMISSION
WARNING: Always fully apply the
parking brake. Make sure you shift into park
(P) for vehicles with an automatic
transmission. Switch the ignition off and
remove the key whenever you leave your
vehicle. WARNING:
Do not apply the brake
pedal and accelerator pedal
simultaneously. Applying both pedals
simultaneously for more than a few
seconds will limit engine performance,
which may result in difficulty maintaining
speed in traffic and could lead to serious
injury.
Understanding the Positions of
Your Automatic Transmission
Putting your vehicle in gear:
1. Fully press down the brake pedal.
2. Move the gearshift lever into the desired gear.
3. Come to a complete stop.
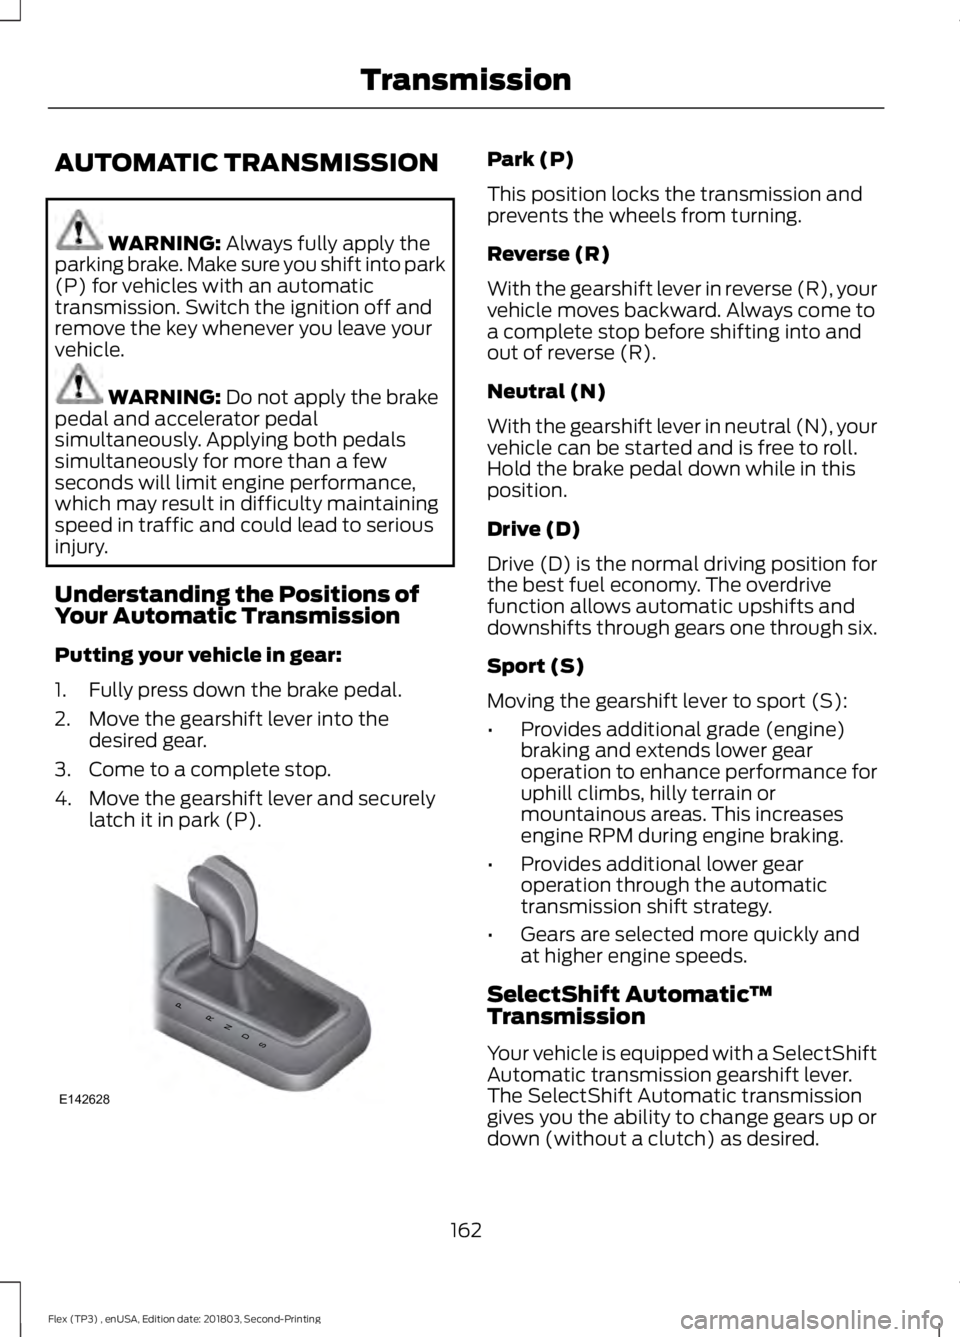
4. Move the gearshift lever and securely latch it in park (P). Park (P)
This position locks the transmission and
prevents the wheels from turning.
Reverse (R)
With the gearshift lever in reverse (R), your
vehicle moves backward. Always come to
a complete stop before shifting into and
out of reverse (R).
Neutral (N)
With the gearshift lever in neutral (N), your
vehicle can be started and is free to roll.
Hold the brake pedal down while in this
position.
Drive (D)
Drive (D) is the normal driving position for
the best fuel economy. The overdrive
function allows automatic upshifts and
downshifts through gears one through six.
Sport (S)
Moving the gearshift lever to sport (S):
•
Provides additional grade (engine)
braking and extends lower gear
operation to enhance performance for
uphill climbs, hilly terrain or
mountainous areas. This increases
engine RPM during engine braking.
• Provides additional lower gear
operation through the automatic
transmission shift strategy.
• Gears are selected more quickly and
at higher engine speeds.
SelectShift Automatic ™
Transmission
Your vehicle is equipped with a SelectShift
Automatic transmission gearshift lever.
The SelectShift Automatic transmission
gives you the ability to change gears up or
down (without a clutch) as desired.
162
Flex (TP3) , enUSA, Edition date: 201803, Second-Printing TransmissionPRNDS
E142628
Page 167 of 513
Brake-Shift Interlock
WARNING: Do not drive your vehicle
until you verify that the stoplamps are
working. WARNING: When doing this
procedure, you need to take the
transmission out of park (P) which means
your vehicle can roll freely. To avoid
unwanted vehicle movement, always fully
apply the parking brake prior to doing this
procedure. Use wheels chocks if
appropriate. WARNING:
If the parking brake is
fully released, but the brake warning lamp
remains illuminated, the brakes may not
be working properly. Have your vehicle
checked as soon as possible.
Note: For some markets this feature will be
disabled.
Your vehicle is equipped with a brake-shift
interlock feature that prevents moving the
gearshift lever from park (P) when the
ignition is in the on position and the brake
pedal is not pressed.
If you cannot move the gearshift lever out
of park (P) position with the ignition in the
on position and the brake pedal pressed,
a malfunction may have occurred. It is
possible that a fuse has blown or your
vehicle ’s brake lamps are not operating
properly. See
Fuse Specification Chart
(page 232).
If the fuse is not blown and the brake
lamps are working properly, the following
procedure will allow you to move the
gearshift lever from park (P):
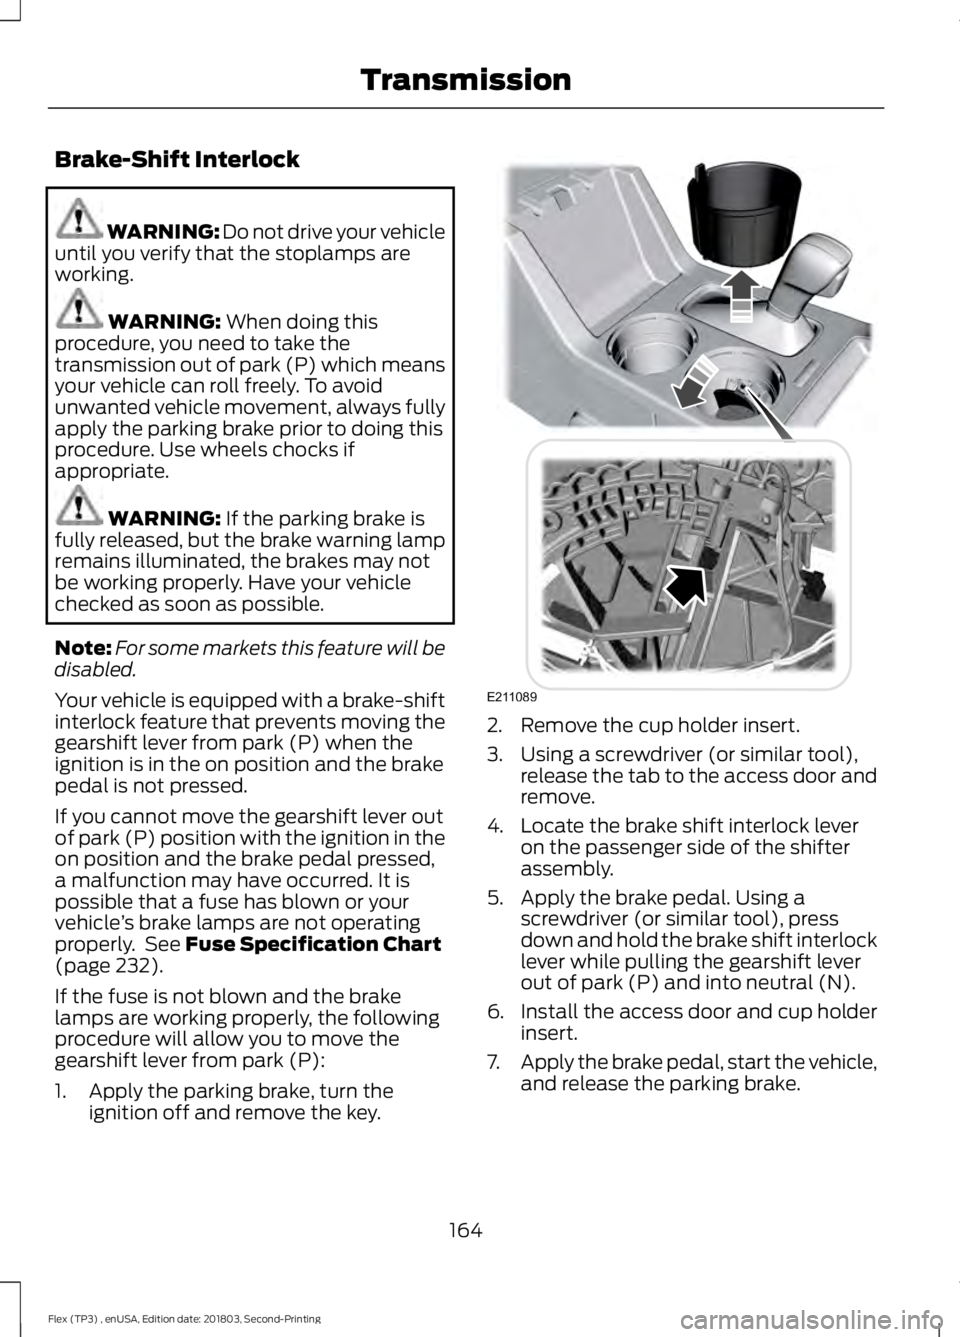
1. Apply the parking brake, turn the ignition off and remove the key. 2. Remove the cup holder insert.
3. Using a screwdriver (or similar tool),
release the tab to the access door and
remove.
4. Locate the brake shift interlock lever on the passenger side of the shifter
assembly.
5. Apply the brake pedal. Using a screwdriver (or similar tool), press
down and hold the brake shift interlock
lever while pulling the gearshift lever
out of park (P) and into neutral (N).
6. Install the access door and cup holder insert.
7. Apply the brake pedal, start the vehicle,
and release the parking brake.
164
Flex (TP3) , enUSA, Edition date: 201803, Second-Printing TransmissionE211089
Page 171 of 513
WARNING: The use of
non-recommended tires and wheels could
cause steering, suspension, axle, transfer
case or power transfer unit failure. If you
have questions regarding tire replacement,
contact your authorized dealer as soon as
possible.
Major dissimilar tire sizes between the front
and rear axles (for example, 17 inch low
profile tires on the front axle and 22 inch
high profile tires on the rear axle) could
cause the AWD system to stop functioning
and default to front-wheel drive or damage
the AWD system. However, the AWD
system is capable of tolerating any
combination of new and worn tires of the
same original tire size. For example, using
3 worn tread tires and 1 new tread tire all
of the same original tire size, can be
tolerated by the AWD system.
Driving In Special Conditions With
All-Wheel Drive (AWD)
AWD vehicles are equipped for driving on
sand, snow, mud and rough roads and have
operating characteristics that are
somewhat different from conventional
vehicles, both on and off the highway.
When driving at slow speeds in deep sand
under high outside temperatures, use a low
gear when possible. Lower gear operation
will maximize the engine and transmission
cooling capability.
Under severe operating conditions, the A/C
may cycle on and off to protect
overheating of the engine. Basic operating principles in special
conditions
•
Drive slower in strong crosswinds which
can affect the normal steering
characteristics of your vehicle.
• Be extremely careful when driving on
pavement made slippery by loose sand,
water, gravel, snow or ice.
If Your Vehicle Goes Off the Edge of the
Pavement
• If your vehicle goes off the edge of the
pavement, slow down, but avoid severe
brake application, ease the vehicle
back onto the pavement only after
reducing your speed. Do not turn the
steering wheel too sharply while
returning to the road surface.
• It may be safer to stay on the apron or
shoulder of the road and slow down
gradually before returning to the
pavement. You may lose control if you
do not slow down or if you turn the
steering wheel too sharply or abruptly.
• It often may be less risky to strike small
objects, such as highway reflectors,
with minor damage to your vehicle
rather than attempt a sudden return to
the pavement which could cause the
vehicle to slide sideways out of control
or rollover. Remember, your safety and
the safety of others should be your
primary concern.
If Your Vehicle Gets Stuck WARNING:
Always fully apply the
parking brake. Make sure you shift into park
(P) for vehicles with an automatic
transmission. Switch the ignition off and
remove the key whenever you leave your
vehicle.
168
Flex (TP3) , enUSA, Edition date: 201803, Second-Printing All-Wheel Drive
(If Equipped)
Page 181 of 513
PRINCIPLE OF OPERATION
WARNING: To help avoid personal
injury, always use caution when in reverse
(R) and when using the sensing system. WARNING:
The system may not
detect objects with surfaces that absorb
reflection. Always drive with due care and
attention. Failure to take care may result
in a crash. WARNING:
Traffic control systems,
inclement weather, air brakes, external
motors and fans may affect the correct
operation of the sensing system.This may
cause reduced performance or false alerts. WARNING:
The system may not
detect small or moving objects, particularly
those close to the ground.
Note: If your vehicle is equipped with
MyKey ™, the sensing system cannot be
turned off when a MyKey ™ is present.
See
Principle of Operation (page 57).
Note: Keep the sensors, located on the
bumper or fascia, free from snow, ice and
large accumulations of dirt. If the sensors
are covered, the system ’s accuracy can be
affected. Do not clean the sensors with
sharp objects.
Note: If your vehicle sustains damage to
the bumper or fascia, leaving it misaligned
or bent, the sensing zone may be altered
causing inaccurate measurement of
obstacles or false alerts. Note:
Certain add-on devices installed
around the bumper or fascia may create
false alerts. For example, large trailer
hitches, bike or surfboard racks, license plate
brackets, bumper covers or any other device
that may block the normal detection zone
of the system. Remove the add-on device
to prevent false alerts.
Note: When a trailer is connected to your
vehicle, the rear parking aid may detect the
trailer and therefore provide an alert. Disable
the rear parking aid when a trailer is
connected to prevent the alert.
The sensing system warns the driver of
obstacles within a certain range of your
vehicle. The system turns on automatically
whenever you switch the ignition on.
The system can be switched off through
the information display menu or from the
pop-up message that appears once you
shift the transmission into reverse (R). See
General Information
(page 95).
If a fault is present in the system, a warning
message appears in the information
display. See
Information Messages
(page 103).
REAR PARKING AID
The rear sensors are only active when the
transmission is in reverse (R). As your
vehicle moves closer to the obstacle, the
rate of the audible warning increases.
When the obstacle is less than
12 in
(30 cm) away, the warning sounds
continuously. If the system detects a
stationary or receding object farther than
12 in (30 cm)
from the corners of the
bumper, the tone sounds for only three
seconds. Once the system detects an
object approaching, the warning sounds
again.
178
Flex (TP3) , enUSA, Edition date: 201803, Second-Printing Parking Aids
Page 217 of 513
2. Set your vehicle parking brake.
3. Place the automatic transmission in
park (P).
4. Place wheel chocks in front and back of the trailer wheels. Chocks are not
included with your vehicle.
Launching or Retrieving a Boat or
Personal Watercraft (PWC)
Note: Disconnect the wiring to the trailer
before backing the trailer into the water.
Note: Reconnect the wiring to the trailer
after
removing the trailer from the water.
When backing down a ramp during boat
launching or retrieval:
• Do not allow the static water level to
rise above the bottom edge of the rear
bumper.
• Do not allow waves to break higher
than
6 in (15 cm) above the bottom
edge of the rear bumper.
Exceeding these limits may allow water to
enter vehicle components:
• Causing internal damage to the
components.
• Affecting driveability, emissions, and
reliability.
Any time the rear axle submerges in water,
replace the rear axle lubricant. Water may
contaminate the rear axle lubricant, which
is not a normal maintenance inspection
item unless there is a possibility of a leak
or other axle repair is required. TOWING THE VEHICLE ON
FOUR WHEELS
Emergency Towing
If your vehicle becomes inoperable
(without access to wheel dollies or vehicle
transport trailer), it can be flat-towed (all
wheels on the ground, regardless of the
powertrain and transmission
configuration) under the following
conditions:
•
Your vehicle is facing forward for
towing in a forward direction.
• Shift into neutral (N). If you cannot
shift into neutral (N), you may need to
override it.
See Transmission (page
162).
• Maximum speed is 35 mph (56 km/h).
• Maximum distance is
50 mi (80 km).
Recreational Towing
Note: Put your climate control system in
recirculated air mode to prevent exhaust
fumes from entering the vehicle. See
Climate Control
(page 112).
Follow these guidelines if you have a need
for recreational (RV) towing. An example
of recreational towing would be towing
your vehicle behind a motorhome. We
designed these guidelines to prevent
damage to your transmission.
You can tow your vehicle with all four
wheels on the ground.
If you tow your vehicle with all four wheels
on the ground:
• Tow only in the forward direction.
• Release the parking brake.
Vehicles with Keyless Start
1. Start the vehicle by pressing the brake pedal, and then pressing the keyless
start button until the vehicle starts.
214
Flex (TP3) , enUSA, Edition date: 201803, Second-Printing Towing
Page 218 of 513
2. Press the brake pedal and shift the
gearshift into neutral (N).
3. Turn the vehicle off by pressing the keyless start button once.
4. Disconnect the negative (black) cable from the battery. You need the door
key to lock and unlock doors when the
battery cable is disconnected. See
Changing the 12V Battery (page 256).
Note: The anti-theft system does not work
until you reconnect the battery cable.
Start the engine within 15 minutes of
reconnecting the battery cable.
Vehicles with an Ignition Key
1. Start the vehicle by pressing the brake pedal, and then turning the ignition key
until the vehicle starts.
2. Press the brake pedal and shift the transmission into neutral (N).
3. Turn off your vehicle by turning the ignition key past the accessory position.
The key position is between the
accessory and off positions. See
Ignition Switch (page 145).
4. Disconnect the negative (black) cable from the battery. See
Changing the
12V Battery (page 256).
Note: The anti-theft system does not work
until you reconnect the battery cable.
Start the engine within 15 minutes of
reconnecting the battery cable. All Vehicles
•
Do not exceed
65 mph (105 km/h).
• Start the engine and allow it to run for
five minutes at the beginning of each
day and every six hours thereafter. With
the engine running and your foot on the
brake, shift into drive (D) and then into
reverse (R) before shifting back into
neutral (N).
Front-wheel Drive Vehicles
Alternatively, you can tow your front-wheel
drive vehicle with the front wheels off the
ground by using a tow dolly, or with all four
wheels off the ground using a vehicle
transport trailer. If you are using a tow
dolly, follow the instructions specified by
the equipment provider.
All-wheel Drive Vehicles
Alternatively, you can tow your all-wheel
drive vehicle with all four wheels off the
ground using a vehicle transport trailer. Do
not tow your all-wheel drive vehicle with
the front wheels off the ground (by using
a tow dolly) and the rear wheels on the
ground. This causes damage to your
all-wheel drive system. If you are using a
vehicle transport trailer, follow the
instruction specified by the equipment
provider.
215
Flex (TP3) , enUSA, Edition date: 201803, Second-Printing Towing
Page 222 of 513
ROADSIDE ASSISTANCE
Vehicles Sold in the United States:
Getting Roadside Assistance
To fully assist you should you have a
vehicle concern, Ford Motor Company
offers a complimentary roadside
assistance program. This program is
separate from the New Vehicle Limited
Warranty.
The service is available:
•
24 hours a day, seven days a week.
• For the coverage period listed on the
Roadside Assistance Card included in
your Owner's Manual portfolio.
Roadside Assistance covers:
• A flat tire change with a good spare
(except vehicles supplied with a tire
inflation kit).
• Battery jump start.
• Lock-out assistance (key replacement
cost is the customer's responsibility).
• Fuel delivery — independent service
contractors, if not prohibited by state,
local or municipal law, shall deliver up
to 2 gal (8 L) of gasoline or 5 gal (20 L)
of diesel fuel to a disabled vehicle.
Roadside Assistance limits fuel delivery
service to two no-charge occurrences
within a 12-month period.
• Winch out — available within 98 ft
(30 m) of a paved or county
maintained road, no recoveries. •
Towing — independent service
contractors, if not prohibited by state,
local or municipal law, shall tow Ford
eligible vehicles to an authorized dealer
within
35 mi (56 km) of the
disablement location or to the nearest
authorized dealer. If a member
requests a tow to an authorized dealer
that is more than
35 mi (56 km) from
the disablement location, the member
shall be responsible for any mileage
costs in excess of
35 mi (56 km).
• Roadside Assistance includes up to
$200 for a towed trailer if the disabled
eligible vehicle requires service at the
nearest authorized dealer. If the towing
vehicle is operational but the trailer is
not, then the trailer does not qualify for
any roadside services.
Vehicles Sold in the United States:
Using Roadside Assistance
Complete the roadside assistance
identification card and place it in your
wallet for quick reference. This card is in
the owner's information portfolio in the
glove compartment.
United States vehicle customers who
require Roadside Assistance, call
1-800-241-3673.
If you need to arrange roadside assistance
for yourself, Ford Motor Company
reimburses a reasonable amount for
towing to the nearest dealership within
35 mi (56 km)
. To obtain reimbursement
information, United States vehicle
customers call 1-800-241-3673.
Customers need to submit their original
receipts.
219
Flex (TP3) , enUSA, Edition date: 201803, Second-Printing Roadside Emergencies
Page 223 of 513
Vehicles Sold in Canada: Getting
Roadside Assistance
To fully assist you should you have a
vehicle concern, Ford Motor Company of
Canada, Limited offers a complimentary
roadside assistance program. This program
is eligible within Canada or the continental
United States.
The service is available 24 hours a day,
seven days a week.
This program is separate from the New
Vehicle Limited Warranty, but the coverage
is concurrent with the powertrain coverage
period of your vehicle. Canadian roadside
coverage and benefits may differ from the
U.S. coverage.
If you require more information, please call
us in Canada at 1-800-665-2006, or visit
our website at www.ford.ca.
Vehicles Sold in Canada: Using
Roadside Assistance
Complete the roadside assistance
identification card and place it in your
wallet for quick reference.
In Canada, this card is found in the
Warranty Guide in the glove compartment
of your vehicle.
Vehicles Sold in Canada: Roadside
Assistance Program Coverage
The service is available 24 hours a day,
seven days a week.
Canadian roadside coverage and benefits
may differ from the U.S. coverage.
If you require more information, please
refer to the coverage section of your
warranty guide, call us in Canada at
1-800-665-2006, or visit our website at
www.ford.ca.
HAZARD FLASHERS
Note:
The hazard flashers operate when
the ignition is in any position, or if the key is
not in the ignition. If used when the vehicle
is not running, the battery loses charge. As
a result, there may be insufficient power to
restart your vehicle. The flasher control is on the
instrument panel. Use your
hazard flashers when your
vehicle is creating a safety hazard for other
motorists.
• Press the flasher control and all front
and rear direction indicators flash.
• Press the button again to switch them
off.
FUEL SHUTOFF WARNING: If your vehicle has been
involved in a crash, have the fuel system
checked. Failure to follow this instruction
could result in fire, personal injury or death.
Note: When you try to restart your vehicle
after a fuel shutoff, the vehicle makes sure
that various systems are safe to restart.
Once the vehicle determines the systems
are safe, then the vehicle allows you to
restart.
Note: In the event that your vehicle does
not restart after your third attempt, contact
a qualified technician.
The fuel pump shutoff stops the flow of
fuel to the engine in the event of a
moderate to severe crash. Not every
impact causes a shutoff.
Should your vehicle shut off after a crash,
you may restart your vehicle.
220
Flex (TP3) , enUSA, Edition date: 201803, Second-Printing Roadside Emergencies
Page 224 of 513
If your vehicle has a key system:
1. Switch off the ignition.
2. Switch to start position.
3. Switch off the ignition.
4.
Switch on the ignition to re-enable the
fuel pump.
5. If the vehicle does not start, repeat steps 1 through 4.
If your vehicle has a push button start
system:
1. Press START/STOP to switch off your
vehicle.
2. Press the brake pedal and START/STOP
to switch on your
vehicle.
3. Remove your foot from the brake pedal
and press
START/STOP to switch off
your vehicle.
4. You can attempt to start the vehicle by pressing the brake pedal and
START/STOP
, or press START/STOP
without pressing the brake pedal.
5. If the vehicle does not start, repeat steps 1 through 4.
JUMP STARTING THE VEHICLE WARNING:
Batteries normally
produce explosive gases which can cause
personal injury. Therefore, do not allow
flames, sparks or lighted substances to
come near the battery. When working near
the battery, always shield your face and
protect your eyes. Always provide correct
ventilation. WARNING:
Keep batteries out of
reach of children. Batteries contain sulfuric
acid. Avoid contact with skin, eyes or
clothing. Shield your eyes when working
near the battery to protect against possible
splashing of acid solution. In case of acid
contact with skin or eyes, flush
immediately with water for a minimum of
15 minutes and get prompt medical
attention. If acid is swallowed, call a
physician immediately. WARNING:
Use only adequately
sized cables with insulated clamps.
Preparing Your Vehicle
Do not attempt to push-start your
automatic transmission vehicle.
Note: Attempting to push-start a vehicle
with an automatic transmission may cause
transmission damage.
Note: Use only a 12-volt supply to start your
vehicle.
Note: Do not disconnect the battery of the
disabled vehicle as this could damage the
vehicle electrical system.
Park the booster vehicle close to the hood
of the disabled vehicle, making sure the
two vehicles do not touch.
Connecting the Jumper Cables WARNING: Do not attach the cables
to fuel lines, engine rocker covers, the
intake manifold or electrical components
as grounding points. Stay clear of moving
parts. To avoid reverse polarity
connections, make sure that you correctly
identify the positive (+) and negative (-)
terminals on both the disabled and booster
vehicles before connecting the cables.
221
Flex (TP3) , enUSA, Edition date: 201803, Second-Printing Roadside Emergencies