check oil FORD FLEX 2019 Owners Manual
[x] Cancel search | Manufacturer: FORD, Model Year: 2019, Model line: FLEX, Model: FORD FLEX 2019Pages: 513, PDF Size: 39.3 MB
Page 7 of 513
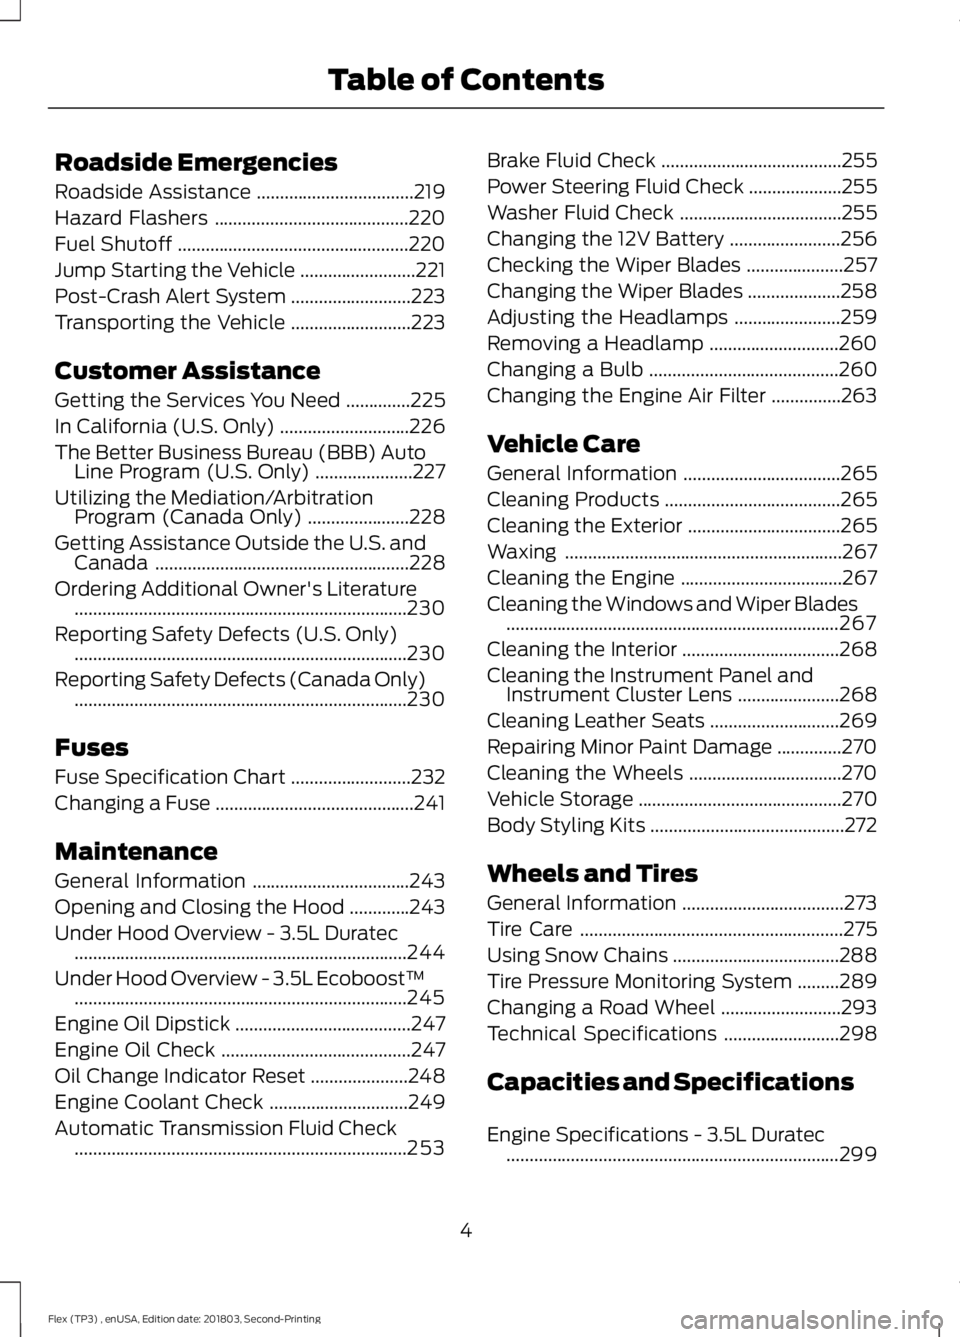
Roadside Emergencies
Roadside Assistance
..................................219
Hazard Flashers ..........................................
220
Fuel Shutoff ..................................................
220
Jump Starting the Vehicle .........................
221
Post-Crash Alert System ..........................
223
Transporting the Vehicle ..........................
223
Customer Assistance
Getting the Services You Need ..............
225
In California (U.S. Only) ............................
226
The Better Business Bureau (BBB) Auto Line Program (U.S. Only) .....................
227
Utilizing the Mediation/Arbitration Program (Canada Only) ......................
228
Getting Assistance Outside the U.S. and Canada .......................................................
228
Ordering Additional Owner's Literature ........................................................................\
230
Reporting Safety Defects (U.S. Only) ........................................................................\
230
Reporting Safety Defects (Canada Only) ........................................................................\
230
Fuses
Fuse Specification Chart ..........................
232
Changing a Fuse ...........................................
241
Maintenance
General Information ..................................
243
Opening and Closing the Hood .............
243
Under Hood Overview - 3.5L Duratec ........................................................................\
244
Under Hood Overview - 3.5L Ecoboost™ ........................................................................\
245
Engine Oil Dipstick ......................................
247
Engine Oil Check .........................................
247
Oil Change Indicator Reset .....................
248
Engine Coolant Check ..............................
249
Automatic Transmission Fluid Check ........................................................................\
253 Brake Fluid Check
.......................................
255
Power Steering Fluid Check ....................
255
Washer Fluid Check ...................................
255
Changing the 12V Battery ........................
256
Checking the Wiper Blades .....................
257
Changing the Wiper Blades ....................
258
Adjusting the Headlamps .......................
259
Removing a Headlamp ............................
260
Changing a Bulb .........................................
260
Changing the Engine Air Filter ...............
263
Vehicle Care
General Information ..................................
265
Cleaning Products ......................................
265
Cleaning the Exterior .................................
265
Waxing ............................................................
267
Cleaning the Engine ...................................
267
Cleaning the Windows and Wiper Blades ........................................................................\
267
Cleaning the Interior ..................................
268
Cleaning the Instrument Panel and Instrument Cluster Lens ......................
268
Cleaning Leather Seats ............................
269
Repairing Minor Paint Damage ..............
270
Cleaning the Wheels .................................
270
Vehicle Storage ............................................
270
Body Styling Kits ..........................................
272
Wheels and Tires
General Information ...................................
273
Tire Care .........................................................
275
Using Snow Chains ....................................
288
Tire Pressure Monitoring System .........
289
Changing a Road Wheel ..........................
293
Technical Specifications .........................
298
Capacities and Specifications
Engine Specifications - 3.5L Duratec ........................................................................\
299
4
Flex (TP3) , enUSA, Edition date: 201803, Second-Printing Table of Contents
Page 11 of 513
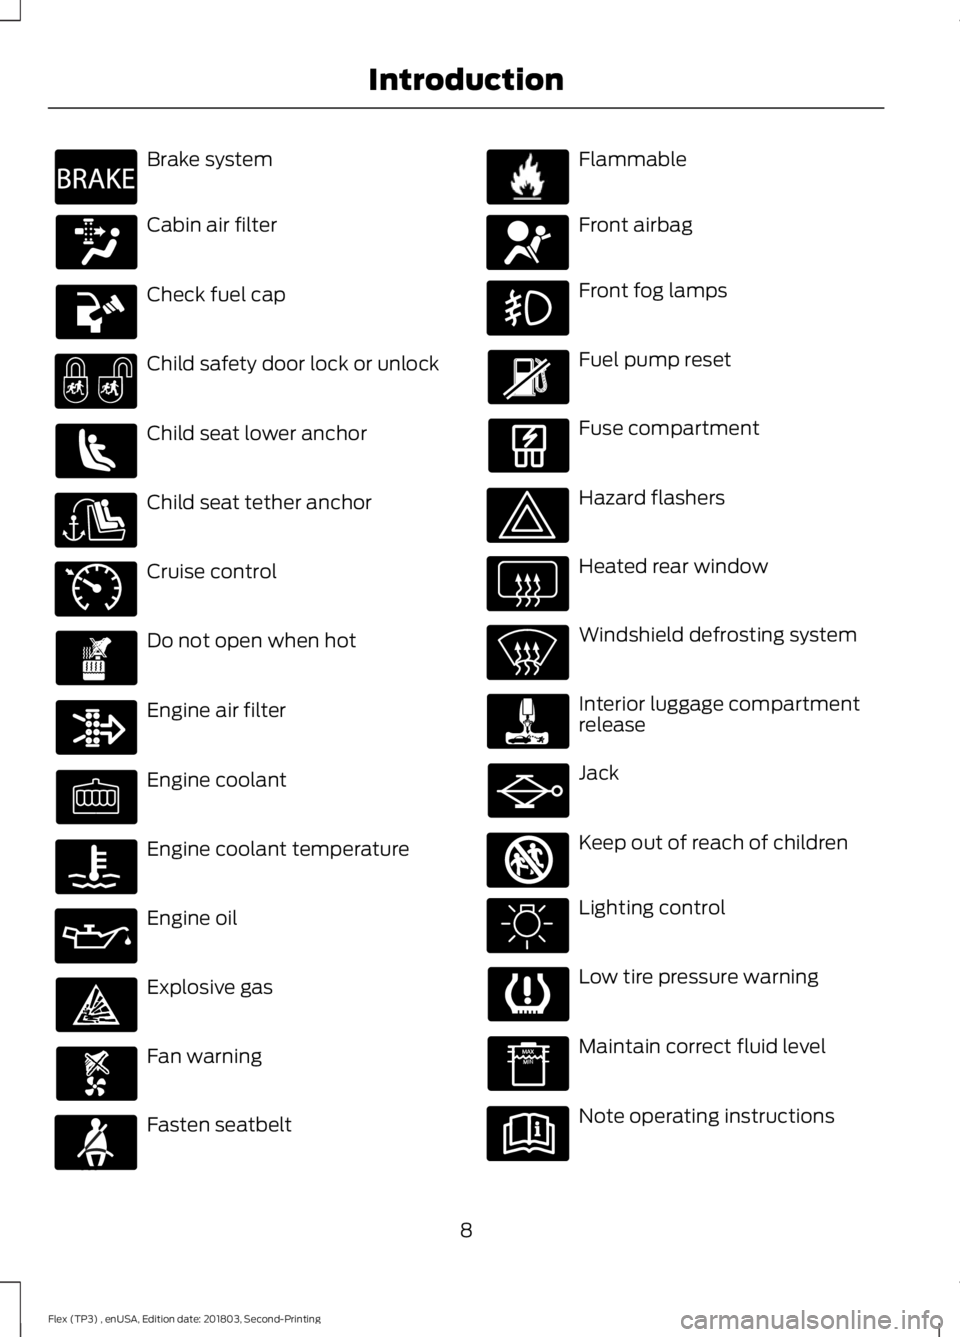
Brake system
Cabin air filter
Check fuel cap
Child safety door lock or unlock
Child seat lower anchor
Child seat tether anchor
Cruise control
Do not open when hot
Engine air filter
Engine coolant
Engine coolant temperature
Engine oil
Explosive gas
Fan warning
Fasten seatbelt Flammable
Front airbag
Front fog lamps
Fuel pump reset
Fuse compartment
Hazard flashers
Heated rear window
Windshield defrosting system
Interior luggage compartment
release
Jack
Keep out of reach of children
Lighting control
Low tire pressure warning
Maintain correct fluid level
Note operating instructions
8
Flex (TP3) , enUSA, Edition date: 201803, Second-Printing IntroductionE270480 E71340 E71880 E231160 E67017 E161353
Page 96 of 513
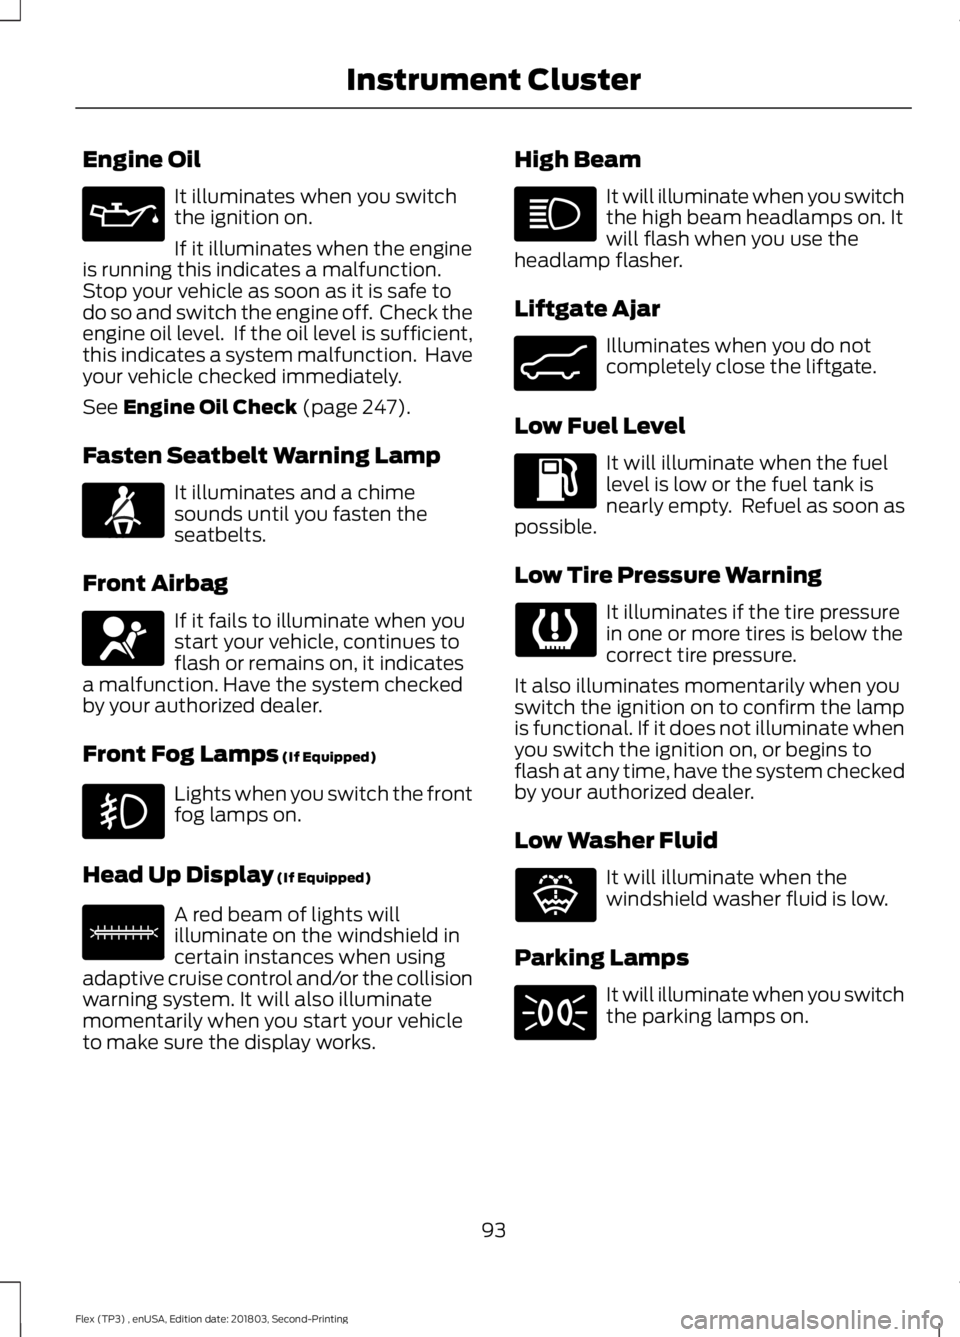
Engine Oil
It illuminates when you switch
the ignition on.
If it illuminates when the engine
is running this indicates a malfunction.
Stop your vehicle as soon as it is safe to
do so and switch the engine off. Check the
engine oil level. If the oil level is sufficient,
this indicates a system malfunction. Have
your vehicle checked immediately.
See Engine Oil Check (page 247).
Fasten Seatbelt Warning Lamp It illuminates and a chime
sounds until you fasten the
seatbelts.
Front Airbag If it fails to illuminate when you
start your vehicle, continues to
flash or remains on, it indicates
a malfunction. Have the system checked
by your authorized dealer.
Front Fog Lamps
(If Equipped) Lights when you switch the front
fog lamps on.
Head Up Display
(If Equipped) A red beam of lights will
illuminate on the windshield in
certain instances when using
adaptive cruise control and/or the collision
warning system. It will also illuminate
momentarily when you start your vehicle
to make sure the display works. High Beam It will illuminate when you switch
the high beam headlamps on. It
will flash when you use the
headlamp flasher.
Liftgate Ajar Illuminates when you do not
completely close the liftgate.
Low Fuel Level It will illuminate when the fuel
level is low or the fuel tank is
nearly empty. Refuel as soon as
possible.
Low Tire Pressure Warning It illuminates if the tire pressure
in one or more tires is below the
correct tire pressure.
It also illuminates momentarily when you
switch the ignition on to confirm the lamp
is functional. If it does not illuminate when
you switch the ignition on, or begins to
flash at any time, have the system checked
by your authorized dealer.
Low Washer Fluid It will illuminate when the
windshield washer fluid is low.
Parking Lamps It will illuminate when you switch
the parking lamps on.
93
Flex (TP3) , enUSA, Edition date: 201803, Second-Printing Instrument Cluster E71880 E67017 E156133 E162453 E132353
Page 111 of 513
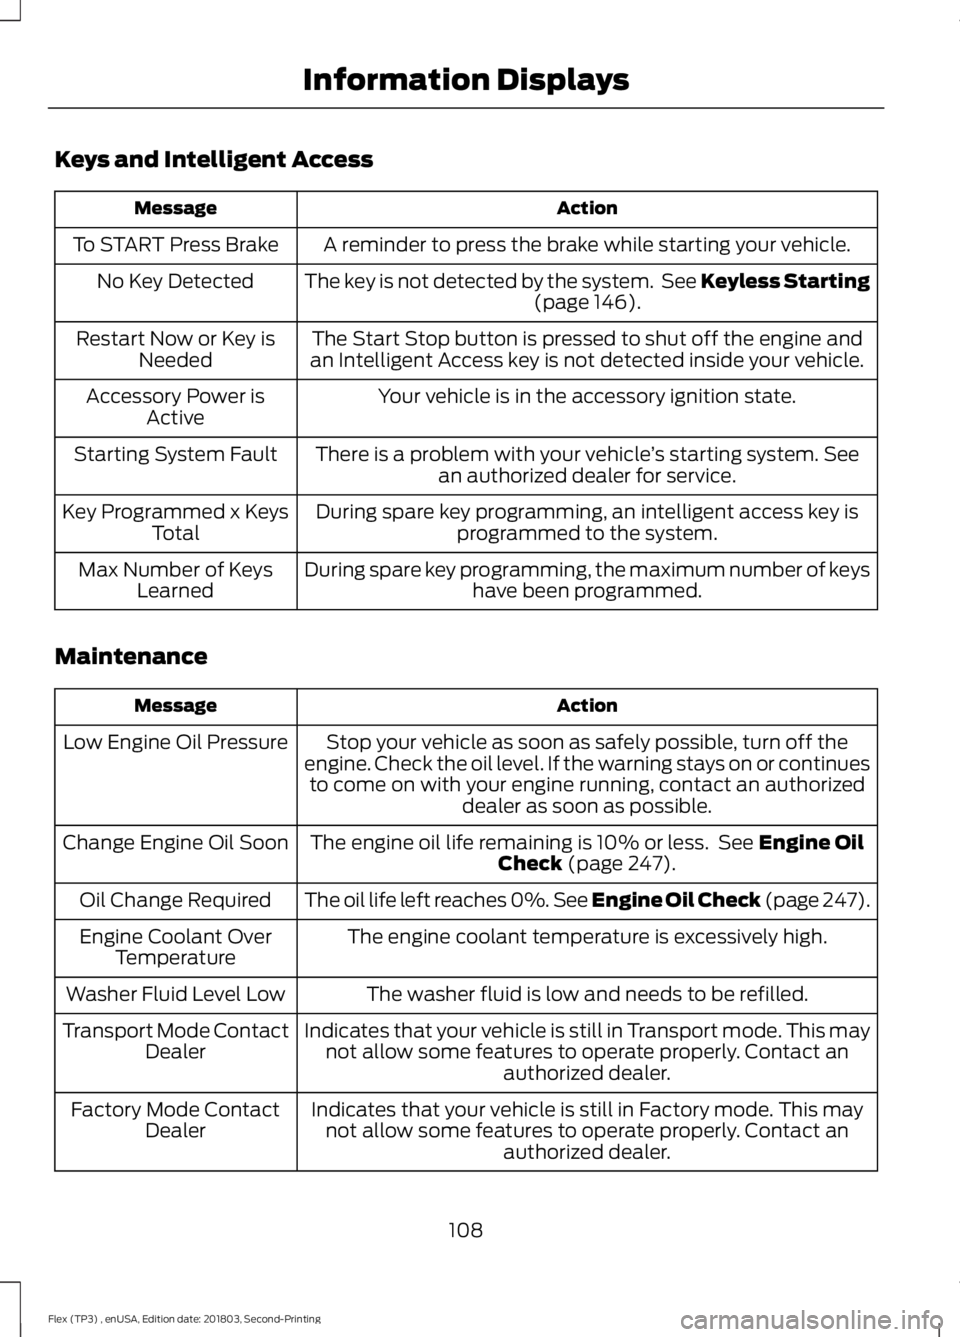
Keys and Intelligent Access
Action
Message
A reminder to press the brake while starting your vehicle.
To START Press Brake
The key is not detected by the system. See Keyless Starting(page 146).
No Key Detected
The Start Stop button is pressed to shut off the engine and
an Intelligent Access key is not detected inside your vehicle.
Restart Now or Key is
Needed
Your vehicle is in the accessory ignition state.
Accessory Power is
Active
There is a problem with your vehicle ’s starting system. See
an authorized dealer for service.
Starting System Fault
During spare key programming, an intelligent access key isprogrammed to the system.
Key Programmed x Keys
Total
During spare key programming, the maximum number of keys have been programmed.
Max Number of Keys
Learned
Maintenance Action
Message
Stop your vehicle as soon as safely possible, turn off the
engine. Check the oil level. If the warning stays on or continues to come on with your engine running, contact an authorized dealer as soon as possible.
Low Engine Oil Pressure
The engine oil life remaining is 10% or less. See
Engine Oil
Check (page 247).
Change Engine Oil Soon
The oil life left reaches 0%. See Engine Oil Check (page 247
).
Oil Change Required
The engine coolant temperature is excessively high.
Engine Coolant Over
Temperature
The washer fluid is low and needs to be refilled.
Washer Fluid Level Low
Indicates that your vehicle is still in Transport mode. This maynot allow some features to operate properly. Contact an authorized dealer.
Transport Mode Contact
Dealer
Indicates that your vehicle is still in Factory mode. This maynot allow some features to operate properly. Contact an authorized dealer.
Factory Mode Contact
Dealer
108
Flex (TP3) , enUSA, Edition date: 201803, Second-Printing Information Displays
Page 161 of 513
EMISSION LAW
WARNING: Do not remove or alter
the original equipment floor covering or
insulation between it and the metal floor
of the vehicle. The floor covering and
insulation protect occupants of the vehicle
from the engine and exhaust system heat
and noise. On vehicles with no original
equipment floor covering insulation, do not
carry passengers in a manner that permits
prolonged skin contact with the metal
floor. Failure to follow these instructions
may result in fire or personal injury.
U.S. federal laws and certain state laws
prohibit removing or rendering inoperative
emission control system components.
Similar federal or provincial laws may
apply in Canada. We do not approve of any
vehicle modification without first
determining applicable laws. Tampering with emissions
control systems including
related sensors or the Diesel
Exhaust Fluid system can result in reduced
engine power and the illumination of the
service engine soon light. Tampering With a Noise Control
System
Federal laws prohibit the following acts:
•
Removal or rendering inoperative by
any person other than for purposes of
maintenance.
• Repair or replacement of any device or
element of the design incorporated into
a new vehicle for the purpose of noise
control prior to its sale or delivery to
the ultimate purchaser or while it is in
use.
• The use of the vehicle after any person
removes or renders inoperative any
device or element of the design.
The U.S. Environmental Protection Agency
may presume to constitute tampering as
follows:
• Removal of hood blanket, fender apron
absorbers, fender apron barriers,
underbody noise shields or acoustically
absorptive material.
• Tampering or rendering inoperative the
engine speed governor, to allow engine
speed to exceed manufacturer
specifications.
If the engine does not start, runs rough,
experiences a decrease in engine
performance, experiences excess fuel
consumption or produces excessive
exhaust smoke, check for the following:
• A plugged or disconnected air inlet
system hose.
• A plugged engine air filter element.
• Water in the fuel filter and water
separator.
• A clogged fuel filter.
• Contaminated fuel.
• Air in the fuel system, due to loose
connections.
• An open or pinched sensor hose.
• Incorrect engine oil level.
158
Flex (TP3) , enUSA, Edition date: 201803, Second-Printing Engine Emission Control
Page 162 of 513
•
Incorrect fuel for climatic conditions.
• Incorrect engine oil viscosity for
climactic conditions.
Note: Some vehicles have a lifetime fuel
filter that is integrated with the fuel tank.
Regular maintenance or replacement is not
needed.
Note: If these checks do not help you
correct the concern, have your vehicle
checked as soon as possible.
Noise Emissions Warranty,
Prohibited Tampering Acts and
Maintenance
On January 1, 1978, Federal regulation
became effective governing the noise
emission on trucks over 10,000 lb
(4,536 kg) Gross Vehicle Weight Rating
(GVWR). The preceding statements
concerning prohibited tampering acts and
maintenance, and the noise warranty
found in the Warranty Guide, are
applicable to complete chassis cabs over
10,000 lb (4,536 kg)
GVWR.
CATALYTIC CONVERTER WARNING: Do not park, idle or drive
your vehicle on dry grass or other dry
ground cover. The emission system heats
up the engine compartment and exhaust
system, creating the risk of fire. WARNING:
The normal operating
temperature of the exhaust system is very
high. Never work around or attempt to
repair any part of the exhaust system until
it has cooled. Use special care when
working around the catalytic converter.
The catalytic converter heats up to a very
high temperature after only a short period
of engine operation and stays hot after the
engine is switched off. WARNING: Exhaust leaks may result
in entry of harmful and potentially lethal
fumes into the passenger compartment.
If you smell exhaust fumes inside your
vehicle, have your vehicle inspected
immediately. Do not drive if you smell
exhaust fumes.
Your vehicle has various emission control
components and a catalytic converter that
enables it to comply with applicable
exhaust emission standards.
To make sure that the catalytic converter
and other emission control components
continue to work properly:
• Do not crank the engine for more than
10 seconds at a time.
• Do not run the engine with a spark plug
lead disconnected.
• Do not push-start or tow-start your
vehicle. Use booster cables. See Jump
Starting the Vehicle
(page 221).
• Use only the specified fuel listed.
• Do not switch the ignition off when your
vehicle is moving.
• Avoid running out of fuel.
• Have the items listed in scheduled
maintenance information performed
according to the specified schedule.
Note: Resulting component damage may
not be covered by the vehicle Warranty.
The scheduled maintenance items listed
in scheduled maintenance information are
essential to the life and performance of
your vehicle and to its emissions system.
If you use anything other than Ford,
Motorcraft or Ford-authorized parts for
maintenance replacements or for service
of components affecting emission control,
such non-Ford parts should be equivalent
to genuine Ford Motor Company parts in
performance and durability.
159
Flex (TP3) , enUSA, Edition date: 201803, Second-Printing Engine Emission Control
Page 248 of 513
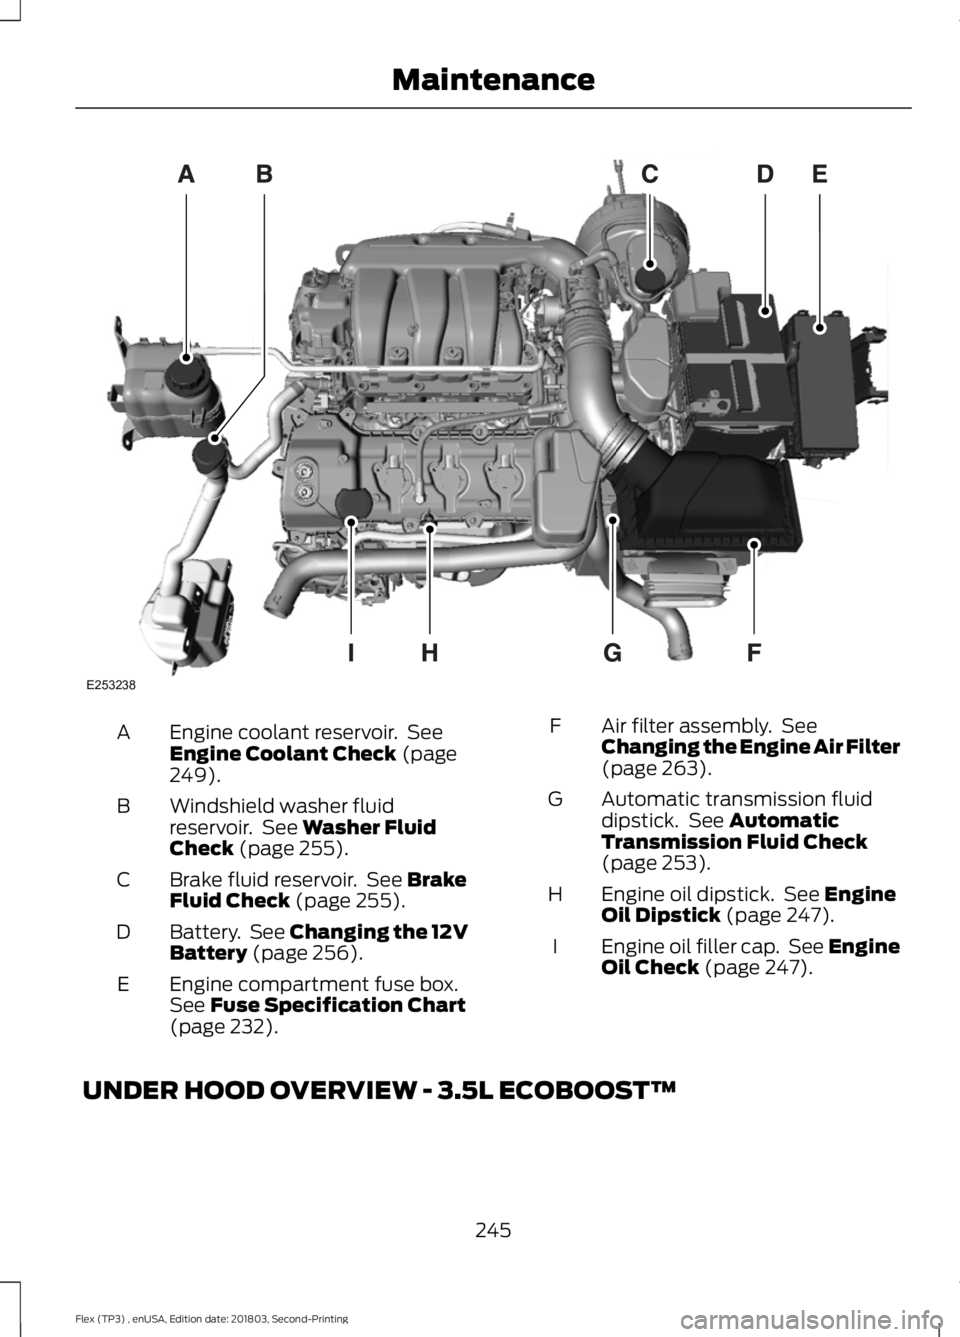
Engine coolant reservoir. See
Engine Coolant Check (page
249).
A
Windshield washer fluid
reservoir. See
Washer Fluid
Check (page 255).
B
Brake fluid reservoir. See
Brake
Fluid Check (page 255).
C
Battery. See
Changing the 12V
Battery (page 256).
D
Engine compartment fuse box.
See
Fuse Specification Chart
(page 232).
E Air filter assembly. See
Changing the Engine Air Filter
(page
263).
F
Automatic transmission fluid
dipstick. See
Automatic
Transmission Fluid Check
(page
253).
G
Engine oil dipstick. See
Engine
Oil Dipstick (page 247).
H
Engine oil filler cap. See Engine
Oil Check
(page 247).
I
UNDER HOOD OVERVIEW - 3.5L ECOBOOST™ 245
Flex (TP3) , enUSA, Edition date: 201803, Second-Printing MaintenanceE253238
Page 249 of 513
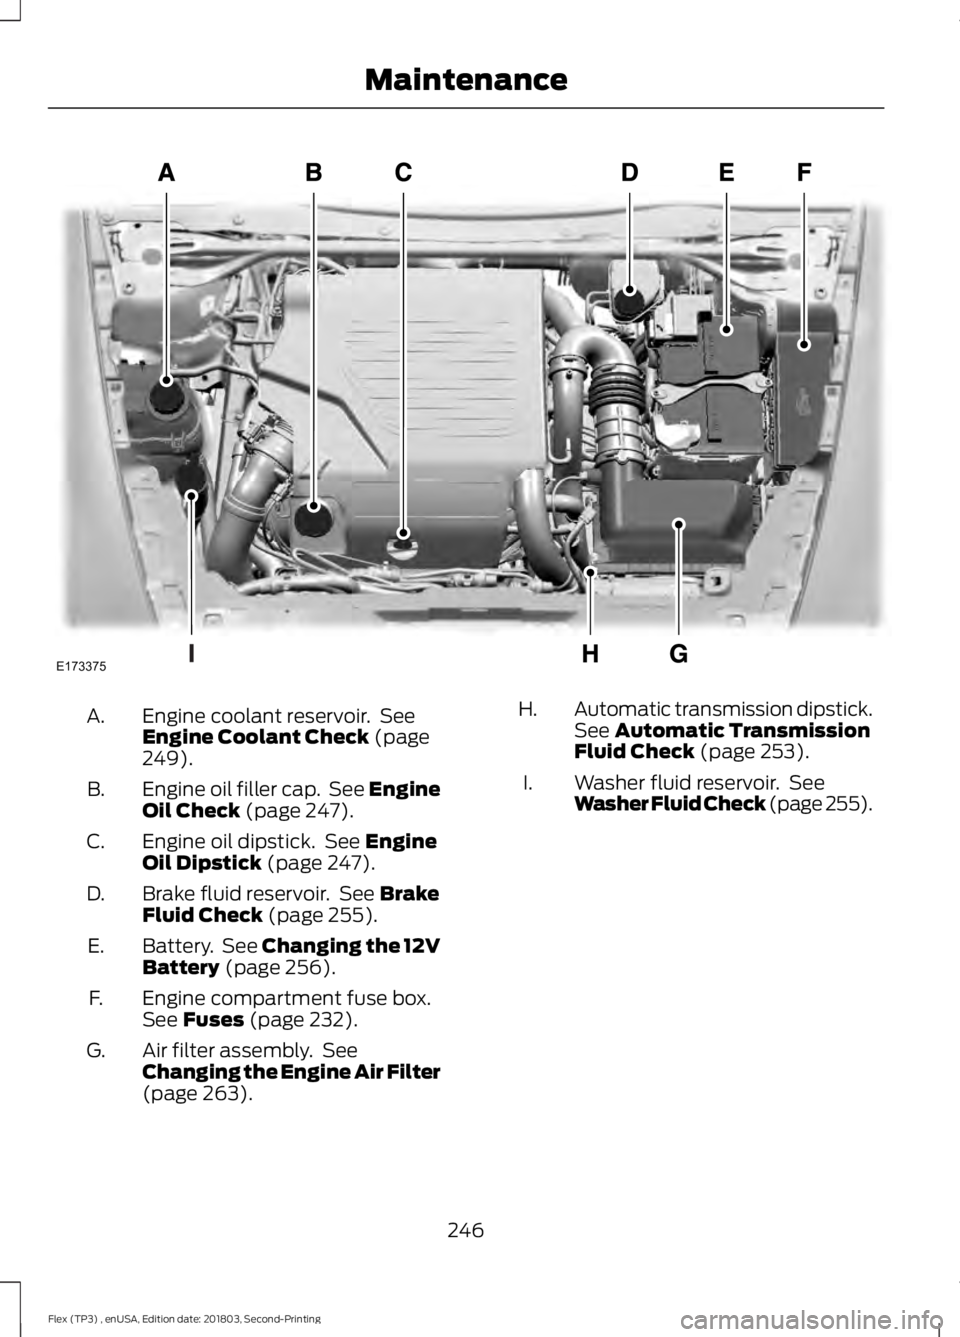
Engine coolant reservoir. See
Engine Coolant Check (page
249).
A.
Engine oil filler cap. See Engine
Oil Check
(page 247).
B.
Engine oil dipstick. See
Engine
Oil Dipstick (page 247).
C.
Brake fluid reservoir. See
Brake
Fluid Check (page 255).
D.
Battery. See
Changing the 12V
Battery (page 256).
E.
Engine compartment fuse box.
See
Fuses (page 232).
F.
Air filter assembly. See
Changing the Engine Air Filter
(page
263).
G. Automatic transmission dipstick.
See
Automatic Transmission
Fluid Check (page 253).
H.
Washer fluid reservoir. See
Washer Fluid Check (page 255
).
I.
246
Flex (TP3) , enUSA, Edition date: 201803, Second-Printing MaintenanceE173375
Page 250 of 513
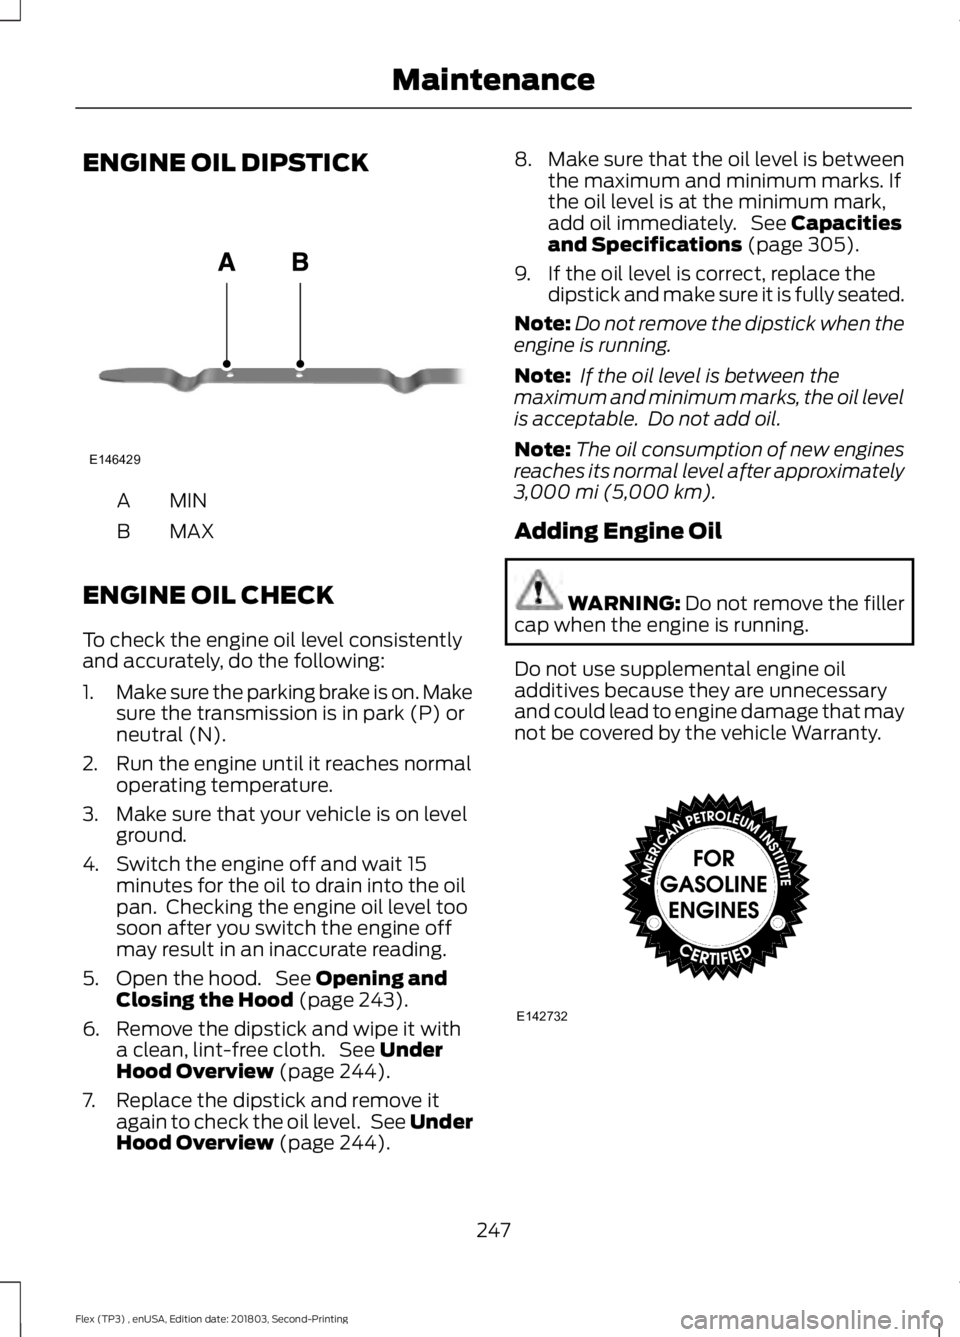
ENGINE OIL DIPSTICK
MINA
MAX
B
ENGINE OIL CHECK
To check the engine oil level consistently
and accurately, do the following:
1. Make sure the parking brake is on. Make
sure the transmission is in park (P) or
neutral (N).
2. Run the engine until it reaches normal operating temperature.
3. Make sure that your vehicle is on level ground.
4. Switch the engine off and wait 15 minutes for the oil to drain into the oil
pan. Checking the engine oil level too
soon after you switch the engine off
may result in an inaccurate reading.
5. Open the hood. See Opening and
Closing the Hood (page 243).
6. Remove the dipstick and wipe it with a clean, lint-free cloth. See
Under
Hood Overview (page 244).
7. Replace the dipstick and remove it again to check the oil level. See Under
Hood Overview
(page 244). 8.
Make sure that the oil level is between
the maximum and minimum marks. If
the oil level is at the minimum mark,
add oil immediately. See
Capacities
and Specifications (page 305).
9. If the oil level is correct, replace the dipstick and make sure it is fully seated.
Note: Do not remove the dipstick when the
engine is running.
Note: If the oil level is between the
maximum and minimum marks, the oil level
is acceptable. Do not add oil.
Note: The oil consumption of new engines
reaches its normal level after approximately
3,000 mi (5,000 km)
.
Adding Engine Oil WARNING: Do not remove the filler
cap when the engine is running.
Do not use supplemental engine oil
additives because they are unnecessary
and could lead to engine damage that may
not be covered by the vehicle Warranty. 247
Flex (TP3) , enUSA, Edition date: 201803, Second-Printing MaintenanceE146429 E142732
Page 251 of 513
Only use oils certified for gasoline engines
by the American Petroleum Institute (API).
An oil with this trademark symbol
conforms to the current engine and
emission system protection standards and
fuel economy requirements of the
International Lubricants Specification
Advisory Committee (ILSAC).
To top up the engine oil level do the
following:
1. Clean the area surrounding the engine
oil filler cap before you remove it.
2. Remove the engine oil filler cap. See Under Hood Overview (page 244).
Turn it counterclockwise and remove
it.
3. Add engine oil that meets our specifications. See
Capacities and
Specifications (page 305). You may
have to use a funnel to pour the engine
oil into the opening.
4. Recheck the oil level.
5. If the oil level is correct, replace the dipstick and make sure it is fully seated.
6. Replace the engine oil filler cap. Turn it clockwise until you feel a strong
resistance.
Note: Do not add oil further than the
maximum mark. Oil levels above the
maximum mark may cause engine damage.
Note: Make sure you install the oil filler cap
correctly.
Note: Soak up any spillage with an
absorbent cloth immediately.
OIL CHANGE INDICATOR
RESET
Use the information display controls on
the steering wheel to reset the oil change
indicator. From the main menu scroll to: Action and description
Message
Press the right arrow button,
then from this menu scroll
to the following message.
Settings
Press the right arrow button,
then from this menu scroll
to the following message.
Vehicle
Press the right arrow button,
then from this menu scroll
to the following message.
Oil Life
Press and hold the
OK
button until the instrument
cluster displays the
following message.
Hold OK to
Reset
Reset Successful
When the oil change indic-
ator resets the instrument
cluster displays 100%.
Remaining Life
{00}%
If the instrument cluster
displays one of the following
messages, repeat the
process.
Not Reset
Reset Cancelled
248
Flex (TP3) , enUSA, Edition date: 201803, Second-Printing Maintenance