low beam FORD FLEX 2019 Owners Manual
[x] Cancel search | Manufacturer: FORD, Model Year: 2019, Model line: FLEX, Model: FORD FLEX 2019Pages: 513, PDF Size: 39.3 MB
Page 84 of 513
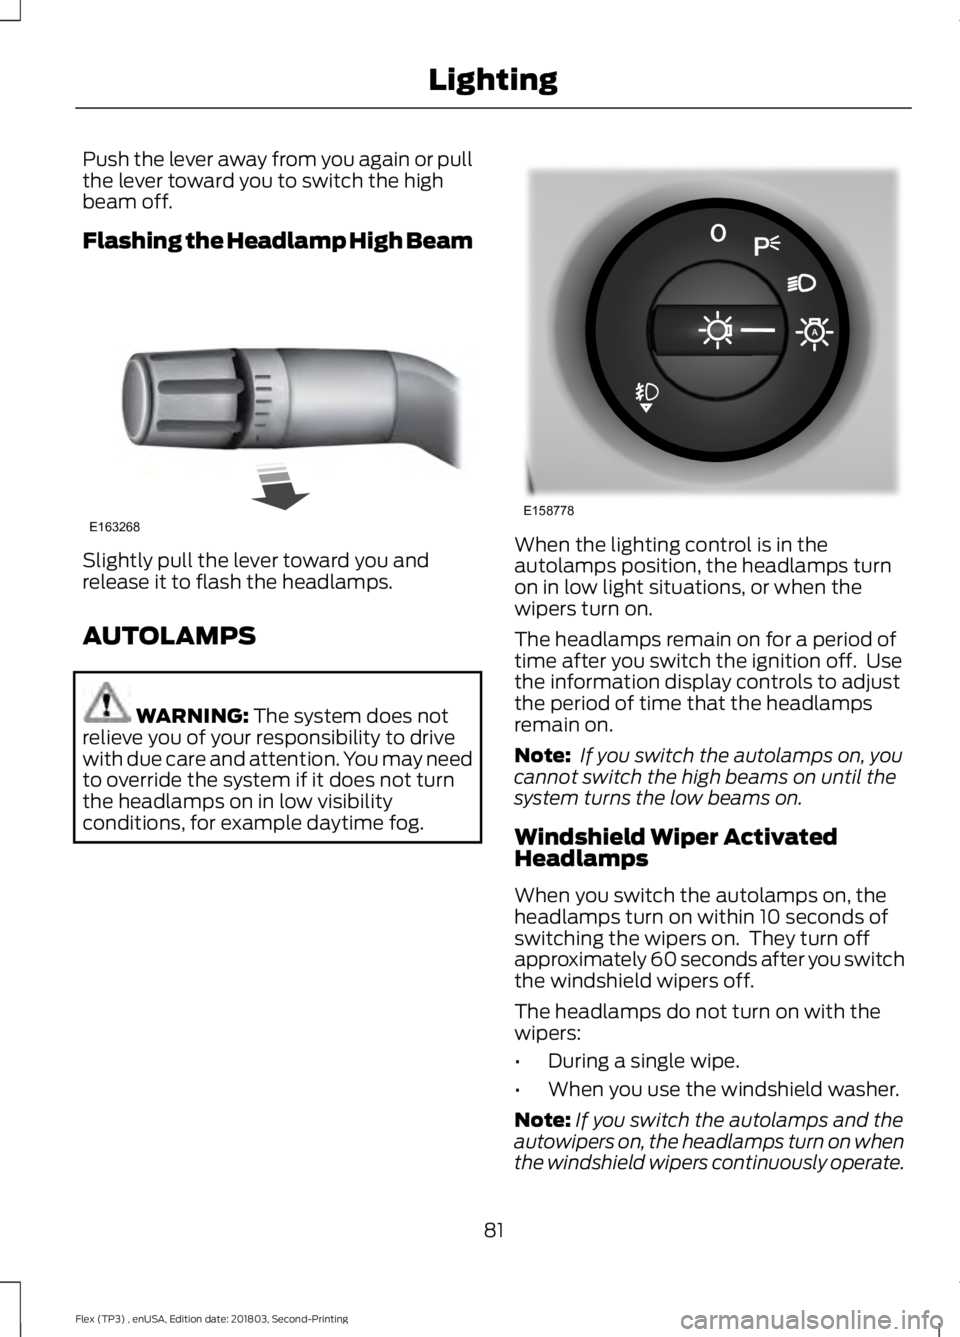
Push the lever away from you again or pull
the lever toward you to switch the high
beam off.
Flashing the Headlamp High Beam
Slightly pull the lever toward you and
release it to flash the headlamps.
AUTOLAMPS
WARNING: The system does not
relieve you of your responsibility to drive
with due care and attention. You may need
to override the system if it does not turn
the headlamps on in low visibility
conditions, for example daytime fog. When the lighting control is in the
autolamps position, the headlamps turn
on in low light situations, or when the
wipers turn on.
The headlamps remain on for a period of
time after you switch the ignition off. Use
the information display controls to adjust
the period of time that the headlamps
remain on.
Note:
If you switch the autolamps on, you
cannot switch the high beams on until the
system turns the low beams on.
Windshield Wiper Activated
Headlamps
When you switch the autolamps on, the
headlamps turn on within 10 seconds of
switching the wipers on. They turn off
approximately 60 seconds after you switch
the windshield wipers off.
The headlamps do not turn on with the
wipers:
• During a single wipe.
• When you use the windshield washer.
Note: If you switch the autolamps and the
autowipers on, the headlamps turn on when
the windshield wipers continuously operate.
81
Flex (TP3) , enUSA, Edition date: 201803, Second-Printing LightingE163268 E158778
Page 96 of 513
Engine Oil
It illuminates when you switch
the ignition on.
If it illuminates when the engine
is running this indicates a malfunction.
Stop your vehicle as soon as it is safe to
do so and switch the engine off. Check the
engine oil level. If the oil level is sufficient,
this indicates a system malfunction. Have
your vehicle checked immediately.
See Engine Oil Check (page 247).
Fasten Seatbelt Warning Lamp It illuminates and a chime
sounds until you fasten the
seatbelts.
Front Airbag If it fails to illuminate when you
start your vehicle, continues to
flash or remains on, it indicates
a malfunction. Have the system checked
by your authorized dealer.
Front Fog Lamps
(If Equipped) Lights when you switch the front
fog lamps on.
Head Up Display
(If Equipped) A red beam of lights will
illuminate on the windshield in
certain instances when using
adaptive cruise control and/or the collision
warning system. It will also illuminate
momentarily when you start your vehicle
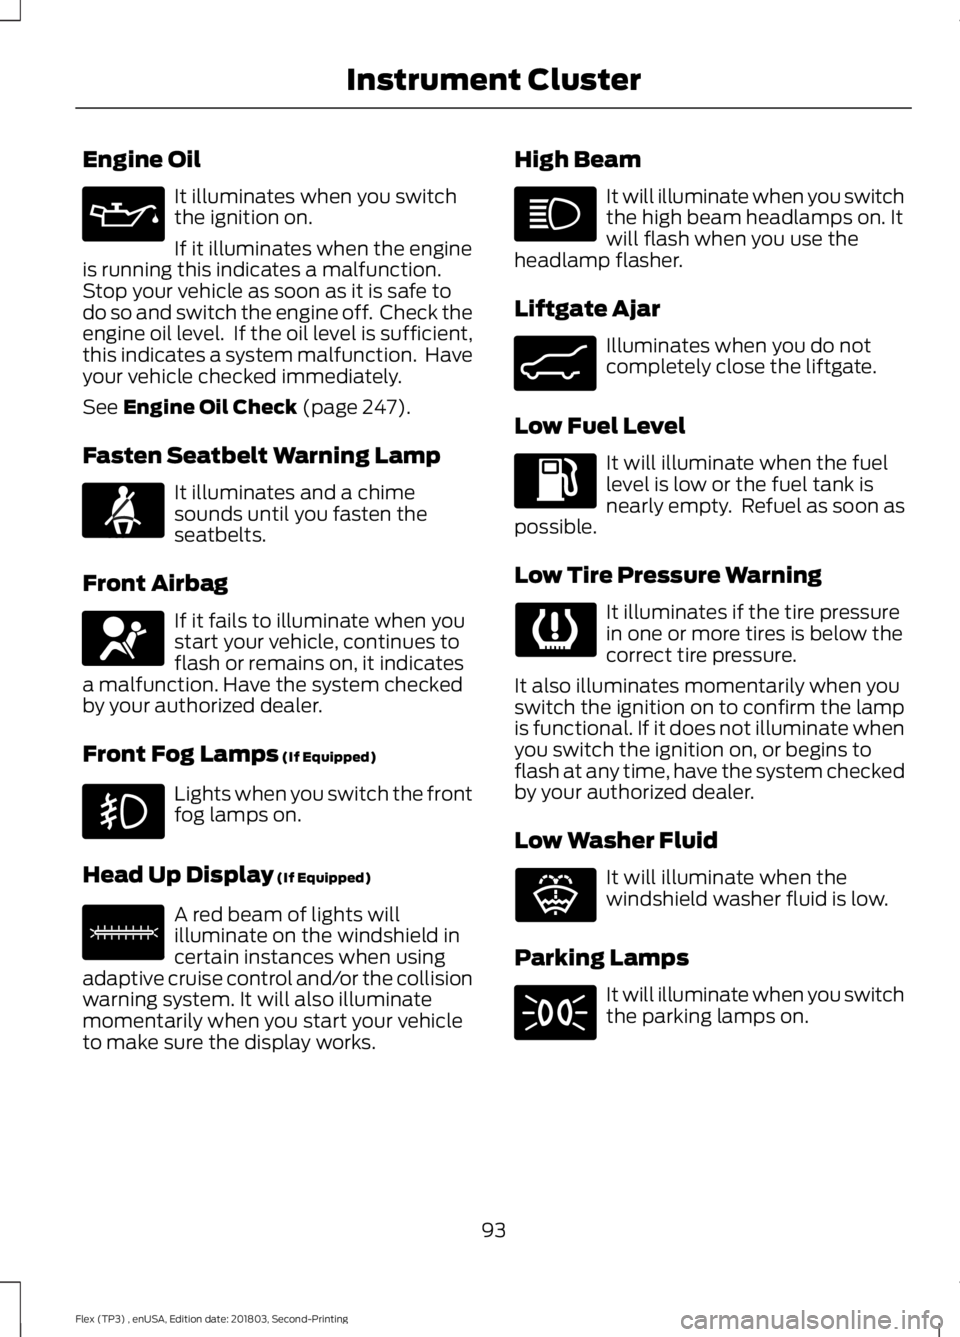
to make sure the display works. High Beam It will illuminate when you switch
the high beam headlamps on. It
will flash when you use the
headlamp flasher.
Liftgate Ajar Illuminates when you do not
completely close the liftgate.
Low Fuel Level It will illuminate when the fuel
level is low or the fuel tank is
nearly empty. Refuel as soon as
possible.
Low Tire Pressure Warning It illuminates if the tire pressure
in one or more tires is below the
correct tire pressure.
It also illuminates momentarily when you
switch the ignition on to confirm the lamp
is functional. If it does not illuminate when
you switch the ignition on, or begins to
flash at any time, have the system checked
by your authorized dealer.
Low Washer Fluid It will illuminate when the
windshield washer fluid is low.
Parking Lamps It will illuminate when you switch
the parking lamps on.
93
Flex (TP3) , enUSA, Edition date: 201803, Second-Printing Instrument Cluster E71880 E67017 E156133 E162453 E132353
Page 191 of 513
Note:
The system remembers the set
speed.
Resuming the Set Speed Press and release to resume the
set speed.
Switching Cruise Control Off Press and hold the toggle button
downward when the system is
in standby mode, or switch the
ignition off.
Note: You erase the set speed when you
switch the system off.
USING ADAPTIVE CRUISE
CONTROL (If Equipped) WARNING:
Always pay close
attention to changing road conditions
when using adaptive cruise control. The
system does not replace attentive driving.
Failing to pay attention to the road may
result in a crash, serious injury or death. WARNING:
Do not use the adaptive
cruise control when entering or leaving a
highway, on roads with intersections or
roundabouts or non-vehicular traffic or
roads that are winding, slippery, unpaved,
or steep slopes. WARNING:
Do not use the system
in poor visibility, for example fog, heavy
rain, spray or snow. WARNING:
Do not use the system
when towing a trailer that has aftermarket
electronic trailer brake controls. Failure to
follow this instruction could result in the
loss of control of your vehicle, personal
injury or death. WARNING:
Do not use tire sizes
other than those recommended because
this can affect the normal operation of the
system. Failure to do so may result in a loss
of vehicle control, which could result in
serious injury. WARNING:
Adaptive cruise control
may not detect stationary or slow moving
vehicles below
6 mph (10 km/h). WARNING:
Adaptive cruise control
does not detect pedestrians or objects in
the road. WARNING:
Adaptive cruise control
does not detect oncoming vehicles in the
same lane. WARNING:
Adaptive cruise control
is not a crash warning or avoidance system.
Note: It is your responsibility to stay alert,
drive safely and be in control of the vehicle
at all times.
The system adjusts your vehicle speed to
maintain the set gap between you and the
vehicle in front of you in the same lane.
You can select four gap settings.
The system uses a radar sensor that
projects a beam directly in front of your
vehicle.
188
Flex (TP3) , enUSA, Edition date: 201803, Second-Printing Cruise Control E265297
Page 195 of 513
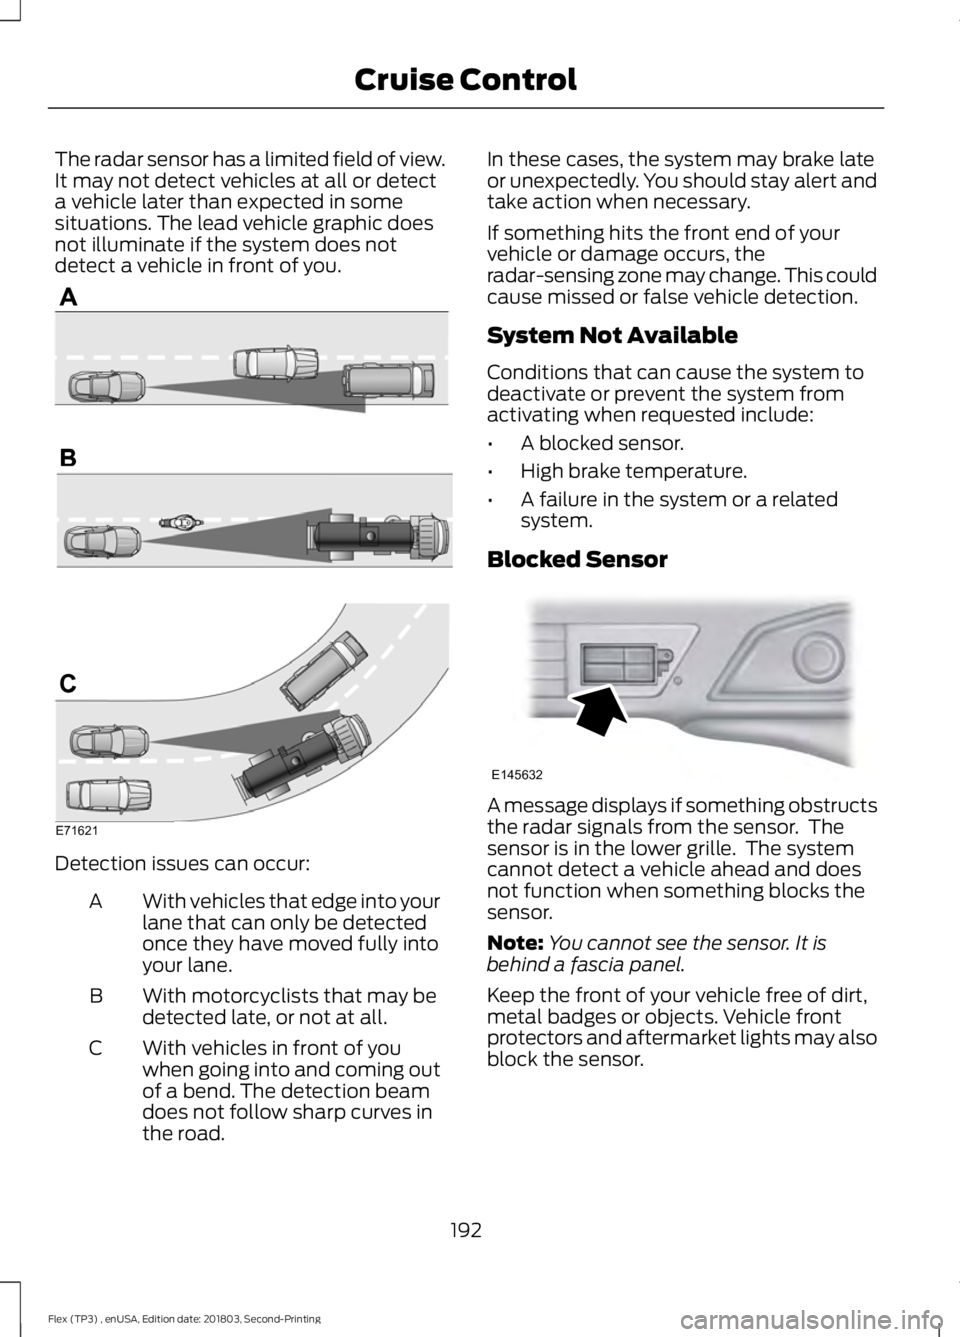
The radar sensor has a limited field of view.
It may not detect vehicles at all or detect
a vehicle later than expected in some
situations. The lead vehicle graphic does
not illuminate if the system does not
detect a vehicle in front of you.
Detection issues can occur:
With vehicles that edge into your
lane that can only be detected
once they have moved fully into
your lane.
A
With motorcyclists that may be
detected late, or not at all.
B
With vehicles in front of you
when going into and coming out
of a bend. The detection beam
does not follow sharp curves in
the road.
C In these cases, the system may brake late
or unexpectedly. You should stay alert and
take action when necessary.
If something hits the front end of your
vehicle or damage occurs, the
radar-sensing zone may change. This could
cause missed or false vehicle detection.
System Not Available
Conditions that can cause the system to
deactivate or prevent the system from
activating when requested include:
•
A blocked sensor.
• High brake temperature.
• A failure in the system or a related
system.
Blocked Sensor A message displays if something obstructs
the radar signals from the sensor. The
sensor is in the lower grille. The system
cannot detect a vehicle ahead and does
not function when something blocks the
sensor.
Note:
You cannot see the sensor. It is
behind a fascia panel.
Keep the front of your vehicle free of dirt,
metal badges or objects. Vehicle front
protectors and aftermarket lights may also
block the sensor.
192
Flex (TP3) , enUSA, Edition date: 201803, Second-Printing Cruise ControlE71621 E145632
Page 242 of 513
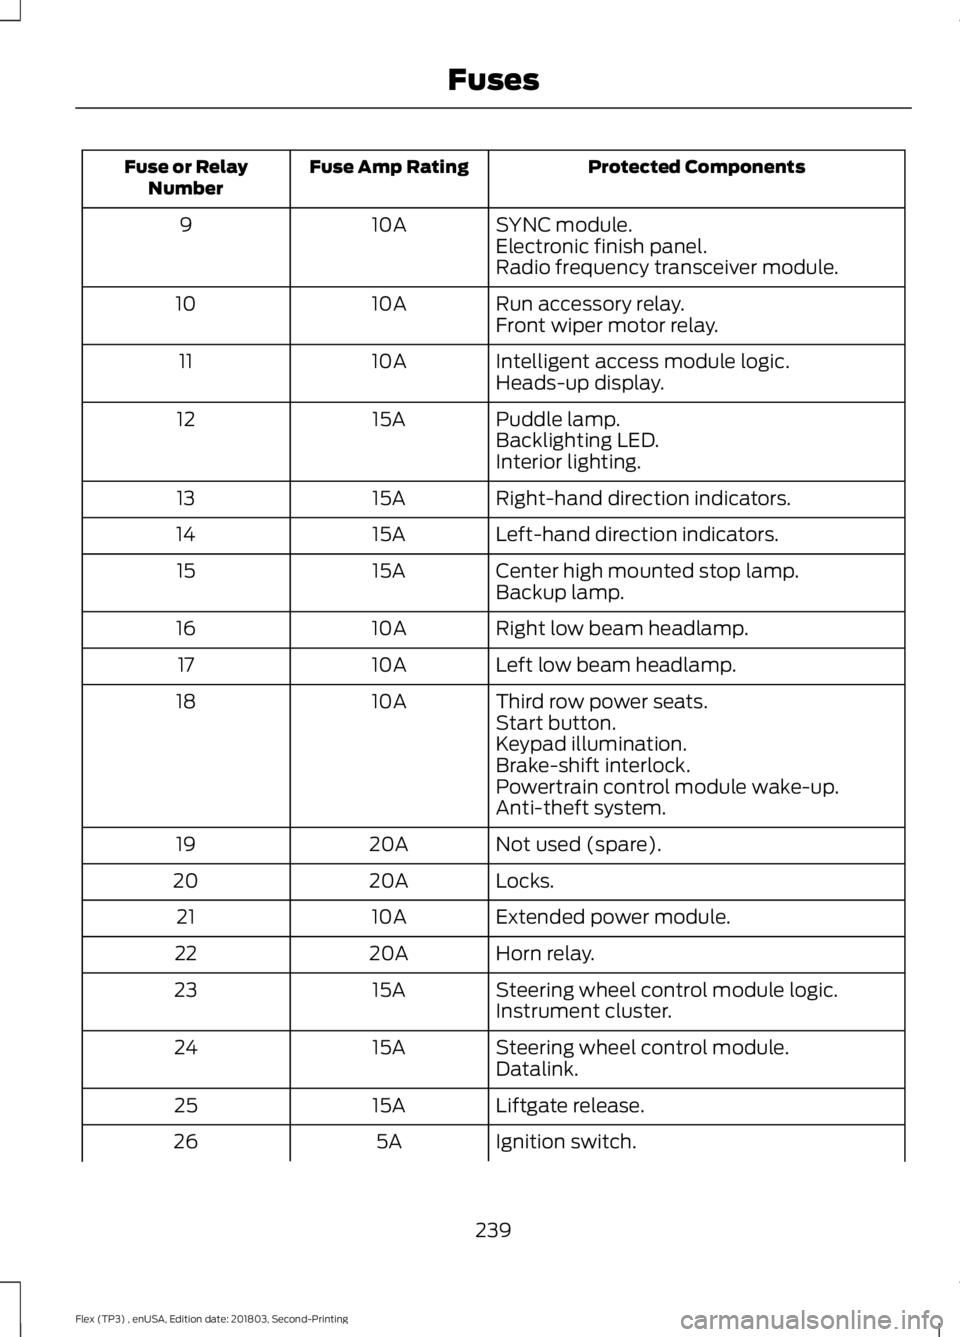
Protected Components
Fuse Amp Rating
Fuse or Relay
Number
SYNC module.
10A
9
Electronic finish panel.
Radio frequency transceiver module.
Run accessory relay.
10A
10
Front wiper motor relay.
Intelligent access module logic.
10A
11
Heads-up display.
Puddle lamp.
15A
12
Backlighting LED.
Interior lighting.
Right-hand direction indicators.
15A
13
Left-hand direction indicators.
15A
14
Center high mounted stop lamp.
15A
15
Backup lamp.
Right low beam headlamp.
10A
16
Left low beam headlamp.
10A
17
Third row power seats.
10A
18
Start button.
Keypad illumination.
Brake-shift interlock.
Powertrain control module wake-up.
Anti-theft system.
Not used (spare).
20A
19
Locks.
20A
20
Extended power module.
10A
21
Horn relay.
20A
22
Steering wheel control module logic.
15A
23
Instrument cluster.
Steering wheel control module.
15A
24
Datalink.
Liftgate release.
15A
25
Ignition switch.
5A
26
239
Flex (TP3) , enUSA, Edition date: 201803, Second-Printing Fuses
Page 262 of 513
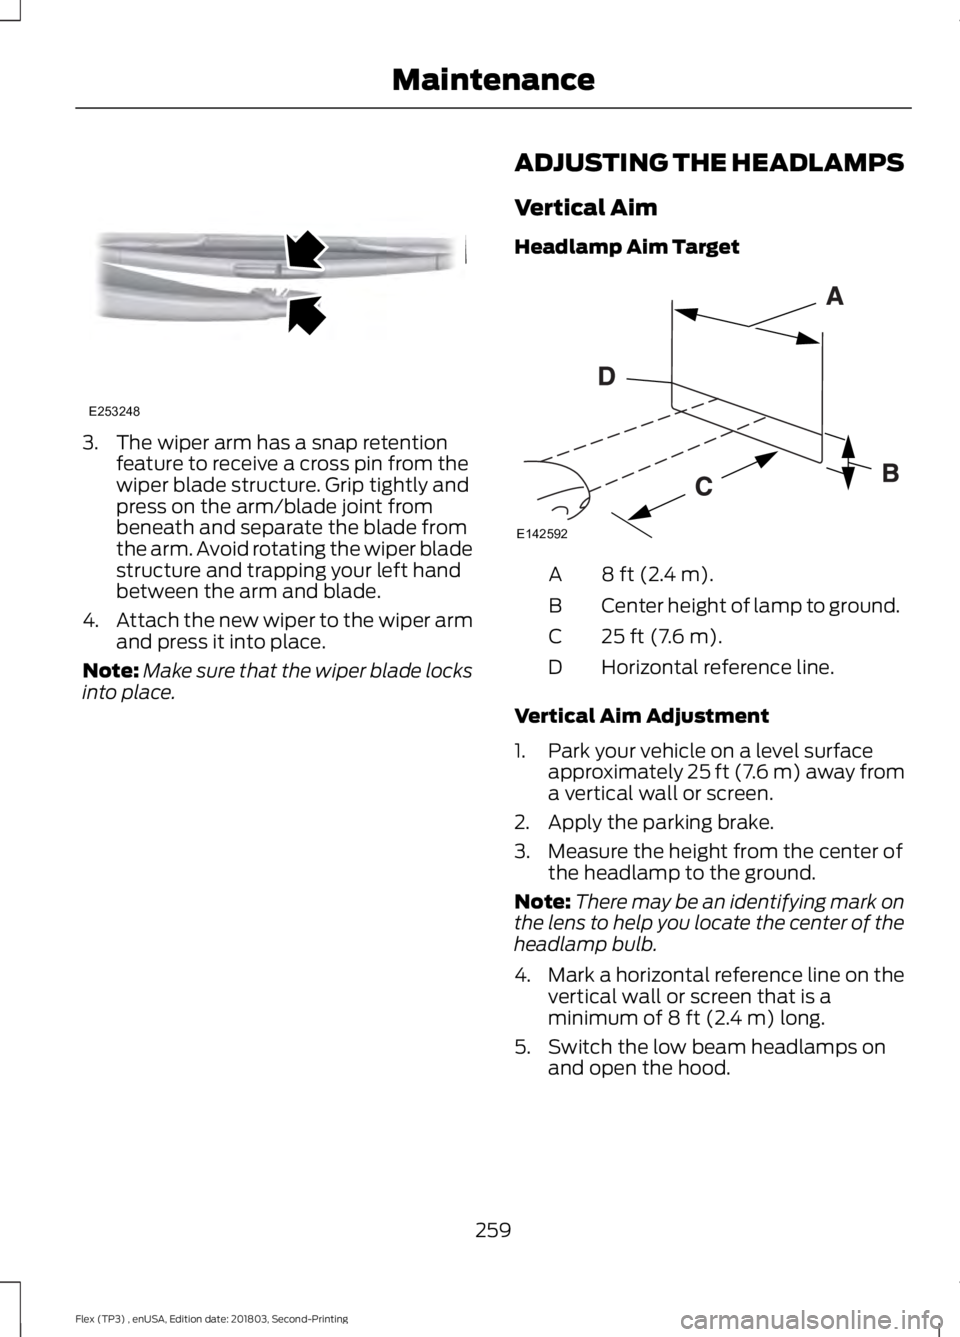
3. The wiper arm has a snap retention
feature to receive a cross pin from the
wiper blade structure. Grip tightly and
press on the arm/blade joint from
beneath and separate the blade from
the arm. Avoid rotating the wiper blade
structure and trapping your left hand
between the arm and blade.
4. Attach the new wiper to the wiper arm
and press it into place.
Note: Make sure that the wiper blade locks
into place. ADJUSTING THE HEADLAMPS
Vertical Aim
Headlamp Aim Target 8 ft (2.4 m).
A
Center height of lamp to ground.
B
25 ft (7.6 m).
C
Horizontal reference line.
D
Vertical Aim Adjustment
1. Park your vehicle on a level surface approximately 25 ft (7.6 m) away from
a vertical wall or screen.
2. Apply the parking brake.
3. Measure the height from the center of the headlamp to the ground.
Note: There may be an identifying mark on
the lens to help you locate the center of the
headlamp bulb.
4. Mark a horizontal reference line on the
vertical wall or screen that is a
minimum of
8 ft (2.4 m) long.
5. Switch the low beam headlamps on and open the hood.
259
Flex (TP3) , enUSA, Edition date: 201803, Second-Printing MaintenanceE253248 E142592
Page 263 of 513
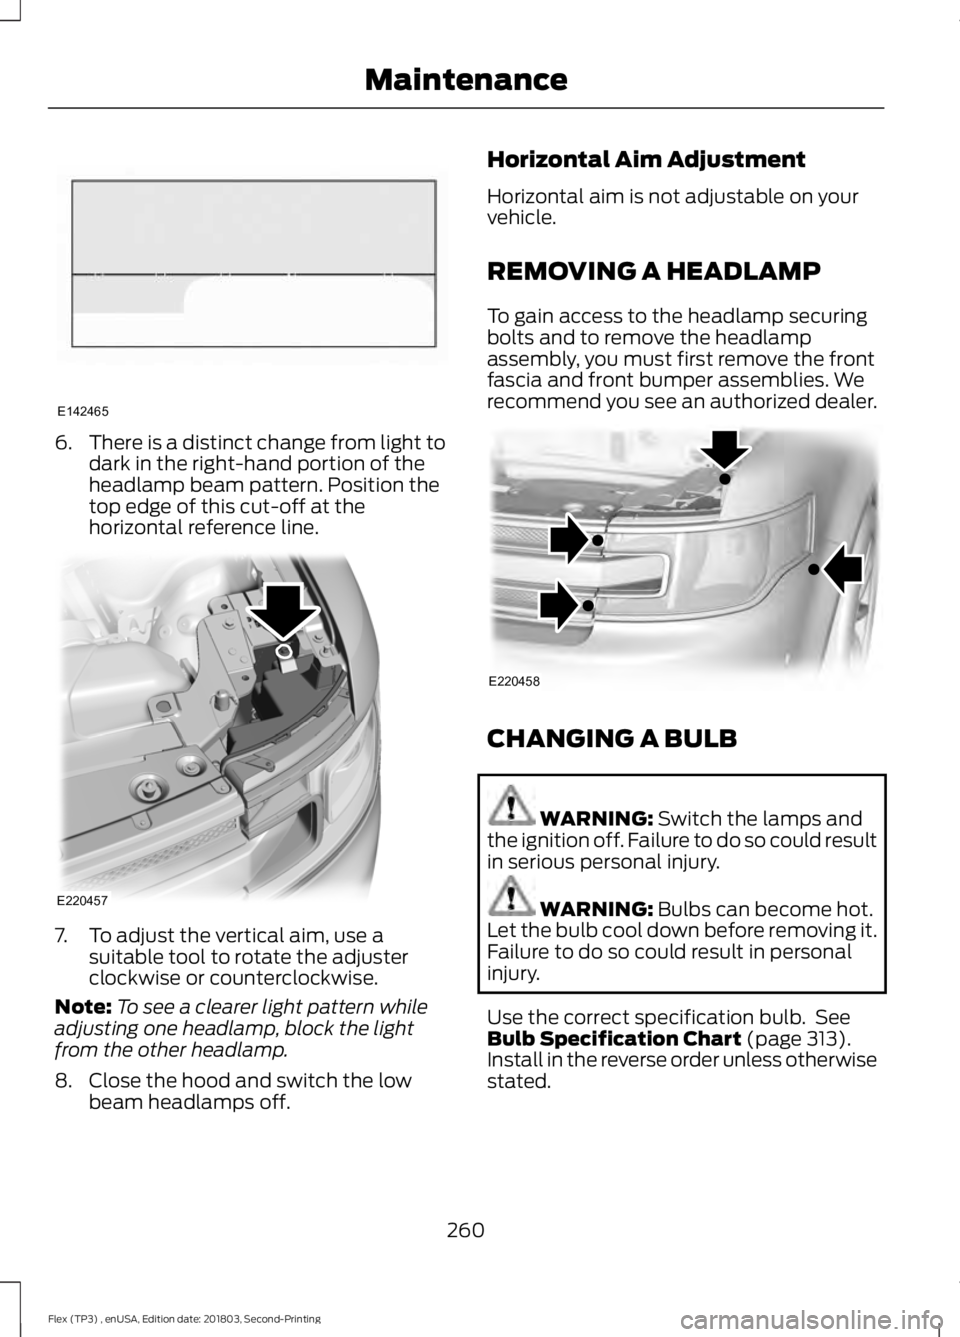
6.
There is a distinct change from light to
dark in the right-hand portion of the
headlamp beam pattern. Position the
top edge of this cut-off at the
horizontal reference line. 7. To adjust the vertical aim, use a
suitable tool to rotate the adjuster
clockwise or counterclockwise.
Note: To see a clearer light pattern while
adjusting one headlamp, block the light
from the other headlamp.
8. Close the hood and switch the low beam headlamps off. Horizontal Aim Adjustment
Horizontal aim is not adjustable on your
vehicle.
REMOVING A HEADLAMP
To gain access to the headlamp securing
bolts and to remove the headlamp
assembly, you must first remove the front
fascia and front bumper assemblies. We
recommend you see an authorized dealer.
CHANGING A BULB
WARNING: Switch the lamps and
the ignition off. Failure to do so could result
in serious personal injury. WARNING:
Bulbs can become hot.
Let the bulb cool down before removing it.
Failure to do so could result in personal
injury.
Use the correct specification bulb. See
Bulb Specification Chart
(page 313).
Install in the reverse order unless otherwise
stated.
260
Flex (TP3) , enUSA, Edition date: 201803, Second-Printing MaintenanceE142465 E220457 E220458
Page 264 of 513
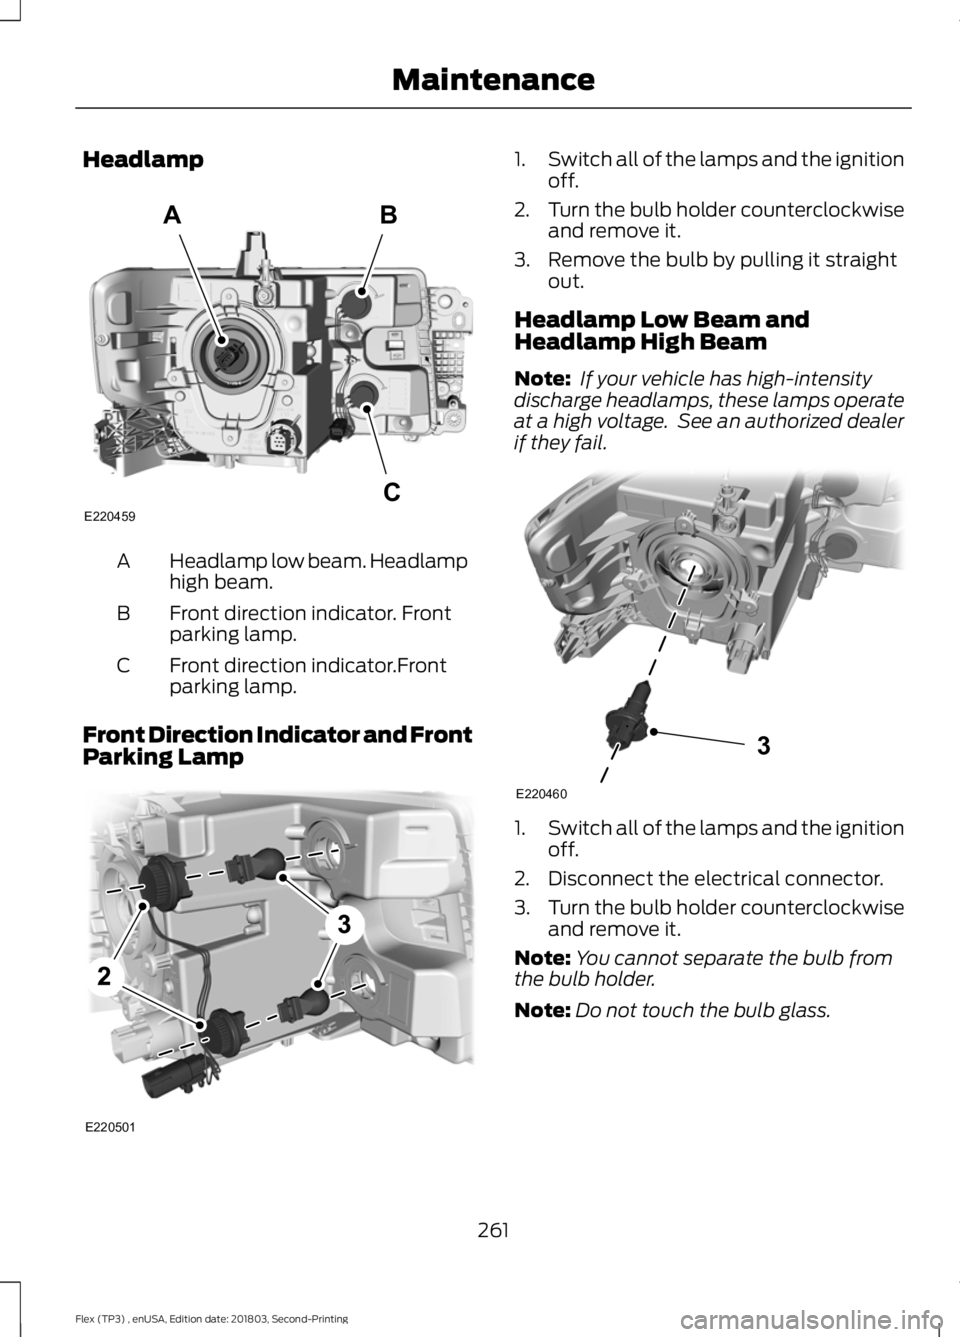
Headlamp
Headlamp low beam. Headlamp
high beam.
A
Front direction indicator. Front
parking lamp.
B
Front direction indicator.Front
parking lamp.
C
Front Direction Indicator and Front
Parking Lamp 1.
Switch all of the lamps and the ignition
off.
2. Turn the bulb holder counterclockwise
and remove it.
3. Remove the bulb by pulling it straight out.
Headlamp Low Beam and
Headlamp High Beam
Note: If your vehicle has high-intensity
discharge headlamps, these lamps operate
at a high voltage. See an authorized dealer
if they fail. 1.
Switch all of the lamps and the ignition
off.
2. Disconnect the electrical connector.
3. Turn the bulb holder counterclockwise
and remove it.
Note: You cannot separate the bulb from
the bulb holder.
Note: Do not touch the bulb glass.
261
Flex (TP3) , enUSA, Edition date: 201803, Second-Printing MaintenanceE220459
AB
C E220501 3
E220460
Page 316 of 513
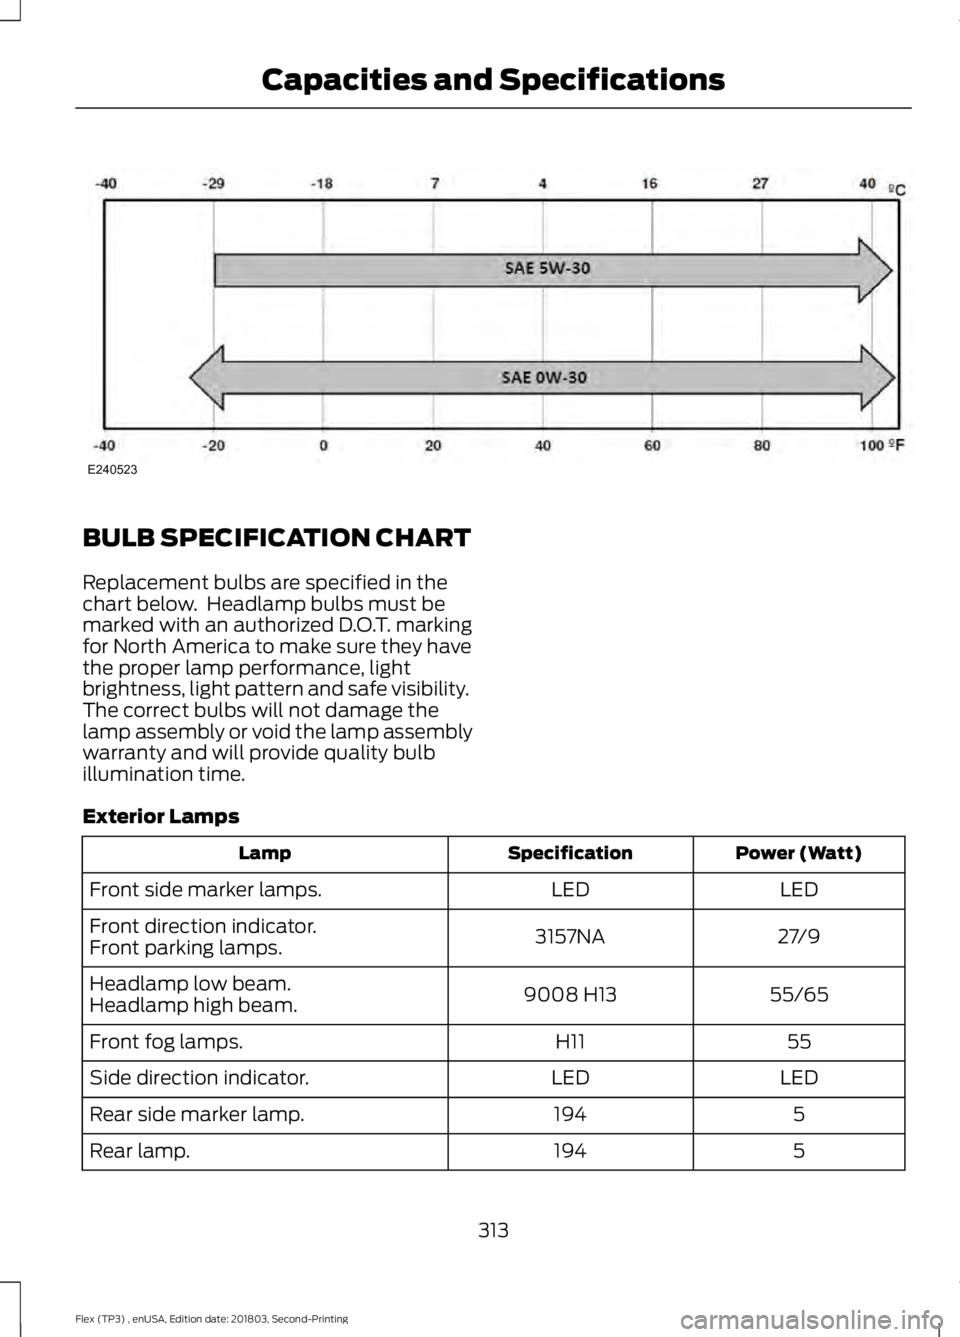
BULB SPECIFICATION CHART
Replacement bulbs are specified in the
chart below. Headlamp bulbs must be
marked with an authorized D.O.T. marking
for North America to make sure they have
the proper lamp performance, light
brightness, light pattern and safe visibility.
The correct bulbs will not damage the
lamp assembly or void the lamp assembly
warranty and will provide quality bulb
illumination time.
Exterior Lamps
Power (Watt)
Specification
Lamp
LED
LED
Front side marker lamps.
27/9
3157NA
Front direction indicator.
Front parking lamps.
55/65
9008 H13
Headlamp low beam.
Headlamp high beam.
55
H11
Front fog lamps.
LED
LED
Side direction indicator.
5
194
Rear side marker lamp.
5
194
Rear lamp.
313
Flex (TP3) , enUSA, Edition date: 201803, Second-Printing Capacities and SpecificationsE240523
Page 504 of 513
Capacities and Specifications - 3.5L
Duratec.........................................................305
Alternative Engine Oil for Extremely Cold Climates........................................................... 308
Specifications..................................................... 306
Capacities and Specifications - 3.5L Ecoboost™.................................................309
Alternative Engine Oil for Extremely Cold Climates............................................................ 312
Specifications...................................................... 310
Capacities and Specifications................299
Cargo Nets.....................................................202
Car Wash See: Cleaning the Exterior.............................. 265
Catalytic Converter
......................................159
On-Board Diagnostics (OBD-II)................... 160
Readiness for Inspection and Maintenance (I/M) Testing................................................... 160
Center Console
..............................................143
Console Refrigerator and Freezer.................143
Second Row Center Console.......................... 143
Changing a Bulb..........................................260 Brake and Rear Lamps, Rear Direction
Indicator and Reversing Lamp.................262
Front Direction Indicator and Front Parking Lamp.................................................................. 261
Front Fog Lamp.................................................. 262
Headlamp.............................................................. 261
Headlamp Low Beam and Headlamp High Beam.................................................................. 261
LED Lamps........................................................... 263
License Plate Lamp.......................................... 263
Changing a Fuse............................................241 Fuses....................................................................... 241
Changing a Road Wheel
...........................293
Dissimilar Spare Wheel and Tire Assembly
Information..................................................... 293
Tire Change Procedure.................................... 294
Changing the 12V Battery.........................256
Changing the Engine Air Filter................263
Changing the Wiper Blades
.....................258
Front Wiper Blades........................................... 258
Rear Window Wiper Blade............................. 258
Checking MyKey System Status...............59 MyKey Distance.................................................... 59
Number of Admin Keys...................................... 59
Number of MyKeys.............................................. 59
Checking the Wiper Blades......................257 Child Restraint and Seatbelt
Maintenance..................................................41
Child Restraint Positioning
.........................30
Child Safety........................................................17
General Information............................................. 17
Child Safety Locks..........................................32 Left-Hand Side...................................................... 33
Right-Hand Side................................................... 33
Cleaning Leather Seats
.............................269
Cleaning Products.......................................265 Materials............................................................... 265
Cleaning the Engine....................................267
Cleaning the Exterior..................................265 Cleaning the Headlamps................................ 266
Exterior Chrome Parts..................................... 266
Exterior Plastic Parts........................................ 266
Stripes or Graphics........................................... 266
Underbody........................................................... 266
Under Hood......................................................... 266
Cleaning the Instrument Panel and Instrument Cluster Lens........................268
Cleaning the Interior...................................268 Mirrors.................................................................... 268
Cleaning the Wheels
..................................270
Cleaning the Windows and Wiper Blades............................................................267
Clearing All MyKeys
.......................................58
Climate............................................................392
Climate Control
..............................................112
Climate Controlled Seats..........................135
Cooled Seats........................................................ 135
Heated Seats........................................................ 135
Collision Warning System.........................199 PRINCIPLE OF OPERATION........................... 199
Coolant Check See: Engine Coolant Check............................ 249
Crash Sensors and Airbag Indicator
.......50
Creating a MyKey...........................................58
Programming and Changing Configurable
Settings............................................................... 58
Cross Traffic Alert.........................................196 False Alerts........................................................... 198
Switching the System Off and On...............198
System Errors....................................................... 198
System Lights, Messages and Audible Alerts................................................................... 197
System Limitations............................................ 198
Using the System............................................... 196
501
Flex (TP3) , enUSA, Edition date: 201803, Second-Printing Index