brake light FORD FOCUS 2015 3.G Owners Manual
[x] Cancel search | Manufacturer: FORD, Model Year: 2015, Model line: FOCUS, Model: FORD FOCUS 2015 3.GPages: 453, PDF Size: 5.32 MB
Page 11 of 453
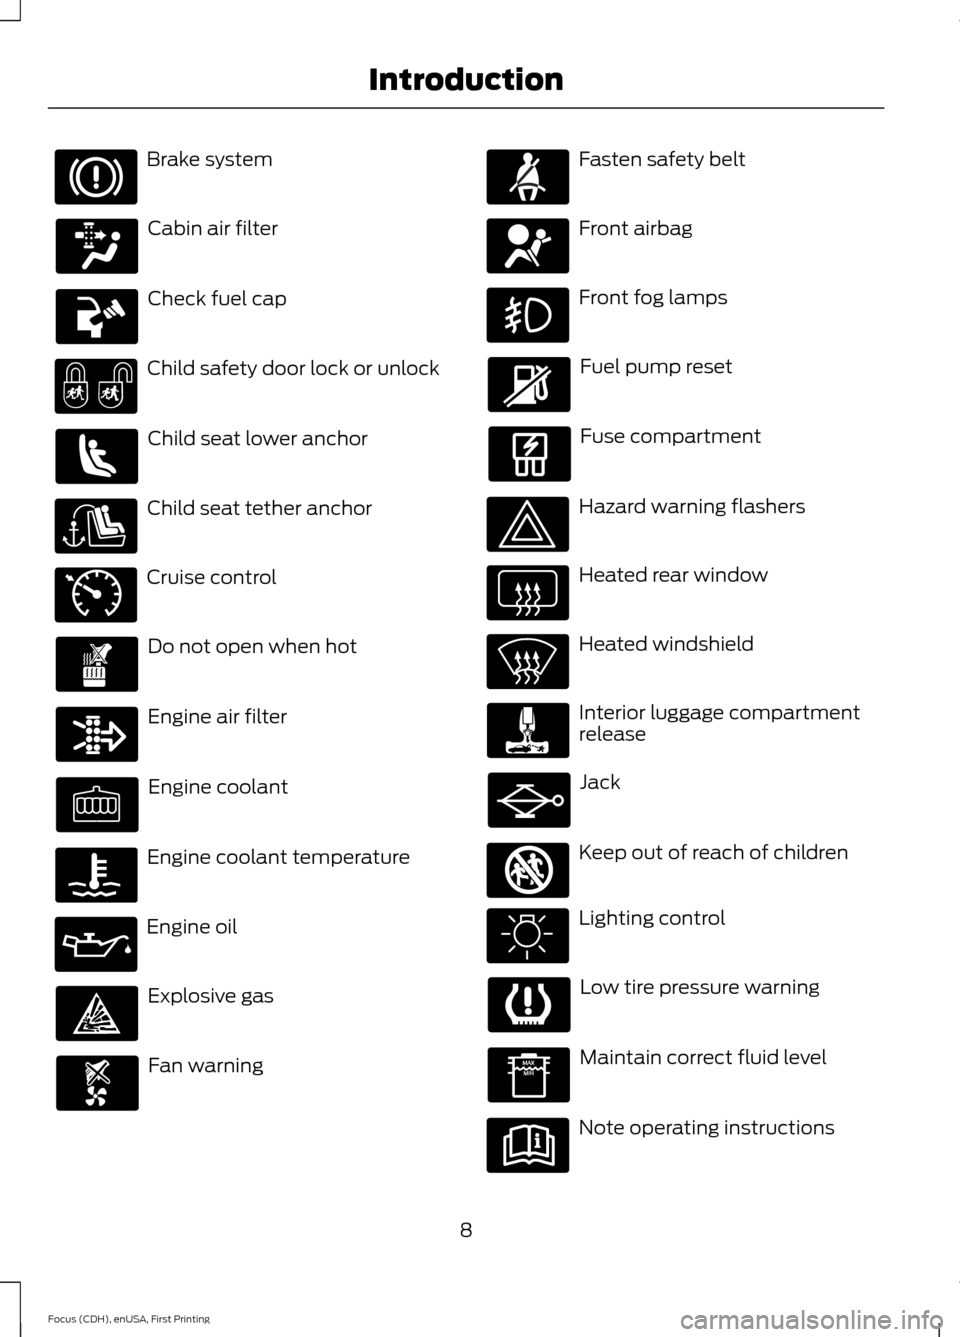
Brake system
Cabin air filter
Check fuel cap
Child safety door lock or unlock
Child seat lower anchor
Child seat tether anchor
Cruise control
Do not open when hot
Engine air filter
Engine coolant
Engine coolant temperature
Engine oil
Explosive gas
Fan warning Fasten safety belt
Front airbag
Front fog lamps
Fuel pump reset
Fuse compartment
Hazard warning flashers
Heated rear window
Heated windshield
Interior luggage compartment
release
Jack
Keep out of reach of children
Lighting control
Low tire pressure warning
Maintain correct fluid level
Note operating instructions
8
Focus (CDH), enUSA, First Printing Introduction E71340 E161353
Page 38 of 453
Pregnant women should always wear their
safety belt. The lap belt portion of a
combination lap and shoulder belt should
be positioned low across the hips below
the belly and worn as tight as comfort will
allow. The shoulder belt should be
positioned to cross the middle of the
shoulder and the center of the chest.
Safety Belt Locking Modes
WARNINGS
After any vehicle crash, the safety
belt system at all passenger seating
positions must be checked by an
authorized dealer to verify that the
automatic locking retractor feature for
child seats is still functioning properly. In
addition, all safety belts should be checked
for proper function. The belt and retractor assembly
must be replaced if the safety belt
assembly automatic locking retractor
feature or any other safety belt function is
not operating properly when checked by
an authorized dealer. Failure to replace the
belt and retractor assembly could increase
the risk of injury in crashes. All safety restraints in the vehicle are
combination lap and shoulder belts. The
driver safety belt has the first type of
locking mode. The front outboard
passenger and rear seat safety belts have
both types of locking modes described as
follows: Vehicle Sensitive Mode
This is the normal retractor mode, which
allows free shoulder belt length
adjustment to your movements and
locking in response to vehicle movement.
For example, if the driver brakes suddenly
or turns a corner sharply, or the vehicle
receives an impact of about 5 mph
(8 km/h) or more, the combination safety
belts will lock to help reduce forward
movement of the driver and passengers.
In addition, the retractor is designed to lock
if the webbing is pulled out too quickly. If
this occurs, let the belt retract slightly and
pull webbing out again in a slow and
controlled manner.
Automatic Locking Mode
In this mode, the shoulder belt is
automatically pre-locked. The belt will still
retract to remove any slack in the shoulder
belt. The automatic locking mode is not
available on the driver safety belt.
When to Use the Automatic Locking
Mode
This mode should be used any time a child
safety seat, except a booster, is installed
in passenger front or rear seating positions.
Children 12 years old and under should be
properly restrained in a rear seating
position whenever possible. See
Child
Safety (page 20).
35
Focus (CDH), enUSA, First Printing Safety Belts
Page 41 of 453
Then...
If...
The Belt-Minder feature will not activate.
You and the front seat passenger buckle
your safety belts before you switch the
ignition on or less than 1-2 minutes elapse after you switch the ignition on...
The Belt-Minder feature activates, the
safety belt warning light illuminates and a warning tone sounds for 6 seconds every
25 seconds, repeating for about 5 minutes or until you and the front seat passenger buckle your safety belts.
You or the front seat passenger do not
buckle your safety belts before your vehicle reaches at least 6 mph (9.7 km/h) and 1-2
minutes elapse after you switch the ignition on...
The Belt-Minder feature activates, the
safety belt warning light illuminates and a warning tone sounds for 6 seconds every
25 seconds, repeating for about 5 minutes or until you and the front seat passenger buckle your safety belts.
The safety belt for the driver or front
passenger is unbuckled for about 1 minute
while the vehicle is traveling at least 6 mph (9.7 km/h) and more than 1-2 minutes
elapse after you switch the ignition on...
Deactivating and Activating the
Belt-Minder Feature WARNING
While the system allows you to
deactivate it, this system is designed
to improve your chances of being
safely belted and surviving an accident.
We recommend you leave the system
activated for yourself and others who may
use the vehicle. Note:
The driver and front passenger
warnings switch on and off independently.
When you perform this procedure for one
seating position, do not buckle the other
position as this will terminate the process.
Note: If you are using MyKey ™, you cannot
disable the Belt-Minder. Also, if you have
previously disabled the Belt-Minder, it will
be re-enabled during the use of MyKey ™.
See MyKey ™ (page 58). Read Steps 1 - 4 thoroughly before
proceeding with the programming
procedure.
Before following the procedure, make sure
that:
•
The parking brake is set.
• The transmission is in park (P)
(automatic transmission) or neutral
(N) (manual transmission).
• The ignition is off.
• The driver and front passenger safety
belts are unbuckled.
1. Switch the ignition on. Do not start the
vehicle.
2. Wait until the safety belt warning light turns off (about one minute). After
Step 2, wait an additional 5 seconds
before proceeding with Step 3. Once
you start Step 3, you must complete
the procedure within 60 seconds.
38
Focus (CDH), enUSA, First Printing Safety Belts
Page 84 of 453
DAYTIME RUNNING LAMPS
WARNING
The daytime running lamps system
does not activate the rear lamps and
may not provide adequate lighting
during low visibility driving conditions. Also,
the autolamps switch position may not
activate the headlamps in all low visibility
conditions, such as daytime fog. Make sure
the headlamps are switched to auto or on,
as appropriate, during all low visibility
conditions. Failure to do so may result in a
crash. Type 1 - Conventional (Non-
Configurable)
The daytime running lamps turn on when:
1. The ignition is switched to the on
position.
2. The transmission is not in park (P) for vehicles with automatic transmissions
or the parking brake is released for
vehicles with manual transmissions.
3. The lighting control is in the off, parking
lamp or autolamps positions.
4. The headlamps are off.
Type 2 - Configurable
Switch the daytime running lamps on or
off using the information display controls.
See Information Displays (page 96).
The daytime running lamps turn on when:
1. They are switched on in the information
display. See
Information Displays
(page 96).
2. The ignition is switched to the on position.
3. The transmission is not in park (P) for vehicles with automatic transmissions
or the parking brake is released for
vehicles with manual transmissions. 4.
The lighting control is in the autolamps
position.
5. The headlamps are off.
The other lighting control switch positions
do not activate the daytime running lamps,
and you can use them to temporarily
override autolamp control.
When switched off in the information
display, the daytime running lamps are off
in all lighting control switch positions.
AUTOMATIC HIGH BEAM
CONTROL
(If Equipped)
The system automatically turns on the high
beams if it is dark enough and no other
traffic is present. When it detects the
headlights of an approaching vehicle, the
rear lamps of the preceding vehicle or
street lighting, the system turns off the high
beams before they distract other drivers.
The low beams remain on.
Note: If it appears that automatic high
beam is not functioning properly, check the
windshield in front of the camera for a
blockage. A clear view of the road is required
for proper system operation. Make sure that
authorized personnel repair any windshield
damage in the area of the camera's field of
view.
Note: If the system detects a blockage such
as bird droppings, bug splatter, snow or ice,
and you do not observe changes, the system
may go into low beam mode until you clear
the blockage. A message may also appear
in the information display noting the front
camera is blocked.
81
Focus (CDH), enUSA, First Printing Lighting
Page 95 of 453
WARNING LAMPS AND
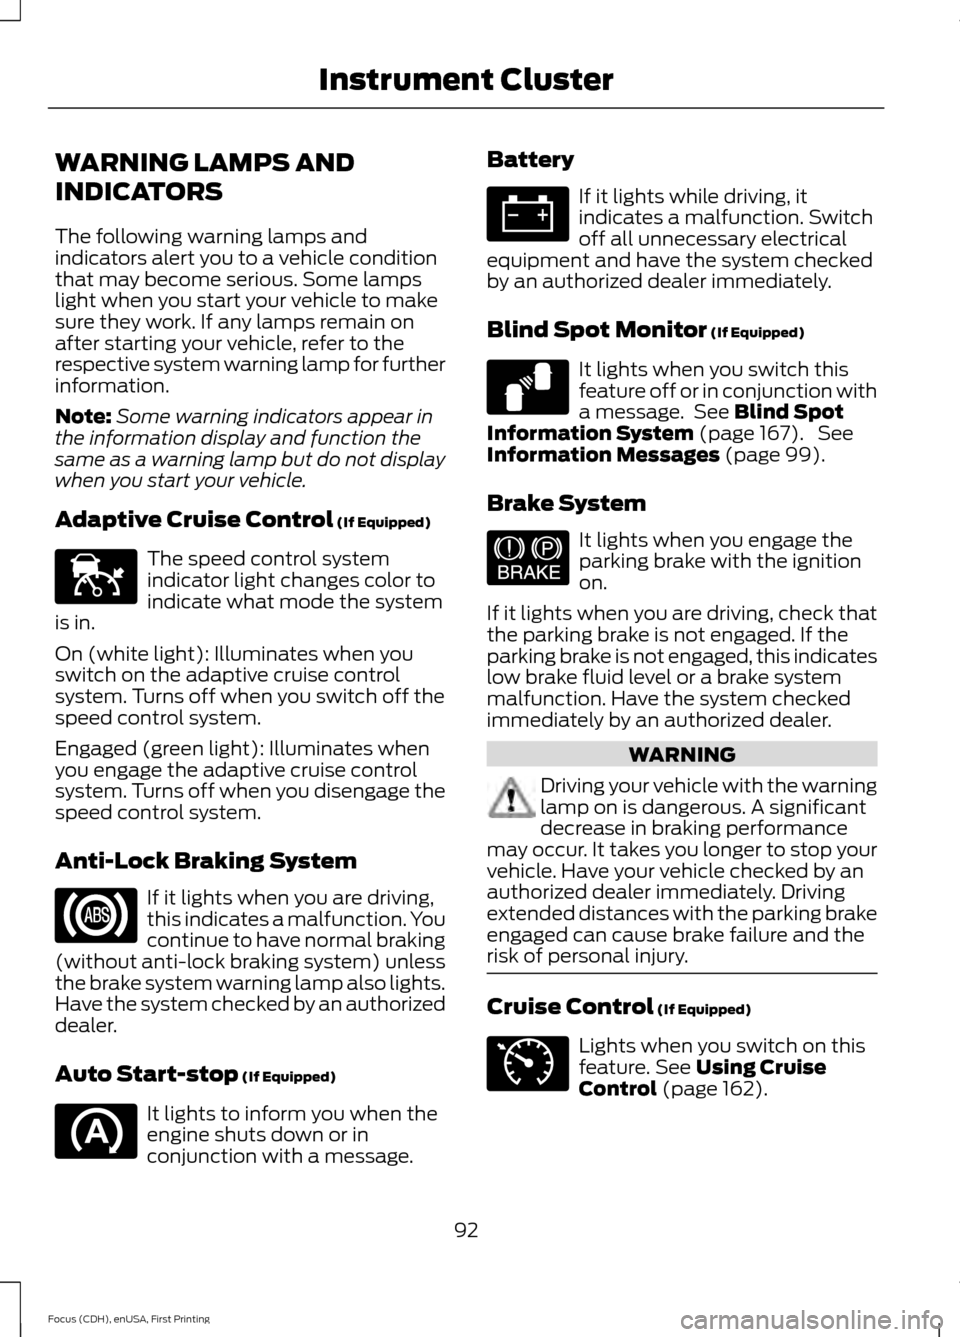
INDICATORS
The following warning lamps and
indicators alert you to a vehicle condition
that may become serious. Some lamps
light when you start your vehicle to make
sure they work. If any lamps remain on
after starting your vehicle, refer to the
respective system warning lamp for further
information.
Note:
Some warning indicators appear in
the information display and function the
same as a warning lamp but do not display
when you start your vehicle.
Adaptive Cruise Control (If Equipped) The speed control system
indicator light changes color to
indicate what mode the system
is in.
On (white light): Illuminates when you
switch on the adaptive cruise control
system. Turns off when you switch off the
speed control system.
Engaged (green light): Illuminates when
you engage the adaptive cruise control
system. Turns off when you disengage the
speed control system.
Anti-Lock Braking System If it lights when you are driving,
this indicates a malfunction. You
continue to have normal braking
(without anti-lock braking system) unless
the brake system warning lamp also lights.
Have the system checked by an authorized
dealer.
Auto Start-stop
(If Equipped) It lights to inform you when the
engine shuts down or in
conjunction with a message. Battery If it lights while driving, it
indicates a malfunction. Switch
off all unnecessary electrical
equipment and have the system checked
by an authorized dealer immediately.
Blind Spot Monitor
(If Equipped) It lights when you switch this
feature off or in conjunction with
a message. See
Blind Spot
Information System (page 167). See
Information Messages (page 99).
Brake System It lights when you engage the
parking brake with the ignition
on.
If it lights when you are driving, check that
the parking brake is not engaged. If the
parking brake is not engaged, this indicates
low brake fluid level or a brake system
malfunction. Have the system checked
immediately by an authorized dealer. WARNING
Driving your vehicle with the warning
lamp on is dangerous. A significant
decrease in braking performance
may occur. It takes you longer to stop your
vehicle. Have your vehicle checked by an
authorized dealer immediately. Driving
extended distances with the parking brake
engaged can cause brake failure and the
risk of personal injury. Cruise Control
(If Equipped)
Lights when you switch on this
feature.
See Using Cruise
Control (page 162).
92
Focus (CDH), enUSA, First Printing Instrument ClusterE144524 E124823 E144522 E71340
Page 106 of 453
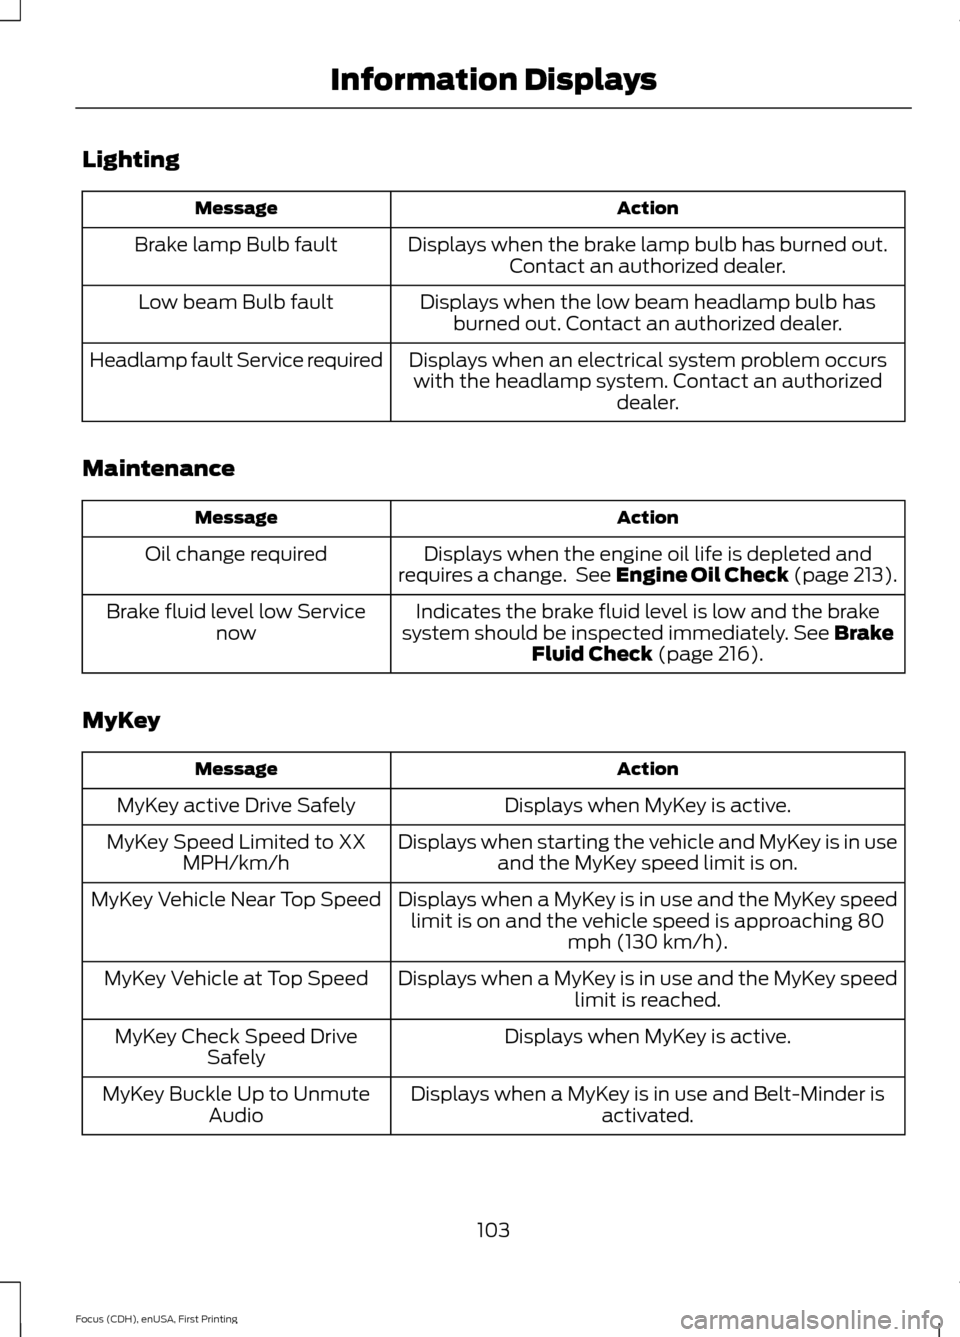
Lighting
Action
Message
Displays when the brake lamp bulb has burned out.Contact an authorized dealer.
Brake lamp Bulb fault
Displays when the low beam headlamp bulb hasburned out. Contact an authorized dealer.
Low beam Bulb fault
Displays when an electrical system problem occurswith the headlamp system. Contact an authorized dealer.
Headlamp fault Service required
Maintenance Action
Message
Displays when the engine oil life is depleted and
requires a change. See Engine Oil Check (page 213).
Oil change required
Indicates the brake fluid level is low and the brake
system should be inspected immediately. See Brake
Fluid Check (page 216).
Brake fluid level low Service
now
MyKey Action
Message
Displays when MyKey is active.
MyKey active Drive Safely
Displays when starting the vehicle and MyKey is in useand the MyKey speed limit is on.
MyKey Speed Limited to XX
MPH/km/h
Displays when a MyKey is in use and the MyKey speedlimit is on and the vehicle speed is approaching 80 mph (130 km/h).
MyKey Vehicle Near Top Speed
Displays when a MyKey is in use and the MyKey speedlimit is reached.
MyKey Vehicle at Top Speed
Displays when MyKey is active.
MyKey Check Speed Drive
Safely
Displays when a MyKey is in use and Belt-Minder isactivated.
MyKey Buckle Up to Unmute
Audio
103
Focus (CDH), enUSA, First Printing Information Displays
Page 133 of 453
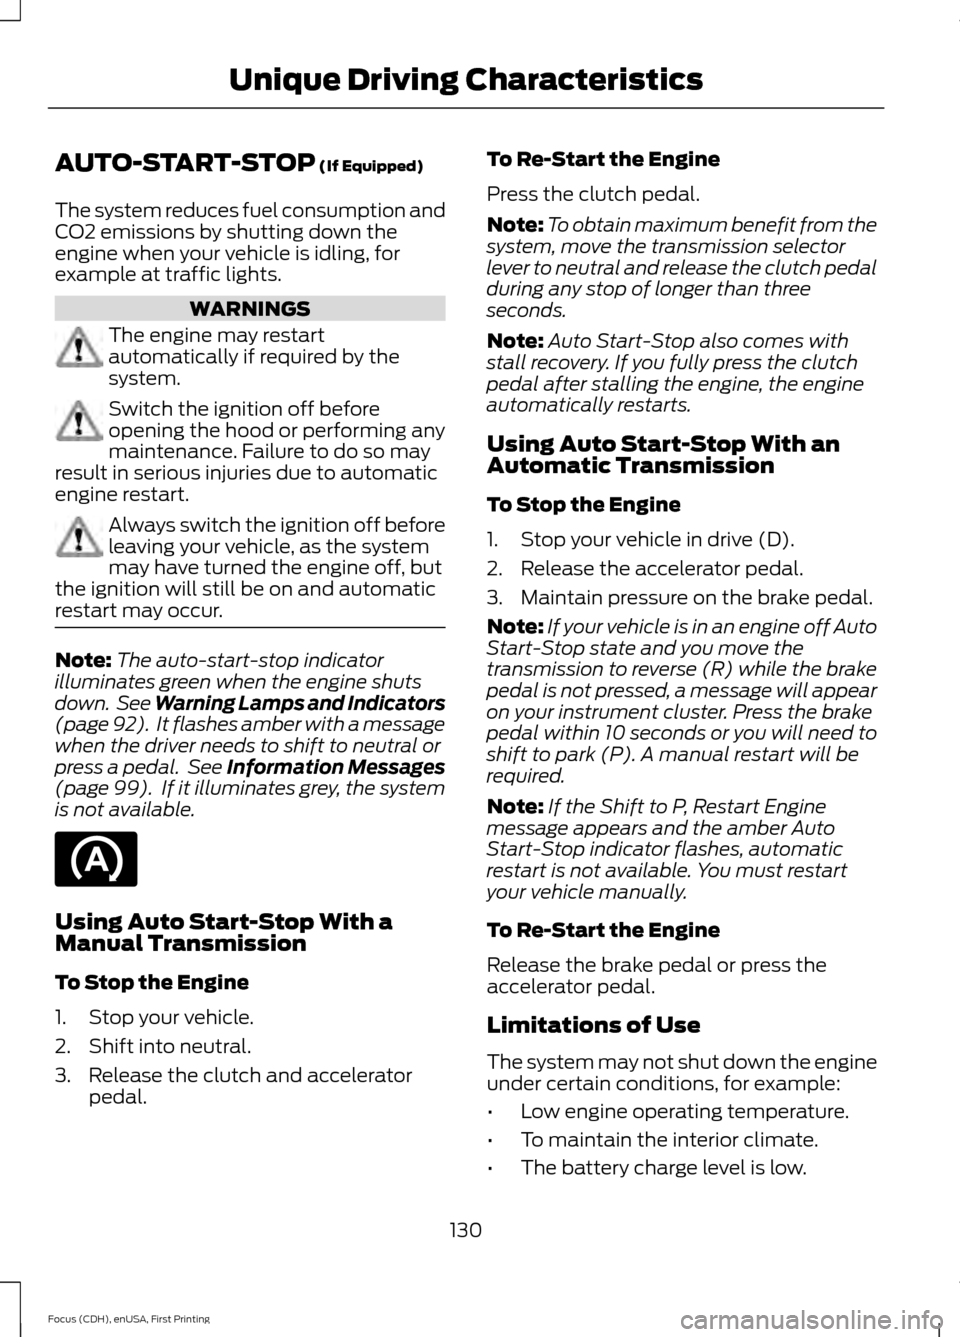
AUTO-START-STOP (If Equipped)
The system reduces fuel consumption and
CO2 emissions by shutting down the
engine when your vehicle is idling, for
example at traffic lights. WARNINGS
The engine may restart
automatically if required by the
system.
Switch the ignition off before
opening the hood or performing any
maintenance. Failure to do so may
result in serious injuries due to automatic
engine restart. Always switch the ignition off before
leaving your vehicle, as the system
may have turned the engine off, but
the ignition will still be on and automatic
restart may occur. Note:
The auto-start-stop indicator
illuminates green when the engine shuts
down. See Warning Lamps and Indicators
(page 92). It flashes amber with a message
when the driver needs to shift to neutral or
press a pedal. See Information Messages
(page
99). If it illuminates grey, the system
is not available. Using Auto Start-Stop With a
Manual Transmission
To Stop the Engine
1. Stop your vehicle.
2. Shift into neutral.
3. Release the clutch and accelerator
pedal. To Re-Start the Engine
Press the clutch pedal.
Note:
To obtain maximum benefit from the
system, move the transmission selector
lever to neutral and release the clutch pedal
during any stop of longer than three
seconds.
Note: Auto Start-Stop also comes with
stall recovery. If you fully press the clutch
pedal after stalling the engine, the engine
automatically restarts.
Using Auto Start-Stop With an
Automatic Transmission
To Stop the Engine
1. Stop your vehicle in drive (D).
2. Release the accelerator pedal.
3. Maintain pressure on the brake pedal.
Note: If your vehicle is in an engine off Auto
Start-Stop state and you move the
transmission to reverse (R) while the brake
pedal is not pressed, a message will appear
on your instrument cluster. Press the brake
pedal within 10 seconds or you will need to
shift to park (P). A manual restart will be
required.
Note: If the Shift to P, Restart Engine
message appears and the amber Auto
Start-Stop indicator flashes, automatic
restart is not available. You must restart
your vehicle manually.
To Re-Start the Engine
Release the brake pedal or press the
accelerator pedal.
Limitations of Use
The system may not shut down the engine
under certain conditions, for example:
• Low engine operating temperature.
• To maintain the interior climate.
• The battery charge level is low.
130
Focus (CDH), enUSA, First Printing Unique Driving Characteristics
Page 151 of 453
GENERAL INFORMATION
Note:
Occasional brake noise is normal. If
a metal-to-metal, continuous grinding or
continuous squeal sound is present, the
brake linings may be worn-out and an
authorized dealer should check them. If the
vehicle has continuous vibration or shudder
in the steering wheel while braking, an
authorized dealer should check your vehicle.
Note: Brake dust may accumulate on the
wheels, even under normal driving
conditions. Some dust is inevitable as the
brakes wear and does not contribute to
brake noise. See Cleaning the Alloy
Wheels (page 234). See
Warning Lamps and
Indicators (page 92).
Wet brakes result in reduced braking
efficiency. Gently press the brake pedal a
few times when driving from a car wash or
standing water to dry the brakes.
Brake Over Accelerator
In the event the accelerator pedal
becomes stuck or entrapped, apply steady
and firm pressure to the brake pedal to
slow the vehicle and reduce engine power.
If you experience this condition, apply the
brakes and bring your vehicle to a safe
stop. Switch the engine off, move the
transmission to park (P) and apply the
parking brake. Inspect the accelerator
pedal and the area around it for any items
or debris that may be obstructing its
movement. If none are found and the
condition persists, have your vehicle towed
to the nearest authorized dealer. Emergency Brake Assist
Emergency brake assist detects when you
brake heavily by measuring the rate at
which you press the brake pedal. It
provides maximum braking efficiency as
long as you press the pedal. Emergency
brake assist can reduce stopping distances
in critical situations.
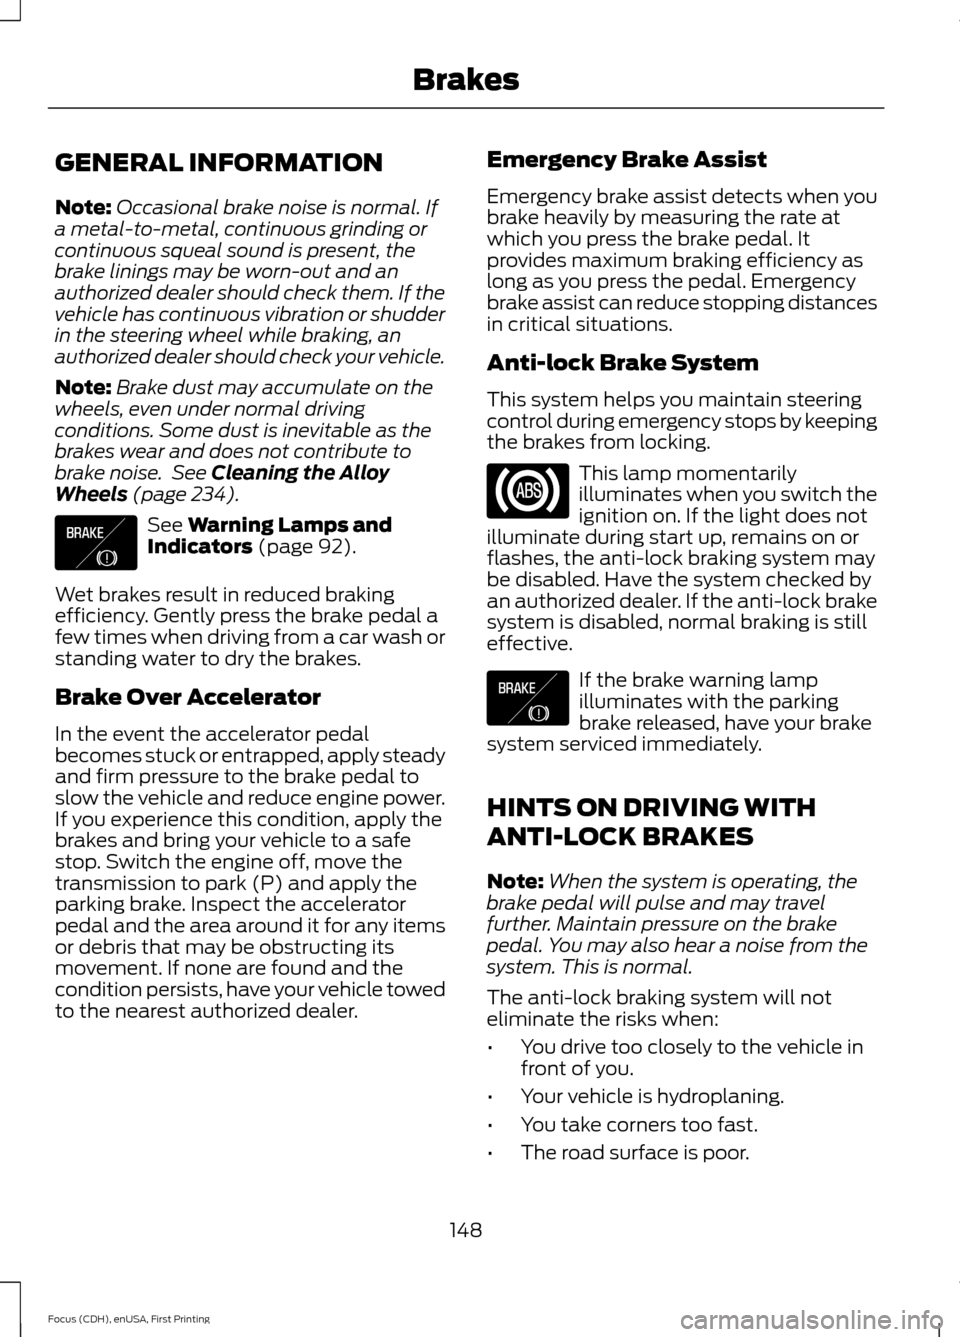
Anti-lock Brake System
This system helps you maintain steering
control during emergency stops by keeping
the brakes from locking.
This lamp momentarily
illuminates when you switch the
ignition on. If the light does not
illuminate during start up, remains on or
flashes, the anti-lock braking system may
be disabled. Have the system checked by
an authorized dealer. If the anti-lock brake
system is disabled, normal braking is still
effective. If the brake warning lamp
illuminates with the parking
brake released, have your brake
system serviced immediately.
HINTS ON DRIVING WITH
ANTI-LOCK BRAKES
Note: When the system is operating, the
brake pedal will pulse and may travel
further. Maintain pressure on the brake
pedal. You may also hear a noise from the
system. This is normal.
The anti-lock braking system will not
eliminate the risks when:
• You drive too closely to the vehicle in
front of you.
• Your vehicle is hydroplaning.
• You take corners too fast.
• The road surface is poor.
148
Focus (CDH), enUSA, First Printing BrakesE138644 E138644
Page 152 of 453
PARKING BRAKE
Vehicles With Automatic
Transmission
WARNING
Always set the parking brake fully
and leave your vehicle with the
transmission selector lever in
position P. Note:
If you park your vehicle on a hill and
facing uphill move the transmission selector
lever to position P and turn the steering
wheel away from the curb.
Note: If you park your vehicle on a hill and
facing downhill move the transmission
selector lever to position P and turn the
steering wheel toward the curb.
Vehicles With Manual
Transmission WARNING
Always set the parking brake fully.
Note:
If you park your vehicle on a hill and
facing uphill select first gear and turn the
steering wheel away from the curb.
Note: If you park your vehicle on a hill and
facing downhill select reverse gear and turn
the steering wheel toward the curb.
All Vehicles
Note: Do not press the release button while
pulling the lever up.
To apply the parking brake:
1. Press the foot brake pedal firmly.
2. Pull the parking brake lever up to its fullest extent.
To release the parking brake: 1. Press the brake pedal firmly.
2. Pull the lever up slightly.
3. Press the release button and push the
lever down.
HILL START ASSIST WARNINGS
The system does not replace the
parking brake. When you leave your
vehicle, always apply the parking
brake and shift the transmission into park
(P) for automatic transmission or first gear
for manual transmission. You must remain in your vehicle once
you have activated the system.
During all times, you are responsible
for controlling your vehicle,
supervising the system and
intervening, if required. If the engine is revved excessively, or
if a malfunction is detected, the
system will be deactivated.
The system makes it easier to pull away
when your vehicle is on a slope without the
need to use the parking brake.
When the system is active, your vehicle will
remain stationary on the slope for two to
three seconds after you release the brake
pedal. This allows you time to move your
foot from the brake to the accelerator
pedal. The brakes are released
automatically once the engine has
developed sufficient drive to prevent your
vehicle from rolling down the slope. This
is an advantage when pulling away on a
slope, for example from a car park ramp,
traffic lights or when reversing uphill into
a parking space.
149
Focus (CDH), enUSA, First Printing Brakes
Page 154 of 453
PRINCIPLE OF OPERATION
The traction control system helps avoid
drive wheel spin and loss of traction.
If your vehicle begins to slide, the system
applies the brakes to individual wheels
and, when needed, reduces engine power
at the same time. If the wheels spin when
accelerating on slippery or loose surfaces,
the system reduces engine power in order
to increase traction.
USING TRACTION CONTROL
In certain situations for example, stuck in
snow or mud, turning the traction control
off may be beneficial as this allows the
wheels to spin with full engine power.
Depending on the type of system you have
on your vehicle, you can either turn the
system off using the information display
or by pressing the button.
Switching the System Off Using
the Information Display Controls
(If Equipped)
Your vehicle comes with this feature
already enabled. If required, you can switch
this feature off using the information
display controls. See (page 96).
Switching the System Off Using a
Switch
(If Equipped)
The button is located in the instrument
panel.
Press the button. You will see a message
in conjunction with an illuminated icon in
the display. Press the button again to
return the system to normal mode.
When you switch the traction control
system off, stability control remains fully
active. System Indicator Lights and
Messages WARNING
If a failure has been detected within
the AdvanceTrac system, the
stability control light will illuminate
steadily. Verify that the AdvanceTrac
system was not manually disabled through
the information display. If the stability
control light still illuminates steadily, have
the system serviced by an authorized
dealer immediately. Operating your vehicle
with AdvanceTrac disabled could lead to
an increased risk of loss of vehicle control,
vehicle rollover, personal injury and death. The stability control light
temporarily illuminates on
engine start-up and flashes
when a driving condition activates the
stability system. The stability control off light
temporarily illuminates on
engine start-up and stays on
when you turn the traction control system
off.
When you turn the traction control system
off or on, a message appears in the
information display showing system status.
151
Focus (CDH), enUSA, First Printing Traction ControlE138639