check oil FORD FUSION (AMERICAS) 2014 2.G Owners Manual
[x] Cancel search | Manufacturer: FORD, Model Year: 2014, Model line: FUSION (AMERICAS), Model: FORD FUSION (AMERICAS) 2014 2.GPages: 458, PDF Size: 27.89 MB
Page 7 of 458
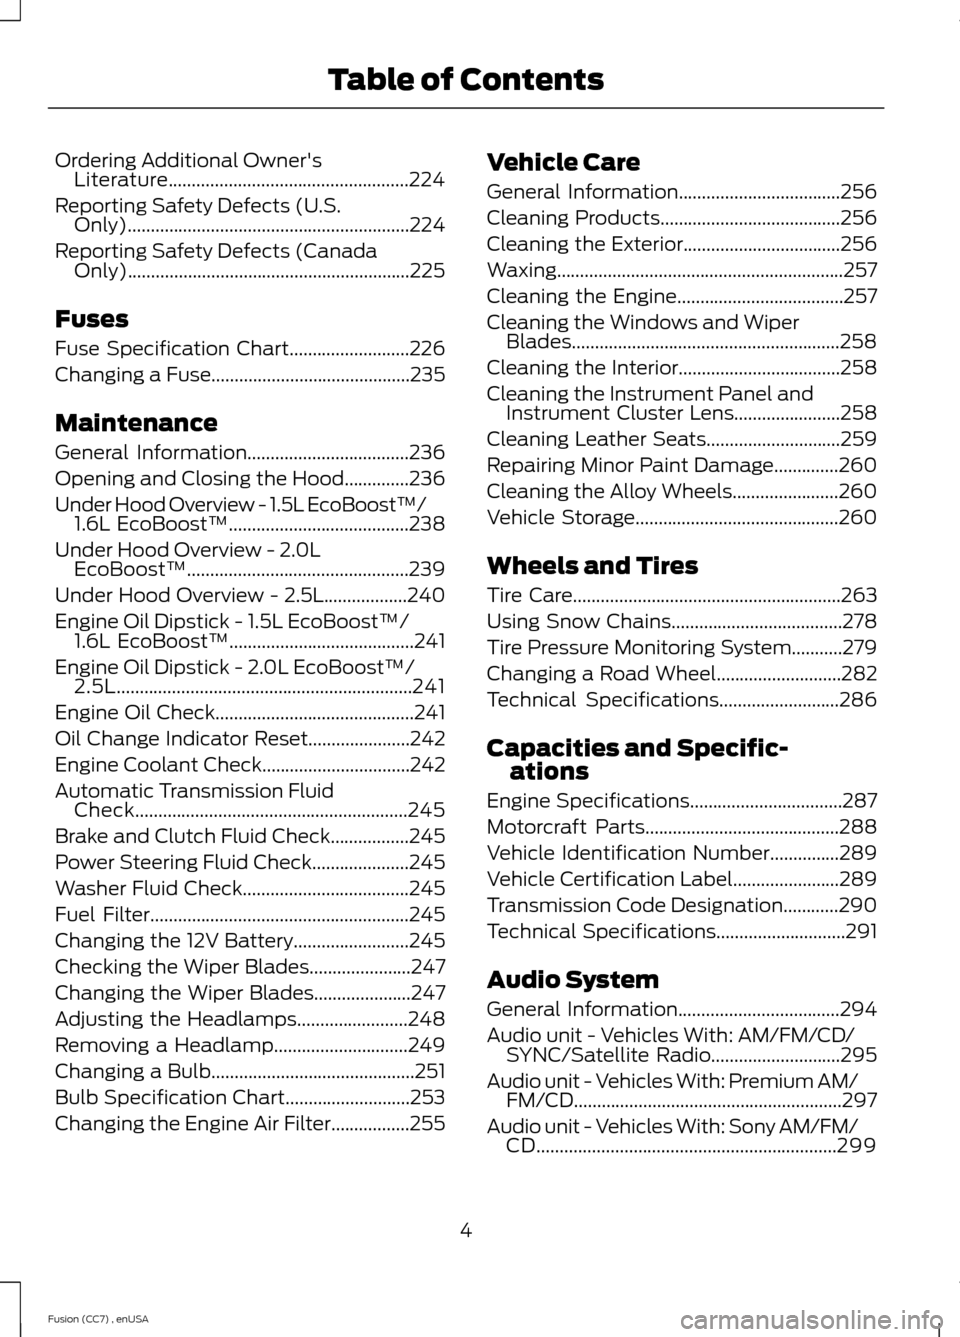
Ordering Additional Owner'sLiterature....................................................224
Reporting Safety Defects (U.S.Only).............................................................224
Reporting Safety Defects (CanadaOnly).............................................................225
Fuses
Fuse Specification Chart..........................226
Changing a Fuse...........................................235
Maintenance
General Information...................................236
Opening and Closing the Hood..............236
Under Hood Overview - 1.5L EcoBoost™/1.6L EcoBoost™.......................................238
Under Hood Overview - 2.0LEcoBoost™................................................239
Under Hood Overview - 2.5L..................240
Engine Oil Dipstick - 1.5L EcoBoost™/1.6L EcoBoost™........................................241
Engine Oil Dipstick - 2.0L EcoBoost™/2.5L................................................................241
Engine Oil Check...........................................241
Oil Change Indicator Reset......................242
Engine Coolant Check................................242
Automatic Transmission FluidCheck...........................................................245
Brake and Clutch Fluid Check.................245
Power Steering Fluid Check.....................245
Washer Fluid Check....................................245
Fuel Filter........................................................245
Changing the 12V Battery.........................245
Checking the Wiper Blades......................247
Changing the Wiper Blades.....................247
Adjusting the Headlamps........................248
Removing a Headlamp.............................249
Changing a Bulb............................................251
Bulb Specification Chart...........................253
Changing the Engine Air Filter.................255
Vehicle Care
General Information...................................256
Cleaning Products.......................................256
Cleaning the Exterior..................................256
Waxing..............................................................257
Cleaning the Engine....................................257
Cleaning the Windows and WiperBlades..........................................................258
Cleaning the Interior...................................258
Cleaning the Instrument Panel andInstrument Cluster Lens.......................258
Cleaning Leather Seats.............................259
Repairing Minor Paint Damage..............260
Cleaning the Alloy Wheels.......................260
Vehicle Storage............................................260
Wheels and Tires
Tire Care..........................................................263
Using Snow Chains.....................................278
Tire Pressure Monitoring System...........279
Changing a Road Wheel...........................282
Technical Specifications..........................286
Capacities and Specific-ations
Engine Specifications.................................287
Motorcraft Parts..........................................288
Vehicle Identification Number...............289
Vehicle Certification Label.......................289
Transmission Code Designation............290
Technical Specifications............................291
Audio System
General Information...................................294
Audio unit - Vehicles With: AM/FM/CD/SYNC/Satellite Radio............................295
Audio unit - Vehicles With: Premium AM/FM/CD..........................................................297
Audio unit - Vehicles With: Sony AM/FM/CD.................................................................299
4Fusion (CC7) , enUSATable of Contents
Page 11 of 458
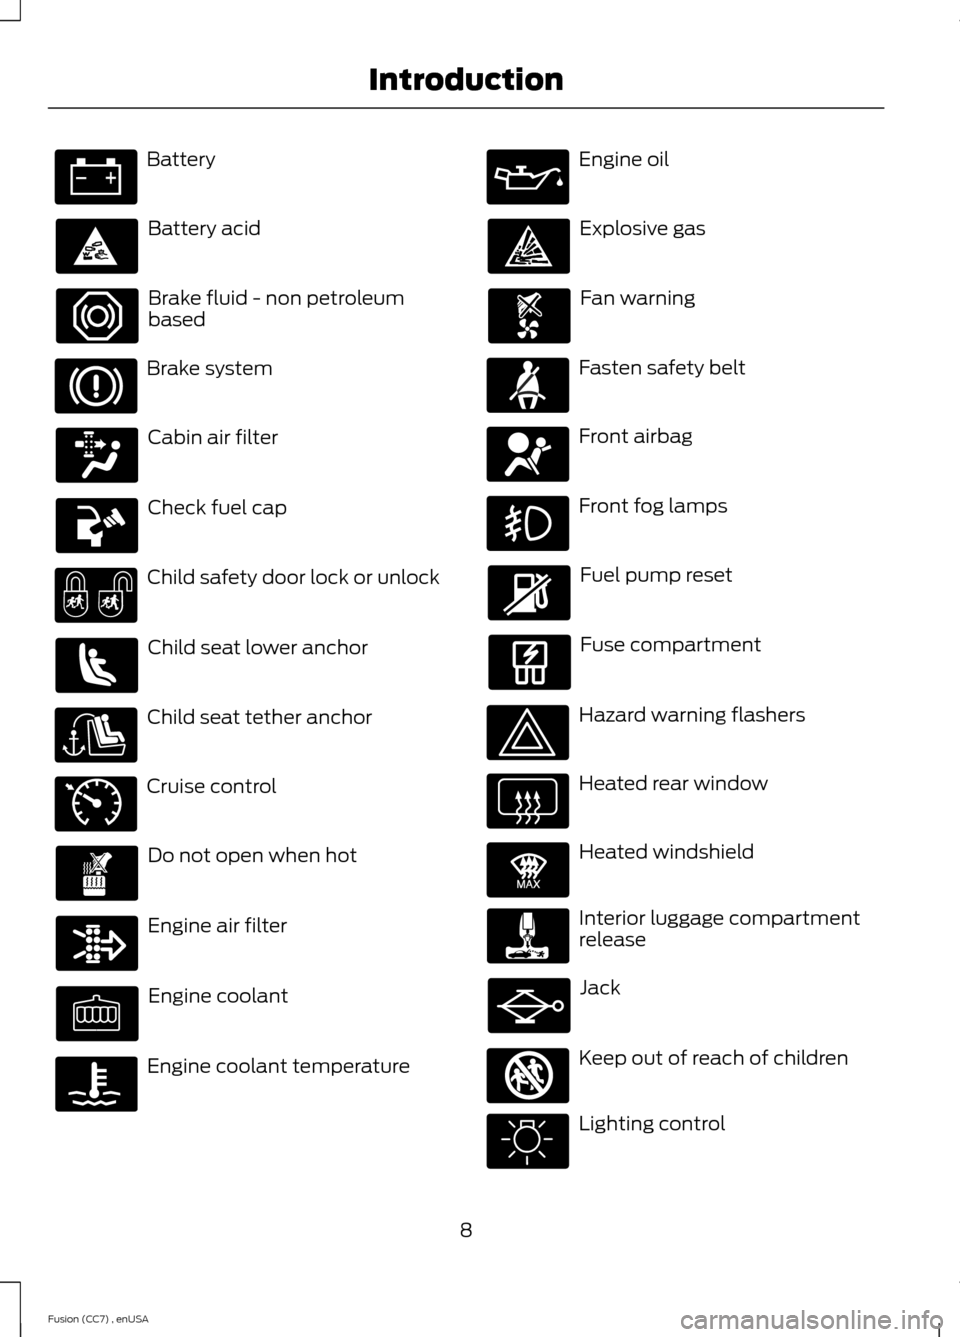
Battery
Battery acid
Brake fluid - non petroleumbased
Brake system
Cabin air filter
Check fuel cap
Child safety door lock or unlock
Child seat lower anchor
Child seat tether anchor
Cruise control
Do not open when hot
Engine air filter
Engine coolant
Engine coolant temperature
Engine oil
Explosive gas
Fan warning
Fasten safety belt
Front airbag
Front fog lamps
Fuel pump reset
Fuse compartment
Hazard warning flashers
Heated rear window
Heated windshield
Interior luggage compartmentrelease
Jack
Keep out of reach of children
Lighting control
8Fusion (CC7) , enUSAIntroduction E71340 E91392 E161353
Page 87 of 458
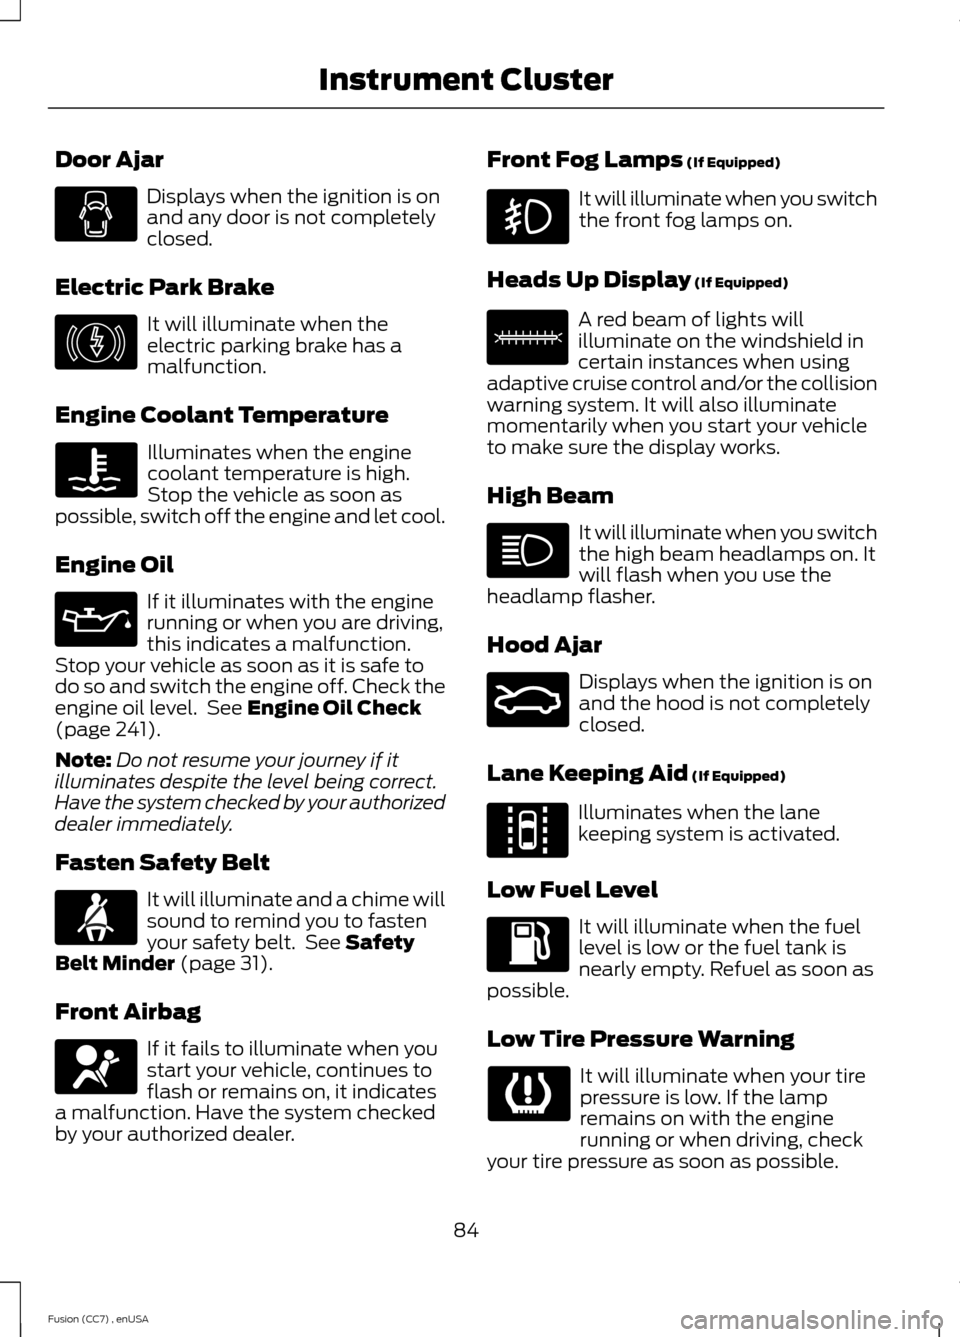
Door Ajar
Displays when the ignition is onand any door is not completelyclosed.
Electric Park Brake
It will illuminate when theelectric parking brake has amalfunction.
Engine Coolant Temperature
Illuminates when the enginecoolant temperature is high.Stop the vehicle as soon aspossible, switch off the engine and let cool.
Engine Oil
If it illuminates with the enginerunning or when you are driving,this indicates a malfunction.Stop your vehicle as soon as it is safe todo so and switch the engine off. Check theengine oil level. See Engine Oil Check(page 241).
Note:Do not resume your journey if itilluminates despite the level being correct.Have the system checked by your authorizeddealer immediately.
Fasten Safety Belt
It will illuminate and a chime willsound to remind you to fastenyour safety belt. See SafetyBelt Minder (page 31).
Front Airbag
If it fails to illuminate when youstart your vehicle, continues toflash or remains on, it indicatesa malfunction. Have the system checkedby your authorized dealer.
Front Fog Lamps (If Equipped)
It will illuminate when you switchthe front fog lamps on.
Heads Up Display (If Equipped)
A red beam of lights willilluminate on the windshield incertain instances when usingadaptive cruise control and/or the collisionwarning system. It will also illuminatemomentarily when you start your vehicleto make sure the display works.
High Beam
It will illuminate when you switchthe high beam headlamps on. Itwill flash when you use theheadlamp flasher.
Hood Ajar
Displays when the ignition is onand the hood is not completelyclosed.
Lane Keeping Aid (If Equipped)
Illuminates when the lanekeeping system is activated.
Low Fuel Level
It will illuminate when the fuellevel is low or the fuel tank isnearly empty. Refuel as soon aspossible.
Low Tire Pressure Warning
It will illuminate when your tirepressure is low. If the lampremains on with the enginerunning or when driving, checkyour tire pressure as soon as possible.
84Fusion (CC7) , enUSAInstrument Cluster E146190 E156133 E159324 E144813
Page 92 of 458
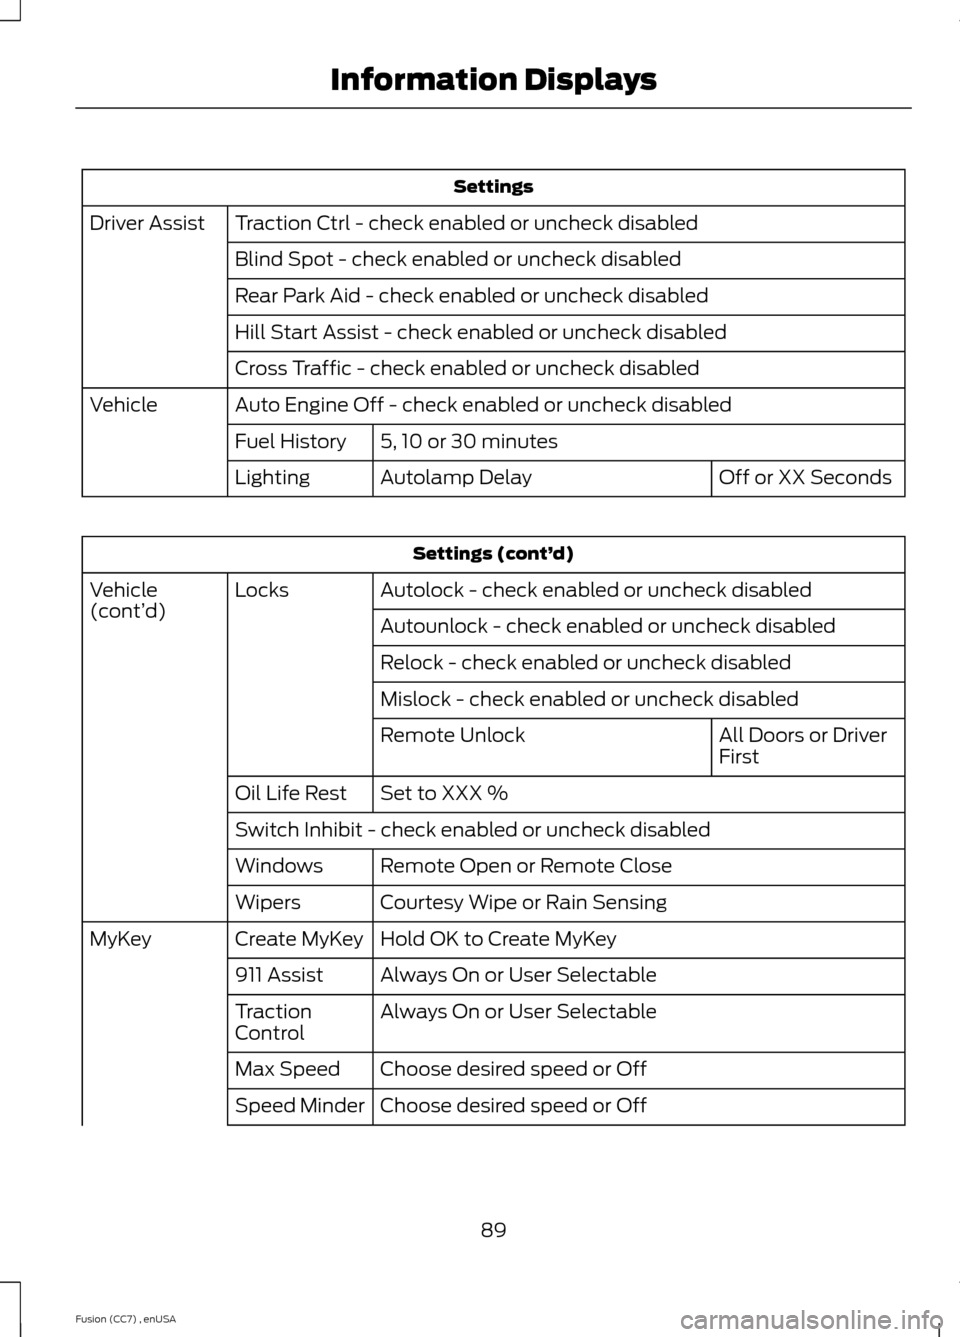
Settings
Traction Ctrl - check enabled or uncheck disabledDriver Assist
Blind Spot - check enabled or uncheck disabled
Rear Park Aid - check enabled or uncheck disabled
Hill Start Assist - check enabled or uncheck disabled
Cross Traffic - check enabled or uncheck disabled
Auto Engine Off - check enabled or uncheck disabledVehicle
5, 10 or 30 minutesFuel History
Off or XX SecondsAutolamp DelayLighting
Settings (cont’d)
Autolock - check enabled or uncheck disabledLocksVehicle(cont’d)Autounlock - check enabled or uncheck disabled
Relock - check enabled or uncheck disabled
Mislock - check enabled or uncheck disabled
All Doors or DriverFirstRemote Unlock
Set to XXX %Oil Life Rest
Switch Inhibit - check enabled or uncheck disabled
Remote Open or Remote CloseWindows
Courtesy Wipe or Rain SensingWipers
Hold OK to Create MyKeyCreate MyKeyMyKey
Always On or User Selectable911 Assist
Always On or User SelectableTractionControl
Choose desired speed or OffMax Speed
Choose desired speed or OffSpeed Minder
89Fusion (CC7) , enUSAInformation Displays
Page 107 of 458
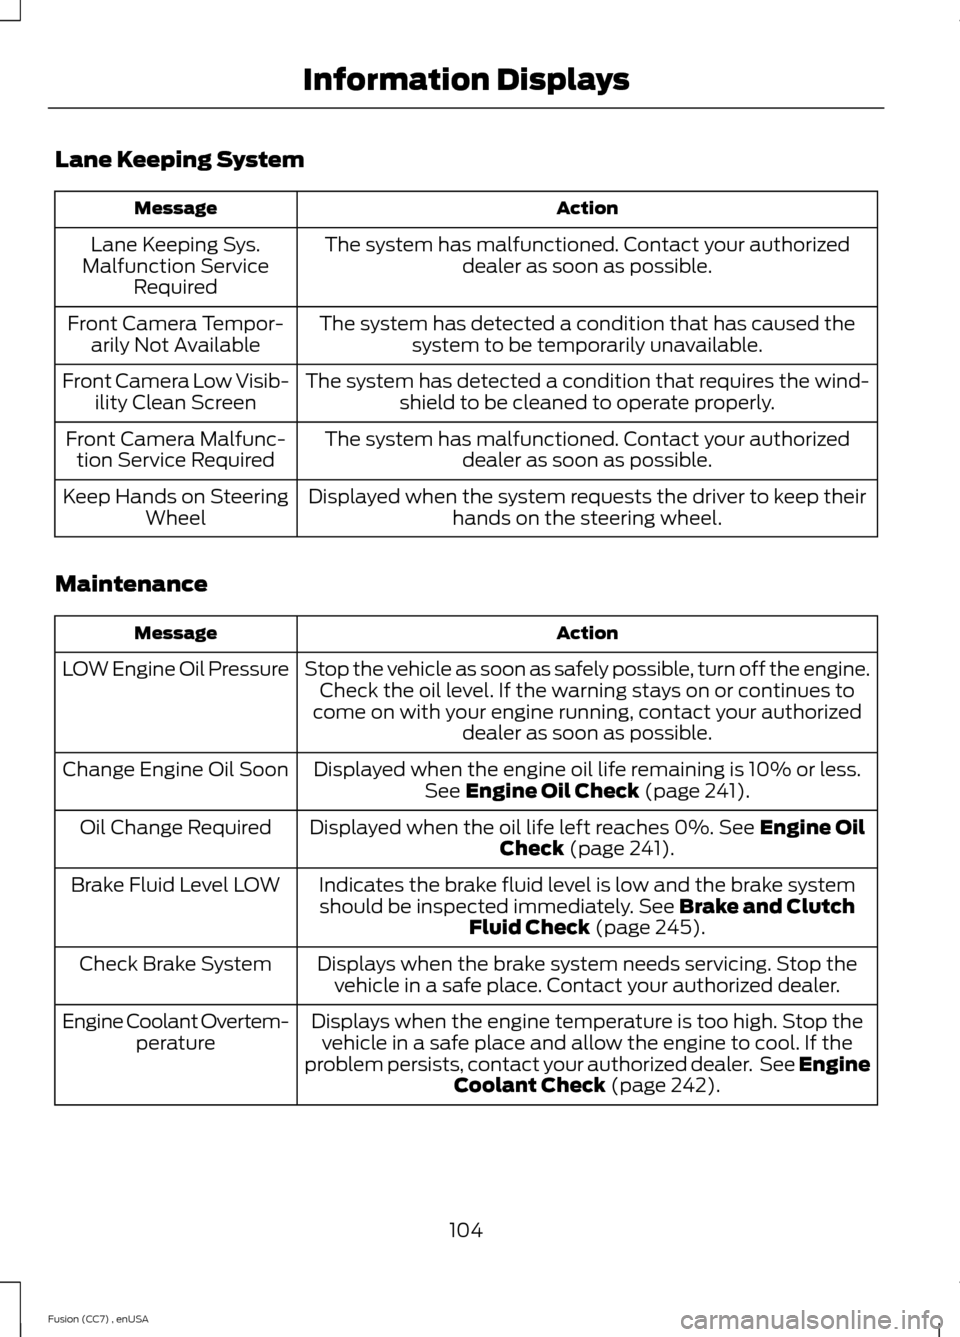
Lane Keeping System
ActionMessage
The system has malfunctioned. Contact your authorizeddealer as soon as possible.Lane Keeping Sys.Malfunction ServiceRequired
The system has detected a condition that has caused thesystem to be temporarily unavailable.Front Camera Tempor-arily Not Available
The system has detected a condition that requires the wind-shield to be cleaned to operate properly.Front Camera Low Visib-ility Clean Screen
The system has malfunctioned. Contact your authorizeddealer as soon as possible.Front Camera Malfunc-tion Service Required
Displayed when the system requests the driver to keep theirhands on the steering wheel.Keep Hands on SteeringWheel
Maintenance
ActionMessage
Stop the vehicle as soon as safely possible, turn off the engine.Check the oil level. If the warning stays on or continues tocome on with your engine running, contact your authorizeddealer as soon as possible.
LOW Engine Oil Pressure
Displayed when the engine oil life remaining is 10% or less.See Engine Oil Check (page 241).Change Engine Oil Soon
Displayed when the oil life left reaches 0%. See Engine OilCheck (page 241).Oil Change Required
Indicates the brake fluid level is low and the brake systemshould be inspected immediately. See Brake and ClutchFluid Check (page 245).
Brake Fluid Level LOW
Displays when the brake system needs servicing. Stop thevehicle in a safe place. Contact your authorized dealer.Check Brake System
Displays when the engine temperature is too high. Stop thevehicle in a safe place and allow the engine to cool. If theproblem persists, contact your authorized dealer. See EngineCoolant Check (page 242).
Engine Coolant Overtem-perature
104Fusion (CC7) , enUSAInformation Displays
Page 244 of 458
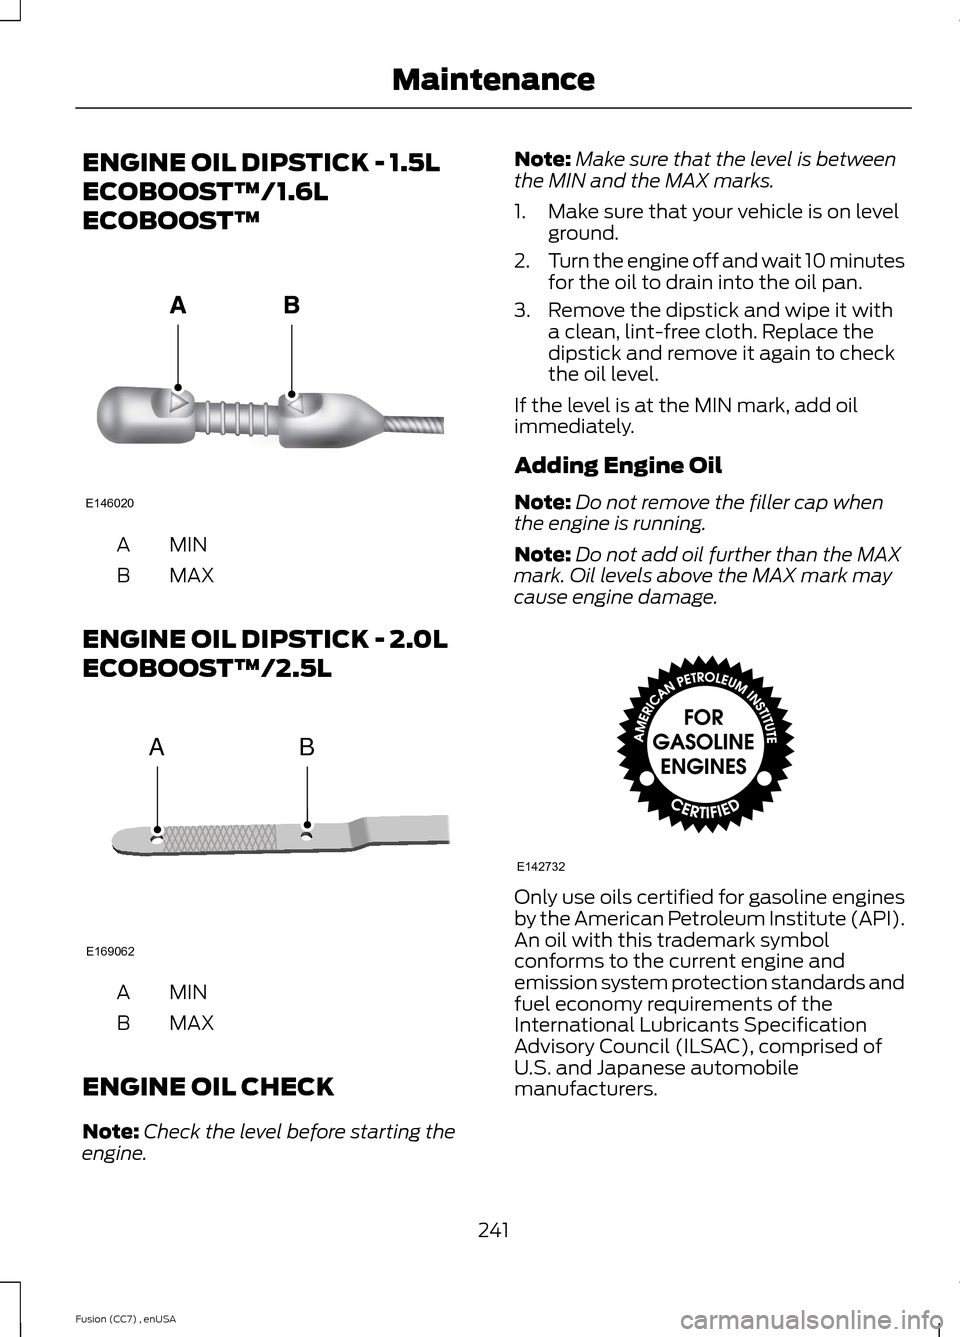
ENGINE OIL DIPSTICK - 1.5L
ECOBOOST™/1.6L
ECOBOOST™
MINA
MAXB
ENGINE OIL DIPSTICK - 2.0L
ECOBOOST™/2.5L
MINA
MAXB
ENGINE OIL CHECK
Note:Check the level before starting theengine.
Note:Make sure that the level is betweenthe MIN and the MAX marks.
1.Make sure that your vehicle is on levelground.
2.Turn the engine off and wait 10 minutesfor the oil to drain into the oil pan.
3.Remove the dipstick and wipe it witha clean, lint-free cloth. Replace thedipstick and remove it again to checkthe oil level.
If the level is at the MIN mark, add oilimmediately.
Adding Engine Oil
Note:Do not remove the filler cap whenthe engine is running.
Note:Do not add oil further than the MAXmark. Oil levels above the MAX mark maycause engine damage.
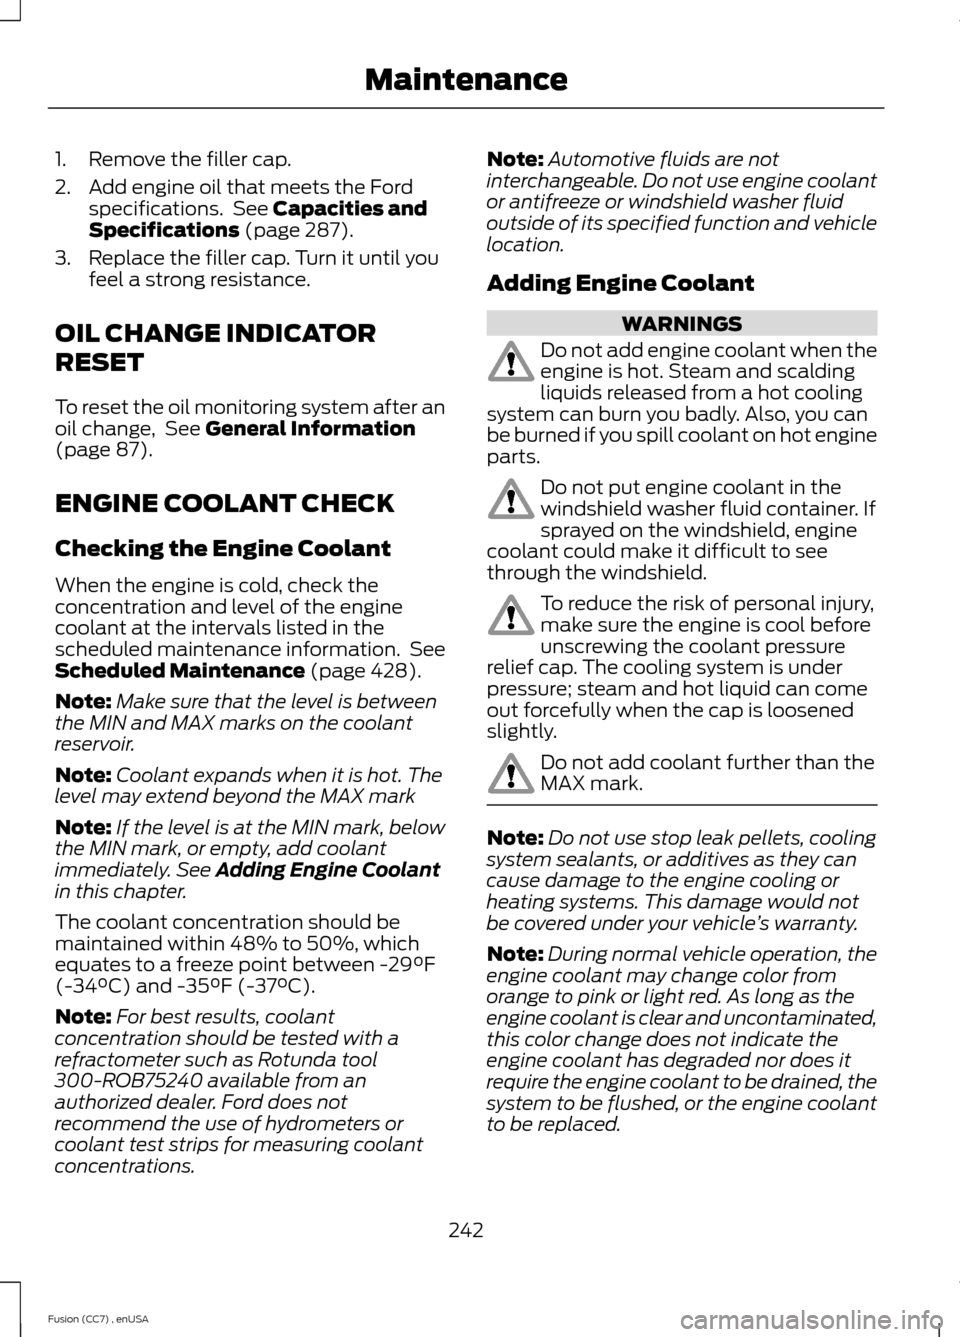
Only use oils certified for gasoline enginesby the American Petroleum Institute (API).An oil with this trademark symbolconforms to the current engine andemission system protection standards andfuel economy requirements of theInternational Lubricants SpecificationAdvisory Council (ILSAC), comprised ofU.S. and Japanese automobilemanufacturers.
241Fusion (CC7) , enUSAMaintenanceE146020 ABE169062 E142732
Page 245 of 458
1.Remove the filler cap.
2.Add engine oil that meets the Fordspecifications. See Capacities andSpecifications (page 287).
3.Replace the filler cap. Turn it until youfeel a strong resistance.
OIL CHANGE INDICATOR
RESET
To reset the oil monitoring system after anoil change, See General Information(page 87).
ENGINE COOLANT CHECK
Checking the Engine Coolant
When the engine is cold, check theconcentration and level of the enginecoolant at the intervals listed in thescheduled maintenance information. SeeScheduled Maintenance (page 428).
Note:Make sure that the level is betweenthe MIN and MAX marks on the coolantreservoir.
Note:Coolant expands when it is hot. Thelevel may extend beyond the MAX mark
Note:If the level is at the MIN mark, belowthe MIN mark, or empty, add coolantimmediately. See Adding Engine Coolantin this chapter.
The coolant concentration should bemaintained within 48% to 50%, whichequates to a freeze point between -29°F(-34°C) and -35°F (-37°C).
Note:For best results, coolantconcentration should be tested with arefractometer such as Rotunda tool300-ROB75240 available from anauthorized dealer. Ford does notrecommend the use of hydrometers orcoolant test strips for measuring coolantconcentrations.
Note:Automotive fluids are notinterchangeable. Do not use engine coolantor antifreeze or windshield washer fluidoutside of its specified function and vehiclelocation.
Adding Engine Coolant
WARNINGS
Do not add engine coolant when theengine is hot. Steam and scaldingliquids released from a hot coolingsystem can burn you badly. Also, you canbe burned if you spill coolant on hot engineparts.
Do not put engine coolant in thewindshield washer fluid container. Ifsprayed on the windshield, enginecoolant could make it difficult to seethrough the windshield.
To reduce the risk of personal injury,make sure the engine is cool beforeunscrewing the coolant pressurerelief cap. The cooling system is underpressure; steam and hot liquid can comeout forcefully when the cap is loosenedslightly.
Do not add coolant further than theMAX mark.
Note:Do not use stop leak pellets, coolingsystem sealants, or additives as they cancause damage to the engine cooling orheating systems. This damage would notbe covered under your vehicle’s warranty.
Note:During normal vehicle operation, theengine coolant may change color fromorange to pink or light red. As long as theengine coolant is clear and uncontaminated,this color change does not indicate theengine coolant has degraded nor does itrequire the engine coolant to be drained, thesystem to be flushed, or the engine coolantto be replaced.
242Fusion (CC7) , enUSAMaintenance
Page 251 of 458
Note:Make sure that the wiper blade locksinto place. Lower the wiper arm and bladeback to the windshield. The wiper arms willautomatically return to their normal positionwhen the ignition is turned on.
Replace wiper blades at least once peryear for optimum performance.
Poor wiper quality can be improved bycleaning the wiper blades and thewindshield.
ADJUSTING THE HEADLAMPS
Vertical Aim Adjustment
The headlamps on your vehicle areproperly aimed at the assembly plant. Ifyour vehicle has been in an accident, thealignment of your headlamps should bechecked by your authorized dealer.
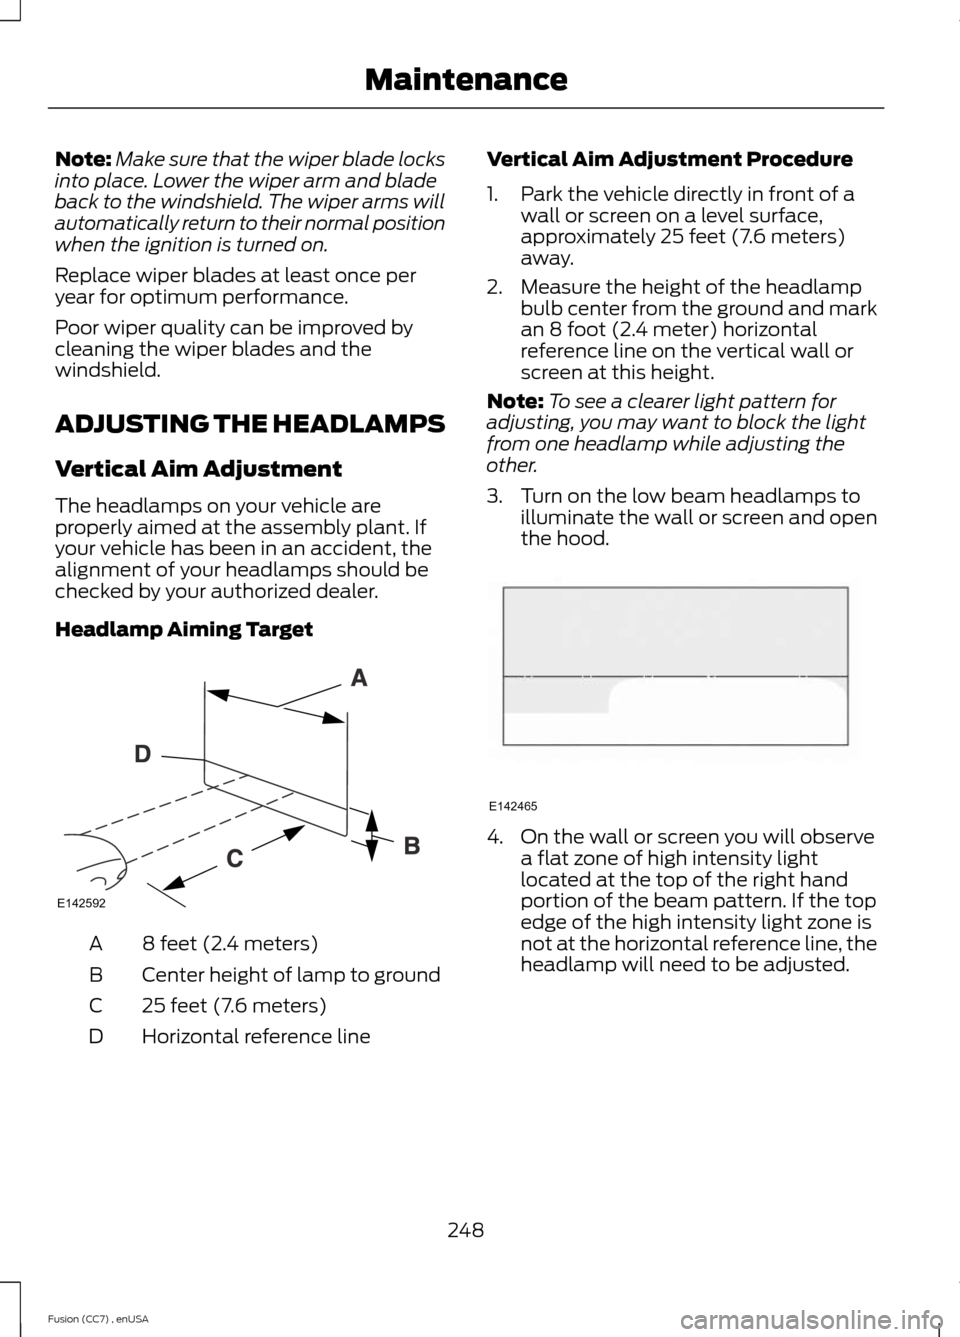
Headlamp Aiming Target
8 feet (2.4 meters)A
Center height of lamp to groundB
25 feet (7.6 meters)C
Horizontal reference lineD
Vertical Aim Adjustment Procedure
1.Park the vehicle directly in front of awall or screen on a level surface,approximately 25 feet (7.6 meters)away.
2.Measure the height of the headlampbulb center from the ground and markan 8 foot (2.4 meter) horizontalreference line on the vertical wall orscreen at this height.
Note:To see a clearer light pattern foradjusting, you may want to block the lightfrom one headlamp while adjusting theother.
3.Turn on the low beam headlamps toilluminate the wall or screen and openthe hood.
4.On the wall or screen you will observea flat zone of high intensity lightlocated at the top of the right handportion of the beam pattern. If the topedge of the high intensity light zone isnot at the horizontal reference line, theheadlamp will need to be adjusted.
248Fusion (CC7) , enUSAMaintenanceE142592 E142465
Page 262 of 458
Clean the instrument panel and clusterlens with a clean, damp, white cottoncloth, then use a clean and dry whitecotton cloth to dry these areas.
•Avoid cleaners or polishes that increasethe gloss of the upper portion of theinstrument panel. The dull finish in thisarea helps protect you fromundesirable windshield reflection.
•Be certain to wash or wipe your handsclean if you have been in contact withcertain products such as insectrepellent and suntan lotion in order toavoid possible damage to the interiorpainted surfaces.
•Do not use household or glass cleanersas these may damage the finish of theinstrument panel, interior trim andcluster lens.
•Do not allow air fresheners and handsanitizers to spill onto interior surfaces.If a spill occurs, wipe off immediately.Damage may not be covered by yourwarranty.
If a staining liquid like coffee or juice hasbeen spilled on the instrument panel or oninterior trim surfaces, clean as follows:
1.Wipe up spilled liquid using a clean,white, cotton cloth.
2.Wipe the surface with a damp, clean,white cotton cloth. For more thoroughcleaning, use a mild soap and watersolution. If the spot cannot becompletely cleaned by this method,the area may be cleaned using acommercially available cleaningproduct designed for automotiveinteriors.
3.If necessary, apply more soap andwater solution or cleaning product toa clean, white, cotton cloth and pressthe cloth onto the soiled area. Allowthis to set at room temperature for 30minutes.
4.Remove the soaked cloth and if it is notsoiled badly, use this cloth to clean thearea by using a rubbing motion for 60seconds.
5.Following this, wipe area dry with aclean, white, cotton cloth.
CLEANING LEATHER SEATS (IF
EQUIPPED)
For routine cleaning, wipe the surface witha soft, damp cloth. For more thoroughcleaning, wipe the surface with a mild soapand water solution. Dry the area with a softcloth.
If you cannot completely clean the leatherusing a mild soap and water solution, youcan try a commercially available leathercleaning product designed for automotiveinteriors.
Note:To check for compatibility, first testany cleaner or stain remover on aninconspicuous part of the leather.
You should:
•remove dust and loose dirt with avacuum cleaner
•clean spills and stains as quickly aspossible
•check for compatibility by first testingany cleaner or stain remover on aninconspicuous part of the leather.
Do not use the following products as thesemay damage the leather:
•oil/petroleum-based leatherconditioners
•household cleaners
•alcohol solutions
•solvents or cleaners intendedspecifically for rubber, vinyl andplastics.
259Fusion (CC7) , enUSAVehicle Care
Page 264 of 458
•Touch-up exposed or primed metal toprevent rust.
•Cover chrome and stainless steel partswith a thick coat of auto wax to preventdiscoloration. Re-wax as necessarywhen your vehicle is washed.
•Lubricate all hood, door and trunk lidhinges, and latches with a light gradeoil.
•Cover interior trim to prevent fading.
•Keep all rubber parts free from oil andsolvents.
Engine
•The engine oil and filter should bechanged prior to storage, as usedengine oil contain contaminates thatmay cause engine damage.
•Start the engine every 15 days. Run atfast idle until it reaches normaloperating temperature
•With your foot on the brake, shiftthrough all the gears while the engineis running.
Fuel system
•Fill the fuel tank with high-quality fueluntil the first automatic shutoff of thefuel pump nozzle.
Cooling system
•Protect against freezing temperatures.
•When removing your vehicle fromstorage, check coolant fluid level.Confirm there are no cooling systemleaks, and fluid is at the recommendedlevel.
Battery
•Check and recharge as necessary. Keepconnections clean.
•If storing your vehicle for more than 30days without recharging the battery, itmay be advisable to disconnect thebattery cables to ensure battery chargeis maintained for quick starting.
Note:If battery cables are disconnected, itwill be necessary to reset memory features.
Brakes
•Make sure brakes and parking brakeare fully released.
Tires
•Maintain recommended air pressure.
Miscellaneous
•Make sure all linkages, cables, leversand pins under your vehicle are coveredwith grease to prevent rust.
•Move vehicles at least 25 feet (8meters) every 15 days to lubricateworking parts and prevent corrosion.
Removing Vehicle From Storage
When your vehicle is ready to come out ofstorage, do the following:
•Wash your vehicle to remove any dirtor grease film build-up on windowsurfaces.
•Check windshield wipers for anydeterioration.
•Check under the hood for any foreignmaterial that may have collectedduring storage (mice/squirrel nests).
•Check the exhaust for any foreignmaterial that may have collectedduring storage.
•Check tire pressures and set tireinflation per the Tire Label.
261Fusion (CC7) , enUSAVehicle Care