display FORD FUSION HYBRID 2014 User Guide
[x] Cancel search | Manufacturer: FORD, Model Year: 2014, Model line: FUSION HYBRID, Model: FORD FUSION HYBRID 2014Pages: 473, PDF Size: 5.93 MB
Page 63 of 473
The factory-set code will appear in the
information display for a few seconds.
Note: The code may not display until after
any other warning messages first display.
INTERIOR LUGGAGE
COMPARTMENT RELEASE WARNINGS
Keep vehicle doors and luggage
compartment locked and keep keys
and remote transmitters out of a
child’s reach. Unsupervised children could
lock themselves in the trunk and risk injury.
Children should be taught not to play in
vehicles.
Do not leave children, unreliable
adults, or animals unattended in the
vehicle. On hot days, the
temperature in the trunk or vehicle interior
can rise very quickly. Exposure of people
or animals to these high temperatures for
even a short time can cause death or
serious heat-related injuries, including brain
damage. Small children are particularly at
risk.
Your vehicle is equipped with a release
handle that provides a means of escape
for children and adults if they become
locked inside the luggage compartment.
Adults should familiarize themselves with
the operation and location of the release
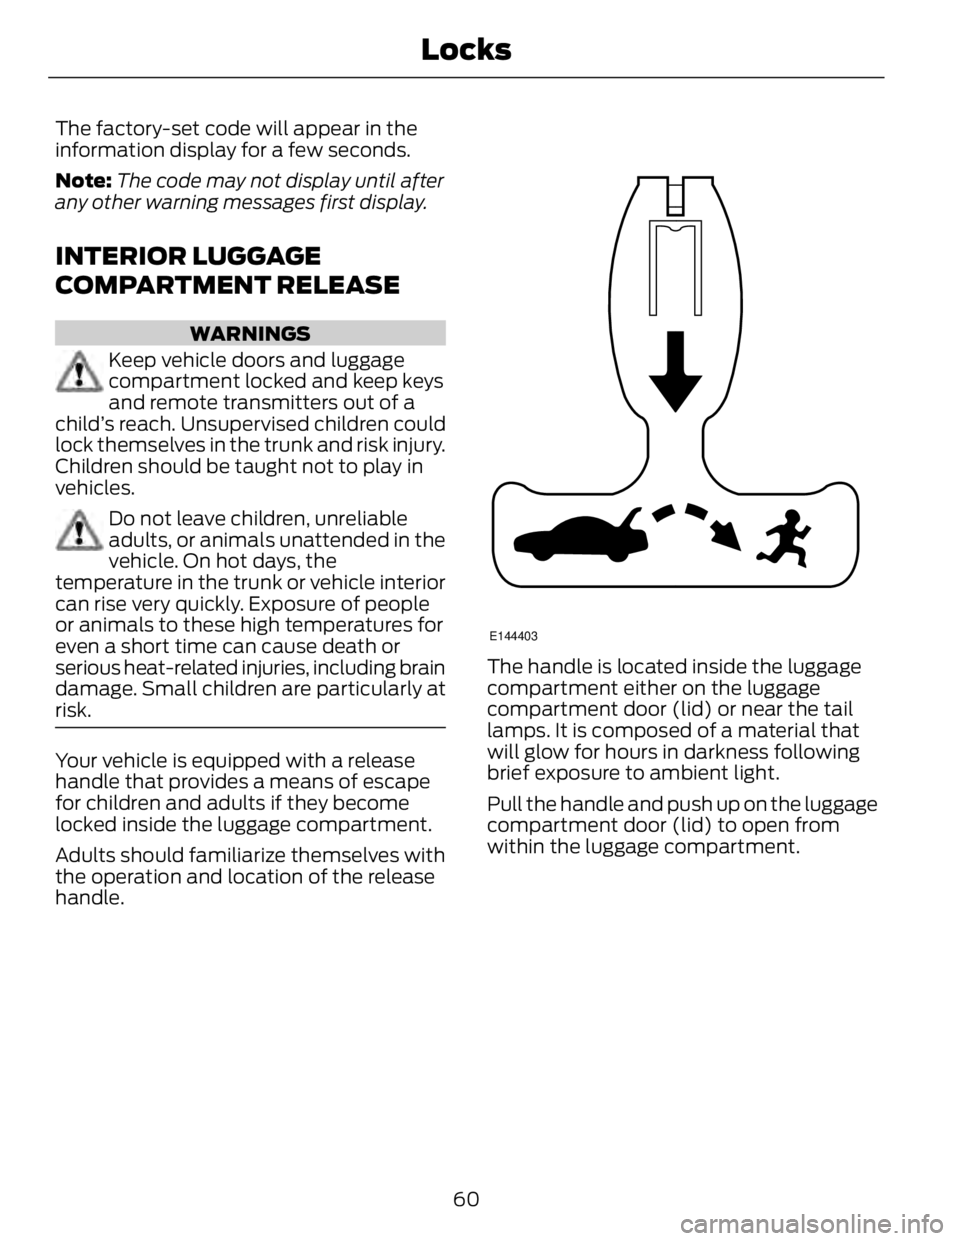
handle. E144403
The handle is located inside the luggage
compartment either on the luggage
compartment door (lid) or near the tail
lamps. It is composed of a material that
will glow for hours in darkness following
brief exposure to ambient light.
Pull the handle and push up on the luggage
compartment door (lid) to open from
within the luggage compartment.
60Locks
Page 64 of 473
PASSIVE ANTI-THEFT
SYSTEM Note: The system is not compatible with
non-Ford aftermarket remote start systems.
Use of these systems may result in vehicle
starting problems and a loss of security
protection.
Note: Metallic objects, electronic devices
or a second coded key on the same key
chain may cause vehicle starting problems
if they are too close to the key when starting
your vehicle. Prevent these objects from
touching the coded key while starting your
vehicle. Switch the ignition off, move all
objects on the key chain away from the
coded key and restart your vehicle if a
problem occurs.
Note: Do not leave a duplicate coded key
in your vehicle. Always take your keys and
lock all doors when leaving your vehicle.
SecuriLock® The system helps prevent your vehicle
from starting unless you use a coded key
programmed to your vehicle. Using the
wrong key may prevent your vehicle from
starting. A message may appear in the
information display.
If you are unable to start your vehicle with
a correctly coded key, a malfunction has
happened. A message may appear in the
information display.
Automatic Arming
Your vehicle arms immediately after
switching the ignition off.
Automatic Disarming
Switching the ignition on with a coded key
disarms your vehicle. Replacement Keys
Note: Your vehicle comes equipped with
two integrated keyhead transmitters or two
intelligent access keys.
The integrated keyhead transmitter
functions as a programmed ignition key
that operates all the locks and starts your
vehicle, as well as a remote control.
The intelligent access key functions as a
programmed key that operates the driver
door lock and activates the intelligent
access with push button start system, as
well as a remote control.
If your programmed transmitters or
standard SecuriLock coded keys
(integrated keyhead transmitters only) are
lost or stolen and you do not have an extra
coded key, you will need to have your
vehicle towed to an authorized dealer. You
need to erase the key codes from your
vehicle and program new coded keys.
Store an extra programmed key away from
your vehicle in a safe place to help prevent
any inconveniences. See your authorized
dealer to purchase additional spare or
replacement keys.
Programming a Spare Integrated
Keyhead Transmitter
Note: You can program a maximum of eight
coded keys to your vehicle. All eight can be
integrated keyhead transmitters.
You can program your own integrated
keyhead transmitter or standard
SecuriLock coded keys to your vehicle. This
procedure will program both the vehicle
immobilizer keycode and the remote entry
portion of the remote control to your
vehicle.
Only use integrated keyhead transmitters
or standard SecuriLock keys.
61Security
Page 68 of 473
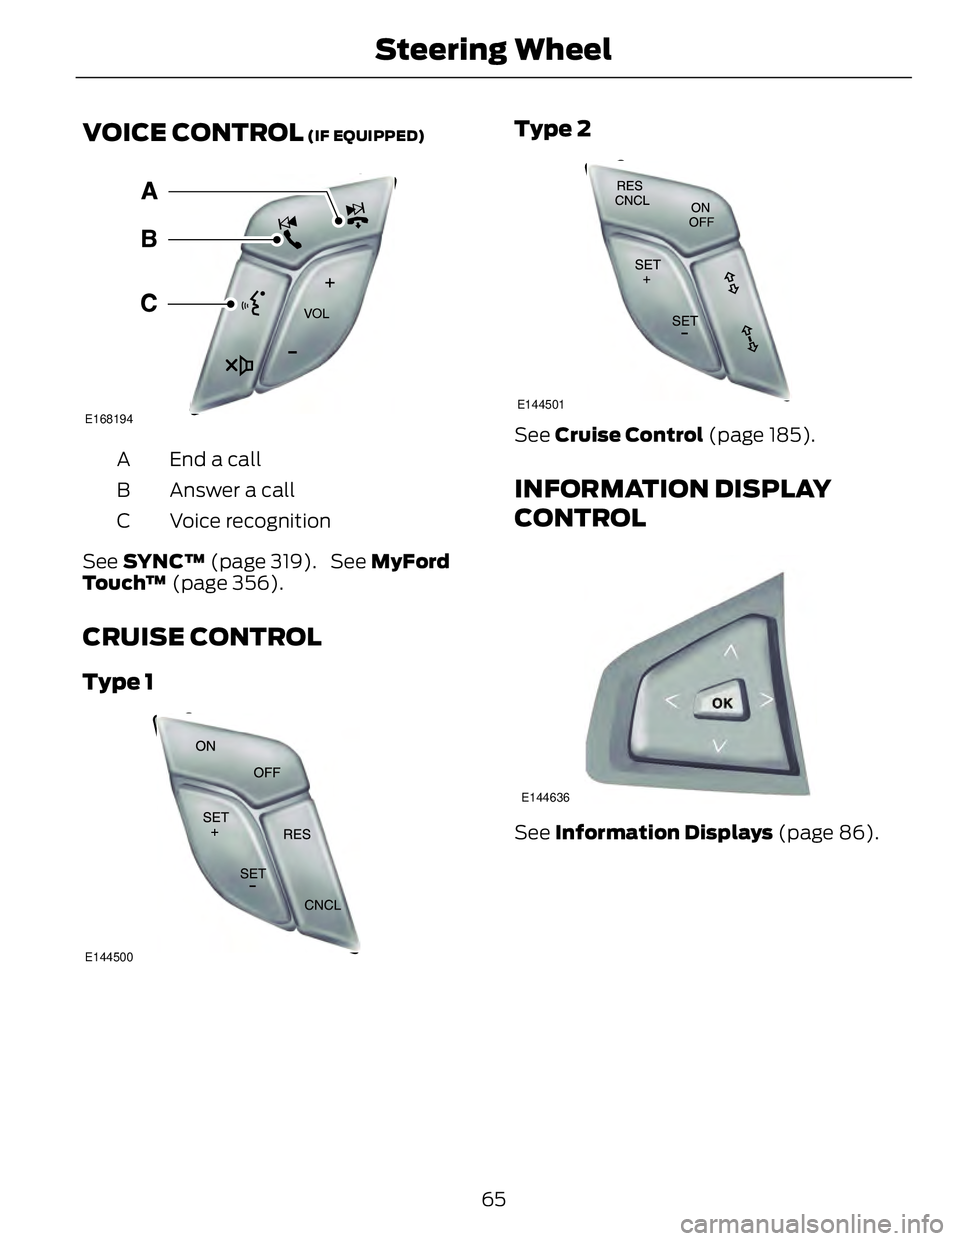
VOICE CONTROL (IF EQUIPPED)
E168194
End a callA
Answer a callB
Voice recognitionC
See SYNC™ (page 319). See MyFord
Touch™ (page 356).
CRUISE CONTROL Type 1
E144500 Type 2 E144501
See Cruise Control (page 185).
INFORMATION DISPLAY
CONTROL E144636
See Information Displays (page 86).
65Steering Wheel
Page 69 of 473
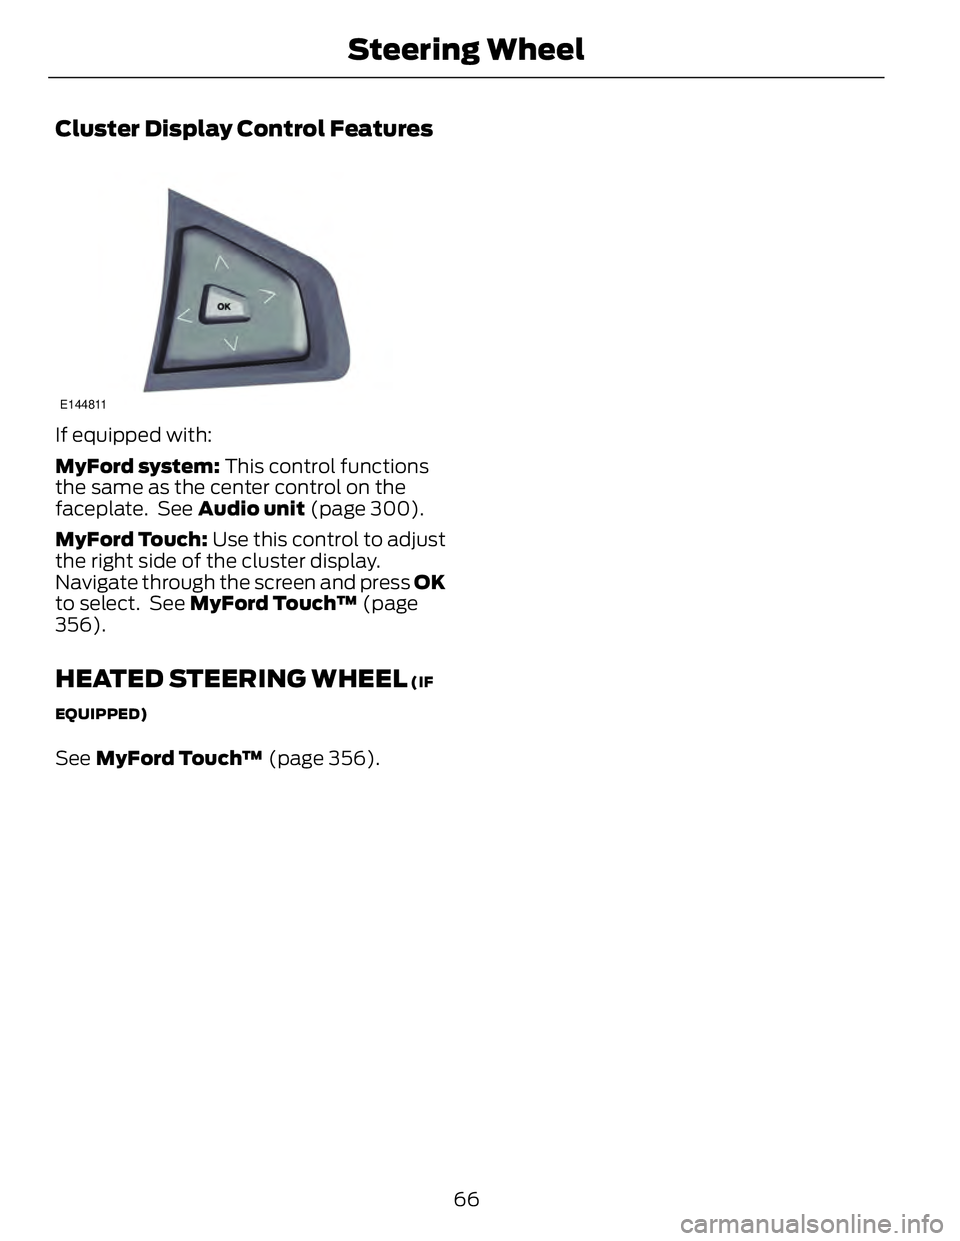
Cluster Display Control Features E144811
If equipped with:
MyFord system: This control functions
the same as the center control on the
faceplate. See Audio unit (page 300).
MyFord Touch: Use this control to adjust
the right side of the cluster display.
Navigate through the screen and press OK
to select. See MyFord Touch™ (page
356).
HEATED STEERING WHEEL (IF
EQUIPPED)
See MyFord Touch™ (page 356).
66Steering Wheel
Page 71 of 473
Note: Wet or winter driving conditions with
ice, snow or salty road mist can cause
inconsistent and unexpected wiping or
smearing.
In these conditions, you can do the
following to help keep your windshield
clear:
• Lower the sensitivity of the autowipers
to reduce the amount of smearing.
• Switch to normal or high-speed wipe.
• Switch the autowipers off.
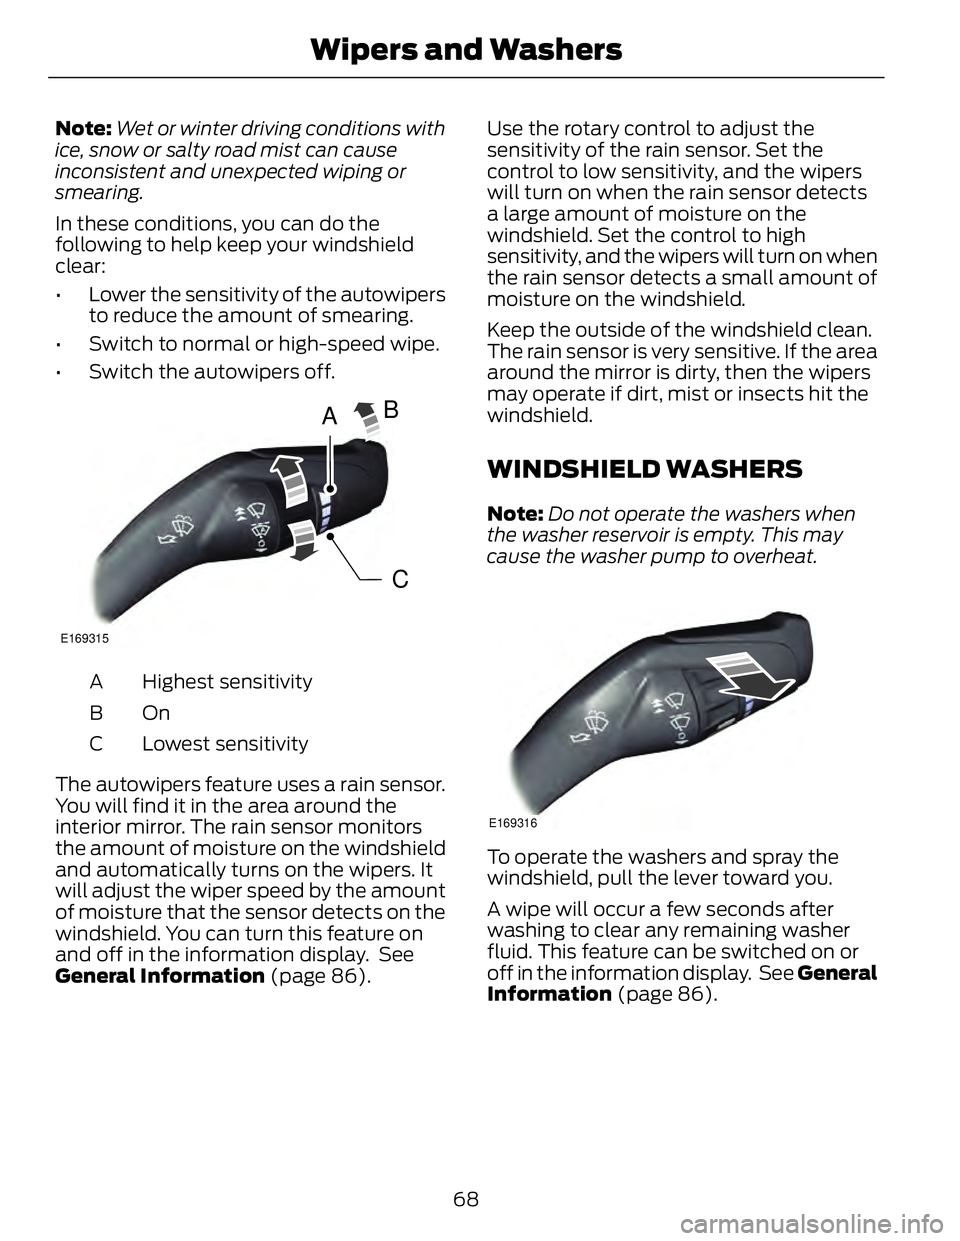
A
CBE169315
Highest sensitivityA
OnB
Lowest sensitivityC
The autowipers feature uses a rain sensor.
You will find it in the area around the
interior mirror. The rain sensor monitors
the amount of moisture on the windshield
and automatically turns on the wipers. It
will adjust the wiper speed by the amount
of moisture that the sensor detects on the
windshield. You can turn this feature on
and off in the information display. See
General Information (page 86). Use the rotary control to adjust the
sensitivity of the rain sensor. Set the
control to low sensitivity, and the wipers
will turn on when the rain sensor detects
a large amount of moisture on the
windshield. Set the control to high
sensitivity, and the wipers will turn on when
the rain sensor detects a small amount of
moisture on the windshield.
Keep the outside of the windshield clean.
The rain sensor is very sensitive. If the area
around the mirror is dirty, then the wipers
may operate if dirt, mist or insects hit the
windshield.
WINDSHIELD WASHERS Note: Do not operate the washers when
the washer reservoir is empty. This may
cause the washer pump to overheat.
E169316
To operate the washers and spray the
windshield, pull the lever toward you.
A wipe will occur a few seconds after
washing to clear any remaining washer
fluid. This feature can be switched on or
off in the information display. See General
Information (page 86).
68Wipers and Washers
Page 72 of 473
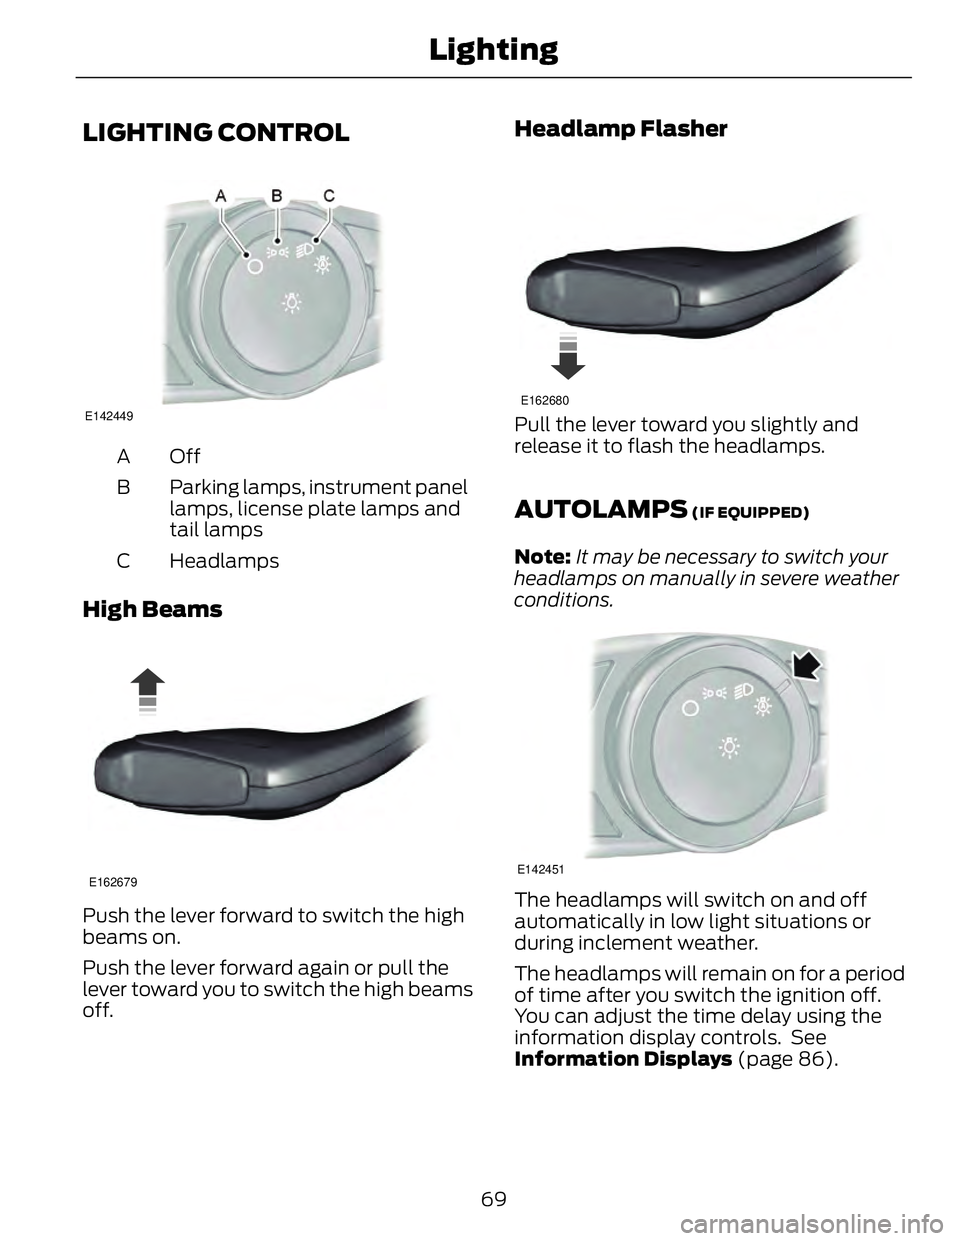
LIGHTING CONTROL E142449
OffA
Parking lamps, instrument panel
lamps, license plate lamps and
tail lampsB
HeadlampsC
High Beams E162679
Push the lever forward to switch the high
beams on.
Push the lever forward again or pull the
lever toward you to switch the high beams
off. Headlamp Flasher E162680
Pull the lever toward you slightly and
release it to flash the headlamps.
AUTOLAMPS (IF EQUIPPED)
Note: It may be necessary to switch your
headlamps on manually in severe weather
conditions.
E142451
The headlamps will switch on and off
automatically in low light situations or
during inclement weather.
The headlamps will remain on for a period
of time after you switch the ignition off.
You can adjust the time delay using the
information display controls. See
Information Displays (page 86).
69Lighting
Page 74 of 473
The system switches the low beam
headlamps on at a reduced intensity in
daylight conditions.
To switch the system on, switch the
ignition on, and switch the lighting control
to the off, autolamp or parking lamp
position.
AUTOMATIC HIGH BEAM
CONTROL (IF EQUIPPED)
The system will automatically turn on your
high beams if it is dark enough and no other
traffic is present. When it detects the
headlights of an approaching vehicle, the
tail lamps of the preceding vehicle or street
lighting, the system will turn off the high
beams before they distract other drivers.
The low beams remain on.
Note: If it appears that automatic control
of the high beams is not functioning
properly, check the windshield in front of
the camera for a blockage. A clear view of
the road is required for proper system
operation. Have any windshield damage in
the area of the camera’s field-of-view
repaired.
Note: If the system detects a blockage such
as bird droppings, bug splatter, snow or ice,
and you do not observe changes, the system
will go into low beam mode until you clear
the blockage. A message may also appear
in the instrument cluster display noting the
front camera is blocked.
Note: Typical road dust, dirt and water
spots will not affect the performance of the
automatic high beam system . However, in
cold or inclement weather conditions, you
will notice a decrease in the availability of
the high beam system, especially at start
up. If you want to change the beam state
independently of the system, you may
switch the high beams on or off using the
multifunction switch. Automatic control will
resume when conditions are correct. Note: Modification of the vehicle ride height
such as using much larger tires, may
degrade feature performance.
A camera sensor, centrally mounted
behind the windshield of your vehicle,
continuously monitors conditions to decide
when to switch the high beams off and on.
Once the system is active, the high beams
will switch on if:
• the ambient light level is low enough
• there is no traffic in front of the vehicle
• the vehicle speed is greater than
25 mph (40 km/h)
The high beams will switch off if:
• the system detects the headlamps of
an approaching vehicle or the tail
lamps of a preceding vehicle.
• vehicle speed falls below 16 mph
(25 km/h)
• the ambient light level is high enough
that high beams are not required
• the system detects severe rain, snow
or fog
• the camera is blocked
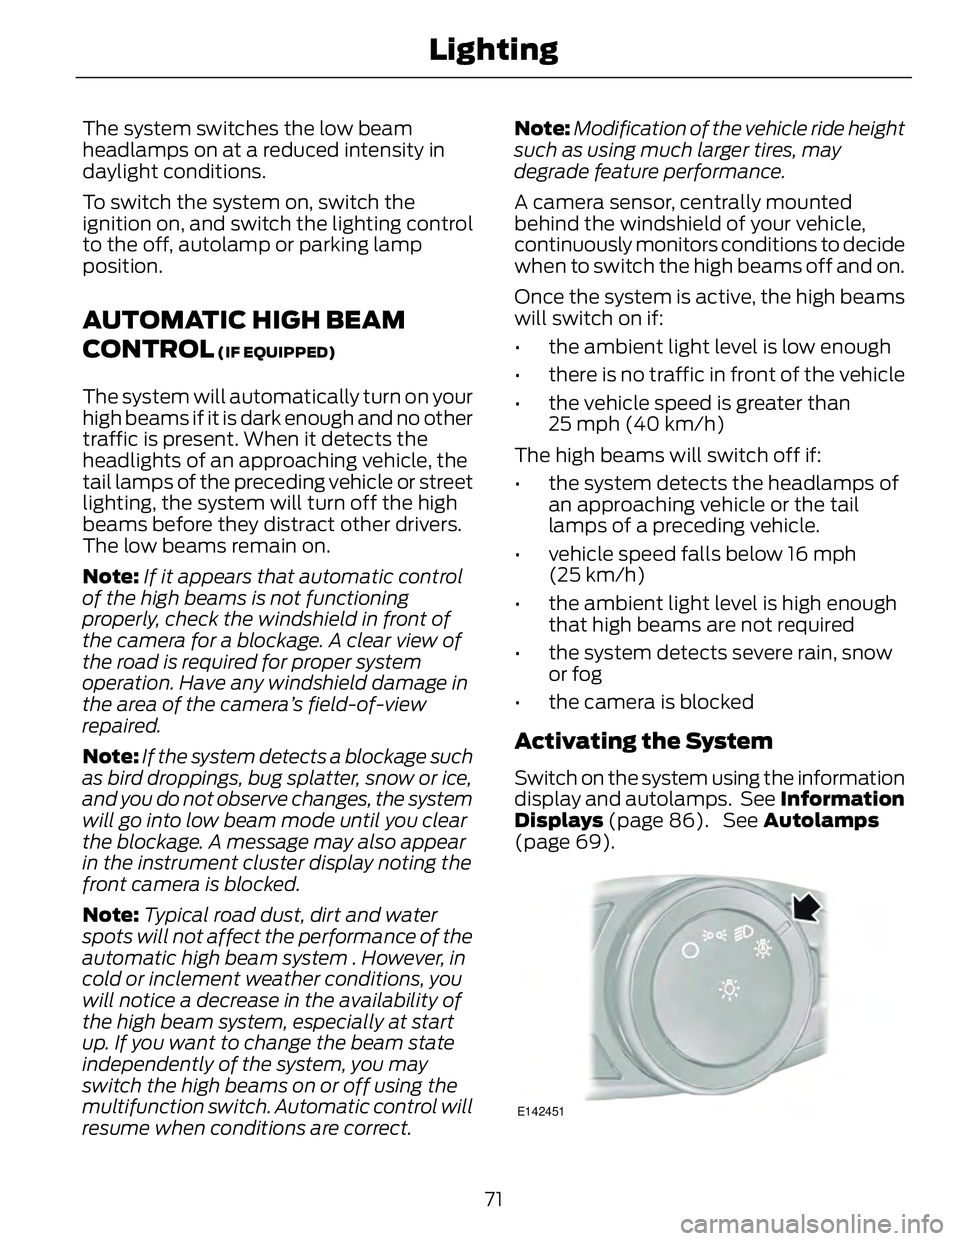
Activating the System Switch on the system using the information
display and autolamps. See Information
Displays (page 86). See Autolamps
(page 69).
E142451
71Lighting
Page 75 of 473
Switch the lighting control to the
autolamps position.
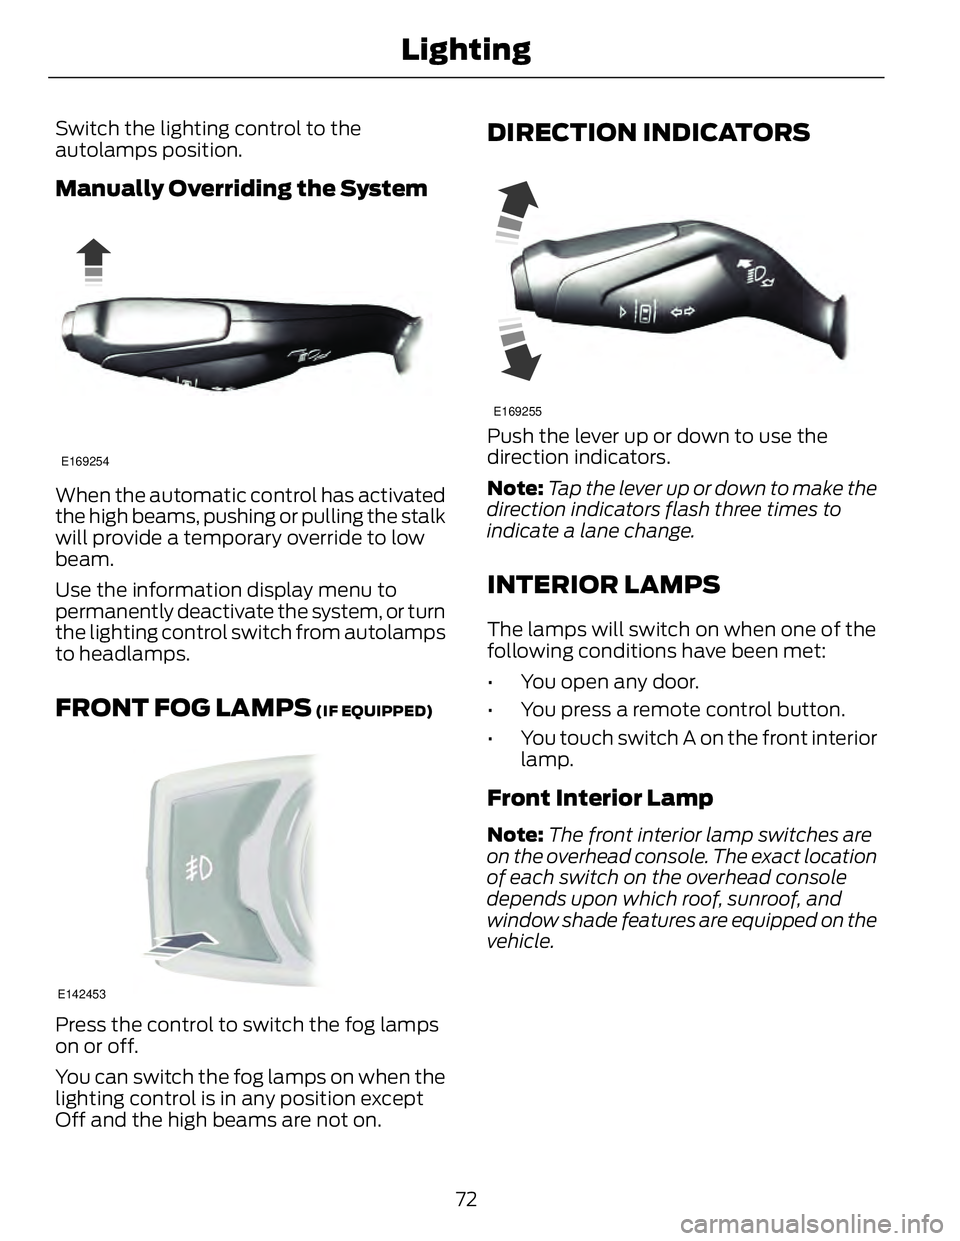
Manually Overriding the System E169254
When the automatic control has activated
the high beams, pushing or pulling the stalk
will provide a temporary override to low
beam.
Use the information display menu to
permanently deactivate the system, or turn
the lighting control switch from autolamps
to headlamps.
FRONT FOG LAMPS (IF EQUIPPED)
E142453
Press the control to switch the fog lamps
on or off.
You can switch the fog lamps on when the
lighting control is in any position except
Off and the high beams are not on. DIRECTION INDICATORS E169255
Push the lever up or down to use the
direction indicators.
Note: Tap the lever up or down to make the
direction indicators flash three times to
indicate a lane change.
INTERIOR LAMPS The lamps will switch on when one of the
following conditions have been met:
• You open any door.
• You press a remote control button.
• You touch switch A on the front interior
lamp.
Front Interior Lamp Note: The front interior lamp switches are
on the overhead console. The exact location
of each switch on the overhead console
depends upon which roof, sunroof, and
window shade features are equipped on the
vehicle.
72Lighting
Page 78 of 473
GLOBAL OPENING AND
CLOSING You can use the remote control to operate
the windows with the ignition off.
Note: You can enable or disable this feature
in the information display or see an
authorized dealer. See General
Information (page 86).
Note: To operate this feature, accessory
delay must not be active.
Opening the Windows You can only open the windows for a short
time after you unlock your vehicle with the
remote control. After you unlock your
vehicle, press and hold the remote control
unlock button to open the windows and
vent the moonroof. Release the button
once movement starts. Press the lock or
unlock button to stop movement.
Closing the Windows WARNING
When closing the windows and
moonroof, you should verify they are
free of obstructions and make sure
that children and pets are not in the
proximity of the window openings.
To close the windows and moonroof, press
and hold the remote control lock button.
Release the button once movement starts.
Press the lock or unlock button to stop
movement.
EXTERIOR MIRRORS
Power Exterior Mirrors
WARNING
Do not adjust the mirrors when your
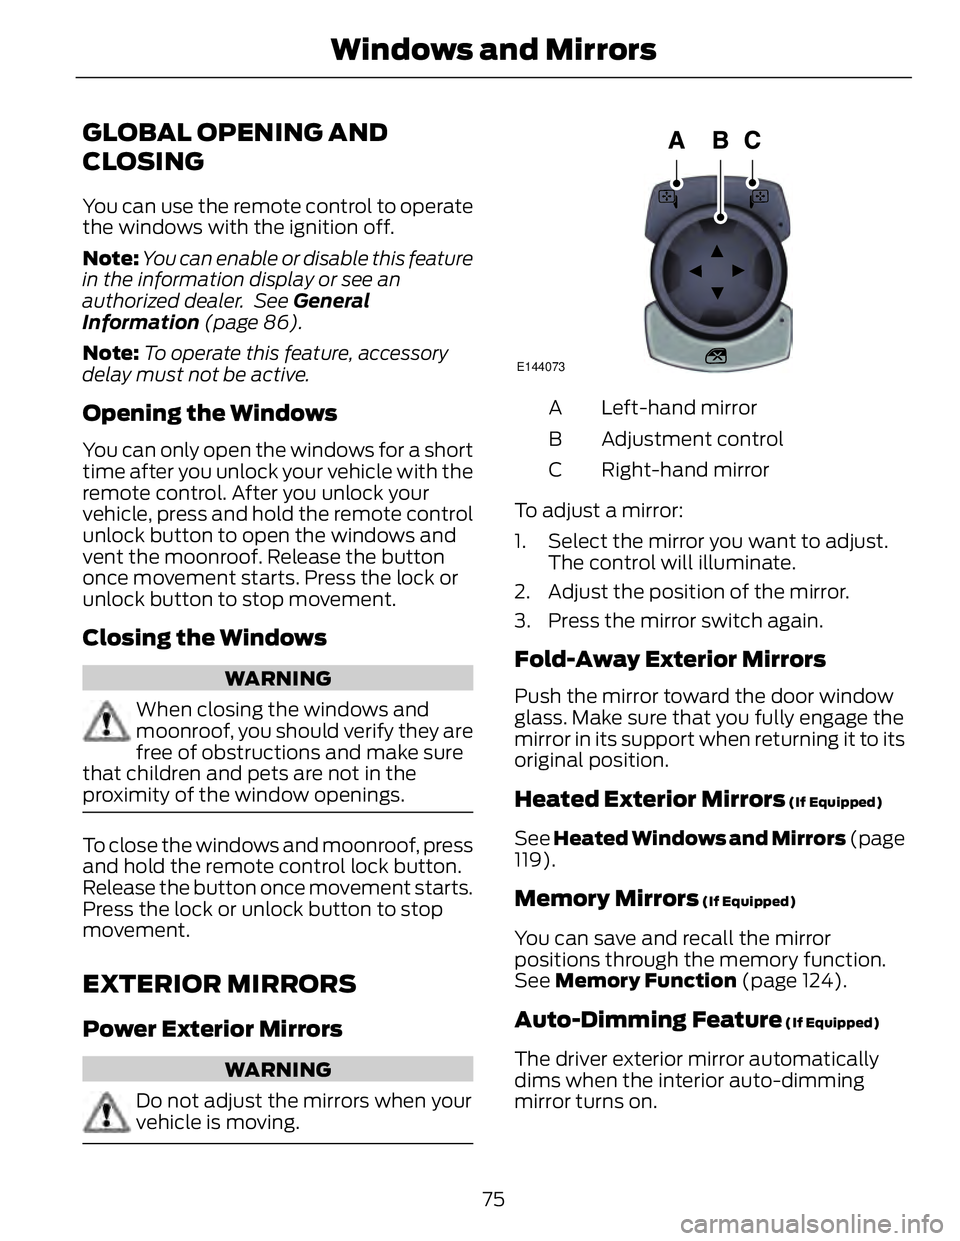
vehicle is moving. E144073
Left-hand mirrorA
Adjustment controlB
Right-hand mirrorC
To adjust a mirror:
1. Select the mirror you want to adjust.
The control will illuminate.
2. Adjust the position of the mirror.
3. Press the mirror switch again.
Fold-Away Exterior Mirrors Push the mirror toward the door window
glass. Make sure that you fully engage the
mirror in its support when returning it to its
original position.
Heated Exterior Mirrors (If Equipped)
See Heated Windows and Mirrors (page
119).
Memory Mirrors (If Equipped)
You can save and recall the mirror
positions through the memory function.
See Memory Function (page 124).
Auto-Dimming Feature (If Equipped)
The driver exterior mirror automatically
dims when the interior auto-dimming
mirror turns on.
75Windows and Mirrors
Page 82 of 473
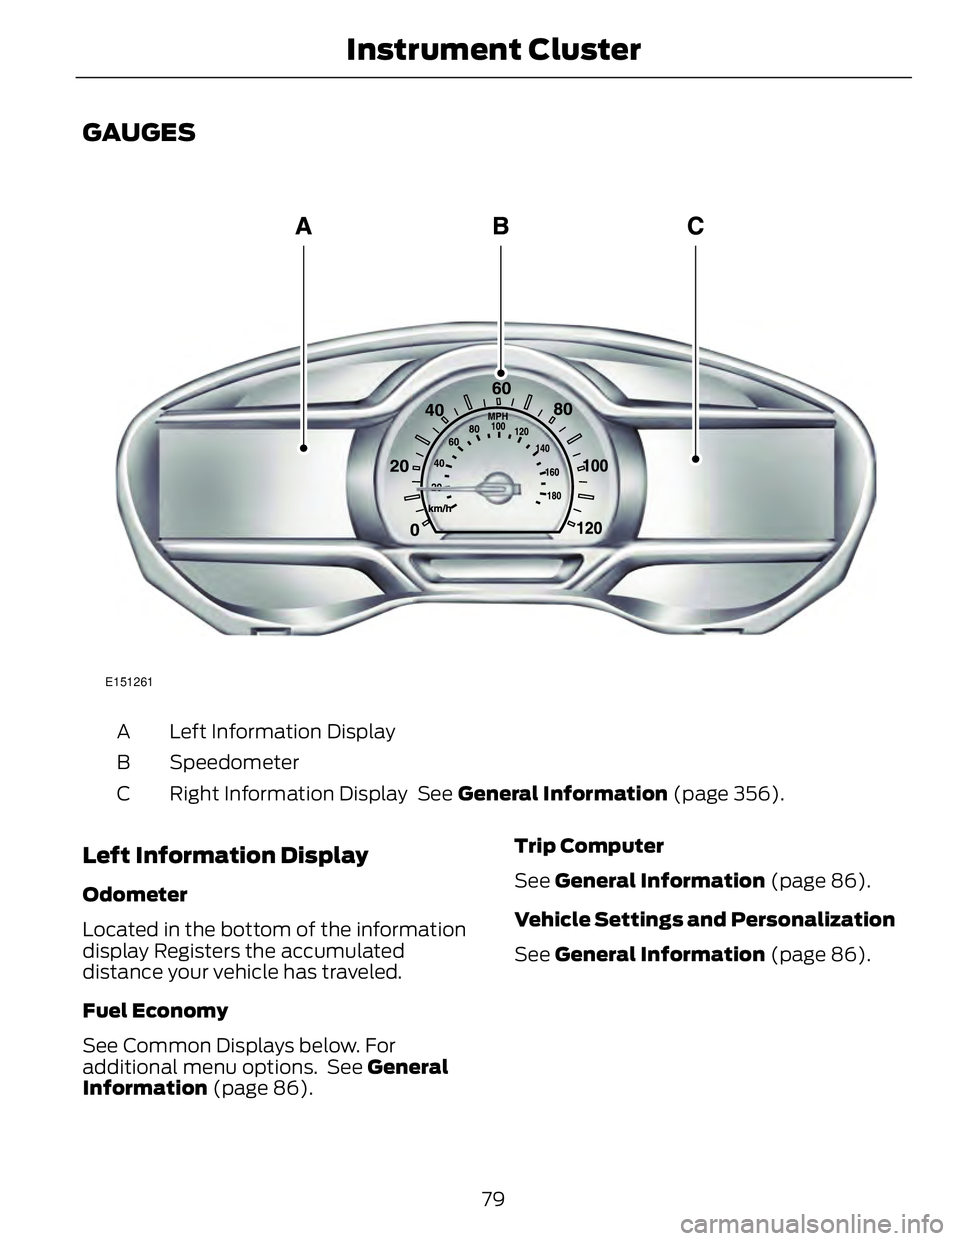
GAUGES E151261
Left Information DisplayA
SpeedometerB
Right Information Display See General Information (page 356).C
Left Information Display Odometer
Located in the bottom of the information
display Registers the accumulated
distance your vehicle has traveled.
Fuel Economy
See Common Displays below. For
additional menu options. See General
Information (page 86). Trip Computer
See General Information (page 86).
Vehicle Settings and Personalization
See General Information (page 86).
79Instrument Cluster