park assist FORD FUSION HYBRID 2014 Owners Manual
[x] Cancel search | Manufacturer: FORD, Model Year: 2014, Model line: FUSION HYBRID, Model: FORD FUSION HYBRID 2014Pages: 473, PDF Size: 5.93 MB
Page 6 of 473
Fuel and Refueling Safety Precautions......................................148
Fuel Quality....................................................149
Refueling .........................................................149
Running Out of Fuel.....................................153
Fuel Consumption.......................................156
Emission Control System...........................157
High Voltage Battery General Information....................................160
Charging the High Voltage Battery.........161
High Voltage Battery Cut-Off
Switch...........................................................164
Transmission Automatic Transmission...........................166
Brakes General Information....................................169
Hints on Driving With Anti-Lock
Brakes...........................................................170
Electric Parking Brake.................................170
Hill Start Assist...............................................172
Traction Control Principle of Operation.................................174
Using Traction Control................................174
Stability Control Principle of Operation.................................175
Using Stability Control................................175
Parking Aids Parking Aid......................................................176
Active Park Assist.........................................178
Rear View Camera........................................181
Cruise Control
Principle of Operation.................................185
Using Cruise Control....................................185 Using Adaptive Cruise Control................186
Driving Aids Driver Alert......................................................192
Lane Keeping System.................................193
Blind Spot Monitor.......................................197
Steering ............................................................ 201
Collision Warning System........................202
Load Carrying Load Limit......................................................205
Towing Towing a Trailer..............................................213
Transporting the Vehicle............................213
Towing the Vehicle on Four Wheels......213
Driving Hints Breaking-In ...................................................... 215
Economical Driving......................................215
Driving Through Water................................215
Floor Mats........................................................216
Customer Assistance Getting the Services You Need................218
In California (U.S. Only).............................219
The Better Business Bureau (BBB) Auto
Line Program (U.S. Only).....................220
Utilizing the Mediation/Arbitration
Program (Canada Only).......................220
Getting Assistance Outside the U.S. and
Canada.........................................................221
Ordering Additional Owner's
Literature.....................................................222
Reporting Safety Defects (U.S.
Only).............................................................222
Reporting Safety Defects (Canada
Only).............................................................223
Roadside Emergencies
Roadside Assistance..................................224
3Table of Contents
Page 12 of 473
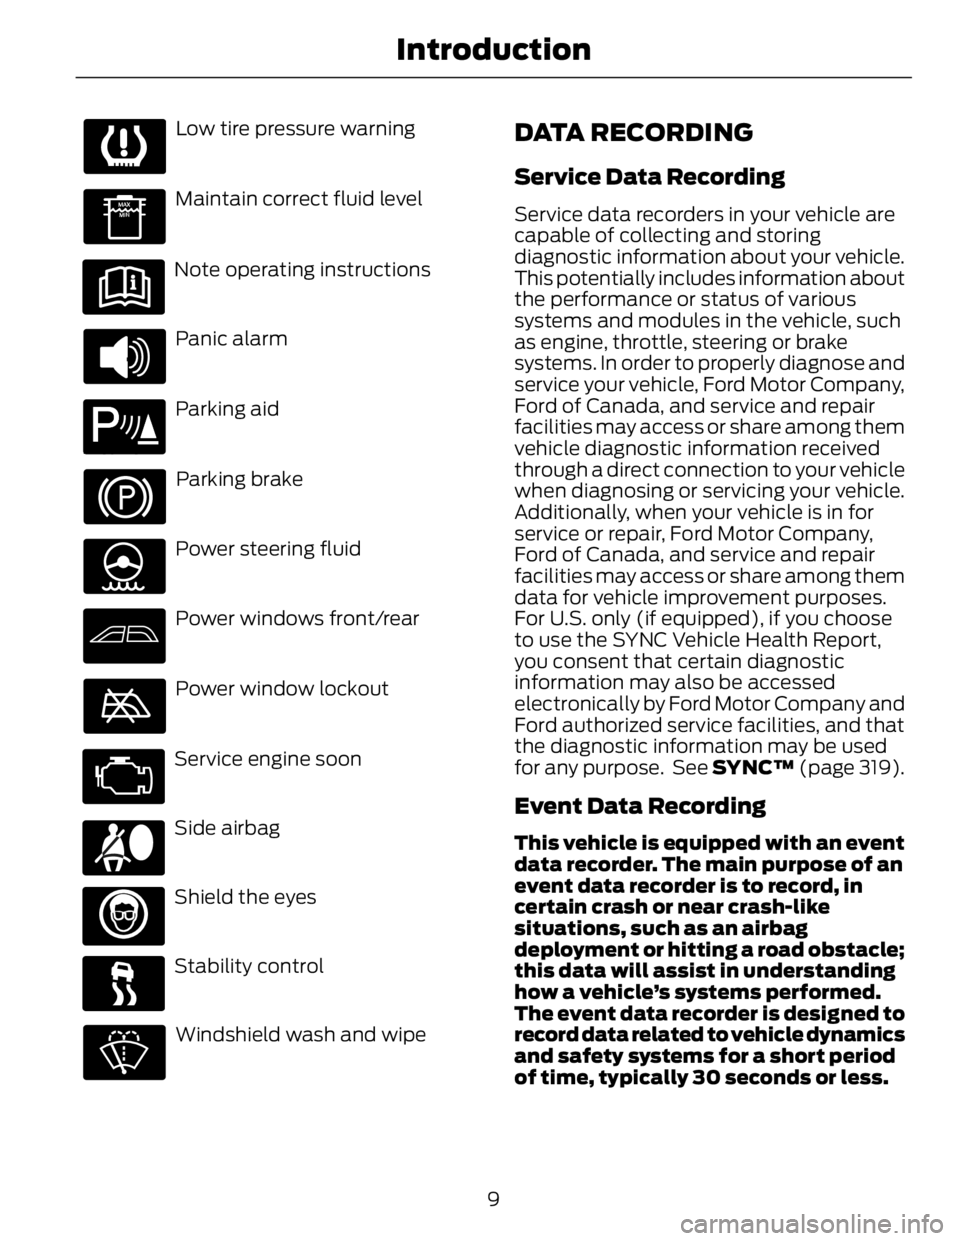
Low tire pressure warning
Maintain correct fluid level
Note operating instructions
Panic alarmE139213
Parking aid
Parking brake
Power steering fluid
Power windows front/rear
Power window lockout
Service engine soon
Side airbag
Shield the eyes
Stability control
Windshield wash and wipe DATA RECORDING Service Data Recording Service data recorders in your vehicle are
capable of collecting and storing
diagnostic information about your vehicle.
This potentially includes information about
the performance or status of various
systems and modules in the vehicle, such
as engine, throttle, steering or brake
systems. In order to properly diagnose and
service your vehicle, Ford Motor Company,
Ford of Canada, and service and repair
facilities may access or share among them
vehicle diagnostic information received
through a direct connection to your vehicle
when diagnosing or servicing your vehicle.
Additionally, when your vehicle is in for
service or repair, Ford Motor Company,
Ford of Canada, and service and repair
facilities may access or share among them
data for vehicle improvement purposes.
For U.S. only (if equipped), if you choose
to use the SYNC Vehicle Health Report,
you consent that certain diagnostic
information may also be accessed
electronically by Ford Motor Company and
Ford authorized service facilities, and that
the diagnostic information may be used
for any purpose. See SYNC™ (page 319).
Event Data Recording This vehicle is equipped with an event
data recorder. The main purpose of an
event data recorder is to record, in
certain crash or near crash-like
situations, such as an airbag
deployment or hitting a road obstacle;
this data will assist in understanding
how a vehicle’s systems performed.
The event data recorder is designed to
record data related to vehicle dynamics
and safety systems for a short period
of time, typically 30 seconds or less.
9Introduction
Page 53 of 473
PRINCIPLE OF OPERATION MyKey allows you to program keys with
restricted driving modes to promote good
driving habits. All but one of the keys
programmed to the vehicle can be
activated with these restricted modes.
Any keys that have not been programmed
are referred to as administrator keys or
admin keys. These can be used to:
• create a MyKey
• program configurable MyKey settings
• clear all MyKey features.
When you have programmed a MyKey, you
can access the following information using
the information display:
• How many admin keys and MyKeys are
programmed to your vehicle.
• The total distance your vehicle has
traveled using a MyKey.
Note: All MyKeys are programmed to the
same settings. You cannot program them
individually.
Note: For vehicles with intelligent access
with push-button start, when both a MyKey
and an admin intelligent access key fob are
present, the admin fob will be recognized
by the vehicle while switching the ignition
on to start the vehicle.
Non-configurable Settings The following settings cannot be changed
by an admin key user: • Belt-Minder. You cannot disable this
feature. The audio system will mute
when the front seat occupants’ safety
belts are not fastened.
• Early low fuel. The low-fuel warning
activates earlier, giving the MyKey user
more time to refuel.
• Driver assist features, if equipped on
your vehicle, are forced on: parking aid,
blind spot information system (BLIS)
with cross traffic alert, lane departure
warning and forward collision warning
system.
Configurable Settings With an admin key, you can configure
certain MyKey settings when you first
create a MyKey and before you recycle the
key or restart the vehicle. You can also
change the settings afterward with an
admin key.
• A vehicle speed limit can be set.
Warnings will be shown in the display
followed by an audible tone when your
vehicle reaches the set speed. You
cannot override the set speed by fully
depressing the accelerator pedal or by
setting cruise control.
• Vehicle speed minders of 45, 55 or 65
mph (75, 90 or 105 km/h). Once you
select a speed, it will be shown in the
display, followed by an audible tone
when the preselected vehicle speed is
exceeded.
• Audio system maximum volume of
45%. A message will be shown in the
display when you attempt to exceed
the limited volume. Also, the
speed-sensitive or compensated
automatic volume control will be
disabled.
• Always on setting. When this is
selected, you will not be able to turn
off Advance Trac (if your vehicle is
equipped with this feature).
50MyKey™
Page 86 of 473
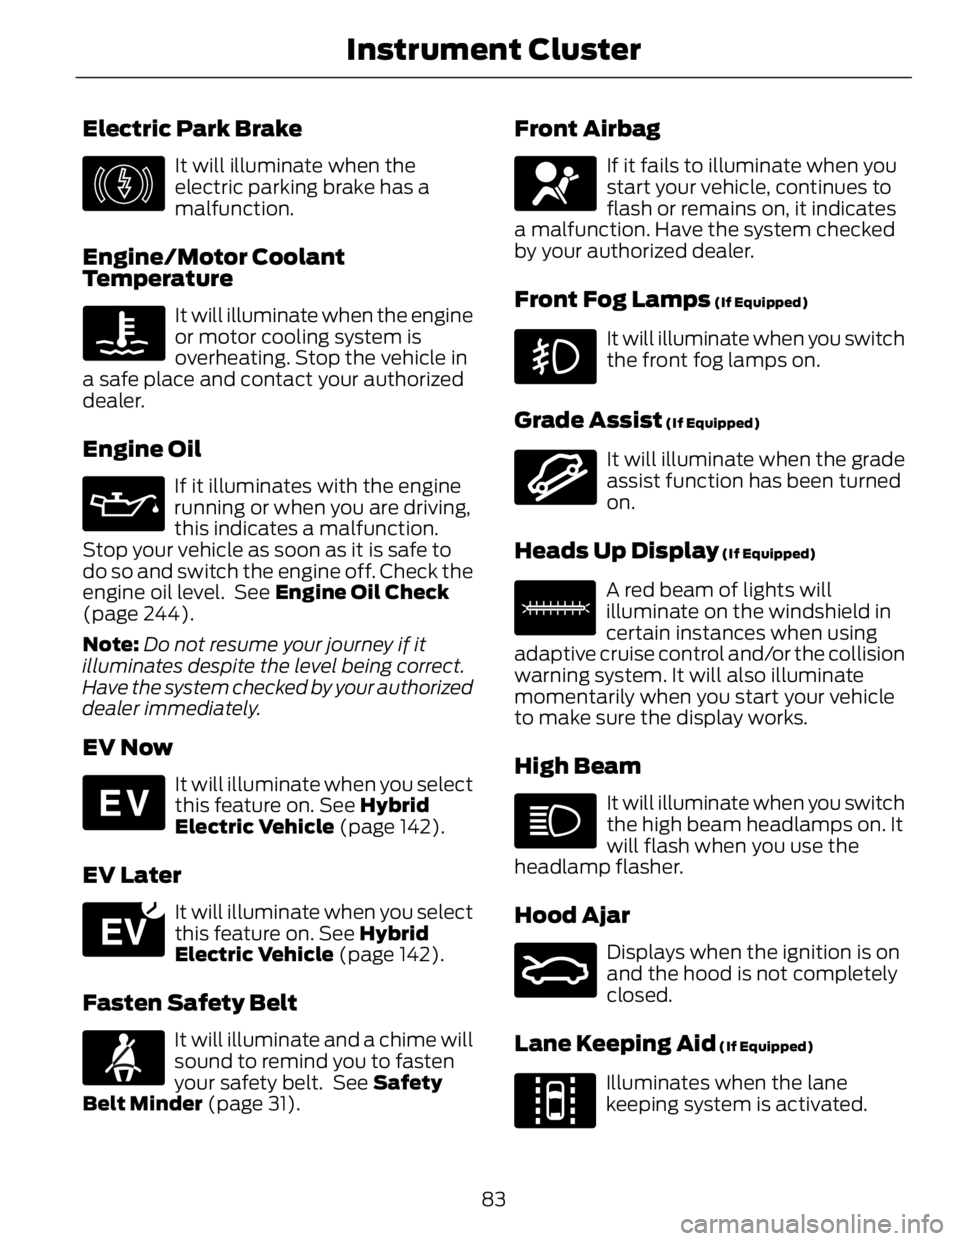
Electric Park Brake E146190
It will illuminate when the
electric parking brake has a
malfunction.
Engine/Motor Coolant
Temperature It will illuminate when the engine
or motor cooling system is
overheating. Stop the vehicle in
a safe place and contact your authorized
dealer.
Engine Oil If it illuminates with the engine
running or when you are driving,
this indicates a malfunction.
Stop your vehicle as soon as it is safe to
do so and switch the engine off. Check the
engine oil level. See Engine Oil Check
(page 244).
Note: Do not resume your journey if it
illuminates despite the level being correct.
Have the system checked by your authorized
dealer immediately.
EV Now E144814
It will illuminate when you select
this feature on. See Hybrid
Electric Vehicle (page 142).
EV Later E151263
It will illuminate when you select
this feature on. See Hybrid
Electric Vehicle (page 142).
Fasten Safety Belt
It will illuminate and a chime will
sound to remind you to fasten
your safety belt. See Safety
Belt Minder (page 31). Front Airbag If it fails to illuminate when you
start your vehicle, continues to
flash or remains on, it indicates
a malfunction. Have the system checked
by your authorized dealer.
Front Fog Lamps (If Equipped)
It will illuminate when you switch
the front fog lamps on.
Grade Assist (If Equipped)
E144523
It will illuminate when the grade
assist function has been turned
on.
Heads Up Display (If Equipped)
E156133
A red beam of lights will
illuminate on the windshield in
certain instances when using
adaptive cruise control and/or the collision
warning system. It will also illuminate
momentarily when you start your vehicle
to make sure the display works.
High Beam It will illuminate when you switch
the high beam headlamps on. It
will flash when you use the
headlamp flasher.
Hood Ajar E159324
Displays when the ignition is on
and the hood is not completely
closed.
Lane Keeping Aid (If Equipped)
E144813
Illuminates when the lane
keeping system is activated.
83Instrument Cluster
Page 99 of 473
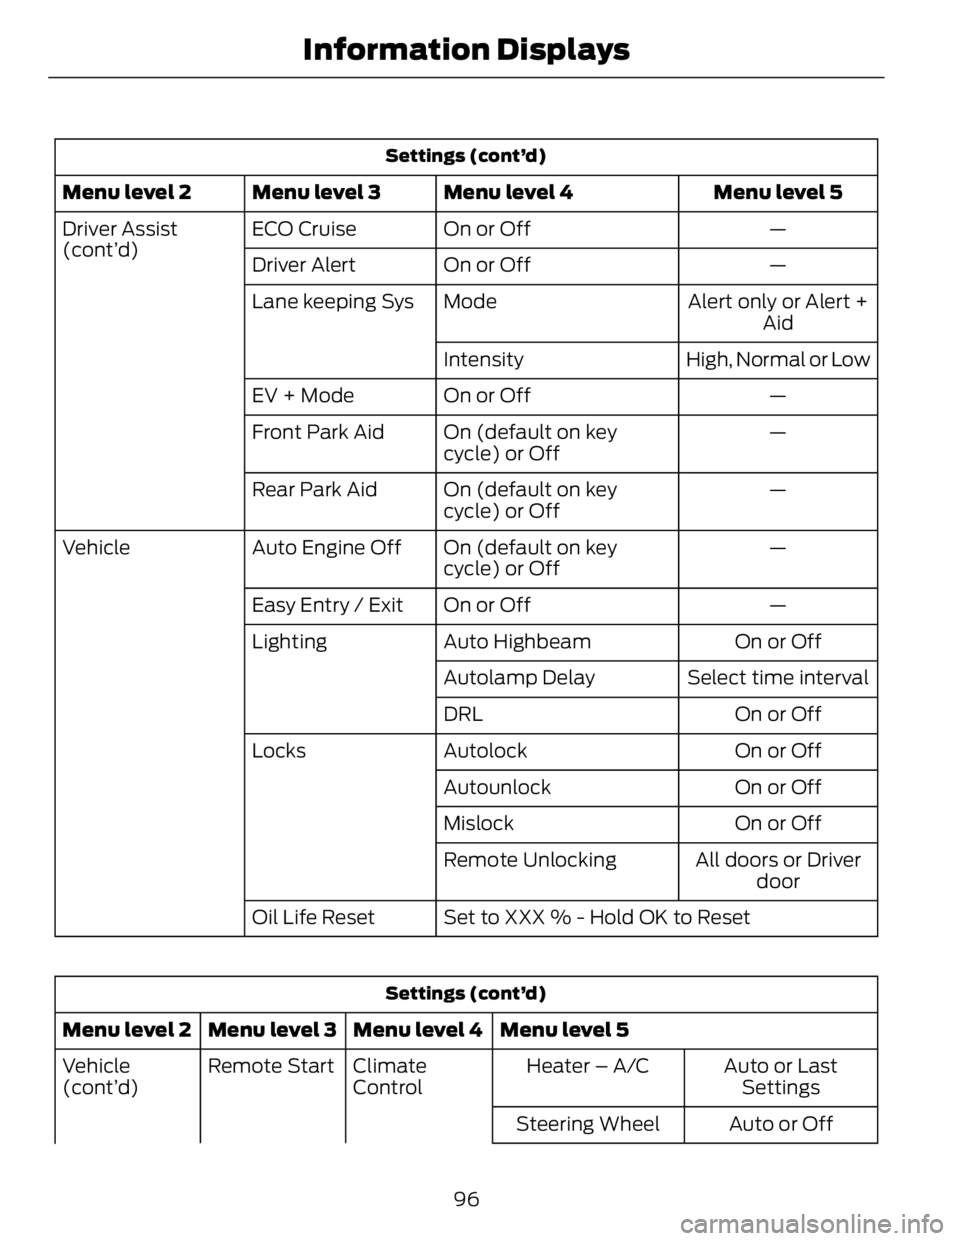
Settings (cont’d)
Menu level 5Menu level 4Menu level 3Menu level 2
—On or OffECO CruiseDriver Assist
(cont’d)
—On or OffDriver Alert
Alert only or Alert +
AidModeLane keeping Sys
High, Normal or LowIntensity
—On or OffEV + Mode
—On (default on key
cycle) or OffFront Park Aid
—On (default on key
cycle) or OffRear Park Aid
—On (default on key
cycle) or OffAuto Engine OffVehicle
—On or OffEasy Entry / Exit
On or OffAuto HighbeamLighting
Select time intervalAutolamp Delay
On or OffDRL
On or OffAutolockLocks
On or OffAutounlock
On or OffMislock
All doors or Driver
doorRemote Unlocking
Set to XXX % - Hold OK to ResetOil Life Reset
Settings (cont’d)
Menu level 5Menu level 4Menu level 3Menu level 2
Auto or Last
SettingsHeater – A/CClimate
ControlRemote StartVehicle
(cont’d)
Auto or OffSteering Wheel
96Information Displays
Page 112 of 473
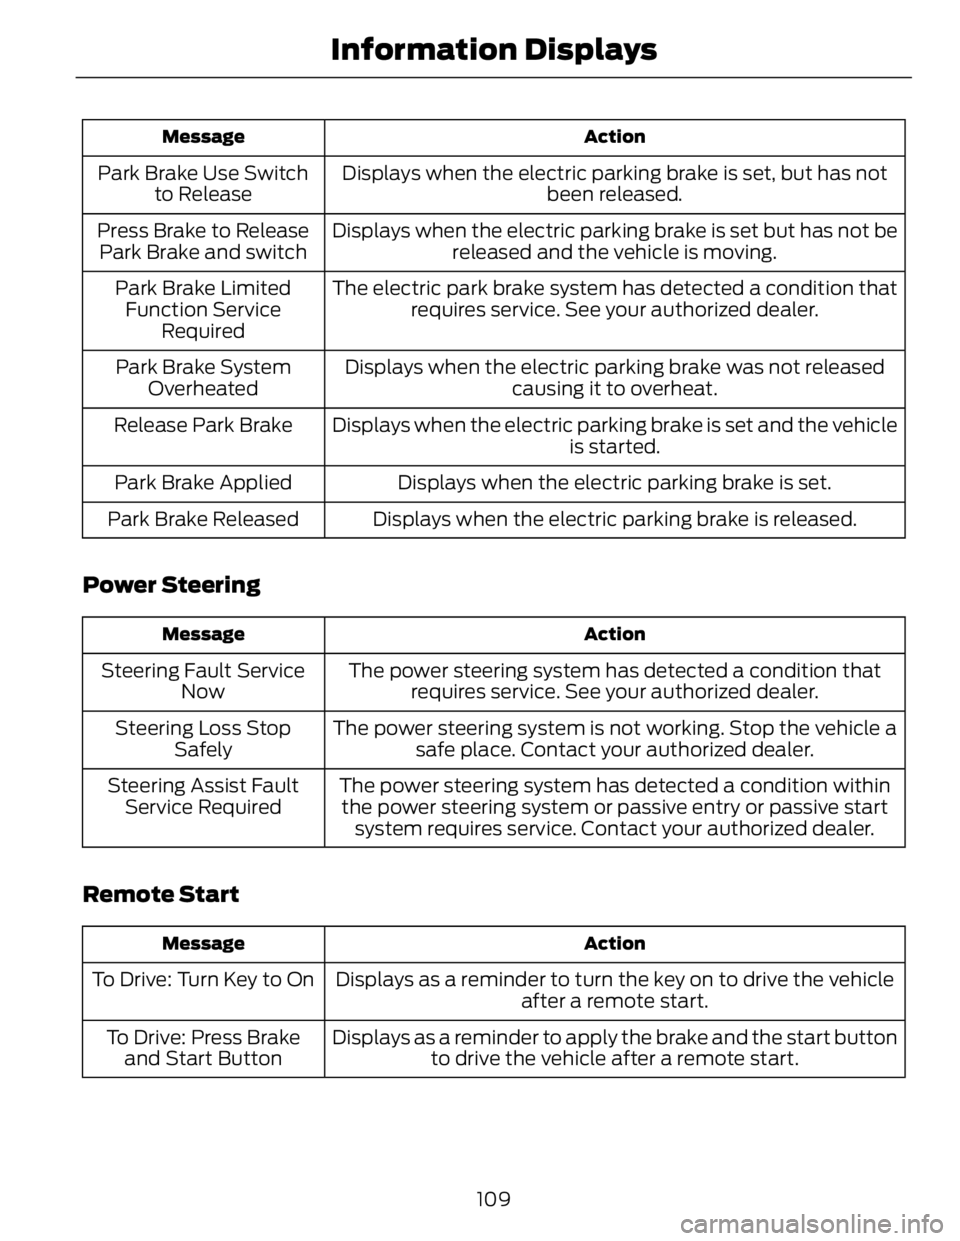
ActionMessage
Displays when the electric parking brake is set, but has not
been released.Park Brake Use Switch
to Release
Displays when the electric parking brake is set but has not be
released and the vehicle is moving.Press Brake to Release
Park Brake and switch
The electric park brake system has detected a condition that
requires service. See your authorized dealer.Park Brake Limited
Function Service
Required
Displays when the electric parking brake was not released
causing it to overheat.Park Brake System
Overheated
Displays when the electric parking brake is set and the vehicle
is started.Release Park Brake
Displays when the electric parking brake is set.Park Brake Applied
Displays when the electric parking brake is released.Park Brake Released
Power Steering ActionMessage
The power steering system has detected a condition that
requires service. See your authorized dealer.Steering Fault Service
Now
The power steering system is not working. Stop the vehicle a
safe place. Contact your authorized dealer.Steering Loss Stop
Safely
The power steering system has detected a condition within
the power steering system or passive entry or passive start
system requires service. Contact your authorized dealer.Steering Assist Fault
Service Required
Remote Start ActionMessage
Displays as a reminder to turn the key on to drive the vehicle
after a remote start.To Drive: Turn Key to On
Displays as a reminder to apply the brake and the start button
to drive the vehicle after a remote start.To Drive: Press Brake
and Start Button
109Information Displays
Page 142 of 473
• You can reset the timer by interacting
with your vehicle (such as pressing the
brake pedal or accelerator pedal).
• You can temporarily switch off the
shutdown feature any time the ignition
is on (for the current ignition cycle
only). Use the information display to
do so. See Information Displays
(page 86).
• During the countdown before
shutdown, you are prompted to press
OK or RESET (depending on your type
of information display) to temporarily
switch the feature off (for the current
ignition cycle only).
Switching Off the Vehicle When It
Is Stationary Vehicles with an Ignition Key
1. Move the transmission selector lever
to position P .
2. Turn the key to position 0 .
3. Apply the parking brake.
Vehicles with Keyless Start
1. Move the transmission selector lever
to position P .
2. Press the button once.
3. Apply the parking brake.
Note: This switches off the ignition, all
electrical circuits, warning lamps and
indicators.
Note: If the engine is idling for 30 minutes,
the ignition and engine automatically shut
down. Switching Off the Vehicle When It
Is Moving WARNING
Switching off the engine when the
vehicle is still moving will result in a
loss of brake and steering assistance.
The steering will not lock, but higher effort
will be required. When the ignition is
switched off, some electrical circuits,
warning lamps and indicators may also be
off.
Vehicles with an Ignition Key
1. Move the transmission selector lever
to position N and use the brakes to
bring your vehicle to a safe stop.
2. When your vehicle has stopped, move
the transmission selector lever to
position P and turn the key to position
0 .
3. Apply the parking brake.
Vehicles with Keyless Start
1. Move the transmission selector lever
to position N and use the brakes to
bring your vehicle to a safe stop.
2. When your vehicle has stopped, move
the transmission selector lever to
position P .
3. Press and hold the button for one
second, or press it three times within
two seconds.
4. Apply the parking brake.
139Starting and Stopping the Engine
Page 169 of 473
AUTOMATIC TRANSMISSION WARNINGS
Always set the parking brake fully
and make sure the gearshift is
latched in P (Park). Turn the ignition
to the off position and remove the key
whenever you leave your vehicle.
Do not apply the brake pedal and
accelerator pedal simultaneously.
Applying both pedals simultaneously
for more than three seconds will limit
engine rpm, which may result in difficulty
maintaining speed in traffic and could lead
to serious injury.
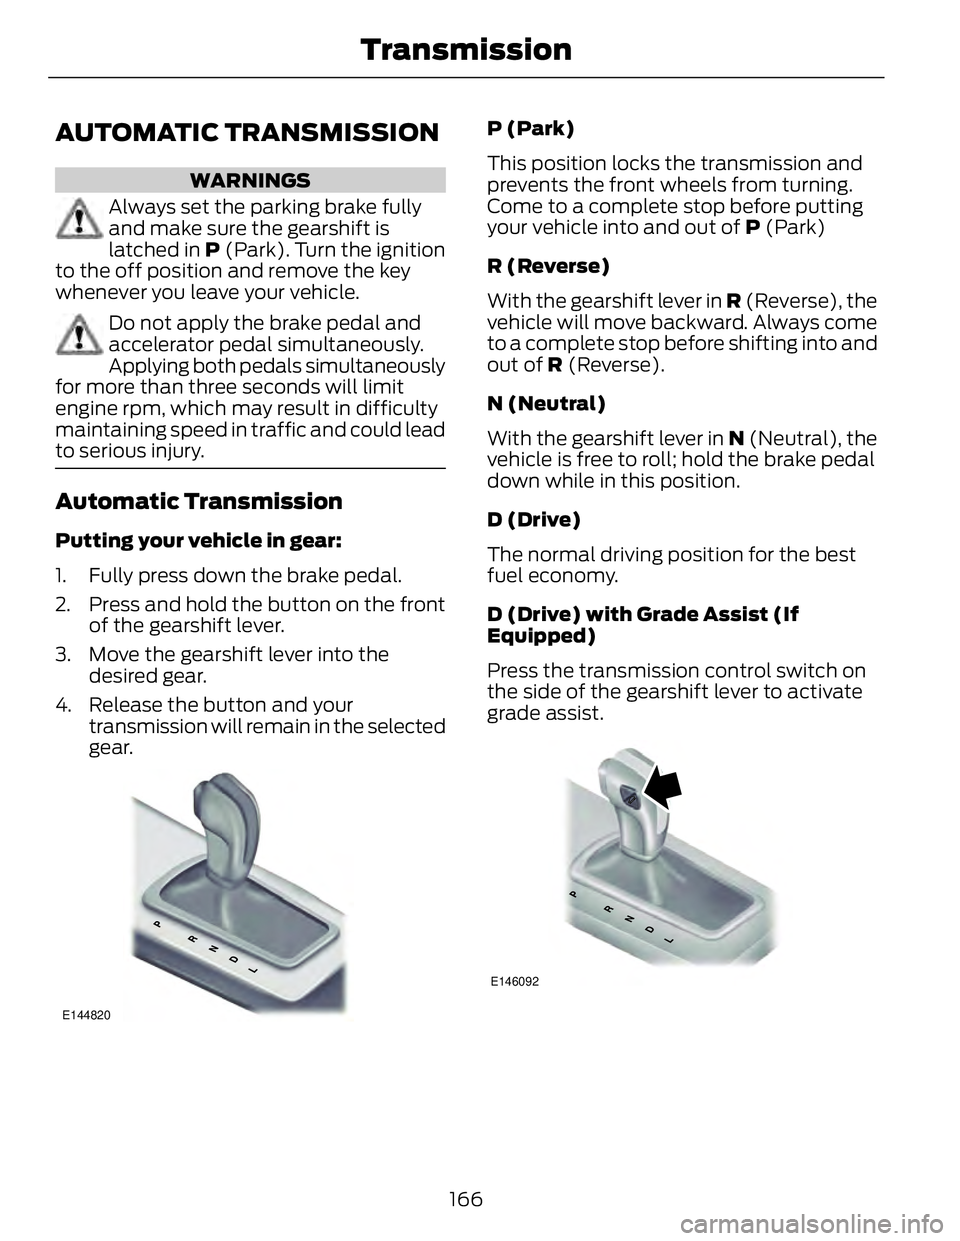
Automatic Transmission Putting your vehicle in gear:
1. Fully press down the brake pedal.
2. Press and hold the button on the front
of the gearshift lever.
3. Move the gearshift lever into the
desired gear.
4. Release the button and your
transmission will remain in the selected
gear.
E144820 P (Park)
This position locks the transmission and
prevents the front wheels from turning.
Come to a complete stop before putting
your vehicle into and out of P (Park)
R (Reverse)
With the gearshift lever in R (Reverse), the
vehicle will move backward. Always come
to a complete stop before shifting into and
out of R (Reverse).
N (Neutral)
With the gearshift lever in N (Neutral), the
vehicle is free to roll; hold the brake pedal
down while in this position.
D (Drive)
The normal driving position for the best
fuel economy.
D (Drive) with Grade Assist (If
Equipped)
Press the transmission control switch on
the side of the gearshift lever to activate
grade assist.
E146092
166Transmission
Page 170 of 473
Grade assist:
• Provides additional grade braking with
a combination of engine motoring and
high-voltage battery charging to help
maintain vehicle speed when
descending a grade.
• As the vehicle determines the amount
of engine motoring and high-voltage
battery charging, you may notice the
engine speed increasing and
decreasing to help maintain your
vehicle speed when descending a
grade.
• The grade assist lamp in the instrument
cluster is illuminated. E144523
The grade assist lamp will
appear in the instrument cluster
when grade assist is turned on.
Press the transmission control switch
again to return to normal D (Drive).
L (Low)
• Provides maximum engine braking.
• The transmission may be shifted into
L (Low) at any vehicle speed.
Brake-Shift Interlock WARNINGS
Do not drive your vehicle until you
verify that the brake lamps are
working.
When doing this procedure, you will
be taking the vehicle out of park
which means the vehicle can roll
freely. To avoid unwanted vehicle
movement, always fully set the parking
brake prior to doing this procedure. Use
wheel chocks if appropriate.
If the parking brake is fully released,
but the brake warning lamp remains
illuminated, the brakes may not be
working properly. See your authorized
dealer. Note: See your authorized dealer as soon
as possible if this procedure is used.
Note: For some markets this feature will be
disabled.
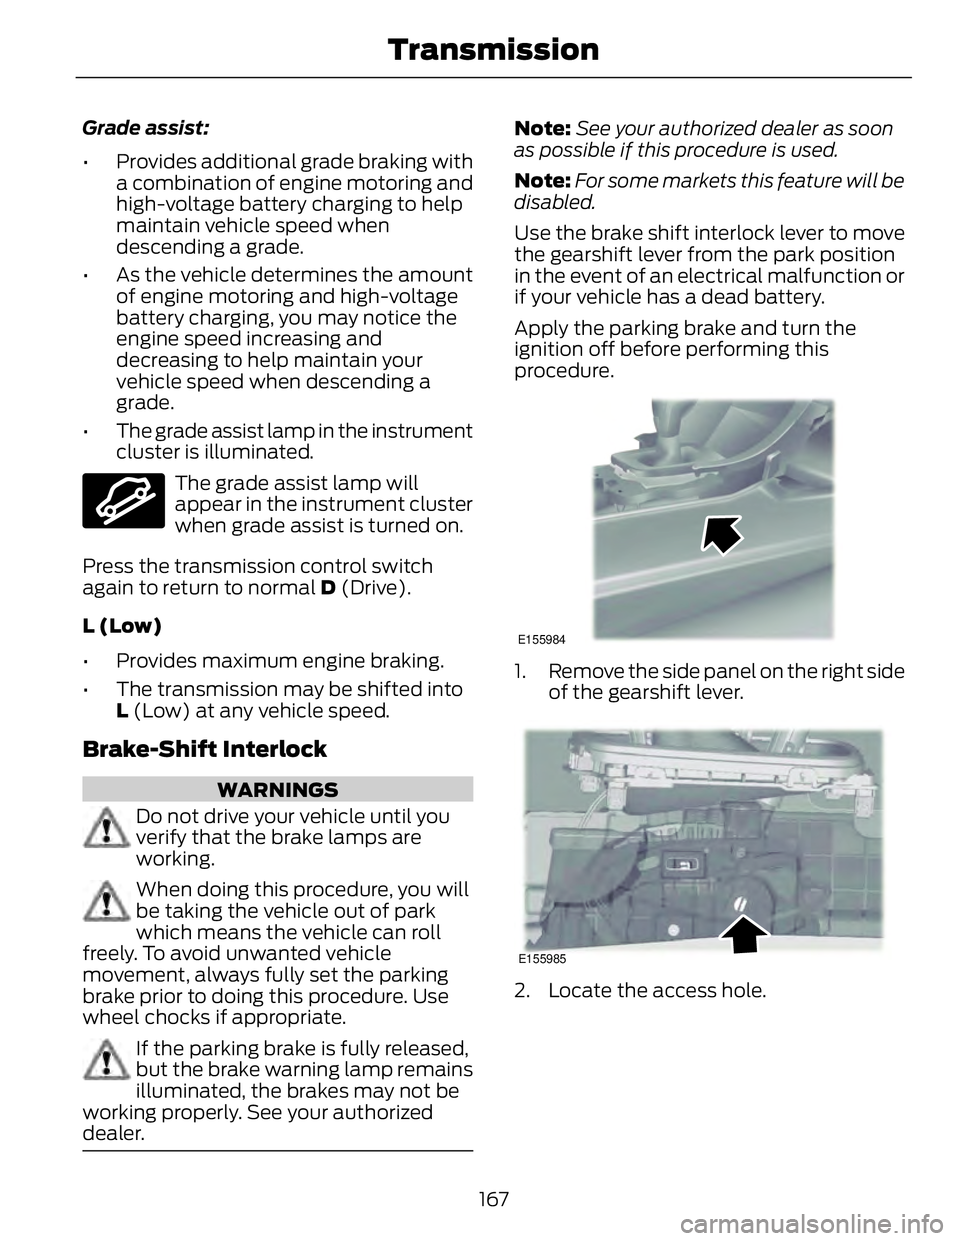
Use the brake shift interlock lever to move
the gearshift lever from the park position
in the event of an electrical malfunction or
if your vehicle has a dead battery.
Apply the parking brake and turn the
ignition off before performing this
procedure. E155984
1. Remove the side panel on the right side
of the gearshift lever.
E155985
2. Locate the access hole.
167Transmission
Page 172 of 473
GENERAL INFORMATION Note: Occasional brake noise is normal. If
a metal-to-metal, continuous grinding or
continuous squeal sound is present, the
brake linings may be worn-out. Have the
system checked by an authorized dealer. If
the vehicle has continuous vibration or
shudder in the steering wheel while braking,
have it checked by an authorized dealer.
Note: Brake dust may accumulate on the
wheels, even under normal driving
conditions. Some dust is inevitable as the
brakes wear and does not contribute to
brake noise. See Cleaning the Alloy
Wheels (page 264).E144522
See Warning Lamps and
Indicators (page 81).
Wet brakes result in reduced braking
efficiency. Gently press the brake pedal a
few times when driving from a car wash or
standing water to dry the brakes.
Brake Over Accelerator In the event the accelerator pedal
becomes stuck or entrapped, apply steady
and firm pressure to the brake pedal to
slow the vehicle and reduce engine power.
If you experience this condition, apply the
brakes and bring your vehicle to a safe
stop. Move the transmission selector lever
to position P, switch the engine off and
apply the parking brake. Inspect the
accelerator pedal for any interference. If
none are found and the condition persists,
have your vehicle towed to the nearest
authorized dealer. Brake Assist Brake assist detects when you brake
heavily by measuring the rate at which you
press the brake pedal. It provides
maximum braking efficiency as long as you
press the pedal. Brake assist can reduce
stopping distances in critical situations.
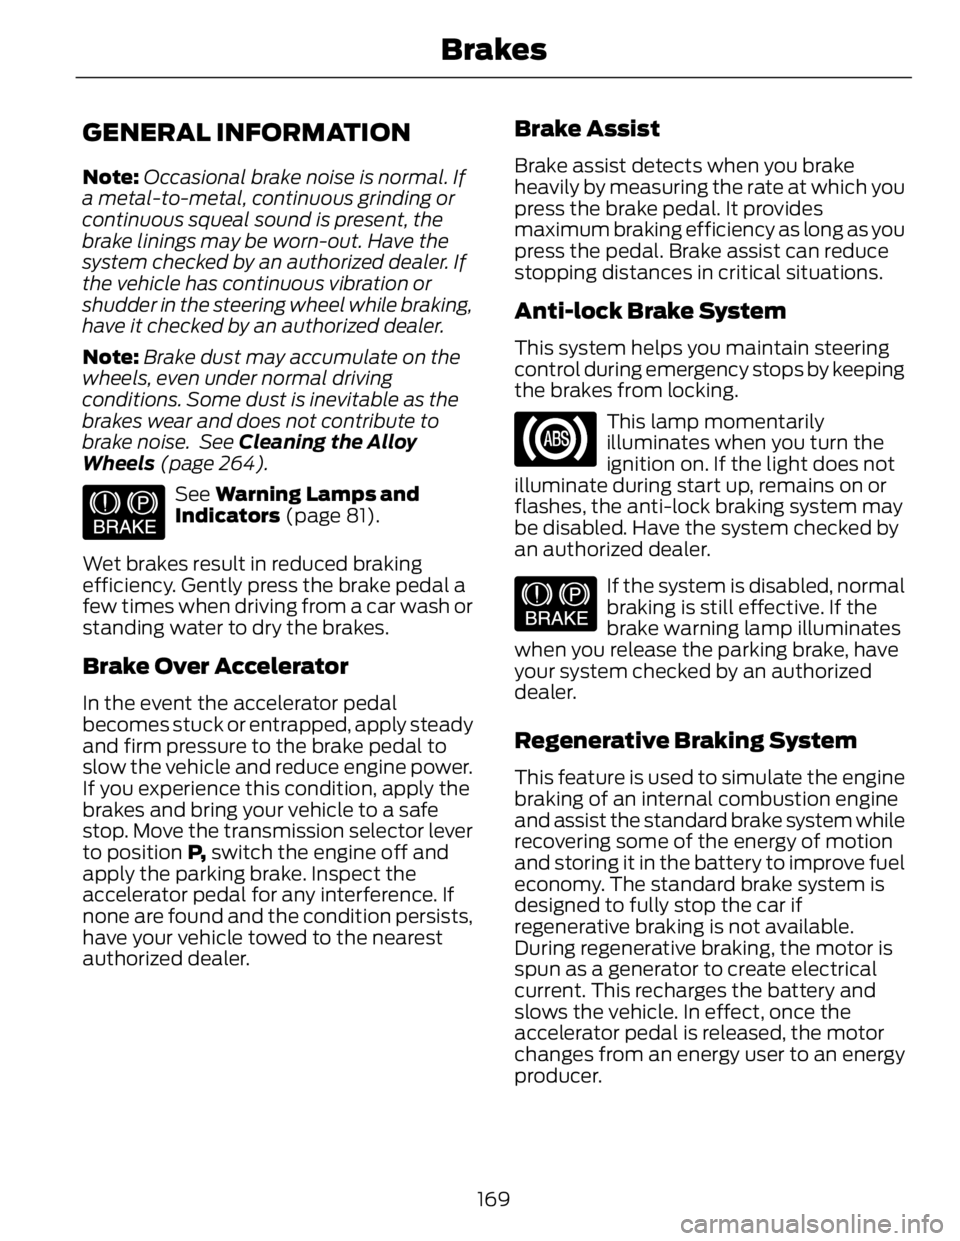
Anti-lock Brake System This system helps you maintain steering
control during emergency stops by keeping
the brakes from locking.
This lamp momentarily
illuminates when you turn the
ignition on. If the light does not
illuminate during start up, remains on or
flashes, the anti-lock braking system may
be disabled. Have the system checked by
an authorized dealer. E144522
If the system is disabled, normal
braking is still effective. If the
brake warning lamp illuminates
when you release the parking brake, have
your system checked by an authorized
dealer.
Regenerative Braking System This feature is used to simulate the engine
braking of an internal combustion engine
and assist the standard brake system while
recovering some of the energy of motion
and storing it in the battery to improve fuel
economy. The standard brake system is
designed to fully stop the car if
regenerative braking is not available.
During regenerative braking, the motor is
spun as a generator to create electrical
current. This recharges the battery and
slows the vehicle. In effect, once the
accelerator pedal is released, the motor
changes from an energy user to an energy
producer.
169Brakes