trunk release FORD FUSION HYBRID 2014 Owners Manual
[x] Cancel search | Manufacturer: FORD, Model Year: 2014, Model line: FUSION HYBRID, Model: FORD FUSION HYBRID 2014Pages: 473, PDF Size: 5.93 MB
Page 60 of 473
The illuminated entry system will turn off
the lights if:
• the ignition is on,
• you press the remote control lock
button, or
• after 25 seconds of illumination.
The lights will not turn off if:
• you turn them on with the lamp control,
or
• any door is open.
Illuminated Exit The interior lamps and select exterior
lamps will illuminate when all doors are
closed, you switch the ignition off and you
remove the key from the ignition
(integrated keyhead transmitter only).
The lamps will turn off if all the doors
remain closed and:
• 25 seconds elapse
• you insert the key in the ignition
(integrated keyhead transmitter only)
• you press the START/STOP button
(intelligent access key only).
Battery Saver If you leave the courtesy lamps, dome
lamps or headlamps on, the battery saver
will shut them off 10 minutes after you
switch the ignition off.
Accessory Mode Battery Saver for
Intelligent Access Keys (If Equipped)
If you leave your vehicle in the run ignition
state, it will shut off once it detects a
certain amount of battery drain or after 45
minutes. Luggage Compartment With the Remote Control E138630
Press twice within three seconds
to unlatch the trunk.
From Outside Your Vehicle E144402
Press the release button above the license
plate to unlatch the trunk. Your vehicle
must be unlocked or have an intelligent
access transmitter within 3 feet (1 meter)
of the trunk.
KEYLESS ENTRY (IF EQUIPPED)
SECURICODE™ KEYLESS ENTRY
KEYPAD The keypad is located near the driver
window. It is invisible until touched and
then it lights up so you can see and touch
the appropriate buttons.
Note: If you enter your entry code too fast
on the keypad, the unlock function may not
work. Re-enter your entry code more slowly.
57Locks
Page 61 of 473
E138637
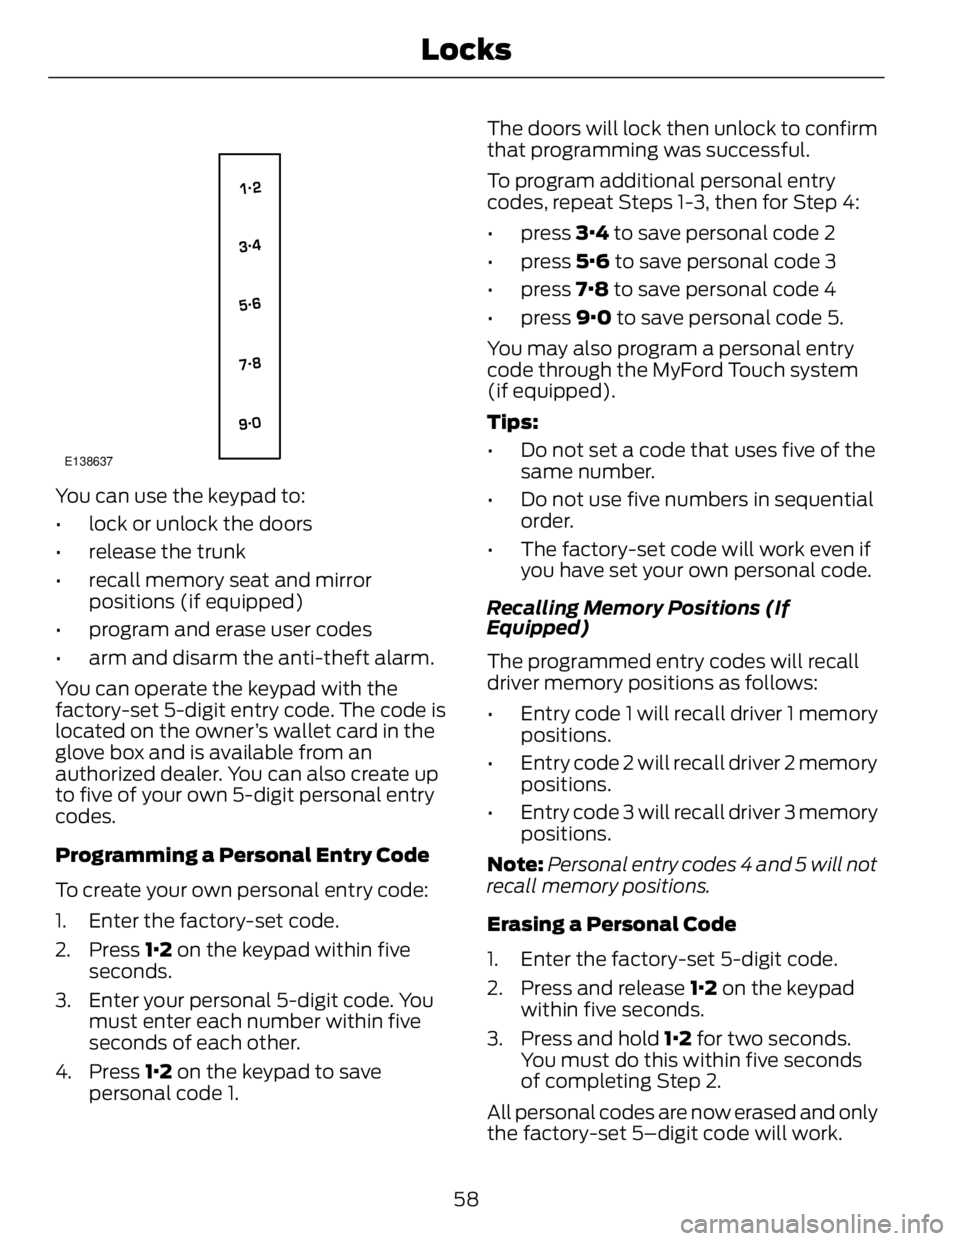
You can use the keypad to:
• lock or unlock the doors
• release the trunk
• recall memory seat and mirror
positions (if equipped)
• program and erase user codes
• arm and disarm the anti-theft alarm.
You can operate the keypad with the
factory-set 5-digit entry code. The code is
located on the owner’s wallet card in the
glove box and is available from an
authorized dealer. You can also create up
to five of your own 5-digit personal entry
codes.
Programming a Personal Entry Code
To create your own personal entry code:
1. Enter the factory-set code.
2. Press 1·2 on the keypad within five
seconds.
3. Enter your personal 5-digit code. You
must enter each number within five
seconds of each other.
4. Press 1·2 on the keypad to save
personal code 1. The doors will lock then unlock to confirm
that programming was successful.
To program additional personal entry
codes, repeat Steps 1-3, then for Step 4:
• press 3·4 to save personal code 2
• press 5·6 to save personal code 3
• press 7·8 to save personal code 4
• press 9·0 to save personal code 5.
You may also program a personal entry
code through the MyFord Touch system
(if equipped).
Tips:
• Do not set a code that uses five of the
same number.
• Do not use five numbers in sequential
order.
• The factory-set code will work even if
you have set your own personal code.
Recalling Memory Positions (If
Equipped)
The programmed entry codes will recall
driver memory positions as follows:
• Entry code 1 will recall driver 1 memory
positions.
• Entry code 2 will recall driver 2 memory
positions.
• Entry code 3 will recall driver 3 memory
positions.
Note: Personal entry codes 4 and 5 will not
recall memory positions.
Erasing a Personal Code
1. Enter the factory-set 5-digit code.
2. Press and release 1·2 on the keypad
within five seconds.
3. Press and hold 1·2 for two seconds.
You must do this within five seconds
of completing Step 2.
All personal codes are now erased and only
the factory-set 5–digit code will work.
58Locks
Page 62 of 473
Anti-Scan Feature
The keypad will go into an anti-scan mode
if you enter the wrong code seven times
(35 consecutive button presses). This
mode disables the keypad for one minute
and the keypad lamp will flash.
The anti-scan feature will turn off after:
• one minute of keypad inactivity
• pressing the unlock button on the
remote control
• switching the ignition on
• unlocking your vehicle using intelligent
access.
Unlocking and Locking the Doors
To Unlock the Driver Door
Enter the factory-set 5-digit code or your
personal code. You must press each
number within five seconds of each other.
The interior lamps will illuminate.
Note: All doors will unlock if you enable the
all-door unlocking mode. See Locking and
Unlocking (page 54).
To Unlock All Doors
Enter the factory-set code or your personal
code, then press 3·4 within five seconds.
To Lock All Doors
Press and hold 7·8 and 9·0 at the same
time (with the driver door closed). You do
not need to enter the keypad code first.
To Release the Trunk
Enter the factory-set code or your personal
code, then press 5·6 within five seconds.
Displaying the Factory Set Code
With Integrated Keyhead Transmitters
Note: You will need to have two
programmed passive anti-theft keys for this
procedure. To display the factory-set code in the
information display:
1. Insert a key into the ignition and switch
the ignition on for a few seconds.
2. Switch the ignition off and remove the
key.
3. Insert the second key into the ignition
and switch the ignition on.
The factory-set code will display for a few
seconds.
Note: The code may not display until after
any other warning messages first display.
With Intelligent Access Keys
Note: You will need to have two
programmed intelligent access keys for this
procedure.
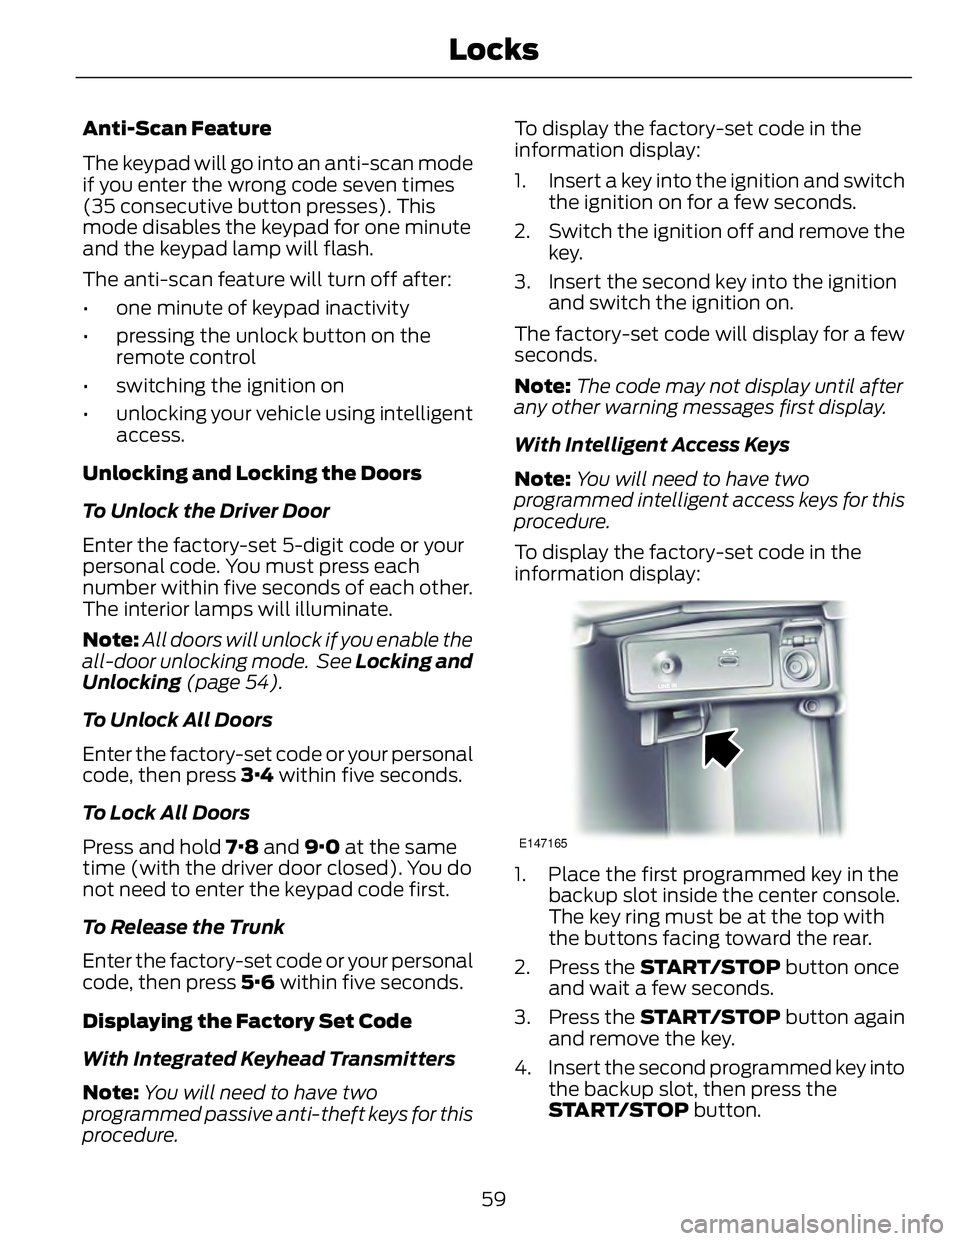
To display the factory-set code in the
information display:
E147165
1. Place the first programmed key in the
backup slot inside the center console.
The key ring must be at the top with
the buttons facing toward the rear.
2. Press the START/STOP button once
and wait a few seconds.
3. Press the START/STOP button again
and remove the key.
4. Insert the second programmed key into
the backup slot, then press the
START/STOP button.
59Locks
Page 63 of 473
The factory-set code will appear in the
information display for a few seconds.
Note: The code may not display until after
any other warning messages first display.
INTERIOR LUGGAGE
COMPARTMENT RELEASE WARNINGS
Keep vehicle doors and luggage
compartment locked and keep keys
and remote transmitters out of a
child’s reach. Unsupervised children could
lock themselves in the trunk and risk injury.
Children should be taught not to play in
vehicles.
Do not leave children, unreliable
adults, or animals unattended in the
vehicle. On hot days, the
temperature in the trunk or vehicle interior
can rise very quickly. Exposure of people
or animals to these high temperatures for
even a short time can cause death or
serious heat-related injuries, including brain
damage. Small children are particularly at
risk.
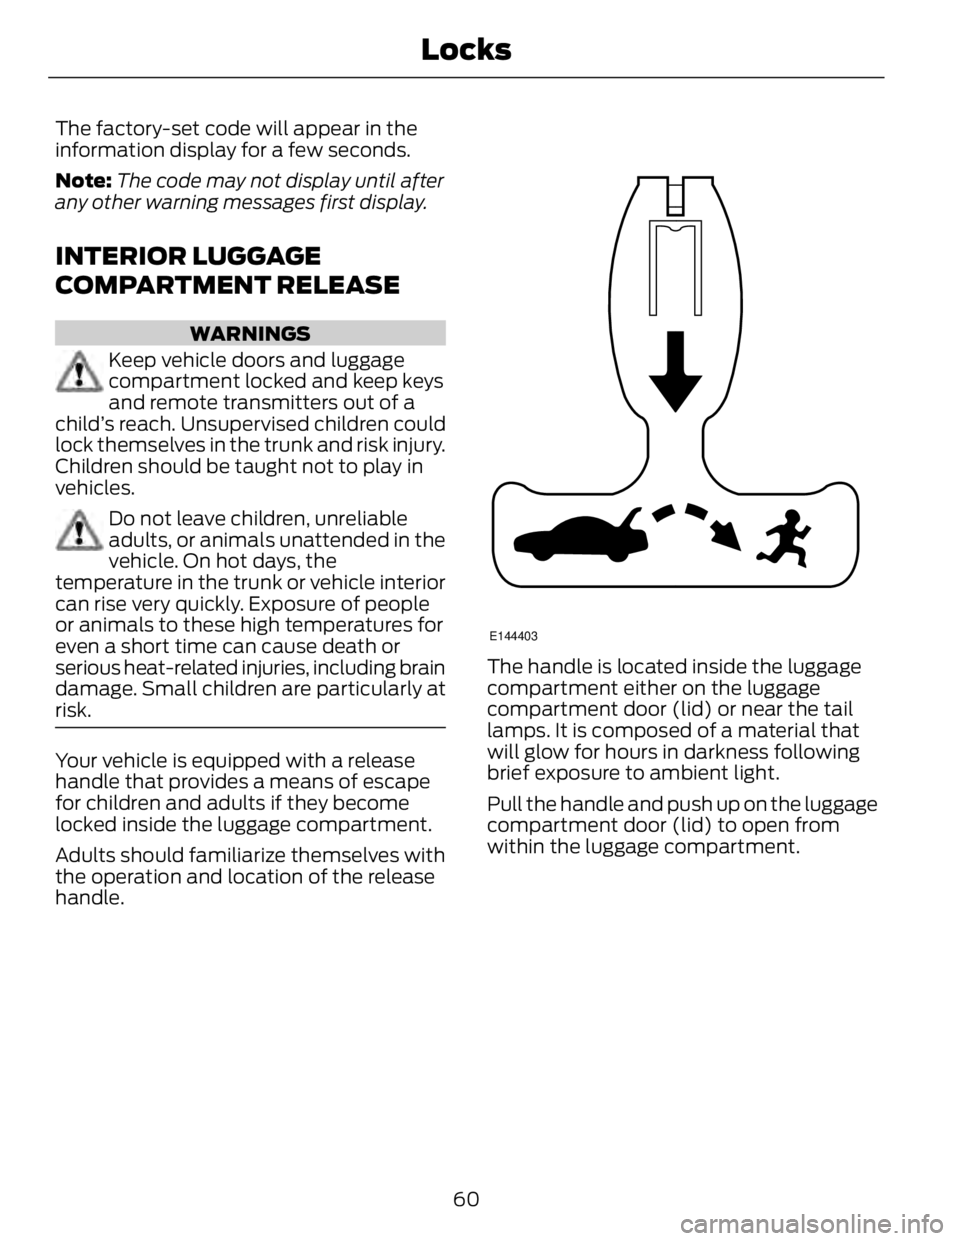
Your vehicle is equipped with a release
handle that provides a means of escape
for children and adults if they become
locked inside the luggage compartment.
Adults should familiarize themselves with
the operation and location of the release
handle. E144403
The handle is located inside the luggage
compartment either on the luggage
compartment door (lid) or near the tail
lamps. It is composed of a material that
will glow for hours in darkness following
brief exposure to ambient light.
Pull the handle and push up on the luggage
compartment door (lid) to open from
within the luggage compartment.
60Locks
Page 88 of 473
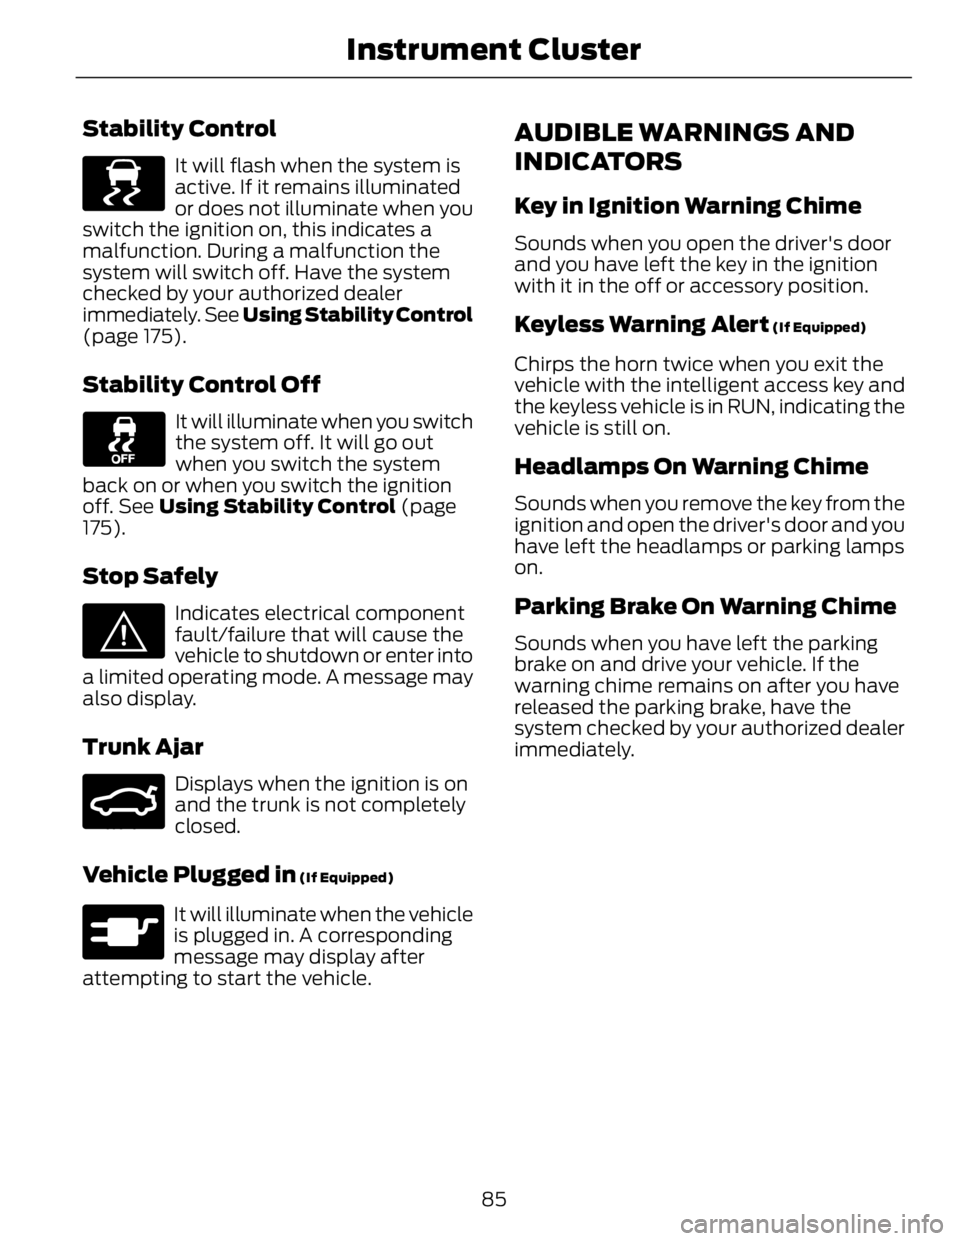
Stability Control E138639
It will flash when the system is
active. If it remains illuminated
or does not illuminate when you
switch the ignition on, this indicates a
malfunction. During a malfunction the
system will switch off. Have the system
checked by your authorized dealer
immediately. See Using Stability Control
(page 175).
Stability Control Off It will illuminate when you switch
the system off. It will go out
when you switch the system
back on or when you switch the ignition
off. See Using Stability Control (page
175).
Stop Safely E144693
Indicates electrical component
fault/failure that will cause the
vehicle to shutdown or enter into
a limited operating mode. A message may
also display.
Trunk Ajar E159323
Displays when the ignition is on
and the trunk is not completely
closed.
Vehicle Plugged in (If Equipped)
E144694
It will illuminate when the vehicle
is plugged in. A corresponding
message may display after
attempting to start the vehicle. AUDIBLE WARNINGS AND
INDICATORS Key in Ignition Warning Chime Sounds when you open the driver's door
and you have left the key in the ignition
with it in the off or accessory position.
Keyless Warning Alert (If Equipped)
Chirps the horn twice when you exit the
vehicle with the intelligent access key and
the keyless vehicle is in RUN, indicating the
vehicle is still on.
Headlamps On Warning Chime Sounds when you remove the key from the
ignition and open the driver's door and you
have left the headlamps or parking lamps
on.
Parking Brake On Warning Chime Sounds when you have left the parking
brake on and drive your vehicle. If the
warning chime remains on after you have
released the parking brake, have the
system checked by your authorized dealer
immediately.
85Instrument Cluster
Page 242 of 473
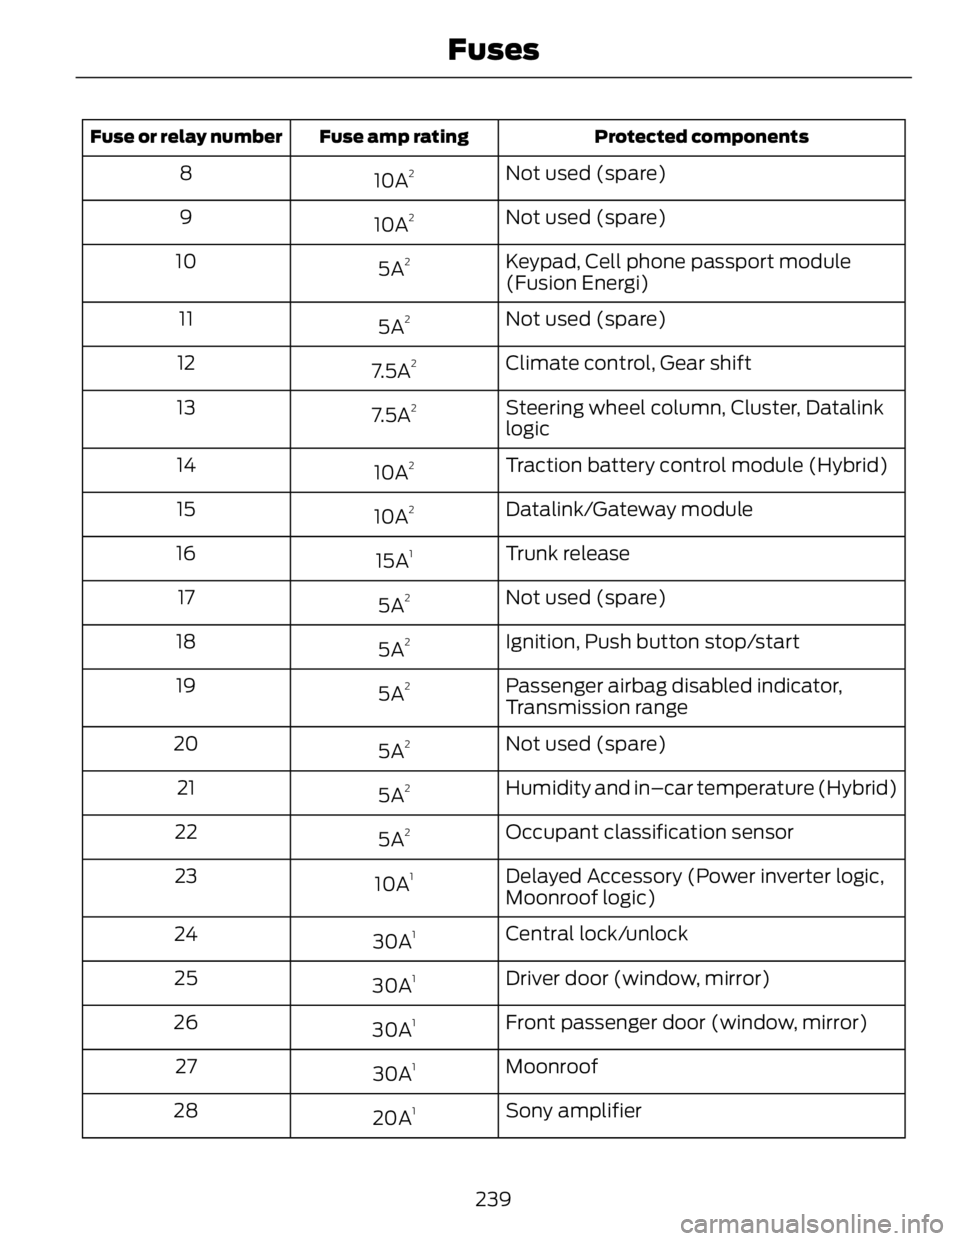
Protected componentsFuse amp ratingFuse or relay number
Not used (spare)
10A 2
8
Not used (spare)
10A 2
9
Keypad, Cell phone passport module
(Fusion Energi)5A 2
10
Not used (spare)
5A 2
11
Climate control, Gear shift
7.5A 2
12
Steering wheel column, Cluster, Datalink
logic7.5A 2
13
Traction battery control module (Hybrid)
10A 2
14
Datalink/Gateway module
10A 2
15
Trunk release
15A 1
16
Not used (spare)
5A 2
17
Ignition, Push button stop/start
5A 2
18
Passenger airbag disabled indicator,
Transmission range5A 2
19
Not used (spare)
5A 2
20
Humidity and in–car temperature (Hybrid)
5A 2
21
Occupant classification sensor
5A 2
22
Delayed Accessory (Power inverter logic,
Moonroof logic)10A 1
23
Central lock/unlock
30A 1
24
Driver door (window, mirror)
30A 1
25
Front passenger door (window, mirror)
30A 1
26
Moonroof
30A 1
27
Sony amplifier
20A 1
28
239Fuses
Page 261 of 473
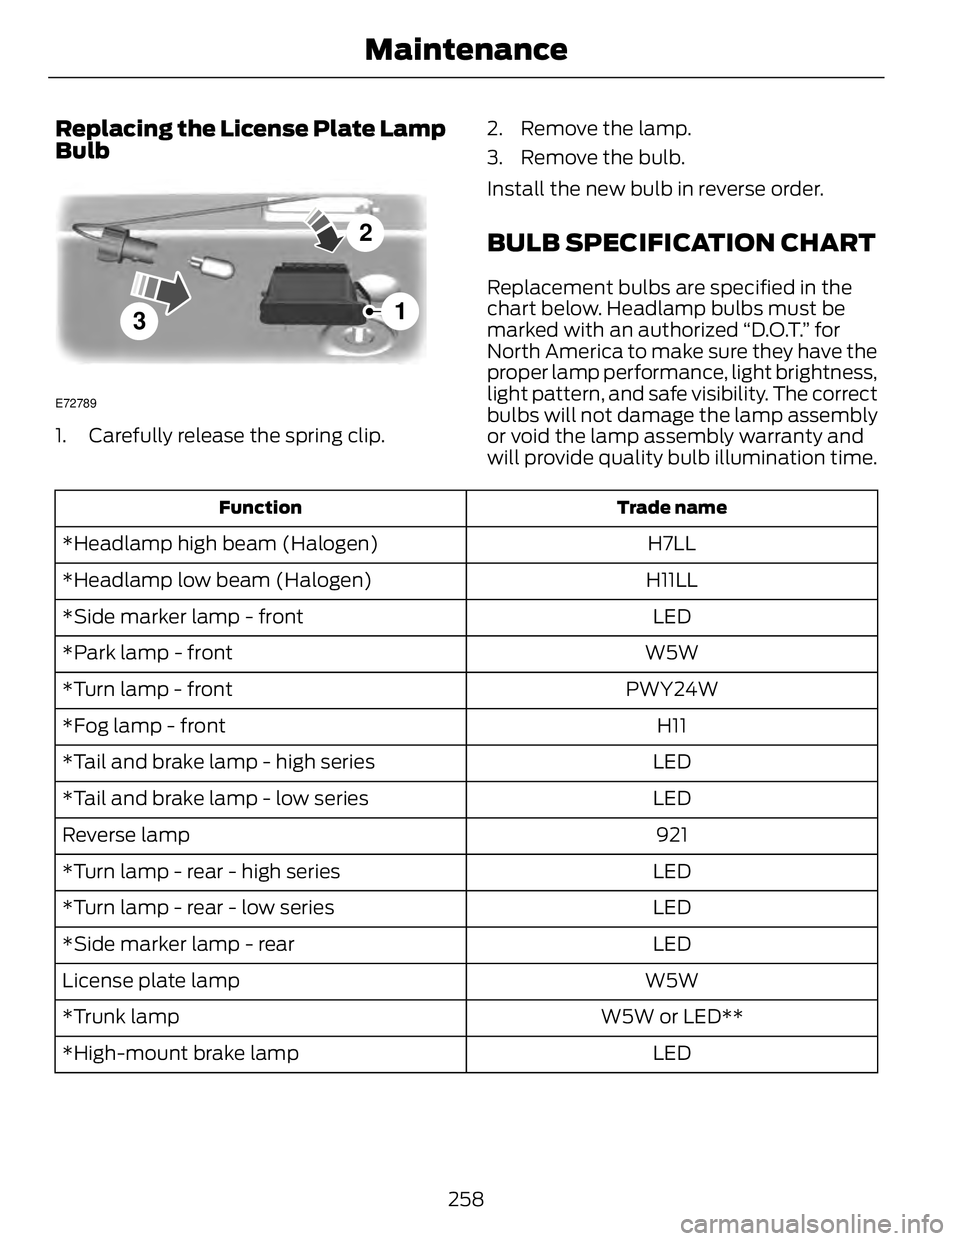
Replacing the License Plate Lamp
Bulb
3 2
1E72789
1. Carefully release the spring clip. 2. Remove the lamp.
3. Remove the bulb.
Install the new bulb in reverse order.
BULB SPECIFICATION CHART Replacement bulbs are specified in the
chart below. Headlamp bulbs must be
marked with an authorized “D.O.T.” for
North America to make sure they have the
proper lamp performance, light brightness,
light pattern, and safe visibility. The correct
bulbs will not damage the lamp assembly
or void the lamp assembly warranty and
will provide quality bulb illumination time. Trade nameFunction
H7LL*Headlamp high beam (Halogen)
H11LL*Headlamp low beam (Halogen)
LED*Side marker lamp - front
W5W*Park lamp - front
PWY24W*Turn lamp - front
H11*Fog lamp - front
LED*Tail and brake lamp - high series
LED*Tail and brake lamp - low series
921Reverse lamp
LED*Turn lamp - rear - high series
LED*Turn lamp - rear - low series
LED*Side marker lamp - rear
W5WLicense plate lamp
W5W or LED***Trunk lamp
LED*High-mount brake lamp
258Maintenance