FORD GT 2020 Owners Manual
Manufacturer: FORD, Model Year: 2020, Model line: GT, Model: FORD GT 2020Pages: 316, PDF Size: 6.25 MB
Page 171 of 316
Because your vehicle
’s engine is
electronically controlled by a computer,
some control conditions are maintained
by power from the battery. When the
battery is disconnected or a new battery
is installed, the engine must relearn its idle
and fuel trim strategy for optimum
driveability and performance.
To restore the settings, do the following:
1. Apply the parking brake.
2. Shift into park (P) or neutral (N).
3. Switch off all accessories.
4. Press the brake pedal and start your vehicle.
5. Run the engine until it reaches normal operating temperature. As the engine
is warming up, complete the following:
Reset the clock. See Audio System
(page 218). Reset the radio station
presets. See Audio System (page 218).
6. Allow the engine to idle for at least one
minute.
7. Drive the vehicle at least 10 mi (16 km)
to completely relearn the idle trim and
fuel trim strategy.
Note: If you do not allow the engine to
relearn the idle and fuel trim strategy, the
idle quality of your vehicle may be adversely
affected until the engine computer
eventually relearns the idle trim and fuel
trim strategy.
Make sure that you dispose of old batteries
in an environmentally friendly way. Seek
advice from your local authority about
recycling old batteries.
Battery Charger and Maintainer
If you plan to have your GT parked or in
storage for more than two weeks without
driving it, connect the Li-Ion compatible
battery charger and maintainer provided.
There are two methods to connect the
charger: Method 1: Rear Hatch Storage
Compartment Power Point
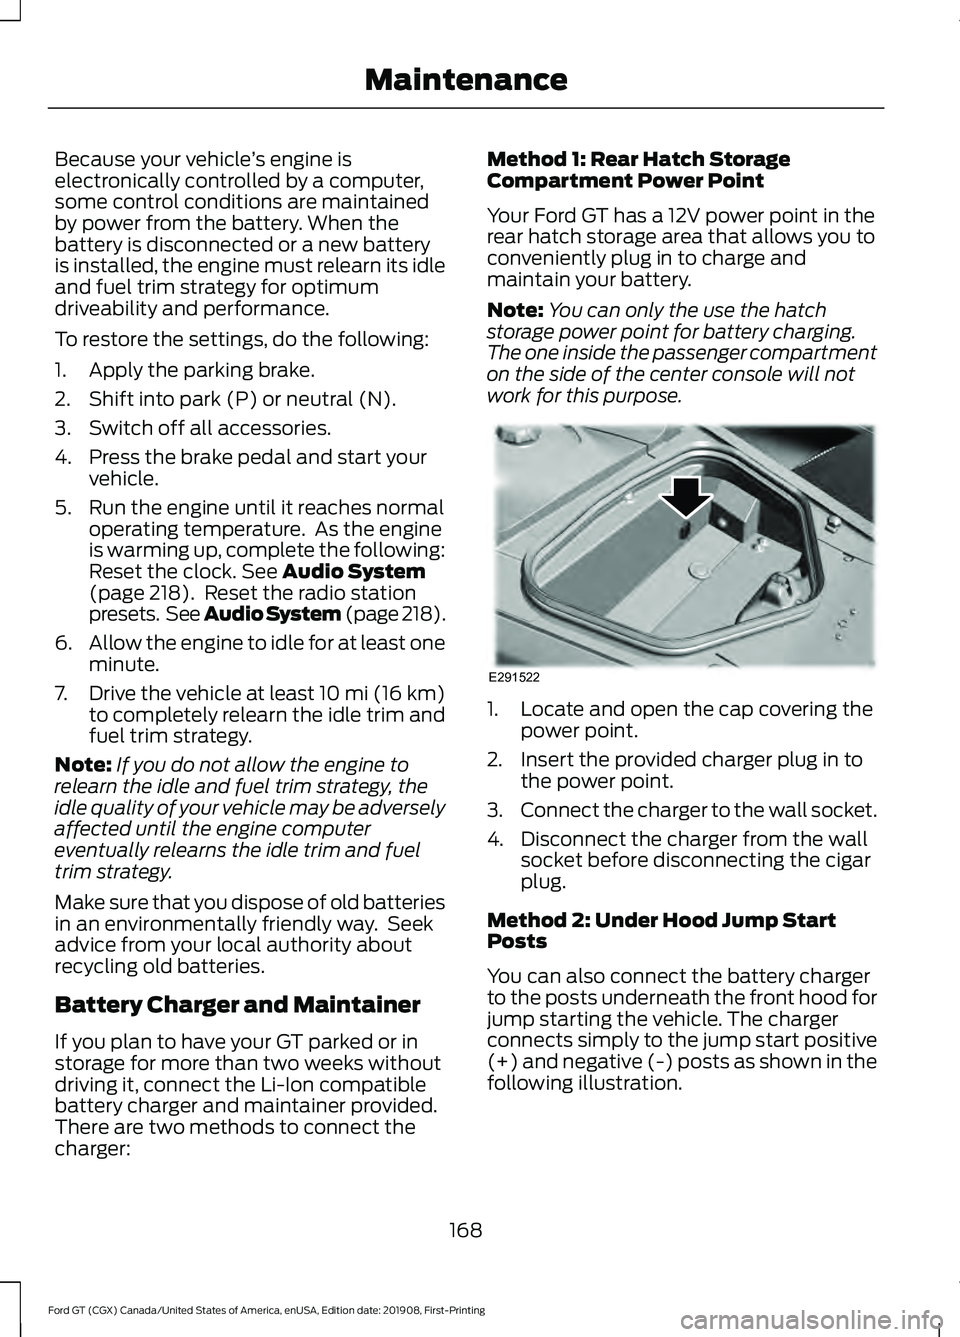
Your Ford GT has a 12V power point in the
rear hatch storage area that allows you to
conveniently plug in to charge and
maintain your battery.
Note:
You can only the use the hatch
storage power point for battery charging.
The one inside the passenger compartment
on the side of the center console will not
work for this purpose. 1. Locate and open the cap covering the
power point.
2. Insert the provided charger plug in to the power point.
3. Connect the charger to the wall socket.
4. Disconnect the charger from the wall socket before disconnecting the cigar
plug.
Method 2: Under Hood Jump Start
Posts
You can also connect the battery charger
to the posts underneath the front hood for
jump starting the vehicle. The charger
connects simply to the jump start positive
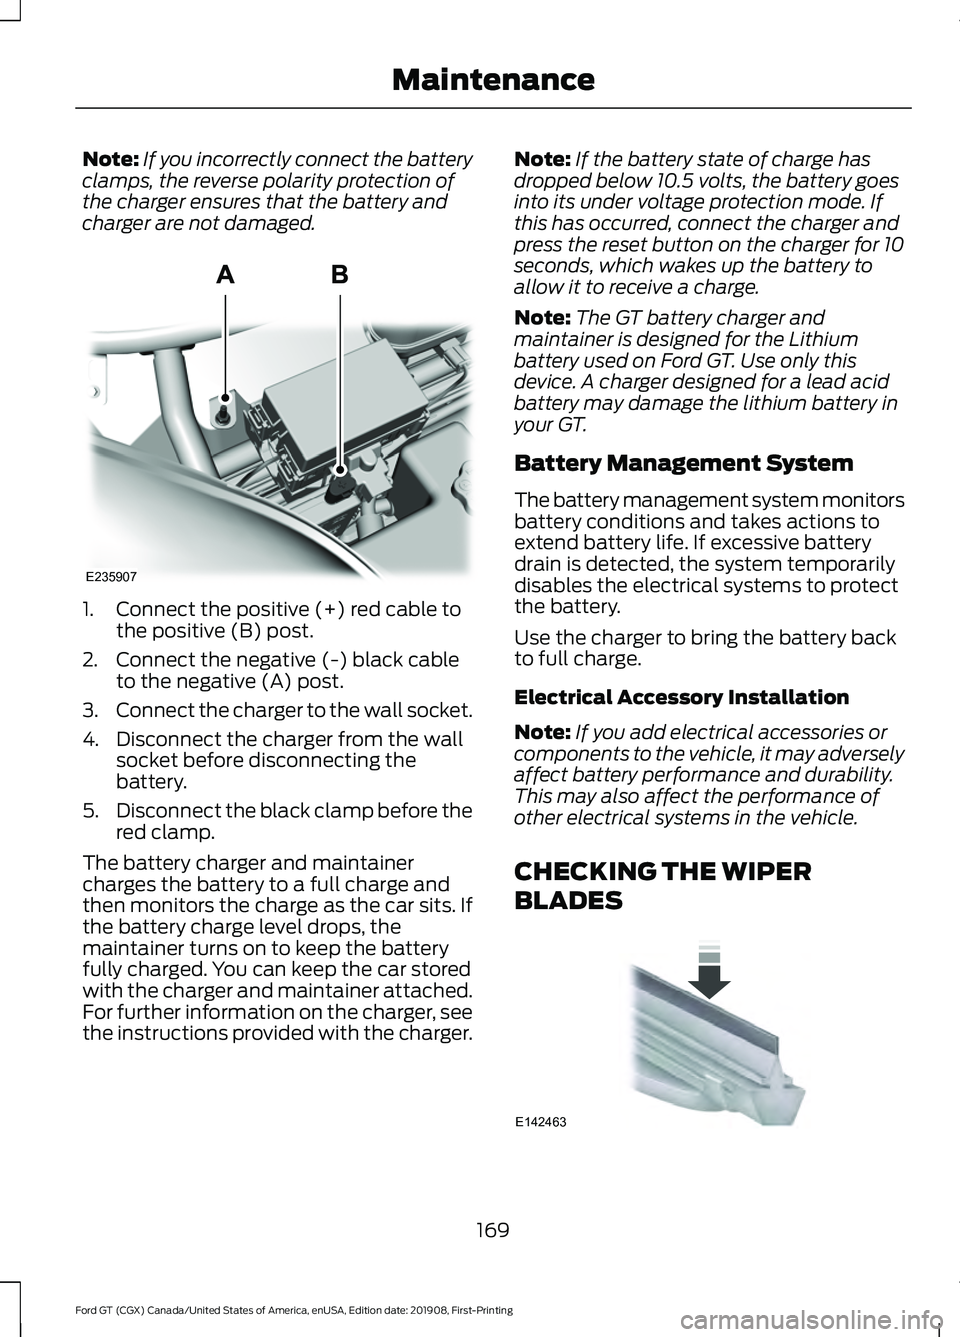
(+) and negative (-) posts as shown in the
following illustration.
168
Ford GT (CGX) Canada/United States of America, enUSA, Edition date: 201908, First-Printing MaintenanceE291522
Page 172 of 316
Note:
If you incorrectly connect the battery
clamps, the reverse polarity protection of
the charger ensures that the battery and
charger are not damaged. 1. Connect the positive (+) red cable to
the positive (B) post.
2. Connect the negative (-) black cable to the negative (A) post.
3. Connect the charger to the wall socket.
4. Disconnect the charger from the wall socket before disconnecting the
battery.
5. Disconnect the black clamp before the
red clamp.
The battery charger and maintainer
charges the battery to a full charge and
then monitors the charge as the car sits. If
the battery charge level drops, the
maintainer turns on to keep the battery
fully charged. You can keep the car stored
with the charger and maintainer attached.
For further information on the charger, see
the instructions provided with the charger. Note:
If the battery state of charge has
dropped below 10.5 volts, the battery goes
into its under voltage protection mode. If
this has occurred, connect the charger and
press the reset button on the charger for 10
seconds, which wakes up the battery to
allow it to receive a charge.
Note: The GT battery charger and
maintainer is designed for the Lithium
battery used on Ford GT. Use only this
device. A charger designed for a lead acid
battery may damage the lithium battery in
your GT.
Battery Management System
The battery management system monitors
battery conditions and takes actions to
extend battery life. If excessive battery
drain is detected, the system temporarily
disables the electrical systems to protect
the battery.
Use the charger to bring the battery back
to full charge.
Electrical Accessory Installation
Note: If you add electrical accessories or
components to the vehicle, it may adversely
affect battery performance and durability.
This may also affect the performance of
other electrical systems in the vehicle.
CHECKING THE WIPER
BLADES 169
Ford GT (CGX) Canada/United States of America, enUSA, Edition date: 201908, First-Printing MaintenanceE235907 E142463
Page 173 of 316
Run the tip of your fingers over the edge of
the blade to check for roughness.
Clean the wiper blades with washer fluid
or water applied with a soft sponge or
cloth.
CHANGING THE WIPER
BLADES
Replacement blades are available at your
Ford dealer.
Note:
To avoid damaging the windshield,
lift the wiper blade a few inches off the
glass and place a cloth on the windshield
under the blade.
Note: Manually move the wiper blades to
the midway position.
Note: The windshield wiper blades are
different in length. The longer blade is on
the driver's side.
1. Disconnect the washer pipe from the wiper arm.
2. Press the release button on the top of the wiper arm where the blade
assembly attaches to the arm.
3. Pull the blade assembly away from the
arm, while rocking it from side to side
to help release it.
4. Keep the cloth in place to avoid the arm from hitting the windshield glass. 5. Install the new blade assembly and
reconnect the washer pipe.
6. When complete, switch on the wipers and they will cycle back to the park
position when you switch them off.
Replace wiper blades at least once per
year for optimum performance.
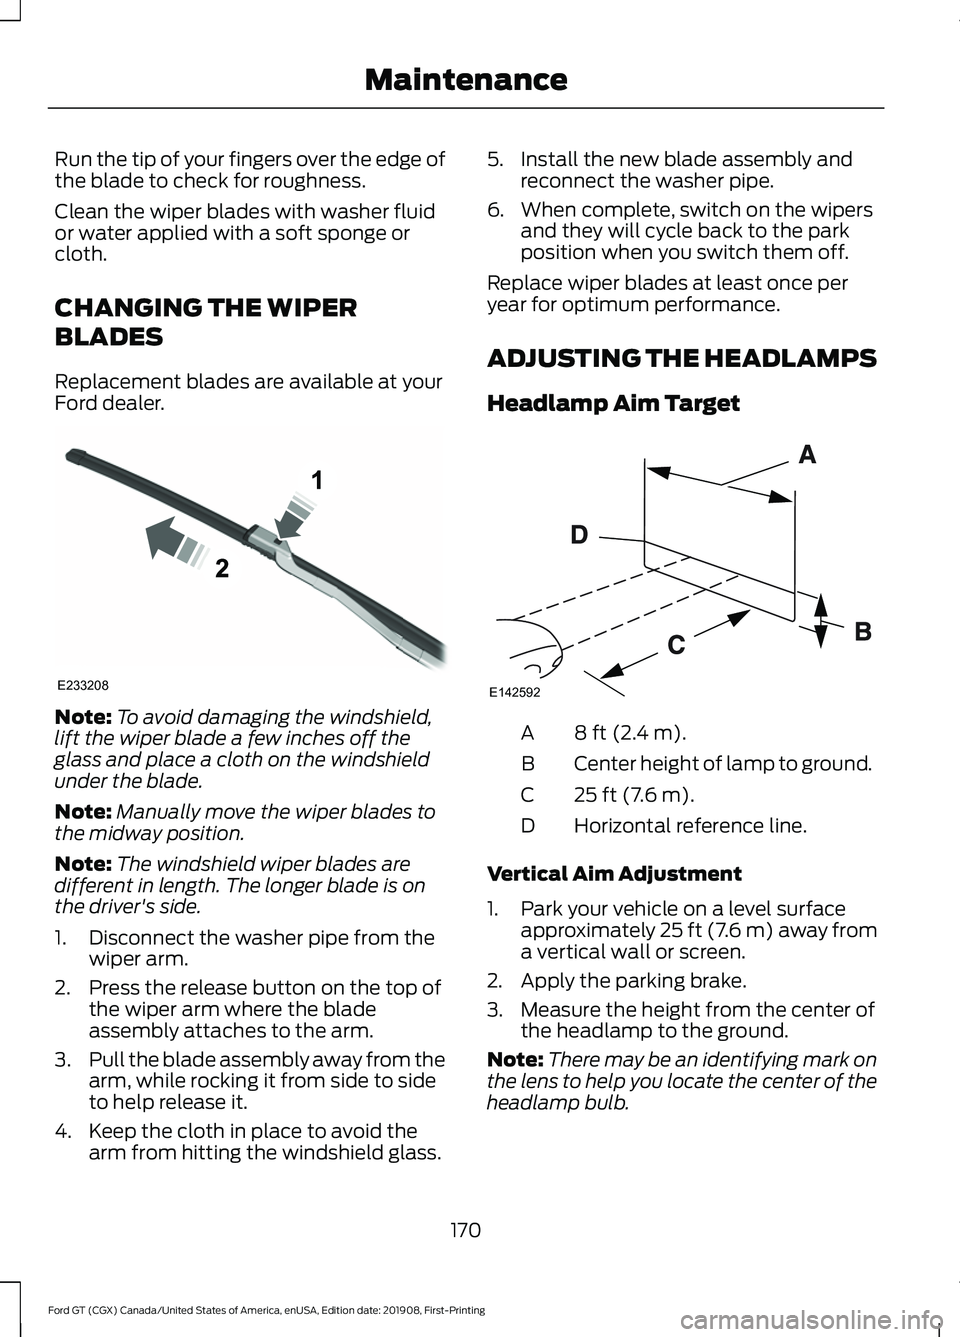
ADJUSTING THE HEADLAMPS
Headlamp Aim Target 8 ft (2.4 m).
A
Center height of lamp to ground.
B
25 ft (7.6 m).
C
Horizontal reference line.
D
Vertical Aim Adjustment
1. Park your vehicle on a level surface approximately 25 ft (7.6 m) away from
a vertical wall or screen.
2. Apply the parking brake.
3. Measure the height from the center of the headlamp to the ground.
Note: There may be an identifying mark on
the lens to help you locate the center of the
headlamp bulb.
170
Ford GT (CGX) Canada/United States of America, enUSA, Edition date: 201908, First-Printing MaintenanceE233208 E142592
Page 174 of 316
4.
Mark a horizontal reference line on the
vertical wall or screen that is a
minimum of 8 ft (2.4 m) long.
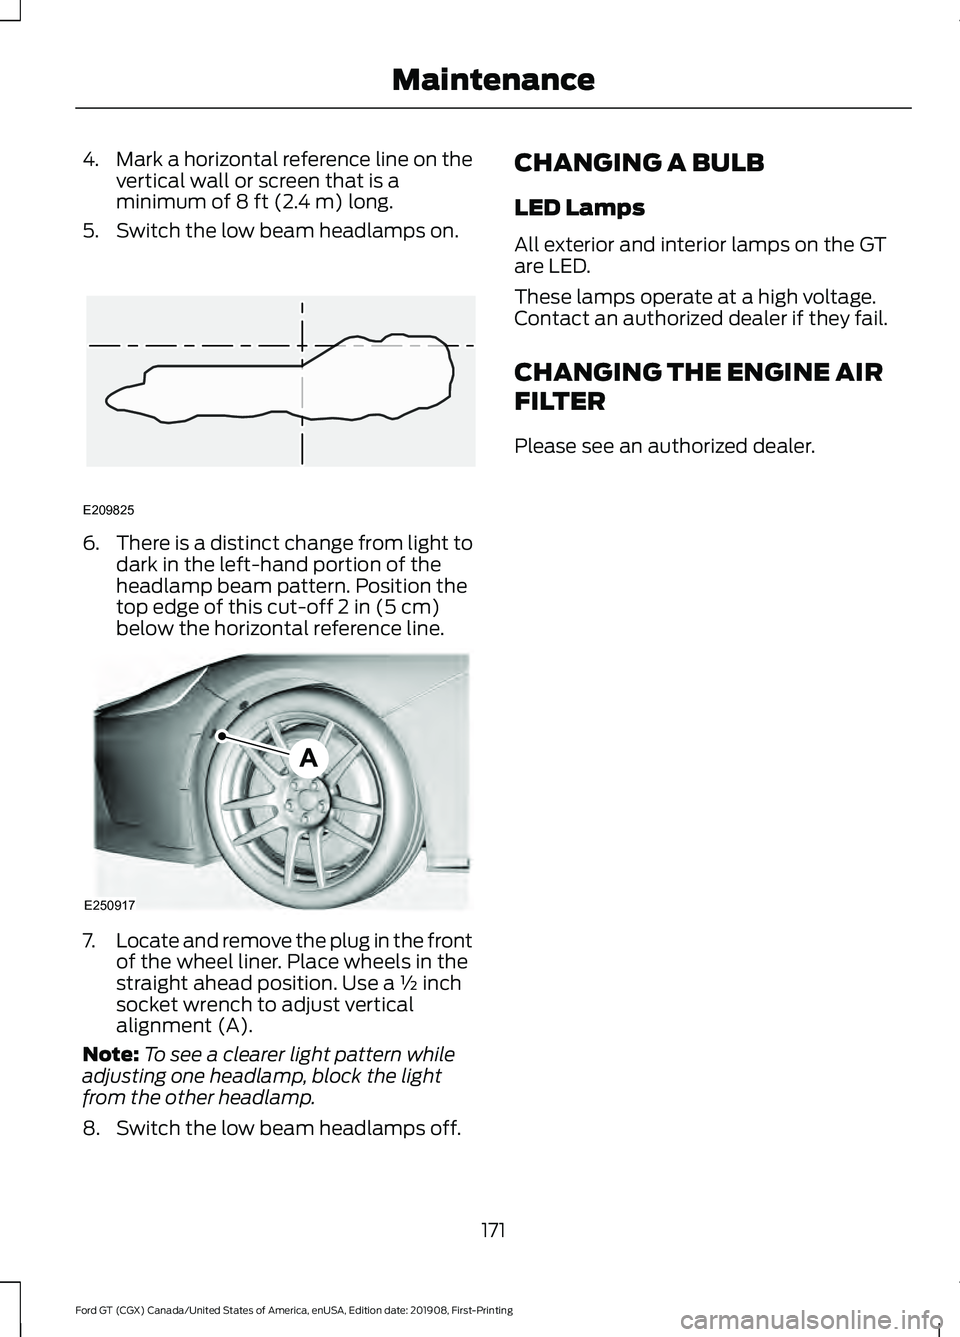
5. Switch the low beam headlamps on. 6.
There is a distinct change from light to
dark in the left-hand portion of the
headlamp beam pattern. Position the
top edge of this cut-off
2 in (5 cm)
below the horizontal reference line. 7.
Locate and remove the plug in the front
of the wheel liner. Place wheels in the
straight ahead position. Use a ½ inch
socket wrench to adjust vertical
alignment (A).
Note: To see a clearer light pattern while
adjusting one headlamp, block the light
from the other headlamp.
8. Switch the low beam headlamps off. CHANGING A BULB
LED Lamps
All exterior and interior lamps on the GT
are LED.
These lamps operate at a high voltage.
Contact an authorized dealer if they fail.
CHANGING THE ENGINE AIR
FILTER
Please see an authorized dealer.
171
Ford GT (CGX) Canada/United States of America, enUSA, Edition date: 201908, First-Printing MaintenanceE209825 E250917
Page 175 of 316
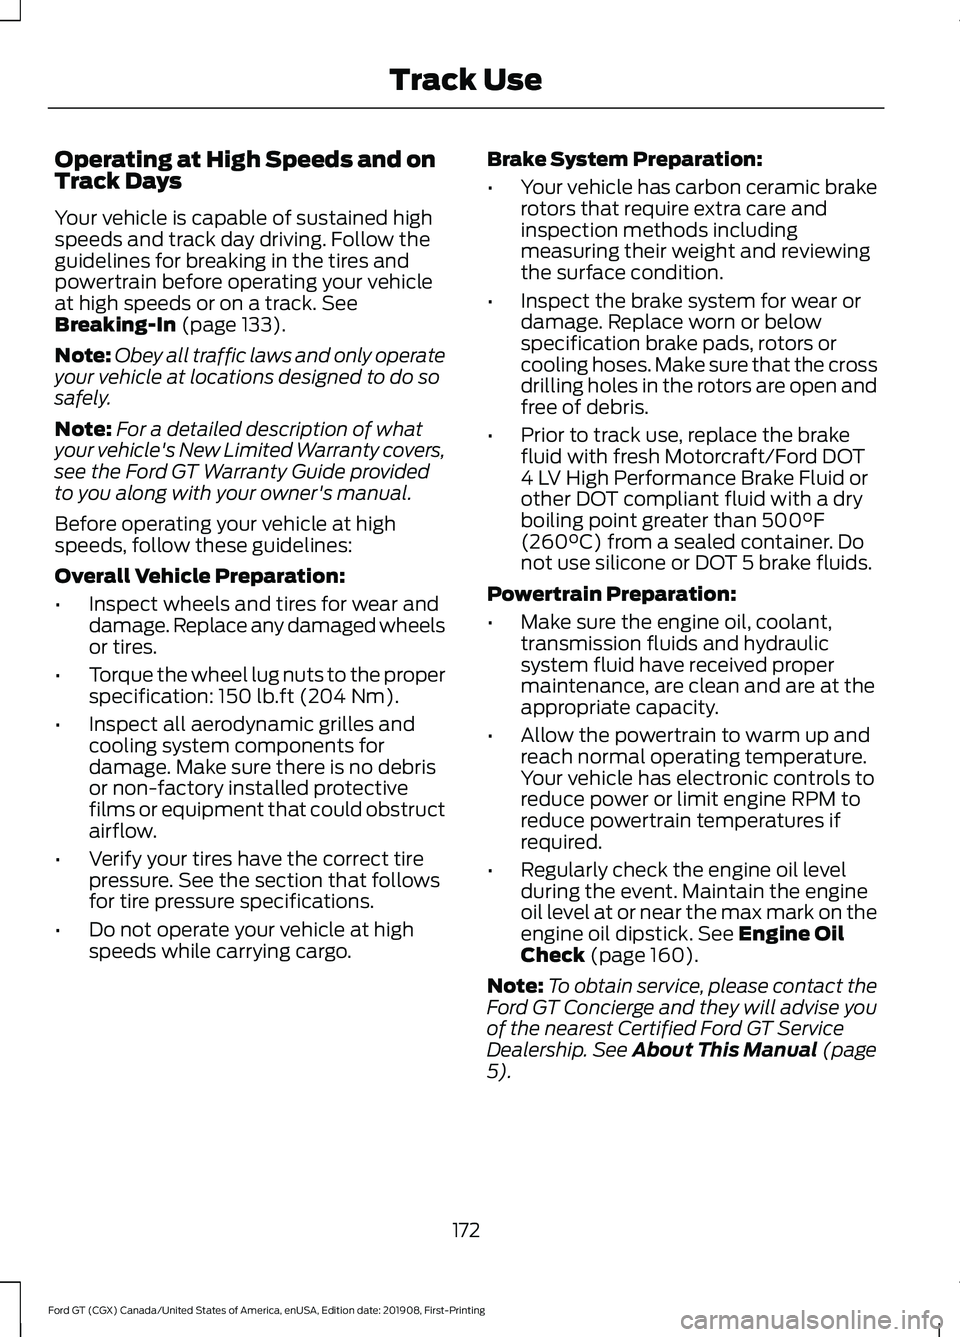
Operating at High Speeds and on
Track Days
Your vehicle is capable of sustained high
speeds and track day driving. Follow the
guidelines for breaking in the tires and
powertrain before operating your vehicle
at high speeds or on a track. See
Breaking-In (page 133).
Note: Obey all traffic laws and only operate
your vehicle at locations designed to do so
safely.
Note: For a detailed description of what
your vehicle's New Limited Warranty covers,
see the Ford GT Warranty Guide provided
to you along with your owner's manual.
Before operating your vehicle at high
speeds, follow these guidelines:
Overall Vehicle Preparation:
• Inspect wheels and tires for wear and
damage. Replace any damaged wheels
or tires.
• Torque the wheel lug nuts to the proper
specification:
150 lb.ft (204 Nm).
• Inspect all aerodynamic grilles and
cooling system components for
damage. Make sure there is no debris
or non-factory installed protective
films or equipment that could obstruct
airflow.
• Verify your tires have the correct tire
pressure. See the section that follows
for tire pressure specifications.
• Do not operate your vehicle at high
speeds while carrying cargo. Brake System Preparation:
•
Your vehicle has carbon ceramic brake
rotors that require extra care and
inspection methods including
measuring their weight and reviewing
the surface condition.
• Inspect the brake system for wear or
damage. Replace worn or below
specification brake pads, rotors or
cooling hoses. Make sure that the cross
drilling holes in the rotors are open and
free of debris.
• Prior to track use, replace the brake
fluid with fresh Motorcraft/Ford DOT
4 LV High Performance Brake Fluid or
other DOT compliant fluid with a dry
boiling point greater than
500°F
(260°C) from a sealed container. Do
not use silicone or DOT 5 brake fluids.
Powertrain Preparation:
• Make sure the engine oil, coolant,
transmission fluids and hydraulic
system fluid have received proper
maintenance, are clean and are at the
appropriate capacity.
• Allow the powertrain to warm up and
reach normal operating temperature.
Your vehicle has electronic controls to
reduce power or limit engine RPM to
reduce powertrain temperatures if
required.
• Regularly check the engine oil level
during the event. Maintain the engine
oil level at or near the max mark on the
engine oil dipstick.
See Engine Oil
Check (page 160).
Note: To obtain service, please contact the
Ford GT Concierge and they will advise you
of the nearest Certified Ford GT Service
Dealership.
See About This Manual (page
5).
172
Ford GT (CGX) Canada/United States of America, enUSA, Edition date: 201908, First-Printing Track Use
Page 176 of 316
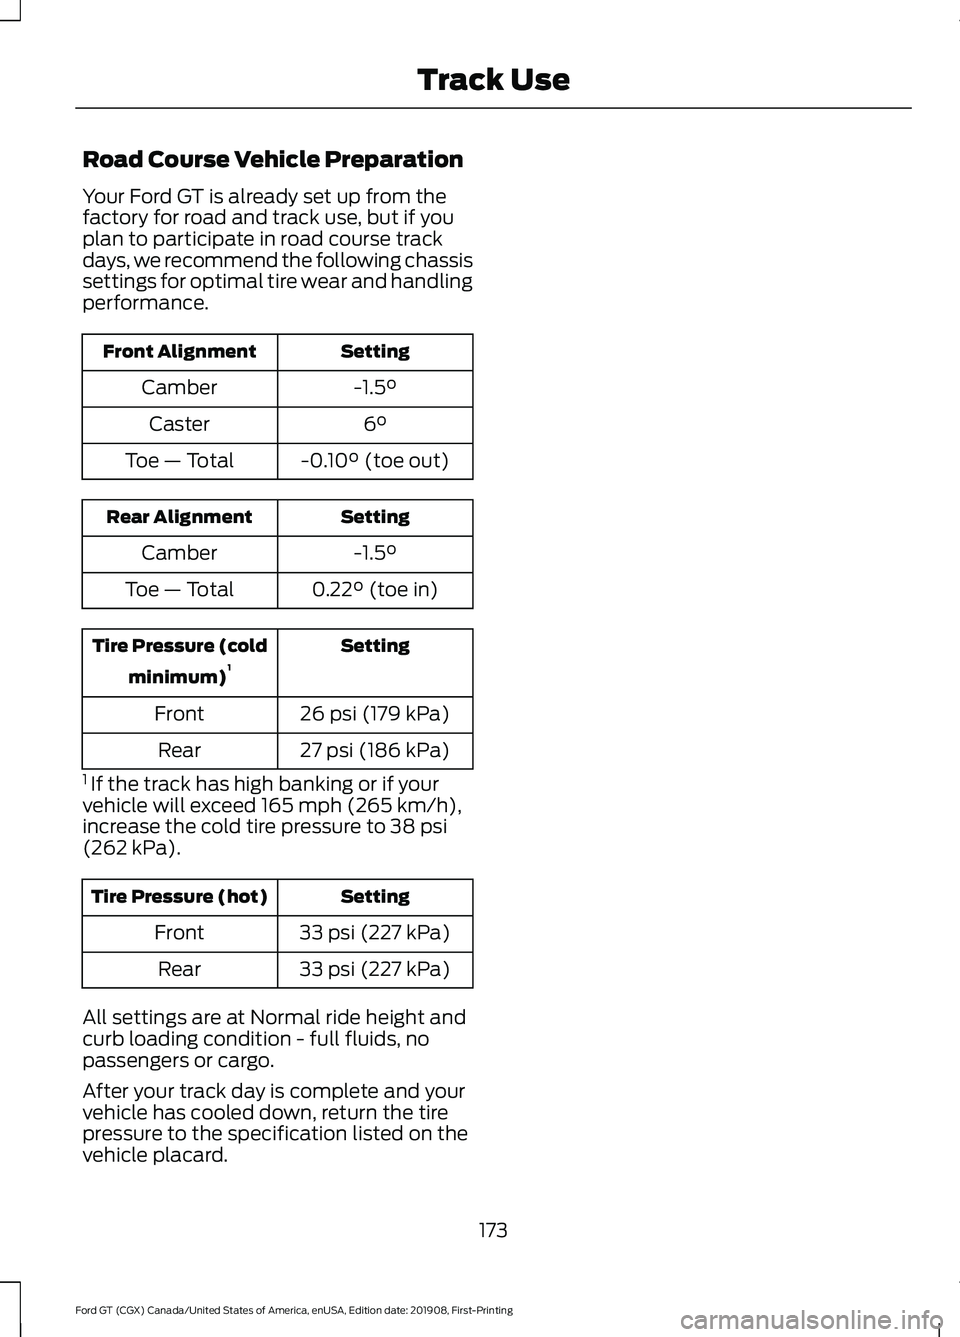
Road Course Vehicle Preparation
Your Ford GT is already set up from the
factory for road and track use, but if you
plan to participate in road course track
days, we recommend the following chassis
settings for optimal tire wear and handling
performance.
Setting
Front Alignment
-1.5°
Camber
6°
Caster
-0.10° (toe out)
Toe — Total Setting
Rear Alignment
-1.5°
Camber
0.22° (toe in)
Toe — Total Setting
Tire Pressure (cold
minimum) 1
26 psi (179 kPa)
Front
27 psi (186 kPa)
Rear
1 If the track has high banking or if your
vehicle will exceed 165 mph (265 km/h),
increase the cold tire pressure to 38 psi
(262 kPa). Setting
Tire Pressure (hot)
33 psi (227 kPa)
Front
33 psi (227 kPa)
Rear
All settings are at Normal ride height and
curb loading condition - full fluids, no
passengers or cargo.
After your track day is complete and your
vehicle has cooled down, return the tire
pressure to the specification listed on the
vehicle placard.
173
Ford GT (CGX) Canada/United States of America, enUSA, Edition date: 201908, First-Printing Track Use
Page 177 of 316
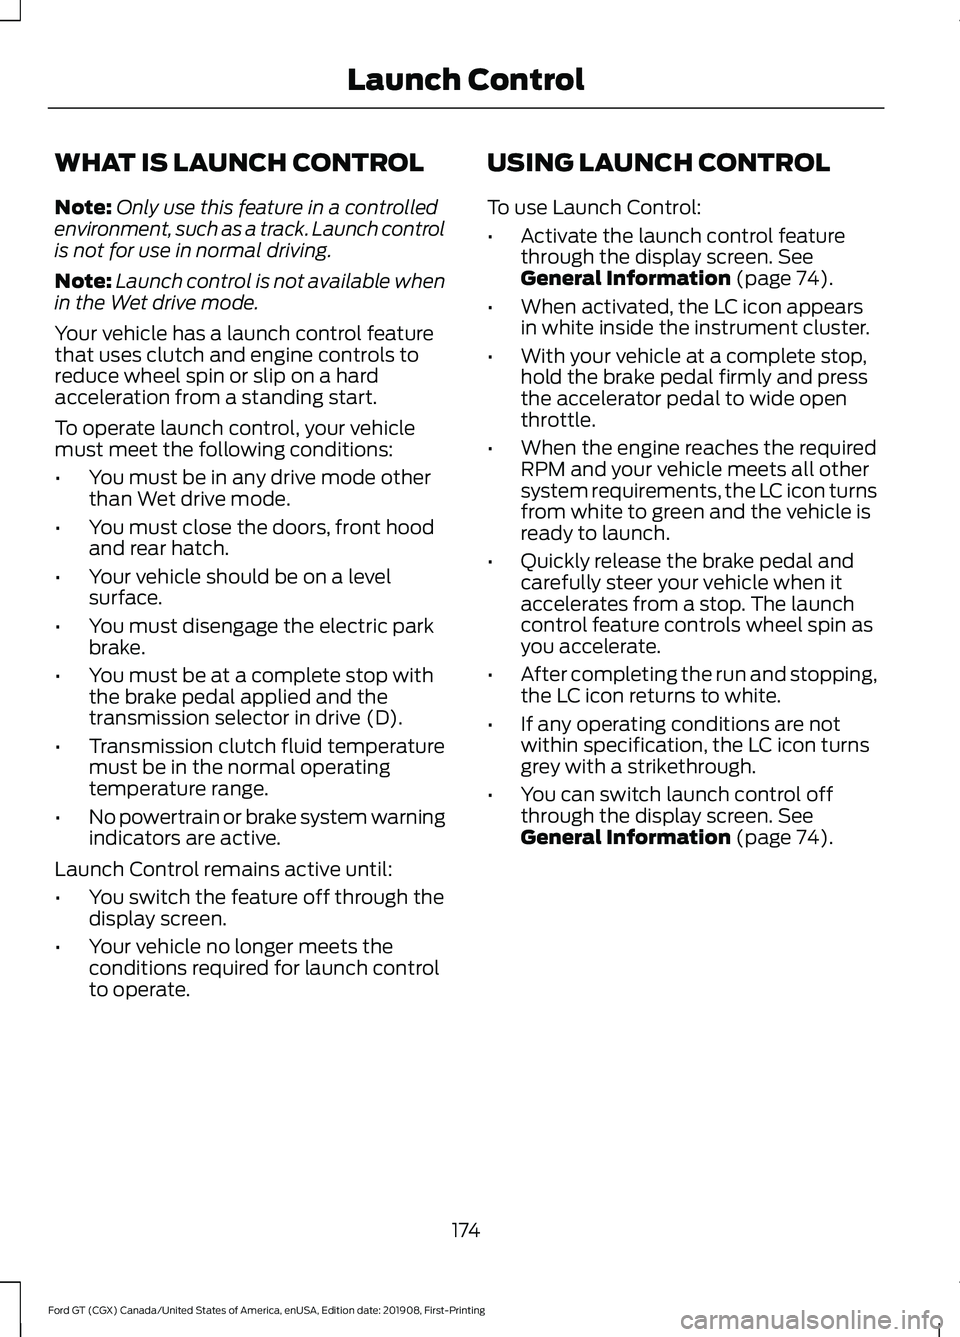
WHAT IS LAUNCH CONTROL
Note:
Only use this feature in a controlled
environment, such as a track. Launch control
is not for use in normal driving.
Note: Launch control is not available when
in the Wet drive mode.
Your vehicle has a launch control feature
that uses clutch and engine controls to
reduce wheel spin or slip on a hard
acceleration from a standing start.
To operate launch control, your vehicle
must meet the following conditions:
• You must be in any drive mode other
than Wet drive mode.
• You must close the doors, front hood
and rear hatch.
• Your vehicle should be on a level
surface.
• You must disengage the electric park
brake.
• You must be at a complete stop with
the brake pedal applied and the
transmission selector in drive (D).
• Transmission clutch fluid temperature
must be in the normal operating
temperature range.
• No powertrain or brake system warning
indicators are active.
Launch Control remains active until:
• You switch the feature off through the
display screen.
• Your vehicle no longer meets the
conditions required for launch control
to operate. USING LAUNCH CONTROL
To use Launch Control:
•
Activate the launch control feature
through the display screen. See
General Information (page 74).
• When activated, the LC icon appears
in white inside the instrument cluster.
• With your vehicle at a complete stop,
hold the brake pedal firmly and press
the accelerator pedal to wide open
throttle.
• When the engine reaches the required
RPM and your vehicle meets all other
system requirements, the LC icon turns
from white to green and the vehicle is
ready to launch.
• Quickly release the brake pedal and
carefully steer your vehicle when it
accelerates from a stop. The launch
control feature controls wheel spin as
you accelerate.
• After completing the run and stopping,
the LC icon returns to white.
• If any operating conditions are not
within specification, the LC icon turns
grey with a strikethrough.
• You can switch launch control off
through the display screen.
See
General Information (page 74).
174
Ford GT (CGX) Canada/United States of America, enUSA, Edition date: 201908, First-Printing Launch Control
Page 178 of 316
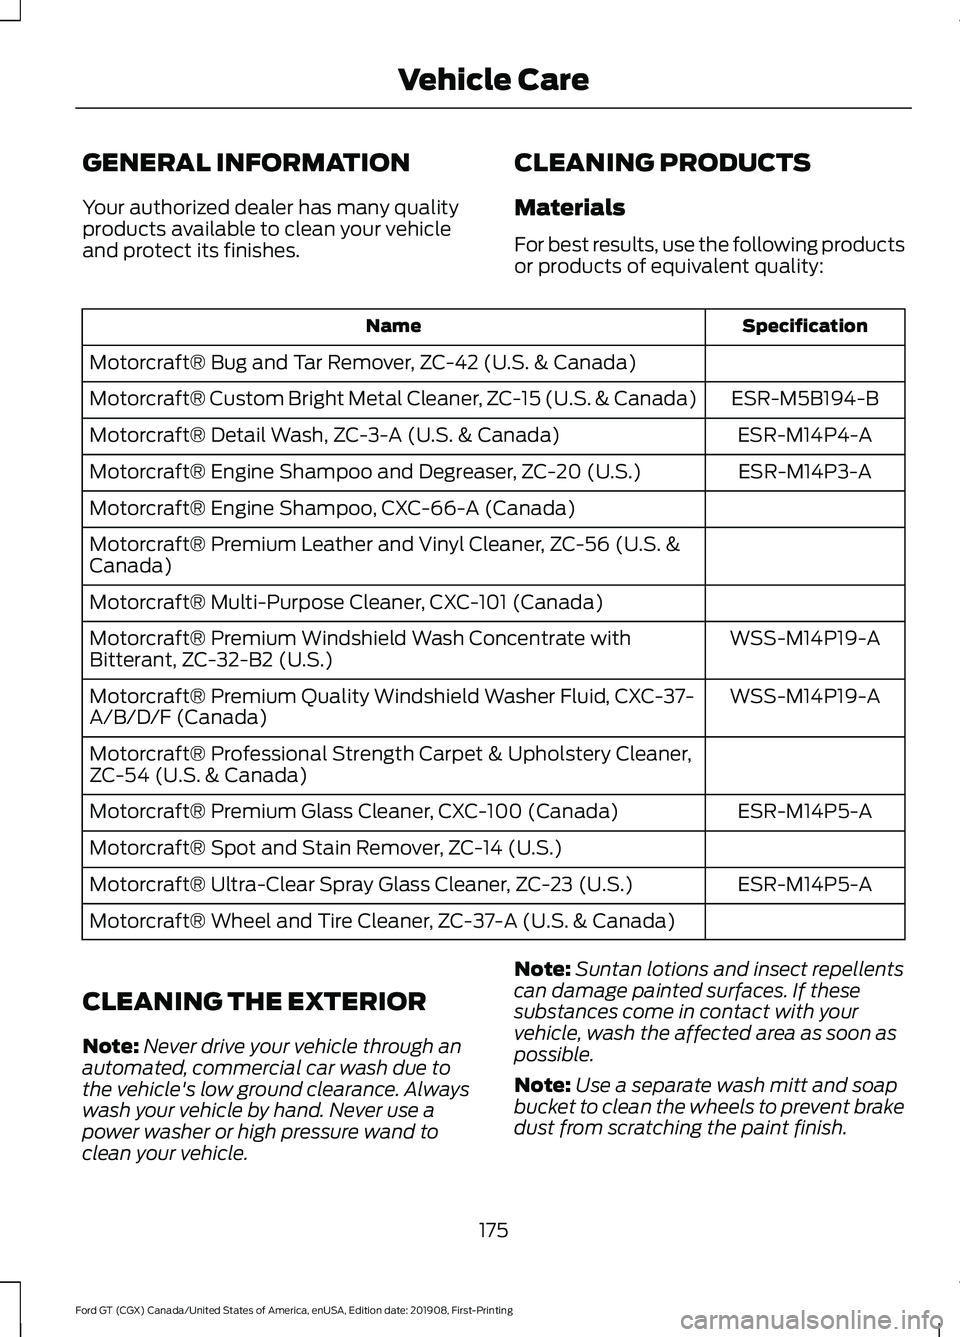
GENERAL INFORMATION
Your authorized dealer has many quality
products available to clean your vehicle
and protect its finishes.
CLEANING PRODUCTS
Materials
For best results, use the following products
or products of equivalent quality: Specification
Name
Motorcraft® Bug and Tar Remover, ZC-42 (U.S. & Canada) ESR-M5B194-B
Motorcraft® Custom Bright Metal Cleaner, ZC-15 (U.S. & Canada)
ESR-M14P4-A
Motorcraft® Detail Wash, ZC-3-A (U.S. & Canada)
ESR-M14P3-A
Motorcraft® Engine Shampoo and Degreaser, ZC-20 (U.S.)
Motorcraft® Engine Shampoo, CXC-66-A (Canada)
Motorcraft® Premium Leather and Vinyl Cleaner, ZC-56 (U.S. &
Canada)
Motorcraft® Multi-Purpose Cleaner, CXC-101 (Canada)
WSS-M14P19-A
Motorcraft® Premium Windshield Wash Concentrate with
Bitterant, ZC-32-B2 (U.S.)
WSS-M14P19-A
Motorcraft® Premium Quality Windshield Washer Fluid, CXC-37-
A/B/D/F (Canada)
Motorcraft® Professional Strength Carpet & Upholstery Cleaner,
ZC-54 (U.S. & Canada)
ESR-M14P5-A
Motorcraft® Premium Glass Cleaner, CXC-100 (Canada)
Motorcraft® Spot and Stain Remover, ZC-14 (U.S.)
ESR-M14P5-A
Motorcraft® Ultra-Clear Spray Glass Cleaner, ZC-23 (U.S.)
Motorcraft® Wheel and Tire Cleaner, ZC-37-A (U.S. & Canada)
CLEANING THE EXTERIOR
Note: Never drive your vehicle through an
automated, commercial car wash due to
the vehicle's low ground clearance. Always
wash your vehicle by hand. Never use a
power washer or high pressure wand to
clean your vehicle. Note:
Suntan lotions and insect repellents
can damage painted surfaces. If these
substances come in contact with your
vehicle, wash the affected area as soon as
possible.
Note: Use a separate wash mitt and soap
bucket to clean the wheels to prevent brake
dust from scratching the paint finish.
175
Ford GT (CGX) Canada/United States of America, enUSA, Edition date: 201908, First-Printing Vehicle Care
Page 179 of 316
Note:
Do not spray cleaning products on
the brake discs. Any resulting damage is not
covered by your vehicle warranty.
Note: Always follow the instructions
included in this manual when cleaning your
vehicle and do not use abrasive cleaning
products.
Standard Paint Finish
If your vehicle has a matte paint finish, see
Matte Paint Finish in this chapter.
Wash your vehicle regularly with cool or
lukewarm water and a neutral pH
shampoo, we recommend Motorcraft®™
Detail Wash.
• Never use strong household detergents
or soap, for example dish washing or
laundry liquid. These products can
discolor and spot painted surfaces.
• Never wash your vehicle when it is hot
to the touch, or during strong or direct
sunlight.
• Dry your vehicle with a chamois or soft
terry cloth towel to eliminate water
spotting.
• Immediately remove fuel spillages, bird
droppings, insect deposits and road tar.
These may cause damage to your
vehicle ’s paintwork or trim over time.
We recommend Motorcraft® Bug and
Tar Remover.
Matte Paint Finish
(If Equipped)
Prepare the following before washing your
vehicle:
• Use a no shine, matte car wash soap
that does not contain fillers or silicone.
• Use high quality, soft lamb's wool mitts
and wash each mitt thoroughly after
each car wash. •
Wash your vehicle's painted surfaces
in the shade with two buckets of water,
one for soap and the other for clean
water.
• Add a plastic grit guard to the bottom
of the soap bucket so that dirt settles
at the bottom of the bucket and does
not contaminate the wash mitt.
To wash your vehicle:
1. Rinse your vehicle to remove as much dirt and debris as possible.
2. Wet the wash mitt in the soap bucket and apply the soapy water to your
vehicle in a gentle back-and-forth
motion.
Note: Do not rub the wash mitt in circles or
rub the paint surface aggressively. Rubbing
too hard in circles leaves permanent swirl
marks in the paint finish.
3. Rinse the wash mitt in clean water before inserting the mitt back into the
soap bucket to prevent dirt from
contaminating the soapy water.
4. Rinse the vehicle with clean water and
dry it with a clean, damp cloth.
Note: Do not use automotive waxes, detail
sprays or abrasive polishes or glazes on your
vehicle. Improper use of cleaning products
can cause damage to your vehicle not
covered by your vehicle warranty.
Immediately remove fuel spillages, bird
droppings, insect deposits and road tar.
Use a wet microfiber towel and an
alcohol-based window cleaner, a matte
paint finish cleaner or a 50/50 mix of
alcohol and deionized water.
Note: Always soak a microfiber towel or
wash mitt with water before cleaning. Using
a dry towel or mitt on a matte paint finish
creates a permanent glossy spot in the paint
finish.
176
Ford GT (CGX) Canada/United States of America, enUSA, Edition date: 201908, First-Printing Vehicle Care
Page 180 of 316
Raising the Rear Wing
For routine cleaning, raise the wing.
Using the information display select the
following:
1. Rear wing deployment.
2. Select Raised.
After you have cleaned your vehicle, to
return the wing to the lowered position you
must drive the car at 15 mph (25 km/h) or
above. The wing will return to the lowered
position.
Note:
You cannot lower the wing when your
vehicle is stationary.
Exterior Plastic Parts
For routine cleaning we recommend
Motorcraft® Detail Wash. If tar or grease
spots are present, we recommend
Motorcraft® Bug and Tar Remover.
Under Hood
For removing black rubber marks from
under the hood we recommend
Motorcraft® Wheel and Tire Cleaner or
Motorcraft® Bug and Tar Remover.
WAXING
Note: If your vehicle has a matte paint
finish, do not wax your vehicle.
Regular waxing is necessary to protect your
car's paint from the elements. We
recommend that you wash and wax the
painted surface once or twice a year.
When washing and waxing, park your
vehicle in a shaded area out of direct
sunlight. Always wash your vehicle before
applying wax.
• Use a quality wax that does not contain
abrasives.
• Follow the manufacturer ’s instructions
to apply and remove the wax. •
Apply a small amount of wax in a
back-and-forth motion, not in circles.
• Do not allow wax to come in contact
with any non-body (low-gloss black)
colored trim. The wax will discolor or
stain the parts over time.
• Do not apply wax to glass areas.
• After waxing, your car's paint should
feel smooth, and be free of streaks and
smudges.
CLEANING THE ENGINE
Engines are more efficient when they are
clean because grease and dirt buildup keep
the engine warmer than normal.
When washing:
• Do not spray a hot engine with cold
water to avoid cracking the engine
block or other engine components.
• Spray Motorcraft® Engine Shampoo
and Degreaser on all parts that require
cleaning and pressure rinse clean. In
Canada, use Motorcraft Engine
Shampoo.
• Never wash or rinse the engine while it
is hot or running; water in the running
engine may cause internal damage.
• Never wash or rinse any ignition coil,
spark plug wire or spark plug well, or
the area in and around these locations.
• Never spray water on electrical
components such as modules,
connectors and fuse boxes. Cover all
electrical components before cleaning
to prevent water damage.
177
Ford GT (CGX) Canada/United States of America, enUSA, Edition date: 201908, First-Printing Vehicle Care