display FORD KUGA 2010 1.G User Guide
[x] Cancel search | Manufacturer: FORD, Model Year: 2010, Model line: KUGA, Model: FORD KUGA 2010 1.GPages: 226, PDF Size: 8.07 MB
Page 75 of 226
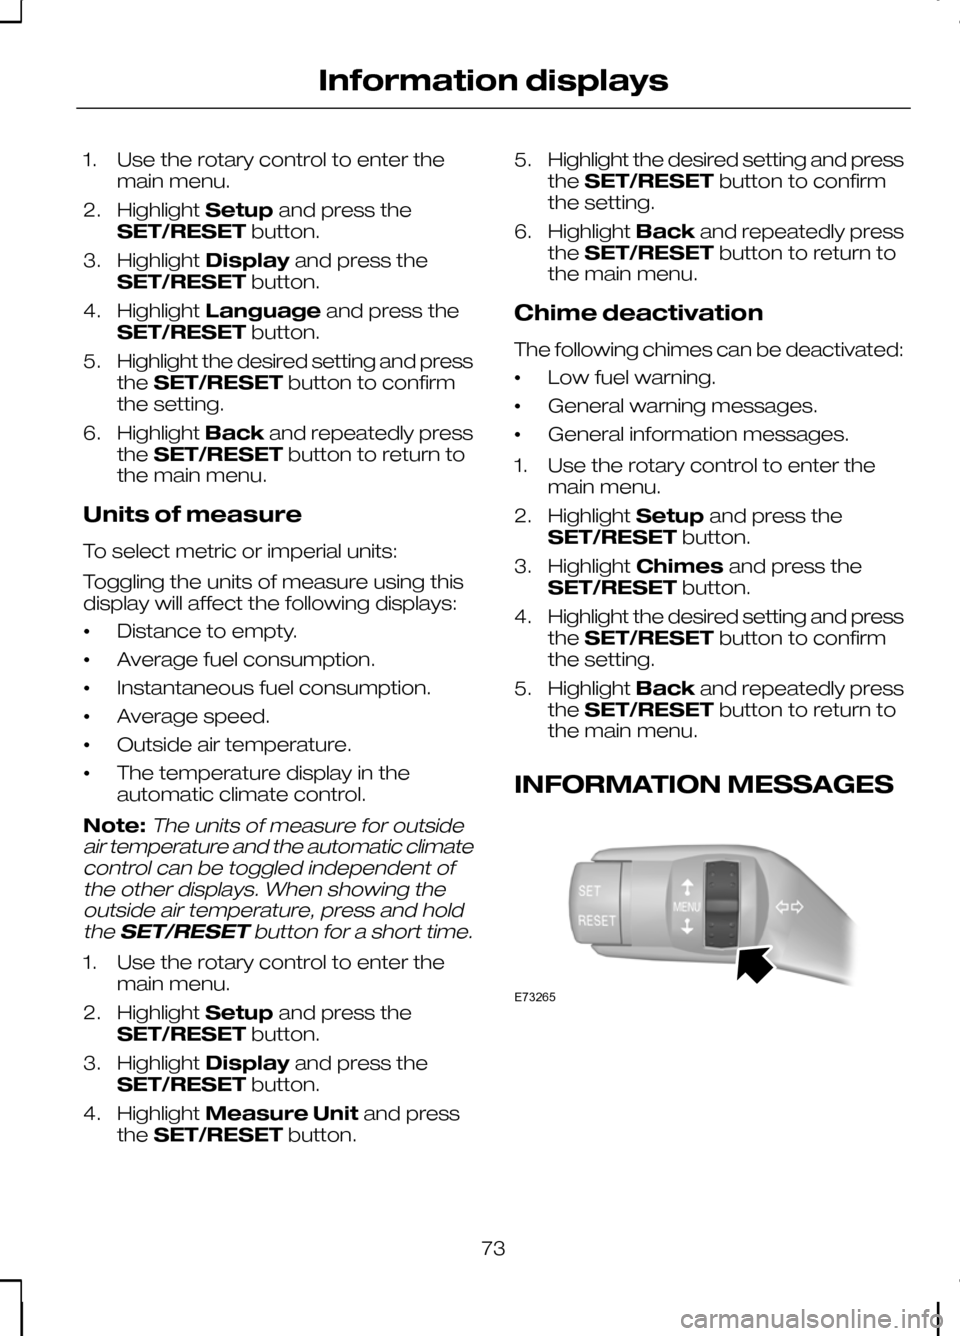
1. Use the rotary control to enter the
main menu.
2. Highlight Setupand press the
SET/RESET button.
3. Highlight Display and press the
SET/RESET button.
4. Highlight Language and press the
SET/RESET button.
5. Highlight the desired setting and press
the SET/RESET button to confirm
the setting.
6. Highlight Backand repeatedly press
the SET/RESET button to return to
the main menu.
Units of measure
To select metric or imperial units:
Toggling the units of measure using this
display will affect the following displays:
• Distance to empty.
• Average fuel consumption.
• Instantaneous fuel consumption.
• Average speed.
• Outside air temperature.
• The temperature display in the
automatic climate control.
Note:The units of measure for outside
air temperature and the automatic climate control can be toggled independent ofthe other displays. When showing theoutside air temperature, press and hold
the SET/RESET button for a short time.
1. Use the rotary control to enter the
main menu.
2. Highlight Setupand press the
SET/RESET button.
3. Highlight Display and press the
SET/RESET button.
4. Highlight Measure Unit and press
the SET/RESET button. 5.
Highlight the desired setting and press
the SET/RESET button to confirm
the setting.
6. Highlight Backand repeatedly press
the SET/RESET button to return to
the main menu.
Chime deactivation
The following chimes can be deactivated:
• Low fuel warning.
• General warning messages.
• General information messages.
1. Use the rotary control to enter the main menu.
2. Highlight Setupand press the
SET/RESET button.
3. Highlight Chimes and press the
SET/RESET button.
4. Highlight the desired setting and press
the SET/RESET button to confirm
the setting.
5. Highlight Backand repeatedly press
the SET/RESET button to return to
the main menu.
INFORMATION MESSAGES 73
Information displaysE73265
Page 76 of 226
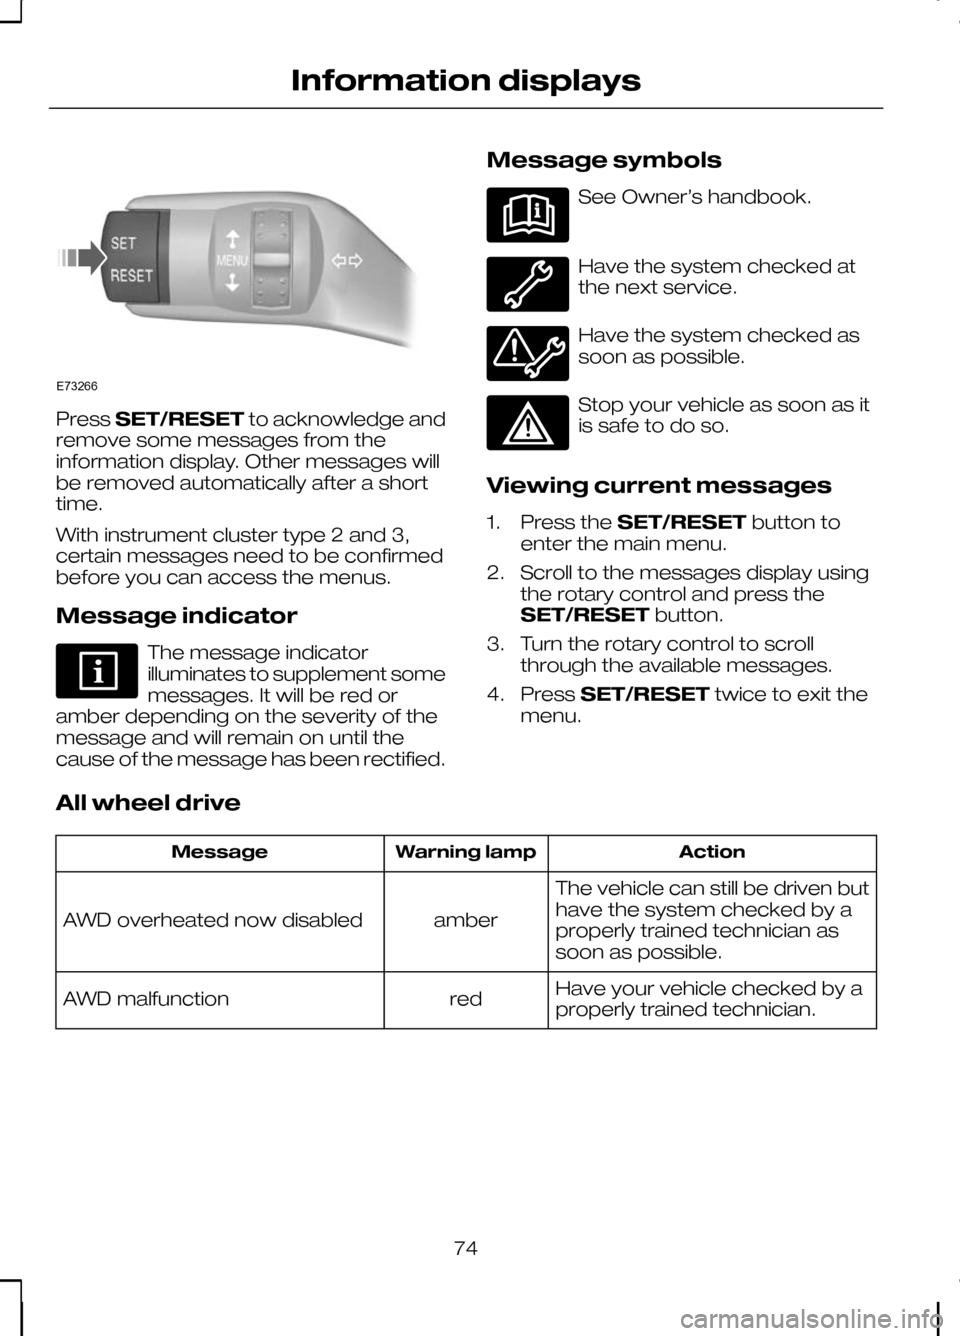
Press
SET/RESET to acknowledge and
remove some messages from the
information display. Other messages will
be removed automatically after a short
time.
With instrument cluster type 2 and 3,
certain messages need to be confirmed
before you can access the menus.
Message indicator The message indicator
illuminates to supplement some
messages. It will be red or
amber depending on the severity of the
message and will remain on until the
cause of the message has been rectified. Message symbols See Owner’s handbook.
Have the system checked at
the next service.
Have the system checked as
soon as possible.
Stop your vehicle as soon as it
is safe to do so.
Viewing current messages
1. Press the SET/RESET button to
enter the main menu.
2. Scroll to the messages display using the rotary control and press the
SET/RESET button.
3. Turn the rotary control to scroll through the available messages.
4. Press SET/RESET twice to exit the
menu.
All wheel drive Action
Warning lamp
Message
The vehicle can still be driven but
have the system checked by a
properly trained technician as
soon as possible.
amber
AWD overheated now disabled
Have your vehicle checked by a
properly trained technician.
red
AWD malfunction
74
Information displaysE73266
Page 77 of 226
Doors open
Action
Warning lamp
Message
Vehicle is moving. Stop the
vehicle as soon as safely possible
and close.
red
Driver door open
Vehicle is moving. Stop the
vehicle as soon as safely possible
and close.
red
Driver side rear door open
Vehicle is moving. Stop the
vehicle as soon as safely possible
and close.
red
Passenger door open
Vehicle is moving. Stop the
vehicle as soon as safely possible
and close.
red
Passenger side rear door open
Vehicle is moving. Stop the
vehicle as soon as safely possible
and close.
red
Luggage comp. open
Vehicle is moving. Stop the
vehicle as soon as safely possible
and close.
red
Bonnet open
Vehicle not moving. Close.
amber
Door ajar close door
Keyless system Action
Warning lamp
Message
Have the system checked by a
properly trained technician.
red
Immobiliser malfunction
You willONLYbe able restart
your vehicle up to a maximum of
five times or for a period of up to
56 hours after which the vehicle
cannot be started. Have the
system checked by a properly
trained technician as soon as
possible.
red
Steering malfunction
SeeKeyless entry (page 31).
amber
Key not detected
SeeKeyless entry (page 31).
amber
Key outside car
75
Information displays
Page 78 of 226
Action
Warning lamp
Message
SeeChanging the remote
control battery (page 27).
amber
Remote key battery low
Have the system checked by a
properly trained technician.
-
Steering malfunction
SeeKeyless starting (page
101).
-
To start press brake
SeeKeyless starting (page
101).
-
To start press clutch
Lighting Action
Warning lamp
Message
Brake lamp switch. The vehicle
can be driven as normal.
However, cruise control cannot
be switched on. Have the system
checked by a properly trained
technician as soon as possible.
red
Brake light fault
Have the system checked by a
properly trained technician.
amber
Adaptive front light failure
Maintenance Action
Warning lamp
Message
Have the system checked by a
properly trained technician.
red
High engine temperature
SeeBrake and clutch fluid
check (page 149).
red
Low brake fluid level
Stop the vehicle as soon as safely
possible and switch off the engine
immediately. Have the system
checked by a properly trained
technician immediately.
red
Engine malfunction
76
Information displays
Page 79 of 226
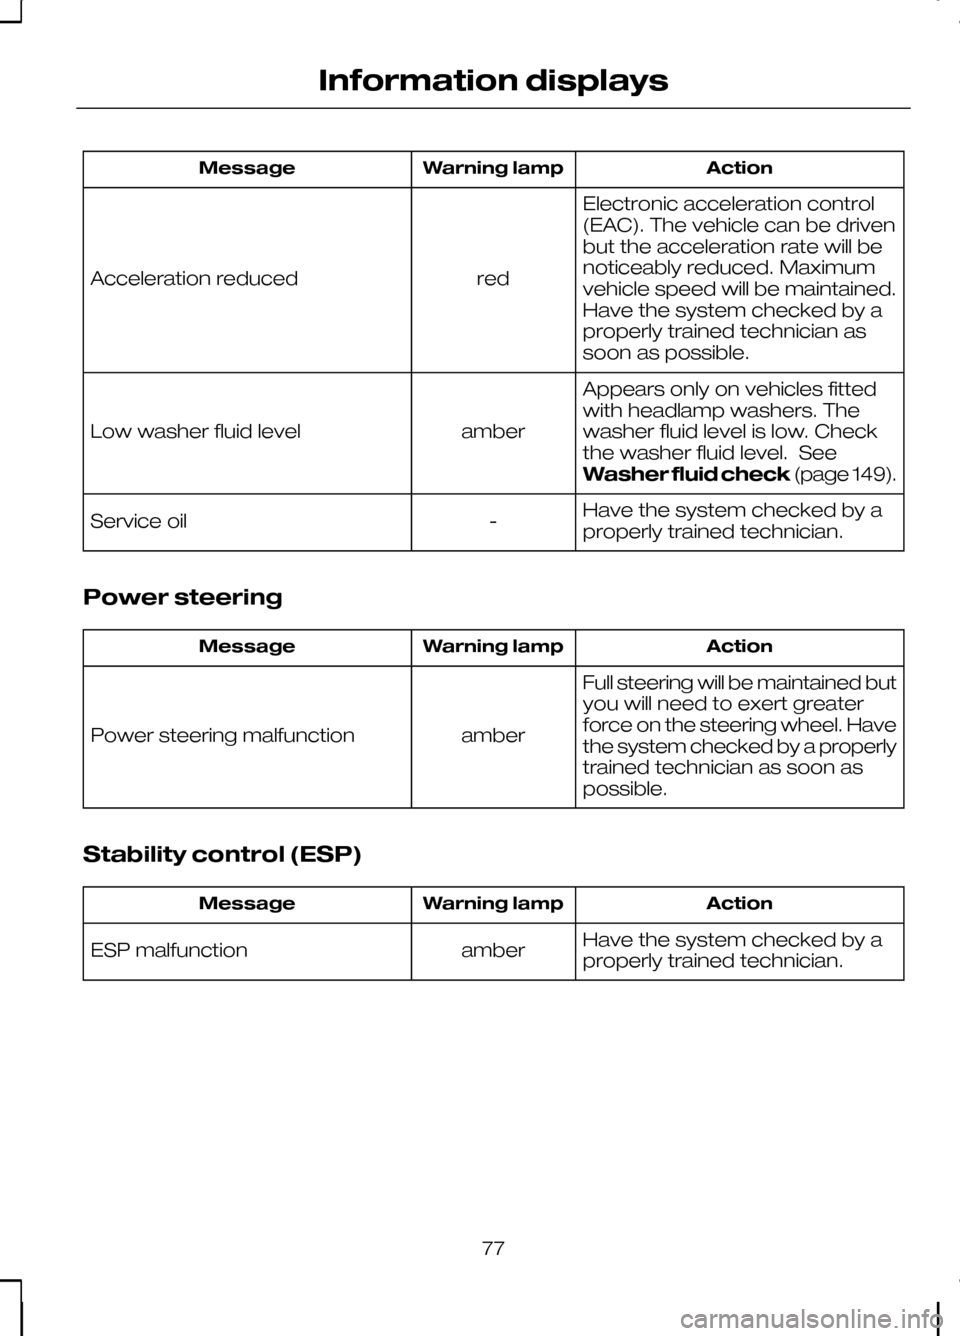
Action
Warning lamp
Message
Electronic acceleration control
(EAC). The vehicle can be driven
but the acceleration rate will be
noticeably reduced. Maximum
vehicle speed will be maintained.
Have the system checked by a
properly trained technician as
soon as possible.
red
Acceleration reduced
Appears only on vehicles fitted
with headlamp washers. The
washer fluid level is low. Check
the washer fluid level. See
Washer fluid check(page 149).
amber
Low washer fluid level
Have the system checked by a
properly trained technician.
-
Service oil
Power steering Action
Warning lamp
Message
Full steering will be maintained but
you will need to exert greater
force on the steering wheel. Have
the system checked by a properly
trained technician as soon as
possible.
amber
Power steering malfunction
Stability control (ESP) Action
Warning lamp
Message
Have the system checked by a
properly trained technician.
amber
ESP malfunction
77
Information displays
Page 80 of 226
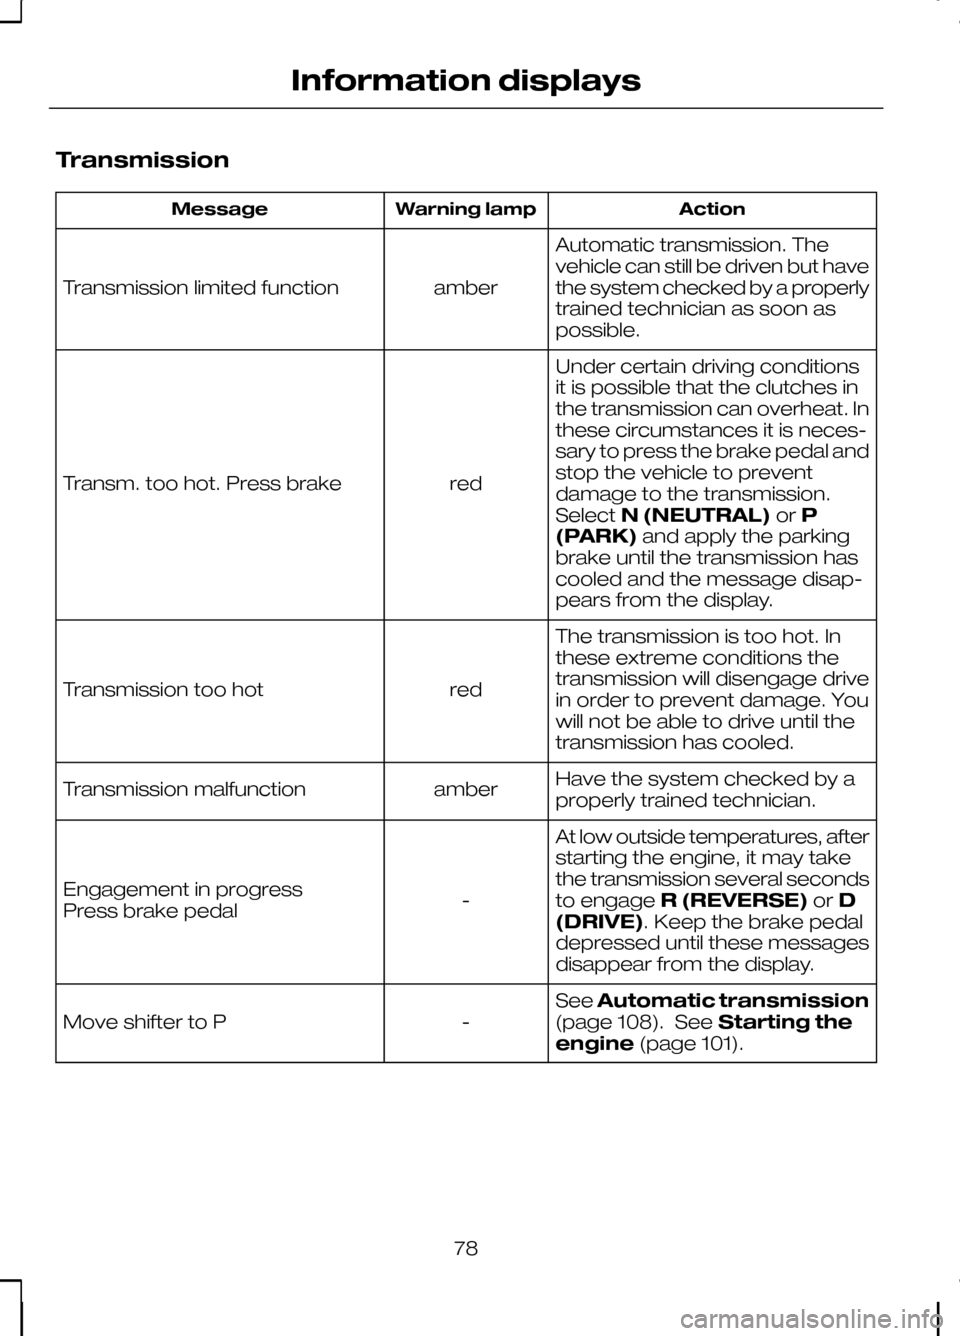
Transmission
Action
Warning lamp
Message
Automatic transmission. The
vehicle can still be driven but have
the system checked by a properly
trained technician as soon as
possible.
amber
Transmission limited function
Under certain driving conditions
it is possible that the clutches in
the transmission can overheat. In
these circumstances it is neces-
sary to press the brake pedal and
stop the vehicle to prevent
red
Transm. too hot. Press brake
damage to the transmission.
SelectN (NEUTRAL) orP
(PARK) and apply the parking
brake until the transmission has
cooled and the message disap-
pears from the display.
The transmission is too hot. In
these extreme conditions the
transmission will disengage drive
in order to prevent damage. You
will not be able to drive until the
transmission has cooled.
red
Transmission too hot
Have the system checked by a
properly trained technician.
amber
Transmission malfunction
At low outside temperatures, after
starting the engine, it may take
the transmission several seconds
to engageR (REVERSE) orD
(DRIVE). Keep the brake pedal
depressed until these messages
disappear from the display.
-
Engagement in progress
Press brake pedal
SeeAutomatic transmission
(page 108). See Starting the
engine (page 101).
-
Move shifter to P
78
Information displays
Page 81 of 226
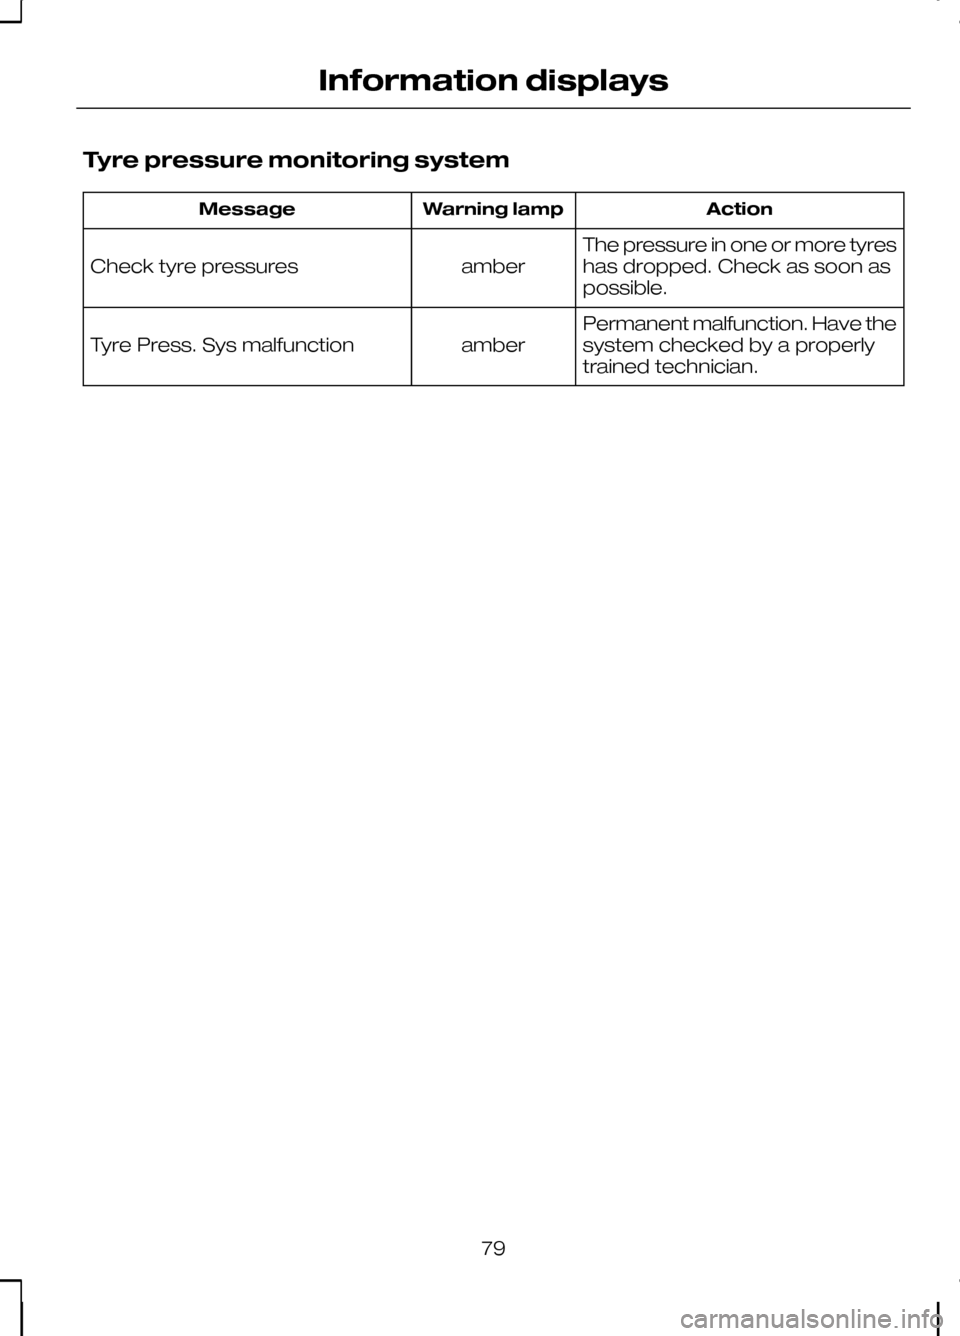
Tyre pressure monitoring system
Action
Warning lamp
Message
The pressure in one or more tyres
has dropped. Check as soon as
possible.
amber
Check tyre pressures
Permanent malfunction. Have the
system checked by a properly
trained technician.
amber
Tyre Press. Sys malfunction
79
Information displays
Page 86 of 226
Note:For information on the automatic
climate control, on vehicles fitted with a combined Navigation and automaticclimate control system, see separatehandbook.
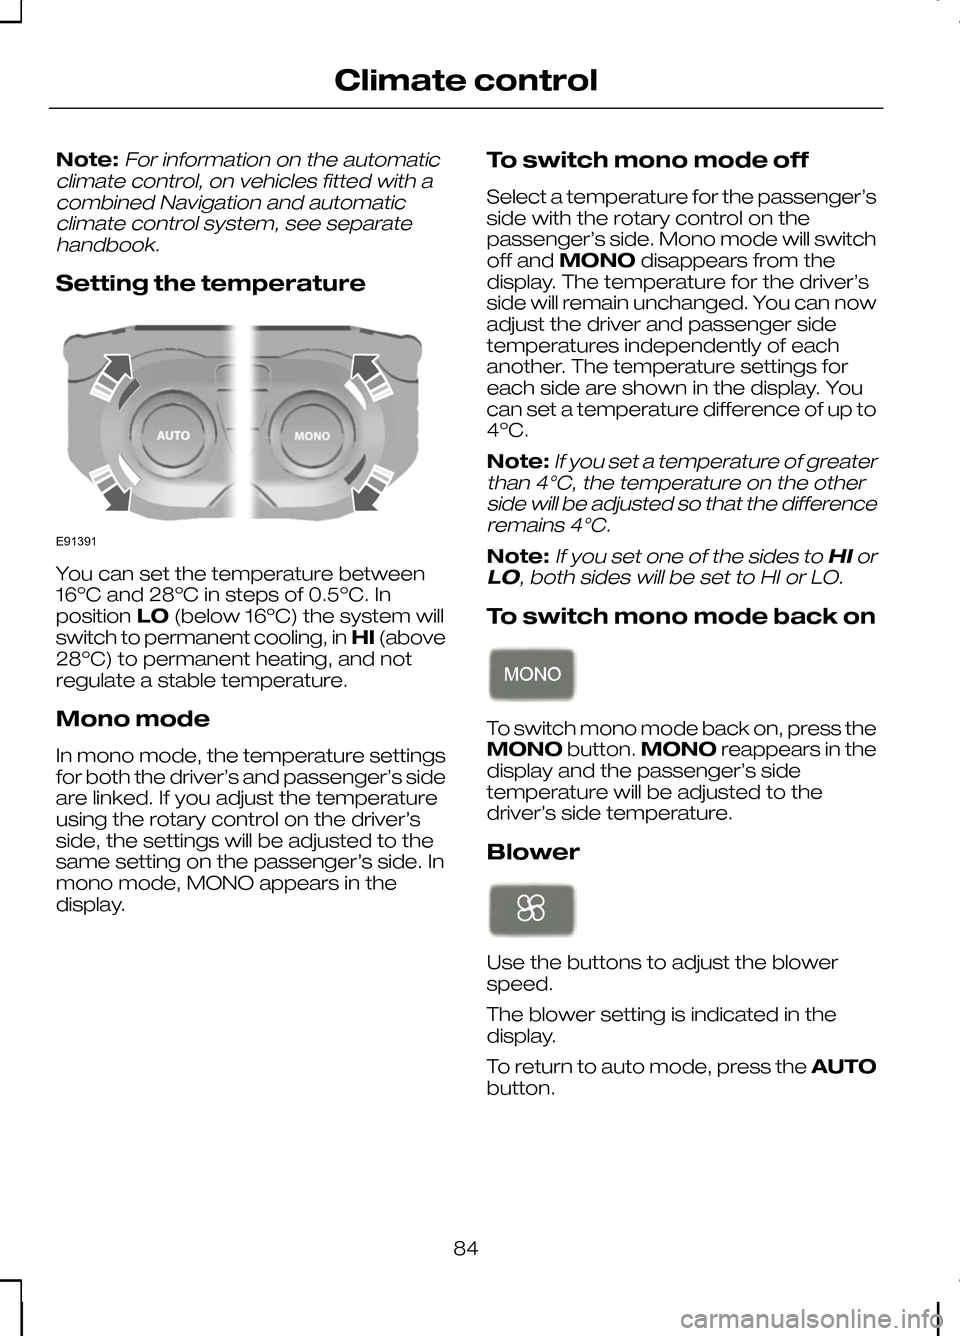
Setting the temperature You can set the temperature between
16ºC and 28ºC in steps of 0.5ºC. In
position
LO(below 16ºC) the system will
switch to permanent cooling, in HI(above
28ºC) to permanent heating, and not
regulate a stable temperature.
Mono mode
In mono mode, the temperature settings
for both the driver’s and passenger’s side
are linked. If you adjust the temperature
using the rotary control on the driver’s
side, the settings will be adjusted to the
same setting on the passenger’s side. In
mono mode, MONO appears in the
display. To switch mono mode off
Select a temperature for the passenger’s
side with the rotary control on the
passenger’s side. Mono mode will switch
off and
MONO disappears from the
display. The temperature for the driver’s
side will remain unchanged. You can now
adjust the driver and passenger side
temperatures independently of each
another. The temperature settings for
each side are shown in the display. You
can set a temperature difference of up to
4ºC.
Note:
If you set a temperature of greater
than 4°C, the temperature on the other side will be adjusted so that the differenceremains 4°C.
Note:If you set one of the sides to HIor
LO, both sides will be set to HI or LO.
To switch mono mode back on To switch mono mode back on, press the
MONO
button.MONO reappears in the
display and the passenger’s side
temperature will be adjusted to the
driver’s side temperature.
Blower Use the buttons to adjust the blower
speed.
The blower setting is indicated in the
display.
To return to auto mode, press the
AUTO
button.
84
Climate controlE91391
Page 87 of 226
Air distribution
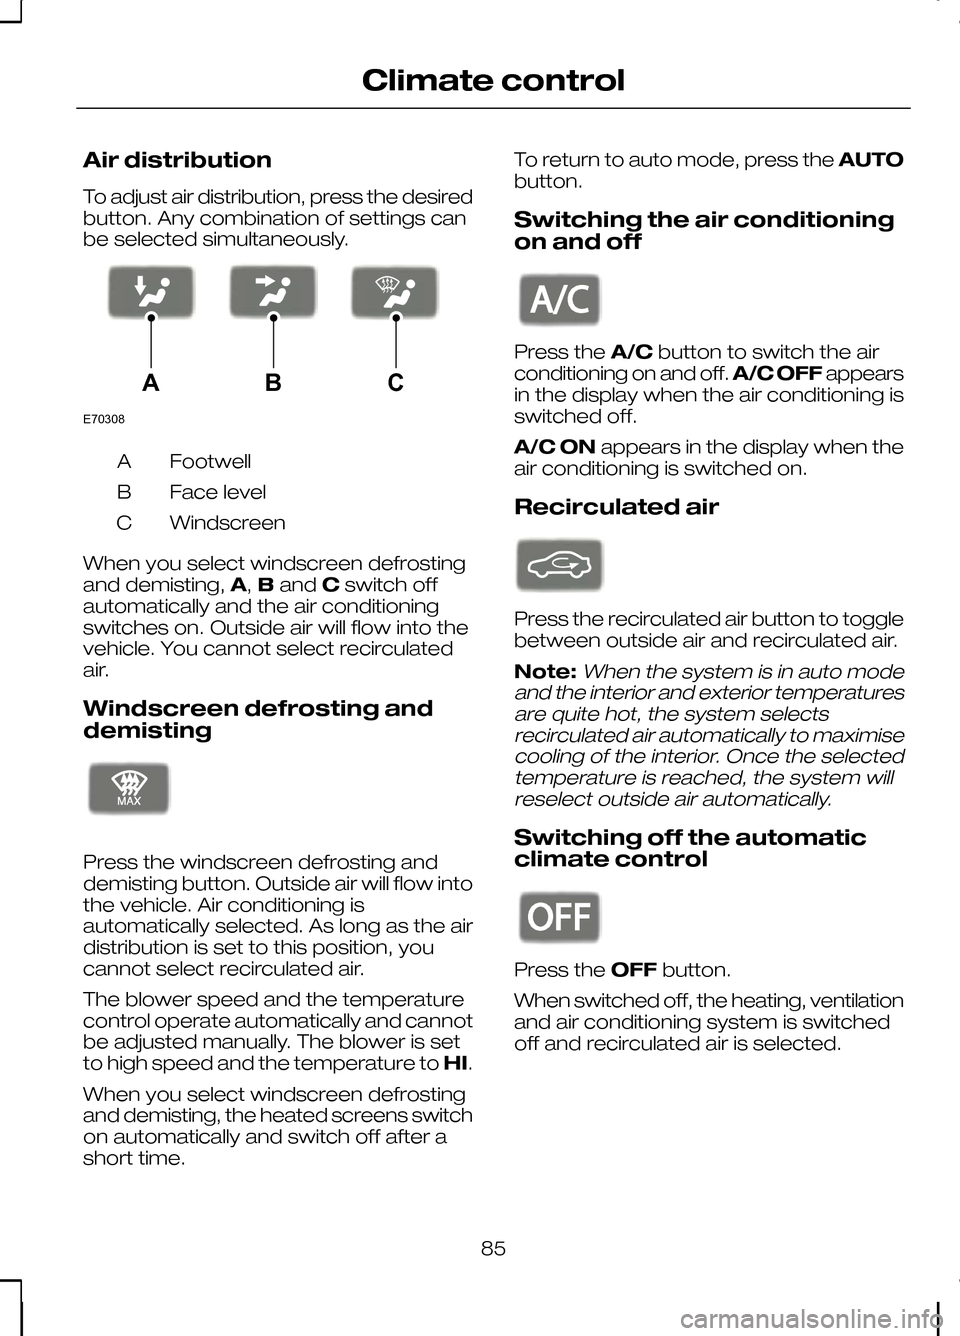
To adjust air distribution, press the desired
button. Any combination of settings can
be selected simultaneously.
Footwell
A
Face level
B
Windscreen
C
When you select windscreen defrosting
and demisting, A,Band Cswitch off
automatically and the air conditioning
switches on. Outside air will flow into the
vehicle. You cannot select recirculated
air.
Windscreen defrosting and
demisting Press the windscreen defrosting and
demisting button. Outside air will flow into
the vehicle. Air conditioning is
automatically selected. As long as the air
distribution is set to this position, you
cannot select recirculated air.
The blower speed and the temperature
control operate automatically and cannot
be adjusted manually. The blower is set
to high speed and the temperature to
HI.
When you select windscreen defrosting
and demisting, the heated screens switch
on automatically and switch off after a
short time. To return to auto mode, press the
AUTO
button.
Switching the air conditioning
on and off Press the
A/Cbutton to switch the air
conditioning on and off. A/C OFFappears
in the display when the air conditioning is
switched off.
A/C ON appears in the display when the
air conditioning is switched on.
Recirculated air Press the recirculated air button to toggle
between outside air and recirculated air.
Note:When the system is in auto mode
and the interior and exterior temperatures are quite hot, the system selectsrecirculated air automatically to maximisecooling of the interior. Once the selectedtemperature is reached, the system willreselect outside air automatically.
Switching off the automatic
climate control Press the
OFFbutton.
When switched off, the heating, ventilation
and air conditioning system is switched
off and recirculated air is selected.
85
Climate controlE70308ABC E91392 E91393 E91394
Page 90 of 226
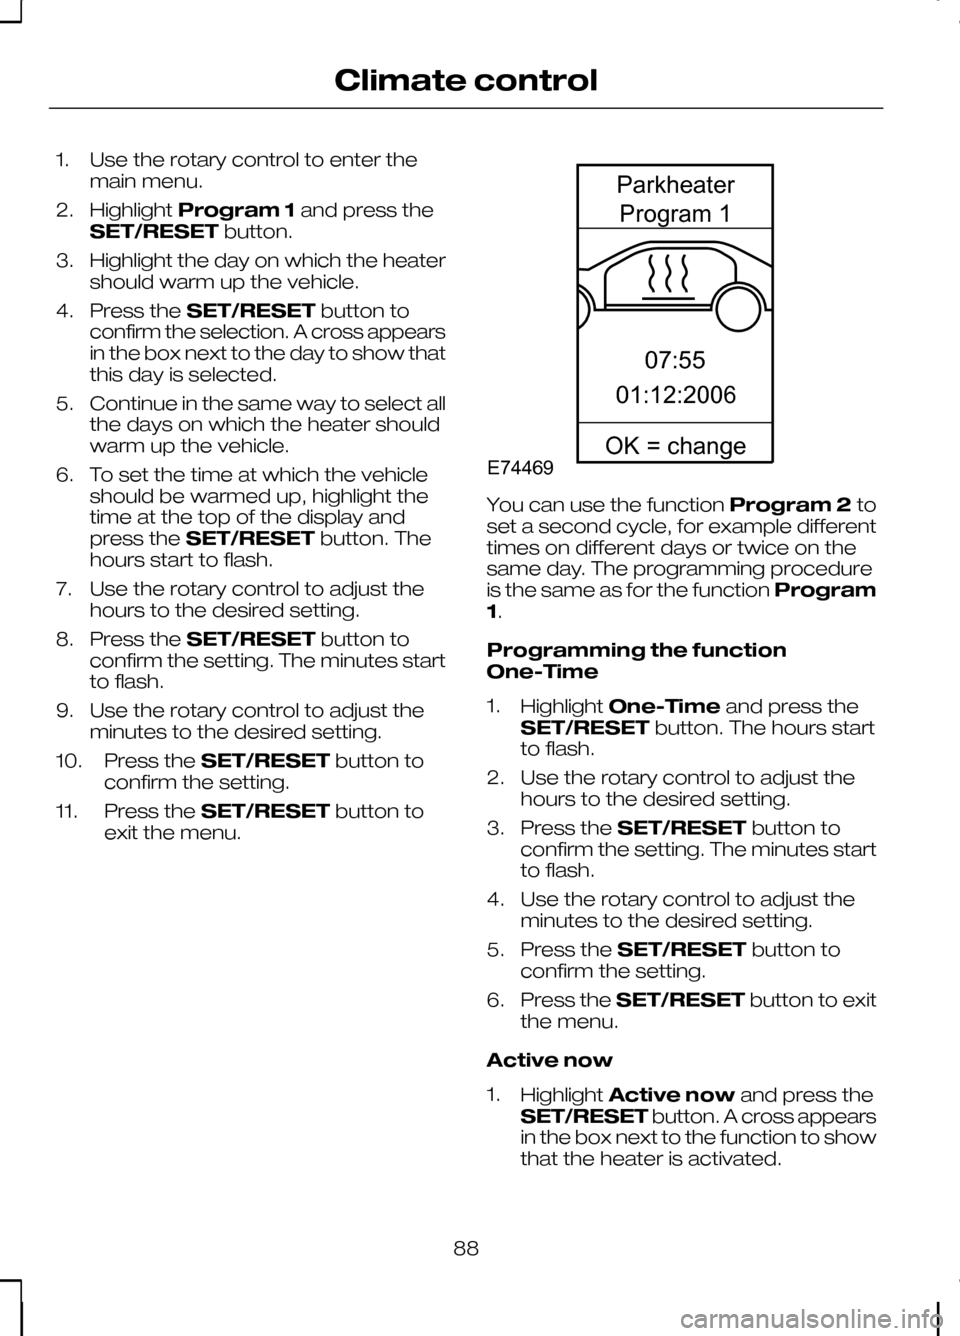
1. Use the rotary control to enter the
main menu.
2. Highlight Program 1 and press the
SET/RESET button.
3. Highlight the day on which the heater should warm up the vehicle.
4. Press the SET/RESET button to
confirm the selection. A cross appears
in the box next to the day to show that
this day is selected.
5. Continue in the same way to select all the days on which the heater should
warm up the vehicle.
6. To set the time at which the vehicle should be warmed up, highlight the
time at the top of the display and
press the SET/RESET button. The
hours start to flash.
7. Use the rotary control to adjust the hours to the desired setting.
8. Press the SET/RESET button to
confirm the setting. The minutes start
to flash.
9. Use the rotary control to adjust the minutes to the desired setting.
10. Press the SET/RESET button to
confirm the setting.
11. Press the SET/RESET button to
exit the menu. You can use the function
Program 2to
set a second cycle, for example different
times on different days or twice on the
same day. The programming procedure
is the same as for the function Program
1.
Programming the function
One-Time
1. Highlight One-Time and press the
SET/RESET button. The hours start
to flash.
2. Use the rotary control to adjust the hours to the desired setting.
3. Press the SET/RESET button to
confirm the setting. The minutes start
to flash.
4. Use the rotary control to adjust the minutes to the desired setting.
5. Press the SET/RESET button to
confirm the setting.
6. Press the SET/RESET button to exit
the menu.
Active now
1. Highlight Active now and press the
SET/RESET button. A cross appears
in the box next to the function to show
that the heater is activated.
88
Climate controlE7446907:5501:12:2006ParkheaterProgram1OK=change