Lock FORD KUGA 2010 1.G Owner's Guide
[x] Cancel search | Manufacturer: FORD, Model Year: 2010, Model line: KUGA, Model: FORD KUGA 2010 1.GPages: 226, PDF Size: 8.07 MB
Page 92 of 226
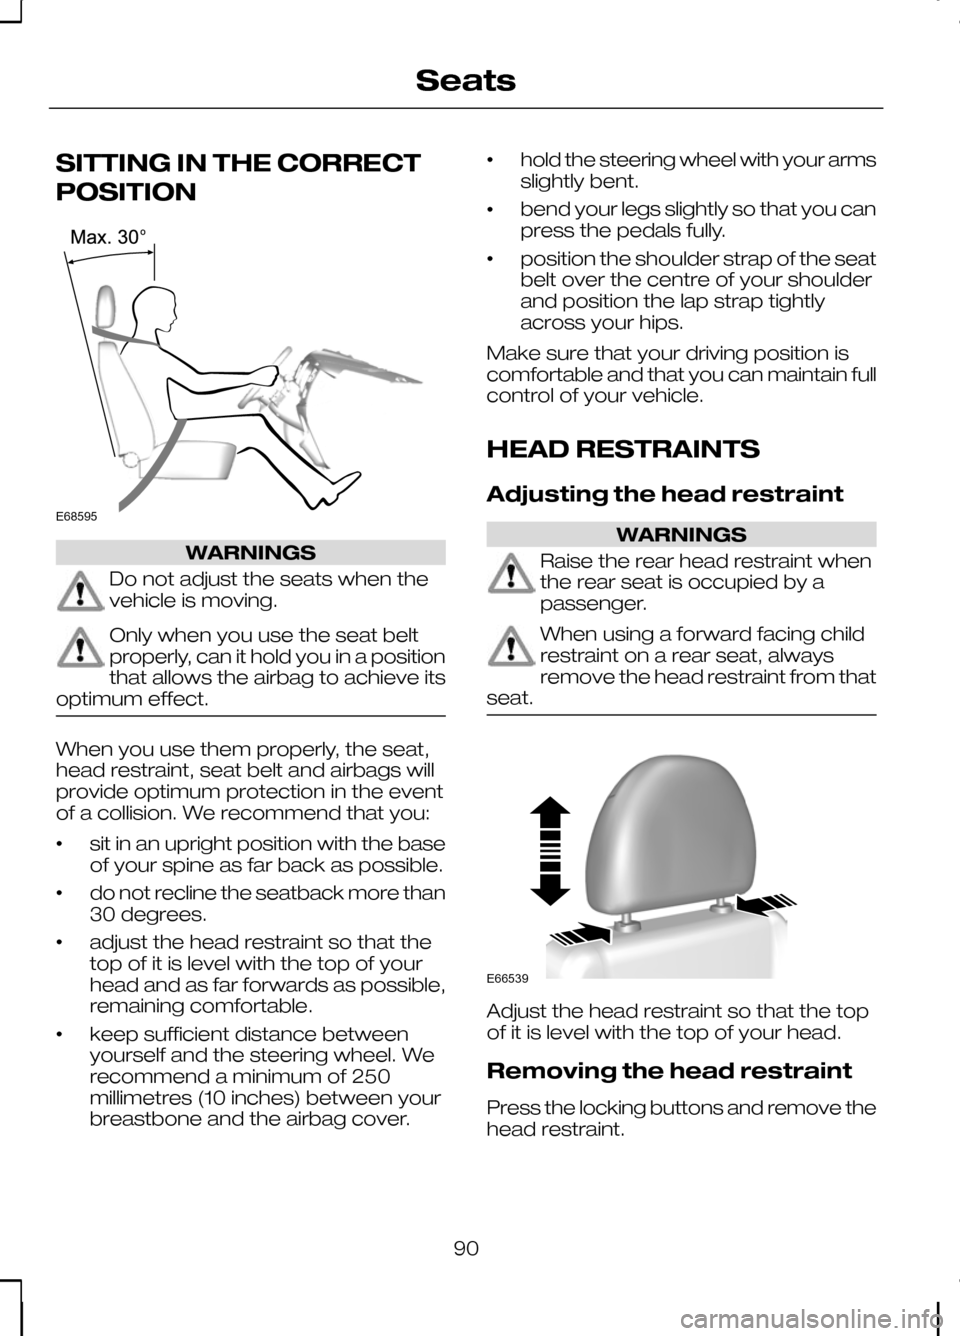
SITTING IN THE CORRECT
POSITION
WARNINGS
Do not adjust the seats when the
vehicle is moving.
Only when you use the seat belt
properly, can it hold you in a position
that allows the airbag to achieve its
optimum effect. When you use them properly, the seat,
head restraint, seat belt and airbags will
provide optimum protection in the event
of a collision. We recommend that you:
•
sit in an upright position with the base
of your spine as far back as possible.
• do not recline the seatback more than
30 degrees.
• adjust the head restraint so that the
top of it is level with the top of your
head and as far forwards as possible,
remaining comfortable.
• keep sufficient distance between
yourself and the steering wheel. We
recommend a minimum of 250
millimetres (10 inches) between your
breastbone and the airbag cover. •
hold the steering wheel with your arms
slightly bent.
• bend your legs slightly so that you can
press the pedals fully.
• position the shoulder strap of the seat
belt over the centre of your shoulder
and position the lap strap tightly
across your hips.
Make sure that your driving position is
comfortable and that you can maintain full
control of your vehicle.
HEAD RESTRAINTS
Adjusting the head restraint WARNINGS
Raise the rear head restraint when
the rear seat is occupied by a
passenger.
When using a forward facing child
restraint on a rear seat, always
remove the head restraint from that
seat. Adjust the head restraint so that the top
of it is level with the top of your head.
Removing the head restraint
Press the locking buttons and remove the
head restraint.
90
SeatsE68595 E66539
Page 96 of 226
REAR SEATS
WARNINGS
When folding the seatbacks down,
take care not to get your fingers
caught between the seatback and
seat frame. Make sure that the seats and the
seatbacks are secure and fully
engaged in their catches.
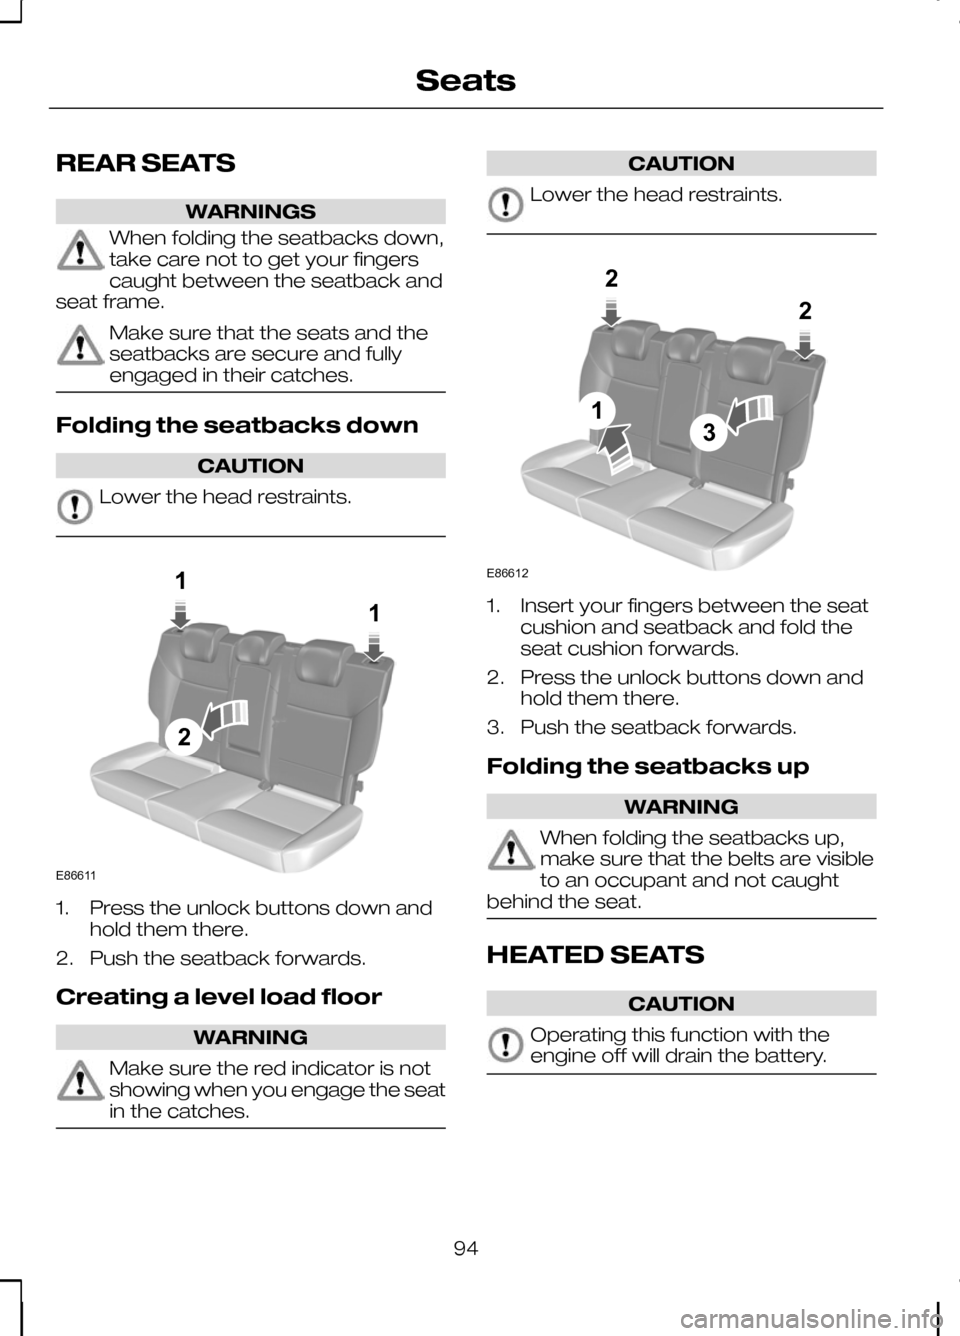
Folding the seatbacks down
CAUTION
Lower the head restraints.
1. Press the unlock buttons down and
hold them there.
2. Push the seatback forwards.
Creating a level load floor WARNING
Make sure the red indicator is not
showing when you engage the seat
in the catches. CAUTION
Lower the head restraints.
1. Insert your fingers between the seat
cushion and seatback and fold the
seat cushion forwards.
2. Press the unlock buttons down and hold them there.
3. Push the seatback forwards.
Folding the seatbacks up WARNING
When folding the seatbacks up,
make sure that the belts are visible
to an occupant and not caught
behind the seat. HEATED SEATS
CAUTION
Operating this function with the
engine off will drain the battery.
94
Seats121E86611 2132E86612
Page 103 of 226
GENERAL INFORMATION
General points on starting
If the battery has been disconnected the
vehicle may exhibit some unusual driving
characteristics for approx. 8 kilometres
(5 miles) after reconnecting the battery.
This is because the engine management
system must realign itself with the engine.
Any unusual driving characteristics during
this period may be disregarded.
Starting the engine by towing
or pushing
WARNING
To prevent damage you must not
push or tow start your vehicle. Use
booster cables and a booster
battery. See Using booster cables
(page 154). KEYLESS STARTING
WARNINGS
The keyless starting system may not
function if the key is close to metal
objects or electronic devices such
as mobile phones. Always check that the steering
wheel lock is deactivated before
attempting to move your vehicle.
Note:A valid passive key must be
located inside the vehicle to switch the ignition on and start the engine.
Note:To start your engine you must also
fully depress the brake or clutch pedal, depending on the transmission fitted. Ignition on
Press the start button once. All electrical
circuits are operational, warning lamps
and indicators illuminate.
Starting with automatic
transmission
Note:
Releasing the brake pedal during
engine start will stop the engine cranking and return to ignition on.
1. Make sure the transmission is in Por
N.
2. Fully depress the brake pedal.
3. Briefly press the start button.
Starting with manual
transmission
Note:
Releasing the clutch pedal during
engine start will stop the engine cranking and return to ignition on.
1. Fully depress the clutch pedal.
2. Briefly press the start button.
Starting a diesel engine
Note:
Engine cranking will not
commence until the engine glow plug cycle has been completed. This may takeseveral seconds in extremely coldconditions.
Note:Continue to press the clutch or
brake pedal until engine cranking begins.
101
Starting the engineE85766
Page 110 of 226
MANUAL TRANSMISSION
CAUTION
Do not engage reverse gear when
the vehicle is moving. This can cause
damage to the transmission.
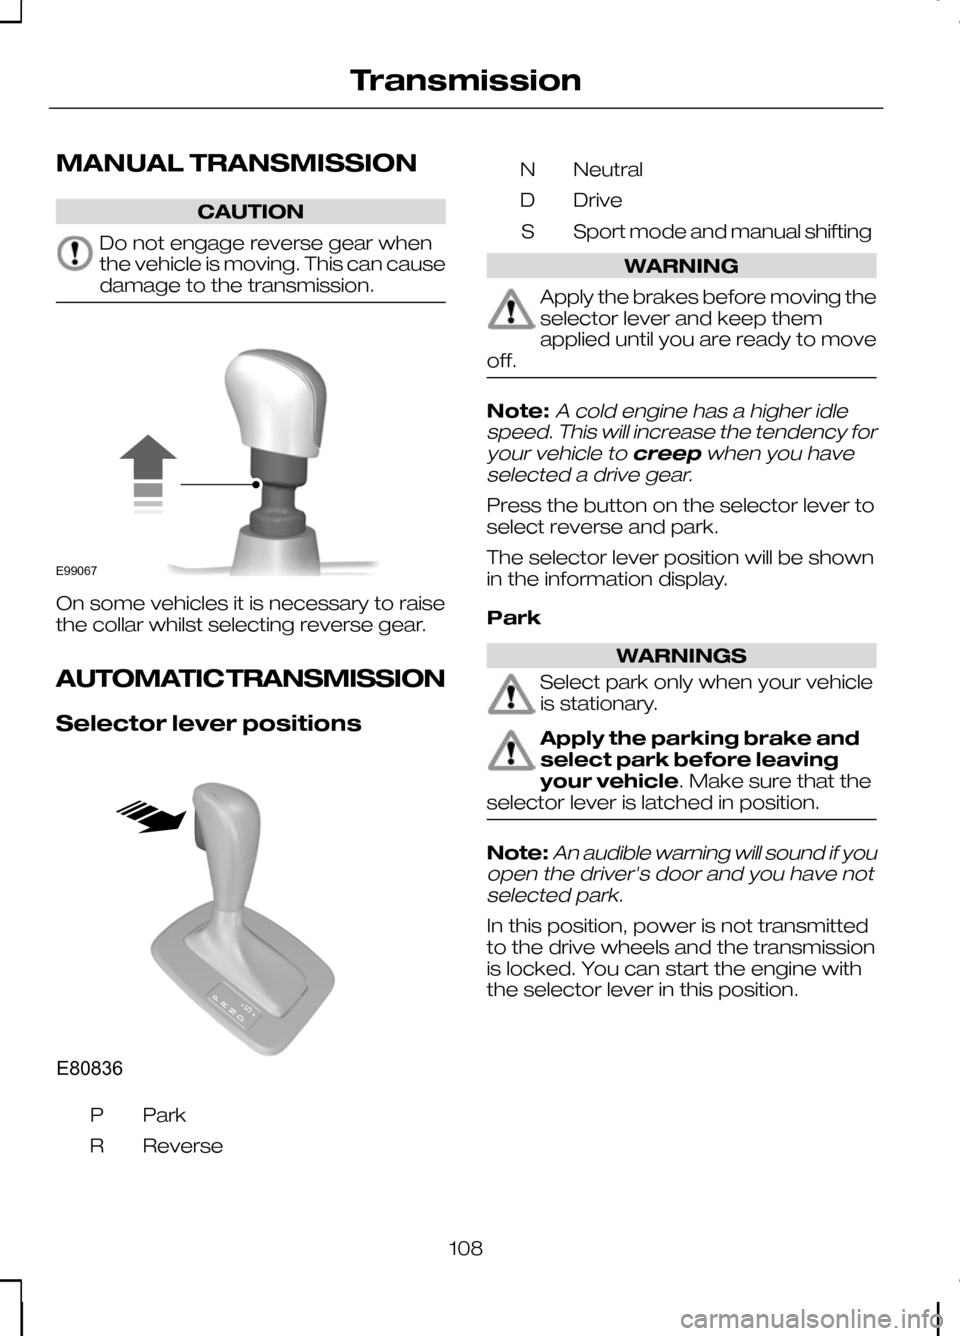
On some vehicles it is necessary to raise
the collar whilst selecting reverse gear.
AUTOMATIC TRANSMISSION
Selector lever positions
ParkP
Reverse
R Neutral
N
Drive
D
Sport mode and manual shifting
S WARNING
Apply the brakes before moving the
selector lever and keep them
applied until you are ready to move
off. Note:A cold engine has a higher idle
speed. This will increase the tendency for
your vehicle to creepwhen you have
selected a drive gear.
Press the button on the selector lever to
select reverse and park.
The selector lever position will be shown
in the information display.
Park WARNINGS
Select park only when your vehicle
is stationary.
Apply the parking brake and
select park before leaving
your vehicle. Make sure that the
selector lever is latched in position. Note:
An audible warning will sound if you
open the driver's door and you have not selected park.
In this position, power is not transmitted
to the drive wheels and the transmission
is locked. You can start the engine with
the selector lever in this position.
108
TransmissionE99067 E80836S
Page 111 of 226
Reverse
WARNING
Select reverse only when your
vehicle is stationary and the engine
is at idle speed.
Neutral
In this position, power is not transmitted
to the drive wheels but the transmission
is not locked. You can start the engine
with the selector lever in this position.
Drive
Select drive to shift automatically through
the forward gears.
The transmission will select the
appropriate gear for optimum
performance based on ambient
temperature, road gradient, vehicle load
and driver input.
Manual shifting - Vehicles with
a 5 speed transmission
WARNING
Do not hold the selector lever
permanently in – or +.
CAUTION
The transmission will automatically
downshift when the engine speed is
too low and upshift when too high.
Note:A shift will occur only when the
vehicle speed and the engine speed are appropriate.
Note:In Select mode the current gear
(1, 2, 3, 4 or 5) will be displayed on the instrument panel.
Move the selector lever to position S.
Push the selector lever forwards to shift
down and pull it backwards to shift up. Gears may be skipped by moving the
selector lever repeatedly at short intervals.
Manual mode also provides a kickdown
function. See
Kickdown.
Sport mode and manual shifting
- Vehicles with a 6 speed
transmission
Note:
A shift will occur only when the
vehicle speed and the engine speed are appropriate.
Note:In Sport mode the transmission
operates as normal but gears are selected more quickly and at higherengine speeds.
Note:In Sport modeSwill be displayed
on the instrument panel.
Sport Mode
Activate Sportmode by moving the
selector lever to position S.Sport mode
will remain active until either you shift
manually up or down the gears or return
the selector lever to position D.
Manual shifting WARNING
Do not hold the selector lever
permanently in – or +.
CAUTION
The transmission will automatically
downshift when the engine speed is
too low and upshift when too high.
Push the selector lever forwards to shift
down and pull it backwards to shift up.
Gears may be skipped by moving the
selector lever repeatedly at short intervals.
Manual mode also provides a kickdown
function. See
Kickdown.
109
Transmission
Page 114 of 226
PRINCIPLE OF OPERATION
Disc brakes
Wet brake discs result in reduced braking
efficiency. Dab the brake pedal when
driving from a car wash to remove the film
of water.
ABS
WARNING
The ABS does not relieve you of
your responsibility to drive with due
care and attention.
The ABS helps you to maintain full steering
and directional stability when you brake
heavily in an emergency, by preventing
the road wheels from locking.
HINTS ON DRIVING WITH
ABS
When the ABS is operating, the brake
pedal will pulse. This is normal. Maintain
pressure on the brake pedal.
The ABS will not eliminate the dangers
inherent when:
•
you drive too close to the vehicle in
front of you.
• the vehicle is aquaplaning.
• you take corners too fast.
• the road surface is poor. PARKING BRAKE
All vehicles WARNING
Vehicles with an automatic
transmission should always be left
with the selector lever in position
P. •
Press the foot brake pedal firmly.
• Pull the parking brake lever up smartly
to its fullest extent.
• Do not press the release button while
pulling the lever up.
• If your vehicle is parked on a hill and
facing uphill, select first gear and turn
the steering wheel away from the
kerb.
• If your vehicle is parked on a hill and
facing downhill, select reverse gear
and turn the steering wheel towards
the kerb.
To release the parking brake, press the
brake pedal firmly, pull the lever up slightly,
depress the release button and push the
lever down.
112
Brakes
Page 125 of 226
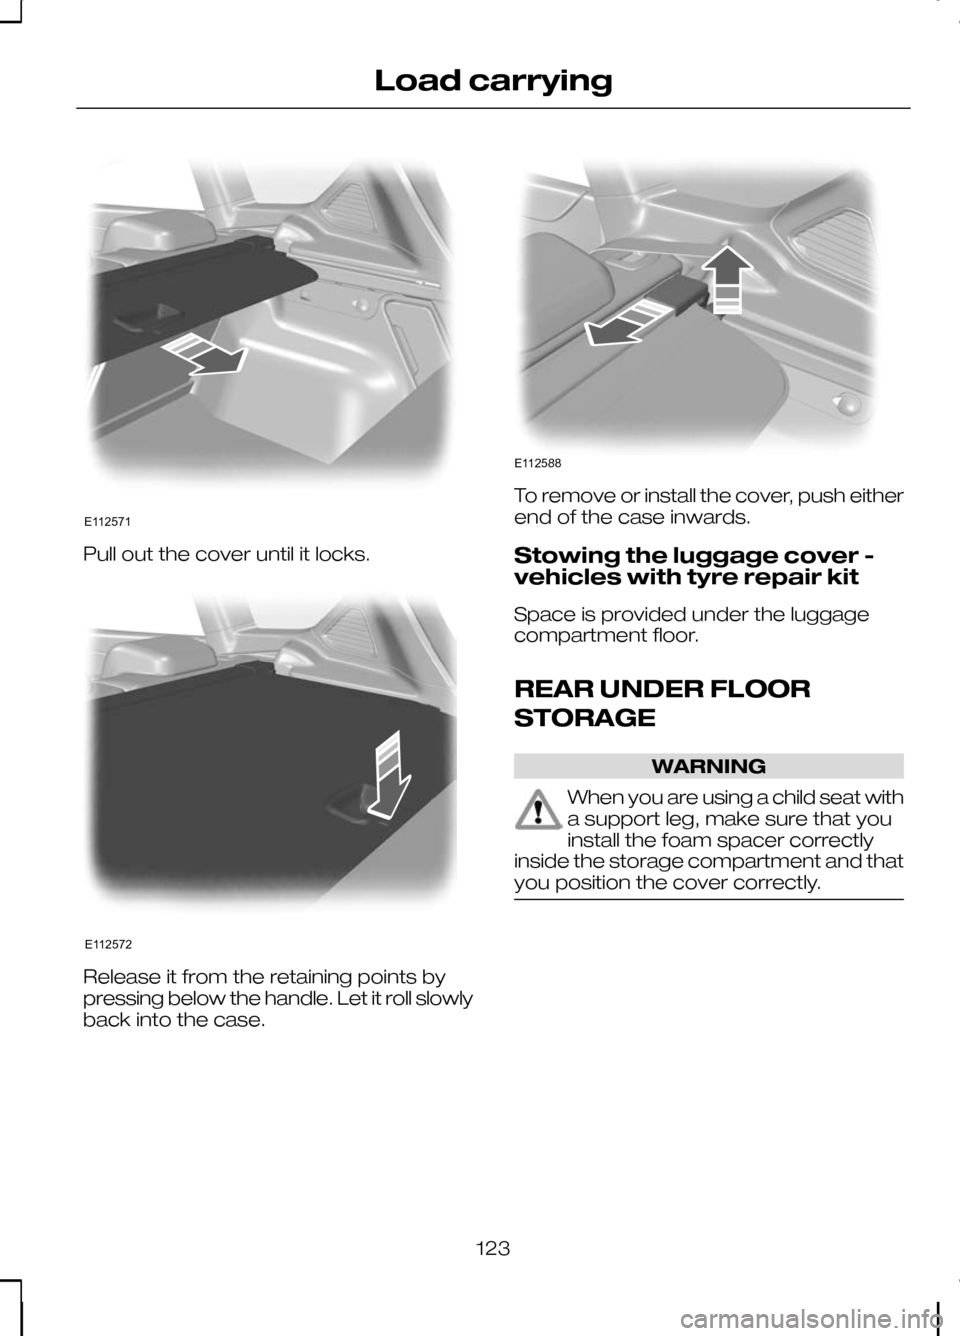
Pull out the cover until it locks.
Release it from the retaining points by
pressing below the handle. Let it roll slowly
back into the case. To remove or install the cover, push either
end of the case inwards.
Stowing the luggage cover -
vehicles with tyre repair kit
Space is provided under the luggage
compartment floor.
REAR UNDER FLOOR
STORAGE
WARNING
When you are using a child seat with
a support leg, make sure that you
install the foam spacer correctly
inside the storage compartment and that
you position the cover correctly. 123
Load carryingE112571 E112572 E112588
Page 127 of 226
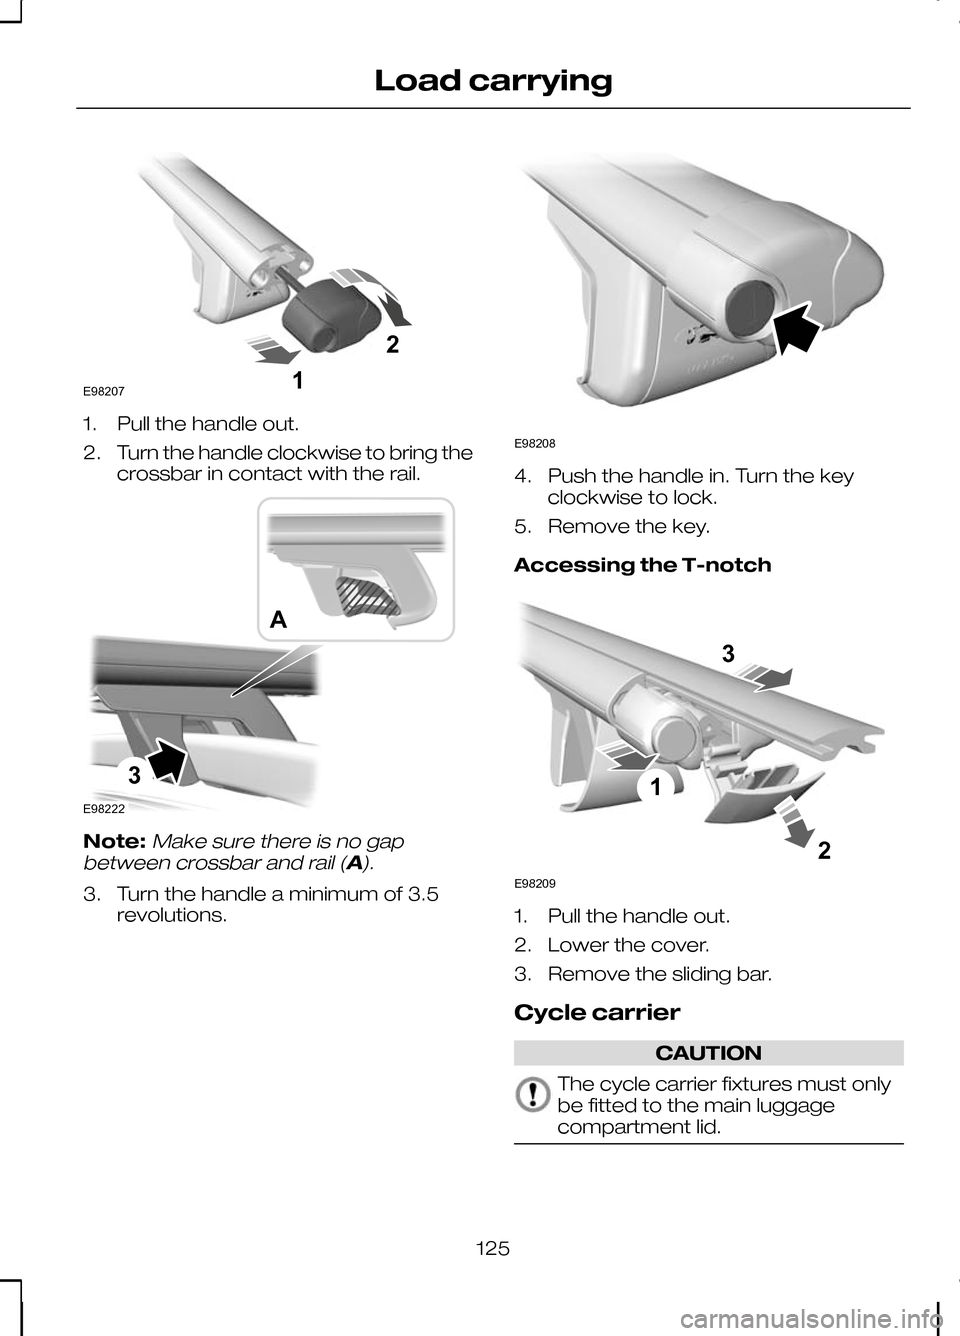
1. Pull the handle out.
2.
Turn the handle clockwise to bring the
crossbar in contact with the rail. Note:Make sure there is no gap
between crossbar and rail (A).
3. Turn the handle a minimum of 3.5 revolutions. 4. Push the handle in. Turn the key
clockwise to lock.
5. Remove the key.
Accessing the T-notch 1. Pull the handle out.
2. Lower the cover.
3. Remove the sliding bar.
Cycle carrier
CAUTION
The cycle carrier fixtures must only
be fitted to the main luggage
compartment lid.
125
Load carrying12E98207 3E98222A E98208 123E98209
Page 130 of 226
Unlocking the tow ball arm
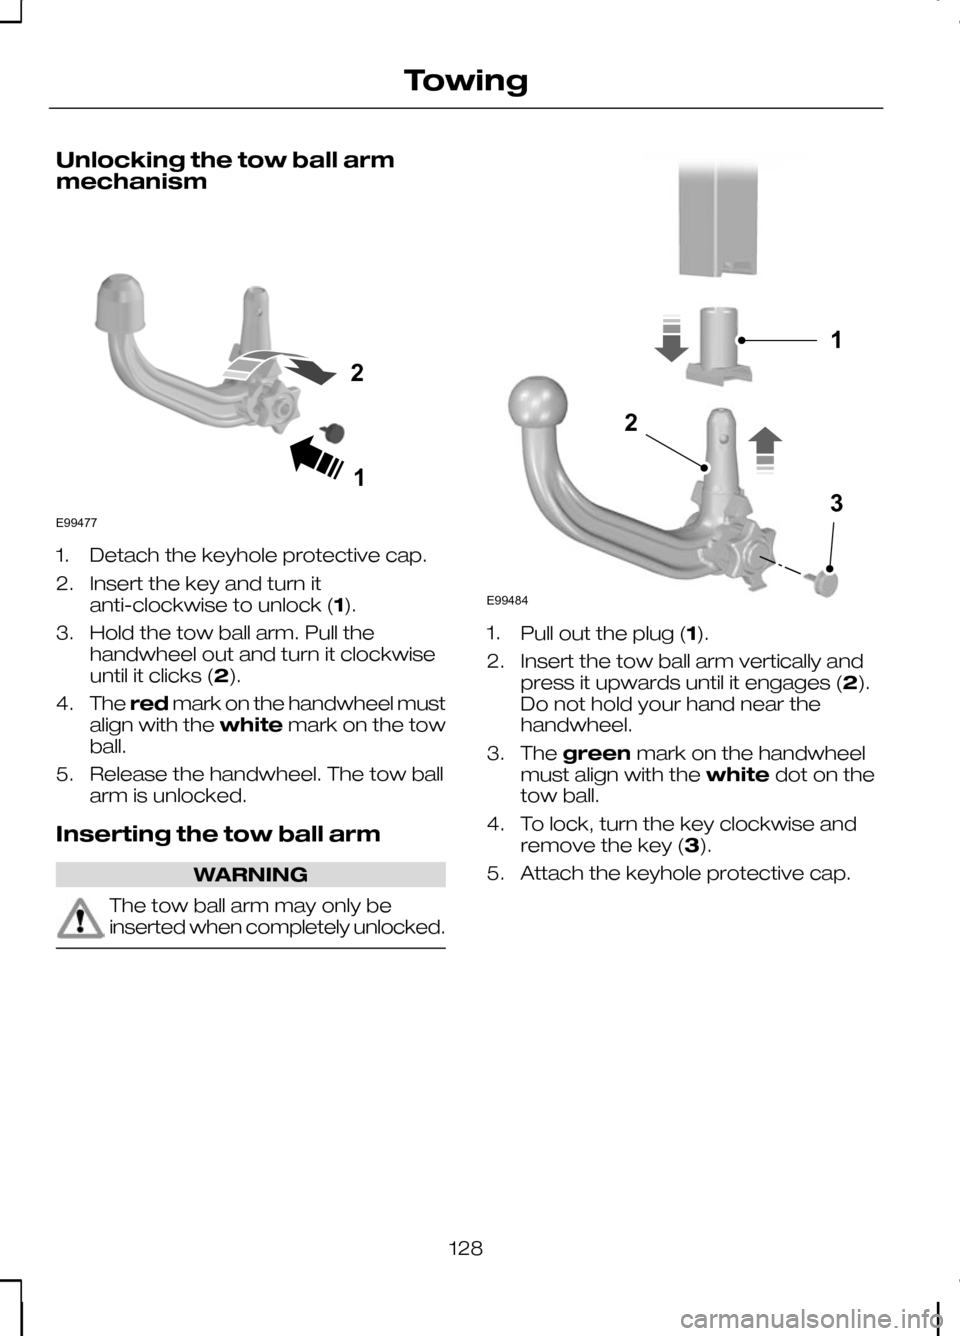
mechanism
1. Detach the keyhole protective cap.
2. Insert the key and turn it
anti-clockwise to unlock (1).
3. Hold the tow ball arm. Pull the handwheel out and turn it clockwise
until it clicks (2).
4. The red mark on the handwheel must
align with the whitemark on the tow
ball.
5. Release the handwheel. The tow ball arm is unlocked.
Inserting the tow ball arm WARNING
The tow ball arm may only be
inserted when completely unlocked. 1.
Pull out the plug (1).
2. Insert the tow ball arm vertically and press it upwards until it engages (2).
Do not hold your hand near the
handwheel.
3. The green mark on the handwheel
must align with the whitedot on the
tow ball.
4. To lock, turn the key clockwise and remove the key (3).
5. Attach the keyhole protective cap.
128
TowingE9947712 E99484132
Page 131 of 226
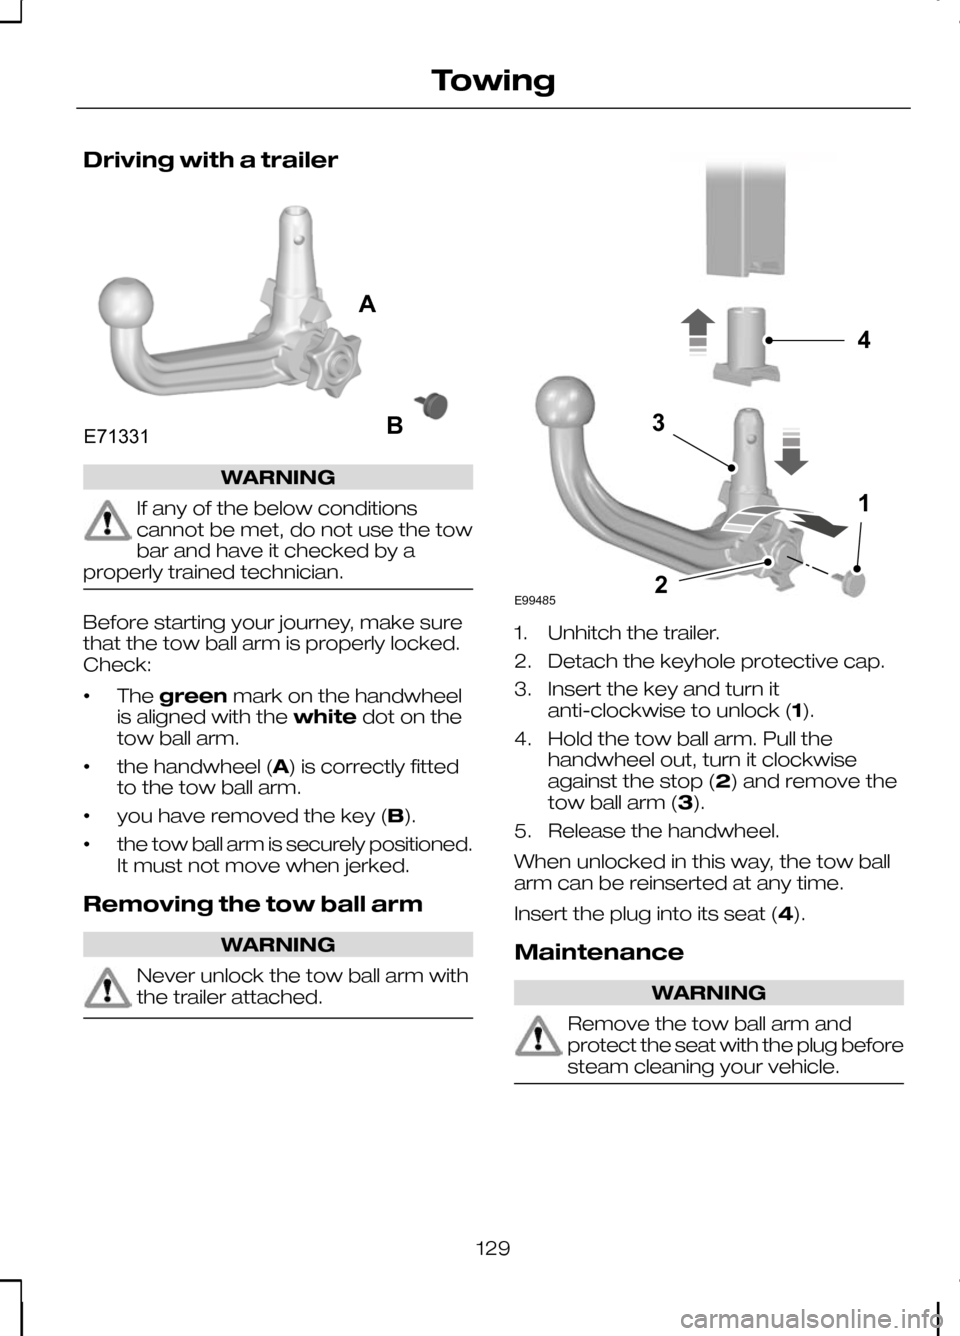
Driving with a trailer
WARNING
If any of the below conditions
cannot be met, do not use the tow
bar and have it checked by a
properly trained technician. Before starting your journey, make sure
that the tow ball arm is properly locked.
Check:
•
The
green mark on the handwheel
is aligned with the whitedot on the
tow ball arm.
• the handwheel (A) is correctly fitted
to the tow ball arm.
• you have removed the key (B).
• the tow ball arm is securely positioned.
It must not move when jerked.
Removing the tow ball arm WARNING
Never unlock the tow ball arm with
the trailer attached. 1. Unhitch the trailer.
2. Detach the keyhole protective cap.
3. Insert the key and turn it
anti-clockwise to unlock (1).
4. Hold the tow ball arm. Pull the handwheel out, turn it clockwise
against the stop (2) and remove the
tow ball arm (3).
5. Release the handwheel.
When unlocked in this way, the tow ball
arm can be reinserted at any time.
Insert the plug into its seat (4).
Maintenance WARNING
Remove the tow ball arm and
protect the seat with the plug before
steam cleaning your vehicle.
129
TowingE71331AB E994854132