bulb FORD MAVERICK 2023 Owners Manual
[x] Cancel search | Manufacturer: FORD, Model Year: 2023, Model line: MAVERICK, Model: FORD MAVERICK 2023Pages: 556, PDF Size: 14.79 MB
Page 14 of 556
Integrated Trailer Brake Controller –Troubleshooting......................................275
Trailer Sway Control
How Does Trailer Sway Control Work.........................................................................277
Trailer Sway Control Precautions..........277
Switching Trailer Sway Control On andOff.................................................................277
Driving Hints
Cold Weather Precautions......................278
Driving on Snow and Ice...........................278
Breaking-In....................................................278
Driving Economically.................................278
Driving in Special Conditions..................279
Driving Through Shallow Water............280
Floor Mats.....................................................280
Crash and BreakdownInformation
Roadside Assistance.................................282
High Voltage Battery Vehicle Precautions- Hybrid Electric Vehicle (HEV).........283
Switching the Hazard Flashers On andOff................................................................284
Jump Starting the Vehicle.......................284
Post-Crash Alert System.........................287
Post Impact Braking..................................288
Automatic Crash Shutoff........................288
Recovery Towing.........................................289
Transporting the Vehicle.........................290
Towing Your Vehicle
Towing Your Vehicle Precautions.........292
Recreationally Towing Your Vehicle -Gasoline, FWD.........................................292
Recreationally Towing Your Vehicle -Gasoline, AWD.........................................292
Recreationally Towing Your Vehicle -Hybrid Electric Vehicle (HEV)............292
Emergency Towing - Gasoline...............293
Emergency Towing - Hybrid ElectricVehicle (HEV)..........................................293
Towing Your Vehicle – Troubleshooting- Hybrid Electric Vehicle (HEV).........294
Fuses
Fuse Precautions........................................295
Under Hood Fuse Box...............................295
Body Control Module Fuse Box.............301
Identifying Fuse Types..............................303
Fuses – Troubleshooting.........................303
Maintenance
Maintenance Precautions.......................304
Opening and Closing the Hood............304
Under Hood Overview - 2.5L.................306
Under Hood Overview - 2.0L EcoBoost™........................................................................307
Engine Oil......................................................308
Checking the Coolant...............................309
Changing the Engine Air Filter - 2.0LEcoBoost™................................................313
Changing the Engine Air Filter - 2.5L,Hybrid Electric Vehicle (HEV).............314
Changing the Fuel Filter............................315
Drive Belt Routing Overview - 2.0LEcoBoost™................................................315
Changing the 12V Battery.........................315
Changing the 12V Battery - HybridElectric Vehicle (HEV)...........................318
Adjusting the Headlamps.......................320
Exterior Bulbs................................................321
Interior Bulbs................................................326
Vehicle Care
Cleaning Products.......................................327
Cleaning the Exterior.................................328
Cleaning the Interior..................................329
Repairing Minor Paint Damage..............332
Waxing Your Vehicle..................................332
10
2023 Maverick (CFE) Canada/United States of America, enUSA, Edition date: 202208, First-PrintingTable of Contents
Page 34 of 556
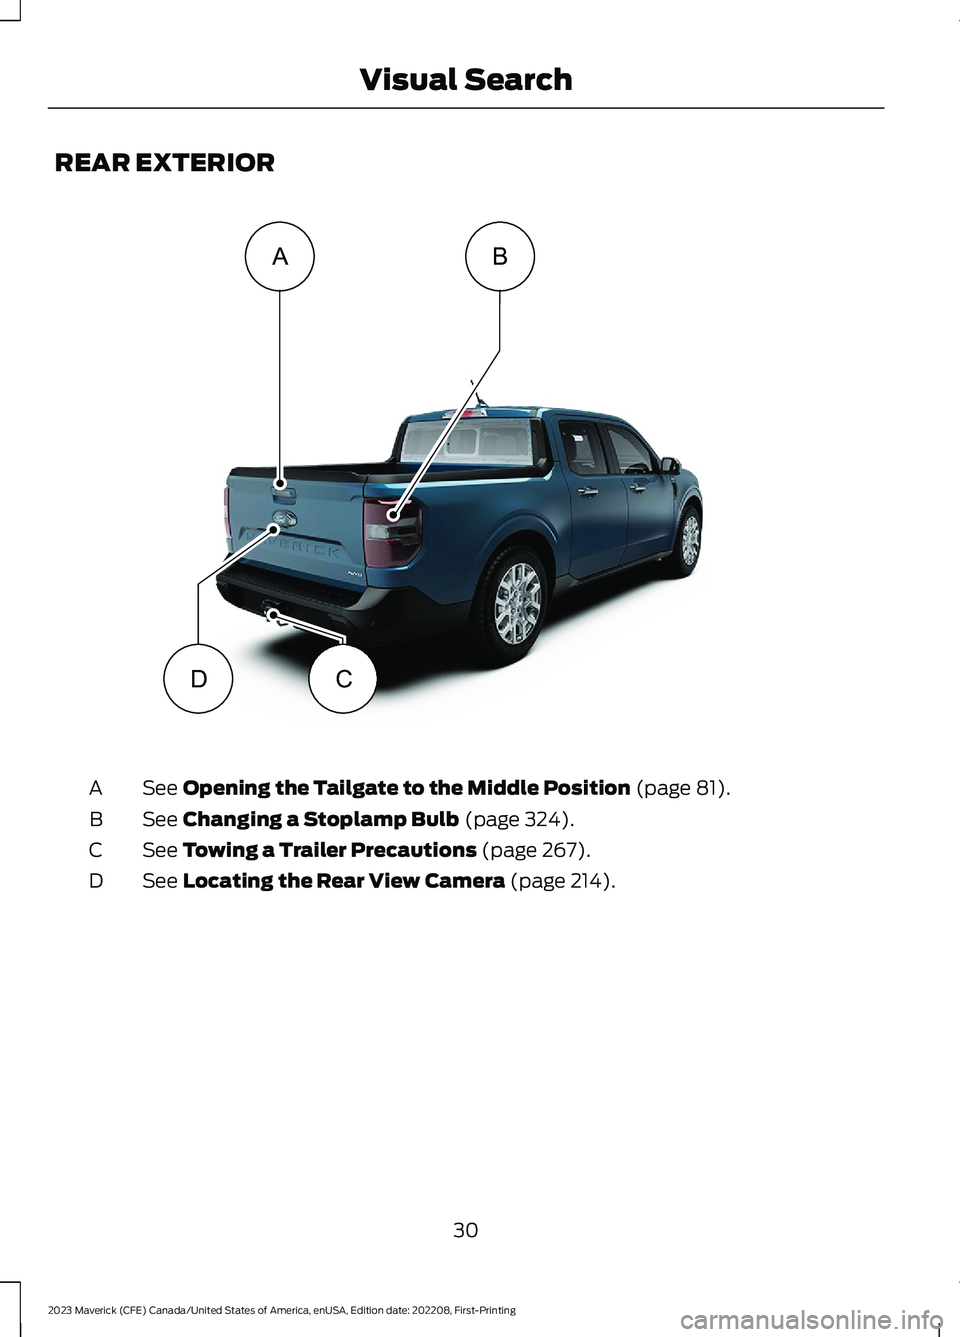
REAR EXTERIOR
See Opening the Tailgate to the Middle Position (page 81).A
See Changing a Stoplamp Bulb (page 324).B
See Towing a Trailer Precautions (page 267).C
See Locating the Rear View Camera (page 214).D
30
2023 Maverick (CFE) Canada/United States of America, enUSA, Edition date: 202208, First-PrintingVisual SearchADCBE358431
Page 290 of 556
Starting the Engine
1.Start the engine of the booster vehicleand moderately rev the engine, orgently press the accelerator to keepthe engine speed between 2000 and3000 RPM, as shown in yourtachometer.
2.Start the engine of the disabled vehicle.
3.Once you start the disabled vehicle, runboth vehicle engines for an additionalthree minutes before disconnecting thejumper cables.
Removing the Jumper Cables
Remove the jumper cables in the reverseorder that they were connected.
Note:Do not switch the headlamps onwhen disconnecting the cables. The peakvoltage could blow the bulbs.
JUMP STARTING THE VEHICLE -HYBRID ELECTRIC VEHICLE (HEV)
Connecting the Jumper Cables
WARNING: Do not connect thenegative jumper cable to any other partof your vehicle. Use the ground point.
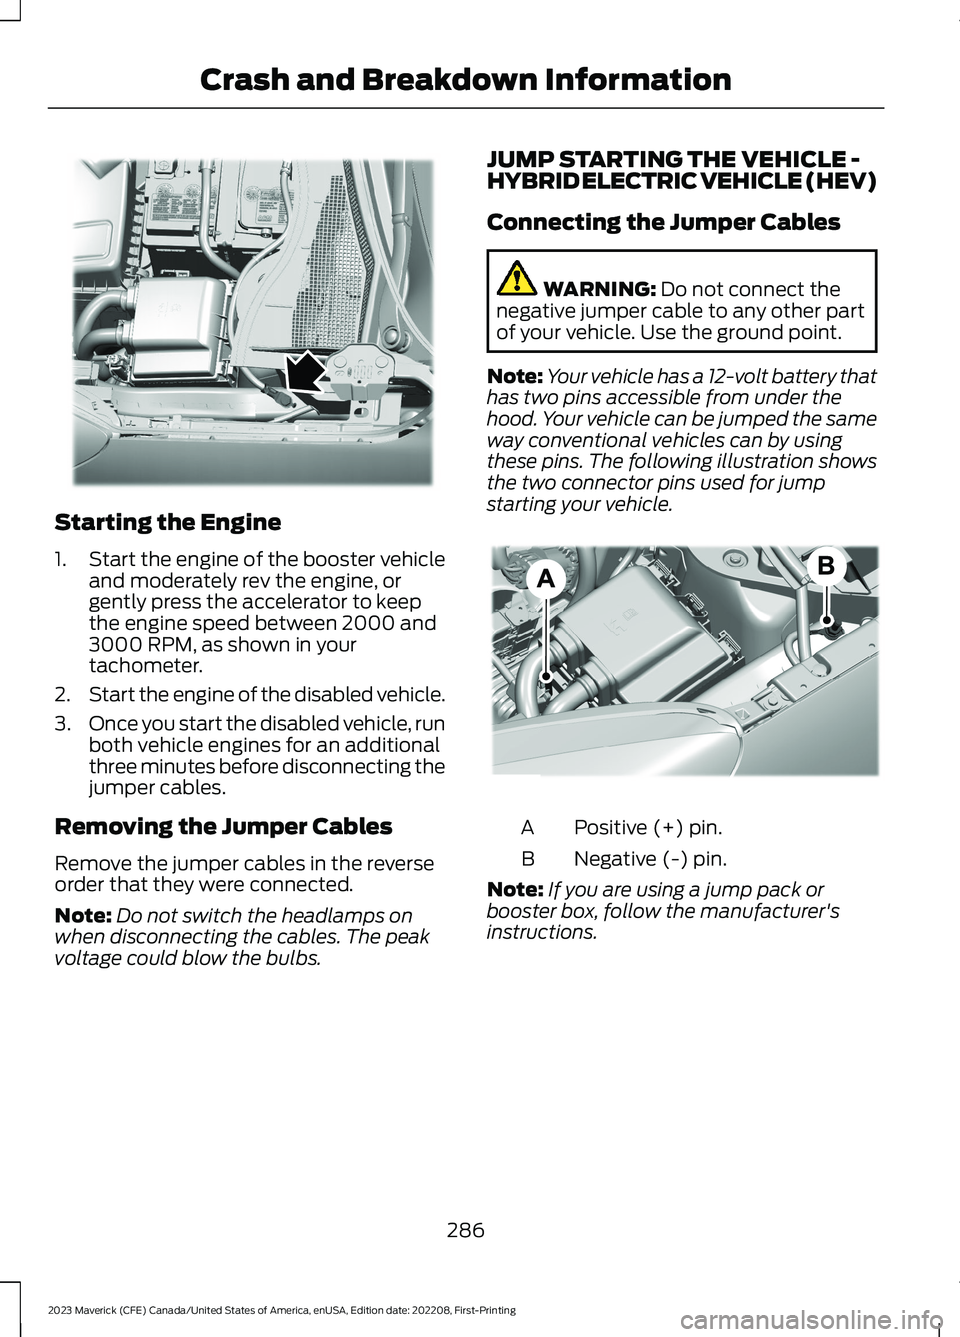
Note:Your vehicle has a 12-volt battery thathas two pins accessible from under thehood. Your vehicle can be jumped the sameway conventional vehicles can by usingthese pins. The following illustration showsthe two connector pins used for jumpstarting your vehicle.
Positive (+) pin.A
Negative (-) pin.B
Note:If you are using a jump pack orbooster box, follow the manufacturer'sinstructions.
286
2023 Maverick (CFE) Canada/United States of America, enUSA, Edition date: 202208, First-PrintingCrash and Breakdown InformationE338624 E309691
Page 291 of 556
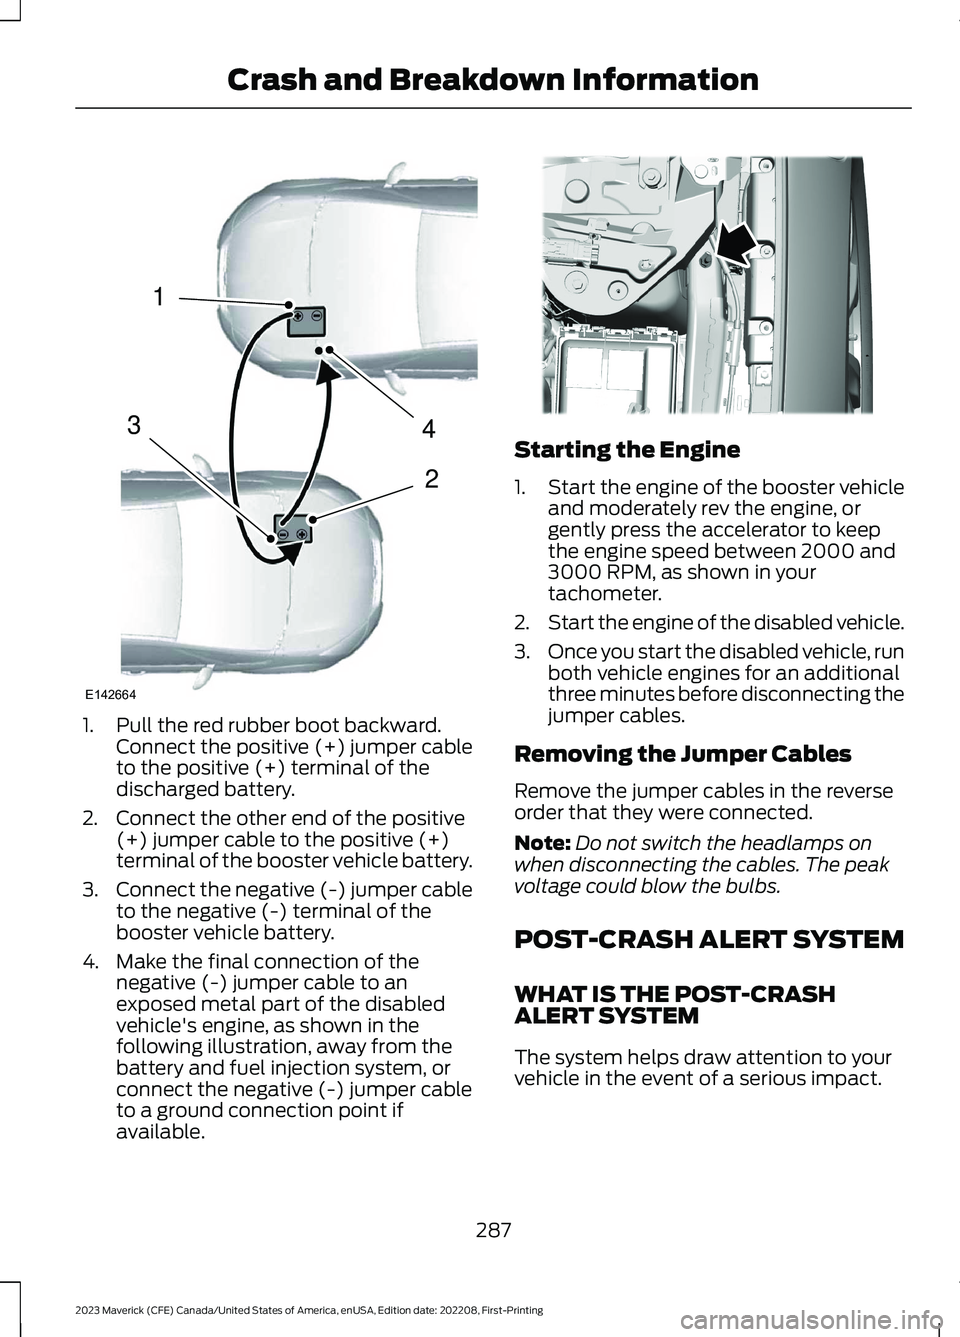
1.Pull the red rubber boot backward.Connect the positive (+) jumper cableto the positive (+) terminal of thedischarged battery.
2.Connect the other end of the positive(+) jumper cable to the positive (+)terminal of the booster vehicle battery.
3.Connect the negative (-) jumper cableto the negative (-) terminal of thebooster vehicle battery.
4.Make the final connection of thenegative (-) jumper cable to anexposed metal part of the disabledvehicle's engine, as shown in thefollowing illustration, away from thebattery and fuel injection system, orconnect the negative (-) jumper cableto a ground connection point ifavailable.
Starting the Engine
1.Start the engine of the booster vehicleand moderately rev the engine, orgently press the accelerator to keepthe engine speed between 2000 and3000 RPM, as shown in yourtachometer.
2.Start the engine of the disabled vehicle.
3.Once you start the disabled vehicle, runboth vehicle engines for an additionalthree minutes before disconnecting thejumper cables.
Removing the Jumper Cables
Remove the jumper cables in the reverseorder that they were connected.
Note:Do not switch the headlamps onwhen disconnecting the cables. The peakvoltage could blow the bulbs.
POST-CRASH ALERT SYSTEM
WHAT IS THE POST-CRASHALERT SYSTEM
The system helps draw attention to yourvehicle in the event of a serious impact.
287
2023 Maverick (CFE) Canada/United States of America, enUSA, Edition date: 202208, First-PrintingCrash and Breakdown Information4213E142664 E338715
Page 325 of 556
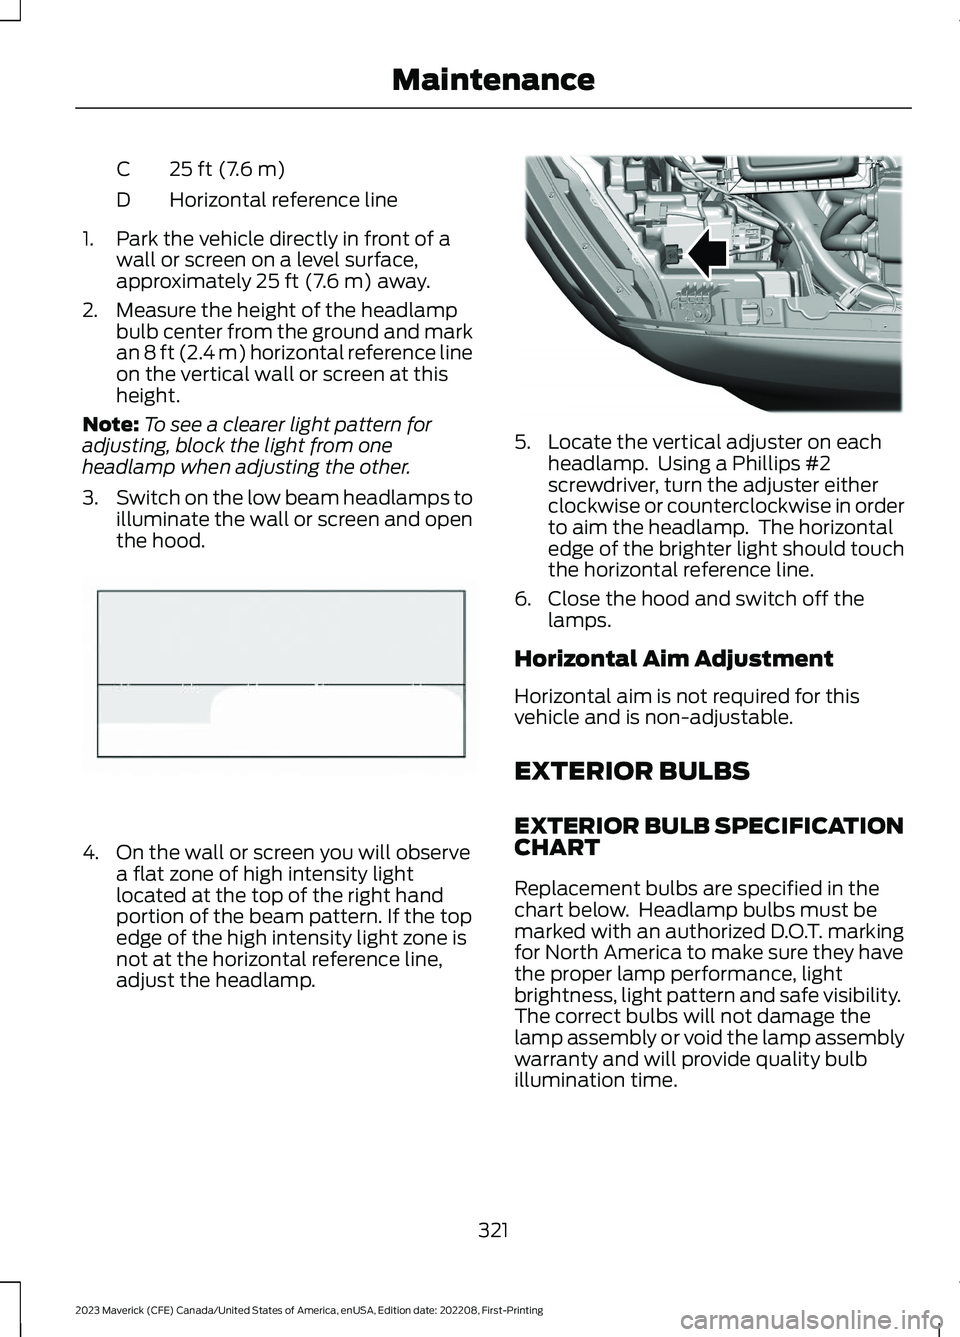
25 ft (7.6 m)C
Horizontal reference lineD
1.Park the vehicle directly in front of awall or screen on a level surface,approximately 25 ft (7.6 m) away.
2.Measure the height of the headlampbulb center from the ground and markan 8 ft (2.4 m) horizontal reference lineon the vertical wall or screen at thisheight.
Note:To see a clearer light pattern foradjusting, block the light from oneheadlamp when adjusting the other.
3.Switch on the low beam headlamps toilluminate the wall or screen and openthe hood.
4.On the wall or screen you will observea flat zone of high intensity lightlocated at the top of the right handportion of the beam pattern. If the topedge of the high intensity light zone isnot at the horizontal reference line,adjust the headlamp.
5.Locate the vertical adjuster on eachheadlamp. Using a Phillips #2screwdriver, turn the adjuster eitherclockwise or counterclockwise in orderto aim the headlamp. The horizontaledge of the brighter light should touchthe horizontal reference line.
6.Close the hood and switch off thelamps.
Horizontal Aim Adjustment
Horizontal aim is not required for thisvehicle and is non-adjustable.
EXTERIOR BULBS
EXTERIOR BULB SPECIFICATIONCHART
Replacement bulbs are specified in thechart below. Headlamp bulbs must bemarked with an authorized D.O.T. markingfor North America to make sure they havethe proper lamp performance, lightbrightness, light pattern and safe visibility.The correct bulbs will not damage thelamp assembly or void the lamp assemblywarranty and will provide quality bulbillumination time.
321
2023 Maverick (CFE) Canada/United States of America, enUSA, Edition date: 202208, First-PrintingMaintenanceE142465 E355886
Page 326 of 556
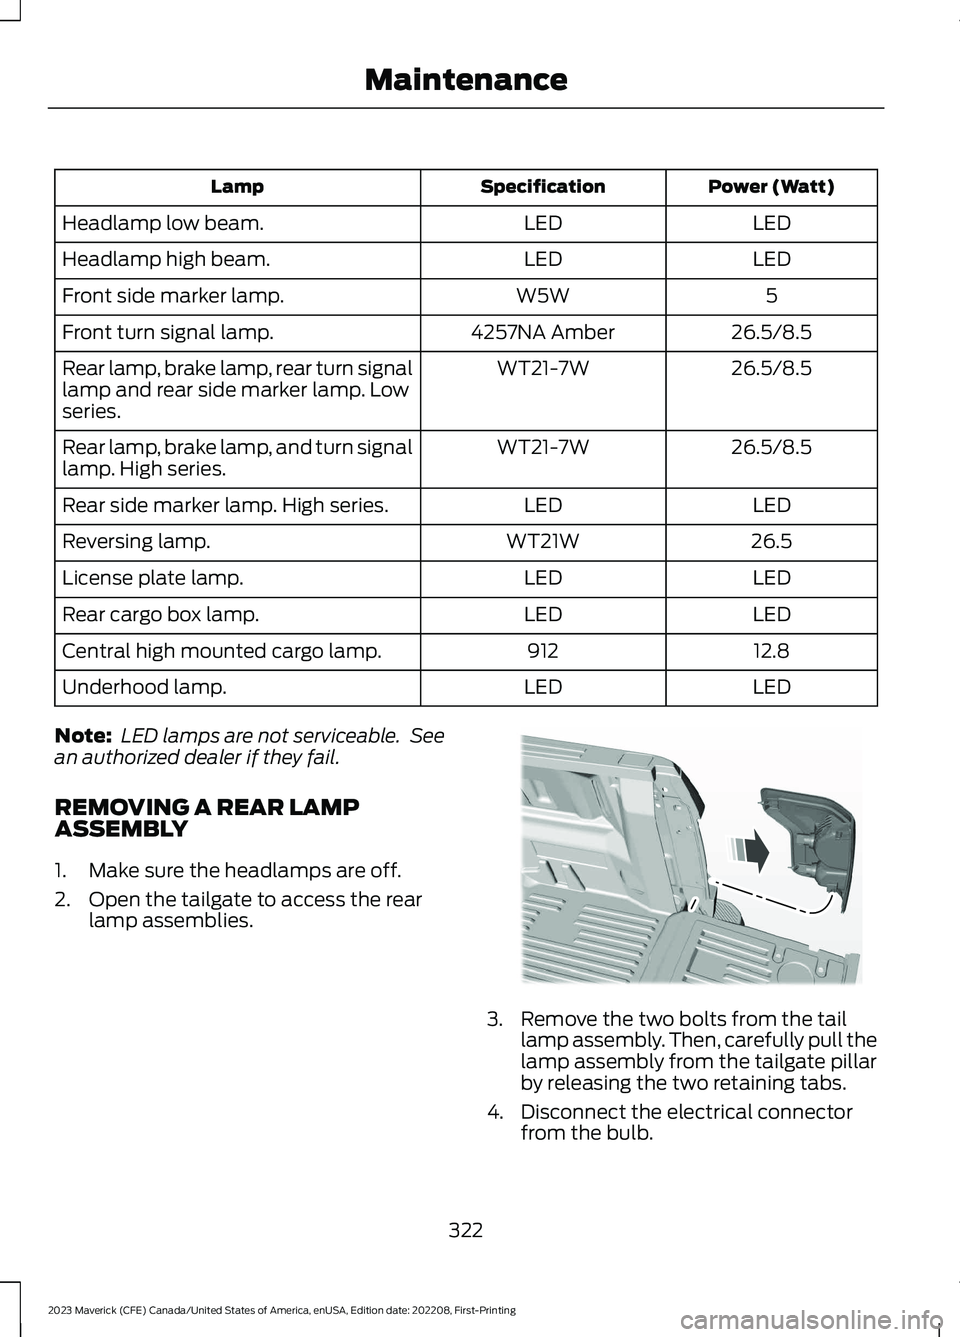
Power (Watt)SpecificationLamp
LEDLEDHeadlamp low beam.
LEDLEDHeadlamp high beam.
5W5WFront side marker lamp.
26.5/8.54257NA AmberFront turn signal lamp.
26.5/8.5WT21-7WRear lamp, brake lamp, rear turn signallamp and rear side marker lamp. Lowseries.
26.5/8.5WT21-7WRear lamp, brake lamp, and turn signallamp. High series.
LEDLEDRear side marker lamp. High series.
26.5WT21WReversing lamp.
LEDLEDLicense plate lamp.
LEDLEDRear cargo box lamp.
12.8912Central high mounted cargo lamp.
LEDLEDUnderhood lamp.
Note: LED lamps are not serviceable. Seean authorized dealer if they fail.
REMOVING A REAR LAMPASSEMBLY
1.Make sure the headlamps are off.
2.Open the tailgate to access the rearlamp assemblies.
3.Remove the two bolts from the taillamp assembly. Then, carefully pull thelamp assembly from the tailgate pillarby releasing the two retaining tabs.
4.Disconnect the electrical connectorfrom the bulb.
322
2023 Maverick (CFE) Canada/United States of America, enUSA, Edition date: 202208, First-PrintingMaintenanceE187288
Page 327 of 556
5.To install, reverse the removalprocedure.
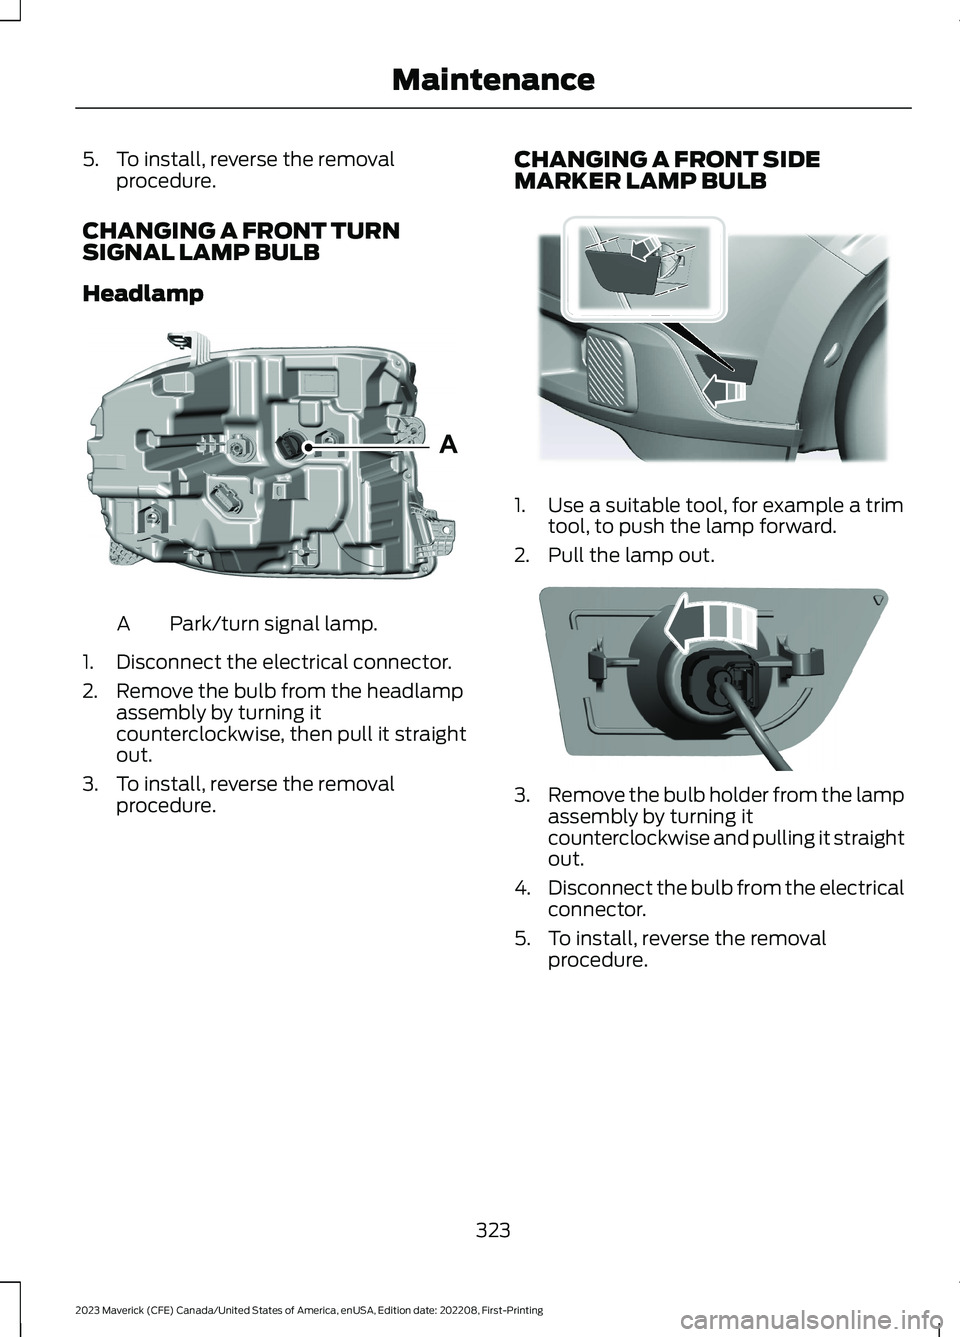
CHANGING A FRONT TURNSIGNAL LAMP BULB
Headlamp
Park/turn signal lamp.A
1.Disconnect the electrical connector.
2.Remove the bulb from the headlampassembly by turning itcounterclockwise, then pull it straightout.
3.To install, reverse the removalprocedure.
CHANGING A FRONT SIDEMARKER LAMP BULB
1.Use a suitable tool, for example a trimtool, to push the lamp forward.
2.Pull the lamp out.
3.Remove the bulb holder from the lampassembly by turning itcounterclockwise and pulling it straightout.
4.Disconnect the bulb from the electricalconnector.
5.To install, reverse the removalprocedure.
323
2023 Maverick (CFE) Canada/United States of America, enUSA, Edition date: 202208, First-PrintingMaintenanceAE348847 E349259 E349260
Page 328 of 556
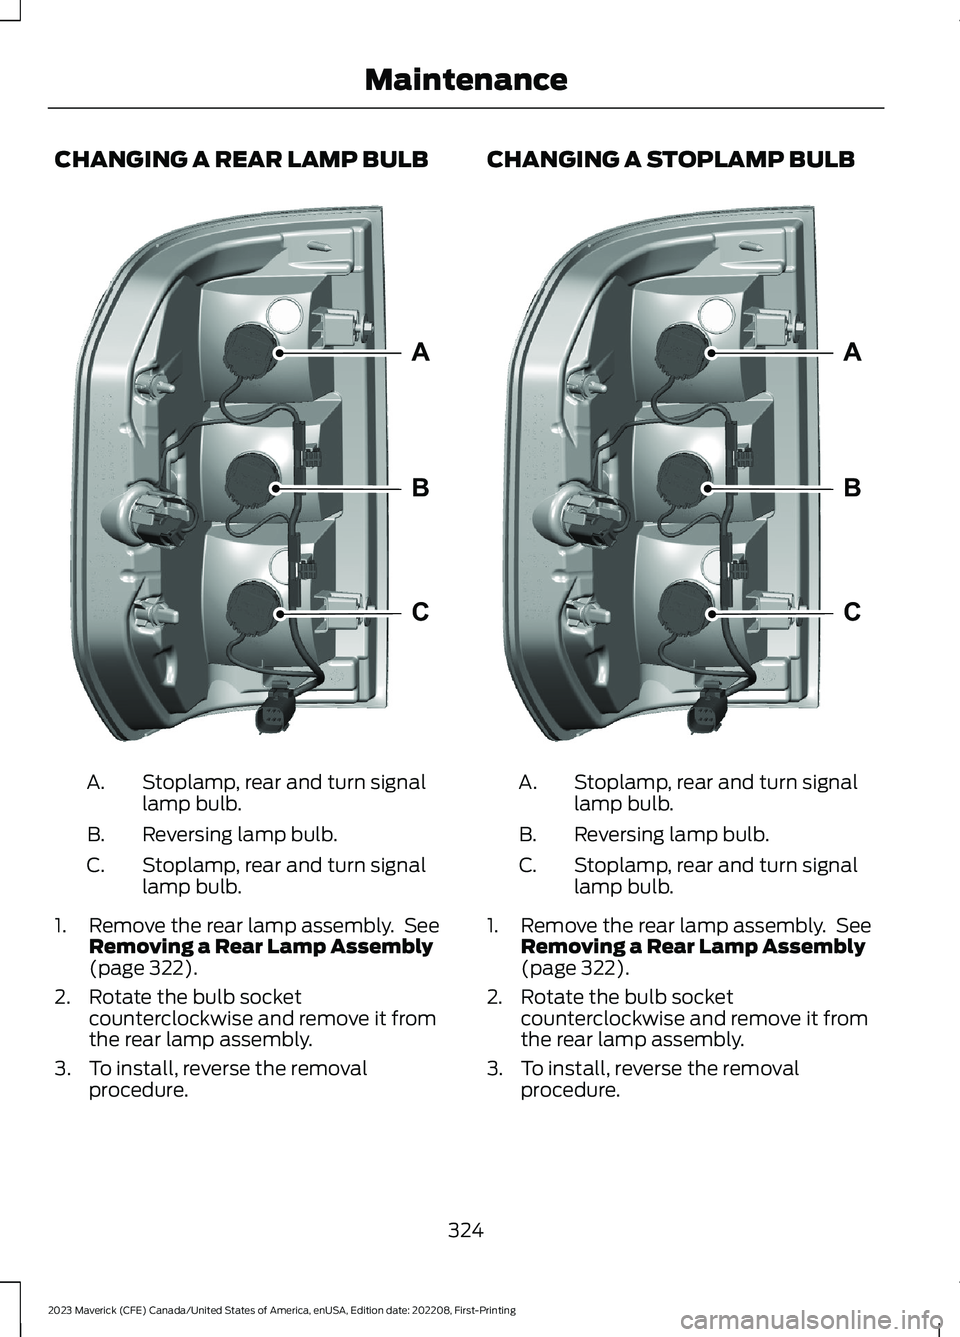
CHANGING A REAR LAMP BULB
Stoplamp, rear and turn signallamp bulb.A.
Reversing lamp bulb.B.
Stoplamp, rear and turn signallamp bulb.C.
1.Remove the rear lamp assembly. SeeRemoving a Rear Lamp Assembly(page 322).
2.Rotate the bulb socketcounterclockwise and remove it fromthe rear lamp assembly.
3.To install, reverse the removalprocedure.
CHANGING A STOPLAMP BULB
Stoplamp, rear and turn signallamp bulb.A.
Reversing lamp bulb.B.
Stoplamp, rear and turn signallamp bulb.C.
1.Remove the rear lamp assembly. SeeRemoving a Rear Lamp Assembly(page 322).
2.Rotate the bulb socketcounterclockwise and remove it fromthe rear lamp assembly.
3.To install, reverse the removalprocedure.
324
2023 Maverick (CFE) Canada/United States of America, enUSA, Edition date: 202208, First-PrintingMaintenanceABCE348848 ABCE348848
Page 329 of 556
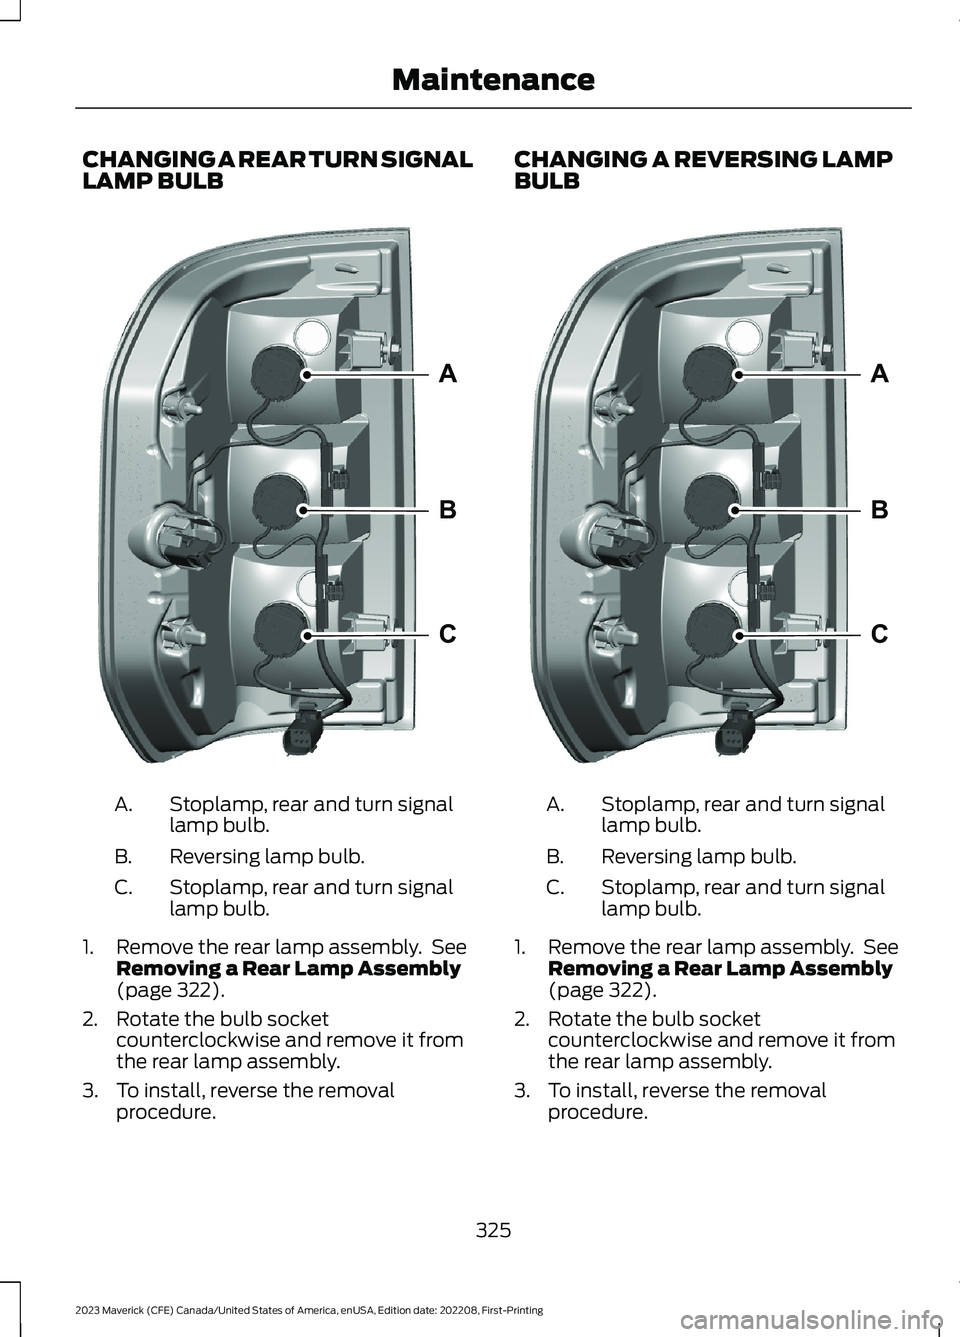
CHANGING A REAR TURN SIGNALLAMP BULB
Stoplamp, rear and turn signallamp bulb.A.
Reversing lamp bulb.B.
Stoplamp, rear and turn signallamp bulb.C.
1.Remove the rear lamp assembly. SeeRemoving a Rear Lamp Assembly(page 322).
2.Rotate the bulb socketcounterclockwise and remove it fromthe rear lamp assembly.
3.To install, reverse the removalprocedure.
CHANGING A REVERSING LAMPBULB
Stoplamp, rear and turn signallamp bulb.A.
Reversing lamp bulb.B.
Stoplamp, rear and turn signallamp bulb.C.
1.Remove the rear lamp assembly. SeeRemoving a Rear Lamp Assembly(page 322).
2.Rotate the bulb socketcounterclockwise and remove it fromthe rear lamp assembly.
3.To install, reverse the removalprocedure.
325
2023 Maverick (CFE) Canada/United States of America, enUSA, Edition date: 202208, First-PrintingMaintenanceABCE348848 ABCE348848
Page 330 of 556
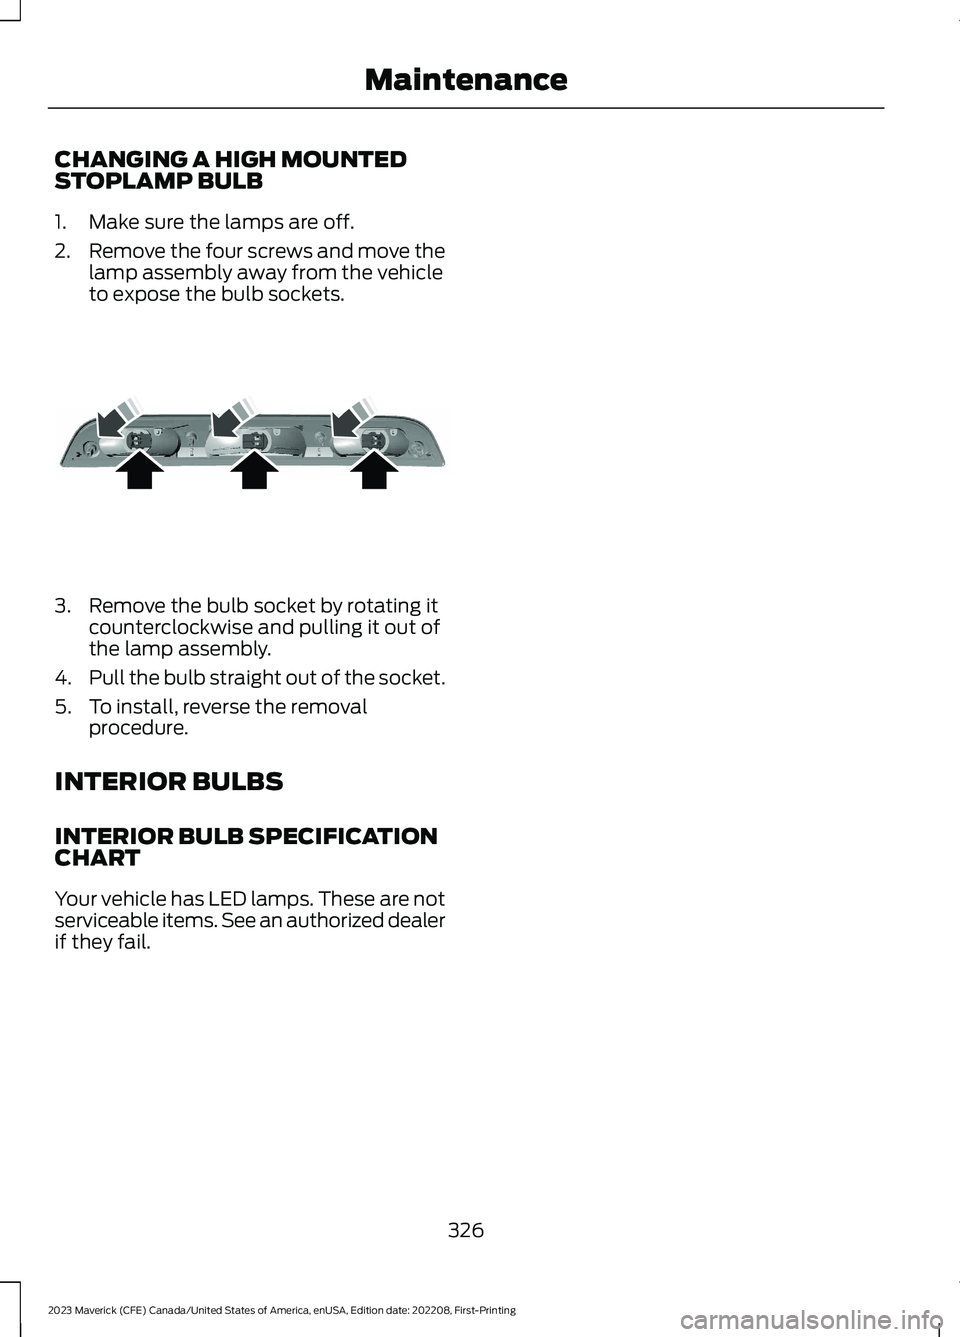
CHANGING A HIGH MOUNTEDSTOPLAMP BULB
1.Make sure the lamps are off.
2.Remove the four screws and move thelamp assembly away from the vehicleto expose the bulb sockets.
3.Remove the bulb socket by rotating itcounterclockwise and pulling it out ofthe lamp assembly.
4.Pull the bulb straight out of the socket.
5.To install, reverse the removalprocedure.
INTERIOR BULBS
INTERIOR BULB SPECIFICATIONCHART
Your vehicle has LED lamps. These are notserviceable items. See an authorized dealerif they fail.
326
2023 Maverick (CFE) Canada/United States of America, enUSA, Edition date: 202208, First-PrintingMaintenanceE187290