FORD MUSTANG 2011 5.G Repair Manual
Manufacturer: FORD, Model Year: 2011, Model line: MUSTANG, Model: FORD MUSTANG 2011 5.GPages: 348, PDF Size: 2.65 MB
Page 61 of 348
5. Then usea7mmAllenwrench or a Phillips screwdriver to adjust the
headlamp up or down. HORIZONTAL AIM IS NOT REQUIRED FOR THIS
VEHICLE AND IS NON-ADJUSTABLE.
6. Close the hood and turn off the lamps.
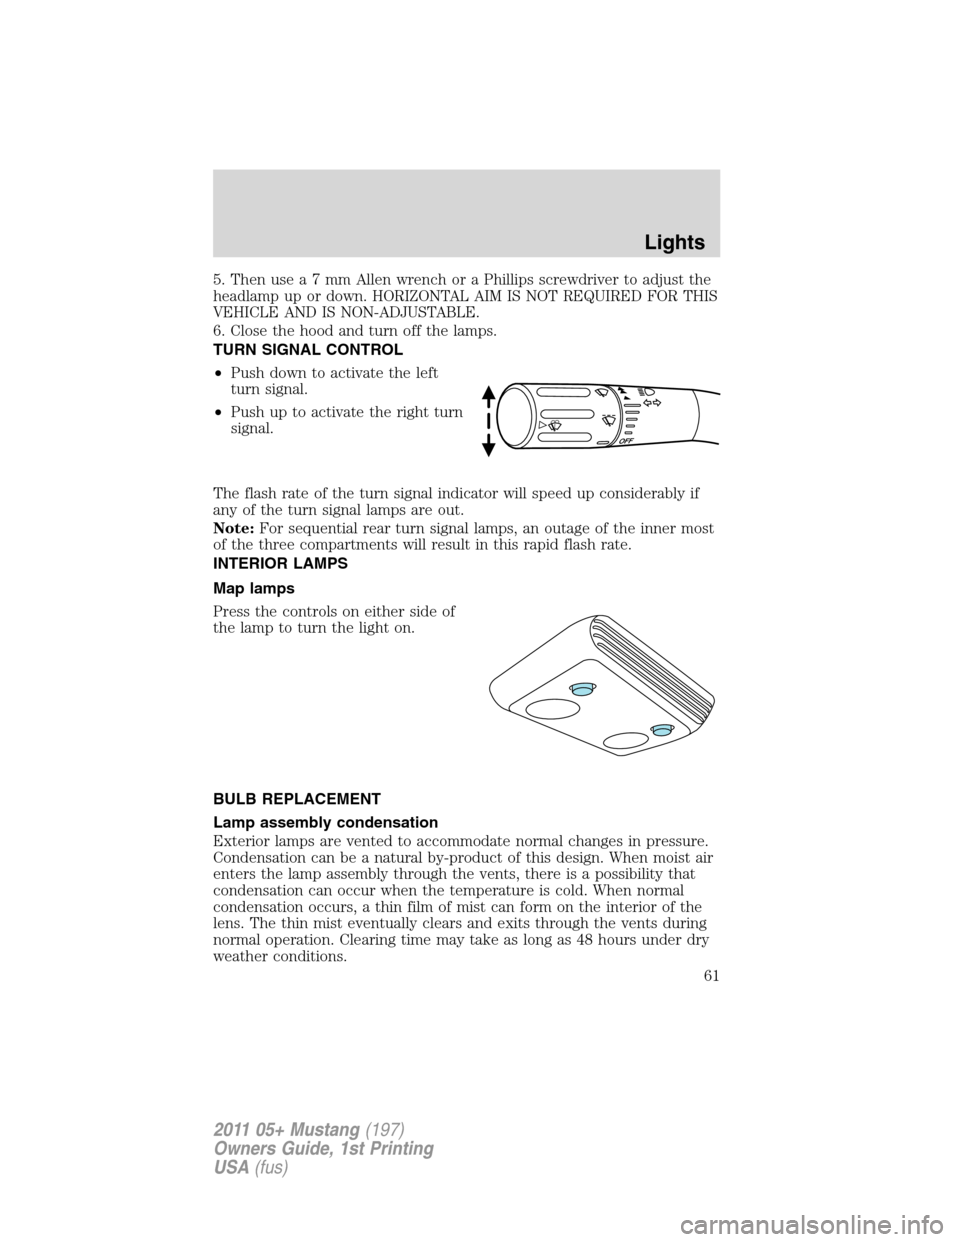
TURN SIGNAL CONTROL
•Push down to activate the left
turn signal.
•Push up to activate the right turn
signal.
The flash rate of the turn signal indicator will speed up considerably if
any of the turn signal lamps are out.
Note:For sequential rear turn signal lamps, an outage of the inner most
of the three compartments will result in this rapid flash rate.
INTERIOR LAMPS
Map lamps
Press the controls on either side of
the lamp to turn the light on.
BULB REPLACEMENT
Lamp assembly condensation
Exterior lamps are vented to accommodate normal changes in pressure.
Condensation can be a natural by-product of this design. When moist air
enters the lamp assembly through the vents, there is a possibility that
condensation can occur when the temperature is cold. When normal
condensation occurs, a thin film of mist can form on the interior of the
lens. The thin mist eventually clears and exits through the vents during
normal operation. Clearing time may take as long as 48 hours under dry
weather conditions.
Lights
61
2011 05+ Mustang(197)
Owners Guide, 1st Printing
USA(fus)
Page 62 of 348
Examples of acceptable condensation are:
•Presence of thin mist (no streaks, drip marks or droplets)
•Fine mist covers less than 50% of the lens
Examples of unacceptable moisture (usually caused by a lamp water
leak) are:
•Water puddle inside the lamp
•Large water droplets, drip marks or streaks present on the interior of
the lens
Take your vehicle to a dealer for service if any of the above conditions of
unacceptable moisture are present.
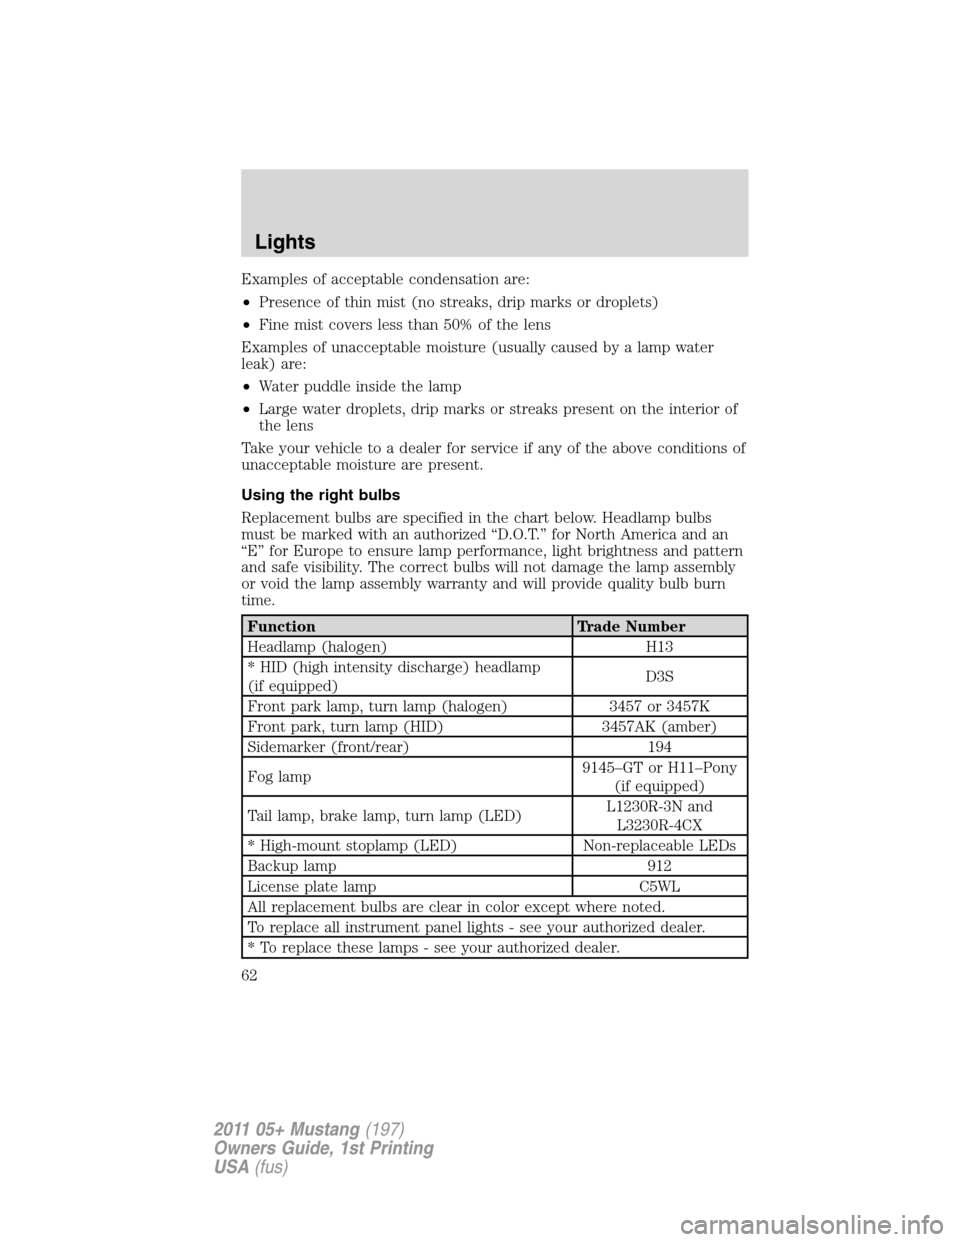
Using the right bulbs
Replacement bulbs are specified in the chart below. Headlamp bulbs
must be marked with an authorized “D.O.T.” for North America and an
“E” for Europe to ensure lamp performance, light brightness and pattern
and safe visibility. The correct bulbs will not damage the lamp assembly
or void the lamp assembly warranty and will provide quality bulb burn
time.
Function Trade Number
Headlamp (halogen) H13
* HID (high intensity discharge) headlamp
(if equipped)D3S
Front park lamp, turn lamp (halogen) 3457 or 3457K
Front park, turn lamp (HID) 3457AK (amber)
Sidemarker (front/rear) 194
Fog lamp9145–GT or H11–Pony
(if equipped)
Tail lamp, brake lamp, turn lamp (LED)L1230R-3N and
L3230R-4CX
* High-mount stoplamp (LED) Non-replaceable LEDs
Backup lamp 912
License plate lamp C5WL
All replacement bulbs are clear in color except where noted.
To replace all instrument panel lights - see your authorized dealer.
* To replace these lamps - see your authorized dealer.
Lights
62
2011 05+ Mustang(197)
Owners Guide, 1st Printing
USA(fus)
Page 63 of 348
Replacing interior bulbs
Check the operation of all bulbs frequently.
Replacing exterior bulbs
Check the operation of all bulbs frequently.
Replacing headlamp bulbs
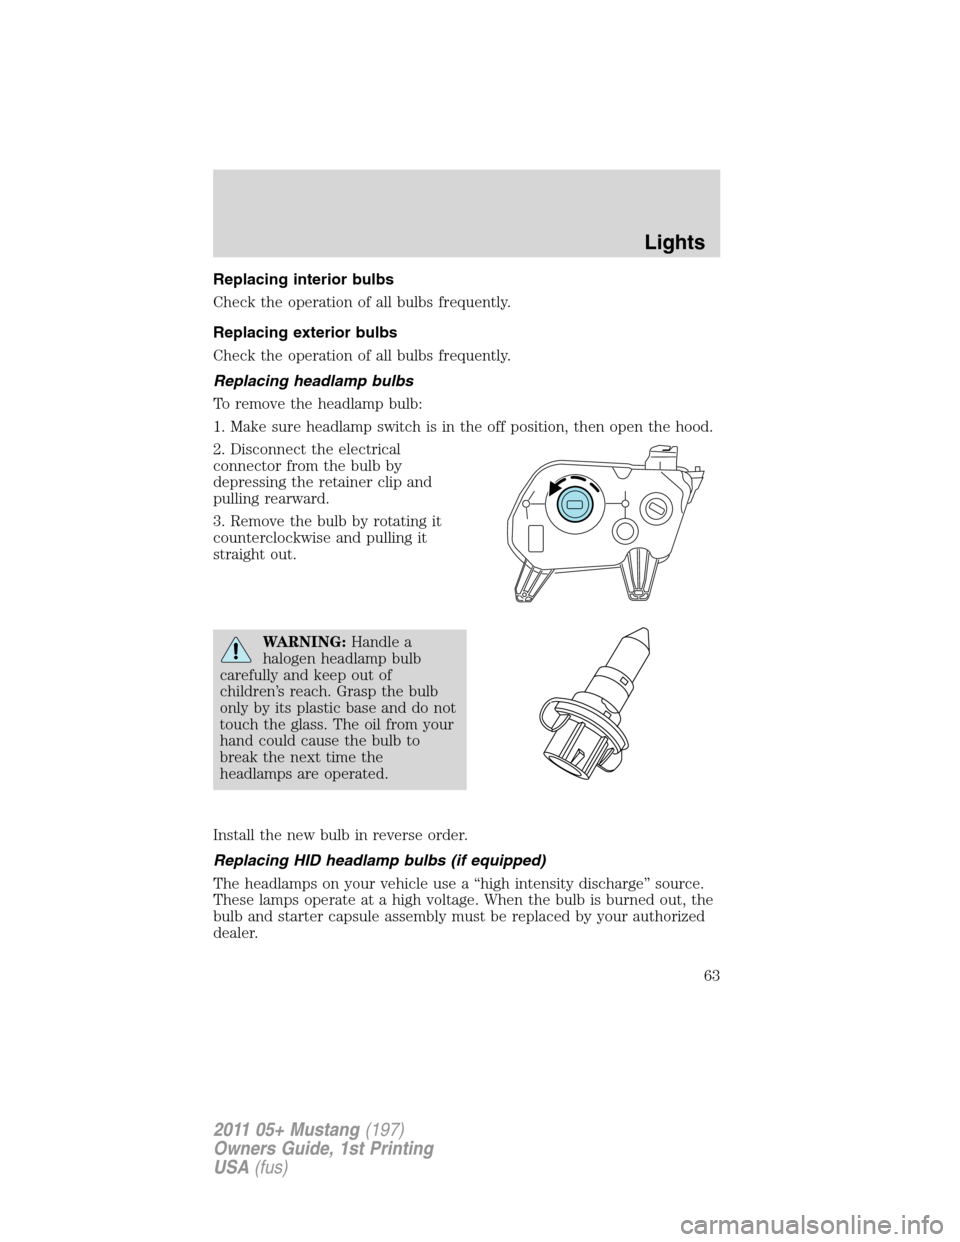
To remove the headlamp bulb:
1. Make sure headlamp switch is in the off position, then open the hood.
2. Disconnect the electrical
connector from the bulb by
depressing the retainer clip and
pulling rearward.
3. Remove the bulb by rotating it
counterclockwise and pulling it
straight out.
WARNING:Handle a
halogen headlamp bulb
carefully and keep out of
children’s reach. Grasp the bulb
only by its plastic base and do not
touch the glass. The oil from your
hand could cause the bulb to
break the next time the
headlamps are operated.
Install the new bulb in reverse order.
Replacing HID headlamp bulbs (if equipped)
The headlamps on your vehicle use a “high intensity discharge” source.
These lamps operate at a high voltage. When the bulb is burned out, the
bulb and starter capsule assembly must be replaced by your authorized
dealer.
Lights
63
2011 05+ Mustang(197)
Owners Guide, 1st Printing
USA(fus)
Page 64 of 348
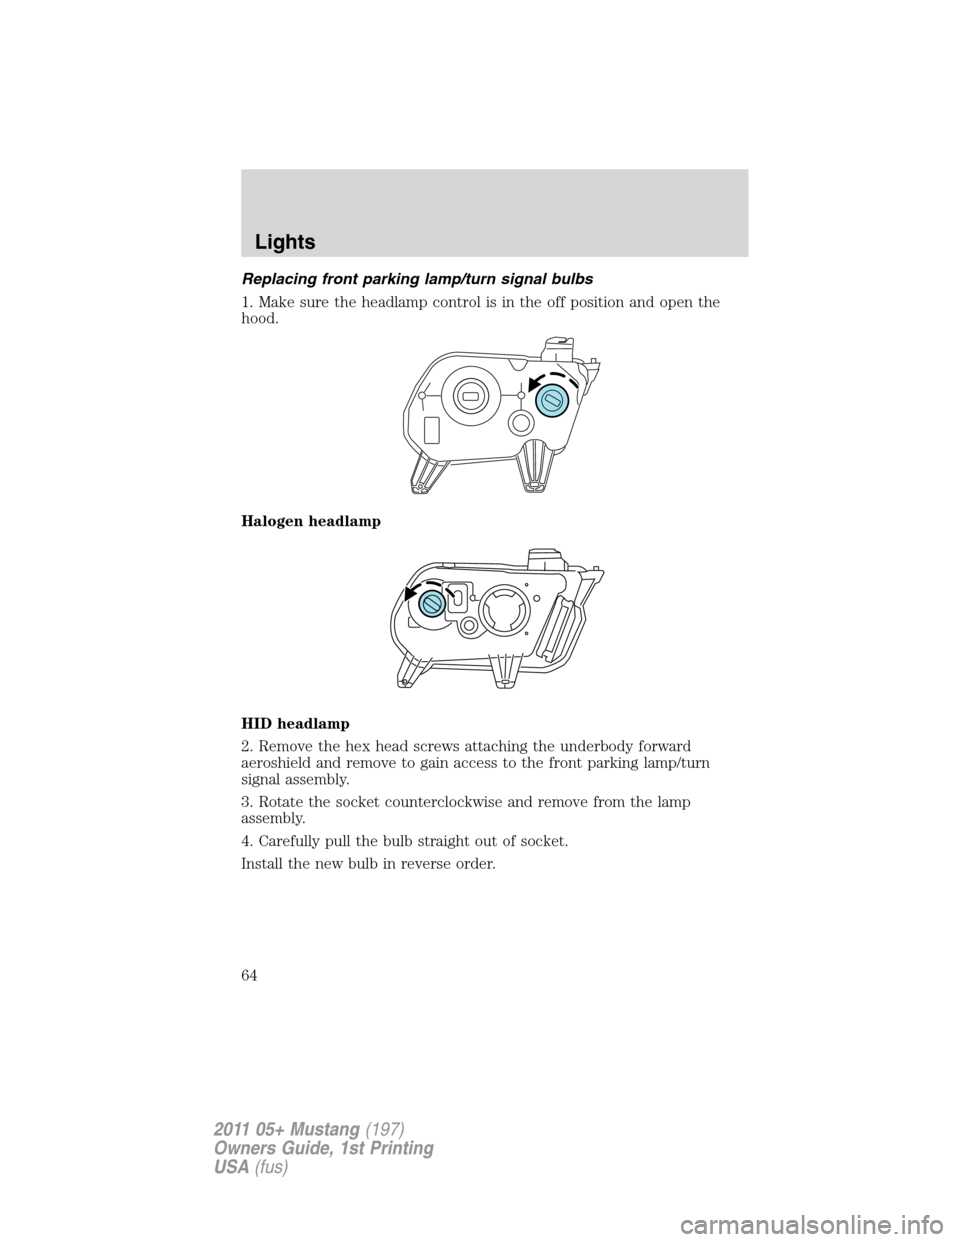
Replacing front parking lamp/turn signal bulbs
1. Make sure the headlamp control is in the off position and open the
hood.
Halogen headlamp
HID headlamp
2. Remove the hex head screws attaching the underbody forward
aeroshield and remove to gain access to the front parking lamp/turn
signal assembly.
3. Rotate the socket counterclockwise and remove from the lamp
assembly.
4. Carefully pull the bulb straight out of socket.
Install the new bulb in reverse order.
Lights
64
2011 05+ Mustang(197)
Owners Guide, 1st Printing
USA(fus)
Page 65 of 348
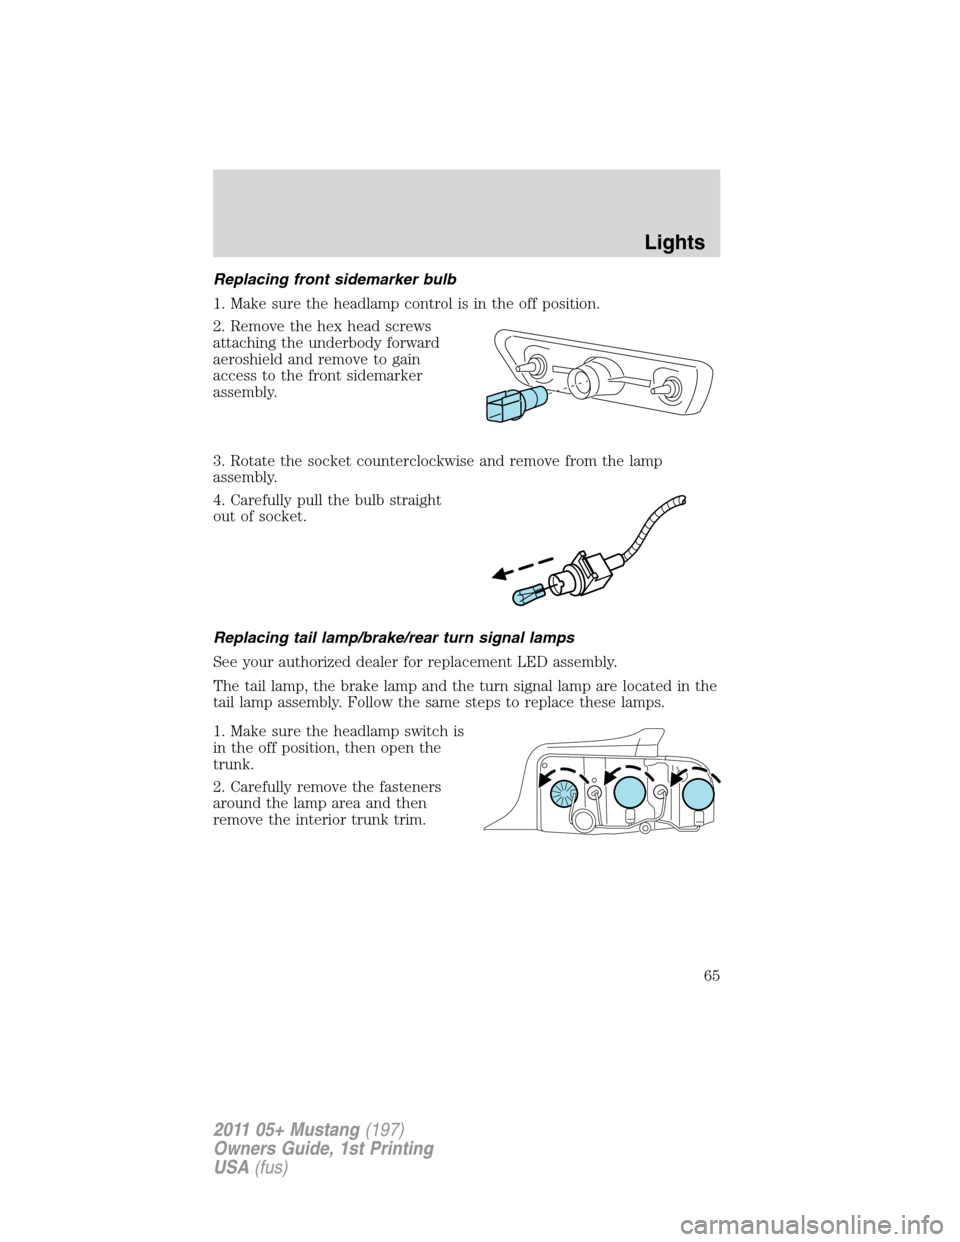
Replacing front sidemarker bulb
1. Make sure the headlamp control is in the off position.
2. Remove the hex head screws
attaching the underbody forward
aeroshield and remove to gain
access to the front sidemarker
assembly.
3. Rotate the socket counterclockwise and remove from the lamp
assembly.
4. Carefully pull the bulb straight
out of socket.
Replacing tail lamp/brake/rear turn signal lamps
See your authorized dealer for replacement LED assembly.
The tail lamp, the brake lamp and the turn signal lamp are located in the
tail lamp assembly. Follow the same steps to replace these lamps.
1. Make sure the headlamp switch is
in the off position, then open the
trunk.
2. Carefully remove the fasteners
around the lamp area and then
remove the interior trunk trim.
Lights
65
2011 05+ Mustang(197)
Owners Guide, 1st Printing
USA(fus)
Page 66 of 348
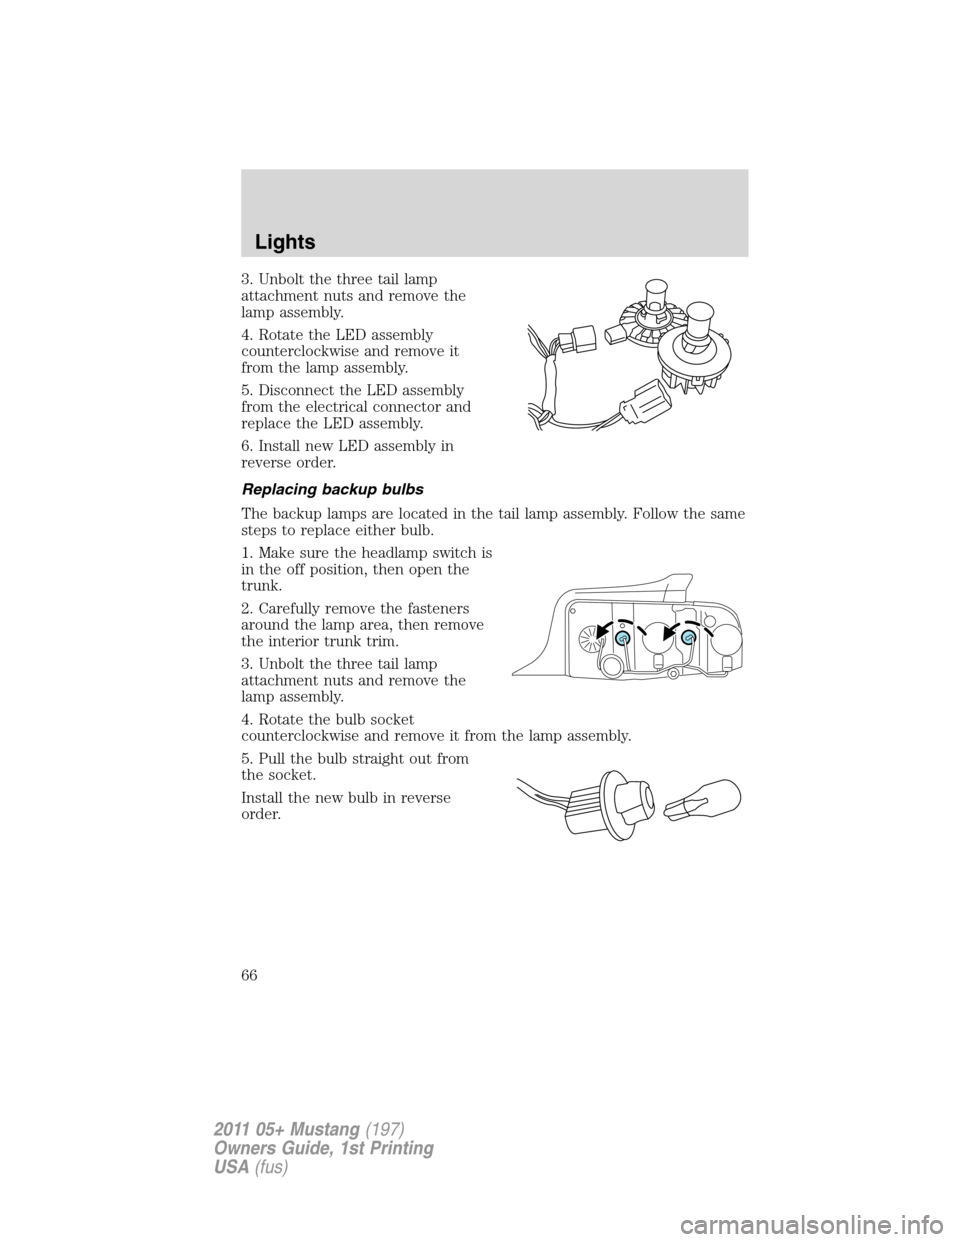
3. Unbolt the three tail lamp
attachment nuts and remove the
lamp assembly.
4. Rotate the LED assembly
counterclockwise and remove it
from the lamp assembly.
5. Disconnect the LED assembly
from the electrical connector and
replace the LED assembly.
6. Install new LED assembly in
reverse order.
Replacing backup bulbs
The backup lamps are located in the tail lamp assembly. Follow the same
steps to replace either bulb.
1. Make sure the headlamp switch is
in the off position, then open the
trunk.
2. Carefully remove the fasteners
around the lamp area, then remove
the interior trunk trim.
3. Unbolt the three tail lamp
attachment nuts and remove the
lamp assembly.
4. Rotate the bulb socket
counterclockwise and remove it from the lamp assembly.
5. Pull the bulb straight out from
the socket.
Install the new bulb in reverse
order.
Lights
66
2011 05+ Mustang(197)
Owners Guide, 1st Printing
USA(fus)
Page 67 of 348
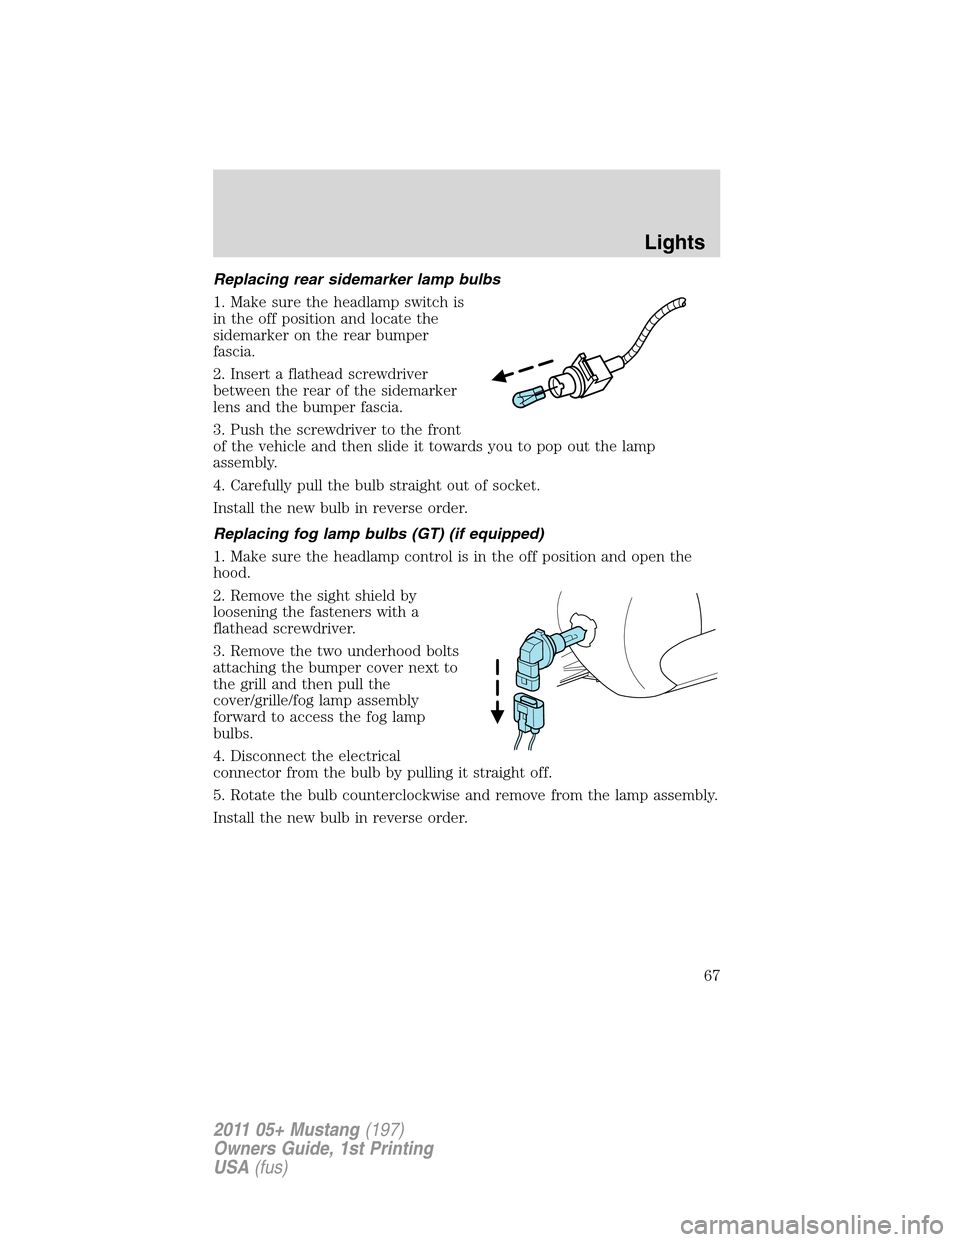
Replacing rear sidemarker lamp bulbs
1. Make sure the headlamp switch is
in the off position and locate the
sidemarker on the rear bumper
fascia.
2. Insert a flathead screwdriver
between the rear of the sidemarker
lens and the bumper fascia.
3. Push the screwdriver to the front
of the vehicle and then slide it towards you to pop out the lamp
assembly.
4. Carefully pull the bulb straight out of socket.
Install the new bulb in reverse order.
Replacing fog lamp bulbs (GT) (if equipped)
1. Make sure the headlamp control is in the off position and open the
hood.
2. Remove the sight shield by
loosening the fasteners with a
flathead screwdriver.
3. Remove the two underhood bolts
attaching the bumper cover next to
the grill and then pull the
cover/grille/fog lamp assembly
forward to access the fog lamp
bulbs.
4. Disconnect the electrical
connector from the bulb by pulling it straight off.
5. Rotate the bulb counterclockwise and remove from the lamp assembly.
Install the new bulb in reverse order.
Lights
67
2011 05+ Mustang(197)
Owners Guide, 1st Printing
USA(fus)
Page 68 of 348
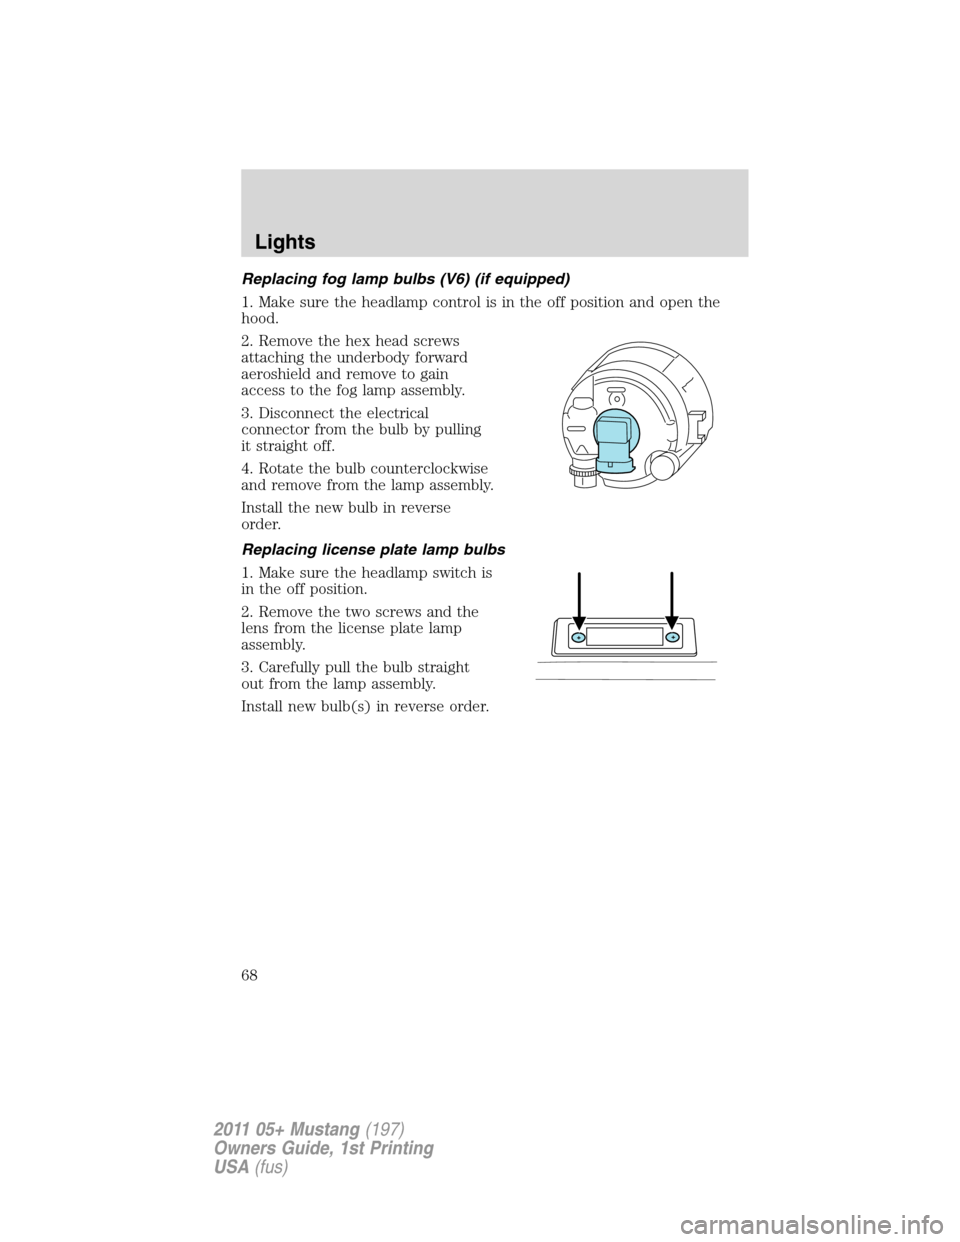
Replacing fog lamp bulbs (V6) (if equipped)
1. Make sure the headlamp control is in the off position and open the
hood.
2. Remove the hex head screws
attaching the underbody forward
aeroshield and remove to gain
access to the fog lamp assembly.
3. Disconnect the electrical
connector from the bulb by pulling
it straight off.
4. Rotate the bulb counterclockwise
and remove from the lamp assembly.
Install the new bulb in reverse
order.
Replacing license plate lamp bulbs
1. Make sure the headlamp switch is
in the off position.
2. Remove the two screws and the
lens from the license plate lamp
assembly.
3. Carefully pull the bulb straight
out from the lamp assembly.
Install new bulb(s) in reverse order.
Lights
68
2011 05+ Mustang(197)
Owners Guide, 1st Printing
USA(fus)
Page 69 of 348
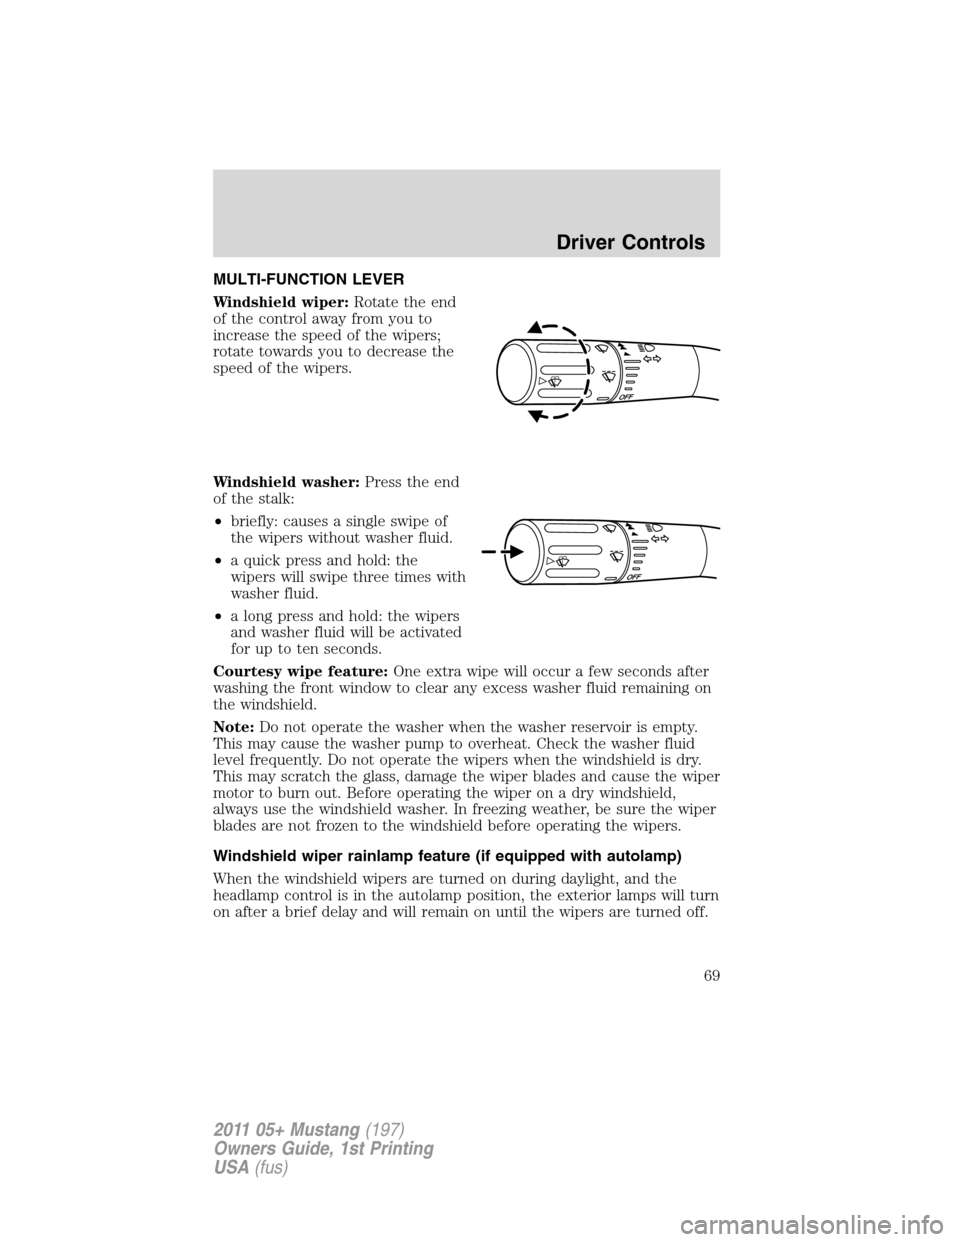
MULTI-FUNCTION LEVER
Windshield wiper:Rotate the end
of the control away from you to
increase the speed of the wipers;
rotate towards you to decrease the
speed of the wipers.
Windshield washer:Press the end
of the stalk:
•briefly: causes a single swipe of
the wipers without washer fluid.
•a quick press and hold: the
wipers will swipe three times with
washer fluid.
•a long press and hold: the wipers
and washer fluid will be activated
for up to ten seconds.
Courtesy wipe feature:One extra wipe will occur a few seconds after
washing the front window to clear any excess washer fluid remaining on
the windshield.
Note:Do not operate the washer when the washer reservoir is empty.
This may cause the washer pump to overheat. Check the washer fluid
level frequently. Do not operate the wipers when the windshield is dry.
This may scratch the glass, damage the wiper blades and cause the wiper
motor to burn out. Before operating the wiper on a dry windshield,
always use the windshield washer. In freezing weather, be sure the wiper
blades are not frozen to the windshield before operating the wipers.
Windshield wiper rainlamp feature (if equipped with autolamp)
When the windshield wipers are turned on during daylight, and the
headlamp control is in the autolamp position, the exterior lamps will turn
on after a brief delay and will remain on until the wipers are turned off.
Driver Controls
69
2011 05+ Mustang(197)
Owners Guide, 1st Printing
USA(fus)
Page 70 of 348
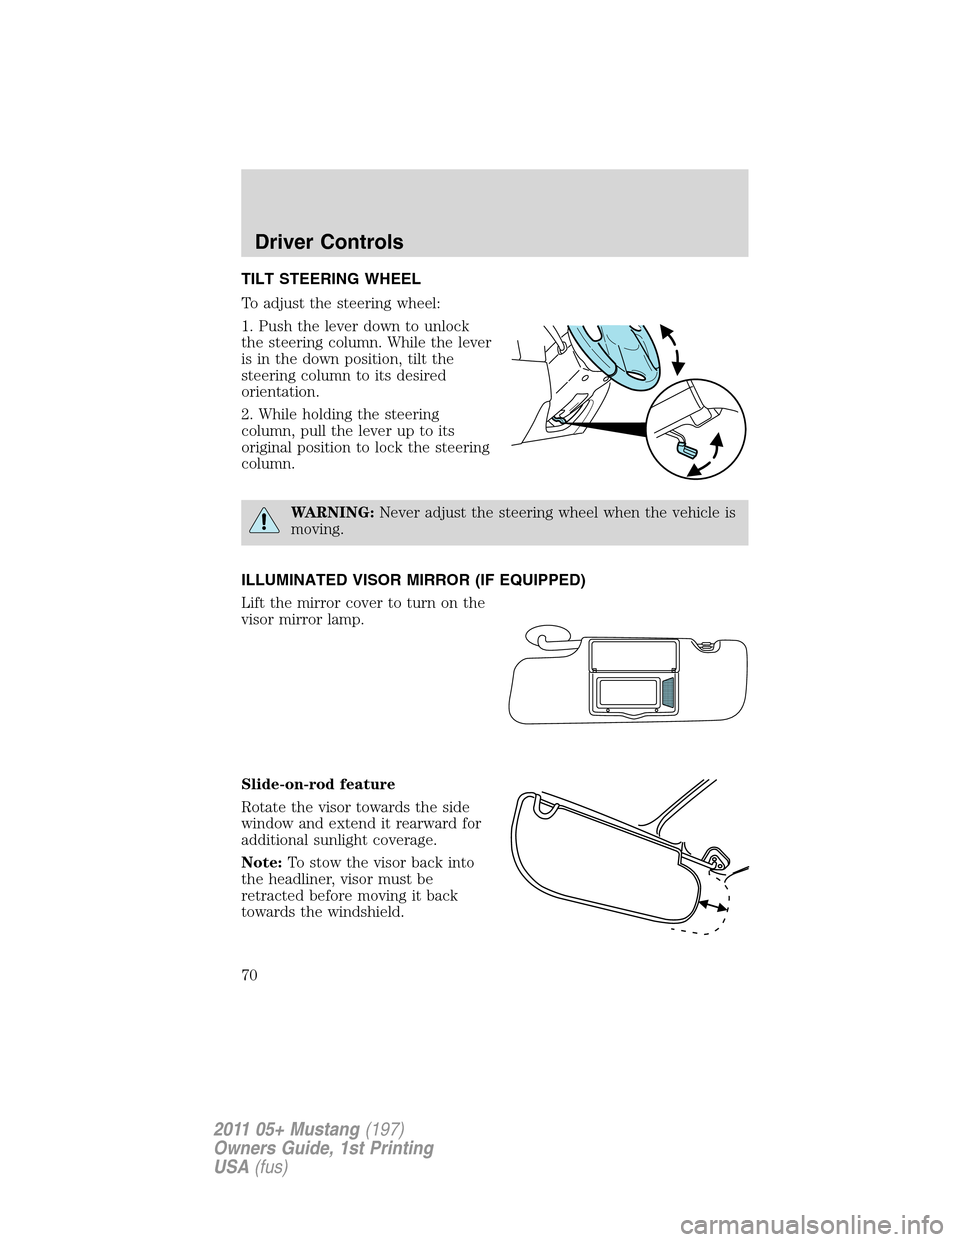
TILT STEERING WHEEL
To adjust the steering wheel:
1. Push the lever down to unlock
the steering column. While the lever
is in the down position, tilt the
steering column to its desired
orientation.
2. While holding the steering
column, pull the lever up to its
original position to lock the steering
column.
WARNING:Never adjust the steering wheel when the vehicle is
moving.
ILLUMINATED VISOR MIRROR (IF EQUIPPED)
Lift the mirror cover to turn on the
visor mirror lamp.
Slide-on-rod feature
Rotate the visor towards the side
window and extend it rearward for
additional sunlight coverage.
Note:To stow the visor back into
the headliner, visor must be
retracted before moving it back
towards the windshield.
Driver Controls
70
2011 05+ Mustang(197)
Owners Guide, 1st Printing
USA(fus)