ECU FORD MUSTANG 2018 Owner's Manual
[x] Cancel search | Manufacturer: FORD, Model Year: 2018, Model line: MUSTANG, Model: FORD MUSTANG 2018Pages: 506, PDF Size: 7.66 MB
Page 248 of 506
CHANGING THE ENGINE AIR
FILTER
WARNING
To reduce the risk of vehicle damage
and personal burn injuries, do not
start your engine with the air cleaner
removed and do not remove it while the
engine is running. Note:
Failure to use the correct air filter
element may result in severe engine
damage. Your warranty may not cover
these damages.
Only use the specified replacement air
filter. See Motorcraft Parts (page 291).
For EcoBoost equipped vehicles: When
servicing the air cleaner, it is important that
no foreign material enter the air induction
system. The engine and turbocharger are
susceptible to damage from even small
particles.
Change the air filter element at the proper
intervals. See
Scheduled Maintenance
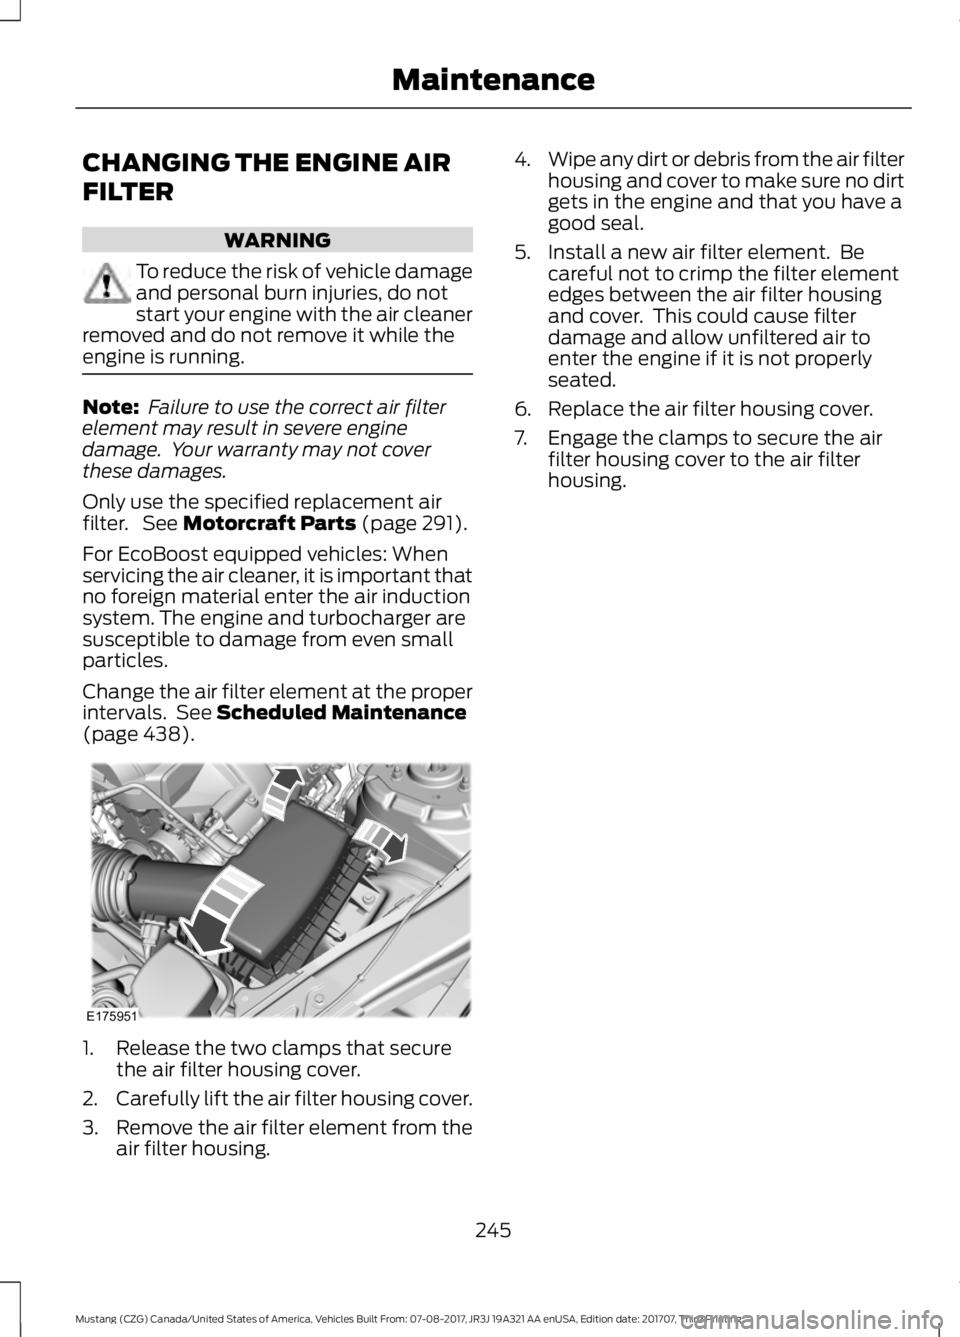
(page 438). 1. Release the two clamps that secure
the air filter housing cover.
2. Carefully lift the air filter housing cover.
3. Remove the air filter element from the
air filter housing. 4.
Wipe any dirt or debris from the air filter
housing and cover to make sure no dirt
gets in the engine and that you have a
good seal.
5. Install a new air filter element. Be careful not to crimp the filter element
edges between the air filter housing
and cover. This could cause filter
damage and allow unfiltered air to
enter the engine if it is not properly
seated.
6. Replace the air filter housing cover.
7. Engage the clamps to secure the air filter housing cover to the air filter
housing.
245
Mustang (CZG) Canada/United States of America, Vehicles Built From: 07-08-2017, JR3J 19A321 AA enUSA, Edition date: 201707, Third Printing MaintenanceE175951
Page 261 of 506
General Information
WARNING
Failure to follow these guidelines
could result in an increased risk of
loss of vehicle control, injury or death.
Note:
Do not use the kit if you have severely
damaged a tire. Only seal punctures located
within the tire tread with the kit.
Do not attempt to repair punctures larger
than ¼ inch (6 millimeters) or damage to
the tire's sidewall. The tire may not
completely seal.
Loss of air pressure may adversely affect
tire performance. For this reason:
Note: Do not drive the vehicle above
50 mph (80 km/h).
Note: Do not drive further than
120 mi
(200 km). Drive only to the closest
authorized Ford dealer or tire repair shop to
have your tire inspected.
• Drive carefully and avoid abrupt
steering maneuvers.
• Periodically monitor tire inflation
pressure in the affected tire; if the tire
is losing pressure, have the vehicle
towed.
• Read the information in the Tips for
Use of the Kit section to make sure safe
operation of the kit and your vehicle.
Tips for Use of the Kit
To ensure safe operation of the kit:
• Read all instructions and cautions fully.
• Before operating the kit, make sure
your vehicle is safely off the road and
away from moving traffic. Switch on
the hazard lights.
• Always set the parking brake to ensure
the vehicle does not move
unexpectedly. •
Do not remove any foreign objects,
such as nails or screws, from the tire.
• When using the kit, leave the engine
running (only if the vehicle is outdoors
or in a well-ventilated area) so the
compressor does not drain the
vehicle's battery.
• Do not allow the compressor to
operate continuously for more than 15
minutes. This will help prevent the
compressor from overheating.
• Never leave the kit unattended during
operation.
• Sealant compound contains latex.
Those with latex sensitivities should
use appropriate precautions to avoid
an allergic reaction.
• Keep the kit away from children.
• Only use the kit when the ambient
temperature is between -22°F (-30°C)
and 158°F (70°C).
• Only use the sealing compound before
the use-by date. The use-by date is on
a label on the sealant canister, which
you can see through the rectangular
viewing window on the bottom of the
compressor. Check the use-by date
regularly and replace the canister after
four years of non-use.
• Do not store the kit unsecured inside
the passenger compartment of the
vehicle as it may cause injury during a
sudden stop or crash. Always store the
kit in its original location.
• After sealant use, an authorized Ford
dealer must replace the tire pressure
monitoring system sensor and valve
stem on the wheel.
• Operating the kit could cause an
electrical disturbance in radio, CD and
DVD player operation.
258
Mustang (CZG) Canada/United States of America, Vehicles Built From: 07-08-2017, JR3J 19A321 AA enUSA, Edition date: 201707, Third Printing Wheels and Tires
Page 262 of 506
* When inflation only is required
for a tire or other objects, the
selector must be in the Air
position.
What to do When a Tire Is
Punctured
You can repair a tire puncture within the
tire's tread area in two stages with the kit.
• In the first stage, inflate the tire with a
sealing compound and air. After you
inflate the tire, you will need to drive
the vehicle a short distance 4 mi
(6 km) to distribute the sealant in the
tire.
• In the second stage, check the tire
pressure and adjust, if necessary, to the
vehicle's specified tire inflation
pressure.
First Stage: Inflating the Tire with
Sealing Compound and Air WARNINGS
Do not stand directly over the kit
while inflating the tire. If you notice
any unusual bulges or deformations
in the tire's sidewall during inflation, stop
and call roadside assistance. If the tire does not inflate to the
recommended tire pressure within
15 minutes, stop and call roadside
assistance. Do not run the engine when
operating the air compressor unless
the vehicle is outdoors or in a
well-ventilated area. Preparation: Park the vehicle in a safe, level
and secure area, away from moving traffic.
Switch the hazard lights on. Apply the
parking brake and switch the engine off.
Inspect the flat tire for visible damage. Sealant compound contains latex. Use
appropriate precautions to avoid any
allergic reactions.
Do not remove any foreign object that has
pierced the tire. If a puncture is located in
the tire sidewall, stop and call roadside
assistance.
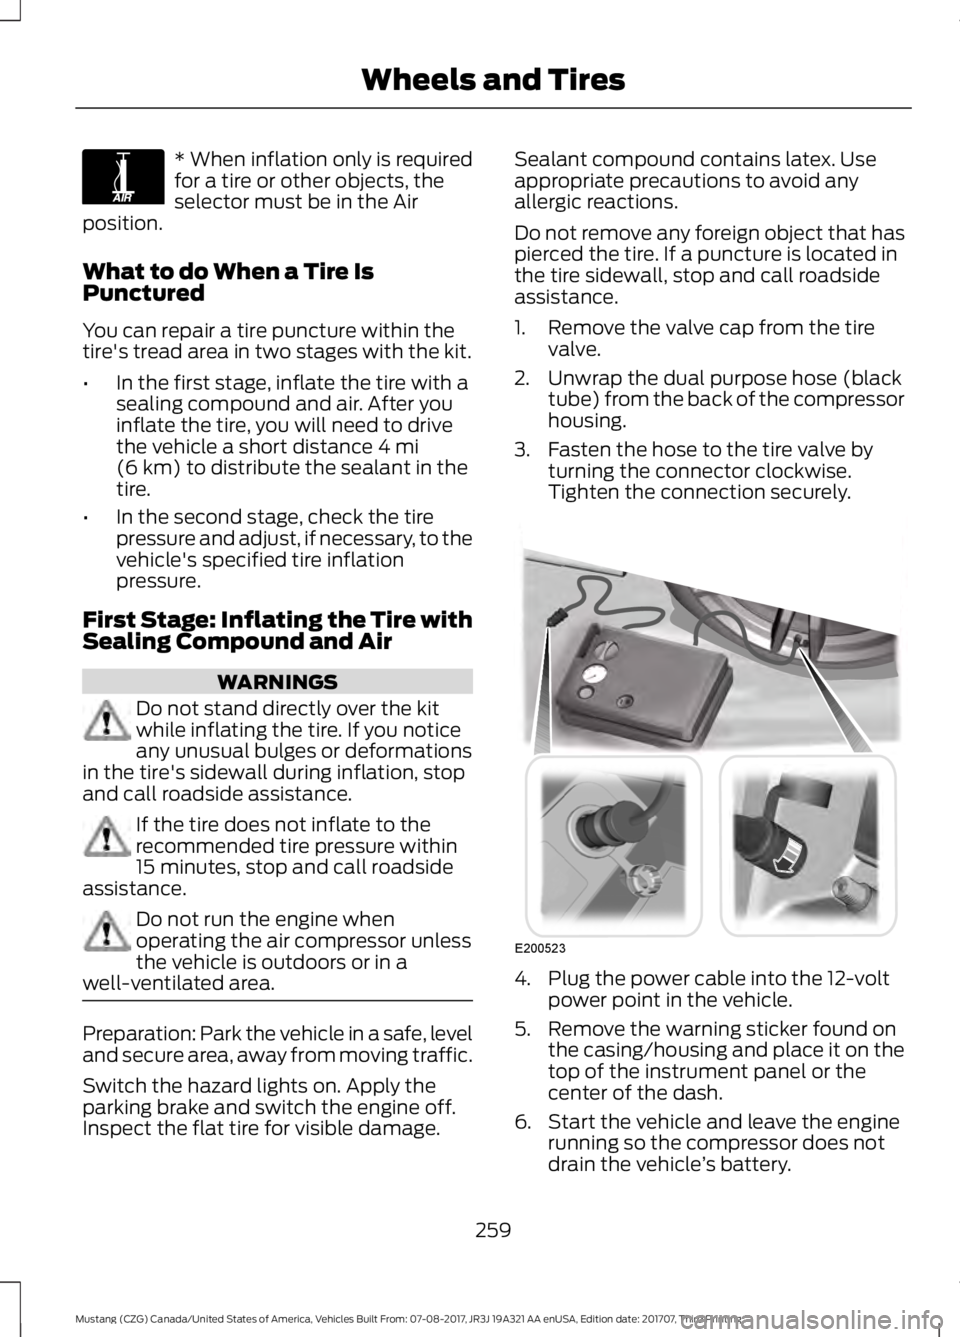
1. Remove the valve cap from the tire
valve.
2. Unwrap the dual purpose hose (black tube) from the back of the compressor
housing.
3. Fasten the hose to the tire valve by turning the connector clockwise.
Tighten the connection securely. 4. Plug the power cable into the 12-volt
power point in the vehicle.
5. Remove the warning sticker found on the casing/housing and place it on the
top of the instrument panel or the
center of the dash.
6. Start the vehicle and leave the engine running so the compressor does not
drain the vehicle ’s battery.
259
Mustang (CZG) Canada/United States of America, Vehicles Built From: 07-08-2017, JR3J 19A321 AA enUSA, Edition date: 201707, Third Printing Wheels and TiresE175978 E200523
Page 282 of 506
The tires on your vehicle may have
all-weather treads to provide traction in
rain and snow. However, in some climates,
you may need to use snow tires and chains.
Use chains on the tires only in an
emergency or if the law requires them.
Note:
The suspension insulation and
bumpers will help prevent vehicle damage.
Do not remove these components from your
vehicle when using snow tires and chains.
Follow these guidelines when using snow
tires and chains:
• If possible, avoid fully loading your
vehicle.
• Chains may damage aluminum wheels.
• Use ultra low profile cables, 10 mm or
less in dimension as measured on the
sidewall of your tire, with 235/55R 17,
235/50R18 and 255/40R19 on the rear
axle only.
• Do not use snow chains or cables with
275/40R19 and 265/35R20 tires.
• Not all S-class snow chains or cables
meet these restrictions. Chains of this
size restriction will include a tensioning
device.
• Purchase chains or cables from a
manufacturer that clearly labels body
to tire dimension restrictions. The snow
chains or cables must be mounted in
pairs on the front or the rear tires only.
• Do not exceed 30 mph (50 km/h) if
recommended by the chain
manufacturer while using snow chains.
• Install cables securely, verifying that
the cables do not touch any wiring,
brake lines or fuel lines. •
Drive cautiously. If you hear the cables
rub or bang against the vehicle, stop
and retighten them. If this does not
work, remove the cables to prevent
vehicle damage.
• Remove the tire chains when they are
no longer needed. Do not use tire
chains on dry roads.
If you have any questions regarding snow
chains or cables, please contact your
authorized dealer.
TIRE PRESSURE MONITORING
SYSTEM WARNING
The tire pressure monitoring system
is not a substitute for manually
checking tire pressures. You should
periodically check tire pressures using a
pressure gauge. Failure to correctly
maintain tire pressures could increase the
risk of tire failure, loss of control, vehicle
rollover and personal injury. Note:
You should only use tire sealants in
roadside emergencies as they may cause
damage to the tire pressure monitoring
system sensor.
Note: If the tire pressure monitoring system
sensor becomes damaged, it may not
function. Each tire, including the spare (if
provided), should be checked
monthly when cold and inflated
to the inflation pressure recommended by
the vehicle manufacturer on the vehicle
placard or tire inflation pressure label. (If
your vehicle has tires of a different size
than the size indicated on the vehicle
placard or tire inflation pressure label, you
should determine the proper tire inflation
pressure for those tires).
279
Mustang (CZG) Canada/United States of America, Vehicles Built From: 07-08-2017, JR3J 19A321 AA enUSA, Edition date: 201707, Third Printing Wheels and Tires
Page 287 of 506
1.
T-type mini-spare: This spare tire
begins with the letter T for tire size and
may have Temporary Use Only molded in
the sidewall.
2. Full-size dissimilar spare with label
on wheel:
This spare tire has a label on
the wheel that states: THIS WHEEL AND
TIRE ASSEMBLY FOR TEMPORARY USE
ONLY.
When driving with one of the dissimilar
spare tires listed above, do not:
• Exceed
50 mph (80 km/h).
• Load the vehicle beyond maximum
vehicle load rating listed on the Safety
Compliance Label.
• Use snow chains on the end of the
vehicle with the dissimilar spare tire.
• Use more than one dissimilar spare tire
at a time.
• Use commercial car washing
equipment.
• Try to repair the dissimilar spare tire.
Use of one of the dissimilar spare tires
listed above at any one wheel location can
lead to impairment of the following:
• Handling, stability and braking
performance.
• Comfort and noise.
• Ground clearance and parking at curbs.
• Winter weather driving capability.
• Wet weather driving capability.
• All-wheel driving capability.
3. Full-size dissimilar spare without
label on wheel
When driving with the full-size dissimilar
spare wheel and tire assembly, do not:
• Exceed
75 mph (120 km/h).
• Use more than one dissimilar spare
wheel and tire assembly at a time. •
Use commercial car washing
equipment.
• Use snow chains on the end of the
vehicle with the dissimilar spare wheel
and tire assembly.
The usage of a full-size dissimilar spare
wheel and tire assembly can lead to
impairment of the following:
• Handling, stability and braking
performance.
• Comfort and noise.
• Ground clearance and parking at curbs.
• Winter weather driving capability.
• Wet weather driving capability.
• All-wheel driving capability.
When driving with the full-size dissimilar
spare wheel and tire assembly additional
caution should be given to:
• Driving vehicles with a load on the
cargo rack.
Drive cautiously when using a full-size
dissimilar spare wheel and tire assembly
and seek service as soon as possible.
Tire Change Procedure WARNINGS
When one of the front wheels is off
the ground, the transmission alone
will not prevent the vehicle from
moving or slipping off the jack, even if the
transmission is in park (P). To help prevent your vehicle from
moving when changing a wheel, shift
the transmission into park (P), set
the parking brake and use an appropriate
block or wheel chock to secure the wheel
diagonally opposite to the wheel being
changed. For example, when changing the
front left wheel, place an appropriate block
or wheel chock on the right rear wheel. Do not get under a vehicle that is only
supported by a vehicle jack.
284
Mustang (CZG) Canada/United States of America, Vehicles Built From: 07-08-2017, JR3J 19A321 AA enUSA, Edition date: 201707, Third Printing Wheels and Tires
Page 290 of 506
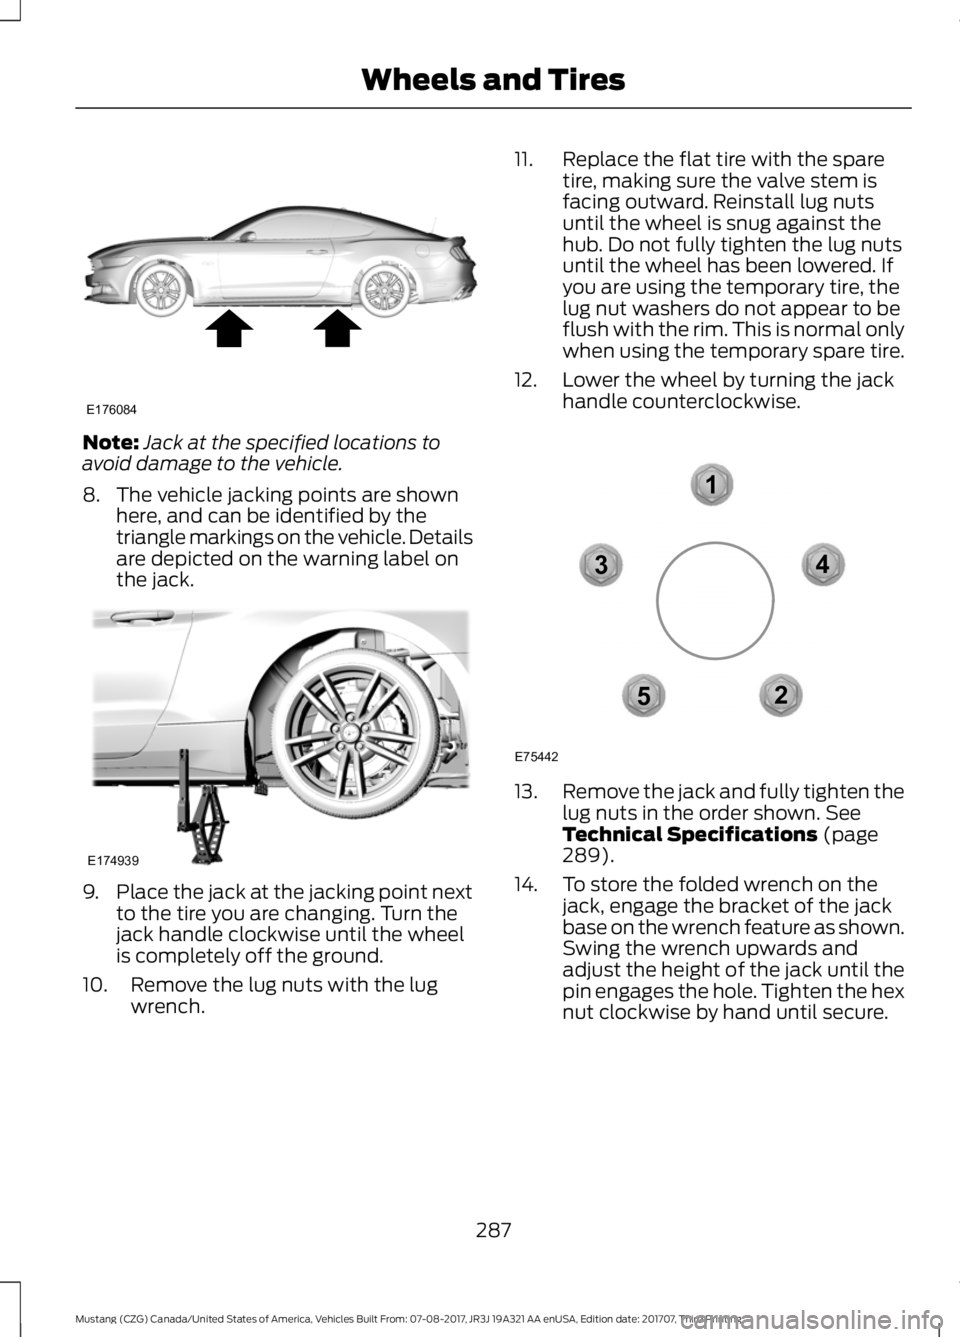
Note:
Jack at the specified locations to
avoid damage to the vehicle.
8. The vehicle jacking points are shown here, and can be identified by the
triangle markings on the vehicle. Details
are depicted on the warning label on
the jack. 9.
Place the jack at the jacking point next
to the tire you are changing. Turn the
jack handle clockwise until the wheel
is completely off the ground.
10. Remove the lug nuts with the lug wrench. 11. Replace the flat tire with the spare
tire, making sure the valve stem is
facing outward. Reinstall lug nuts
until the wheel is snug against the
hub. Do not fully tighten the lug nuts
until the wheel has been lowered. If
you are using the temporary tire, the
lug nut washers do not appear to be
flush with the rim. This is normal only
when using the temporary spare tire.
12. Lower the wheel by turning the jack handle counterclockwise. 13.
Remove the jack and fully tighten the
lug nuts in the order shown. See
Technical Specifications (page
289).
14. To store the folded wrench on the jack, engage the bracket of the jack
base on the wrench feature as shown.
Swing the wrench upwards and
adjust the height of the jack until the
pin engages the hole. Tighten the hex
nut clockwise by hand until secure.
287
Mustang (CZG) Canada/United States of America, Vehicles Built From: 07-08-2017, JR3J 19A321 AA enUSA, Edition date: 201707, Third Printing Wheels and TiresE176084 E174939 12
3
4
5
E75442
Page 292 of 506
TECHNICAL SPECIFICATIONS
Wheel Lug Nut Torque Specifications
WARNING
When a wheel is installed, always remove any corrosion, dirt or foreign materials
present on the mounting surfaces of the wheel or the surface of the wheel hub,
brake drum or brake disc that contacts the wheel. Make sure that any fasteners
that attach the rotor to the hub are secured so they do not interfere with the mounting
surfaces of the wheel. Installing wheels without correct metal-to-metal contact at the
wheel mounting surfaces can cause the wheel nuts to loosen and the wheel to come off
while your vehicle is in motion, resulting in a loss of control. Ib-ft (Nm)
*
Bolt size
150 lb.ft (204 Nm)
M14 X 1.5
* Torque specifications are for nut and bolt threads free of dirt and rust. Use only Ford
recommended replacement fasteners.
Retighten the lug nuts to the specified torque within 100 miles (160 kilometers) after any
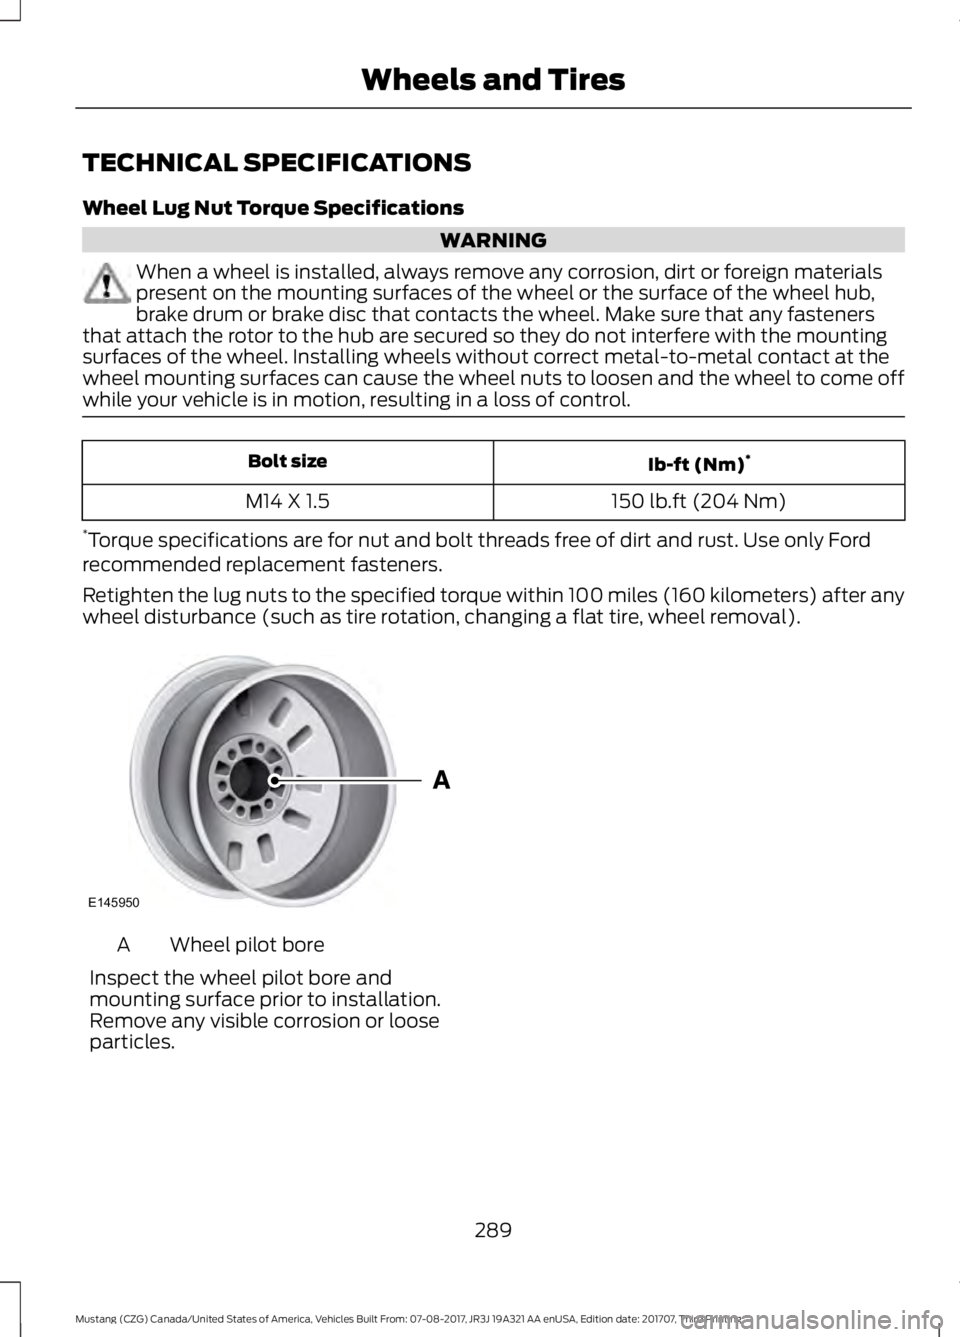
wheel disturbance (such as tire rotation, changing a flat tire, wheel removal). Wheel pilot bore
A
Inspect the wheel pilot bore and
mounting surface prior to installation.
Remove any visible corrosion or loose
particles.
289
Mustang (CZG) Canada/United States of America, Vehicles Built From: 07-08-2017, JR3J 19A321 AA enUSA, Edition date: 201707, Third Printing Wheels and TiresE145950
Page 336 of 506
Description and action
Menu Item
2. When a message to begin pairing appears in the audio
display, search for SYNC on your phone. See your phone's
manual if necessary.
3. When prompted on your cell phone ’s display, confirm
that the PIN provided by SYNC matches the PIN displayed
on your cell phone. Skip the next step. If you are prompted
to enter a PIN on your device, it does not support Secure
Simple Pairing. To pair, enter the PIN displayed on the
screen. The display indicates when the pairing is
successful.
4. When the option to set the phone as primary appears,
select either yes or no.
5. SYNC may prompt you with more cell phone options.
Your cell phone may also prompt you to give SYNC
permission to access information. For more information
on your cell phone ’s capability, see your cell phone ’s
manual and visit the website.
Select the delete option and confirm when the system
asks to delete the selected device. After deleting a phone
from the list, you have to repeat the pairing process to pair
it again.
Delete
The system attempts to connect with the primary cellular
phone each time you switch on the ignition. When you
select a cellular phone as primary, it appears first in the
list, marked with an asterisk. Set a previously paired phone
as master by selecting the master option and confirming
it as the primary.
Master
Connect a previously connected phone. You can only have
one phone connected at a time to use the phone's func-
tionality. When you connect another phone, the previous
phone disconnects from the telephone services. The
system allows you to use different Bluetooth devices for
the cellular phone functionality and the Bluetooth audio
music playback feature at the same time.
Conn.
Disconnects the selected cellular phone. Select this option
and confirm when asked. After disconnecting a phone,
you can reconnect it again without repeating the full pairing
process.
Discon.
System Settings
1. Press the MENU button. 2. Select the SYNC settings option, and
then press the
OK button.
333
Mustang (CZG) Canada/United States of America, Vehicles Built From: 07-08-2017, JR3J 19A321 AA enUSA, Edition date: 201707, Third Printing SYNC™
(If Equipped)
Page 338 of 506
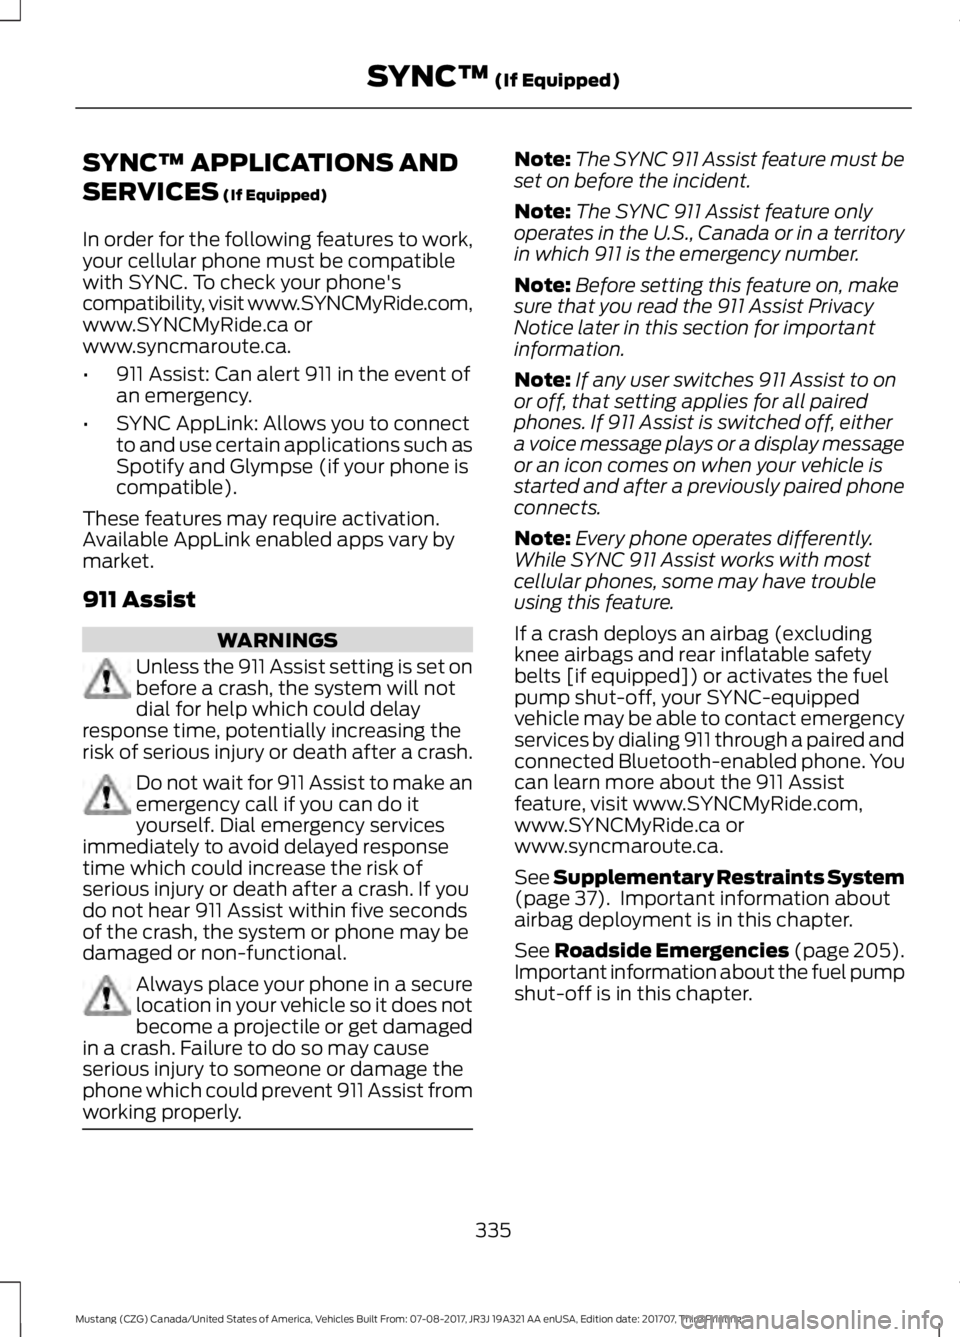
SYNC™ APPLICATIONS AND
SERVICES (If Equipped)
In order for the following features to work,
your cellular phone must be compatible
with SYNC. To check your phone's
compatibility, visit www.SYNCMyRide.com,
www.SYNCMyRide.ca or
www.syncmaroute.ca.
• 911 Assist: Can alert 911 in the event of
an emergency.
• SYNC AppLink: Allows you to connect
to and use certain applications such as
Spotify and Glympse (if your phone is
compatible).
These features may require activation.
Available AppLink enabled apps vary by
market.
911 Assist WARNINGS
Unless the 911 Assist setting is set on
before a crash, the system will not
dial for help which could delay
response time, potentially increasing the
risk of serious injury or death after a crash. Do not wait for 911 Assist to make an
emergency call if you can do it
yourself. Dial emergency services
immediately to avoid delayed response
time which could increase the risk of
serious injury or death after a crash. If you
do not hear 911 Assist within five seconds
of the crash, the system or phone may be
damaged or non-functional. Always place your phone in a secure
location in your vehicle so it does not
become a projectile or get damaged
in a crash. Failure to do so may cause
serious injury to someone or damage the
phone which could prevent 911 Assist from
working properly. Note:
The SYNC 911 Assist feature must be
set on before the incident.
Note: The SYNC 911 Assist feature only
operates in the U.S., Canada or in a territory
in which 911 is the emergency number.
Note: Before setting this feature on, make
sure that you read the 911 Assist Privacy
Notice later in this section for important
information.
Note: If any user switches 911 Assist to on
or off, that setting applies for all paired
phones. If 911 Assist is switched off, either
a voice message plays or a display message
or an icon comes on when your vehicle is
started and after a previously paired phone
connects.
Note: Every phone operates differently.
While SYNC 911 Assist works with most
cellular phones, some may have trouble
using this feature.
If a crash deploys an airbag (excluding
knee airbags and rear inflatable safety
belts [if equipped]) or activates the fuel
pump shut-off, your SYNC-equipped
vehicle may be able to contact emergency
services by dialing 911 through a paired and
connected Bluetooth-enabled phone. You
can learn more about the 911 Assist
feature, visit www.SYNCMyRide.com,
www.SYNCMyRide.ca or
www.syncmaroute.ca.
See
Supplementary Restraints System
(page 37). Important information about
airbag deployment is in this chapter.
See Roadside Emergencies (page 205).
Important information about the fuel pump
shut-off is in this chapter.
335
Mustang (CZG) Canada/United States of America, Vehicles Built From: 07-08-2017, JR3J 19A321 AA enUSA, Edition date: 201707, Third Printing SYNC™
(If Equipped)
Page 353 of 506
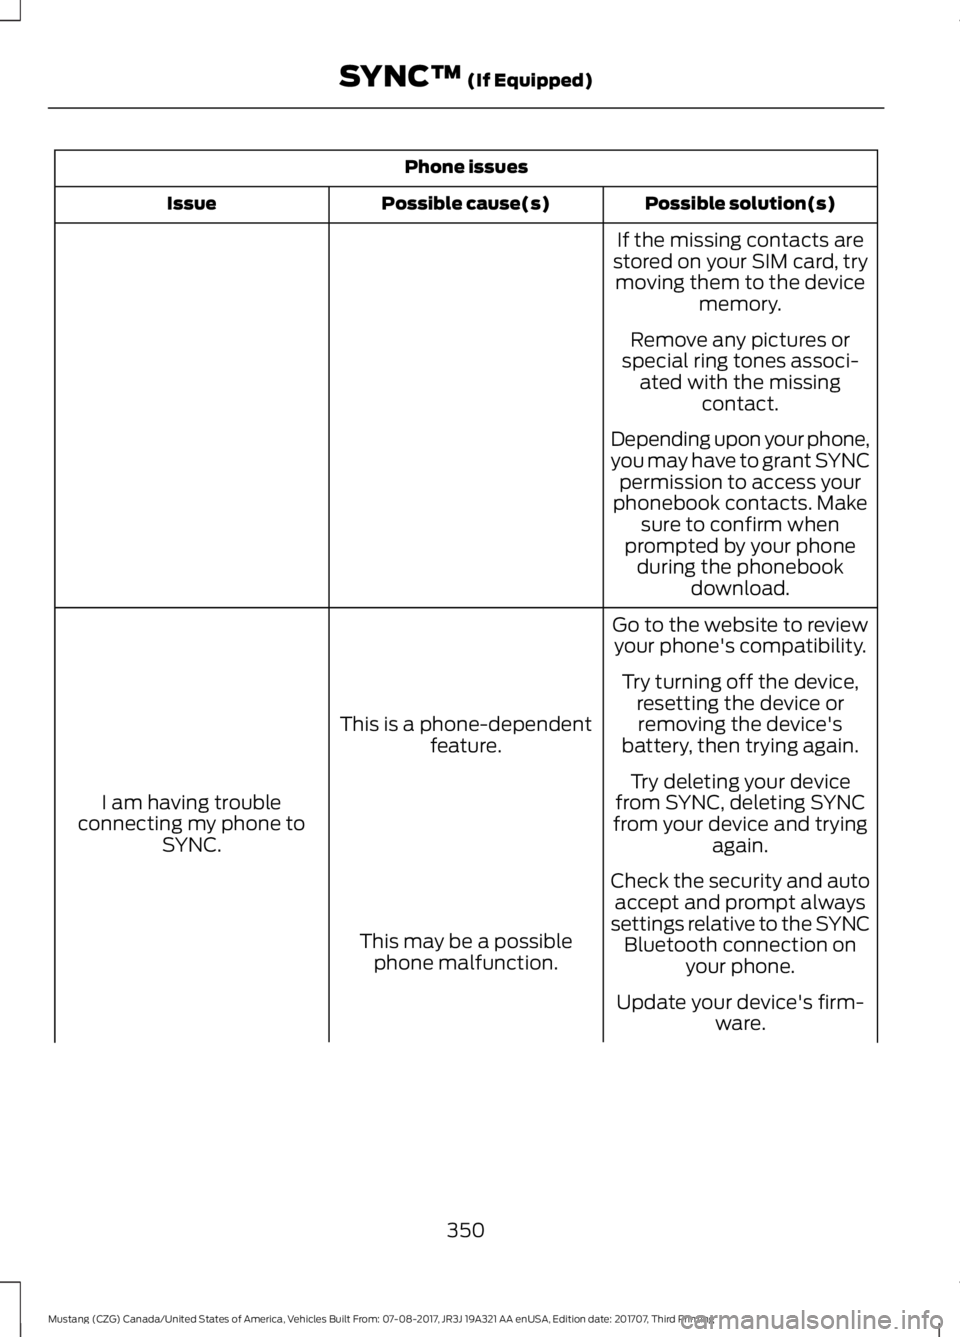
Phone issues
Possible solution(s)
Possible cause(s)
Issue
If the missing contacts are
stored on your SIM card, try moving them to the device memory.
Remove any pictures or
special ring tones associ- ated with the missing contact.
Depending upon your phone,
you may have to grant SYNC permission to access your
phonebook contacts. Make sure to confirm when
prompted by your phone during the phonebook download.
Go to the website to review your phone's compatibility.
This is a phone-dependent feature.
I am having trouble
connecting my phone to SYNC. Try turning off the device,
resetting the device orremoving the device's
battery, then trying again.
Try deleting your device
from SYNC, deleting SYNC
from your device and trying again.
Check the security and auto accept and prompt always
settings relative to the SYNC Bluetooth connection on your phone.
This may be a possible
phone malfunction.
Update your device's firm-ware.
350
Mustang (CZG) Canada/United States of America, Vehicles Built From: 07-08-2017, JR3J 19A321 AA enUSA, Edition date: 201707, Third Printing SYNC™ (If Equipped)