bracket FORD MUSTANG 2019 Owners Manual
[x] Cancel search | Manufacturer: FORD, Model Year: 2019, Model line: MUSTANG, Model: FORD MUSTANG 2019Pages: 495, PDF Size: 8.04 MB
Page 154 of 495
Brake-Shift Interlock
WARNING: Do not drive your
vehicle until you verify that the
stoplamps are working. WARNING:
When doing this
procedure, you need to take the
transmission out of park (P) which
means your vehicle can roll freely. To
avoid unwanted vehicle movement,
always fully apply the parking brake prior
to doing this procedure. Use wheels
chocks if appropriate. WARNING:
If the parking brake is
fully released, but the brake warning
lamp remains illuminated, the brakes
may not be working properly. Have your
vehicle checked as soon as possible.
Note: Contact an authorized dealer as soon
as possible if this procedure is used.
Note: For some markets, this feature is
disabled.
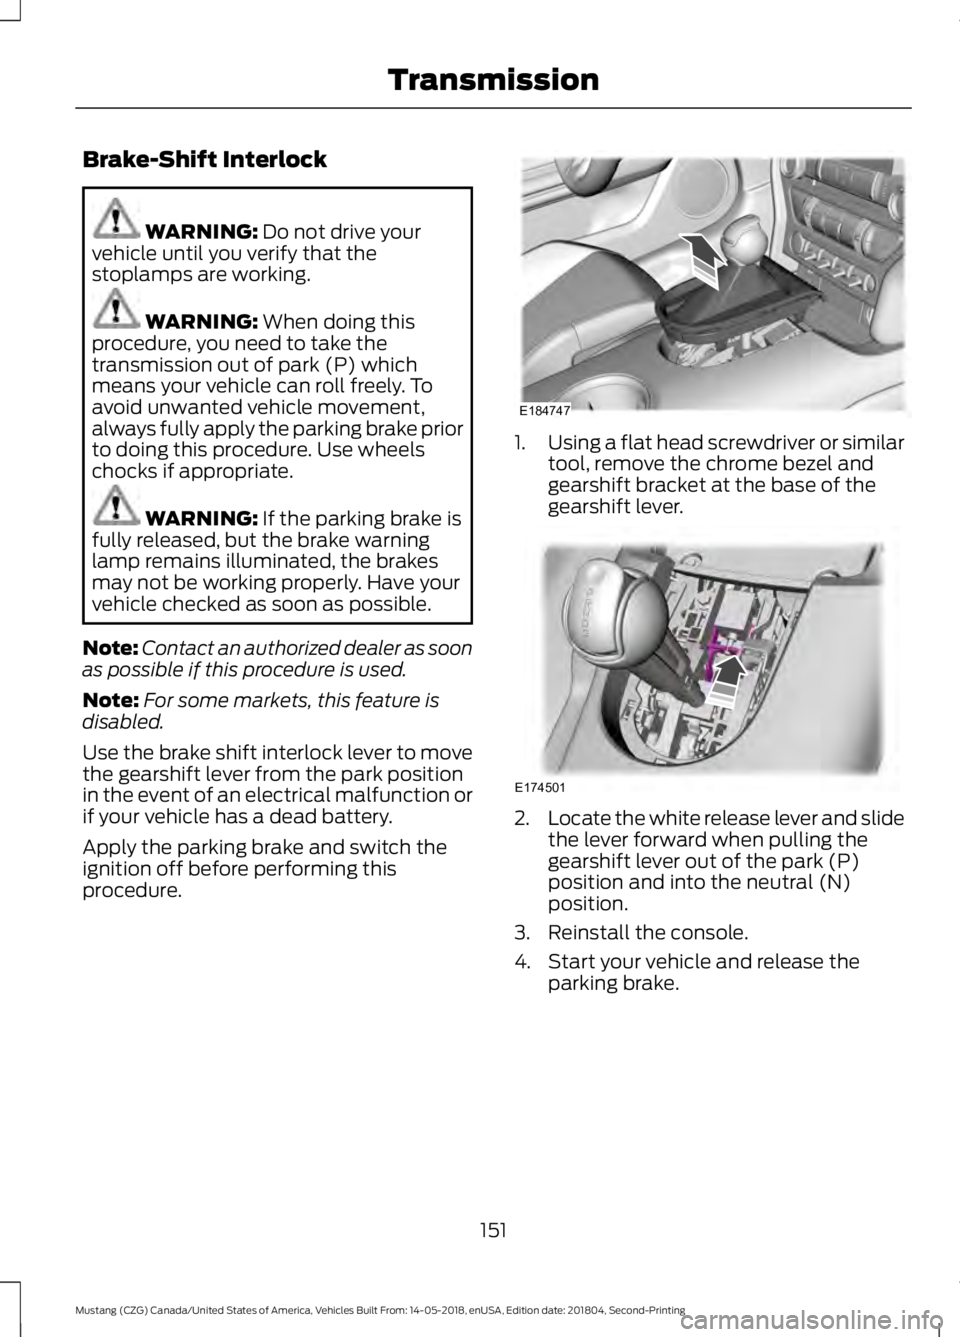
Use the brake shift interlock lever to move
the gearshift lever from the park position
in the event of an electrical malfunction or
if your vehicle has a dead battery.
Apply the parking brake and switch the
ignition off before performing this
procedure. 1.
Using a flat head screwdriver or similar
tool, remove the chrome bezel and
gearshift bracket at the base of the
gearshift lever. 2.
Locate the white release lever and slide
the lever forward when pulling the
gearshift lever out of the park (P)
position and into the neutral (N)
position.
3. Reinstall the console.
4. Start your vehicle and release the parking brake.
151
Mustang (CZG) Canada/United States of America, Vehicles Built From: 14-05-2018, enUSA, Edition date: 201804, Second-Printing TransmissionE184747 E174501
Page 164 of 495
PRINCIPLE OF OPERATION
WARNING: To help avoid personal
injury, always use caution when in
reverse (R) and when using the sensing
system. WARNING: The system may not
detect objects with surfaces that absorb
reflection. Always drive with due care
and attention. Failure to take care may
result in a crash. WARNING:
Traffic control
systems, inclement weather, air brakes,
external motors and fans may affect the
correct operation of the sensing
system.This may cause reduced
performance or false alerts. WARNING:
The system may not
detect small or moving objects,
particularly those close to the ground.
Note: If your vehicle has MyKey ™, the
sensing system cannot be switched off
when a MyKey ™ is present.
See Principle
of Operation (page 48).
Note: Keep the sensors on the bumper or
fascia free from snow, ice and large
accumulations of dirt. If the sensors are
covered, the system ’s accuracy can be
affected. Do not clean the sensors with
sharp objects.
Note: If your vehicle sustains damage to
the bumper or fascia, leaving it misaligned
or bent, the sensing zone may be altered
causing inaccurate measurement of
obstacles or false alerts. Note:
Certain add-on devices installed
around the bumper or fascia may create
false alerts. For example, large trailer
hitches, bike or surfboard racks, license plate
brackets, bumper covers or any other device
that may block the normal detection zone
of the system. Remove the add-on device
to prevent false alerts.
Note: When you connect a trailer to your
vehicle, the rear parking aid may detect the
trailer and therefore provide an alert. Disable
the rear parking aid when you connect a
trailer to prevent the alert.
The sensing system warns the driver of
obstacles within a certain range of your
vehicle. The system turns on automatically
whenever you switch the ignition on.
You can switch the system off through the
information display menu or from the
pop-up message that appears once you
shift the transmission into reverse (R). See
General Information
(page 88). If your
vehicle has a parking aid button, you can
switch the system off by pressing the
button.
If a fault is present in the system, a warning
message appears in the information
display. See
Information Messages
(page 97).
REAR PARKING AID
(IF EQUIPPED)
The rear sensors are only active when the
transmission is in reverse (R). As your
vehicle moves closer to the obstacle, the
rate of the audible warning increases.
When the obstacle is less than
12 in
(30 cm) away, the warning sounds
continuously. If the system detects a
stationary or receding object farther than
12 in (30 cm)
from the corners of the
bumper, the tone sounds for only three
seconds. Once the system detects an
object approaching, the warning sounds
again.
161
Mustang (CZG) Canada/United States of America, Vehicles Built From: 14-05-2018, enUSA, Edition date: 201804, Second-Printing Parking Aids
Page 294 of 495
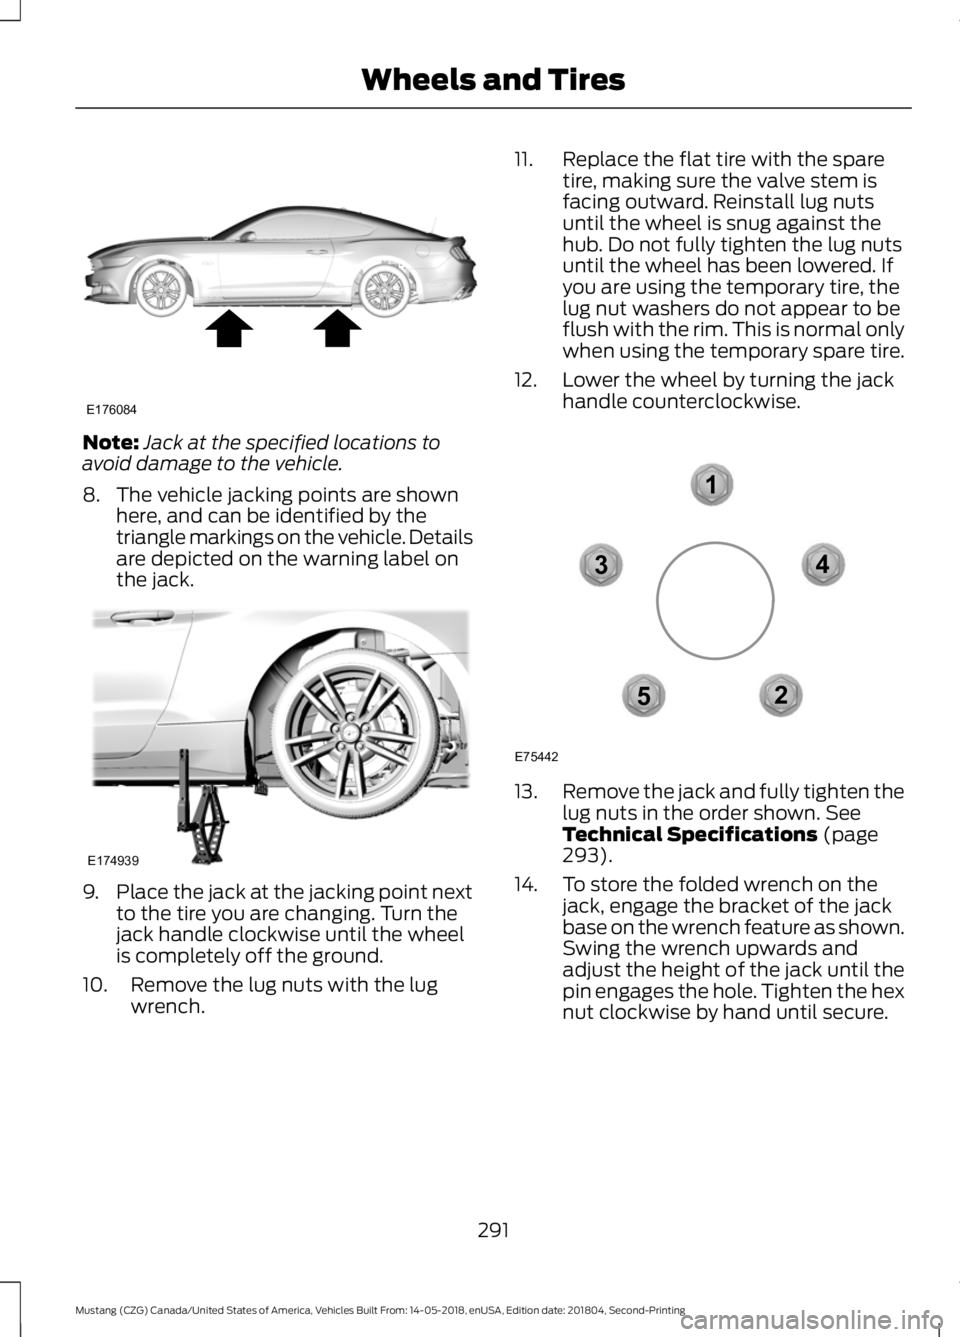
Note:
Jack at the specified locations to
avoid damage to the vehicle.
8. The vehicle jacking points are shown here, and can be identified by the
triangle markings on the vehicle. Details
are depicted on the warning label on
the jack. 9.
Place the jack at the jacking point next
to the tire you are changing. Turn the
jack handle clockwise until the wheel
is completely off the ground.
10. Remove the lug nuts with the lug wrench. 11. Replace the flat tire with the spare
tire, making sure the valve stem is
facing outward. Reinstall lug nuts
until the wheel is snug against the
hub. Do not fully tighten the lug nuts
until the wheel has been lowered. If
you are using the temporary tire, the
lug nut washers do not appear to be
flush with the rim. This is normal only
when using the temporary spare tire.
12. Lower the wheel by turning the jack handle counterclockwise. 13.
Remove the jack and fully tighten the
lug nuts in the order shown. See
Technical Specifications (page
293).
14. To store the folded wrench on the jack, engage the bracket of the jack
base on the wrench feature as shown.
Swing the wrench upwards and
adjust the height of the jack until the
pin engages the hole. Tighten the hex
nut clockwise by hand until secure.
291
Mustang (CZG) Canada/United States of America, Vehicles Built From: 14-05-2018, enUSA, Edition date: 201804, Second-Printing Wheels and TiresE176084 E174939 12
3
4
5
E75442