ECO mode FORD MUSTANG 2021 Repair Manual
[x] Cancel search | Manufacturer: FORD, Model Year: 2021, Model line: MUSTANG, Model: FORD MUSTANG 2021Pages: 530, PDF Size: 10.22 MB
Page 236 of 530
Vehicles Sold in Canada: Getting
Roadside Assistance
To fully assist you should you have a
vehicle concern, Ford Motor Company of
Canada, Limited offers a complimentary
roadside assistance program. This program
is eligible within Canada or the continental
United States.
The service is available 24 hours a day,
seven days a week.
This program is separate from the New
Vehicle Limited Warranty, but the coverage
is concurrent with the powertrain coverage
period of your vehicle. Canadian roadside
coverage and benefits may differ from the
U.S. coverage.
If you require more information, please call
us in Canada at 1-800-665-2006, or visit
our website at www.ford.ca.
HAZARD FLASHERS
Note:
The hazard flashers operate when
the ignition is in any position, or if the key is
not in the ignition. If used when the vehicle
is not running, the battery loses charge. As
a result, there may be insufficient power to
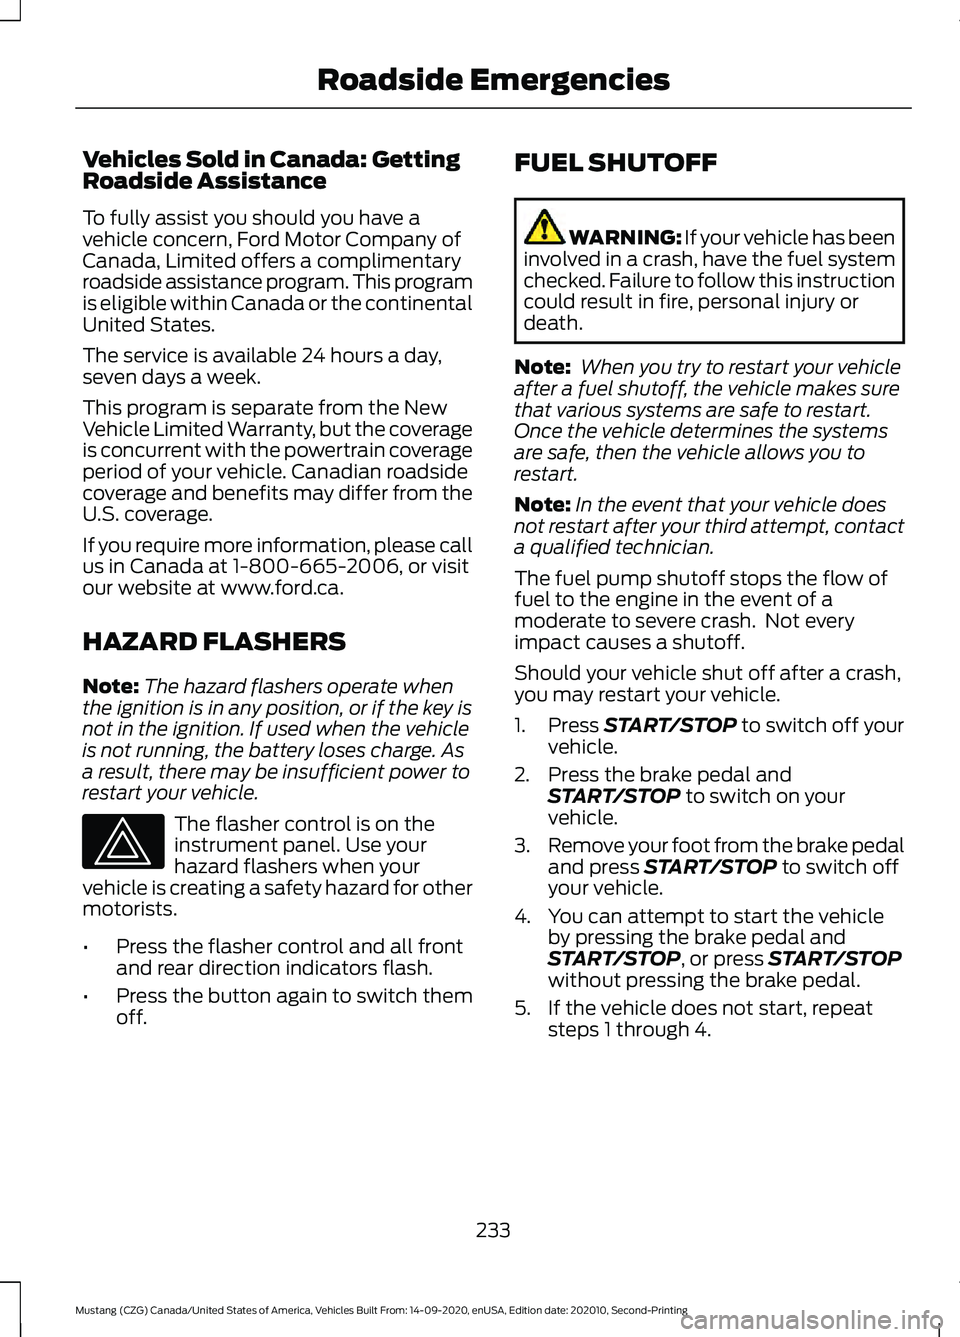
restart your vehicle. The flasher control is on the
instrument panel. Use your
hazard flashers when your
vehicle is creating a safety hazard for other
motorists.
• Press the flasher control and all front
and rear direction indicators flash.
• Press the button again to switch them
off. FUEL SHUTOFF WARNING: If your vehicle has been
involved in a crash, have the fuel system
checked. Failure to follow this instruction
could result in fire, personal injury or
death.
Note: When you try to restart your vehicle
after a fuel shutoff, the vehicle makes sure
that various systems are safe to restart.
Once the vehicle determines the systems
are safe, then the vehicle allows you to
restart.
Note: In the event that your vehicle does
not restart after your third attempt, contact
a qualified technician.
The fuel pump shutoff stops the flow of
fuel to the engine in the event of a
moderate to severe crash. Not every
impact causes a shutoff.
Should your vehicle shut off after a crash,
you may restart your vehicle.
1. Press START/STOP to switch off your
vehicle.
2. Press the brake pedal and START/STOP
to switch on your
vehicle.
3. Remove your foot from the brake pedal
and press
START/STOP to switch off
your vehicle.
4. You can attempt to start the vehicle by pressing the brake pedal and
START/STOP
, or press START/STOP
without pressing the brake pedal.
5. If the vehicle does not start, repeat steps 1 through 4.
233
Mustang (CZG) Canada/United States of America, Vehicles Built From: 14-09-2020, enUSA, Edition date: 202010, Second-Printing Roadside Emergencies
Page 238 of 530
Note:
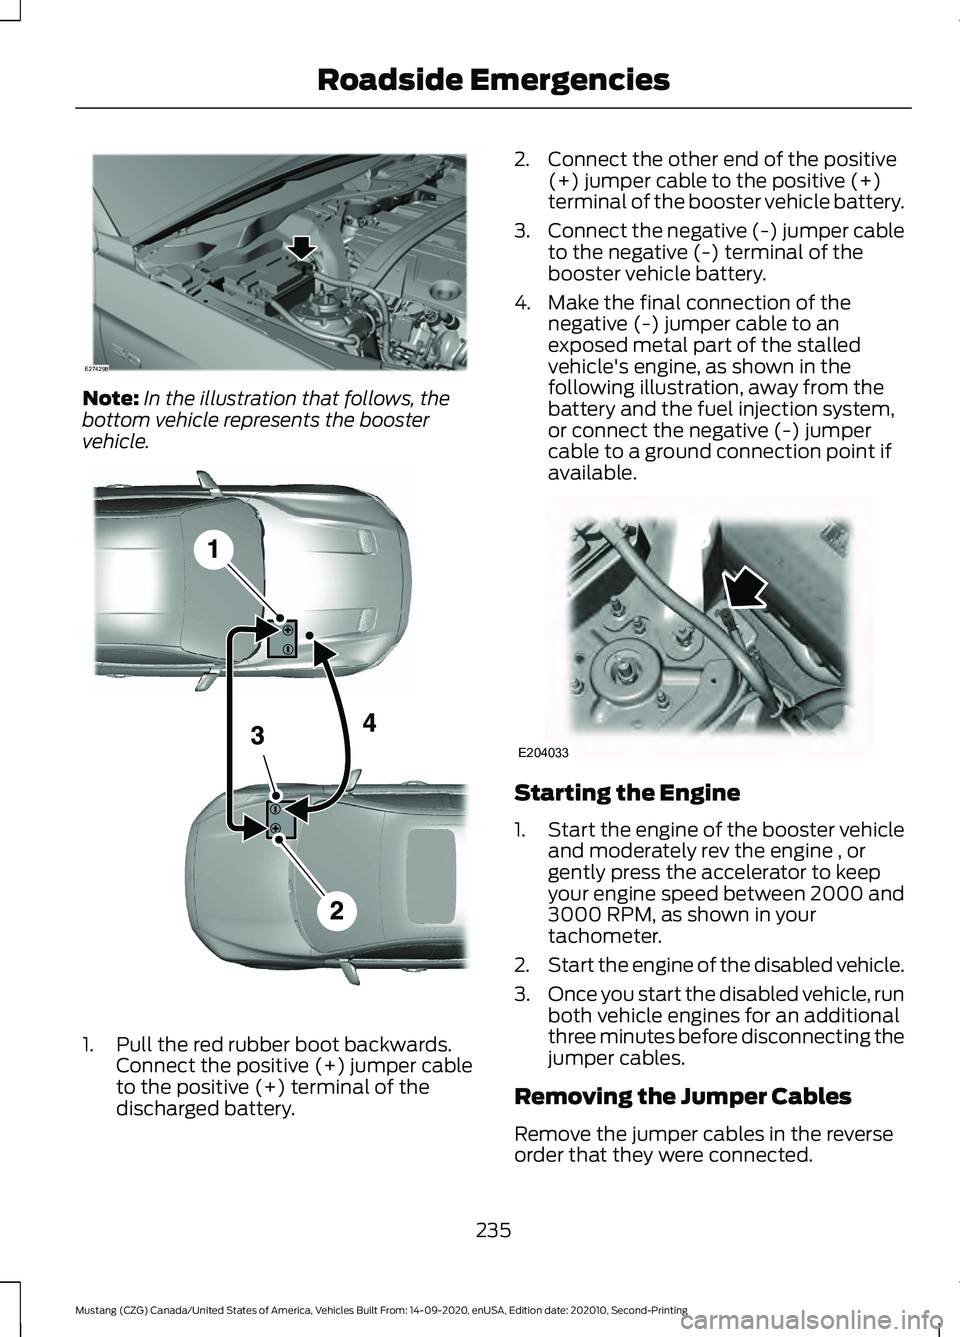
In the illustration that follows, the
bottom vehicle represents the booster
vehicle. 1. Pull the red rubber boot backwards.
Connect the positive (+) jumper cable
to the positive (+) terminal of the
discharged battery. 2. Connect the other end of the positive
(+) jumper cable to the positive (+)
terminal of the booster vehicle battery.
3. Connect the negative (-) jumper cable
to the negative (-) terminal of the
booster vehicle battery.
4. Make the final connection of the negative (-) jumper cable to an
exposed metal part of the stalled
vehicle's engine, as shown in the
following illustration, away from the
battery and the fuel injection system,
or connect the negative (-) jumper
cable to a ground connection point if
available. Starting the Engine
1.
Start the engine of the booster vehicle
and moderately rev the engine , or
gently press the accelerator to keep
your engine speed between 2000 and
3000 RPM, as shown in your
tachometer.
2. Start the engine of the disabled vehicle.
3. Once you start the disabled vehicle, run
both vehicle engines for an additional
three minutes before disconnecting the
jumper cables.
Removing the Jumper Cables
Remove the jumper cables in the reverse
order that they were connected.
235
Mustang (CZG) Canada/United States of America, Vehicles Built From: 14-09-2020, enUSA, Edition date: 202010, Second-Printing Roadside EmergenciesE274298 E281345 E204033
Page 256 of 530
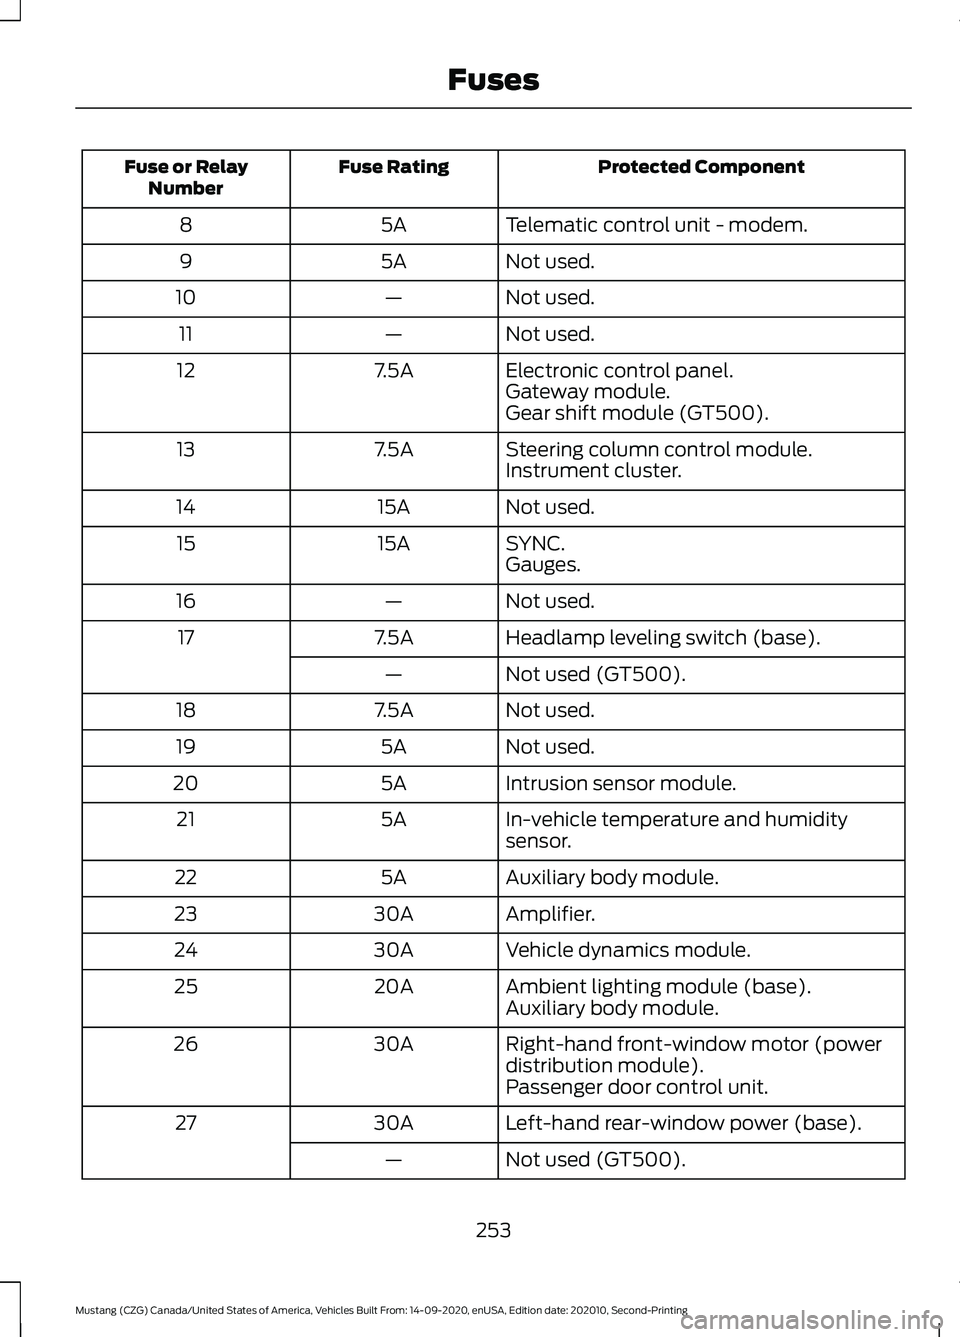
Protected Component
Fuse Rating
Fuse or Relay
Number
Telematic control unit - modem.
5A
8
Not used.
5A
9
Not used.
—
10
Not used.
—
11
Electronic control panel.
7.5A
12
Gateway module.
Gear shift module (GT500).
Steering column control module.
7.5A
13
Instrument cluster.
Not used.
15A
14
SYNC.
15A
15
Gauges.
Not used.
—
16
Headlamp leveling switch (base).
7.5A
17
Not used (GT500).
—
Not used.
7.5A
18
Not used.
5A
19
Intrusion sensor module.
5A
20
In-vehicle temperature and humidity
sensor.
5A
21
Auxiliary body module.
5A
22
Amplifier.
30A
23
Vehicle dynamics module.
30A
24
Ambient lighting module (base).
20A
25
Auxiliary body module.
Right-hand front-window motor (power
distribution module).
30A
26
Passenger door control unit.
Left-hand rear-window power (base).
30A
27
Not used (GT500).
—
253
Mustang (CZG) Canada/United States of America, Vehicles Built From: 14-09-2020, enUSA, Edition date: 202010, Second-Printing Fuses
Page 268 of 530
It is very important to use prediluted
coolant approved to the correct
specification in order to avoid plugging the
small passageways in the engine cooling
system. See Capacities and
Specifications (page 335). Do not mix
different colors or types of coolant in your
vehicle. Mixing of engine coolants or using
an incorrect coolant may harm the engine
or cooling system components and may
not be covered by the vehicle Warranty.
Note: If prediluted coolant is not available,
use the approved concentrated coolant
diluting it to 50/50 with distilled water. See
Capacities and Specifications (page 335).
Using water that has not been deionised
may contribute to deposit formation,
corrosion and plugging of the small cooling
system passageways.
Note: Coolants marketed for all makes and
models may not be approved to our
specifications and may cause damage to
the cooling system. Resulting component
damage may not be covered by the vehicle
Warranty.
If the coolant level is at or below the
minimum mark, add prediluted coolant
immediately.
To top up the coolant level do the
following:
1. Unscrew the cap slowly. Any pressure escapes as you unscrew the cap.
2. Add prediluted coolant approved to the correct specification. See
Capacities and Specifications (page
335
).
3. Add enough prediluted coolant to reach the correct level.
4. Replace the coolant reservoir cap. Turn
the cap clockwise until it contacts the
hard stop. 5. Check the coolant level in the coolant
reservoir the next few times you drive
your vehicle. If necessary, add enough
prediluted engine coolant to bring the
coolant level to the correct level.
If you have to add more than
1.1 qt (1 L) of
engine coolant per month, have your
vehicle checked as soon as possible.
Operating an engine with a low level of
coolant can result in engine overheating
and possible engine damage.
In case of emergency, you can add a large
amount of water without engine coolant
in order to reach a vehicle service location.
In this instance, qualified personnel:
1. Must drain the cooling system.
2. Chemically clean the coolant system.
3. Refill with engine coolant as soon as possible.
Water alone, without engine coolant, can
cause engine damage from corrosion,
overheating or freezing.
Do not use the following as a coolant
substitute:
• Alcohol.
• Methanol.
• Brine.
• Any coolant mixed with alcohol or
methanol antifreeze.
Alcohol and other liquids can cause engine
damage from overheating or freezing.
Do not add extra inhibitors or additives to
the coolant. These can be harmful and
compromise the corrosion protection of
the coolant.
Recycled Coolant
We do not recommend the use of recycled
coolant as an approved recycling process
is not yet available.
Note: Dispose of used coolant in the
appropriate manner.
265
Mustang (CZG) Canada/United States of America, Vehicles Built From: 14-09-2020, enUSA, Edition date: 202010, Second-Printing Maintenance
Page 269 of 530
Follow your community's regulations and
standards for recycling and disposing of
automotive fluids.
Severe Climates
If you drive in extremely cold climates:
•
It may be necessary to increase the
coolant concentration above 50%.
• A coolant concentration of 60%
provides improved freeze point
protection.
• Coolant concentrations above 60%
decrease the overheat protection
characteristics of the coolant and may
cause engine damage.
If you drive in extremely hot climates:
• You can decrease the coolant
concentration to 40%.
• A coolant concentration of 40%
provides improved overheat protection.
• Coolant concentrations below 40%
decrease the overheat and corrosion
protection characteristics of the
coolant and may cause engine
damage.
Vehicles driven year-round in non-extreme
climates should use prediluted coolant for
optimum cooling system and engine
protection.
Coolant Change
At specific mileage intervals, as listed in
the scheduled maintenance information,
the coolant should be changed. Add
prediluted coolant approved to the correct
specification. See Capacities and
Specifications (page 335). Fail-Safe Cooling
Fail-safe cooling allows you to temporarily
drive your vehicle before any incremental
component damage occurs. The fail-safe
distance depends on ambient
temperature, vehicle load and terrain.
How Fail-Safe Cooling Works If the engine begins to overheat,
the coolant temperature gauge
moves toward the red zone:
A warning lamp illuminates and
a message may appear in the
information display.
If the engine reaches a preset
over-temperature condition, the engine
automatically switches to alternating
cylinder operation. Each disabled cylinder
acts as an air pump and cools the engine.
When this occurs, your vehicle still
operates, however:
• Engine power is limited.
• The air conditioning system turns off.
Continued operation increases the engine
temperature, causing the engine to
completely shut down. Your steering and
braking effort increases in this situation.
When the engine temperature cools, you
can re-start the engine. Have your vehicle
checked as soon as possible to minimize
engine damage.
When Fail-Safe Mode Is Activated WARNING: Fail-safe mode is for
use during emergencies only. Operate
your vehicle in fail-safe mode only as
long as necessary to bring your vehicle
to rest in a safe location and seek
immediate repairs. When in fail-safe
mode, your vehicle will have limited
power, will not be able to maintain
266
Mustang (CZG) Canada/United States of America, Vehicles Built From: 14-09-2020, enUSA, Edition date: 202010, Second-Printing Maintenance
Page 270 of 530
high-speed operation, and may
completely shut down without warning,
potentially losing engine power, power
steering assist, and power brake assist,
which may increase the possibility of a
crash resulting in serious injury.
WARNING: Do not remove the
coolant reservoir cap when the engine is
on or the cooling system is hot. Wait 10
minutes for the cooling system to cool
down. Cover the coolant reservoir cap
with a thick cloth to prevent the
possibility of scalding and slowly remove
the cap. Failure to follow this instruction
could result in personal injury.
Your vehicle has limited engine power
when in the fail-safe mode, drive your
vehicle with caution. Your vehicle does not
maintain high-speed operation and the
engine may operate poorly.
Remember that the engine is capable of
automatically shutting down to prevent
engine damage. In this situation:
1. Pull off the road as soon as safely possible and switch the engine off.
2. If you are a member of a roadside assistance program, we recommend
that you contact your roadside
assistance service provider.
3. If this is not possible, wait for a short period of time for the engine to cool.
4. Check the coolant level. If the coolant level is at or below the minimum mark,
add prediluted coolant immediately.
5. When the engine temperature cools, you can re-start the engine. Have your
vehicle checked as soon as possible to
minimize engine damage.
Note: Driving your vehicle without repair
increases the chance of engine damage. Engine Coolant Temperature
Management
(If Equipped) WARNING:
To reduce the risk of
crash and injury, be prepared that the
vehicle speed may reduce and the
vehicle may not be able to accelerate
with full power until the coolant
temperature reduces.
If you tow a trailer with your vehicle, the
engine may temporarily reach a higher
temperature during severe operating
conditions, for example ascending a long
or steep grade in high ambient
temperatures.
At this time, you may notice the coolant
temperature gauge moves toward the red
zone and a message may appear in the
information display.
You may notice a reduction in vehicle
speed caused by reduced engine power in
order to manage the engine coolant
temperature. Your vehicle may enter this
mode if certain high-temperature and
high-load conditions take place. The
amount of speed reduction depends on
vehicle loading, grade and ambient
temperature. If this occurs, there is no
need to stop your vehicle. You can
continue to drive.
The air conditioning may automatically
turn on and off during severe operating
conditions to protect the engine from
overheating. When the coolant
temperature decreases to the normal
operating temperature, the air conditioning
turns on.
If the coolant temperature gauge moves
fully into the red zone, or if the coolant
temperature warning or service engine
soon messages appear in your information
display, do the following:
267
Mustang (CZG) Canada/United States of America, Vehicles Built From: 14-09-2020, enUSA, Edition date: 202010, Second-Printing Maintenance
Page 279 of 530
TRACK USE - MACH 1
Operating at High Speeds and
Track Days
Your vehicle is capable of sustained high
speeds and track day driving.
Before operating your vehicle at high
speeds:
•
Verify your tires have the correct
pressures.
• Inspect wheels and tires for wear and
damage. Replace any damaged wheels
and tires.
• Check and set lug nut torque. See
Technical Specifications (page 334).
• Verify fluid levels for oil, coolant, brake
and hydraulic fluid. See
Capacities
and Specifications (page 335).
• Change the engine oil and replace the
engine oil filter prior to use on the track.
Change the engine oil and filter again
after every four hours of track time.
Maintain the engine oil level at or near
the max mark on the engine oil dipstick.
See
Engine Oil Check (page 261).
• Replace the brake fluid with fresh
Motorcraft/Ford DOT 4 LV High
Performance Brake Fluid or other DOT
compliant fluid with a dry boiling point
greater than
500°F (260°C) from a
sealed container. Do not use silicone
or DOT 5 brake fluids. •
If you are operating your Mach 1 on a
drag strip, use drag strip selectable
drive mode in addition to using line lock
and launch control to provide a specific
set-up tuned for the quickest straight
line elapsed times.
• If you are operating your Mach 1 on a
road course, use sport or track
selectable drive modes to provide a
specific set-up tuned for optimal shift
and suspension set-up that is tuned
towards handling prowess on closed
course surfaces.
After operating your vehicle at high speeds
or track day driving, do the following:
• Set the tire pressure to the proper
specification.
• Check and set the lug nut torque. See
Technical Specifications
(page 334).
• Check all fluid levels.
• Refer to the track maintenance interval
chart. See
Normal Scheduled
Maintenance (page 444).
• Check the front and rear wheel
bearings for abnormal wear.
• Inspect brake caliper dust boots for
abnormal wear.
Track Apps WARNING:
Track Apps™
is for
track use only. Remember that even
advanced technology cannot defy the
laws of physics. It is always possible to
lose control of a vehicle due to
inappropriate driver input for the
conditions. Aggressive driving on any
road condition can cause you to lose
control of your vehicle increasing the risk
of personal injury or property damage.
276
Mustang (CZG) Canada/United States of America, Vehicles Built From: 14-09-2020, enUSA, Edition date: 202010, Second-Printing Track Use
Page 280 of 530
This information display driven feature
provides a suite of menu options to record
and optimize your track performances.
See General Information (page 99).
Note: Track Apps are for track use only. Do
not use them under any other driving
conditions.
Note: You cannot view or clear your results
unless your vehicle is at a complete stop
with the right arrow on the display menu
inactive. If your vehicle does not reach
100 mph (160 km/h)
during the track run,
your display may not show your selected
interval's results.
Note: The pre-collision assist system turns
off when using Track Apps or when you
switch off your stability control system.
Acceleration Timer
Displays your vehicle's rate of acceleration
for a given speed or distance range.
Accelerometer
Displays your vehicle's rate of acceleration
or deceleration. A dot moves toward the
area of acceleration or deceleration.
LEFT Acceleration or Deceleration
When accelerating or decelerating left, the
dot moves to the right on the
accelerometer.
RIGHT Acceleration or Deceleration
When accelerating or decelerating right,
the dot moves to the left on the
accelerometer.
Brake Performance
Displays your vehicle's rate of deceleration
for a given speed range. Exhaust Mode
Gives the driver the ability to choose the
vehicle's exhaust mode.
Note:
The Track Exhaust Mode setting is
only for use at tracks and not for use on
public roadways. Use of this setting results
in increased exterior noise, which may not
meet state and local laws and regulations.
It is the obligation of the driver to operate
the vehicle in a manner that complies with
state and local requirements. Only use the
Track Exhaust Mode setting at a
competition track or an off-road course
where elevated exterior vehicle noise is
acceptable.
Lap Timer
Gives you the ability to record lap times at
three separate tracks.
Launch Control
(If Equipped)
Maximizes your vehicle's traction from a
standing start.
Follow these steps to use launch control:
1. Bring your vehicle to a complete stop.
2. Make sure launch control is enabled. The indicator illuminates in the
information display when launch
control is enabled.
See Warning
Lamps and Indicators (page 94).
3. Fully press the clutch pedal.
4. Shift the transmission into 1st gear.
5. Fully depress the accelerator pedal and
allow the engine RPM to stabilize.
6. Release the clutch pedal.
277
Mustang (CZG) Canada/United States of America, Vehicles Built From: 14-09-2020, enUSA, Edition date: 202010, Second-Printing Track Use
Page 281 of 530
Line Lock
Line lock is a feature intended for use at
tracks only and should not be used on
public roadways. Use of this feature may
result in significantly increased rear tire
wear. It is intended to condition the rear
tires to maximize traction prior to track use.
Line lock maintains brake force at the front
wheels, allowing the rear wheels to spin
with minimal vehicle movement.
This feature is located in the Track Apps
menu. Make selections through the 5-way
information display control and OK button
located on the steering wheel.
Using Line Lock
There are three line lock stages:
•
Initiated.
• Engaged.
• Off.
Initiating Line Lock
The initiation stage verifies that the vehicle
is ready for line lock function, and confirms
driver intent. Follow the prompts in the
information display to initiate line lock.
The following conditions must be met to
initialize line lock:
• The vehicle is on a level surface.
• The engine is running.
• The vehicle is traveling less than
25 mph (40 km/h).
• Selectable drive mode is not in wet
mode (if equipped).
• There are no electronic stability control
faults. If you want to cancel line lock once it is
initialized, press the left information
display control. Once initiated, line lock is
prepared for activation and remains
initiated up to 25 mph (40 km/h). If vehicle
speed exceeds 25 mph (40 km/h), line lock
automatically cancels.
Engaging Line Lock
Follow the prompts in the information
display to engage line lock after it is
initialized. To engage, firmly apply the
brakes. Then press the OK button. Once
engaged, release the brake pedal. The
front brakes remain applied and the rear
brakes release. At this point, the
engagement timer is initiated and shown
on the driver information display.
The following conditions must be met to
engage line lock:
•
The vehicle is on a level surface.
• The engine is running.
• The vehicle is stopped.
• The parking brake is not applied.
• The driver door is closed.
• The transmission is in a forward gear.
• Selectable drive mode is not in wet
mode (if equipped).
• There are no electronic stability control
faults.
• The steering wheel must be in the
straight ahead position.
Releasing Line Lock
While line lock is engaged, you can exit
(release) the feature using the OK button.
When you press the OK button, line lock
releases immediately and normal vehicle
function resumes. When line lock engages,
a countdown timer shows the remaining
278
Mustang (CZG) Canada/United States of America, Vehicles Built From: 14-09-2020, enUSA, Edition date: 202010, Second-Printing Track Use
Page 282 of 530
time before line lock is released
automatically. If you exceed the time limit,
or another vehicle condition requires line
lock to release, the system safely
disengages and normal vehicle function
resumes.
Note:
If you apply the brake pedal while
line lock is engaged, line lock automatically
cancels and normal brake function resumes.
Performance Shift Indicator
The performance shift indicator displays
a row of colored lights that represent
engine RPM.
The performance shift indicator menu
allows you to:
• Choose whether the indicator is shown
on the windshield or information
display.
• Set a shift point within the allowable
RPM range in increments of 100.
• Enable or disable the associated shift
tone, based on the set shift point.
• Set the between off, change with drive
mode, tach, track and drag.
• Set the light intensity. The intensity
adjusts between day time and night
time. Start Option
Allows you to select the type of countdown
the information display shows before
starting an event.
Status Screen
Provides the status of your chosen
performance-related settings.
View/Clear Results
Allows you to view and clear the last and
saved results of the Acceleration Timer,
Brake Performance, and All Time Best
results.
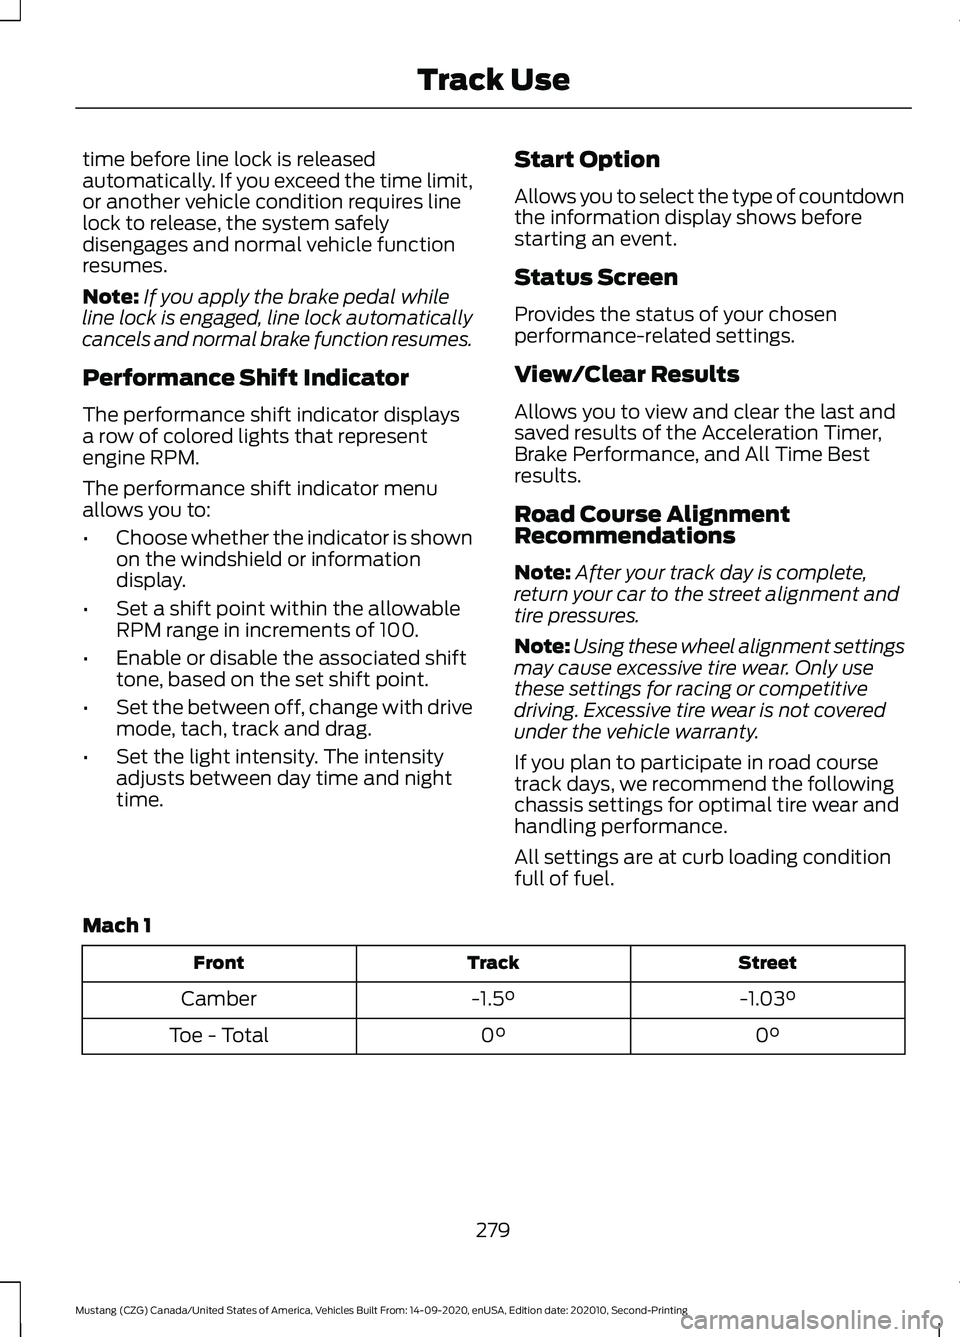
Road Course Alignment
Recommendations
Note:
After your track day is complete,
return your car to the street alignment and
tire pressures.
Note: Using these wheel alignment settings
may cause excessive tire wear. Only use
these settings for racing or competitive
driving. Excessive tire wear is not covered
under the vehicle warranty.
If you plan to participate in road course
track days, we recommend the following
chassis settings for optimal tire wear and
handling performance.
All settings are at curb loading condition
full of fuel.
Mach 1 Street
Track
Front
-1.03°
-1.5°
Camber
0°
0°
Toe - Total
279
Mustang (CZG) Canada/United States of America, Vehicles Built From: 14-09-2020, enUSA, Edition date: 202010, Second-Printing Track Use