headlamp FORD POLICE INTERCEPTOR 2021 User Guide
[x] Cancel search | Manufacturer: FORD, Model Year: 2021, Model line: POLICE INTERCEPTOR, Model: FORD POLICE INTERCEPTOR 2021Pages: 412, PDF Size: 7.51 MB
Page 137 of 412
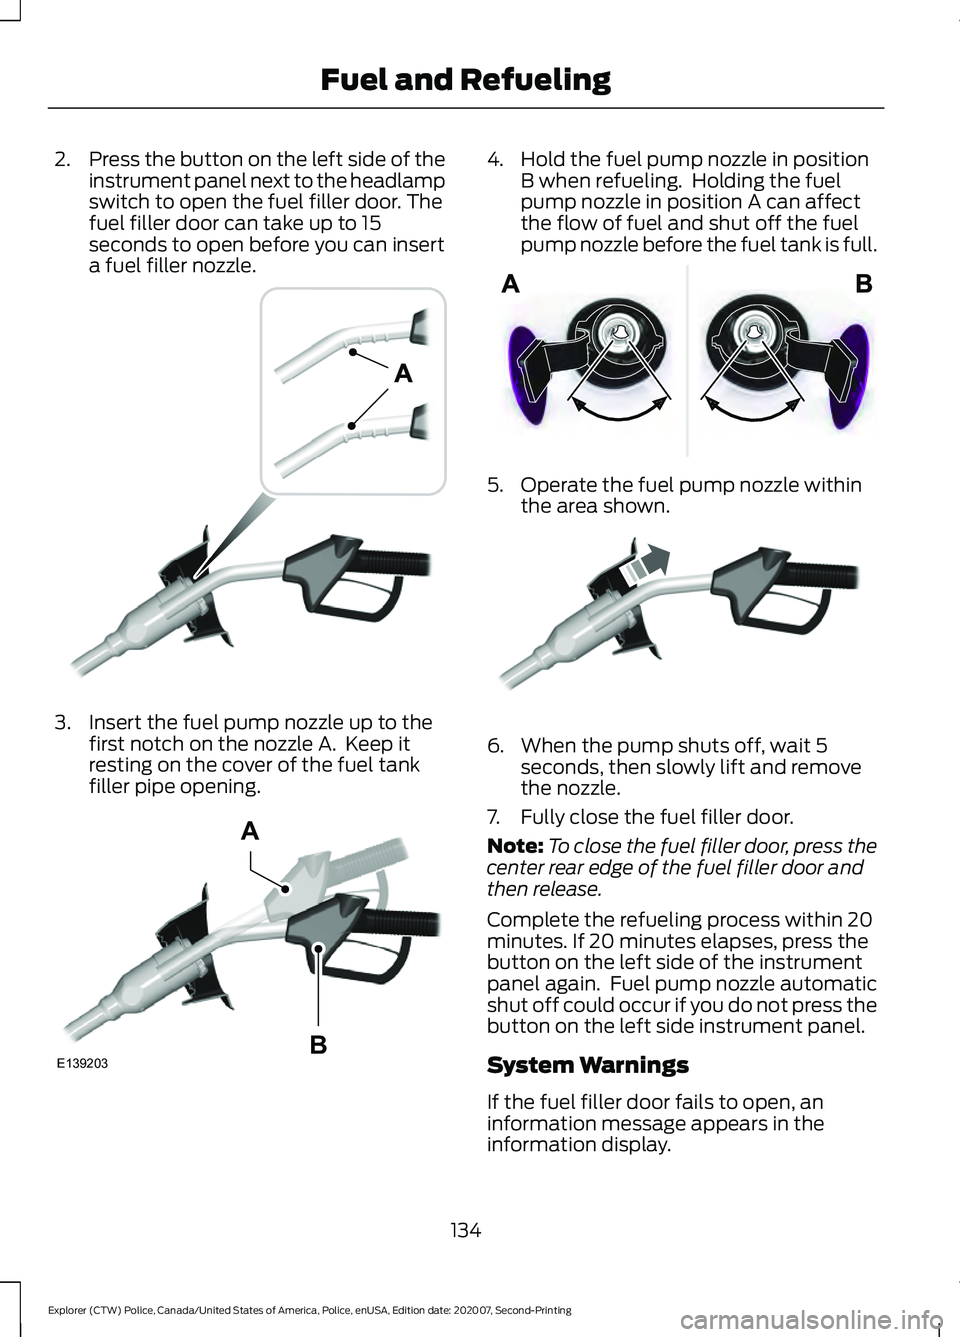
2.
Press the button on the left side of the
instrument panel next to the headlamp
switch to open the fuel filler door. The
fuel filler door can take up to 15
seconds to open before you can insert
a fuel filler nozzle. 3. Insert the fuel pump nozzle up to the
first notch on the nozzle A. Keep it
resting on the cover of the fuel tank
filler pipe opening. 4. Hold the fuel pump nozzle in position
B when refueling. Holding the fuel
pump nozzle in position A can affect
the flow of fuel and shut off the fuel
pump nozzle before the fuel tank is full. 5. Operate the fuel pump nozzle within
the area shown. 6. When the pump shuts off, wait 5
seconds, then slowly lift and remove
the nozzle.
7. Fully close the fuel filler door.
Note: To close the fuel filler door, press the
center rear edge of the fuel filler door and
then release.
Complete the refueling process within 20
minutes. If 20 minutes elapses, press the
button on the left side of the instrument
panel again. Fuel pump nozzle automatic
shut off could occur if you do not press the
button on the left side instrument panel.
System Warnings
If the fuel filler door fails to open, an
information message appears in the
information display.
134
Explorer (CTW) Police, Canada/United States of America, Police, enUSA, Edition date: 202007, Second-Printing Fuel and RefuelingE139202 E139203
A
B E206912 E119081
Page 213 of 412
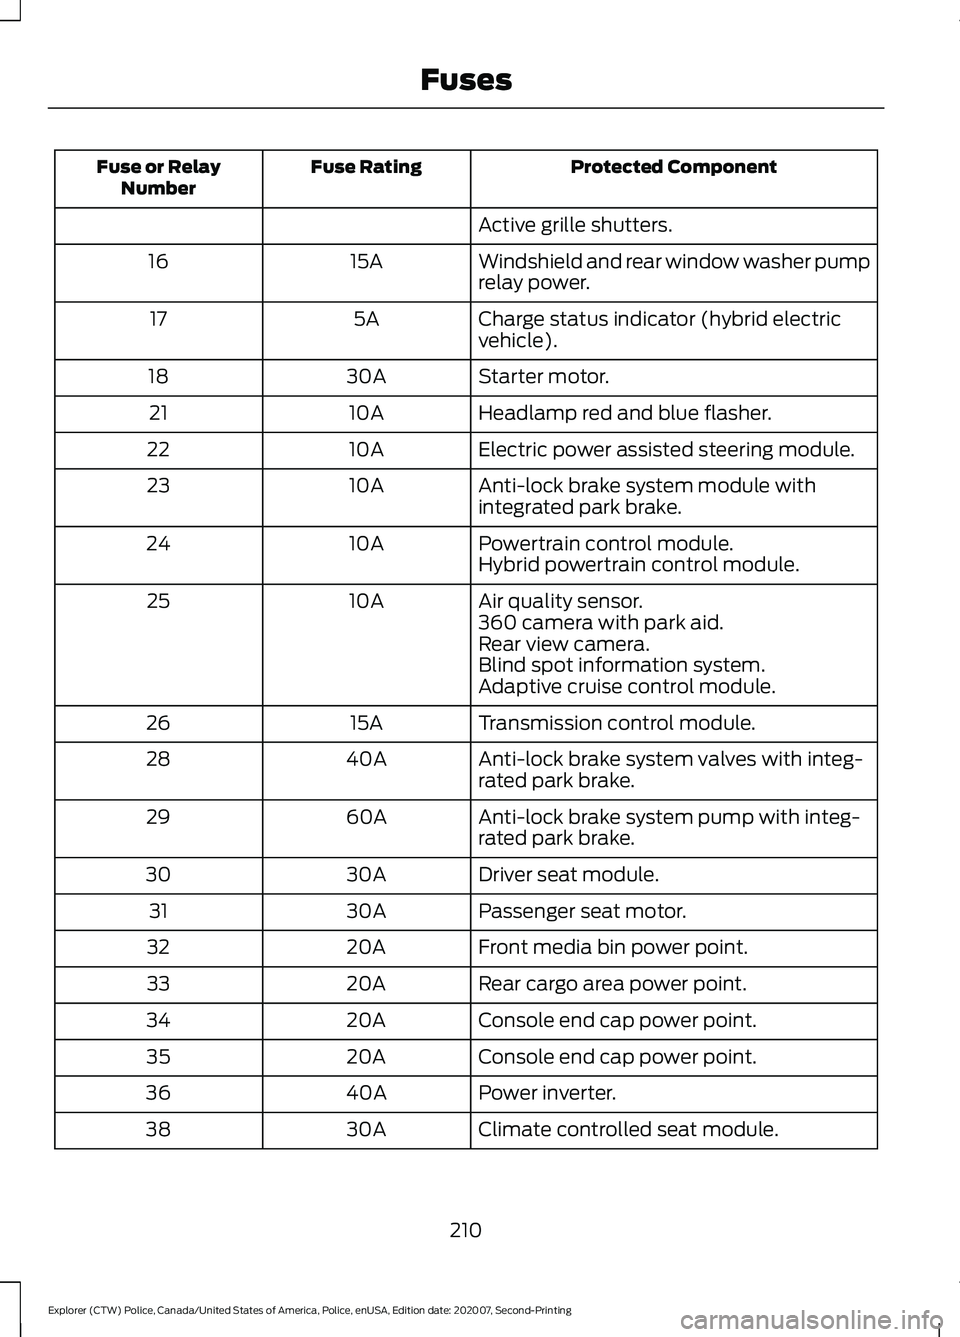
Protected Component
Fuse Rating
Fuse or Relay
Number
Active grille shutters.
Windshield and rear window washer pump
relay power.
15A
16
Charge status indicator (hybrid electric
vehicle).
5A
17
Starter motor.
30A
18
Headlamp red and blue flasher.
10A
21
Electric power assisted steering module.
10A
22
Anti-lock brake system module with
integrated park brake.
10A
23
Powertrain control module.
10A
24
Hybrid powertrain control module.
Air quality sensor.
10A
25
360 camera with park aid.
Rear view camera.
Blind spot information system.
Adaptive cruise control module.
Transmission control module.
15A
26
Anti-lock brake system valves with integ-
rated park brake.
40A
28
Anti-lock brake system pump with integ-
rated park brake.
60A
29
Driver seat module.
30A
30
Passenger seat motor.
30A
31
Front media bin power point.
20A
32
Rear cargo area power point.
20A
33
Console end cap power point.
20A
34
Console end cap power point.
20A
35
Power inverter.
40A
36
Climate controlled seat module.
30A
38
210
Explorer (CTW) Police, Canada/United States of America, Police, enUSA, Edition date: 202007, Second-Printing Fuses
Page 214 of 412
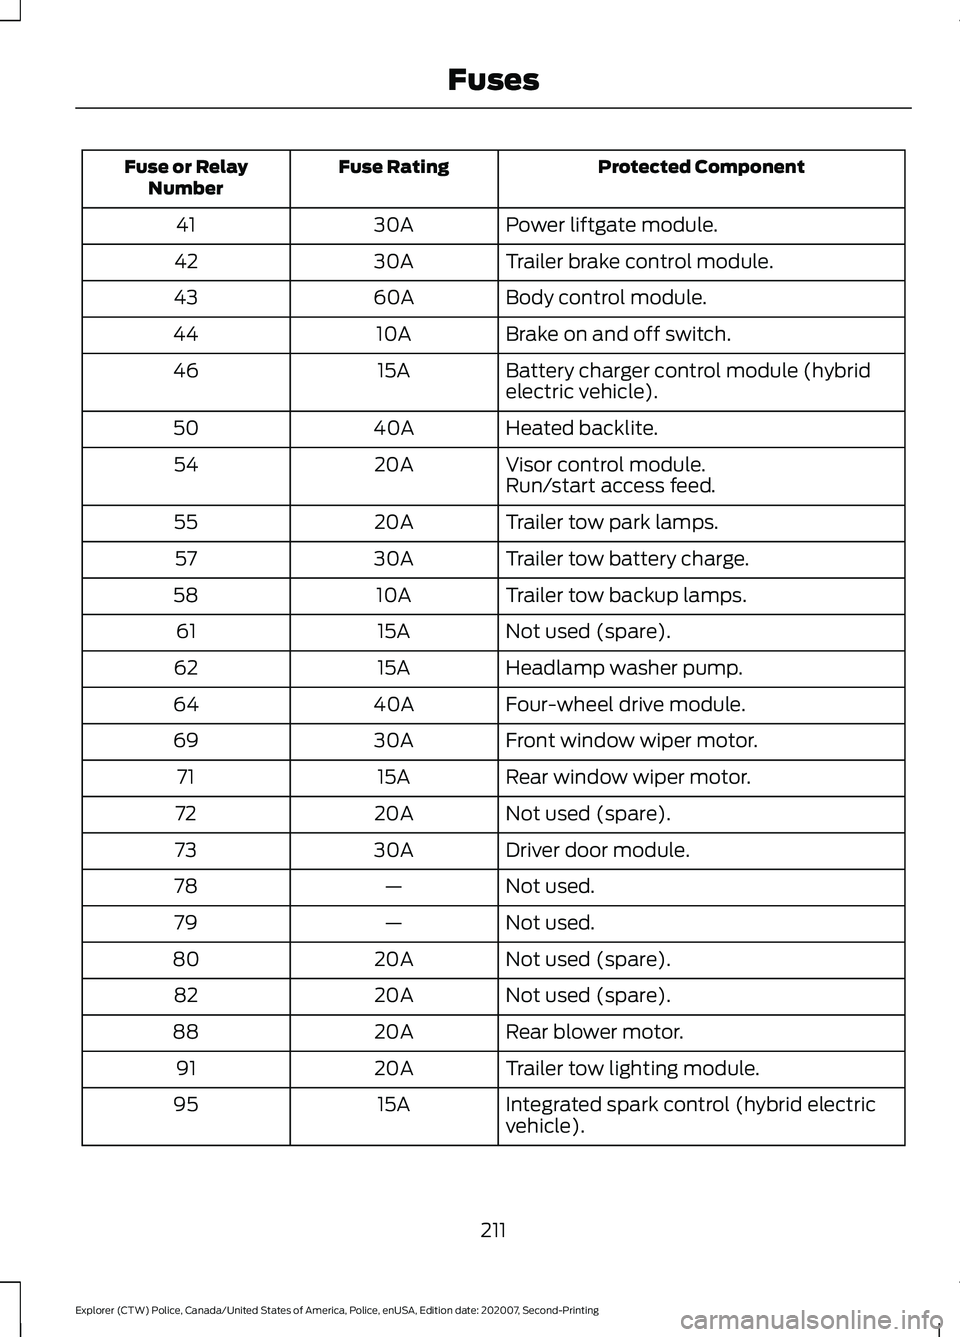
Protected Component
Fuse Rating
Fuse or Relay
Number
Power liftgate module.
30A
41
Trailer brake control module.
30A
42
Body control module.
60A
43
Brake on and off switch.
10A
44
Battery charger control module (hybrid
electric vehicle).
15A
46
Heated backlite.
40A
50
Visor control module.
20A
54
Run/start access feed.
Trailer tow park lamps.
20A
55
Trailer tow battery charge.
30A
57
Trailer tow backup lamps.
10A
58
Not used (spare).
15A
61
Headlamp washer pump.
15A
62
Four-wheel drive module.
40A
64
Front window wiper motor.
30A
69
Rear window wiper motor.
15A
71
Not used (spare).
20A
72
Driver door module.
30A
73
Not used.
—
78
Not used.
—
79
Not used (spare).
20A
80
Not used (spare).
20A
82
Rear blower motor.
20A
88
Trailer tow lighting module.
20A
91
Integrated spark control (hybrid electric
vehicle).
15A
95
211
Explorer (CTW) Police, Canada/United States of America, Police, enUSA, Edition date: 202007, Second-Printing Fuses
Page 216 of 412
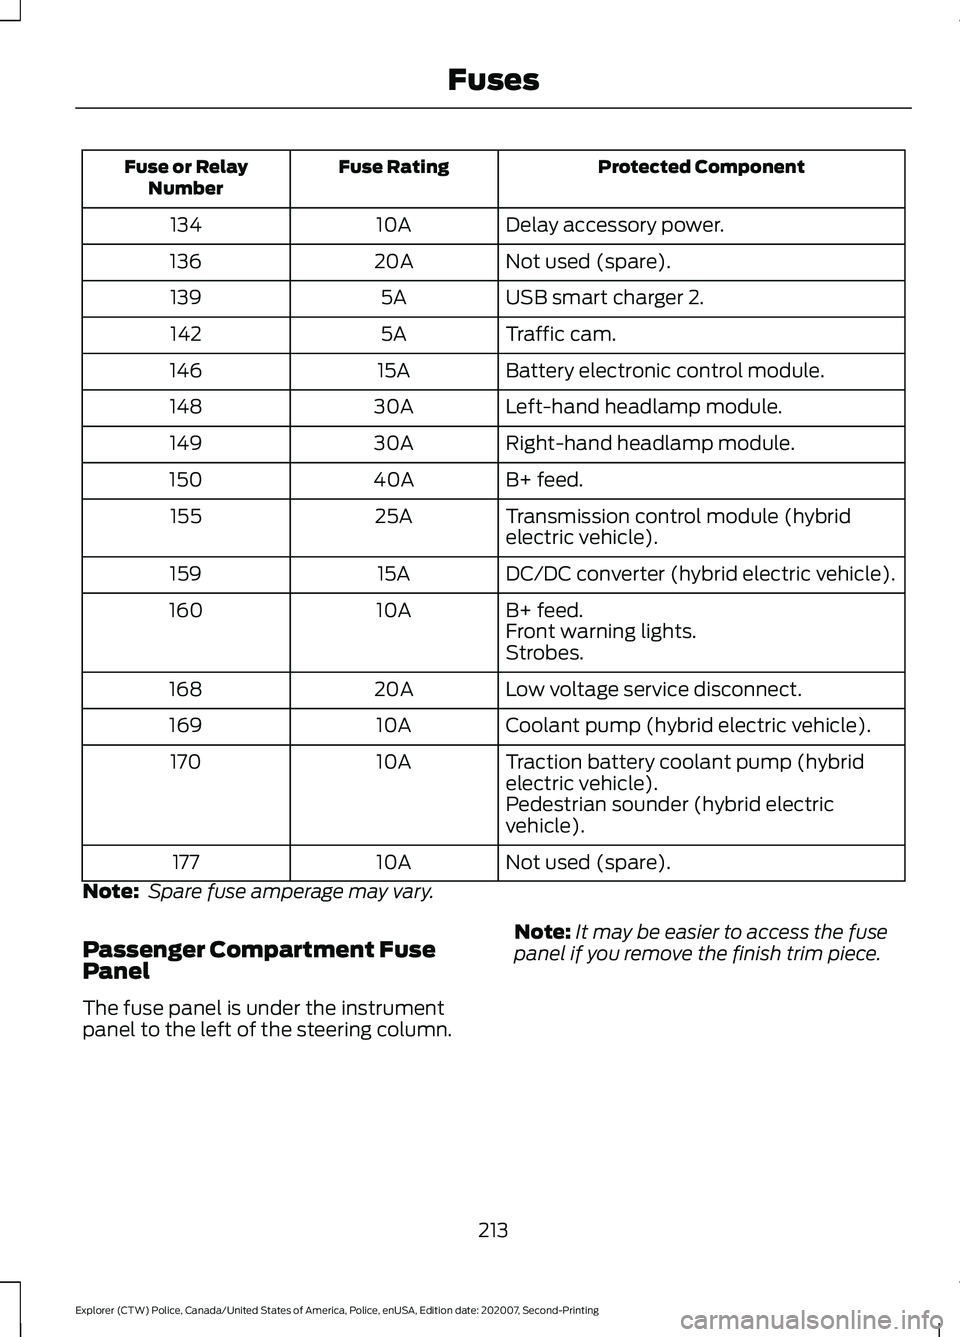
Protected Component
Fuse Rating
Fuse or Relay
Number
Delay accessory power.
10A
134
Not used (spare).
20A
136
USB smart charger 2.
5A
139
Traffic cam.
5A
142
Battery electronic control module.
15A
146
Left-hand headlamp module.
30A
148
Right-hand headlamp module.
30A
149
B+ feed.
40A
150
Transmission control module (hybrid
electric vehicle).
25A
155
DC/DC converter (hybrid electric vehicle).
15A
159
B+ feed.
10A
160
Front warning lights.
Strobes.
Low voltage service disconnect.
20A
168
Coolant pump (hybrid electric vehicle).
10A
169
Traction battery coolant pump (hybrid
electric vehicle).
10A
170
Pedestrian sounder (hybrid electric
vehicle).
Not used (spare).
10A
177
Note: Spare fuse amperage may vary.
Passenger Compartment Fuse
Panel
The fuse panel is under the instrument
panel to the left of the steering column. Note:
It may be easier to access the fuse
panel if you remove the finish trim piece.
213
Explorer (CTW) Police, Canada/United States of America, Police, enUSA, Edition date: 202007, Second-Printing Fuses
Page 218 of 412
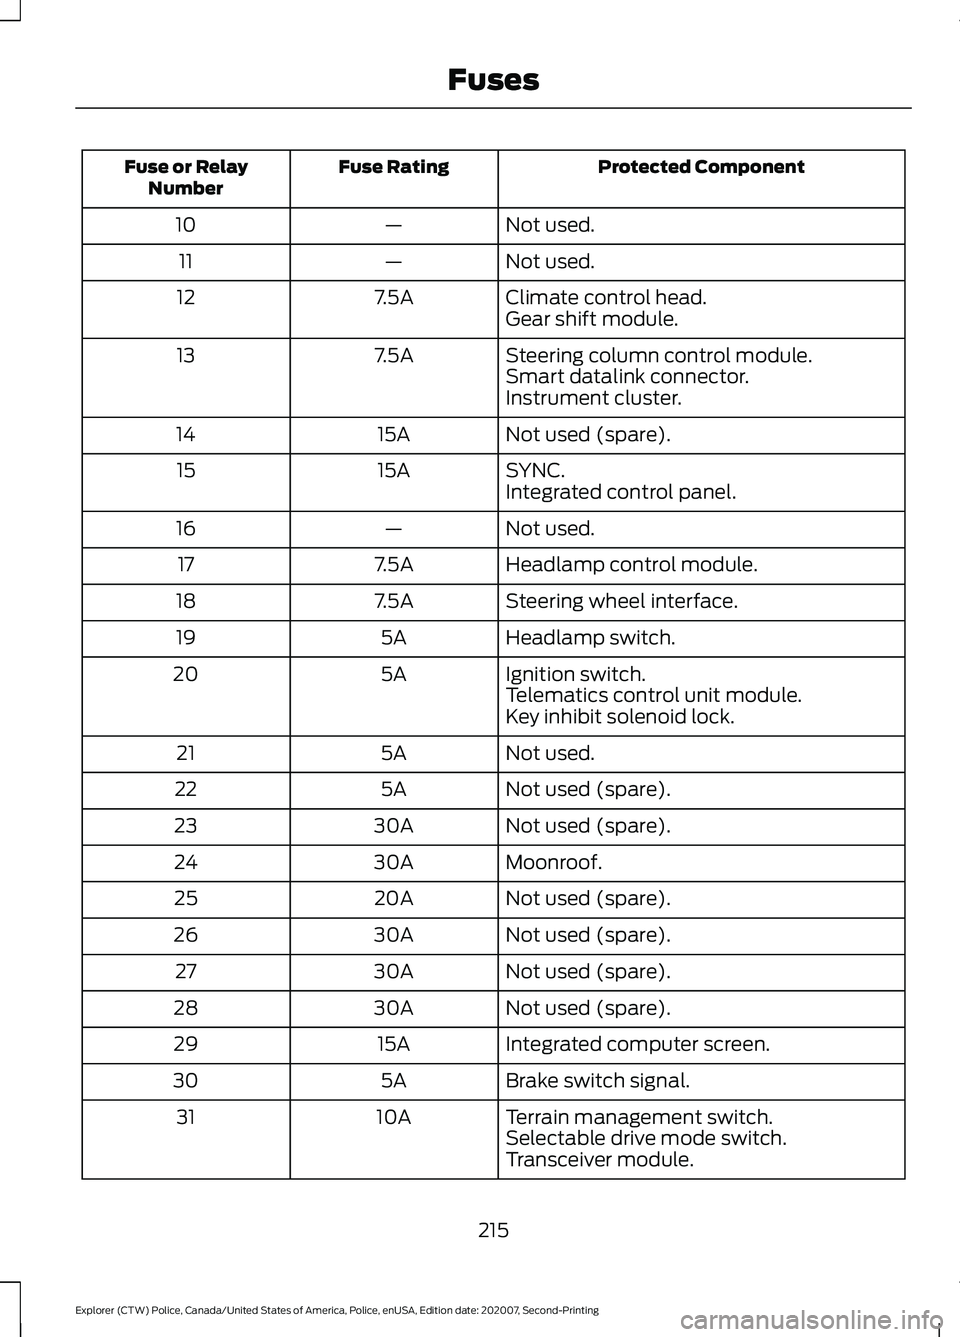
Protected Component
Fuse Rating
Fuse or Relay
Number
Not used.
—
10
Not used.
—
11
Climate control head.
7.5A
12
Gear shift module.
Steering column control module.
7.5A
13
Smart datalink connector.
Instrument cluster.
Not used (spare).
15A
14
SYNC.
15A
15
Integrated control panel.
Not used.
—
16
Headlamp control module.
7.5A
17
Steering wheel interface.
7.5A
18
Headlamp switch.
5A
19
Ignition switch.
5A
20
Telematics control unit module.
Key inhibit solenoid lock.
Not used.
5A
21
Not used (spare).
5A
22
Not used (spare).
30A
23
Moonroof.
30A
24
Not used (spare).
20A
25
Not used (spare).
30A
26
Not used (spare).
30A
27
Not used (spare).
30A
28
Integrated computer screen.
15A
29
Brake switch signal.
5A
30
Terrain management switch.
10A
31
Selectable drive mode switch.
Transceiver module.
215
Explorer (CTW) Police, Canada/United States of America, Police, enUSA, Edition date: 202007, Second-Printing Fuses
Page 236 of 412
After battery replacement, or in some
cases after charging the battery with an
external charger, the battery management
system requires eight hours of vehicle sleep
time to relearn the battery state of charge.
During this time your vehicle must remain
fully locked with the ignition switched off.
Note:
Prior to relearning the battery state
of charge, the battery management system
may temporarily disable some electrical
systems.
Electrical Accessory Installation
To make sure the battery management
system works correctly, do not connect an
electrical device ground connection
directly to the battery negative post. This
can cause inaccurate measurements of
the battery condition and potential
incorrect system operation.
Note: If you add electrical accessories or
components to the vehicle, it may adversely
affect battery performance and durability.
This may also affect the performance of
other electrical systems in the vehicle.
Remove and Reinstall the Battery
To disconnect or remove the battery, do
the following:
1. Apply the parking brake and switch the
ignition off.
2. Switch all electrical equipment off, for
example lights and radio.
3. Wait a minimum of two minutes before
disconnecting the battery.
Note: The engine management system has
a power hold function and remains powered
for a period of time after you switch the
ignition off. This is to allow diagnostic and
adaptive tables to be stored. Disconnecting
the battery without waiting can cause
damage not covered by the vehicle
Warranty. 4. Disconnect the negative battery cable
terminal.
5. Disconnect the positive battery cable terminal.
6. Remove the battery securing clamp.
7. Remove the battery.
8. To install, reverse the removal procedure.
Note: Before reconnecting the battery,
make sure the ignition remains switched off.
Note: Make sure the battery cable terminals
are fully tightened.
If you disconnect or replace the vehicle
battery, you must reset the following
features:
• Window bounce-back. See Power
Windows (page 74).
• Clock Settings.
• Pre-set radio stations.
Battery Disposal Make sure that you dispose of
old batteries in an
environmentally friendly way.
Seek advice from your local authority
about recycling old batteries.
ADJUSTING THE HEADLAMPS
Vertical Aim Adjustment
If your vehicle has been involved in a crash,
have the aim of the headlamp beam
checked by an authorized dealer.
233
Explorer (CTW) Police, Canada/United States of America, Police, enUSA, Edition date: 202007, Second-Printing MaintenanceE107998
Page 237 of 412
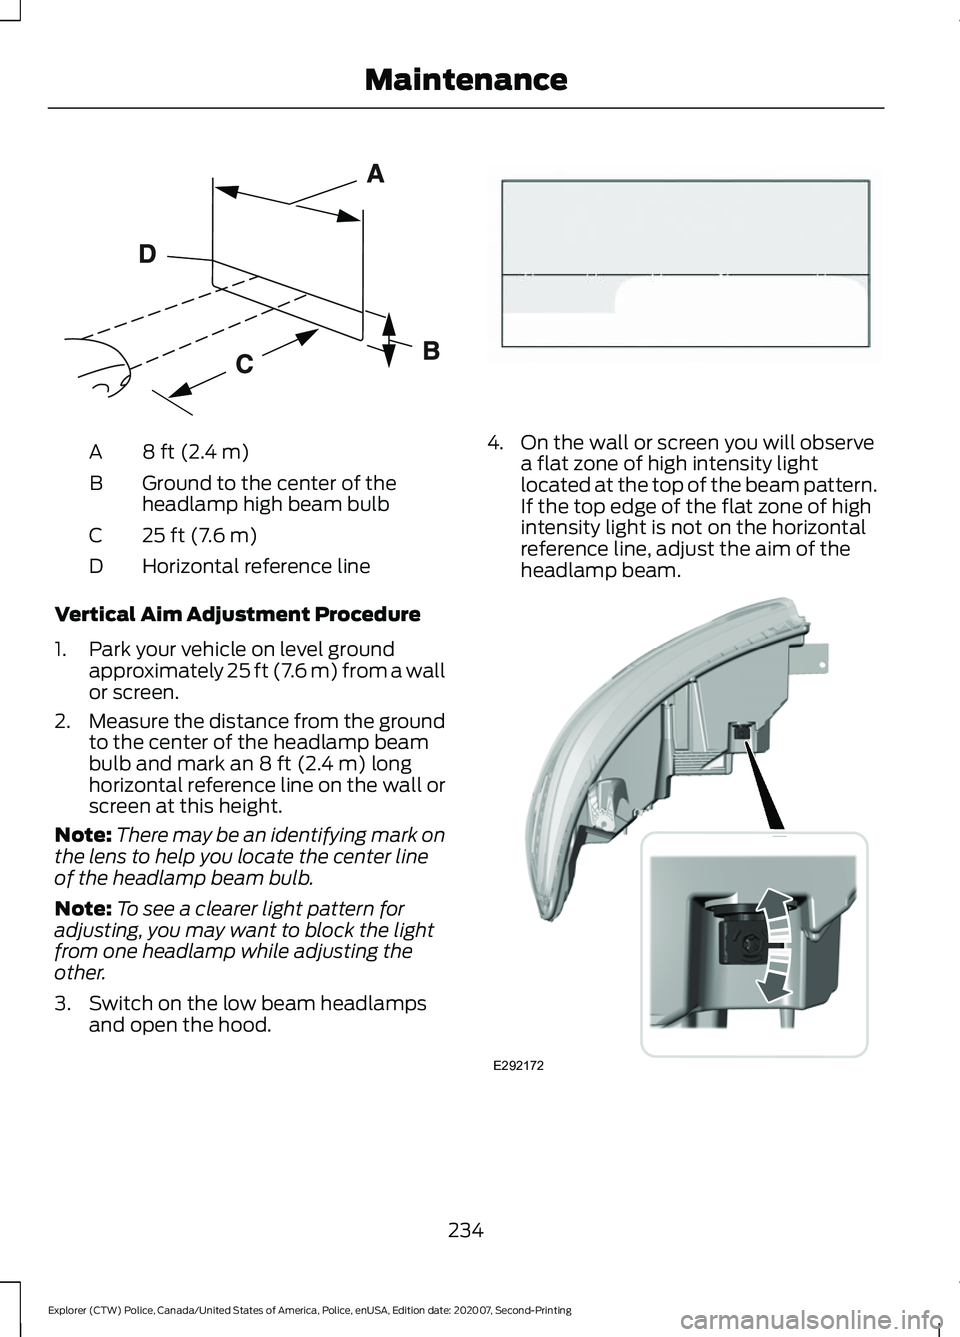
8 ft (2.4 m)
A
Ground to the center of the
headlamp high beam bulb
B
25 ft (7.6 m)
C
Horizontal reference line
D
Vertical Aim Adjustment Procedure
1. Park your vehicle on level ground approximately 25 ft (7.6 m) from a wall
or screen.
2. Measure the distance from the ground
to the center of the headlamp beam
bulb and mark an
8 ft (2.4 m) long
horizontal reference line on the wall or
screen at this height.
Note: There may be an identifying mark on
the lens to help you locate the center line
of the headlamp beam bulb.
Note: To see a clearer light pattern for
adjusting, you may want to block the light
from one headlamp while adjusting the
other.
3. Switch on the low beam headlamps and open the hood. 4. On the wall or screen you will observe
a flat zone of high intensity light
located at the top of the beam pattern.
If the top edge of the flat zone of high
intensity light is not on the horizontal
reference line, adjust the aim of the
headlamp beam. 234
Explorer (CTW) Police, Canada/United States of America, Police, enUSA, Edition date: 202007, Second-Printing MaintenanceE142592 E142465 E292172
Page 238 of 412
5. Use a suitable tool, for example a
screwdriver or socket wrench, to turn
the adjuster clockwise or
counterclockwise to adjust the vertical
aim of the headlamp. The horizontal
edge of the brighter light should touch
the horizontal reference line.
6. Close the hood and switch off the lamps.
WASHER FLUID CHECK WARNING: If you operate your
vehicle in temperatures below 41.0°F
(5°C), use washer fluid with antifreeze
protection. Failure to use washer fluid
with antifreeze protection in cold
weather could result in impaired
windshield vision and increase the risk
of injury or accident.
Note: The front and rear washer systems
are supplied from the same reservoir.
Add fluid to fill the reservoir if the level is
low. Only use a washer fluid that meets
our specifications. See
Capacities and
Specifications (page 279).
State or local regulations on volatile
organic compounds may restrict the use
of methanol, a common windshield washer
antifreeze additive. Washer fluids
containing non-methanol antifreeze
agents should be used only if they provide
cold weather protection without damaging
the vehicle ’s paint finish, wiper blades or
washer system.
FUEL FILTER
Your vehicle is equipped with a lifetime
fuel filter that is integrated with the fuel
tank. Regular maintenance or replacement
is not needed. CHECKING THE WIPER
BLADES
Run the tip of your fingers over the edge of
the blade to check for roughness.
Clean the wiper blades with washer fluid
or water applied with a soft sponge or
cloth.
CHANGING THE FRONT WIPER
BLADES
You can improve poor wiper quality by
cleaning the wiper blades and the
windshield.
Replace the wiper blades at least annually
for optimum performance.
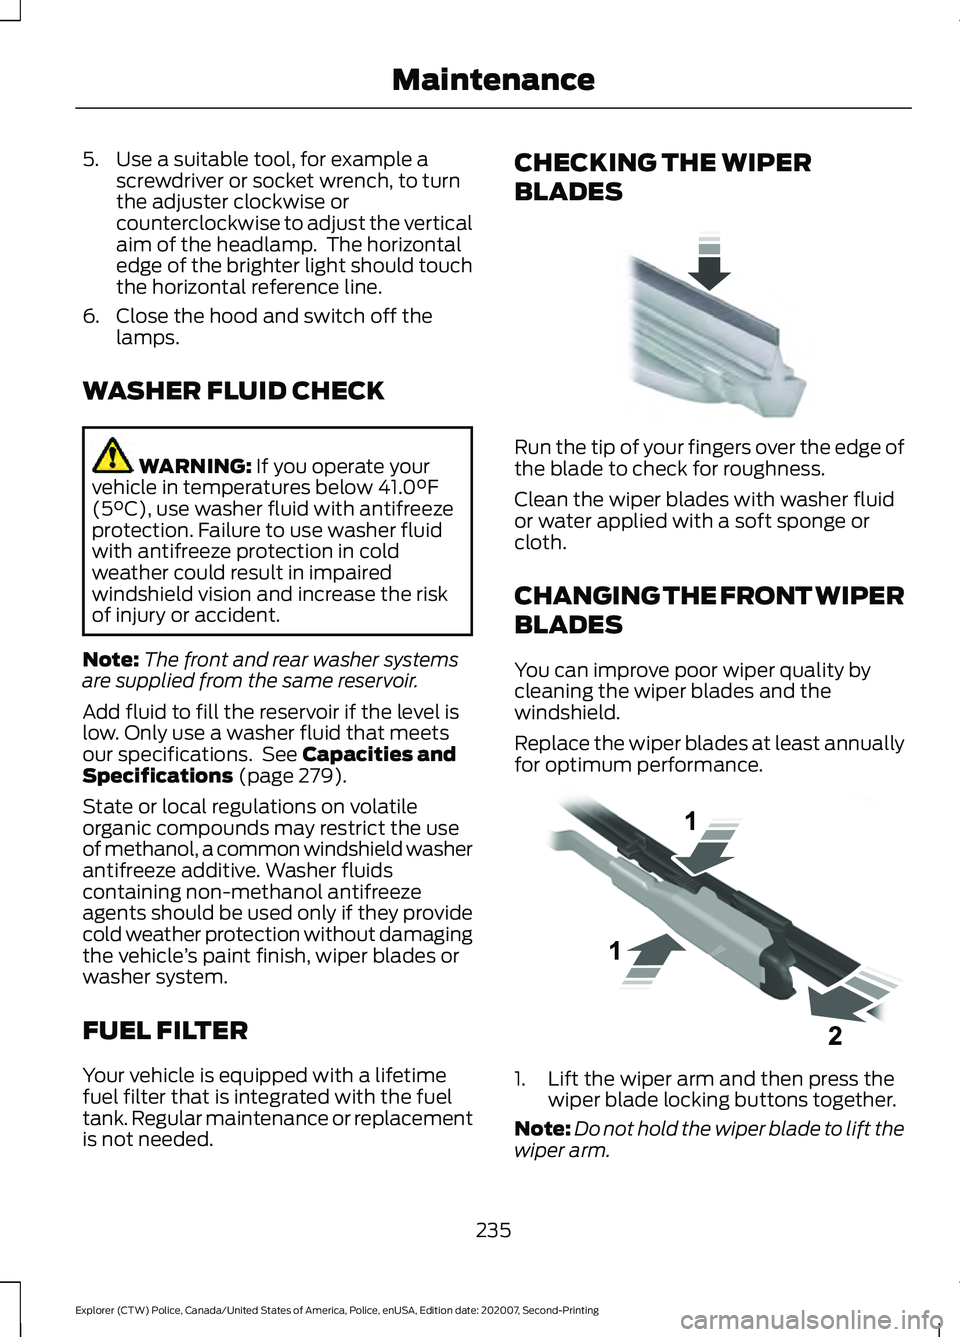
1. Lift the wiper arm and then press the
wiper blade locking buttons together.
Note: Do not hold the wiper blade to lift the
wiper arm.
235
Explorer (CTW) Police, Canada/United States of America, Police, enUSA, Edition date: 202007, Second-Printing MaintenanceE142463 E129990
Page 240 of 412
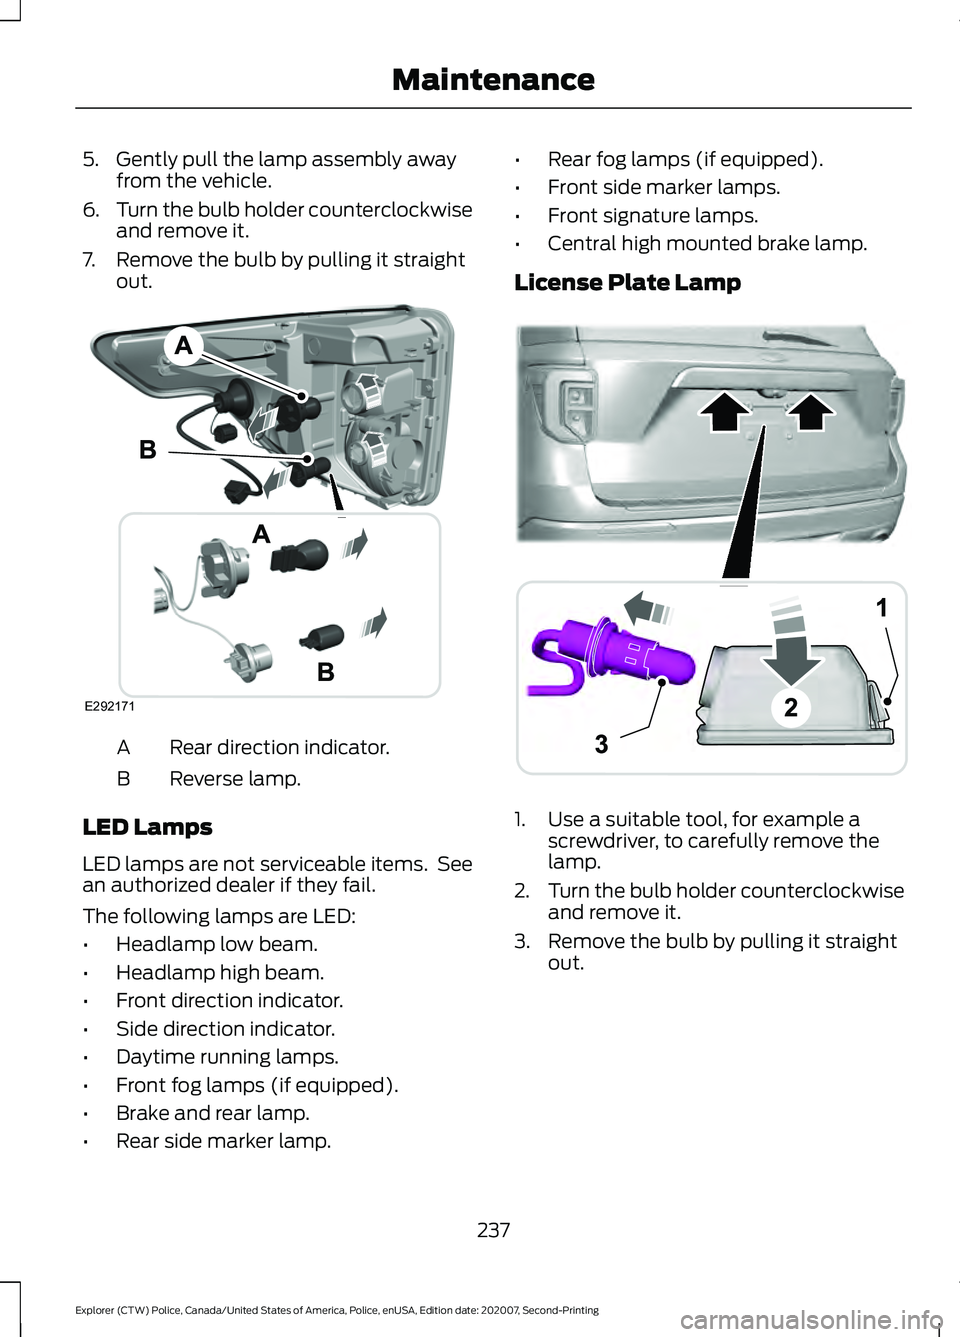
5. Gently pull the lamp assembly away
from the vehicle.
6. Turn the bulb holder counterclockwise
and remove it.
7. Remove the bulb by pulling it straight out. Rear direction indicator.
A
Reverse lamp.
B
LED Lamps
LED lamps are not serviceable items. See
an authorized dealer if they fail.
The following lamps are LED:
• Headlamp low beam.
• Headlamp high beam.
• Front direction indicator.
• Side direction indicator.
• Daytime running lamps.
• Front fog lamps (if equipped).
• Brake and rear lamp.
• Rear side marker lamp. •
Rear fog lamps (if equipped).
• Front side marker lamps.
• Front signature lamps.
• Central high mounted brake lamp.
License Plate Lamp 1. Use a suitable tool, for example a
screwdriver, to carefully remove the
lamp.
2. Turn the bulb holder counterclockwise
and remove it.
3. Remove the bulb by pulling it straight out.
237
Explorer (CTW) Police, Canada/United States of America, Police, enUSA, Edition date: 202007, Second-Printing MaintenanceE292171 A
B
A
12
203A
AE292276
Page 304 of 412
Materials
Specification
Name
WSS-M14P19-A
Motorcraft® Premium Windshield Wash Concen-
trate with Bitterant(U.S.)
Motorcraft® Premium Quality Windshield Washer
Fluid / Liquide lave-glace de haute qualité Motor-
craft®(Canada)
ZC-32-B2(U.S.)
CXC-37-A/B/D/F(Canada)
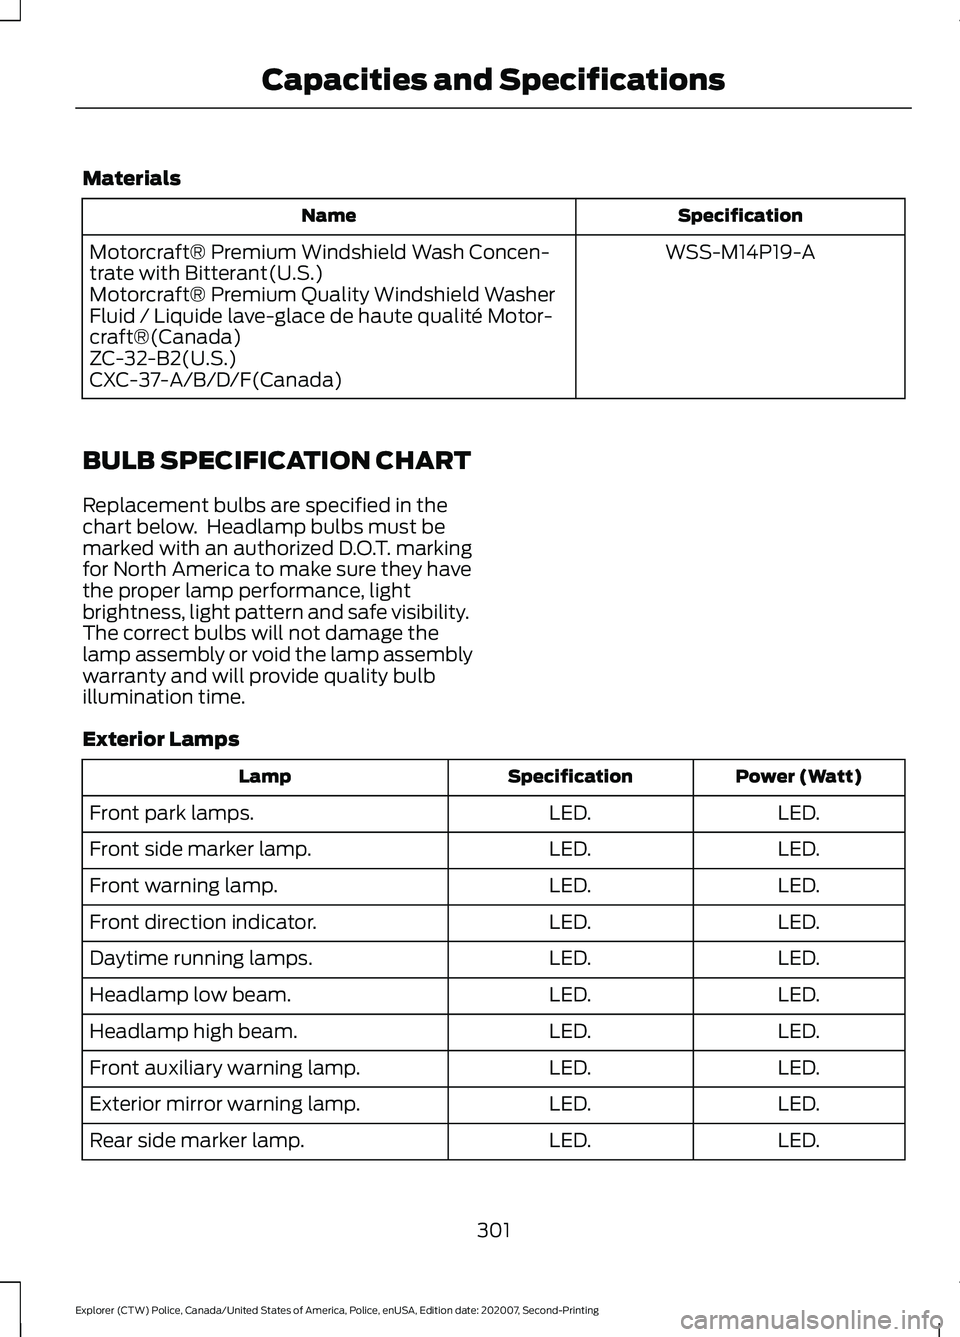
BULB SPECIFICATION CHART
Replacement bulbs are specified in the
chart below. Headlamp bulbs must be
marked with an authorized D.O.T. marking
for North America to make sure they have
the proper lamp performance, light
brightness, light pattern and safe visibility.
The correct bulbs will not damage the
lamp assembly or void the lamp assembly
warranty and will provide quality bulb
illumination time.
Exterior Lamps Power (Watt)
Specification
Lamp
LED.
LED.
Front park lamps.
LED.
LED.
Front side marker lamp.
LED.
LED.
Front warning lamp.
LED.
LED.
Front direction indicator.
LED.
LED.
Daytime running lamps.
LED.
LED.
Headlamp low beam.
LED.
LED.
Headlamp high beam.
LED.
LED.
Front auxiliary warning lamp.
LED.
LED.
Exterior mirror warning lamp.
LED.
LED.
Rear side marker lamp.
301
Explorer (CTW) Police, Canada/United States of America, Police, enUSA, Edition date: 202007, Second-Printing Capacities and Specifications