window FORD POLICE INTERCEPTOR UTILITY 2014 1.G User Guide
[x] Cancel search | Manufacturer: FORD, Model Year: 2014, Model line: POLICE INTERCEPTOR UTILITY, Model: FORD POLICE INTERCEPTOR UTILITY 2014 1.GPages: 406, PDF Size: 6.86 MB
Page 94 of 406
EXTERIOR MIRRORS
Power Exterior Mirrors
WARNING:Do not adjust the mirror while your vehicle is in
motion.
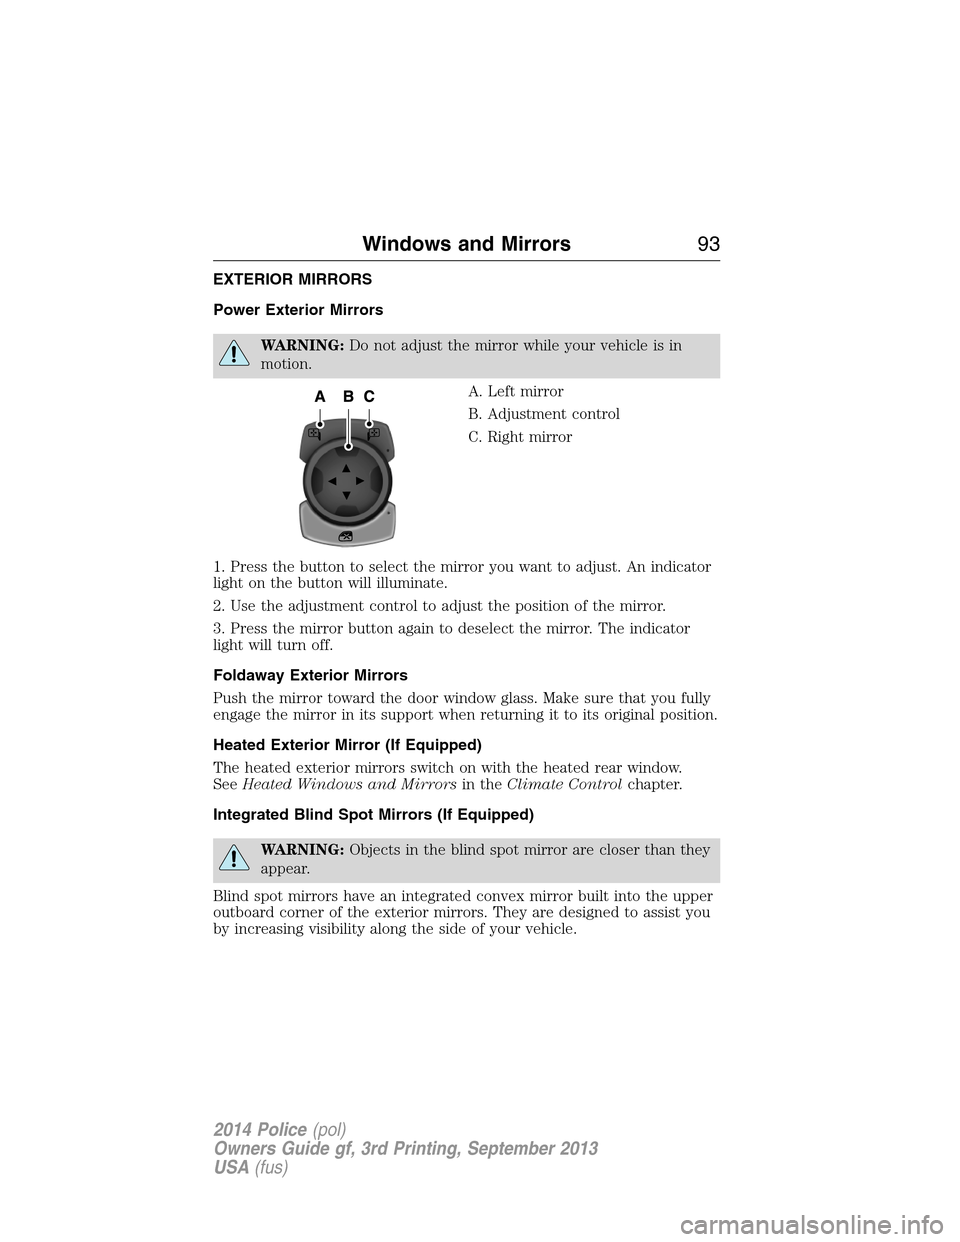
A. Left mirror
B. Adjustment control
C. Right mirror
1. Press the button to select the mirror you want to adjust. An indicator
light on the button will illuminate.
2. Use the adjustment control to adjust the position of the mirror.
3. Press the mirror button again to deselect the mirror. The indicator
light will turn off.
Foldaway Exterior Mirrors
Push the mirror toward the door window glass. Make sure that you fully
engage the mirror in its support when returning it to its original position.
Heated Exterior Mirror (If Equipped)
The heated exterior mirrors switch on with the heated rear window.
SeeHeated Windows and Mirrorsin theClimate Controlchapter.
Integrated Blind Spot Mirrors (If Equipped)
WARNING:Objects in the blind spot mirror are closer than they
appear.
Blind spot mirrors have an integrated convex mirror built into the upper
outboard corner of the exterior mirrors. They are designed to assist you
by increasing visibility along the side of your vehicle.
Windows and Mirrors93
2014 Police(pol)
Owners Guide gf, 3rd Printing, September 2013
USA(fus)
Page 95 of 406
Check the main mirror first before a lane change, then check the blind
spot mirror. If no vehicles are present in the blind spot mirror and the
traffic in the adjacent lane is at a safe distance, signal that you are going
to change lanes. Glance over your shoulder to verify traffic is clear, and
carefully change lanes.
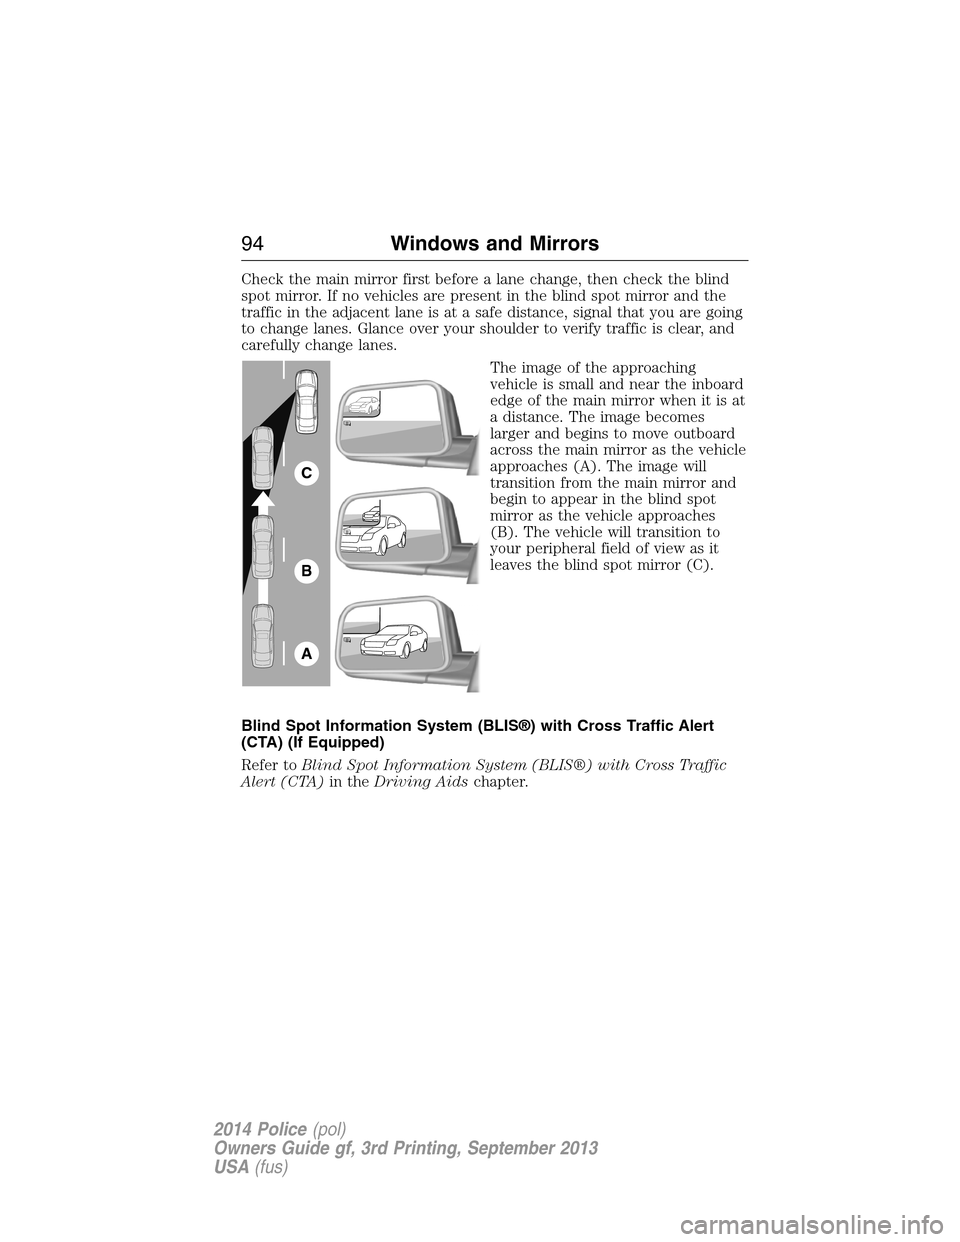
The image of the approaching
vehicle is small and near the inboard
edge of the main mirror when it is at
a distance. The image becomes
larger and begins to move outboard
across the main mirror as the vehicle
approaches (A). The image will
transition from the main mirror and
begin to appear in the blind spot
mirror as the vehicle approaches
(B). The vehicle will transition to
your peripheral field of view as it
leaves the blind spot mirror (C).
Blind Spot Information System (BLIS®) with Cross Traffic Alert
(CTA) (If Equipped)
Refer toBlind Spot Information System (BLIS®) with Cross Traffic
Alert (CTA)in theDriving Aidschapter.
A
B
C
94Windows and Mirrors
2014 Police(pol)
Owners Guide gf, 3rd Printing, September 2013
USA(fus)
Page 96 of 406
INTERIOR MIRROR
WARNING:Do not adjust the mirror when your vehicle is
moving.
Note:Do not clean the housing or glass of any mirror with harsh
abrasives, fuel or other petroleum or ammonia based cleaning products.
You can adjust the interior mirror to your preference. Some mirrors also
have a second pivot point. This lets you move the mirror head up or
down and from side to side.
Pull the tab below the mirror toward you to reduce glare at night.
Auto-Dimming Mirror (If Equipped)
Note:Do not block the sensors on the front and back of the mirror.
Mirror performance may be affected. A rear center passenger or raised
rear center head restraint may also block light from reaching the sensor.
The mirror will dim automatically to reduce glare when bright lights are
detected from behind your vehicle. It will automatically return to normal
reflection when you select reverse gear to make sure you have a clear
view when backing up.
SUN VISORS
Slide-On-Rod
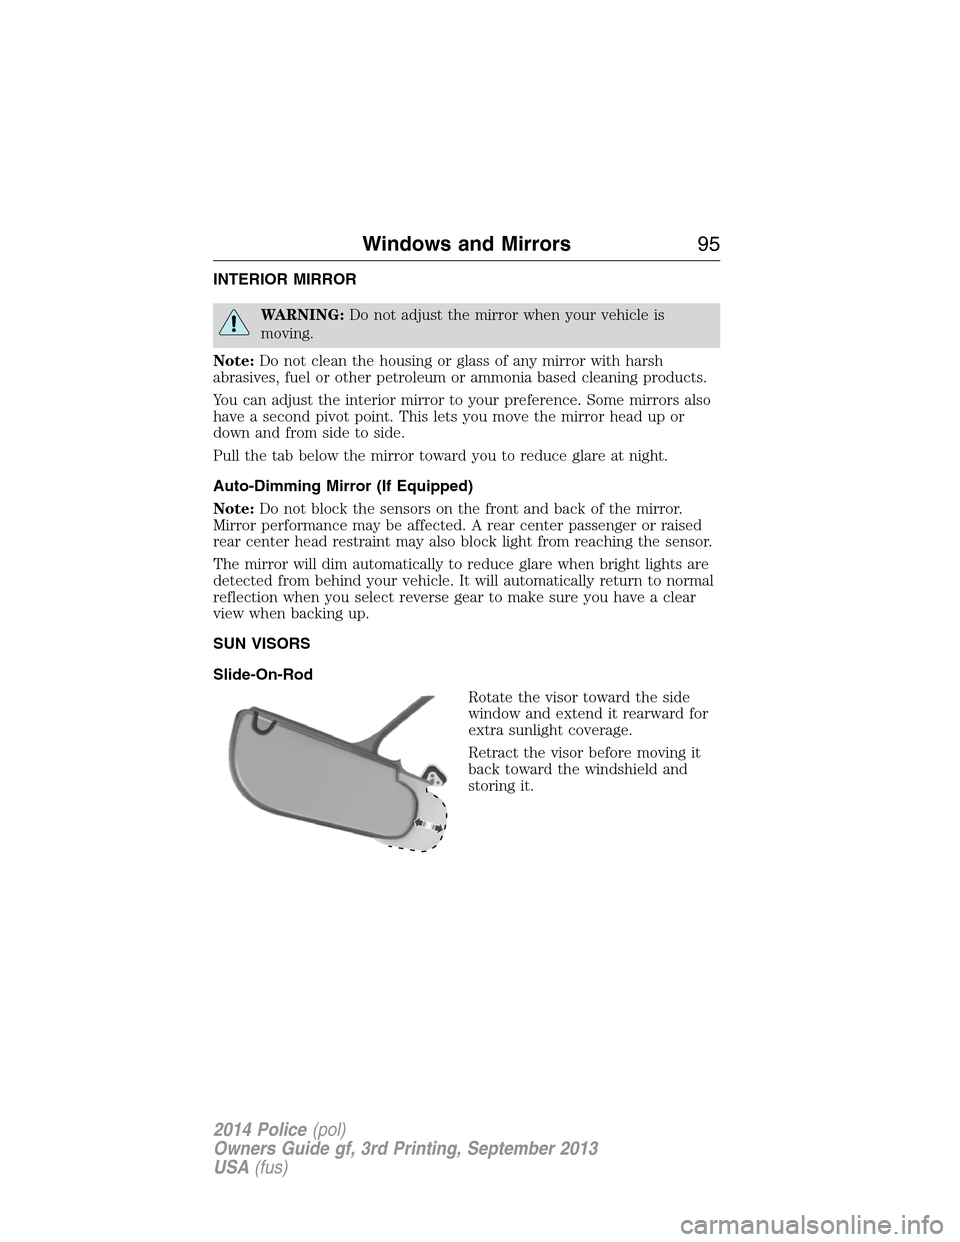
Rotate the visor toward the side
window and extend it rearward for
extra sunlight coverage.
Retract the visor before moving it
back toward the windshield and
storing it.
Windows and Mirrors95
2014 Police(pol)
Owners Guide gf, 3rd Printing, September 2013
USA(fus)
Page 115 of 406
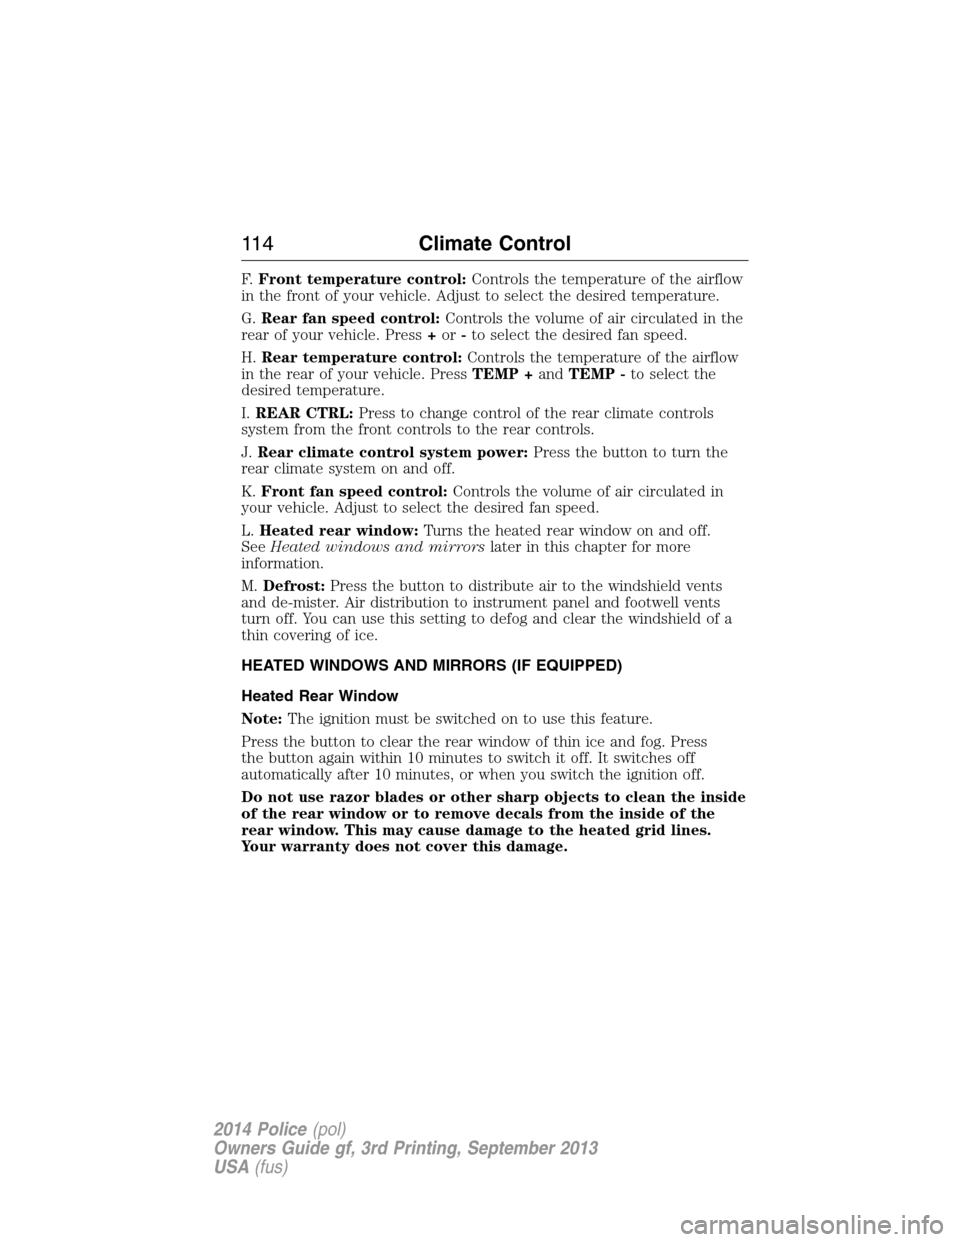
F.Front temperature control:Controls the temperature of the airflow
in the front of your vehicle. Adjust to select the desired temperature.
G.Rear fan speed control:Controls the volume of air circulated in the
rear of your vehicle. Press+or-to select the desired fan speed.
H.Rear temperature control:Controls the temperature of the airflow
in the rear of your vehicle. PressTEMP +andTEMP -to select the
desired temperature.
I.REAR CTRL:Press to change control of the rear climate controls
system from the front controls to the rear controls.
J.Rear climate control system power:Press the button to turn the
rear climate system on and off.
K.Front fan speed control:Controls the volume of air circulated in
your vehicle. Adjust to select the desired fan speed.
L.Heated rear window:Turns the heated rear window on and off.
SeeHeated windows and mirrorslater in this chapter for more
information.
M.Defrost:Press the button to distribute air to the windshield vents
and de-mister. Air distribution to instrument panel and footwell vents
turn off. You can use this setting to defog and clear the windshield of a
thin covering of ice.
HEATED WINDOWS AND MIRRORS (IF EQUIPPED)
Heated Rear Window
Note:The ignition must be switched on to use this feature.
Press the button to clear the rear window of thin ice and fog. Press
the button again within 10 minutes to switch it off. It switches off
automatically after 10 minutes, or when you switch the ignition off.
Do not use razor blades or other sharp objects to clean the inside
of the rear window or to remove decals from the inside of the
rear window. This may cause damage to the heated grid lines.
Your warranty does not cover this damage.
11 4Climate Control
2014 Police(pol)
Owners Guide gf, 3rd Printing, September 2013
USA(fus)
Page 116 of 406
Heated Exterior Mirrors (If Equipped)
Note:Do not remove ice from the mirrors with a scraper or attempt to
readjust the mirror glass that has frozen in place. These actions could
cause damage to the glass and mirrors.
Note:Do not clean the housing or glass of any mirror with harsh
abrasives, fuel or other petroleum-based cleaning products.
Both mirrors heat to remove ice, mist and fog when you switch on the
heated rear window.
CABIN AIR FILTER
Note:Make sure you have a cabin air filter installed at all times. This
prevents foreign objects from entering the system. Running the system
without a filter in place could result in degradation or damage to the
system.
Your vehicle is equipped with a cabin air filter, which is located just in
front of the windshield under the cowl grille on the passenger side of
your vehicle.
The particulate air filtration system reduces the concentration of
airborne particles, such as dust, spores and pollen, in the air supplied to
the interior of your vehicle. The particulate filtration system gives the
following benefits to customers:
•Improves the customer’s driving comfort by reducing particle
concentration.
•Improves the interior compartment cleanliness.
•Protects the climate control components from particle deposits.
For more information regarding the interval at which you should replace
the cabin air filter, see theScheduled Maintenancechapter.
For additional cabin air filter information, or to replace the filter, see an
authorized dealer.
Climate Control11 5
2014 Police(pol)
Owners Guide gf, 3rd Printing, September 2013
USA(fus)
Page 131 of 406
Important Ventilating Information
If you stop your vehicle and leave the engine idling for long periods, we
recommend that you do one of the following:
•Open the windows at least 1 inch (2.5 centimeters).
•Set your climate control to outside air.
ENGINE BLOCK HEATER (IF EQUIPPED)
WARNING:Failure to follow engine block heater instructions
could result in property damage or personal injury.
WARNING:Do not use your heater with ungrounded electrical
systems or two-pronged (cheater) adapters. There is a risk of
electrical shock.
Note:The heater is most effective when outdoor temperatures are below
0°F (-18°C).
The heater acts as a starting aid by warming the engine coolant. This
allows the climate control system to respond quickly. The equipment
includes a heater element (installed in the engine block) and a wire
harness. You can connect the system to a grounded 120–volt A/C
electrical source.
We recommend that you do the following for safe and correct operation:
•Use a 16-gauge outdoor extension cord that is product certified
by Underwriter’s Laboratory or Canadian Standards Association.
This extension cord must be suitable for use outdoors, in cold
temperatures, and be clearly markedSuitable for Use with Outdoor
Appliances.Never use an indoor extension cord outdoors; it could
result in an electric shock or become a fire hazard.
•Use as short an extension cord as possible.
•Do not use multiple extension cords.
•Make sure that when in operation, the extension cord plug and the
heater cord plug connections are free and clear of water. This could
cause an electric shock or fire.
130Starting and Stopping the Engine
2014 Police(pol)
Owners Guide gf, 3rd Printing, September 2013
USA(fus)
Page 191 of 406
BREAKING-IN
You need to break in new tires for approximately 300 miles
(480 kilometers). During this time, your vehicle may exhibit some unique
driving characteristics. Avoid driving too fast during the first 1000 miles
(1600 kilometers). Vary your speed frequently and change up through
the gears early. Do not labor the engine. Do not tow during the first
1000 miles (1600 kilometers).
ECONOMICAL DRIVING
Fuel economy is affected by several things, such as how you drive, the
conditions you drive under and how you maintain your vehicle.
There are some things to keep in mind that may improve your fuel
economy:
•Accelerate and slow down in a smooth, moderate fashion.
•Drive at steady speeds without stopping.
•Anticipate stops; slowing down may eliminate the need to stop.
•Combine errands and minimize stop-and-go driving.
•Close the windows for high-speed driving.
•Drive at reasonable speeds (traveling at 55 mph [88 km/h] uses 15%
less fuel than traveling at 65 mph [105 km/h]).
•Keep the tires properly inflated and use only the recommended size.
•Use the recommended engine oil.
•Perform all regularly scheduled maintenance.
There are also some things you may not want to do because they may
reduce your fuel economy:
•Sudden or hard accelerations.
•Rev the engine before turning it off.
•Idle for periods longer than one minute.
•Warm up your vehicle on cold mornings.
•Use the air conditioner or front defroster.
•Use the speed control in hilly terrain.
•Rest your foot on the brake pedal while driving.
190Driving Hints
2014 Police(pol)
Owners Guide gf, 3rd Printing, September 2013
USA(fus)
Page 210 of 406
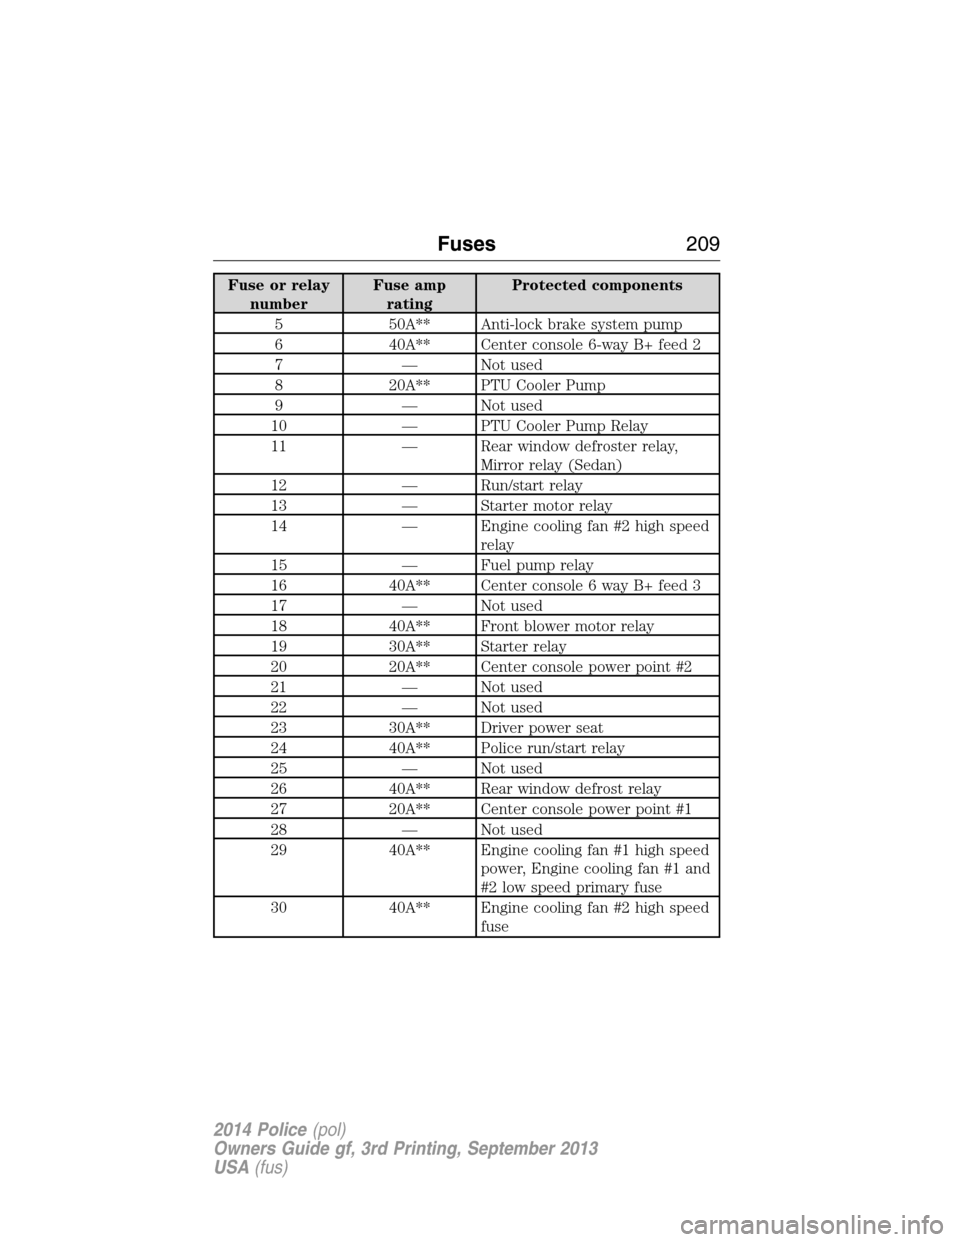
Fuse or relay
numberFuse amp
ratingProtected components
5 50A** Anti-lock brake system pump
6 40A** Center console 6-way B+ feed 2
7 — Not used
8 20A** PTU Cooler Pump
9 — Not used
10 — PTU Cooler Pump Relay
11 — Rear window defroster relay,
Mirror relay (Sedan)
12 — Run/start relay
13 — Starter motor relay
14 — Engine cooling fan #2 high speed
relay
15 — Fuel pump relay
16 40A** Center console 6 way B+ feed 3
17 — Not used
18 40A** Front blower motor relay
19 30A** Starter relay
20 20A** Center console power point #2
21 — Not used
22 — Not used
23 30A** Driver power seat
24 40A** Police run/start relay
25 — Not used
26 40A** Rear window defrost relay
27 20A** Center console power point #1
28 — Not used
29 40A** Engine cooling fan #1 high speed
power, Engine cooling fan #1 and
#2 low speed primary fuse
30 40A** Engine cooling fan #2 high speed
fuse
Fuses209
2014 Police(pol)
Owners Guide gf, 3rd Printing, September 2013
USA(fus)
Page 214 of 406
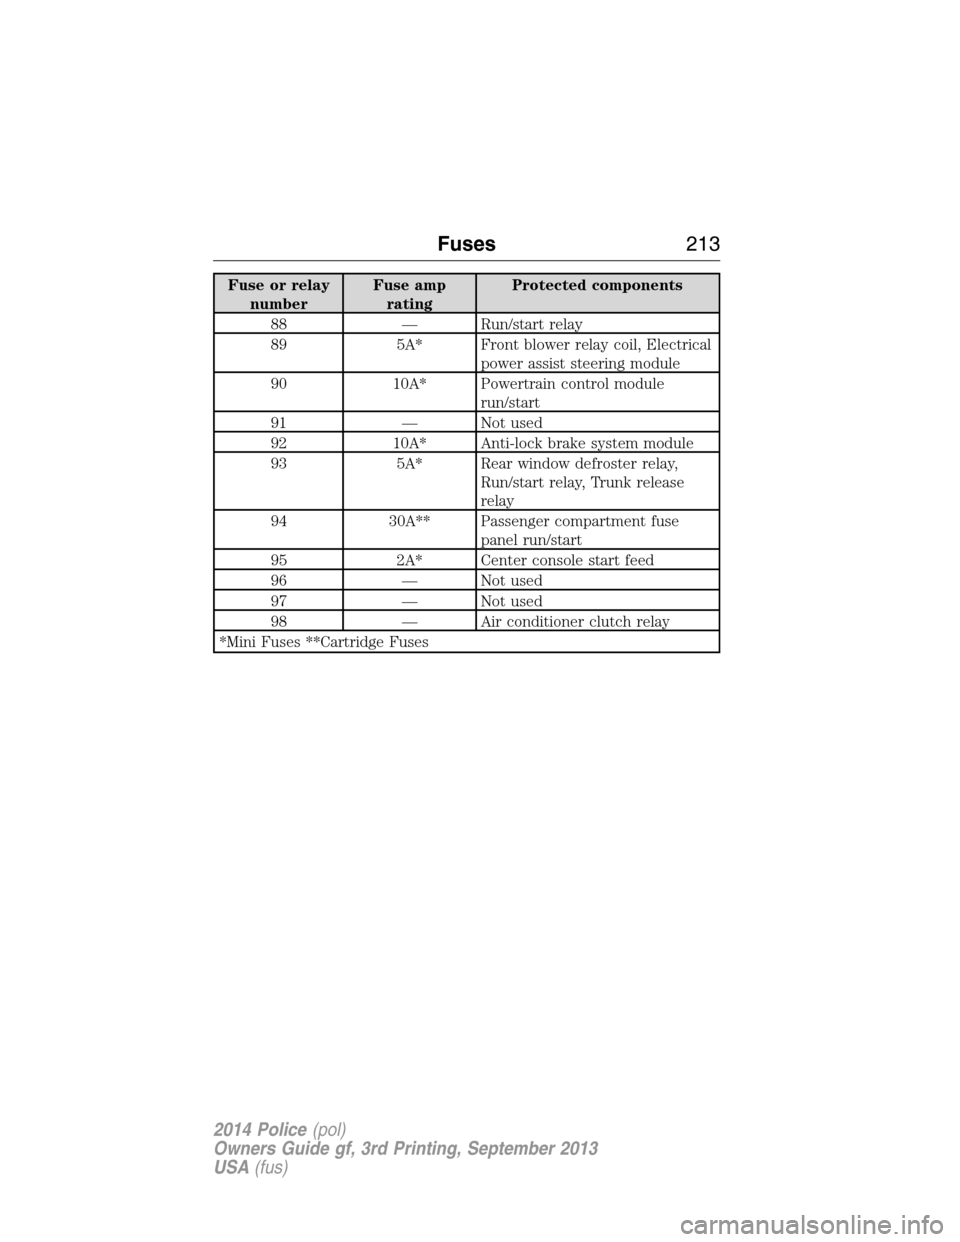
Fuse or relay
numberFuse amp
ratingProtected components
88 — Run/start relay
89 5A* Front blower relay coil, Electrical
power assist steering module
90 10A* Powertrain control module
run/start
91 — Not used
92 10A* Anti-lock brake system module
93 5A* Rear window defroster relay,
Run/start relay, Trunk release
relay
94 30A** Passenger compartment fuse
panel run/start
95 2A* Center console start feed
96 — Not used
97 — Not used
98 — Air conditioner clutch relay
*Mini Fuses **Cartridge Fuses
Fuses213
2014 Police(pol)
Owners Guide gf, 3rd Printing, September 2013
USA(fus)
Page 215 of 406
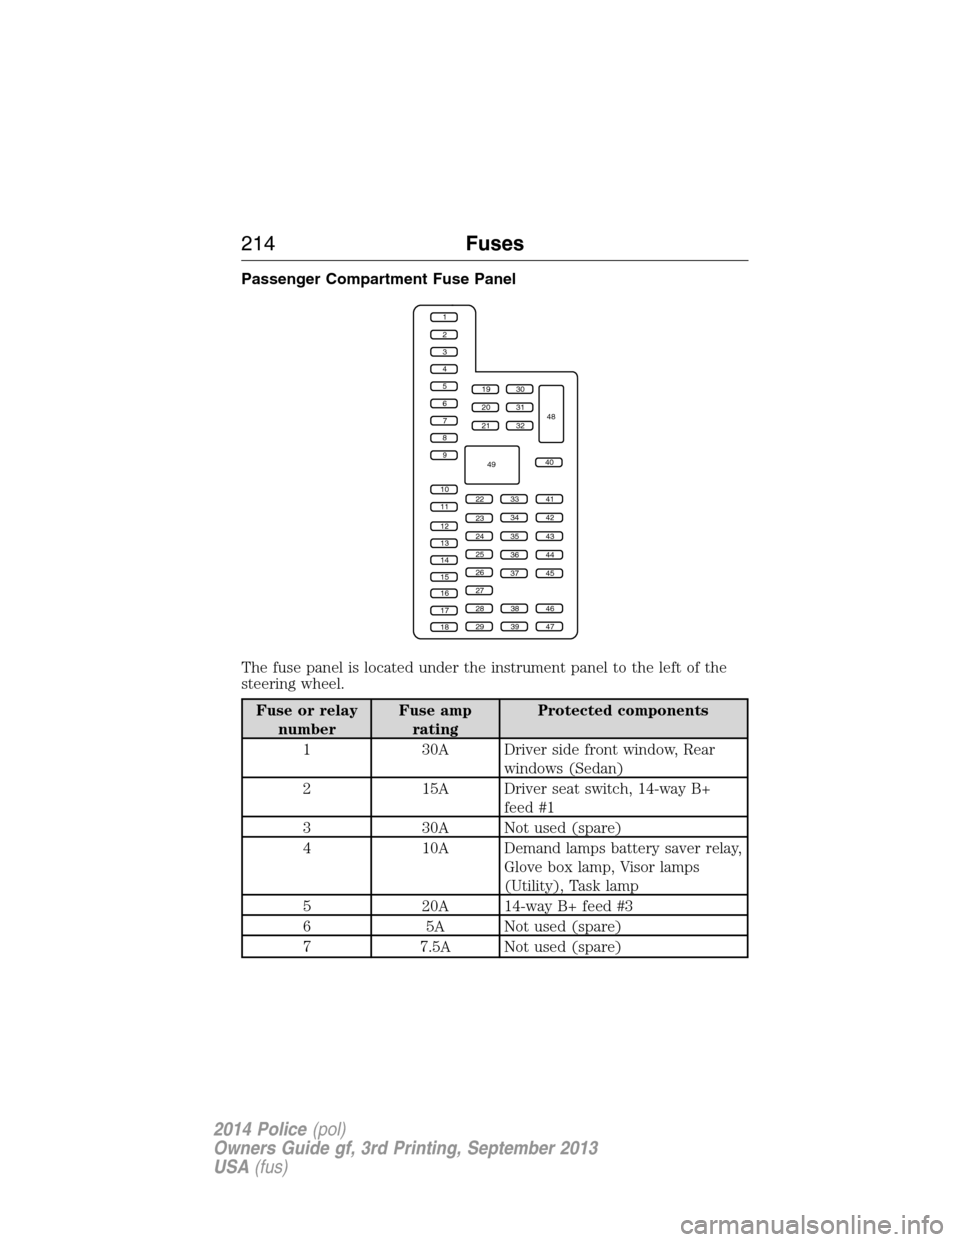
Passenger Compartment Fuse Panel
The fuse panel is located under the instrument panel to the left of the
steering wheel.
Fuse or relay
numberFuse amp
ratingProtected components
1 30A Driver side front window, Rear
windows (Sedan)
2 15A Driver seat switch, 14-way B+
feed #1
3 30A Not used (spare)
4 10A Demand lamps battery saver relay,
Glove box lamp, Visor lamps
(Utility), Task lamp
5 20A 14-way B+ feed #3
6 5A Not used (spare)
7 7.5A Not used (spare)
1
2
3
4
5
6
7
8
9
10
11
12
13
14
15
16
17
18
19
20
21
223341
42
43
44
45
34
35
36
37
23
24
25
26
27
283846
394729
32
40
31
30
48
49
214Fuses
2014 Police(pol)
Owners Guide gf, 3rd Printing, September 2013
USA(fus)