battery FORD POLICE INTERCEPTOR UTILITY 2015 1.G User Guide
[x] Cancel search | Manufacturer: FORD, Model Year: 2015, Model line: POLICE INTERCEPTOR UTILITY, Model: FORD POLICE INTERCEPTOR UTILITY 2015 1.GPages: 398, PDF Size: 6.24 MB
Page 118 of 398
AUXILIARY POWER POINTS
WARNING:Do not plug optional electrical accessories into the
cigarette lighter socket (if equipped). Improper use of the lighter
can cause damage not covered by your warranty, and can result in fire
or serious injury.
Note:If used when the engine is not running, the battery will discharge.
There may be insufficient power to restart your engine.
Note:Do not insert objects other than an accessory plug into the power
point. This will damage the outlet and blow the fuse.
Note:Do not hang any type of accessory or accessory bracket from the
plug.
Note:Do not use the power point over the vehicle capacity of 12 volts
DC 180 watts or a fuse may blow.
Note:Do not use the power point for operating a cigarette lighter
element.
Note:Improper use of the power outlet can cause damage not covered
by your warranty.
Note:Always keep the power point caps closed when not being used.
Run the engine for full capacity use of the power point. To prevent the
battery from being discharged:
•Do not use the power point longer than necessary when the engine is
not running.
•Do not leave devices plugged in overnight or when the vehicle is
parked for extended periods.
Locations
Power points may be found:
•on the instrument panel
•inside the center console storage compartment
•on the rear of the center console (utility only).
Auxiliary Power Points11 7
2015 Police(pol)
Owners Guide gf, 1st Printing, April 2014
USA(fus)
Page 121 of 398
GENERAL INFORMATION
WARNING:Extended idling at high engine speeds can produce
very high temperatures in the engine and exhaust system,
creating the risk of fire or other damage.
WARNING:Do not park, idle, or drive your vehicle on dry grass
or other dry ground cover. The emission system heats up the
engine compartment and exhaust system, which can start a fire.
WARNING:Do not start your vehicle in a closed garage or in
other enclosed areas. Exhaust fumes can be toxic. Always open
the garage door before you start the engine.
WARNING:If you smell exhaust fumes inside your vehicle, have
your vehicle checked by an authorized dealer immediately. Do
not drive if you smell exhaust fumes.
If you disconnect the battery, your vehicle may exhibit some unusual
driving characteristics for approximately 5 miles (8 kilometers) after you
connect it. This is because the engine management system must realign
itself with the engine. You may disregard any unusual driving
characteristics during this period.
The powertrain control system meets all Canadian interference-causing
equipment standard requirements regulating the impulse electrical field
or radio noise.
Do not press the accelerator pedal while starting the engine. If you have
difficulty starting the engine, seeFailure to startlater in this section.
120Starting and Stopping the Engine
2015 Police(pol)
Owners Guide gf, 1st Printing, April 2014
USA(fus)
Page 122 of 398
IGNITION SWITCH
Note:Do not store the key in the ignition after the vehicle is turned off
and you have left the vehicle. This could cause a drain on the battery.
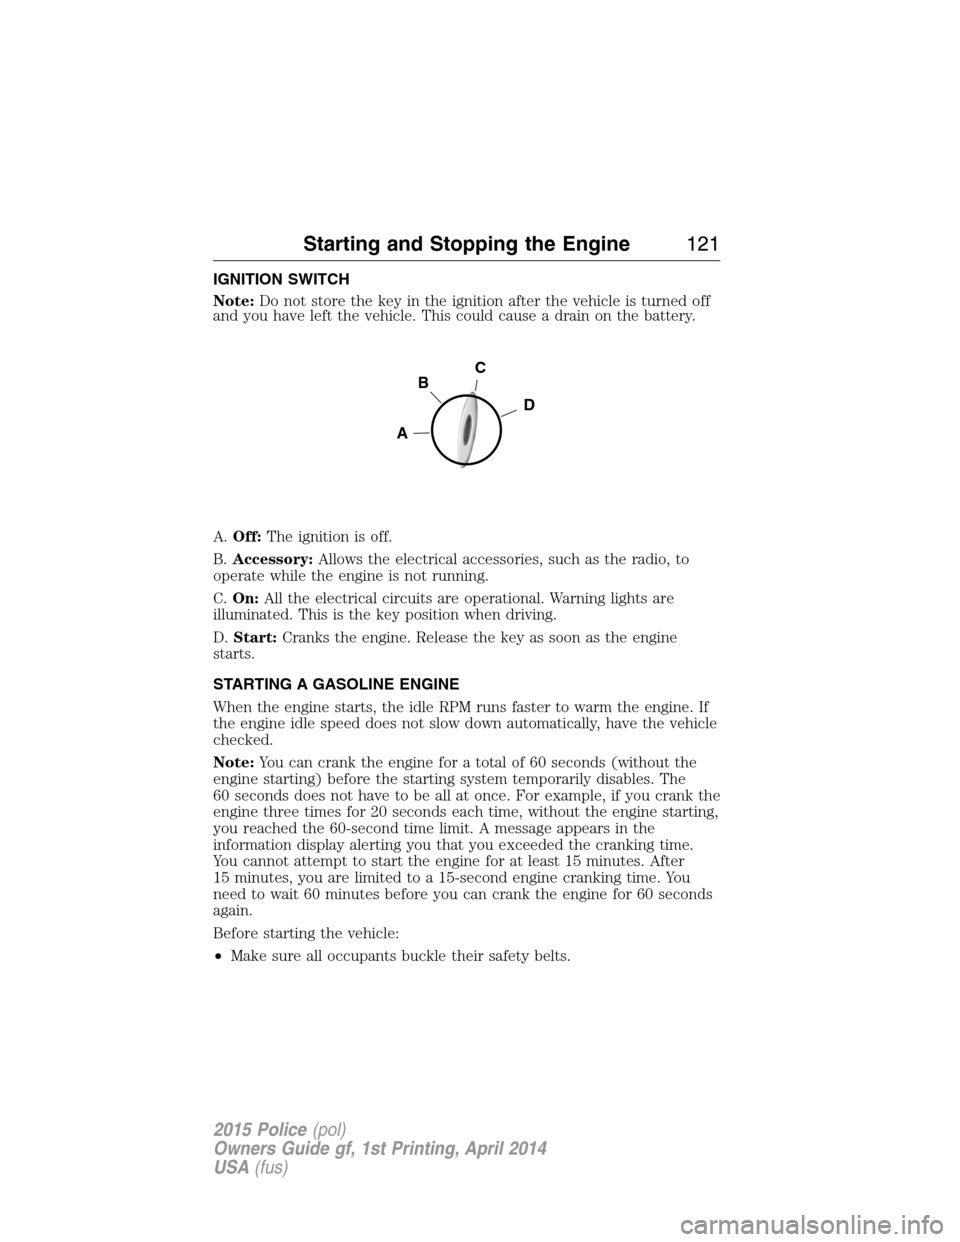
A.Off:The ignition is off.
B.Accessory:Allows the electrical accessories, such as the radio, to
operate while the engine is not running.
C.On:All the electrical circuits are operational. Warning lights are
illuminated. This is the key position when driving.
D.Start:Cranks the engine. Release the key as soon as the engine
starts.
STARTING A GASOLINE ENGINE
When the engine starts, the idle RPM runs faster to warm the engine. If
the engine idle speed does not slow down automatically, have the vehicle
checked.
Note:You can crank the engine for a total of 60 seconds (without the
engine starting) before the starting system temporarily disables. The
60 seconds does not have to be all at once. For example, if you crank the
engine three times for 20 seconds each time, without the engine starting,
you reached the 60-second time limit. A message appears in the
information display alerting you that you exceeded the cranking time.
You cannot attempt to start the engine for at least 15 minutes. After
15 minutes, you are limited to a 15-second engine cranking time. You
need to wait 60 minutes before you can crank the engine for 60 seconds
again.
Before starting the vehicle:
•Make sure all occupants buckle their safety belts.
C
D
B
A
Starting and Stopping the Engine121
2015 Police(pol)
Owners Guide gf, 1st Printing, April 2014
USA(fus)
Page 137 of 398
Readiness for Inspection/Maintenance (I/M) Testing
Some state, provincial and local governments may have
Inspection/Maintenance (I/M) programs to inspect the emission control
equipment on your vehicle. Failure to pass this inspection could prevent
you from getting a vehicle registration.
If the service engine soon indicator is on or the bulb does not
work, the vehicle may need to be serviced. SeeOn-board
Diagnostics (OBD-II)in this chapter.
Your vehicle may not pass the I/M test if the service engine soon
indicator is on or not working properly (bulb is burned out), or if the
OBD-II system has determined that some of the emission control systems
have not been properly checked. In this case, the vehicle is considered
not ready for I/M testing.
If the vehicle’s engine or transmission has just been serviced, or the
battery has recently run down or been replaced, the OBD-II system may
indicate that the vehicle is not ready for I/M testing. To determine if the
vehicle is ready for I/M testing, turn the ignition key to the on position
for 15 seconds without cranking the engine. If the service engine soon
indicator blinks eight times, it means that the vehicle is not ready for I/M
testing; if the service engine soon indicator stays on solid, it means that
the vehicle is ready for I/M testing.
The OBD-II system is designed to check the emission control system
during normal driving. A complete check may take several days. If the
vehicle is not ready for I/M testing, the following driving cycle consisting
of mixed city and highway driving may be performed:
15 minutes of steady driving on an expressway or highway followed by
20 minutes of stop-and-go driving with at least four 30-second idle
periods.
Allow the vehicle to sit for at least eight hours without starting the
engine. Then, start the engine and complete the above driving cycle. The
engine must warm up to its normal operating temperature. Once the
engine is started, do not turn off the engine until the above driving cycle
is complete. If the vehicle is still not ready for I/M testing, the above
driving cycle will have to be repeated.
136Fuel and Refueling
2015 Police(pol)
Owners Guide gf, 1st Printing, April 2014
USA(fus)
Page 139 of 398

L (Low Gear)
The low button is located at the end
of the column shifter. Activating (L)
Low Gear automatically:
•Provides maximum engine
braking.
•Will downshift to the lowest
available gear for the current
vehicle speed; allows for first
gear when vehicle reaches lower
speeds.
•Is not intended for use under extended or normal driving conditions
and results in lower fuel economy.
Automatic Transmission Adaptive Learning
This feature is designed to increase durability and provide consistent
shift feel over the life of the vehicle. A new vehicle or transmission may
have firm shifts, soft shifts or both. This operation is considered normal
and will not affect function or durability of the transmission. Over time,
the adaptive learning process will fully update transmission operation.
Additionally, whenever the battery is disconnected or a new battery
installed, the strategy must be relearned.
If Your Vehicle Gets Stuck in Mud or Snow
Note:Do not rock the vehicle if the engine is not at normal operating
temperature or damage to the transmission may occur.
Note:Do not rock the vehicle for more than a minute or damage to the
transmission and tires may occur, or the engine may overheat.
If your vehicle gets stuck in mud or snow, it may be rocked out by
shifting between forward and reverse gears, stopping between shifts in a
steady pattern. Press lightly on the accelerator in each gear.
LOW GEAR
138Transmission
2015 Police(pol)
Owners Guide gf, 1st Printing, April 2014
USA(fus)
Page 188 of 398
ROADSIDE ASSISTANCE
Vehicles Sold in the United States: Getting Roadside Assistance
To fully assist you should you have a vehicle concern, Ford Motor
Company offers a complimentary Roadside Assistance program. This
program is separate from the New Vehicle Limited Warranty. The service
is available:
•24 hours a day, seven days a week.
•For the coverage period listed on the Roadside Assistance Card
included in your Owner’s Manual portfolio.
Roadside assistance will cover:
•A flat tire change with a good spare (except vehicles that have been
supplied with a tire inflation kit).
•Battery jump start.
•Lock-out assistance (key replacement cost is the customer’s
responsibility).
•Fuel delivery – Independent Service Contractors, if not prohibited by
state, local or municipal law, shall deliver up to 2.0 gallons (7.5 liters)
of gasoline or 5.0 gallons (18.9 liters) of diesel fuel to a disabled
vehicle. Fuel delivery service is limited to two no-charge occurrences
within a 12-month period.
•Winch out – available within 100 feet (30.5 meters) of a paved or
county maintained road, no recoveries.
•Towing – Ford eligible vehicles will be towed to an authorized dealer
within 35 miles (56.3 kilometers) of the disablement location or to the
nearest authorized dealer. If a member requests to be towed to an
authorized dealer more than 35 miles (56.3 kilometers) from the
disablement location, the member shall be responsible for any mileage
costs in excess of 35 miles (56.3 kilometers).
Roadside Assistance will include up to $200 coverage for a towed trailer
if the disabled eligible vehicle requires service at the nearest authorized
dealer. If the towing vehicle is operational but the trailer is not, then the
trailer does not qualify for any roadside services.
Vehicles Sold in the United States: Using Roadside Assistance
Complete the roadside assistance identification card and place it in your
wallet for quick reference. This card is found in the owner’s manual
portfolio in the glove compartment.
Roadside Emergencies187
2015 Police(pol)
Owners Guide gf, 1st Printing, April 2014
USA(fus)
Page 189 of 398
U.S. Ford vehicle customers who require Roadside Assistance, call
1-800-241-3673.
If you need to arrange roadside assistance for yourself, Ford Motor
Company will reimburse a reasonable amount for towing to the nearest
dealership within 35 miles (56.3 kilometers). To obtain reimbursement
information, U.S. Ford vehicle customers call 1-800-241-3673. Customers
will be asked to submit their original receipts.
Vehicles Sold in Canada: Getting Roadside Assistance
Canadian clients who require roadside assistance, call 1-800-665-2006.
Vehicles Sold in Canada: Using Roadside Assistance
For your convenience, you may complete the roadside assistance
identification card found in the centerfold of this warranty guide and
retain for future reference.
Canadian roadside coverage and benefits may differ from the U.S.
coverage. If you require more information, please refer to the coverage
section of your warranty guide, call us in Canada at 1-800-665-2006 or
visit our website at www.ford.ca.
HAZARD WARNING FLASHERS
The hazard flasher control is located on the instrument panel
by the radio. Use it when your vehicle is disabled and is
creating a safety hazard for other motorists.
•Press the flasher control and all front and rear direction signals will
flash.
•Press the flasher control again to turn them off.
Note:With extended use, the flashers may run down your 12–volt
battery.
FUEL SHUTOFF
WARNING:Failure to inspect and if necessary repair fuel leaks
after a collision may increase the risk of fire and serious injury.
Ford Motor Company recommends that the fuel system be inspected by
an authorized dealer after any collision.
In the event of a moderate to severe collision, this vehicle is equipped
with a fuel pump shut-off feature that stops the flow of fuel to the
engine. Not every impact will cause a shut-off.
188Roadside Emergencies
2015 Police(pol)
Owners Guide gf, 1st Printing, April 2014
USA(fus)
Page 190 of 398
Should your vehicle shut off after a collision, you may restart your
vehicle by doing the following:
1. Switch off the ignition and wait 10 seconds.
2. Switch on the ignition.
3. Repeat steps 1 and 2 to re-enable fuel pump.
Note:When you try to restart your vehicle after a fuel shutoff, the
vehicle makes sure that various systems are safe to restart. One your
vehicle determines that the systems are safe, then the vehicle will allow
you to restart.
Note:In the event that your vehicle does not restart after your third
attempt, contact an authorized dealer.
JUMP-STARTING THE VEHICLE
WARNING:The gases around the battery can explode if exposed
to flames, sparks, or lit cigarettes. An explosion could result in
injury or vehicle damage.
WARNING:Batteries contain sulfuric acid which can burn skin,
eyes and clothing, if contacted.
Do not attempt to push-start your automatic transmission vehicle.
Automatic transmissions do not have push-start capability. Attempting to
push-start a vehicle with an automatic transmission may cause
transmission damage.
When the battery is disconnected or a new battery is installed, the
automatic transmission must relearn its shift strategy. As a result, the
transmission may exhibit a combination of firm and soft shifts. This
operation is considered normal and will not affect function or durability
of the transmission. Over time, the adaptive learning process will fully
update transmission operation.
Preparing Your Vehicle
Note:Use only a 12–volt supply to start your vehicle.
Note:Do not disconnect the battery of the disabled vehicle as this could
damage the vehicle’s electrical system.
1. Park the booster vehicle close to the hood of the disabled vehicle
making sure the two vehicles do not touch. Set the parking brake on
both vehicles and stay clear of the engine cooling fan and other moving
parts.
Roadside Emergencies189
2015 Police(pol)
Owners Guide gf, 1st Printing, April 2014
USA(fus)
Page 191 of 398
2. Check all battery terminals. Remove the positive terminal cover (if
equipped) and any excessive corrosion before you attach the battery
cables. Ensure that vent caps are tight and level.
3. Turn the heater fan on in both vehicles to protect from any electrical
surges. Turn all other accessories off.
Connecting the Jumper Cables
WARNING:Do not connect the end of the second cable to the
negative (-) terminal of the battery to be jumped. A spark may
cause an explosion of the gases that surround the battery.
Note:Do not attach the negative (-) cable to fuel lines, engine rocker
covers, the intake manifold or electrical components as grounding points.
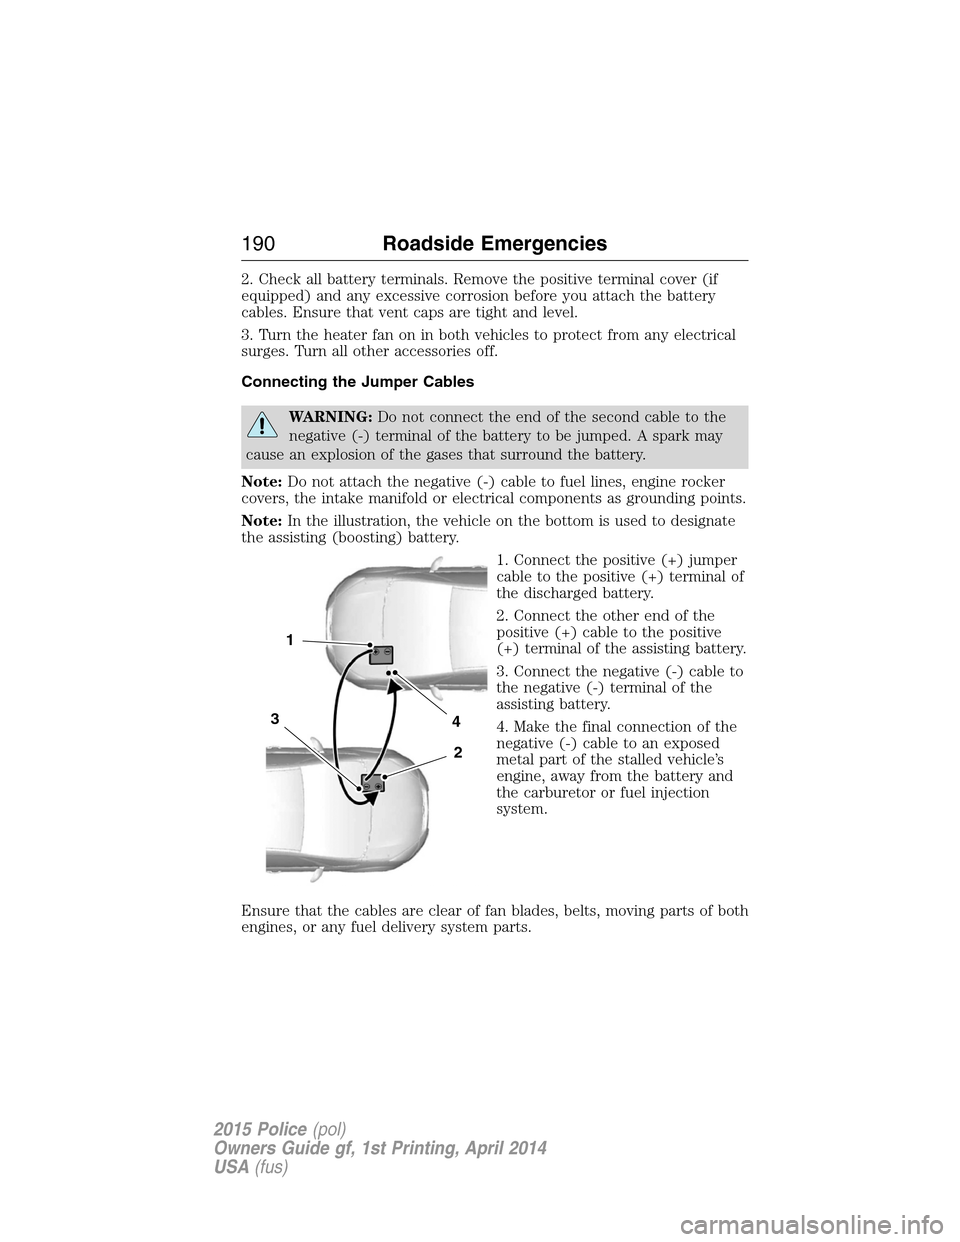
Note:In the illustration, the vehicle on the bottom is used to designate
the assisting (boosting) battery.
1. Connect the positive (+) jumper
cable to the positive (+) terminal of
the discharged battery.
2. Connect the other end of the
positive (+) cable to the positive
(+) terminal of the assisting battery.
3. Connect the negative (-) cable to
the negative (-) terminal of the
assisting battery.
4. Make the final connection of the
negative (-) cable to an exposed
metal part of the stalled vehicle’s
engine, away from the battery and
the carburetor or fuel injection
system.
Ensure that the cables are clear of fan blades, belts, moving parts of both
engines, or any fuel delivery system parts.
4
2
1
3
190Roadside Emergencies
2015 Police(pol)
Owners Guide gf, 1st Printing, April 2014
USA(fus)
Page 192 of 398

Jump Starting
1. Start the engine of the booster vehicle and run the engine at a
moderately increased speed.
2. Start the engine of the disabled vehicle.
3. Once the disabled vehicle has been started, run both engines for an
additional three minutes before disconnecting the jumper cables.
Removing the Jumper Cables
Note:In the illustration, the vehicle on the bottom is used to designate
the assisting (boosting) battery.
Remove the jumper cables in the reverse order that they were
connected.
1. Remove the jumper cable from
the ground metal surface.
2. Remove the jumper cable on the
negative (-) terminal of the booster
vehicle’s battery.
3. Remove the jumper cable from
the positive (+) terminal of the
booster vehicle’s battery.
4. Remove the jumper cable from
the positive (+) terminal of the
disabled vehicle’s battery.
After the disabled vehicle has been started and the jumper cables
removed, allow it to idle for several minutes so the engine computer can
relearn its idle conditions.
4
1
3
2
Roadside Emergencies191
2015 Police(pol)
Owners Guide gf, 1st Printing, April 2014
USA(fus)