lock FORD POLICE INTERCEPTOR UTILITY 2015 1.G Repair Manual
[x] Cancel search | Manufacturer: FORD, Model Year: 2015, Model line: POLICE INTERCEPTOR UTILITY, Model: FORD POLICE INTERCEPTOR UTILITY 2015 1.GPages: 398, PDF Size: 6.24 MB
Page 235 of 398
ADJUSTING THE HEADLAMPS
The headlamps on your vehicle are properly aimed at the assembly plant.
If your vehicle has been in an accident, an authorized dealer should
check the alignment of your headlamps.
Vertical Aim Adjustment
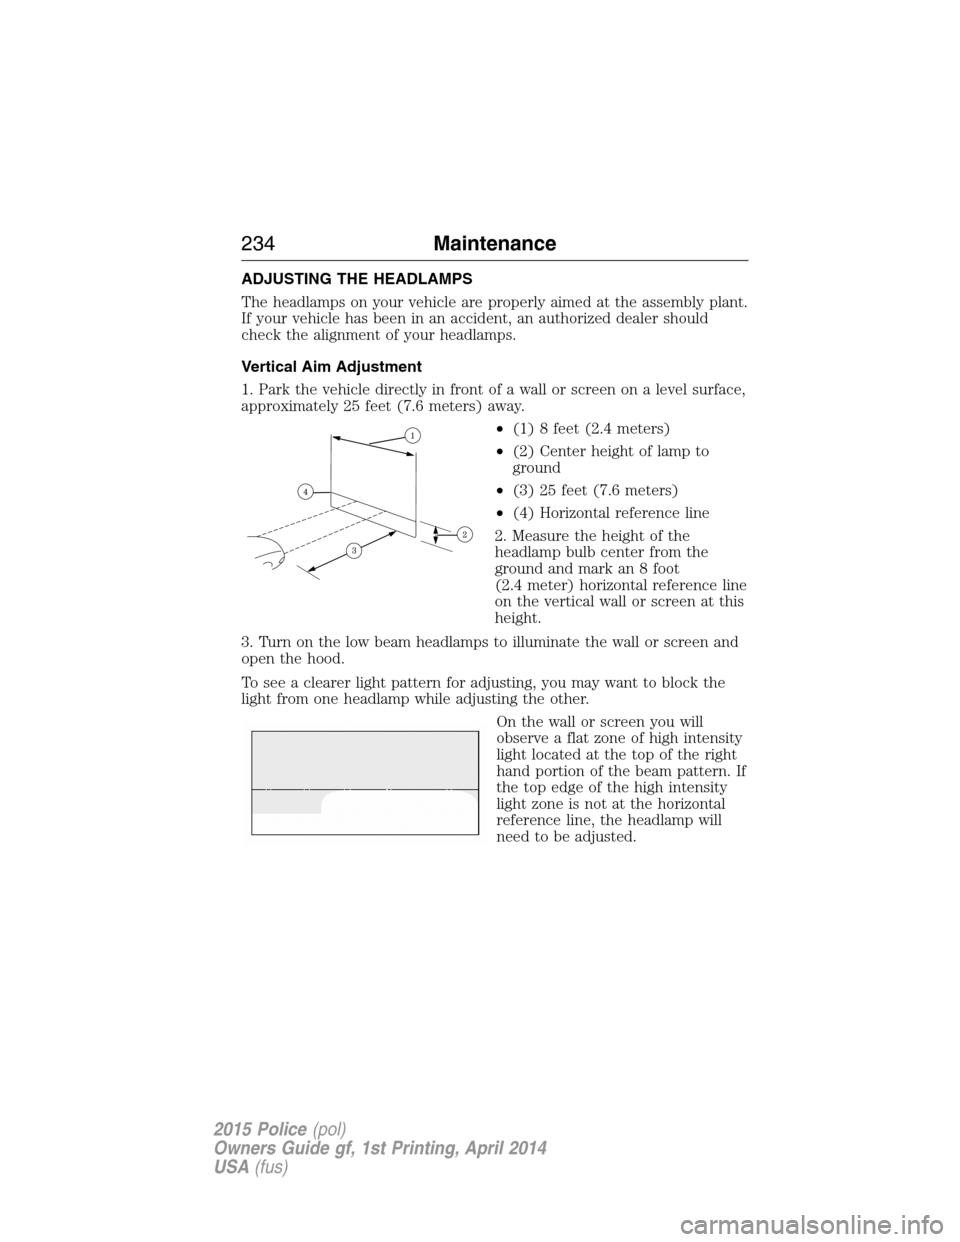
1. Park the vehicle directly in front of a wall or screen on a level surface,
approximately 25 feet (7.6 meters) away.
•(1) 8 feet (2.4 meters)
•(2) Center height of lamp to
ground
•(3) 25 feet (7.6 meters)
•(4) Horizontal reference line
2. Measure the height of the
headlamp bulb center from the
ground and mark an 8 foot
(2.4 meter) horizontal reference line
on the vertical wall or screen at this
height.
3. Turn on the low beam headlamps to illuminate the wall or screen and
open the hood.
To see a clearer light pattern for adjusting, you may want to block the
light from one headlamp while adjusting the other.
On the wall or screen you will
observe a flat zone of high intensity
light located at the top of the right
hand portion of the beam pattern. If
the top edge of the high intensity
light zone is not at the horizontal
reference line, the headlamp will
need to be adjusted.
234Maintenance
2015 Police(pol)
Owners Guide gf, 1st Printing, April 2014
USA(fus)
Page 236 of 398
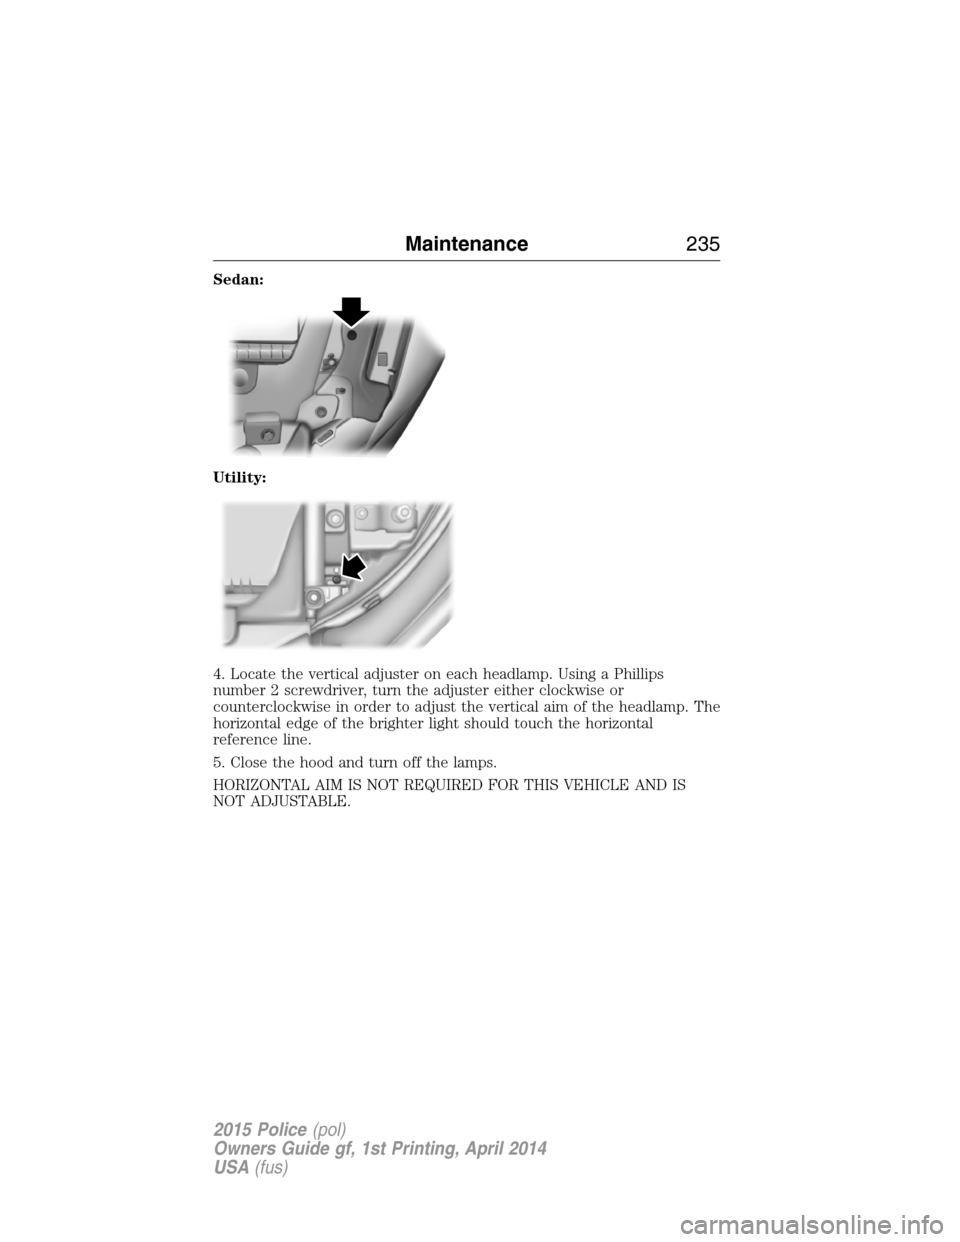
Sedan:
Utility:
4. Locate the vertical adjuster on each headlamp. Using a Phillips
number 2 screwdriver, turn the adjuster either clockwise or
counterclockwise in order to adjust the vertical aim of the headlamp. The
horizontal edge of the brighter light should touch the horizontal
reference line.
5. Close the hood and turn off the lamps.
HORIZONTAL AIM IS NOT REQUIRED FOR THIS VEHICLE AND IS
NOT ADJUSTABLE.
Maintenance235
2015 Police(pol)
Owners Guide gf, 1st Printing, April 2014
USA(fus)
Page 238 of 398

Headlamp (Sedan):
A. Front parking lamp/turn signal
bulb
B. Low/High beam headlamp bulb
C. Sidemarker bulb
Low/High beam bulbs (Sedan)
1. Make sure the headlamp switch is
in the off position, then open the
hood.
2. Reach in behind the headlamp
assembly to access the bulbs and
connectors.
3. Remove service cap.
4. Remove bulb from the headlamp
assembly by turning it
counterclockwise, then pull it
straight out.
Headlamp (Utility):
A. Low/High beam headlamp bulb
B. Front parking lamp/turn signal
bulb
C. Sidemarker bulbABC
Maintenance237
2015 Police(pol)
Owners Guide gf, 1st Printing, April 2014
USA(fus)
Page 239 of 398

Low/High beam bulbs (Utility)
1. Make sure the headlamp switch is
in the off position, then open the
hood.
2. Reach in behind the headlamp
assembly to access the bulbs and
connectors.
3. Remove service cap.
4. Turn the bulb base counterclockwise and remove
it.
5. Disconnect the electrical connector.
Reverse steps to reinstall bulb(s).
Front parking lamp/turn signal/sidemarker bulbs without wig-wags
(Sedan)
1. Make sure headlamp switch is in
the off position, then open the
hood.
2. Reach in behind the headlamp
assembly to access the bulb sockets
and connectors.
3. Rotate the bulb socket
counterclockwise and remove from
the lamp assembly.
4. Carefully pull the bulb out of the socket and push in the new bulb.
Install the new bulbs in reverse order from the steps above.
238Maintenance
2015 Police(pol)
Owners Guide gf, 1st Printing, April 2014
USA(fus)
Page 240 of 398

Front parking lamp/turn signal and sidemarker bulbs without
wig-wags (Utility)
1. Make sure that the headlamp control is
in the off position.
2. Open the hood.
3. Remove the hood overslam bumper
tower to service park/turn or sidemarker
bulbs (if needed).
Replacing front parking lamp/turn signal bulbs without wig-wags
(Utility)
1. Rotate the bulb socket
counterclockwise and remove it from
the lamp assembly.
2. Pull the bulb straight out of the
socket.
Reverse steps to reinstall bulb(s).
Maintenance239
2015 Police(pol)
Owners Guide gf, 1st Printing, April 2014
USA(fus)
Page 241 of 398
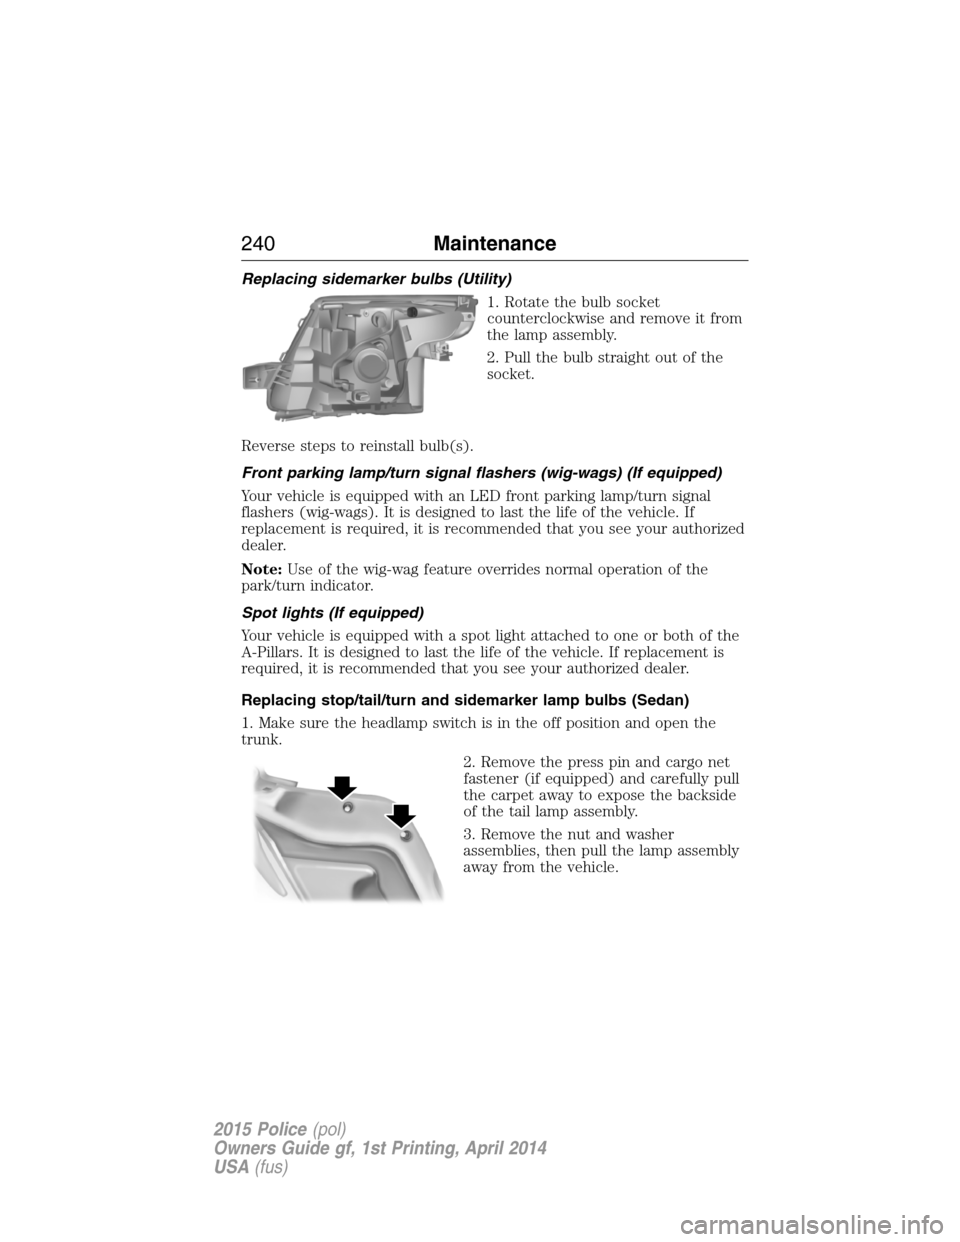
Replacing sidemarker bulbs (Utility)
1. Rotate the bulb socket
counterclockwise and remove it from
the lamp assembly.
2. Pull the bulb straight out of the
socket.
Reverse steps to reinstall bulb(s).
Front parking lamp/turn signal flashers (wig-wags) (If equipped)
Your vehicle is equipped with an LED front parking lamp/turn signal
flashers (wig-wags). It is designed to last the life of the vehicle. If
replacement is required, it is recommended that you see your authorized
dealer.
Note:Use of the wig-wag feature overrides normal operation of the
park/turn indicator.
Spot lights (If equipped)
Your vehicle is equipped with a spot light attached to one or both of the
A-Pillars. It is designed to last the life of the vehicle. If replacement is
required, it is recommended that you see your authorized dealer.
Replacing stop/tail/turn and sidemarker lamp bulbs (Sedan)
1. Make sure the headlamp switch is in the off position and open the
trunk.
2. Remove the press pin and cargo net
fastener (if equipped) and carefully pull
the carpet away to expose the backside
of the tail lamp assembly.
3. Remove the nut and washer
assemblies, then pull the lamp assembly
away from the vehicle.
240Maintenance
2015 Police(pol)
Owners Guide gf, 1st Printing, April 2014
USA(fus)
Page 242 of 398

4. Remove the bulb socket by
rotating it counterclockwise, then
pulling it out of the lamp assembly.
5. Pull the bulb straight from the
socket.
Install new bulb(s) in reverse order.
Replacing backup lamp bulbs (Sedan)
1. Make sure the headlamp switch is in the off position.
2. Remove the deck lid trim panel press pins
and carefully pull the panel away to expose
the backside of the backup lamp assembly.
3. Remove bulb socket by rotating it
counterclockwise, then pull it out of
the lamp assembly.
Maintenance241
2015 Police(pol)
Owners Guide gf, 1st Printing, April 2014
USA(fus)
Page 244 of 398
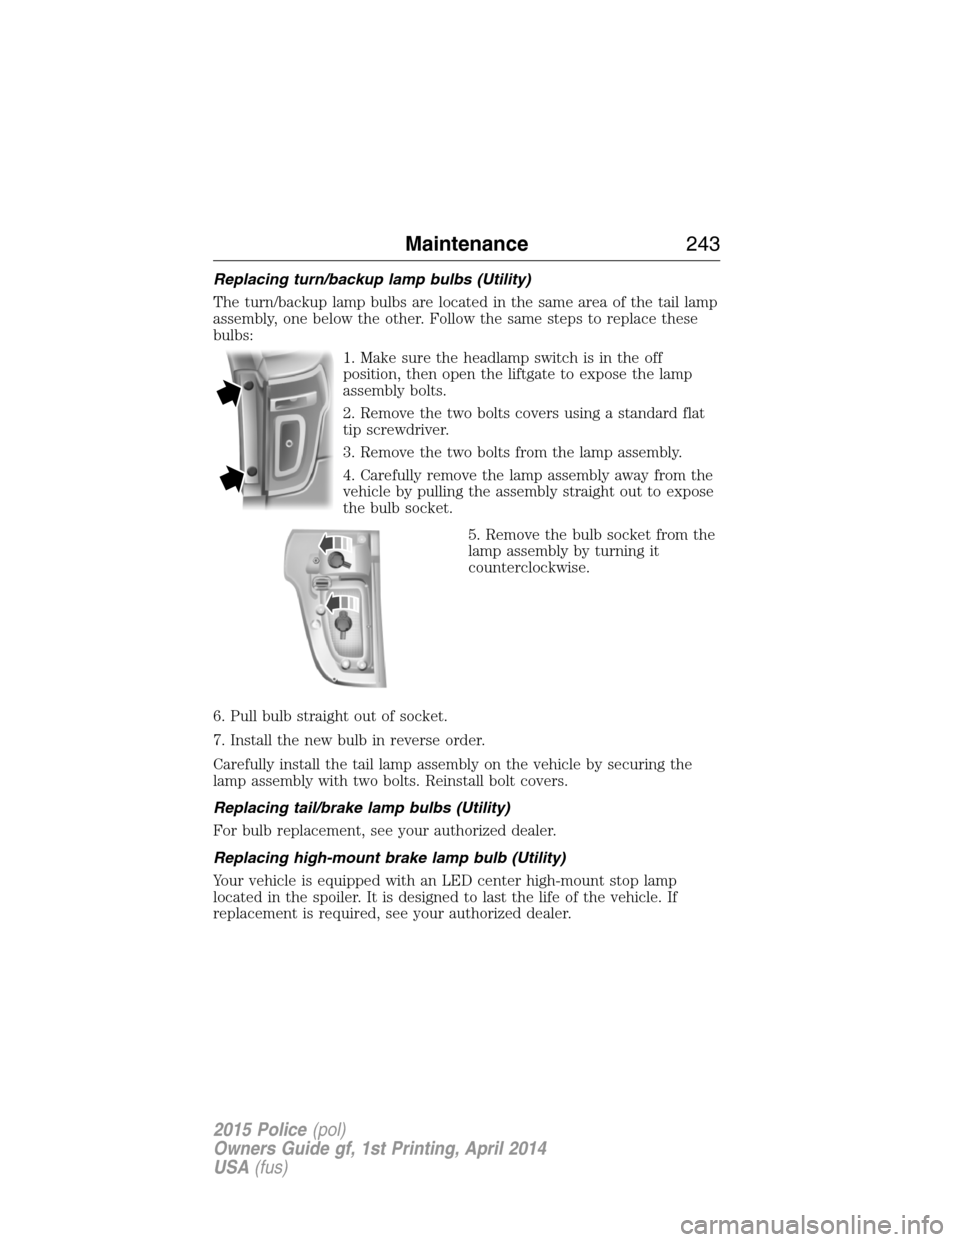
Replacing turn/backup lamp bulbs (Utility)
The turn/backup lamp bulbs are located in the same area of the tail lamp
assembly, one below the other. Follow the same steps to replace these
bulbs:
1. Make sure the headlamp switch is in the off
position, then open the liftgate to expose the lamp
assembly bolts.
2. Remove the two bolts covers using a standard flat
tip screwdriver.
3. Remove the two bolts from the lamp assembly.
4. Carefully remove the lamp assembly away from the
vehicle by pulling the assembly straight out to expose
the bulb socket.
5. Remove the bulb socket from the
lamp assembly by turning it
counterclockwise.
6. Pull bulb straight out of socket.
7. Install the new bulb in reverse order.
Carefully install the tail lamp assembly on the vehicle by securing the
lamp assembly with two bolts. Reinstall bolt covers.
Replacing tail/brake lamp bulbs (Utility)
For bulb replacement, see your authorized dealer.
Replacing high-mount brake lamp bulb (Utility)
Your vehicle is equipped with an LED center high-mount stop lamp
located in the spoiler. It is designed to last the life of the vehicle. If
replacement is required, see your authorized dealer.
Maintenance243
2015 Police(pol)
Owners Guide gf, 1st Printing, April 2014
USA(fus)
Page 251 of 398

When washing:
•Take care when using a power washer to clean the engine. The
high-pressure fluid could penetrate the sealed parts and cause
damage.
•Do not spray a hot engine with cold water to avoid cracking the
engine block or other engine components.
•Spray Motorcraft Engine Shampoo and Degreaser on all parts that
require cleaning and pressure rinse clean. In Canada, use Motorcraft
Engine Shampoo.
•Never wash or rinse the engine while it is hot or running; water in the
running engine may cause internal damage.
•Never wash or rinse any ignition coil, spark plug wire or spark plug
well, or the area in and around these locations.
•Cover the battery, power distribution box, and air filter assembly to
prevent water damage when cleaning the engine.
CLEANING THE WINDOWS AND WIPER BLADES
The windows and wiper blades should be cleaned regularly. If the wipers
do not wipe properly, substances on the vehicle’s glass or the wiper
blades may cause squeaking or chatter noise from the blades, and
streaking and smearing of the windshield. To clean these items, follow
these tips:
•The windows may be cleaned with a non-abrasive cleaner such as
Motorcraft® Ultra-Clear Spray Glass Cleaner (U.S.) or Motorcraft
Premium Glass Cleaner (Canada).
•The wiper blades can be cleaned with isopropyl (rubbing) alcohol or
Motorcraft Premium Windshield Washer Concentrates in the U.S., or
Motorcraft Premium Quality Windshield Washer Fluid in Canada.
Replace your wiper blades when they appear worn or do not function
properly.
•Do not use abrasive materials, as they may cause scratches.
•Do not use fuel, kerosene, or paint thinner to clean any parts.
If you cannot remove those streaks after cleaning with the glass cleaner
or if the wipers chatter and move in a jerky motion, clean the outer
surface of the windshield and the wiper blades using a sponge or soft
cloth with a neutral detergent or mild-abrasive cleaning solution. After
cleaning, rinse the windshield and wiper blades with clean water. The
windshield is clean if beads do not form when you rinse the windshield
with water.
250Vehicle Care
2015 Police(pol)
Owners Guide gf, 1st Printing, April 2014
USA(fus)
Page 284 of 398

If you get a flat tire while driving, do not apply the brake heavily.
Instead, gradually decrease your speed. Hold the steering wheel firmly
and slowly move to a safe place on the side of the road.
Have a flat serviced by an authorized dealer in order to prevent damage
to the system sensors. SeeTire Pressure Monitoring Systemearlier in
the chapter. During repairing or replacing of the flat tire, have the
authorized dealer inspect the system sensor for damage.
Tire Change Procedure
WARNING:When one of the front wheels is off the ground, the
transmission alone will not prevent your vehicle from moving or
slipping off the jack, even if the transmission is in park(P).
WARNING:To help prevent your vehicle from moving when you
change a tire, be sure to place the transmission in park(P),set
the parking brake and block (in both directions) the wheel that is
diagonally opposite (other side and end of your vehicle) to the tire
being changed.
WARNING:Never get underneath a vehicle that is supported
only by a jack. If the vehicle slips off the jack, you or someone
else could be seriously injured.
WARNING:Do not attempt to change a tire on the side of your
vehicle close to moving traffic. Pull far enough off the road to
avoid the danger of being hit when operating the jack or changing the
wheel.
WARNING:Always use the jack provided as original equipment
with your vehicle. If using a jack other than the one provided as
original equipment with your vehicle, make sure the jack capacity is
adequate for the vehicle weight, including any vehicle cargo or
modifications.
Wheels and Tires283
2015 Police(pol)
Owners Guide gf, 1st Printing, April 2014
USA(fus)