window FORD POLICE INTERCEPTOR UTILITY 2017 1.G User Guide
[x] Cancel search | Manufacturer: FORD, Model Year: 2017, Model line: POLICE INTERCEPTOR UTILITY, Model: FORD POLICE INTERCEPTOR UTILITY 2017 1.GPages: 360, PDF Size: 4.06 MB
Page 71 of 360
EXTERIOR MIRRORS
Power Exterior Mirrors
WARNING
Do not adjust the mirrors when your
vehicle is moving.
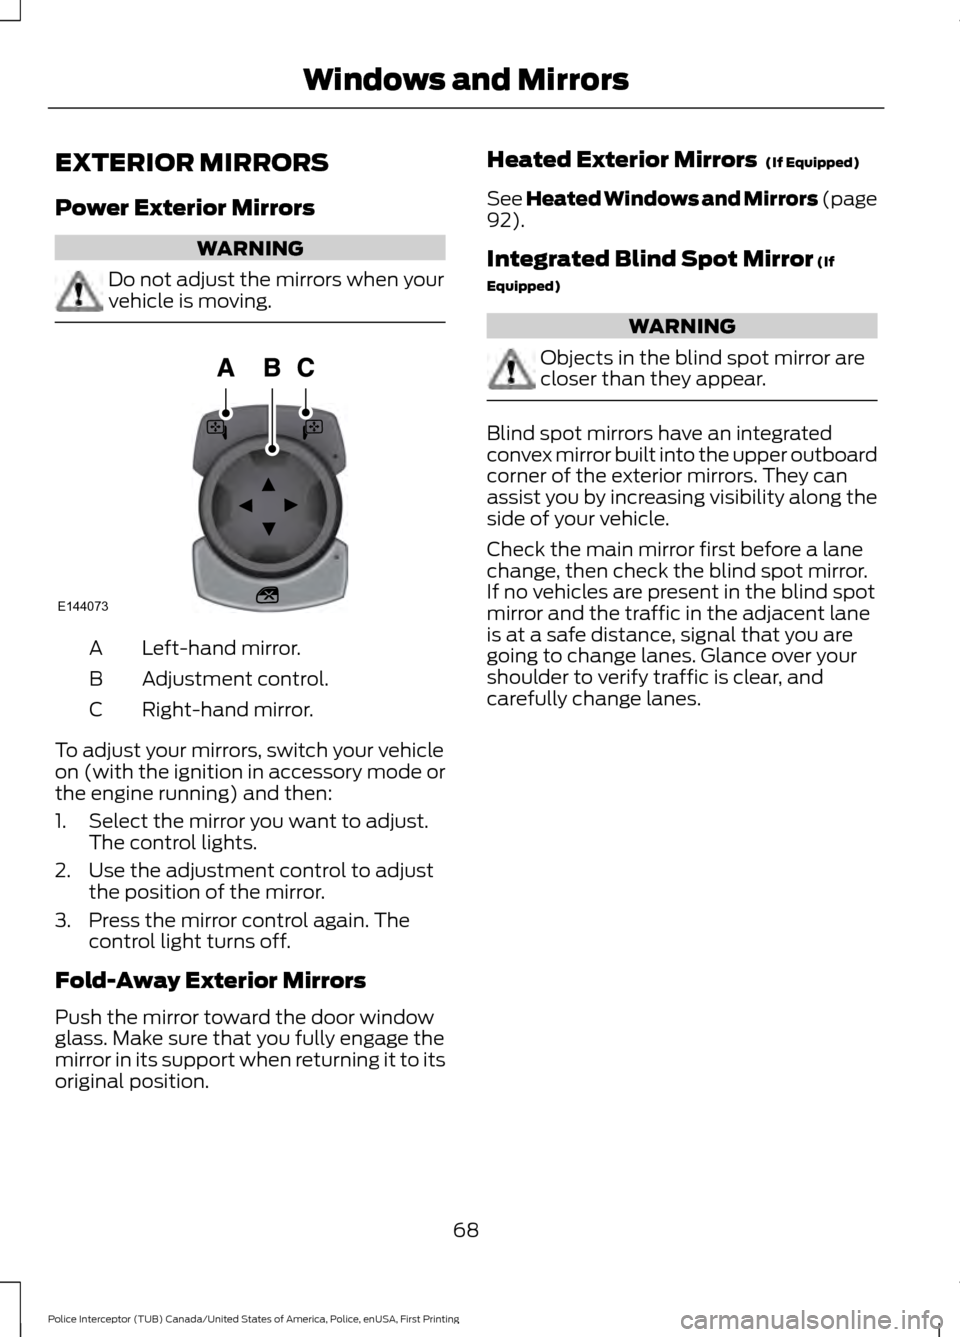
Left-hand mirror.
A
Adjustment control.
B
Right-hand mirror.
C
To adjust your mirrors, switch your vehicle
on (with the ignition in accessory mode or
the engine running) and then:
1. Select the mirror you want to adjust. The control lights.
2. Use the adjustment control to adjust the position of the mirror.
3. Press the mirror control again. The control light turns off.
Fold-Away Exterior Mirrors
Push the mirror toward the door window
glass. Make sure that you fully engage the
mirror in its support when returning it to its
original position. Heated Exterior Mirrors (If Equipped)
See Heated Windows and Mirrors (page
92
).
Integrated Blind Spot Mirror
(If
Equipped) WARNING
Objects in the blind spot mirror are
closer than they appear.
Blind spot mirrors have an integrated
convex mirror built into the upper outboard
corner of the exterior mirrors. They can
assist you by increasing visibility along the
side of your vehicle.
Check the main mirror first before a lane
change, then check the blind spot mirror.
If no vehicles are present in the blind spot
mirror and the traffic in the adjacent lane
is at a safe distance, signal that you are
going to change lanes. Glance over your
shoulder to verify traffic is clear, and
carefully change lanes.
68
Police Interceptor (TUB) Canada/United States of America, Police, enUSA, First Printing Windows and MirrorsE144073
Page 72 of 360
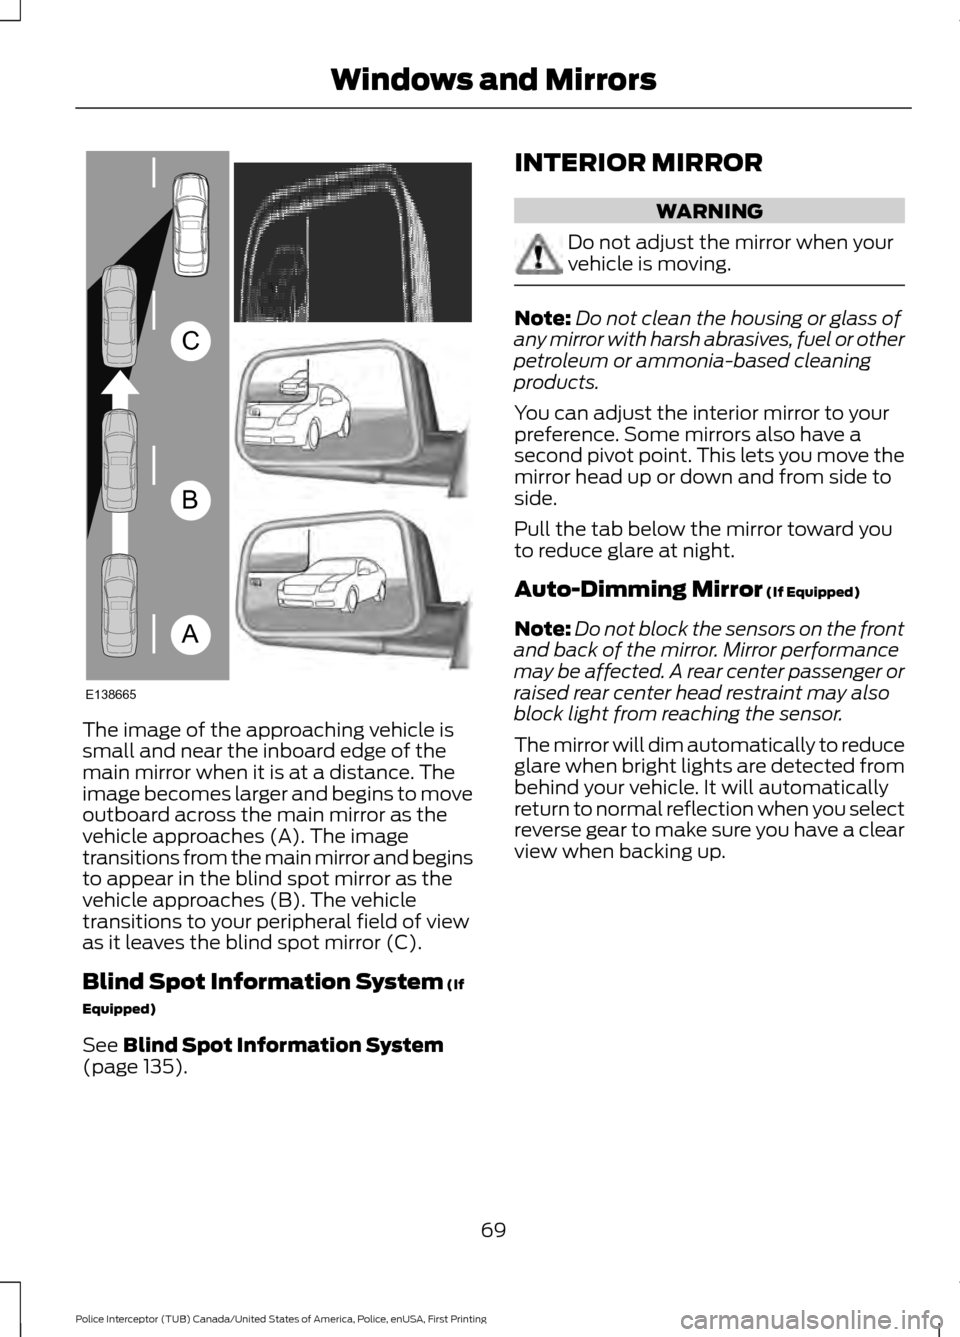
The image of the approaching vehicle is
small and near the inboard edge of the
main mirror when it is at a distance. The
image becomes larger and begins to move
outboard across the main mirror as the
vehicle approaches (A). The image
transitions from the main mirror and begins
to appear in the blind spot mirror as the
vehicle approaches (B). The vehicle
transitions to your peripheral field of view
as it leaves the blind spot mirror (C).
Blind Spot Information System (If
Equipped)
See
Blind Spot Information System
(page 135). INTERIOR MIRROR WARNING
Do not adjust the mirror when your
vehicle is moving.
Note:
Do not clean the housing or glass of
any mirror with harsh abrasives, fuel or other
petroleum or ammonia-based cleaning
products.
You can adjust the interior mirror to your
preference. Some mirrors also have a
second pivot point. This lets you move the
mirror head up or down and from side to
side.
Pull the tab below the mirror toward you
to reduce glare at night.
Auto-Dimming Mirror
(If Equipped)
Note: Do not block the sensors on the front
and back of the mirror. Mirror performance
may be affected. A rear center passenger or
raised rear center head restraint may also
block light from reaching the sensor.
The mirror will dim automatically to reduce
glare when bright lights are detected from
behind your vehicle. It will automatically
return to normal reflection when you select
reverse gear to make sure you have a clear
view when backing up.
69
Police Interceptor (TUB) Canada/United States of America, Police, enUSA, First Printing Windows and MirrorsA
B
C
E138665
Page 73 of 360
SUN VISORS
Slide-on-rod (If Equipped)
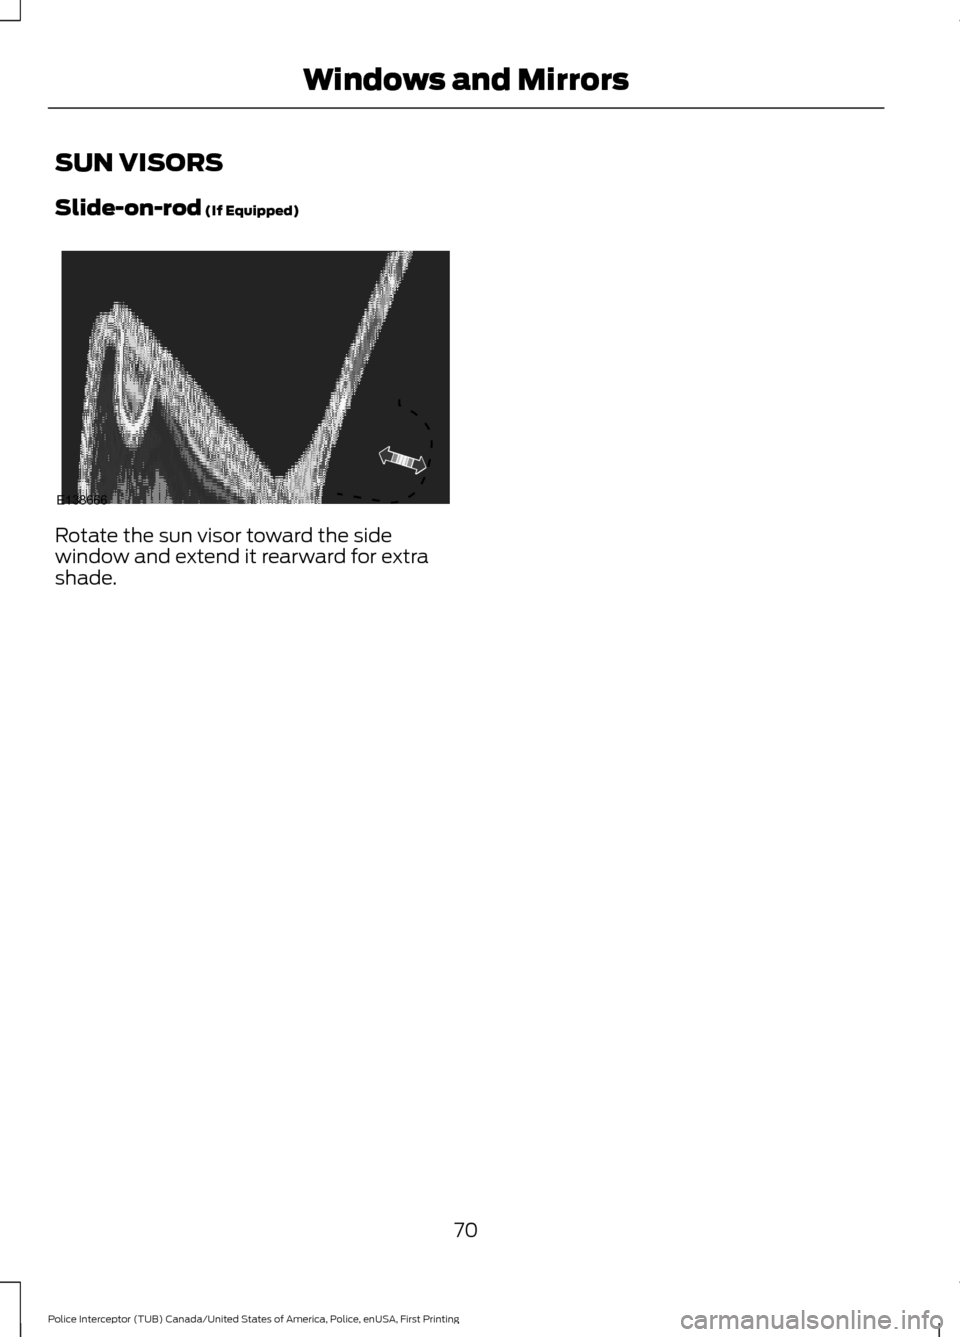
Rotate the sun visor toward the side
window and extend it rearward for extra
shade.
70
Police Interceptor (TUB) Canada/United States of America, Police, enUSA, First Printing Windows and MirrorsE138666
Page 93 of 360
MANUAL CLIMATE CONTROL
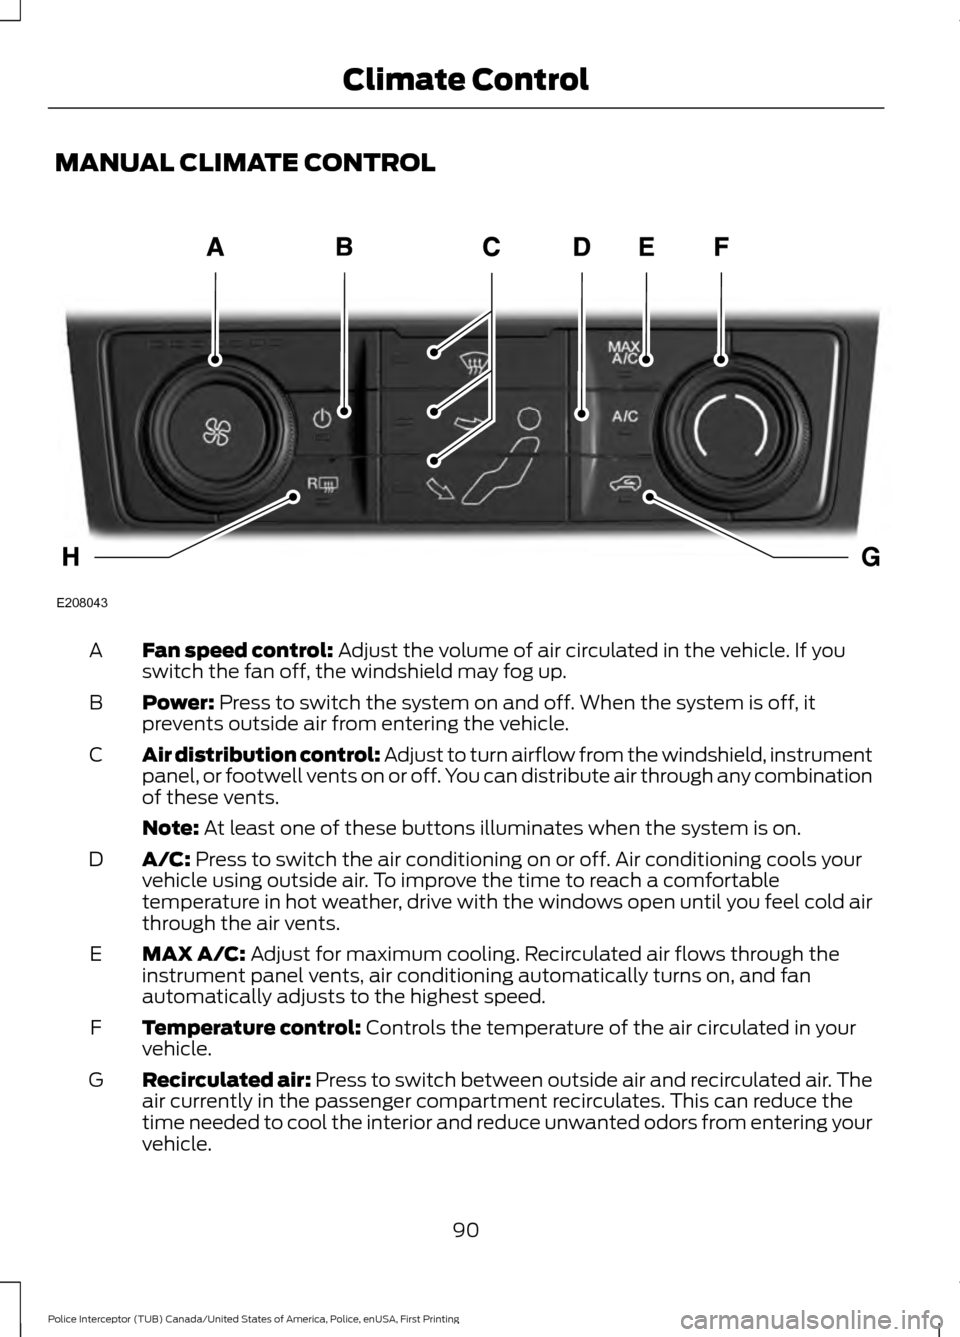
Fan speed control: Adjust the volume of air circulated in the vehicle. If you
switch the fan off, the windshield may fog up.
A
Power:
Press to switch the system on and off. When the system is off, it
prevents outside air from entering the vehicle.
B
Air distribution control: Adjust to turn airflow from the windshield, instrument
panel, or footwell vents on or off. You can distribute air through any combination
of these vents.
C
Note:
At least one of these buttons illuminates when the system is on.
A/C:
Press to switch the air conditioning on or off. Air conditioning cools your
vehicle using outside air. To improve the time to reach a comfortable
temperature in hot weather, drive with the windows open until you feel cold air
through the air vents.
D
MAX A/C:
Adjust for maximum cooling. Recirculated air flows through the
instrument panel vents, air conditioning automatically turns on, and fan
automatically adjusts to the highest speed.
E
Temperature control:
Controls the temperature of the air circulated in your
vehicle.
F
Recirculated air:
Press to switch between outside air and recirculated air. The
air currently in the passenger compartment recirculates. This can reduce the
time needed to cool the interior and reduce unwanted odors from entering your
vehicle.
G
90
Police Interceptor (TUB) Canada/United States of America, Police, enUSA, First Printing Climate ControlE208043
Page 94 of 360
Note: Recirculated air may also turn on and off automatically in instrument
panel or instrument panel and floor airflow modes during hot weather to improve
cooling efficiency.
Heated rear window: Press to switch the heated rear window on and off. See
Heated Windows and Mirrors
(page 92).
H
HINTS ON CONTROLLING THE
INTERIOR CLIMATE
General Hints
Note: Prolonged use of recirculated air may
cause the windows to fog up.
Note: A small amount of air may be felt
from the footwell air vents regardless of the
air distribution setting.
Note: To reduce humidity build-up inside
your vehicle, do not drive with the system
switched off or with recirculated air always
switched on.
Note: Do not place objects under the front
seats as this may interfere with the airflow
to the rear seats.
Note: Keep the air intakes in front of the
windshield free from obstruction (such as
snow or leaves) to allow the climate control
system to function effectively.
Note: To reduce fogging of the windshield
during humid weather, adjust the air
distribution control to the windshield air
vents position. Increase the temperature
and fan speed and press the A/C button to
improve clearing, if required.
Heating the Interior Quickly
• Adjust the fan speed to the highest
speed setting.
• Adjust the temperature control to the
highest setting.
• Adjust the air distribution control to the
footwell air vents position. Recommended Settings for
Heating
•
Adjust the fan speed to the second
speed setting.
• Adjust the temperature control to the
midway point of the hot settings.
• Adjust the air distribution control to the
footwell and windshield air vents
position.
Cooling the Interior Quickly
• Adjust the fan speed to the highest
speed setting.
• Adjust the temperature control to the
MAX A/C
position.
• Adjust the air distribution control to the
instrument panel air vents position.
Recommended Settings for
Cooling
• Adjust the fan speed to the second
speed setting.
• Adjust the temperature control to the
midway point of the cold settings.
• Adjust the air distribution control to the
instrument panel air vents position.
Vehicle Stationary for Extended
Periods During Extreme High
Ambient Temperatures
• Apply the parking brake.
• Move the transmission selector lever
to position
P or neutral.
91
Police Interceptor (TUB) Canada/United States of America, Police, enUSA, First Printing Climate Control
Page 95 of 360
•
Adjust the temperature control to the
MAX A/C position.
• Adjust the fan speed to the lowest
speed setting.
Side Window Defogging in Cold
Weather
• Adjust the air distribution control to the
instrument panel and windshield air
vents positions.
• Press the
A/C button.
• Adjust the temperature control to the
desired setting.
• Adjust the fan speed to the highest
setting.
• Direct the instrument panel side air
vents toward the side windows.
• Close the instrument panel vents.
Maximum Cooling Performance in
Instrument Panel or Instrument
Panel and Footwell Positions
• Adjust the temperature control to the
lowest setting.
• Press the
A/C and recirculated air
buttons.
• Adjust the fan speed to the highest
setting initially and then adjust it to suit
the desired comfort level.
HEATED WINDOWS AND
MIRRORS
(If Equipped)
Heated Rear Window
Note: Make sure the engine is running
before operating the heated windows. Press the button to clear the
heated rear window of thin ice
and fog. The heated rear window
will automatically turn off after a short
period of time. Start the engine before you
switch the heated rear window on. Note:
Do not use razor blades or other
sharp objects to clean or remove decals
from the inside of the heated rear window.
The vehicle warranty does not cover
damage caused to the heated rear window
grid lines.
Heated Exterior Mirror
(If Equipped)
When you switch the heated rear window
on, the heated exterior mirrors will
automatically turn on.
Note: Do not remove ice from the mirrors
with a scraper or adjust the mirror glass
when it is frozen in place.
Note: Do not clean the mirror housing or
glass with harsh abrasives, fuel or other
petroleum-based cleaning products.
CABIN AIR FILTER
Your vehicle is equipped with a cabin air
filter, which gives you and your passengers
the following benefits:
• It improves your driving comfort by
reducing particle concentration.
• It improves the interior compartment
cleanliness.
• It protects the climate control
components from particle deposits.
You can locate the cabin air filter behind
the glove box.
Note: Make sure you have a cabin air filter
installed at all times. This prevents foreign
objects from entering the system. Running
the system without a filter in place could
result in degradation or damage to the
system.
Replace the filter at regular intervals. See
Scheduled Maintenance
(page 302).
For additional cabin air filter information,
or to replace the filter, see an authorized
dealer.
92
Police Interceptor (TUB) Canada/United States of America, Police, enUSA, First Printing Climate ControlE184884
Page 105 of 360
Important Ventilating Information
If you stop your vehicle and then leave the
engine idling for long periods, we
recommend that you do one of the
following:
•
Open the windows at least 1 in
(2.5 cm).
• Set your climate control to outside air.
ENGINE BLOCK HEATER
(If
Equipped) WARNINGS
Failure to follow engine block heater
instructions could result in property
damage or serious personal injury.
Do not use your heater with
ungrounded electrical systems or
two-pronged adapters. There is a risk
of electrical shock. Do not fully close the hood, or allow
it to drop under its own weight when
using the engine block heater. This
could damage the power cable and may
cause an electrical short resulting in fire,
injury and property damage. Note:
The heater is most effective when
outdoor temperatures are below 0°F
(-18°C).
The heater acts as a starting aid by
warming the engine coolant. This allows
the climate control system to respond
quickly. The equipment includes a heater
element (installed in the engine block) and
a wire harness. You can connect the
system to a grounded 120-volt AC
electrical source. We recommend that you do the following
for a safe and correct operation:
•
Use a 16-gauge outdoor extension cord
that is product certified by
Underwriter ’s Laboratory (UL) or
Canadian Standards Association
(CSA). This extension cord must be
suitable for use outdoors, in cold
temperatures, and be clearly marked
Suitable for Use with Outdoor
Appliances. Do not use an indoor
extension cord outdoors. This could
result in an electric shock or become a
fire hazard.
• Use as short an extension cord as
possible.
• Do not use multiple extension cords.
• Make sure that when in operation, the
extension cord plug and heater cord
plug connections are free and clear of
water. This could cause an electric
shock or fire.
• Make sure your vehicle is parked in a
clean area, clear of combustibles.
• Make sure the heater, heater cord and
extension cord are firmly connected.
• Check for heat anywhere in the
electrical hookup once the system has
been operating for approximately 30
minutes.
• Make sure the system is unplugged and
properly stowed before starting and
driving your vehicle. Make sure the
protective cover seals the prongs of the
block heater cord plug when not in use.
• Make sure the heater system is
checked for proper operation before
winter.
Using the Engine Block Heater
Make sure the receptacle terminals are
clean and dry prior to use. Clean them with
a dry cloth if necessary.
102
Police Interceptor (TUB) Canada/United States of America, Police, enUSA, First Printing Starting and Stopping the Engine
Page 106 of 360
The heater uses 0.4 to 1.0 kilowatt-hours
of energy per hour of use. The system does
not have a thermostat. It achieves
maximum temperature after
approximately three hours of operation.
Using the heater longer than three hours
does not improve system performance and
unnecessarily uses electricity.
POLICE ENGINE IDLE FEATURE
The system allows you to leave the engine
running and prevents your vehicle from
unauthorized use when you are outside of
your vehicle. When you remove the key
from the ignition, the engine remains idling.
Switching the System On
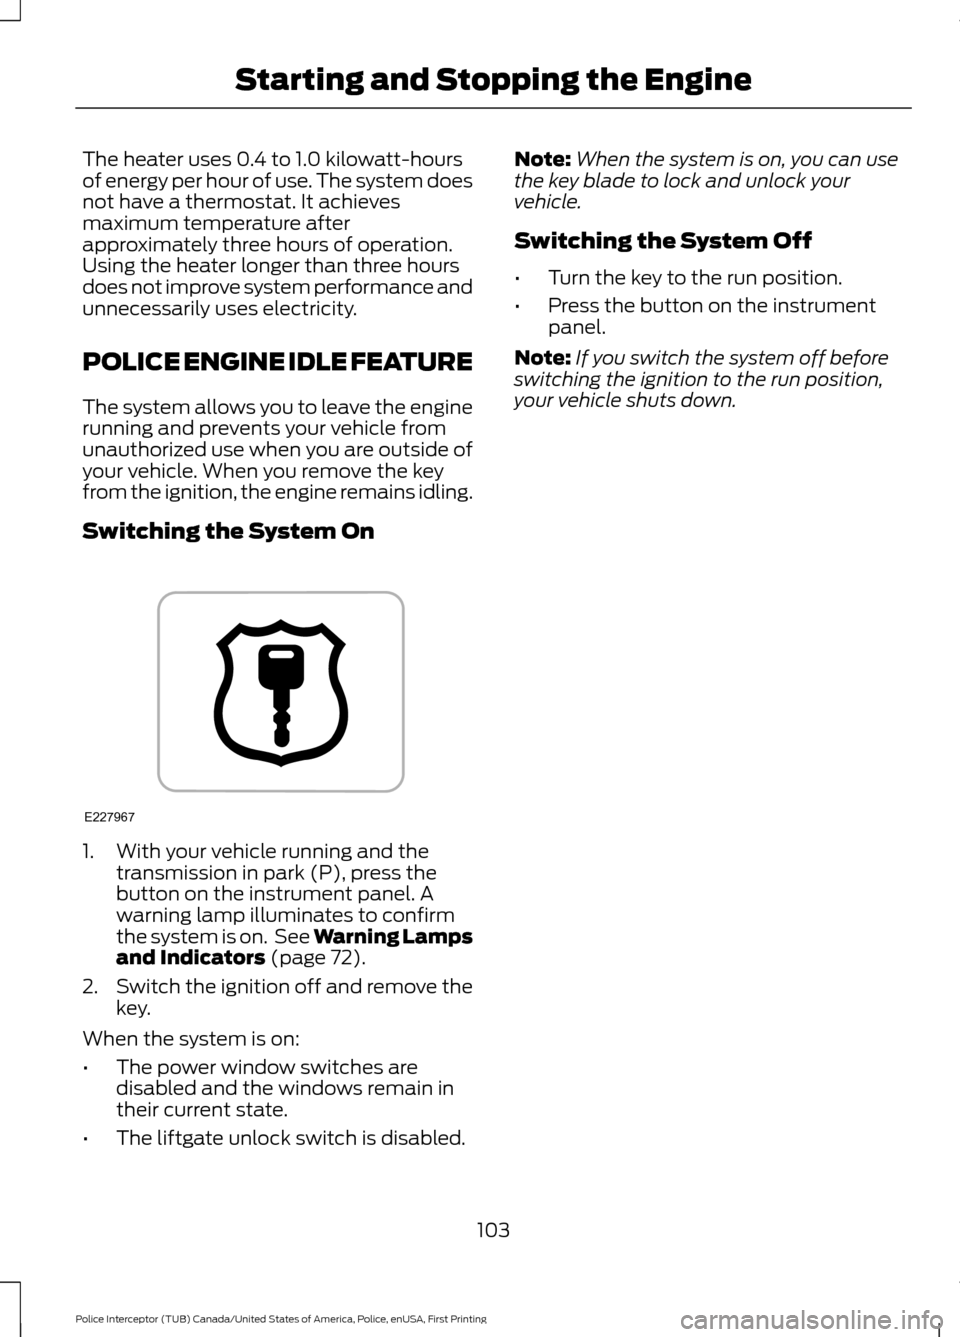
1. With your vehicle running and the
transmission in park (P), press the
button on the instrument panel. A
warning lamp illuminates to confirm
the system is on. See Warning Lamps
and Indicators (page 72).
2. Switch the ignition off and remove the
key.
When the system is on:
• The power window switches are
disabled and the windows remain in
their current state.
• The liftgate unlock switch is disabled. Note:
When the system is on, you can use
the key blade to lock and unlock your
vehicle.
Switching the System Off
• Turn the key to the run position.
• Press the button on the instrument
panel.
Note: If you switch the system off before
switching the ignition to the run position,
your vehicle shuts down.
103
Police Interceptor (TUB) Canada/United States of America, Police, enUSA, First Printing Starting and Stopping the EngineE227967
Page 133 of 360
The rear view camera system provides a
video image of the area behind your
vehicle.
During operation, lines appear in the
display which represent your vehicle
’s path
and proximity to objects behind your
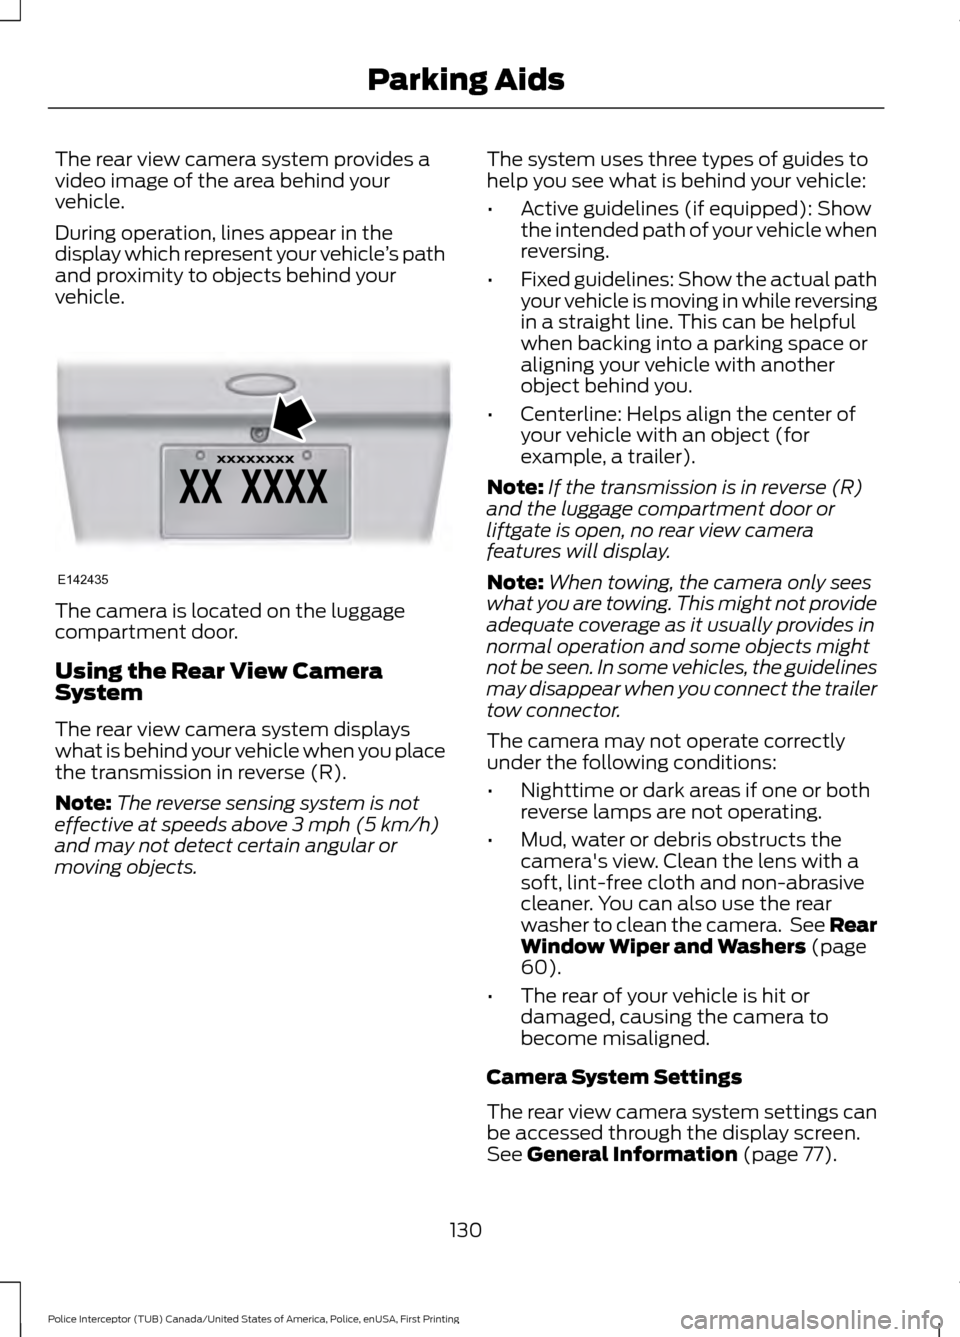
vehicle. The camera is located on the luggage
compartment door.
Using the Rear View Camera
System
The rear view camera system displays
what is behind your vehicle when you place
the transmission in reverse (R).
Note:
The reverse sensing system is not
effective at speeds above 3 mph (5 km/h)
and may not detect certain angular or
moving objects. The system uses three types of guides to
help you see what is behind your vehicle:
•
Active guidelines (if equipped): Show
the intended path of your vehicle when
reversing.
• Fixed guidelines: Show the actual path
your vehicle is moving in while reversing
in a straight line. This can be helpful
when backing into a parking space or
aligning your vehicle with another
object behind you.
• Centerline: Helps align the center of
your vehicle with an object (for
example, a trailer).
Note: If the transmission is in reverse (R)
and the luggage compartment door or
liftgate is open, no rear view camera
features will display.
Note: When towing, the camera only sees
what you are towing. This might not provide
adequate coverage as it usually provides in
normal operation and some objects might
not be seen. In some vehicles, the guidelines
may disappear when you connect the trailer
tow connector.
The camera may not operate correctly
under the following conditions:
• Nighttime or dark areas if one or both
reverse lamps are not operating.
• Mud, water or debris obstructs the
camera's view. Clean the lens with a
soft, lint-free cloth and non-abrasive
cleaner. You can also use the rear
washer to clean the camera. See Rear
Window Wiper and Washers
(page
60).
• The rear of your vehicle is hit or
damaged, causing the camera to
become misaligned.
Camera System Settings
The rear view camera system settings can
be accessed through the display screen.
See
General Information (page 77).
130
Police Interceptor (TUB) Canada/United States of America, Police, enUSA, First Printing Parking AidsE142435
Page 158 of 360
BREAKING-IN
You need to break in new tires for
approximately 300 miles (480
kilometers). During this time, your vehicle
may exhibit some unusual driving
characteristics.
Avoid driving too fast during the first 1000
miles (1600 kilometers). Vary your speed
frequently and change up through the
gears early. Do not labor the engine.
Do not tow during the first 1000 miles
(1600 kilometers).
ECONOMICAL DRIVING
Your fuel economy is affected by several
things, such as how you drive, the
conditions you drive under, and how you
maintain your vehicle.
You may improve your fuel economy by
keeping these things in mind:
•
Accelerate and slow down in a smooth,
moderate fashion.
• Drive at steady speeds without
stopping.
• Anticipate stops; slowing down may
eliminate the need to stop.
• Combine errands and minimize
stop-and-go driving.
• Close the windows for high-speed
driving.
• Drive at reasonable speeds (traveling
at 55 mph [88 km/h] uses 15% less
fuel than traveling at 65 mph [105
km/h]).
• Keep the tires properly inflated and use
only the recommended size.
• Use the recommended engine oil.
• Perform all regularly scheduled
maintenance. Avoid these actions; they reduce your fuel
economy:
•
Sudden accelerations or hard
accelerations.
• Revving the engine before turning it off.
• Idle for periods longer than one minute.
• Warm up your vehicle on cold
mornings.
• Use the air conditioner or front
defroster.
• Use the speed control in hilly terrain.
• Rest your foot on the brake pedal while
driving.
• Drive a heavily loaded vehicle or tow a
trailer.
• Carry unnecessary weight
(approximately 1 mpg [0.4 km/L] is
lost for every 400 lb [180 kilogram] of
weight carried).
• Driving with the wheels out of
alignment.
Conditions
• Heavily loading a vehicle or towing a
trailer may reduce fuel economy at any
speed.
• Adding certain accessories to your
vehicle (for example bug deflectors,
rollbars, light bars, running boards, ski
racks or luggage racks) may reduce
fuel economy.
• To maximize the fuel economy, drive
with the tonneau cover installed (if
equipped).
• Using fuel blended with alcohol may
lower fuel economy.
• Fuel economy may decrease with lower
temperatures during the first 8– 10
miles (12 –16 kilometers) of driving.
• Driving on flat terrain offers improved
fuel economy as compared to driving
on hilly terrain.
155
Police Interceptor (TUB) Canada/United States of America, Police, enUSA, First Printing Driving Hints