FORD RANGER 2011 2.G Service Manual
Manufacturer: FORD, Model Year: 2011, Model line: RANGER, Model: FORD RANGER 2011 2.GPages: 302, PDF Size: 2.33 MB
Page 41 of 302
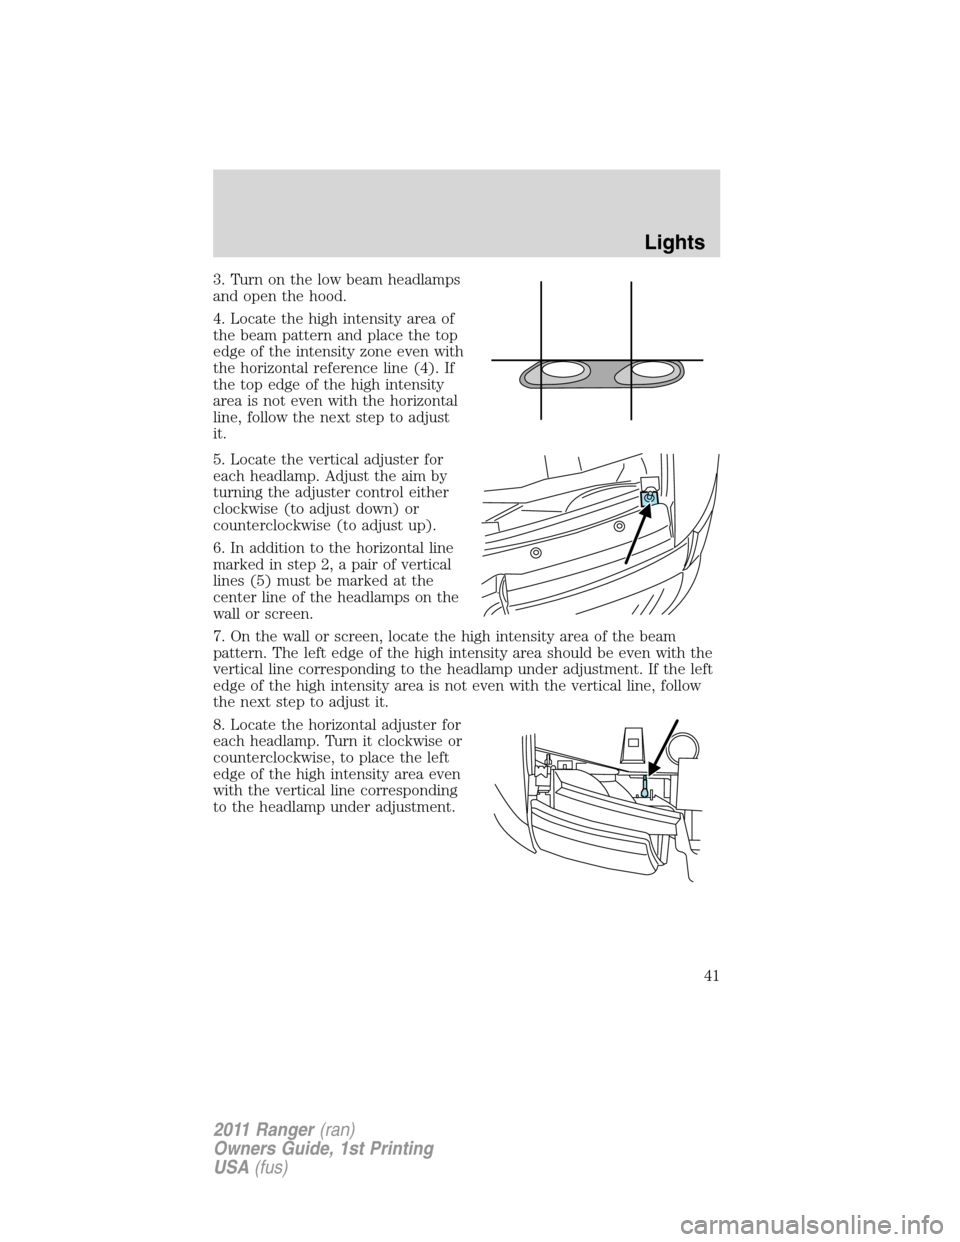
3. Turn on the low beam headlamps
and open the hood.
4. Locate the high intensity area of
the beam pattern and place the top
edge of the intensity zone even with
the horizontal reference line (4). If
the top edge of the high intensity
area is not even with the horizontal
line, follow the next step to adjust
it.
5. Locate the vertical adjuster for
each headlamp. Adjust the aim by
turning the adjuster control either
clockwise (to adjust down) or
counterclockwise (to adjust up).
6. In addition to the horizontal line
marked in step 2, a pair of vertical
lines (5) must be marked at the
center line of the headlamps on the
wall or screen.
7. On the wall or screen, locate the high intensity area of the beam
pattern. The left edge of the high intensity area should be even with the
vertical line corresponding to the headlamp under adjustment. If the left
edge of the high intensity area is not even with the vertical line, follow
the next step to adjust it.
8. Locate the horizontal adjuster for
each headlamp. Turn it clockwise or
counterclockwise, to place the left
edge of the high intensity area even
with the vertical line corresponding
to the headlamp under adjustment.
Lights
41
2011 Ranger(ran)
Owners Guide, 1st Printing
USA(fus)
Page 42 of 302
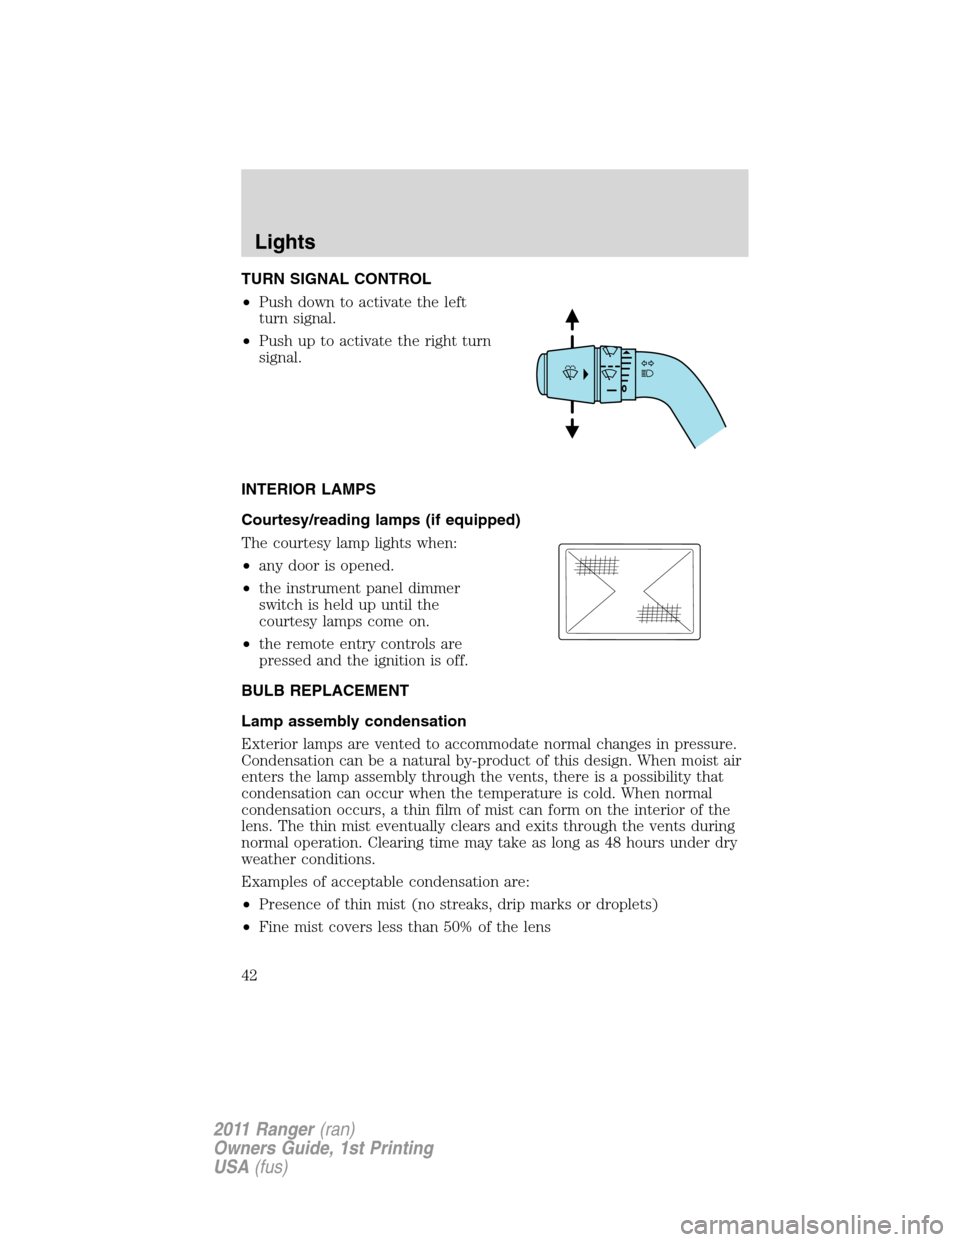
TURN SIGNAL CONTROL
•Push down to activate the left
turn signal.
•Push up to activate the right turn
signal.
INTERIOR LAMPS
Courtesy/reading lamps (if equipped)
The courtesy lamp lights when:
•any door is opened.
•the instrument panel dimmer
switch is held up until the
courtesy lamps come on.
•the remote entry controls are
pressed and the ignition is off.
BULB REPLACEMENT
Lamp assembly condensation
Exterior lamps are vented to accommodate normal changes in pressure.
Condensation can be a natural by-product of this design. When moist air
enters the lamp assembly through the vents, there is a possibility that
condensation can occur when the temperature is cold. When normal
condensation occurs, a thin film of mist can form on the interior of the
lens. The thin mist eventually clears and exits through the vents during
normal operation. Clearing time may take as long as 48 hours under dry
weather conditions.
Examples of acceptable condensation are:
•Presence of thin mist (no streaks, drip marks or droplets)
•Fine mist covers less than 50% of the lens
Lights
42
2011 Ranger(ran)
Owners Guide, 1st Printing
USA(fus)
Page 43 of 302
Examples of unacceptable moisture (usually caused by a lamp water
leak) are:
•Water puddle inside the lamp
•Large water droplets, drip marks or streaks present on the interior of
the lens
Take your vehicle to a dealer for service if any of the above conditions of
unacceptable moisture are present.
Using the right bulbs
Replacement bulbs are specified in the chart below. Headlamp bulbs
must be marked with an authorized “D.O.T.” for North America and an
“E” for Europe to ensure lamp performance, light brightness and pattern
and safe visibility. The correct bulbs will not damage the lamp assembly
or void the lamp assembly warranty and will provide quality bulb burn
time.
Function Number of bulbs Trade number
Park/turn (front) 2 3157 A (amber)
Sidemarker lamps 2 194 NA
Headlamps 2 9007
Fog lamps (if equipped) 2 9145
Hi-mount brake lamp 1 922
Rear stop/turn/tail lamps 2 4157K or 3157K
Rear license plate lamps 2 194
Backup lamps 2 3155
Dome lamp 1 912
Map/dome-SuperCab
(if equipped)2
904
Map/dome-Regular Cab
(if equipped)1
904
All replacement bulbs are clear in color except where noted.
To replace all instrument panel lights - see your authorized dealer.
Replacing interior bulbs
Check the operation of all bulbs frequently.
Replacing exterior bulbs
Check the operation of all the bulbs frequently.
Lights
43
2011 Ranger(ran)
Owners Guide, 1st Printing
USA(fus)
Page 44 of 302
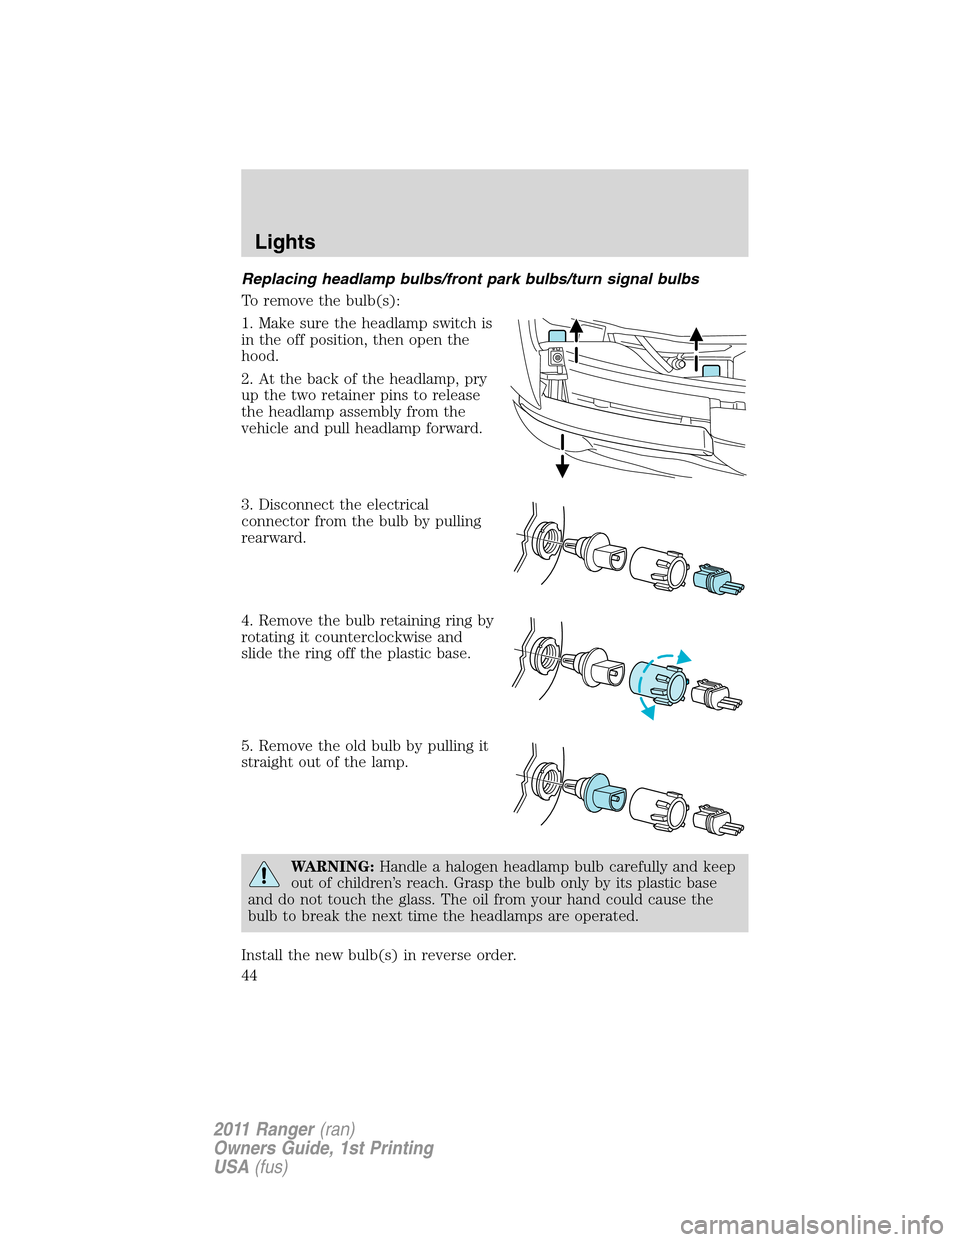
Replacing headlamp bulbs/front park bulbs/turn signal bulbs
To remove the bulb(s):
1. Make sure the headlamp switch is
in the off position, then open the
hood.
2. At the back of the headlamp, pry
up the two retainer pins to release
the headlamp assembly from the
vehicle and pull headlamp forward.
3. Disconnect the electrical
connector from the bulb by pulling
rearward.
4. Remove the bulb retaining ring by
rotating it counterclockwise and
slide the ring off the plastic base.
5. Remove the old bulb by pulling it
straight out of the lamp.
WARNING:Handle a halogen headlamp bulb carefully and keep
out of children’s reach. Grasp the bulb only by its plastic base
and do not touch the glass. The oil from your hand could cause the
bulb to break the next time the headlamps are operated.
Install the new bulb(s) in reverse order.
Lights
44
2011 Ranger(ran)
Owners Guide, 1st Printing
USA(fus)
Page 45 of 302
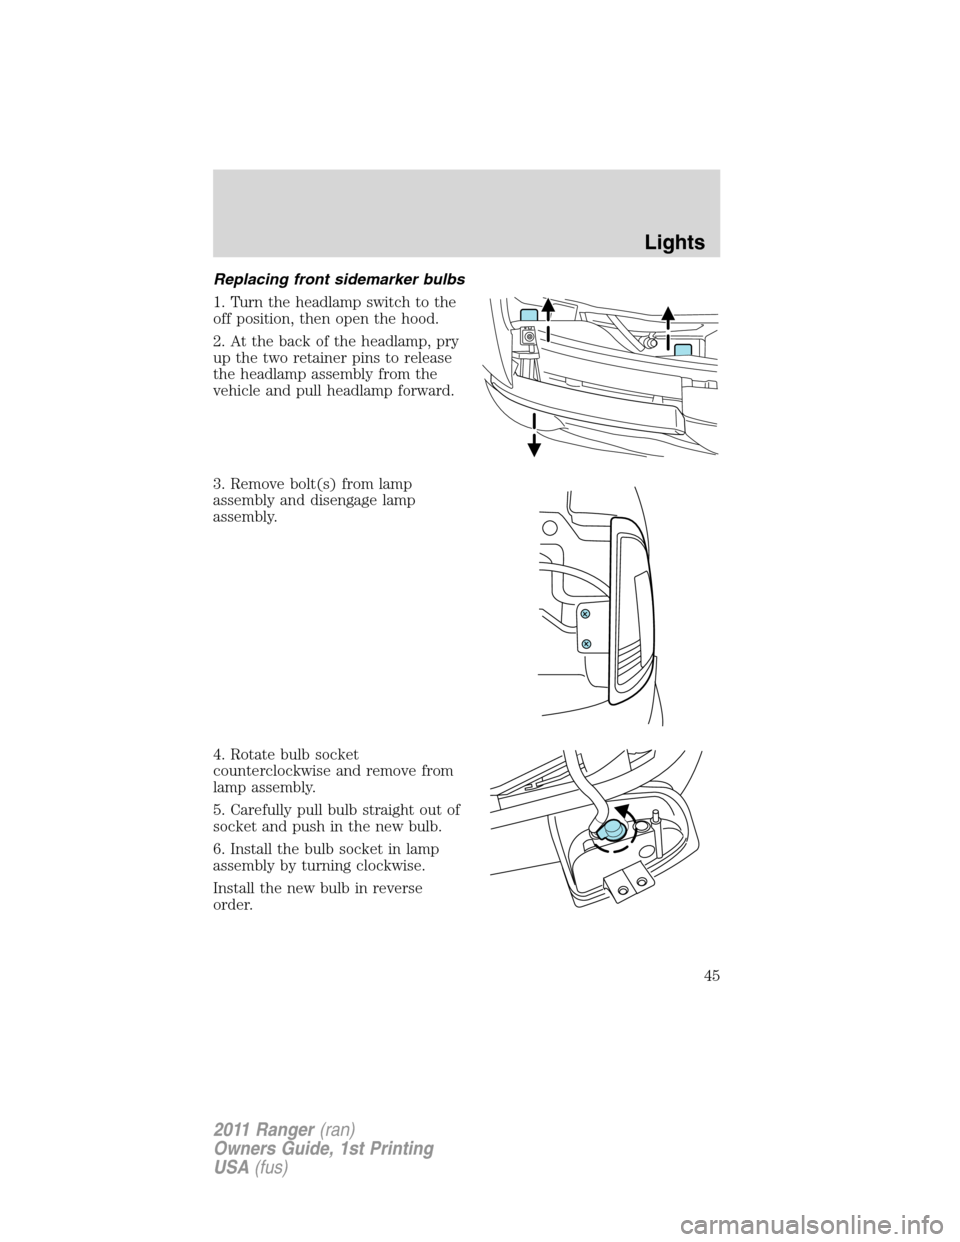
Replacing front sidemarker bulbs
1. Turn the headlamp switch to the
off position, then open the hood.
2. At the back of the headlamp, pry
up the two retainer pins to release
the headlamp assembly from the
vehicle and pull headlamp forward.
3. Remove bolt(s) from lamp
assembly and disengage lamp
assembly.
4. Rotate bulb socket
counterclockwise and remove from
lamp assembly.
5. Carefully pull bulb straight out of
socket and push in the new bulb.
6. Install the bulb socket in lamp
assembly by turning clockwise.
Install the new bulb in reverse
order.
Lights
45
2011 Ranger(ran)
Owners Guide, 1st Printing
USA(fus)
Page 46 of 302
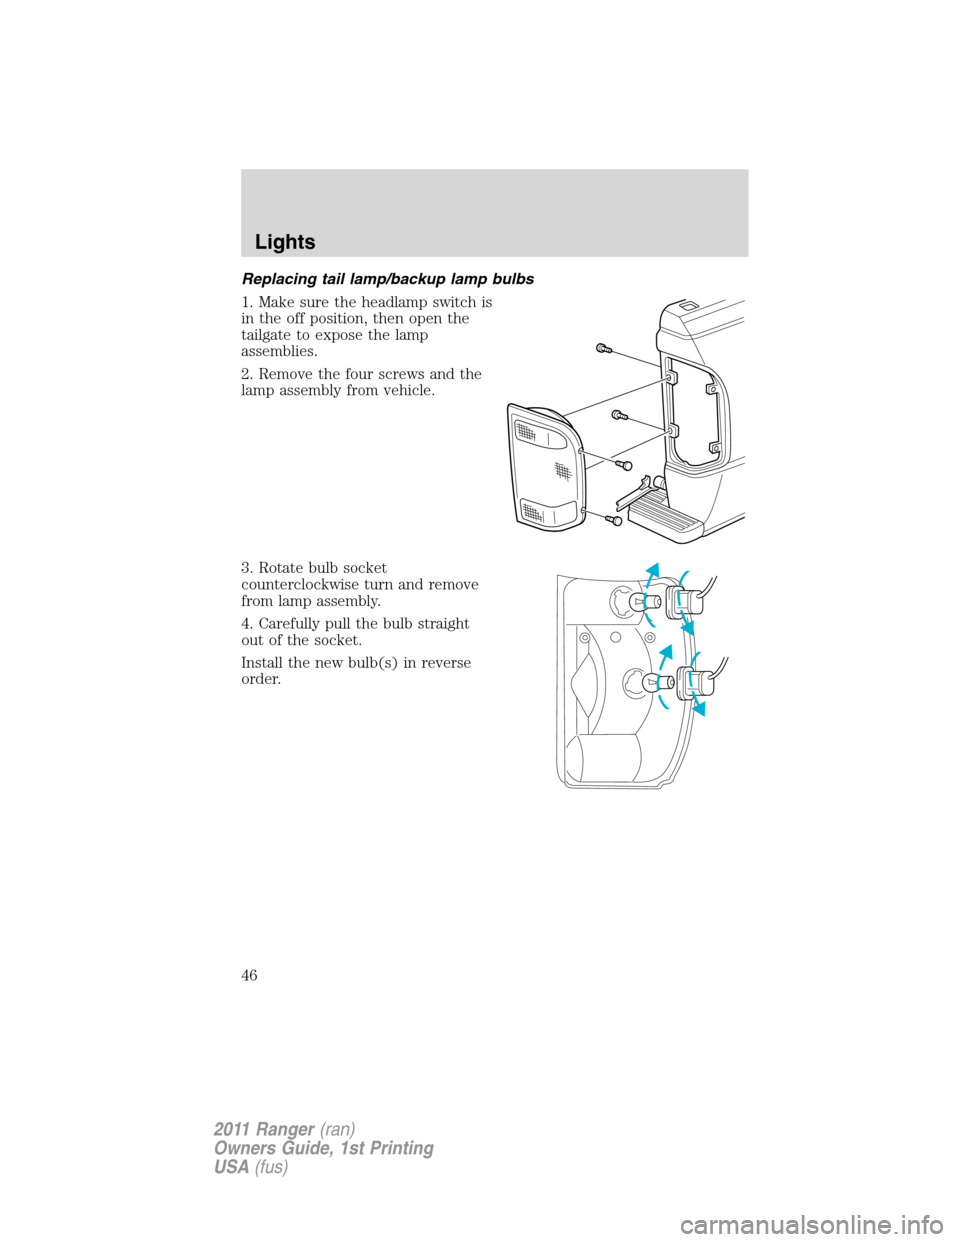
Replacing tail lamp/backup lamp bulbs
1. Make sure the headlamp switch is
in the off position, then open the
tailgate to expose the lamp
assemblies.
2. Remove the four screws and the
lamp assembly from vehicle.
3. Rotate bulb socket
counterclockwise turn and remove
from lamp assembly.
4. Carefully pull the bulb straight
out of the socket.
Install the new bulb(s) in reverse
order.
Lights
46
2011 Ranger(ran)
Owners Guide, 1st Printing
USA(fus)
Page 47 of 302
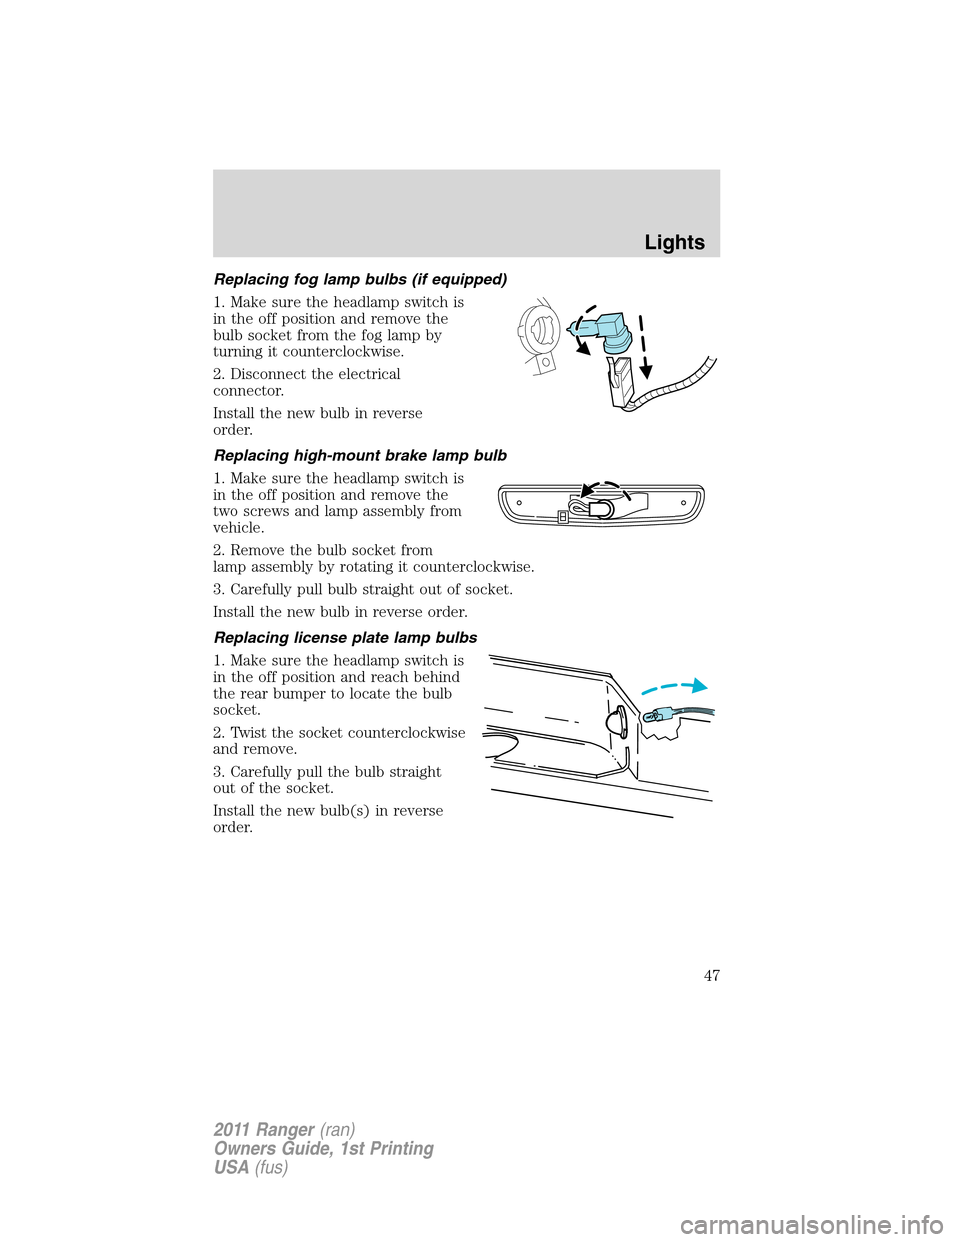
Replacing fog lamp bulbs (if equipped)
1. Make sure the headlamp switch is
in the off position and remove the
bulb socket from the fog lamp by
turning it counterclockwise.
2. Disconnect the electrical
connector.
Install the new bulb in reverse
order.
Replacing high-mount brake lamp bulb
1. Make sure the headlamp switch is
in the off position and remove the
two screws and lamp assembly from
vehicle.
2. Remove the bulb socket from
lamp assembly by rotating it counterclockwise.
3. Carefully pull bulb straight out of socket.
Install the new bulb in reverse order.
Replacing license plate lamp bulbs
1. Make sure the headlamp switch is
in the off position and reach behind
the rear bumper to locate the bulb
socket.
2. Twist the socket counterclockwise
and remove.
3. Carefully pull the bulb straight
out of the socket.
Install the new bulb(s) in reverse
order.
Lights
47
2011 Ranger(ran)
Owners Guide, 1st Printing
USA(fus)
Page 48 of 302
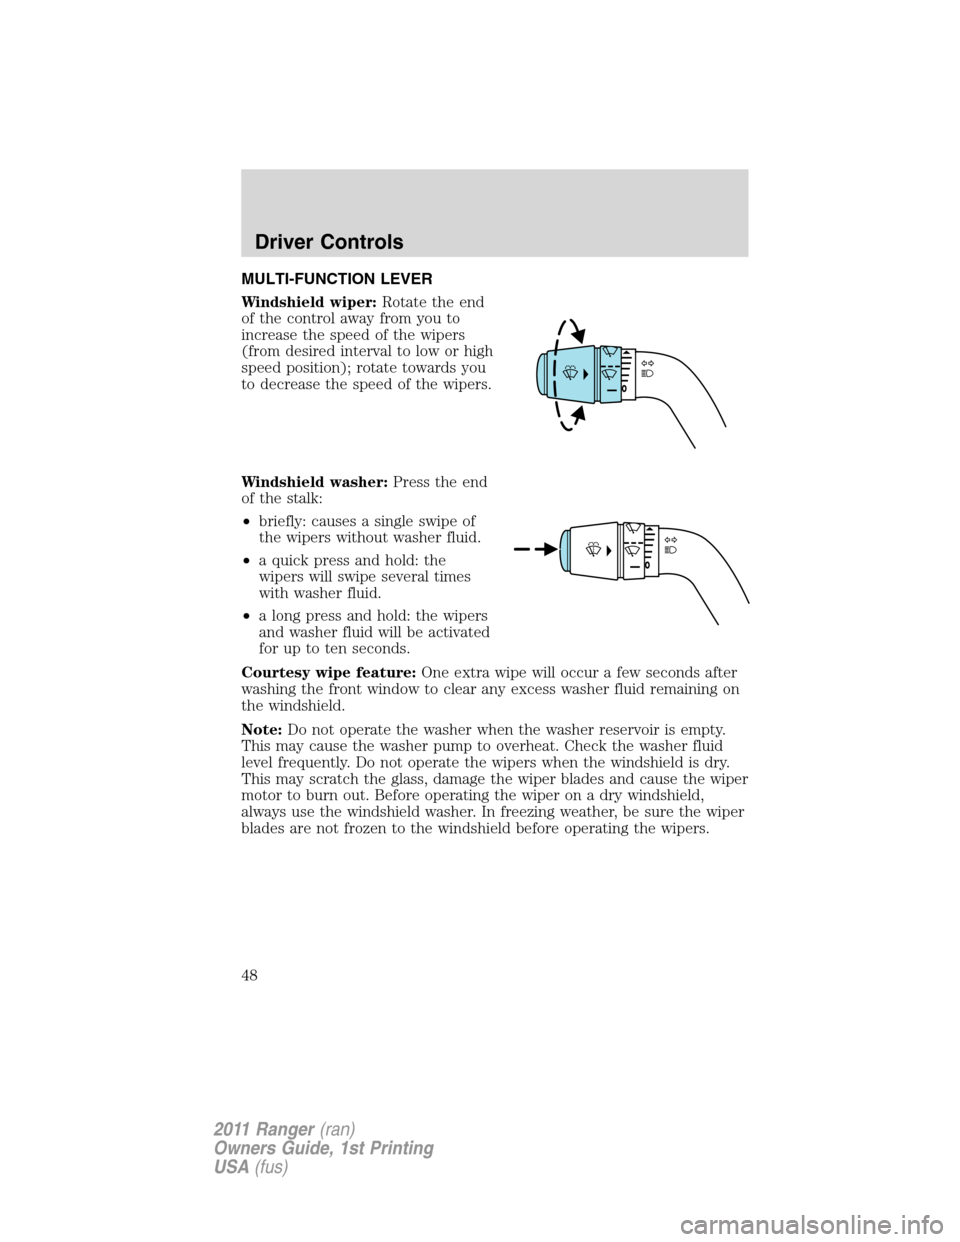
MULTI-FUNCTION LEVER
Windshield wiper:Rotate the end
of the control away from you to
increase the speed of the wipers
(from desired interval to low or high
speed position); rotate towards you
to decrease the speed of the wipers.
Windshield washer:Press the end
of the stalk:
•briefly: causes a single swipe of
the wipers without washer fluid.
•a quick press and hold: the
wipers will swipe several times
with washer fluid.
•a long press and hold: the wipers
and washer fluid will be activated
for up to ten seconds.
Courtesy wipe feature:One extra wipe will occur a few seconds after
washing the front window to clear any excess washer fluid remaining on
the windshield.
Note:Do not operate the washer when the washer reservoir is empty.
This may cause the washer pump to overheat. Check the washer fluid
level frequently. Do not operate the wipers when the windshield is dry.
This may scratch the glass, damage the wiper blades and cause the wiper
motor to burn out. Before operating the wiper on a dry windshield,
always use the windshield washer. In freezing weather, be sure the wiper
blades are not frozen to the windshield before operating the wipers.
Driver Controls
48
2011 Ranger(ran)
Owners Guide, 1st Printing
USA(fus)
Page 49 of 302
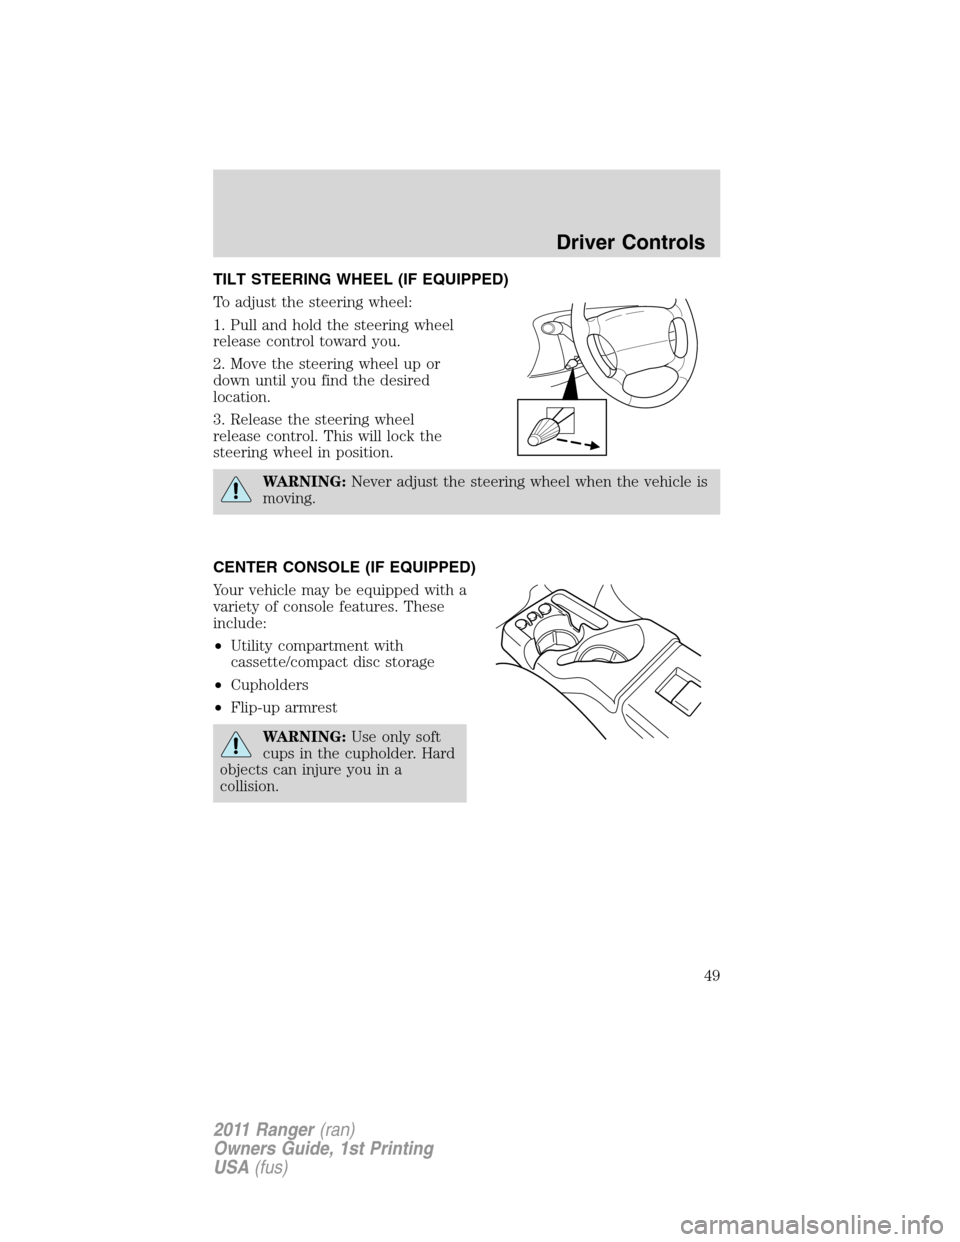
TILT STEERING WHEEL (IF EQUIPPED)
To adjust the steering wheel:
1. Pull and hold the steering wheel
release control toward you.
2. Move the steering wheel up or
down until you find the desired
location.
3. Release the steering wheel
release control. This will lock the
steering wheel in position.
WARNING:Never adjust the steering wheel when the vehicle is
moving.
CENTER CONSOLE (IF EQUIPPED)
Your vehicle may be equipped with a
variety of console features. These
include:
•Utility compartment with
cassette/compact disc storage
•Cupholders
•Flip-up armrest
WARNING:Use only soft
cups in the cupholder. Hard
objects can injure you in a
collision.
Driver Controls
49
2011 Ranger(ran)
Owners Guide, 1st Printing
USA(fus)
Page 50 of 302
AUXILIARY POWER POINT (12V DC)
Power outlets are designed for accessory plugs only. Do not insert
any other object in the power outlet as this will damage the
outlet and blow the fuse. Do not hang any type of accessory or
accessory bracket from the plug. Improper use of the power
outlet can cause damage not covered by your warranty.
The auxiliary power points are located on the instrument panel.
Do not use the power point for operating the cigarette lighter element (if
equipped).
To prevent the fuse from being blown, do not use the power point(s)
over the vehicle capacity of 12V DC/180W. If the power point or cigar
lighter socket is not working, a fuse may have blown. Refer toFuses and
relaysin theRoadside Emergencieschapter for fuse ratings and
information on checking and replacing fuses.
To have full capacity usage of your power point, the engine is required to
be running to avoid unintentional discharge of the battery. To prevent
the battery from being discharged:
•do not use the power point longer than necessary when the engine is
not running,
•do not leave battery chargers, video game adapters, computers and
other devices plugged in overnight or when the vehicle is parked for
extended periods.
Always keep the power point caps closed when not being used.
POWER WINDOWS (IF EQUIPPED)
WARNING:Do not leave children unattended in the vehicle and
do not let children play with the power windows. They may
seriously injure themselves.
WARNING:When closing the power windows, you should verify
they are free of obstructions and ensure that children and/or
pets are not in the proximity of the window openings.
Driver Controls
50
2011 Ranger(ran)
Owners Guide, 1st Printing
USA(fus)