clock FORD SIERRA 1992 2.G Cooling And Air Conditioning Systems Workshop Manual
[x] Cancel search | Manufacturer: FORD, Model Year: 1992, Model line: SIERRA, Model: FORD SIERRA 1992 2.GPages: 12, PDF Size: 0.62 MB
Page 5 of 12

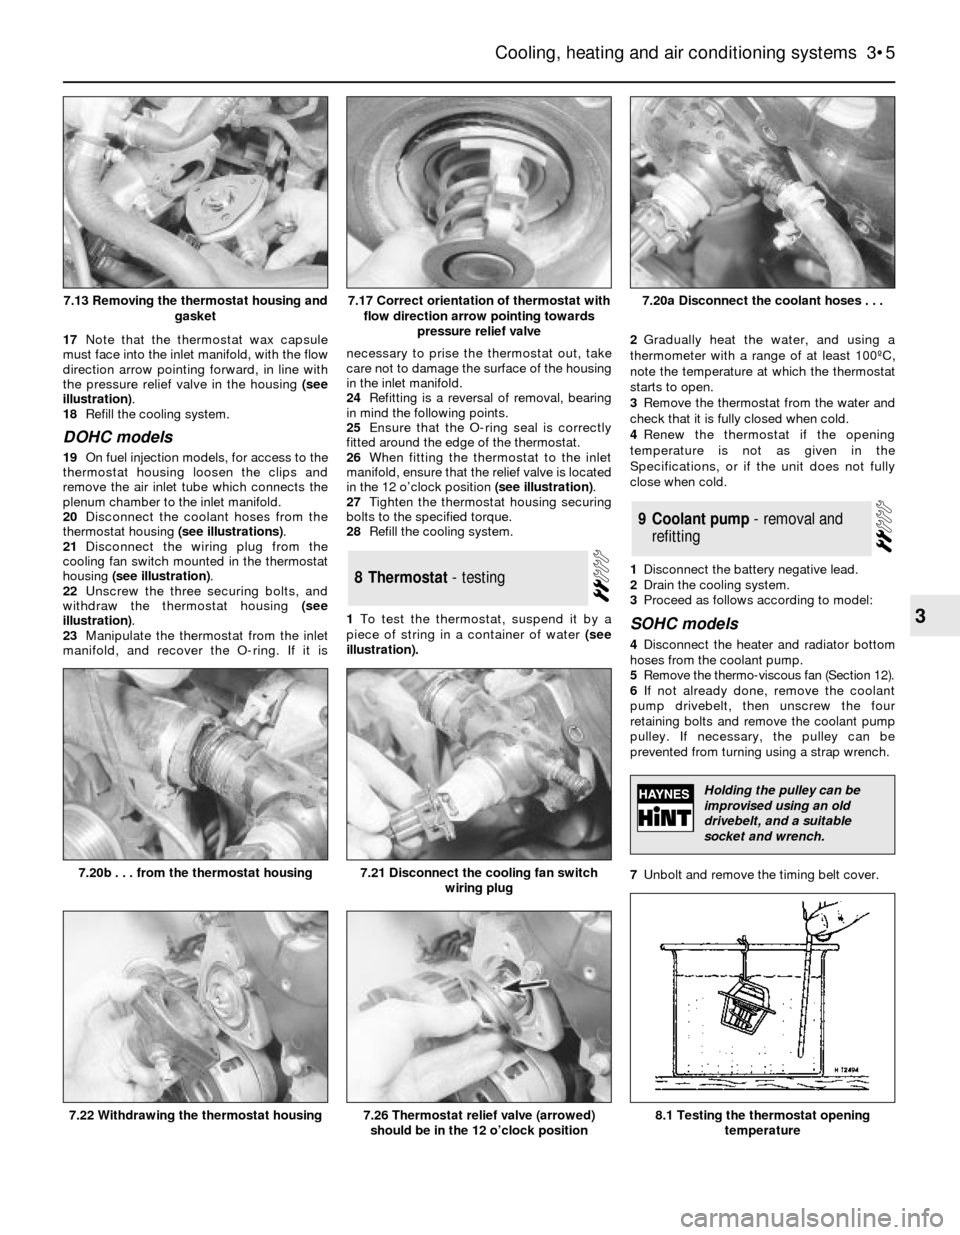
17Note that the thermostat wax capsule
must face into the inlet manifold, with the flow
direction arrow pointing forward, in line with
the pressure relief valve in the housing (see
illustration).
18Refill the cooling system.
DOHC models
19On fuel injection models, for access to the
thermostat housing loosen the clips and
remove the air inlet tube which connects the
plenum chamber to the inlet manifold.
20Disconnect the coolant hoses from the
thermostat housing (see illustrations).
21Disconnect the wiring plug from the
cooling fan switch mounted in the thermostat
housing (see illustration).
22Unscrew the three securing bolts, and
withdraw the thermostat housing (see
illustration).
23Manipulate the thermostat from the inlet
manifold, and recover the O-ring. If it isnecessary to prise the thermostat out, take
care not to damage the surface of the housing
in the inlet manifold.
24Refitting is a reversal of removal, bearing
in mind the following points.
25Ensure that the O-ring seal is correctly
fitted around the edge of the thermostat.
26When fitting the thermostat to the inlet
manifold, ensure that the relief valve is located
in the 12 o’clock position (see illustration).
27Tighten the thermostat housing securing
bolts to the specified torque.
28Refill the cooling system.
1To test the thermostat, suspend it by a
piece of string in a container of water (see
illustration).2Gradually heat the water, and using a
thermometer with a range of at least 100ºC,
note the temperature at which the thermostat
starts to open.
3Remove the thermostat from the water and
check that it is fully closed when cold.
4Renew the thermostat if the opening
temperature is not as given in the
Specifications, or if the unit does not fully
close when cold.
1Disconnect the battery negative lead.
2Drain the cooling system.
3Proceed as follows according to model:
SOHC models
4Disconnect the heater and radiator bottom
hoses from the coolant pump.
5Remove the thermo-viscous fan (Section 12).
6If not already done, remove the coolant
pump drivebelt, then unscrew the four
retaining bolts and remove the coolant pump
pulley. If necessary, the pulley can be
prevented from turning using a strap wrench.
7Unbolt and remove the timing belt cover.
9Coolant pump - removal and
refitting
8Thermostat - testing
Cooling, heating and air conditioning systems 3•5
3
7.20a Disconnect the coolant hoses . . .
8.1 Testing the thermostat opening
temperature7.26 Thermostat relief valve (arrowed)
should be in the 12 o’clock position7.22 Withdrawing the thermostat housing
7.21 Disconnect the cooling fan switch
wiring plug7.20b . . . from the thermostat housing
7.17 Correct orientation of thermostat with
flow direction arrow pointing towards
pressure relief valve7.13 Removing the thermostat housing and
gasket
Holding the pulley can be
improvised using an old
drivebelt, and a suitable
socket and wrench.
Page 7 of 12

36Tighten the coolant pump securing bolts,
and where applicable the pump pulley
securing bolts, to the specified torque.
37On completion, refill the cooling system.
Refer to Chapter 1, Section 21.
Removal
1Remove the alternator drivebelt.
2Loosen the alternator lower mounting
through-bolt, then remove the alternator
upper mounting bolt and swing the alternator
away from the engine.
3Unscrew the central securing bolt, and
withdraw the drivebelt tensioner assembly
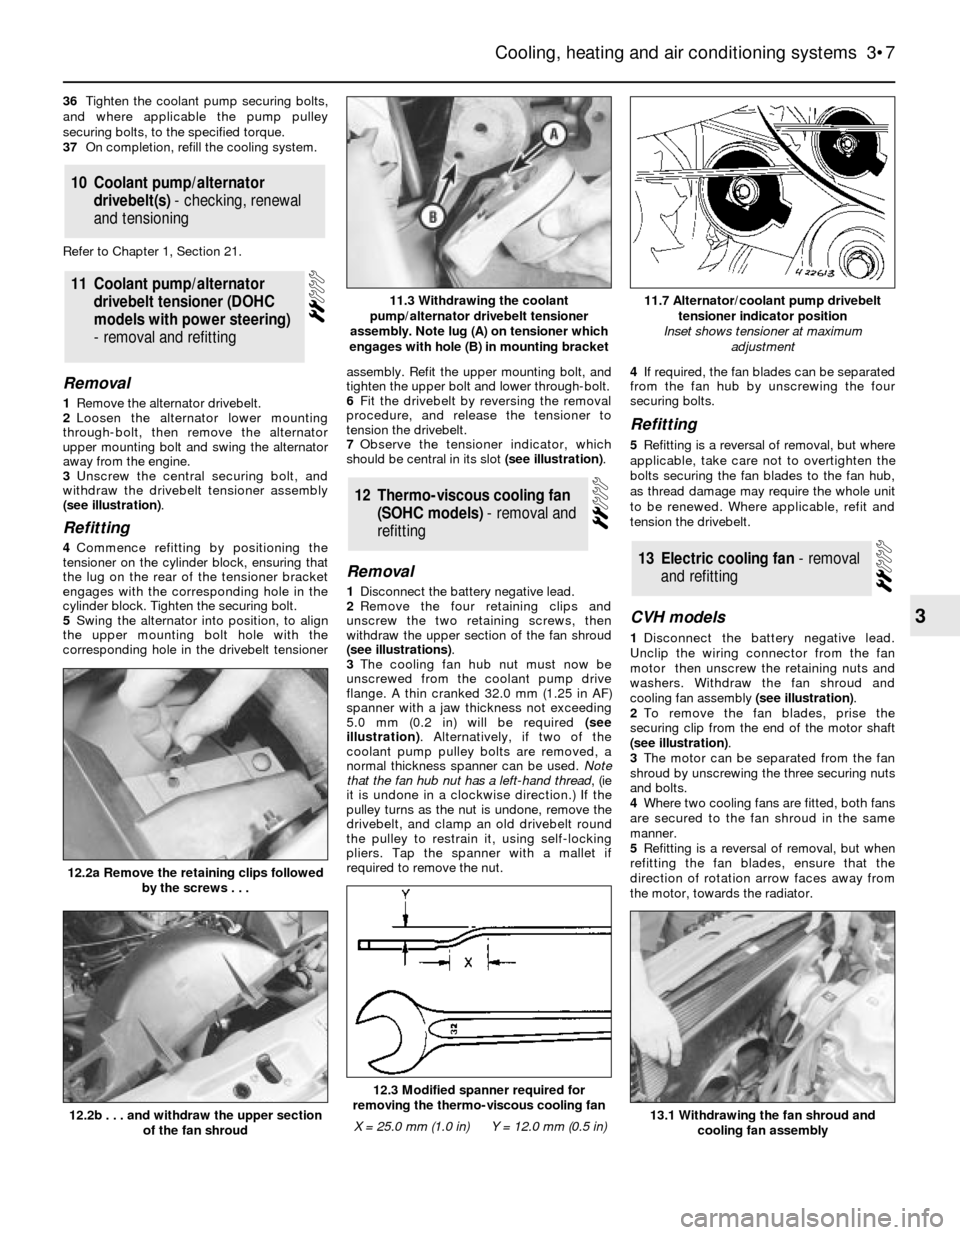
(see illustration).
Refitting
4Commence refitting by positioning the
tensioner on the cylinder block, ensuring that
the lug on the rear of the tensioner bracket
engages with the corresponding hole in the
cylinder block. Tighten the securing bolt.
5Swing the alternator into position, to align
the upper mounting bolt hole with the
corresponding hole in the drivebelt tensionerassembly. Refit the upper mounting bolt, and
tighten the upper bolt and lower through-bolt.
6Fit the drivebelt by reversing the removal
procedure, and release the tensioner to
tension the drivebelt.
7Observe the tensioner indicator, which
should be central in its slot (see illustration).
Removal
1Disconnect the battery negative lead.
2Remove the four retaining clips and
unscrew the two retaining screws, then
withdraw the upper section of the fan shroud
(see illustrations).
3The cooling fan hub nut must now be
unscrewed from the coolant pump drive
flange. A thin cranked 32.0 mm (1.25 in AF)
spanner with a jaw thickness not exceeding
5.0 mm (0.2 in) will be required (see
illustration). Alternatively, if two of the
coolant pump pulley bolts are removed, a
normal thickness spanner can be used.Note
that the fan hub nut has a left-hand thread, (ie
it is undone in a clockwise direction.) If the
pulley turns as the nut is undone, remove the
drivebelt, and clamp an old drivebelt round
the pulley to restrain it, using self-locking
pliers. Tap the spanner with a mallet if
required to remove the nut.4If required, the fan blades can be separated
from the fan hub by unscrewing the four
securing bolts.
Refitting
5Refitting is a reversal of removal, but where
applicable, take care not to overtighten the
bolts securing the fan blades to the fan hub,
as thread damage may require the whole unit
to be renewed. Where applicable, refit and
tension the drivebelt.
CVH models
1Disconnect the battery negative lead.
Unclip the wiring connector from the fan
motor then unscrew the retaining nuts and
washers. Withdraw the fan shroud and
cooling fan assembly (see illustration).
2To remove the fan blades, prise the
securing clip from the end of the motor shaft
(see illustration).
3The motor can be separated from the fan
shroud by unscrewing the three securing nuts
and bolts.
4Where two cooling fans are fitted, both fans
are secured to the fan shroud in the same
manner.
5Refitting is a reversal of removal, but when
refitting the fan blades, ensure that the
direction of rotation arrow faces away from
the motor, towards the radiator.
13Electric cooling fan -removal
andrefitting
12Thermo-viscous cooling fan
(SOHC models) - removal and
refitting
11Coolant pump/alternator
drivebelt tensioner (DOHC
models with power steering)
- removal and refitting
10Coolant pump/alternator
drivebelt(s) - checking, renewal
and tensioning
Cooling, heating and air conditioning systems 3•7
3
12.2a Remove the retaining clips followed
by the screws . . .
13.1 Withdrawing the fan shroud and
cooling fan assembly
12.3 Modified spanner required for
removing the thermo-viscous cooling fan
X = 25.0 mm (1.0 in)Y = 12.0 mm (0.5 in)12.2b . . . and withdraw the upper section
of the fan shroud
11.7 Alternator/coolant pump drivebelt
tensioner indicator position
Inset shows tensioner at maximum
adjustment11.3 Withdrawing the coolant
pump/alternator drivebelt tensioner
assembly. Note lug (A) on tensioner which
engages with hole (B) in mounting bracket
Page 11 of 12

Compressor drivebelt
2Disconnect the battery negative lead.
3On SOHC models, remove the thermo-
viscous cooling fan.
4Slacken the compressor mounting and
pivot bolts, move the compressor towards the
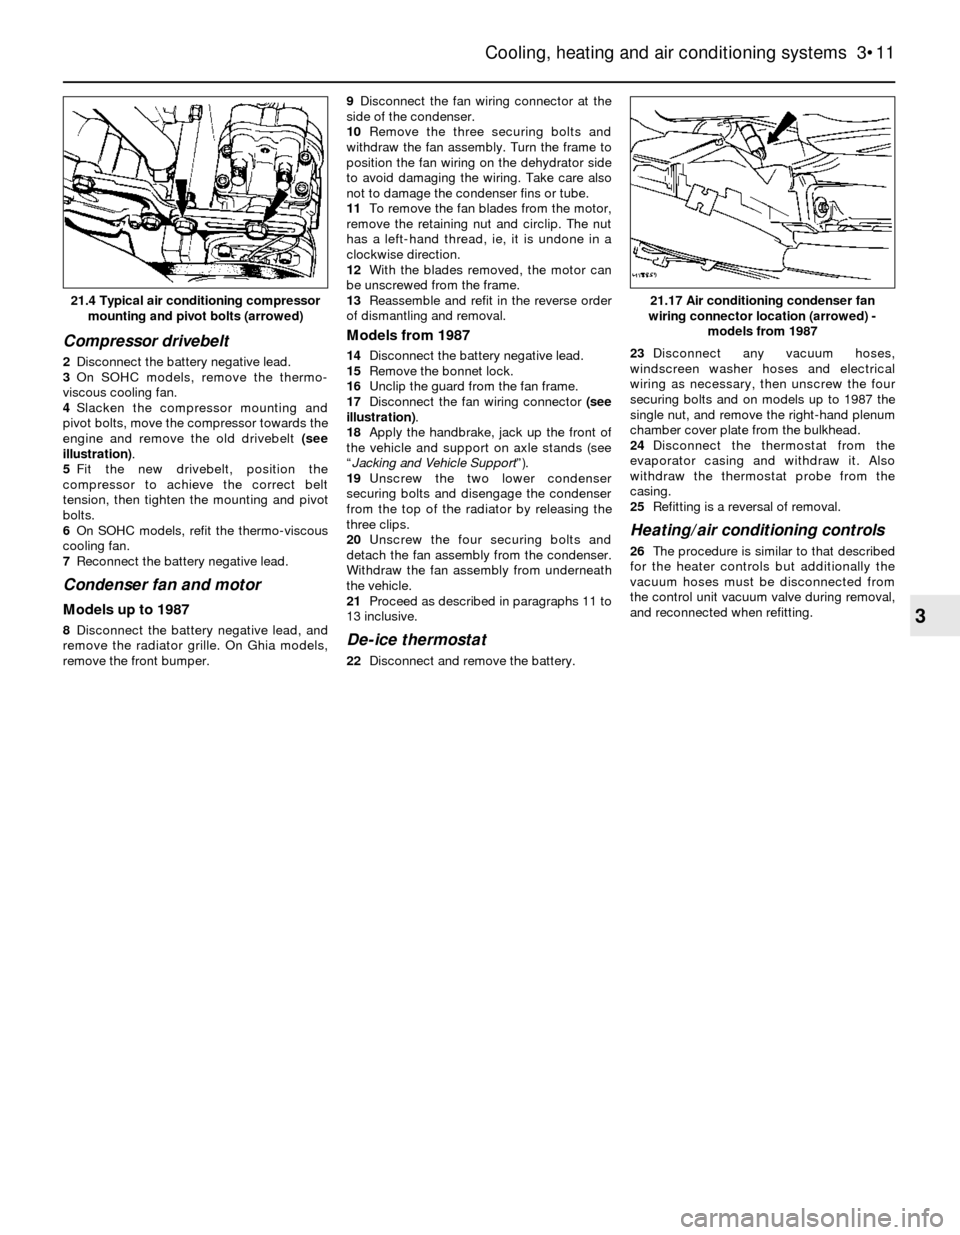
engine and remove the old drivebelt (see
illustration).
5Fit the new drivebelt, position the
compressor to achieve the correct belt
tension, then tighten the mounting and pivot
bolts.
6On SOHC models, refit the thermo-viscous
cooling fan.
7Reconnect the battery negative lead.
Condenser fan and motor
Models up to 1987
8Disconnect the battery negative lead, and
remove the radiator grille. On Ghia models,
remove the front bumper.9Disconnect the fan wiring connector at the
side of the condenser.
10Remove the three securing bolts and
withdraw the fan assembly. Turn the frame to
position the fan wiring on the dehydrator side
to avoid damaging the wiring. Take care also
not to damage the condenser fins or tube.
11To remove the fan blades from the motor,
remove the retaining nut and circlip. The nut
has a left-hand thread, ie, it is undone in a
clockwise direction.
12With the blades removed, the motor can
be unscrewed from the frame.
13Reassemble and refit in the reverse order
of dismantling and removal.
Models from 1987
14Disconnect the battery negative lead.
15Remove the bonnet lock.
16Unclip the guard from the fan frame.
17Disconnect the fan wiring connector (see
illustration).
18Apply the handbrake, jack up the front of
the vehicle and support on axle stands (see
“Jacking and Vehicle Support”).
19Unscrew the two lower condenser
securing bolts and disengage the condenser
from the top of the radiator by releasing the
three clips.
20Unscrew the four securing bolts and
detach the fan assembly from the condenser.
Withdraw the fan assembly from underneath
the vehicle.
21Proceed as described in paragraphs 11 to
13 inclusive.
De-ice thermostat
22Disconnect and remove the battery.23Disconnect any vacuum hoses,
windscreen washer hoses and electrical
wiring as necessary, then unscrew the four
securing bolts and on models up to 1987 the
single nut, and remove the right-hand plenum
chamber cover plate from the bulkhead.
24Disconnect the thermostat from the
evaporator casing and withdraw it. Also
withdraw the thermostat probe from the
casing.
25Refitting is a reversal of removal.
Heating/air conditioning controls
26The procedure is similar to that described
for the heater controls but additionally the
vacuum hoses must be disconnected from
the control unit vacuum valve during removal,
and reconnected when refitting.
Cooling, heating and air conditioning systems 3•11
3
21.17 Air conditioning condenser fan
wiring connector location (arrowed) -
models from 198721.4 Typical air conditioning compressor
mounting and pivot bolts (arrowed)