service FORD SUPER DUTY 2013 3.G Repair Manual
[x] Cancel search | Manufacturer: FORD, Model Year: 2013, Model line: SUPER DUTY, Model: FORD SUPER DUTY 2013 3.GPages: 563, PDF Size: 7.27 MB
Page 348 of 563
M.Maximum Inflation Pressure:Indicates the tire manufacturers’
maximum permissible pressure and/or the pressure at which the
maximum load can be carried by the tire. This pressure is normally
higher than the manufacturer’s recommended cold inflation pressure
which can be found on the Safety Compliance Certification Label (affixed
to either the door hinge pillar, door-latch post, or the door edge that
meets the door-latch post, next to the driver’s seating position), or Tire
Label which is located on the B-Pillar or the edge of the driver’s door.
The cold inflation pressure should never be set lower than the
recommended pressure on the vehicle label.
The tire suppliers may have additional markings, notes or warnings, such
as standard load, radial tubeless, etc.
Additional Information Contained on the Tire Sidewall for LT Type
Tires
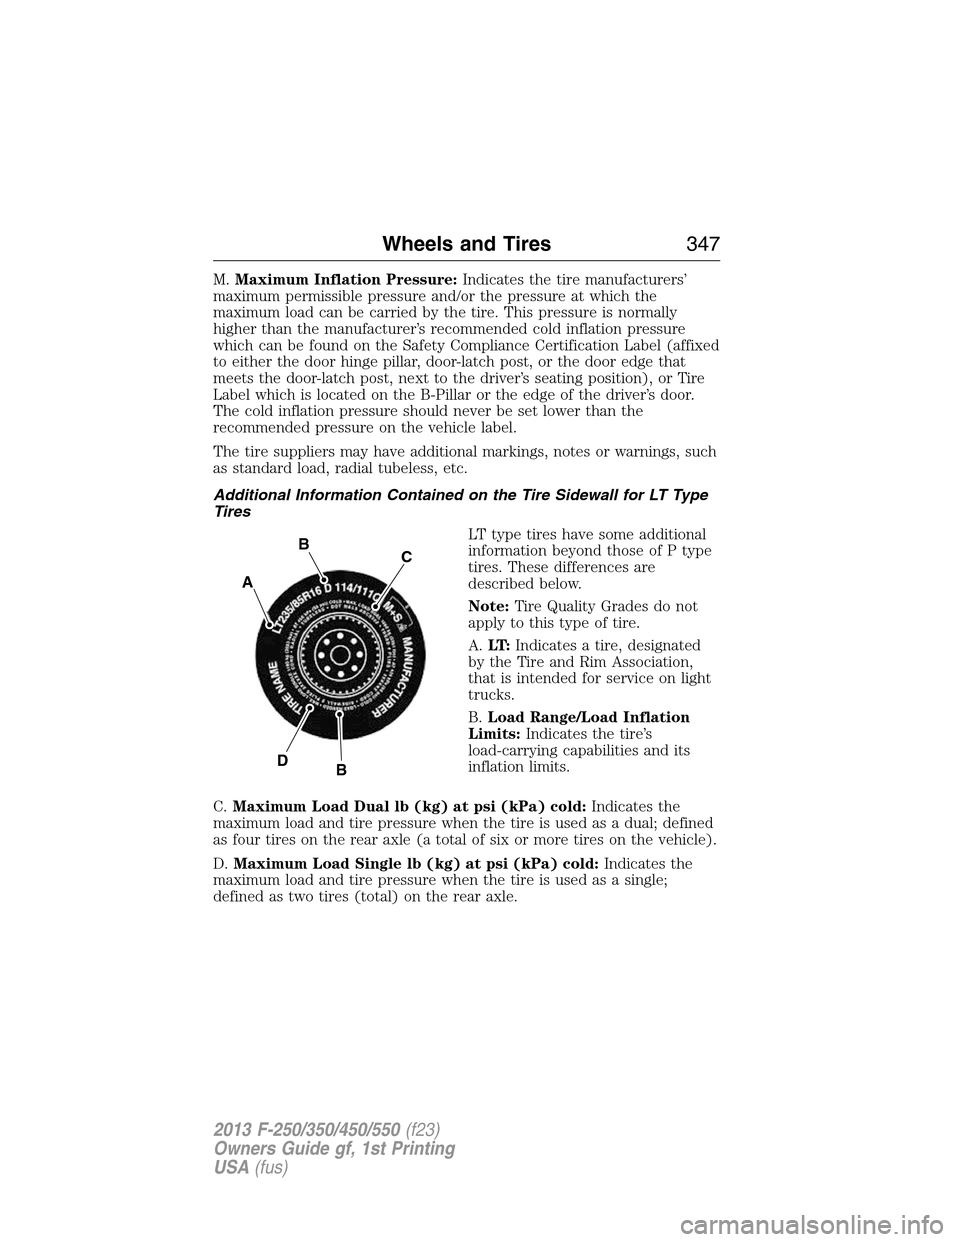
LT type tires have some additional
information beyond those of P type
tires. These differences are
described below.
Note:Tire Quality Grades do not
apply to this type of tire.
A.LT:Indicates a tire, designated
by the Tire and Rim Association,
that is intended for service on light
trucks.
B.Load Range/Load Inflation
Limits:Indicates the tire’s
load-carrying capabilities and its
inflation limits.
C.Maximum Load Dual lb (kg) at psi (kPa) cold:Indicates the
maximum load and tire pressure when the tire is used as a dual; defined
as four tires on the rear axle (a total of six or more tires on the vehicle).
D.Maximum Load Single lb (kg) at psi (kPa) cold:Indicates the
maximum load and tire pressure when the tire is used as a single;
defined as two tires (total) on the rear axle.
A
BC
BD
Wheels and Tires347
2013 F-250/350/450/550(f23)
Owners Guide gf, 1st Printing
USA(fus)
Page 349 of 563
Information on T Type Tires
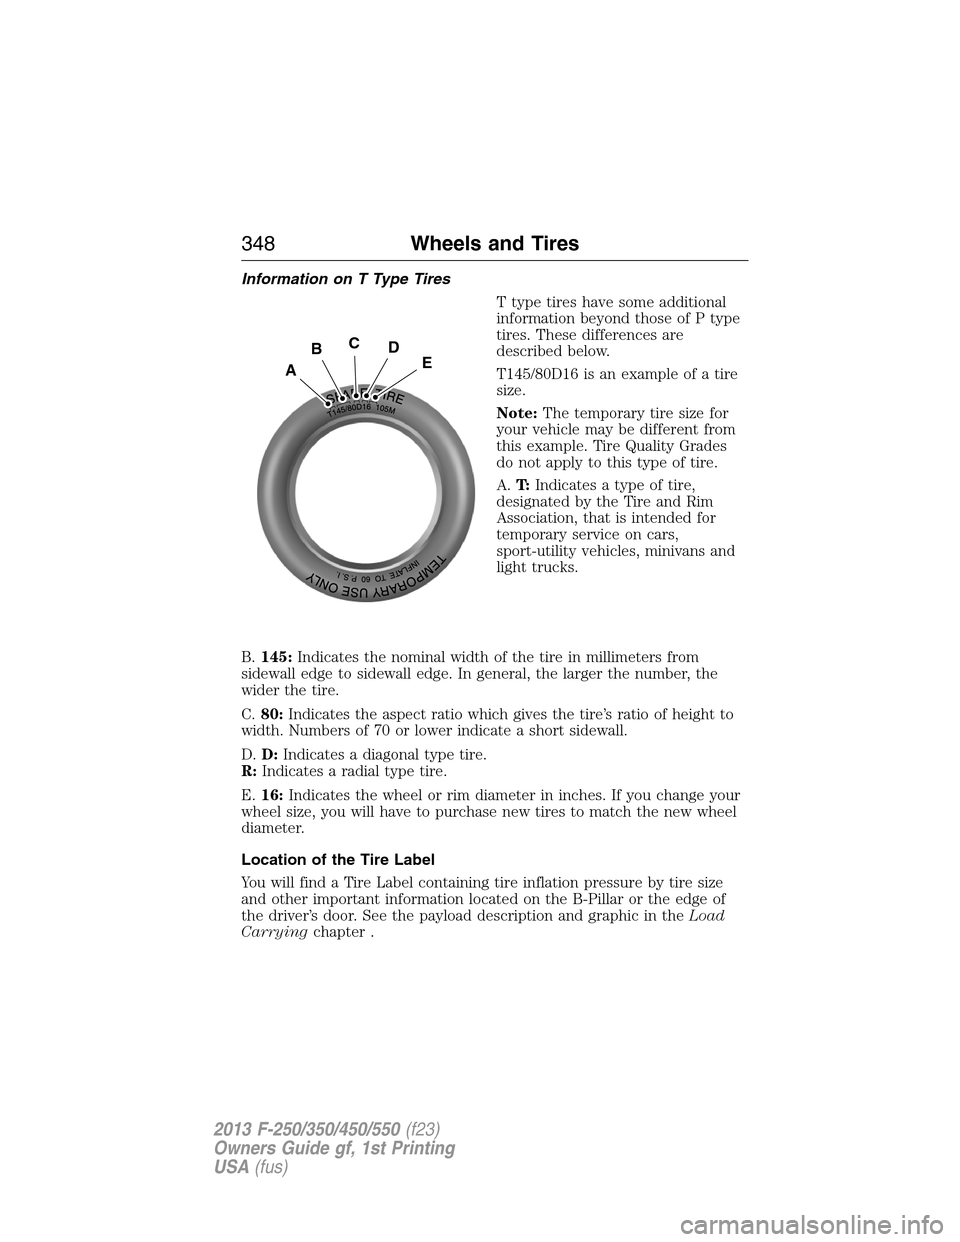
T type tires have some additional
information beyond those of P type
tires. These differences are
described below.
T145/80D16 is an example of a tire
size.
Note:The temporary tire size for
your vehicle may be different from
this example. Tire Quality Grades
do not apply to this type of tire.
A.T:Indicates a type of tire,
designated by the Tire and Rim
Association, that is intended for
temporary service on cars,
sport-utility vehicles, minivans and
light trucks.
B.145:Indicates the nominal width of the tire in millimeters from
sidewall edge to sidewall edge. In general, the larger the number, the
wider the tire.
C.80:Indicates the aspect ratio which gives the tire’s ratio of height to
width. Numbers of 70 or lower indicate a short sidewall.
D.D:Indicates a diagonal type tire.
R:Indicates a radial type tire.
E.16:Indicates the wheel or rim diameter in inches. If you change your
wheel size, you will have to purchase new tires to match the new wheel
diameter.
Location of the Tire Label
You will find a Tire Label containing tire inflation pressure by tire size
and other important information located on the B-Pillar or the edge of
the driver’s door. See the payload description and graphic in theLoad
Carryingchapter .
A
BCDE
348Wheels and Tires
2013 F-250/350/450/550(f23)
Owners Guide gf, 1st Printing
USA(fus)
Page 350 of 563
INFLATING YOUR TIRES
Safe operation of your vehicle requires that your tires are properly
inflated. Remember that a tire can lose up to half of its air pressure
without appearing flat.
Every day before you drive, check your tires. If one looks lower than the
others, use a tire gauge to check pressure of all tires and adjust if
required.
At least once a month and before long trips, inspect each tire and check
the tire pressure with a tire gauge (including spare, if equipped). Inflate
all tires to the inflation pressure recommended by Ford Motor Company.
WARNING:Under-inflation is the most common cause of tire
failures and may result in severe tire cracking, tread separation
or blowout, with unexpected loss of vehicle control and increased risk
of injury. Under-inflation increases sidewall flexing and rolling
resistance, resulting in heat buildup and internal damage to the tire. It
also may result in unnecessary tire stress, irregular wear, loss of vehicle
control and accidents. A tire can lose up to half of its air pressure and
not appear to be flat!
You are strongly urged to buy a reliable tire pressure gauge, as automatic
service station gauges may be inaccurate. Ford recommends the use of a
digital or dial-type tire pressure gauge rather than a stick-type tire
pressure gauge.
Use the recommended cold inflation pressure for optimum tire
performance and wear. Under-inflation or over-inflation may cause
uneven treadwear patterns.
Always inflate your tires to the Ford recommended inflation pressure
even if it is less than the maximum inflation pressure information found
on the tire. The Ford recommended tire inflation pressure is found on
the Safety Compliance Certification Label (affixed to either the door
hinge pillar, door-latch post, or the door edge that meets the door-latch
post, next to the driver’s seating position), or Tire Label which is located
on the B-Pillar or the edge of the driver’s door. Failure to follow the tire
pressure recommendations can cause uneven treadwear patterns and
adversely affect the way your vehicle handles.
Wheels and Tires349
2013 F-250/350/450/550(f23)
Owners Guide gf, 1st Printing
USA(fus)
Page 352 of 563
2. Remove the cap from the valve on one tire, then firmly press the tire
gauge onto the valve and measure the pressure.
3. Add enough air to reach the recommended air pressure.
Note:If you overfill the tire, release air by pushing on the metal stem in
the center of the valve. Then recheck the pressure with your tire gauge.
4. Replace the valve cap.
5. Repeat this procedure for each tire, including the spare.
Note:Some spare tires operate at a higher inflation pressure than the
other tires. For T-type or mini-spare tires, see theDissimilar spare tire
and wheel assembly informationsection. Store and maintain at 60 psi
(4.15 bar). For full-size and dissimilar spare tires, see theDissimilar
spare tire and wheel assembly informationsection. Store and maintain
at the higher of the front and rear inflation pressure as shown on the
Tire Label.
6. Visually inspect the tires to make sure there are no nails or other
objects embedded that could poke a hole in the tire and cause an air
leak.
7. Check the sidewalls to make sure there are no gouges, cuts or bulges.
Tire Inflation Information
WARNING:An inflated tire and rim can be very dangerous if
improperly used, serviced or maintained. To reduce the risk of
serious injury, never attempt to re-inflate a tire which has been run flat
or seriously under-inflated without first removing the tire from the
wheel assembly for inspection. Do not attempt to add air to tires or
replace tires or wheels without first taking precautions to protect
persons and property.
All tires with Steel Carcass Plies (if equipped):
This type of tire utilizes steel cords in the sidewalls. As such, they
cannot be treated like normal light truck tires. Tire service, including
adjusting tire pressure, must be performed by personnel trained,
supervised and equipped according to Federal Occupational Safety and
Health Administration regulations. For example, during any procedure
involving tire inflation, the technician or individual must utilize a remote
inflation device, and make sure that all persons are clear of the
trajectory area.
Wheels and Tires351
2013 F-250/350/450/550(f23)
Owners Guide gf, 1st Printing
USA(fus)
Page 356 of 563
Tire Replacement Requirements
WARNING:Only use replacement tires and wheels that are the
same size, load index, speed rating and type (such as P-metric
versus LT-metric or all-season versus all-terrain) as those originally
provided by Ford. The recommended tire and wheel size may be found on
either the Safety Compliance Certification Label (affixed to either the door
hinge pillar, door-latch post, or the door edge that meets the door-latch
post, next to the driver’s seating position), or the Tire Label which is
located on the B-Pillar or edge of the driver’s door. If this information is
not found on these labels then you should contact your authorized dealer
as soon as possible. Use of any tire or wheel not recommended by Ford
can affect the safety and performance of your vehicle, which could result
in an increased risk of loss of vehicle control, vehicle rollover, personal
injury and death. Additionally, the use of non-recommended tires and
wheels could cause steering, suspension, axle, transfer case, or power
transfer unit failure. If you have questions regarding tire replacement,
contact your authorized dealer as soon as possible.
WARNING:When mounting replacement tires and wheels, you
should not exceed the maximum pressure indicated on the
sidewall of the tire to set the beads without additional precautions
listed below. If the beads do not seat at the maximum pressure
indicated, re-lubricate and try again.
When inflating the tire for mounting pressures up to 20 psi (138 kPa)
greater than the maximum pressure on the tire sidewall, take the
following precautions to protect the person mounting the tire:
1. Make sure that you have the correct tire and wheel size.
2. Lubricate the tire bead and wheel bead seat area again.
3. Stand at a minimum of 12 feet (3.66 meters) away from the tire
wheel assembly.
4. Use both eye and ear protection.
For a mounting pressure more than 20 psi (138 kPa) greater than the
maximum pressure, an authorized dealer or other tire service
professional should do the mounting.
Always inflate steel carcass tires with a remote air fill with the person
inflating standing at a minimum of 12 feet (3.66 meters) away from the
tire wheel assembly.
Your vehicle is equipped with tires designed to provide a safe ride and
handling capability.
Wheels and Tires355
2013 F-250/350/450/550(f23)
Owners Guide gf, 1st Printing
USA(fus)
Page 362 of 563
vehicle to ensure that the replacement or alternate tires and wheels
allow the system to continue to function properly.
The tire pressure monitoring system complies with part 15 of the FCC
rules and with RSS-210 of Industry Canada. Operation is subject to the
following two conditions: (1) This device may not cause harmful
interference, and (2) This device must accept any interference received,
including interference that may cause undesired operation.
Changing Tires with a Tire Pressure Monitoring System
Note:Each road tire is equipped
with a tire pressure sensor located
inside the tire and wheel assembly
cavity. The pressure sensor is
attached to the valve stem. The
pressure sensor is covered by the
tire and is not visible unless the tire
is removed. Take care when
changing the tire to avoid damaging
the sensor.
You should always have your tires serviced by an authorized dealer.
Check the tire pressure periodically (at least monthly) using an accurate
tire gauge. SeeInflating Your Tiresin this chapter.
Understanding Your Tire Pressure Monitoring System
The tire pressure monitoring system measures pressure in your four road
tires and sends the tire pressure readings to your vehicle. The low tire
pressure warning light will turn on if the tire pressure is significantly low.
Once the light is illuminated, your tires are under-inflated and need to be
inflated to the manufacturer’s recommended tire pressure. Even if the
light turns on and a short time later turns off, your tire pressure still
needs to be checked.
When your temporary spare tire is installed
When one of your road tires needs to be replaced with the temporary
spare, the tire pressure monitoring system will continue to identify an
issue to remind you that the damaged road wheel or tire needs to be
repaired and put back on your vehicle.
To restore the full function of the tire pressure monitoring system, have
the damaged road wheel or tire repaired and remounted on your vehicle.
For additional information, seeChanging Tires with a Tire Pressure
Monitoring Systemin this section.
Wheels and Tires361
2013 F-250/350/450/550(f23)
Owners Guide gf, 1st Printing
USA(fus)
Page 366 of 563
Performing the System Reset Procedure
Read the entire procedure before attempting.
1. Drive the vehicle above 20 mph (32 km/h) for at least two minutes
and then park in a safe location where you can easily get to all four tires
and have access to an air pump.
2. Place the ignition in the off position and keep the key in the ignition.
3. Cycle the ignition to the on position with the engine off.
4. Turn the hazard flashers on then off three times. This must be
accomplished within 10 seconds.
If the reset mode has been entered successfully, the horn will sound
once, the system indicator will flash and a message is shown in the
information display (if equipped). If this does not occur, please try again
startingatStep2.
If after repeated attempts to enter the reset mode, the horn does not
sound, the system indicator does not flash and no message is shown in the
information display (if equipped), seek service from your authorized dealer.
5.Note:Train the tire pressure monitoring system sensors in the tires
using the following system reset sequence starting with the left front tire
in the following clockwise order:
•Left front (Driver’s side front tire)
•Right front (Passenger’s side front tire)
•Right rear (Passenger’s side rear tire)
•Left rear (Driver’s side rear tire)
6. Remove the valve cap from the valve stem on the left front tire;
decrease the air pressure until the horn sounds.
Note:The single horn chirp confirms that the sensor identification code
has been learned by the module for this position. If a double horn is
heard, the reset procedure was unsuccessful, and must be repeated.
7. Remove the valve cap from the valve stem on the right front tire;
decrease the air pressure until the horn sounds.
8. Remove the valve cap from the valve stem on the right rear tire;
decrease the air pressure until the horn sounds.
9. Remove the valve cap from the valve stem on the left rear tire;
decrease the air pressure until the horn sounds.
Training is complete after the horn sounds for the last tire trained
(driver’s side rear tire), the system indicator stops flashing, and a
message is shown in the information display (if equipped).
Wheels and Tires365
2013 F-250/350/450/550(f23)
Owners Guide gf, 1st Printing
USA(fus)
Page 367 of 563
10. Turn the ignition off. If two short horn beeps are heard, the reset
procedure was unsuccessful and must be repeated.
If after repeating the procedure and two short beeps are heard when the
ignition is turned to off, seek assistance from your authorized dealer.
11. Set all four tires to the recommended air pressure as indicated on
the Safety Compliance Certification Label (affixed to either the door
hinge pillar, door-latch post, or the door edge that meets the door-latch
post, next to the driver’s seating position) or Tire Label located on the
B-Pillar or the edge of the driver’s door. SeeLoad Carryingfor more
information.
CHANGING A ROAD WHEEL
WARNING:The use of tire sealants may damage your tire
pressure monitoring system and should not be used. However, if
you must use a sealant, the tire pressure monitoring system sensor and
valve stem on the wheel must be replaced by an authorized Ford
dealer.
WARNING:SeeTire Pressure Monitoring Systemin this
chapter for important information. If the tire pressure monitor
sensor becomes damaged, it will no longer function.
Note:If your vehicle is equipped with the tire pressure monitoring
system, the indicator light will illuminate when the spare tire is in use.
To restore the full function of the monitoring system, all road wheels
equipped with tire pressure monitoring sensors must be mounted on the
vehicle.
If you get a flat tire while driving, do not apply the brake heavily.
Instead, gradually decrease your speed. Hold the steering wheel firmly
and slowly move to a safe place on the side of the road.
If your vehicle is equipped with the tire pressure monitoring system,
have a flat serviced by an authorized dealer in order to prevent damage
to the system sensors. SeeTire Pressure Monitoring Systemin this
chapter. Replace the spare tire with a road tire as soon as possible.
During repairing or replacing of the flat tire, have the authorized dealer
inspect the system sensor for damage.
366Wheels and Tires
2013 F-250/350/450/550(f23)
Owners Guide gf, 1st Printing
USA(fus)
Page 369 of 563

3.Full-size dissimilar spare without label on wheel
When driving with the full-size dissimilar spare tire and wheel assembly,
do not:
•exceed 70 mph (113 km/h).
•use more than one dissimilar spare tire and wheel at a time.
•use commercial car washing equipment.
•use snow chains on the end of the vehicle with the dissimilar spare
tire and wheel.
The usage of a full-size dissimilar spare tire and wheel assembly can lead
to impairment of the following:
•Handling, stability and braking performance
•Comfort and noise
•Ground clearance and parking at curbs
•Winter weather driving capability
•Wet weather driving capability
•All-wheel driving capability (if applicable)
•Load leveling adjustment (if applicable)
When driving with the full-size dissimilar spare tire and wheel assembly,
additional caution should be given to:
•towing a trailer.
•driving vehicles equipped with a camper body.
•driving vehicles with a load on the cargo rack.
Drive cautiously when using a full-size dissimilar spare tire and wheel,
and seek service as soon as possible.
Location of the Spare Tire and Tools
If your vehicle is equipped with a spare tire, jack and associated tools,
refer to the following table for their locations:
Tool Location
Spare tire (pick-up trucks only) Under the vehicle, just forward of
the rear bumper
Jack Regular cab and Crew Cab: Fastened
to floor pan behind rearmost seat on
passenger side
SuperCab: Under rear bench seat on
passenger side
368Wheels and Tires
2013 F-250/350/450/550(f23)
Owners Guide gf, 1st Printing
USA(fus)
Page 381 of 563
3. Lay the tire on the ground with the valve stem facing up.
4. Slide the wheel partially under the vehicle and install the retainer
through the wheel center. Pull on the cable to align the components at
the end of the cable.
5. Turn the jack handle clockwise until the tire is raised to its stowed
position underneath the vehicle. The effort to turn the jack handle
increases significantly and the spare tire carrier ratchets or slips when
the tire is raised to the maximum tightness. Tighten to the best of your
ability, to the point where the ratchet/slip occurs, if possible. The spare
tire carrier will not allow you to overtighten. If the spare tire carrier
ratchets or slips with little effort, take the vehicle to your authorized
dealer for assistance at your earliest convenience.
6. Check that the tire lies flat against the frame and is properly
tightened. Try to push or pull, then turn the tire to be sure it will not
move. Loosen and retighten, if necessary. Failure to properly stow the
spare tire may result in failure of the winch cable and loss of the tire.
7. Repeat this tightness check procedure when servicing the spare tire
pressure (every six months, perscheduled maintenance information),
or at any time that the spare tire is disturbed through service of other
components.
8. If removed, install the spare tire lock (if equipped) into the bumper
drive tube with the spare tire lock key (if equipped) and jack handle.
TECHNICAL SPECIFICATIONS
Wheel Lug Nut Torque Specifications
WARNING:When a wheel is installed, always remove any
corrosion, dirt or foreign materials present on the mounting
surfaces of the wheel or the surface of the wheel hub, brake drum or
brake disc that contacts the wheel. Make sure that any fasteners that
attach the rotor to the hub are secured so they do not interfere with
the mounting surfaces of the wheel. Installing wheels without correct
metal-to-metal contact at the wheel mounting surfaces can cause the
wheel nuts to loosen and the wheel to come off while the vehicle is in
motion, resulting in loss of control.
On vehicles equipped with single rear wheels, retighten the lug nuts to
the specified torque at 100 miles (160 kilometers) after any wheel
disturbance (such as tire rotation, changing a flat tire, wheel removal).
380Wheels and Tires
2013 F-250/350/450/550(f23)
Owners Guide gf, 1st Printing
USA(fus)