manual transmission FORD SUPER DUTY 2023 Owners Manual
[x] Cancel search | Manufacturer: FORD, Model Year: 2023, Model line: SUPER DUTY, Model: FORD SUPER DUTY 2023Pages: 738, PDF Size: 18.49 MB
Page 8 of 738
Manually Dimming the Interior Mirror..........................................................................131
Auto-Dimming Interior Mirror...................131
Exterior Mirrors
Adjusting the Exterior Mirrors..................132
Folding the Exterior Mirrors - VehiclesWith: Manual Folding Mirrors..............132
Folding the Exterior Mirrors - VehiclesWith: Power Folding Mirrors................132
Extending the Exterior Mirrors.................133
Exterior Mirrors Videos...............................133
Moonroof
Opening and Closing the Sunshade......134
Opening and Closing the Moonroof......134
Venting the Moonroof................................135
Moonroof Bounce-Back............................135
Moonroof Videos.........................................135
Instrument Cluster
Instrument Cluster Overview - VehiclesWith: 8 Inch Screen................................136
Instrument Cluster Overview - VehiclesWith: 12 Inch Screen................................137
Tachometer....................................................137
Speedometer.................................................137
Fuel Gauge......................................................137
Engine Coolant Temperature Gauge.........................................................................138
Engine Oil Pressure Gauge.......................138
Engine Oil Temperature Gauge..............138
Transmission Fluid Temperature Gauge.........................................................................138
Turbo Boost Gauge.....................................138
Diesel Exhaust Fluid Gauge.....................138
What Are the Instrument ClusterWarning Lamps........................................139
Instrument Cluster Warning Lamps......139
What Are the Instrument ClusterIndicators...................................................140
Instrument Cluster Indicators.................140
Instrument Cluster Display
Using the Instrument Cluster DisplayControls.......................................................143
Instrument Cluster Display Main Menu -Vehicles With: 8 Inch Screen...............143
Instrument Cluster Display Main Menu -Vehicles With: 12 Inch Screen.............144
Customizing the Instrument ClusterDisplay - Vehicles With: 8 Inch Screen.........................................................................144
Customizing the Instrument ClusterDisplay - Vehicles With: 12 Inch Screen.........................................................................144
Personalized Settings
Changing the Language............................145
Changing the Measurement Unit..........145
Changing the Temperature Unit............145
Changing the Tire Pressure Unit............145
Trip Computer
Accessing the Trip Computer - VehiclesWith: 8 Inch Screen................................146
Accessing the Trip Computer - VehiclesWith: 12 Inch Screen...............................146
Resetting the Trip Computer..................146
Trip Data.........................................................146
Head Up Display
What Is the Head Up Display..................147
Switching the Head Up Display On andOff..................................................................147
Head Up Display Settings.........................147
Head Up Display – Troubleshooting.........................................................................148
Remote Start
What Is Remote Start................................149
Remote Start Precautions.......................149
Remote Start Limitations........................149
4
2023 Super Duty (TFH) Canada/United States of America, enUSA, Edition date: 202211, DOMTable of Contents
Page 11 of 738
Glasses Holder.............................................201
Starting and Stopping theEngine
Starting and Stopping the Engine –Precautions...............................................202
Ignition Switch.............................................202
Push Button Ignition Switch...................203
Starting the Engine....................................203
Engine Block Heater..................................205
Stopping the Engine.................................206
Idle Timer.......................................................207
Automatic Engine Stop...........................208
Accessing the Passive Key BackupPosition......................................................209
Starting and Stopping the Engine –Troubleshooting.....................................209
Starting and Stopping the Engine Videos.........................................................................213
Fuel and Refueling
Fuel and Refueling Precautions.............214
Fuel Quality....................................................214
Running Out of Fuel....................................217
Refueling.........................................................218
Fuel Tank Capacity....................................220
Fuel and Refueling – Troubleshooting........................................................................220
Diesel Particulate Filter
What Is the Diesel Particulate Filter......221
How Does the Diesel Particulate FilterWork..............................................................221
Diesel Particulate Filter Precautions.........................................................................221
Diesel Particulate Filter Requirements........................................................................222
Diesel Particulate Filter ManualRegeneration............................................222
Diesel Particulate Filter –Troubleshooting......................................224
Selective Catalytic ReductionSystem
What Is the Selective CatalyticReduction System..................................226
How Does the Selective CatalyticReduction System Work......................226
Selective Catalytic Reduction SystemPrecautions...............................................226
Selective Catalytic Reduction SystemRequirements..........................................228
Selective Catalytic Reduction SystemGuidelines..................................................228
Filling the Selective Catalytic ReductionSystem Tank.............................................228
Checking the Selective CatalyticReduction System Status...................230
Diesel Exhaust Fluid Capacity andSpecification............................................230
Selective Catalytic Reduction System –Troubleshooting......................................230
Catalytic Converter
What Is the Catalytic Converter............233
Catalytic Converter Precautions...........233
Catalytic Converter – Troubleshooting........................................................................233
Automatic Transmission
Automatic Transmission Precautions........................................................................234
Automatic Transmission Positions......234
Shifting Your Vehicle Into Gear..............235
Automatic Transmission PositionIndicators...................................................235
Manually Shifting Gears...........................235
Using Progressive Range Selection......236
Automatic Transmission AudibleWarnings....................................................236
Power Take-Off...........................................236
Four-Wheel Drive
How Does Four-Wheel Drive Work......238
7
2023 Super Duty (TFH) Canada/United States of America, enUSA, Edition date: 202211, DOMTable of Contents
Page 124 of 738
4.Switch Daytime Running Lights on oroff.
The daytime running lamps turn on whenall of the following occur:
•You switch the system on.
•You switch your vehicle on.
•The transmission is not in park (P) forvehicles with automatic transmissionsor you release the parking brake forvehicles with manual transmissions.
•The lighting control is in the autolampsposition.
•The headlamps are off.
Note:Other lighting control positions donot turn on the daytime running lamps.
SWITCHING THE DAYTIMERUNNING LAMPS ON AND OFF -VEHICLES WITH: DAYTIMERUNNING LAMPS (DRL)
WARNING: The daytime runninglamps system does not activate the rearlamps and may not provide adequatelighting during low visibility drivingconditions. Make sure you switch theheadlamps on, as appropriate, during alllow visibility conditions. Failure to do somay result in a crash.
Daytime running lamps are always onunless you switch on the headlamps oryour vehicle is in park (P).
USING THE FRONT FOG LAMPS (If
Equipped)
To switch the lamps on or off:
1.Set the lighting control to the parkinglamps, headlamps or autolampsposition.
Note:When the lighting control is in theautolamps position, you cannot switch thefog lamps on unless the low beamheadlamps are on.
2.
Press the button on thelighting control to switch the front foglamps on or off.
Note:Only switch the front fog lamps onduring reduced visibility.
Note:The brightness of the daytime runninglamps may decrease when the front foglamps are switched on.
Note:The front fog lamps lights switch offautomatically when high beams areactivated.
Front Fog Lamps Indicator
It illuminates when you switchthe front fog lamps on.
SWITCHING THE CARGO LAMPSON (If Equipped)
Press the button in the lightingcontrol or in the rear cargo box.
SWITCHING THE SPOT LAMPS ONAND OFF (If Equipped)
The spot lamp buttons are near the lightingcontrol.
Press the button to switch on theleft-hand spot lamp.
Press the button to switch on theright-hand spot lamp.
Move the position of the exterior mirrorsto adjust the aim.
120
2023 Super Duty (TFH) Canada/United States of America, enUSA, Edition date: 202211, DOMExterior Lighting E189587 E340436 E340437
Page 238 of 738
AUTOMATIC TRANSMISSION
PRECAUTIONS
WARNING: Apply the parkingbrake, shift into park (P), switch theignition off and remove the key beforeyou leave your vehicle. Failure to followthis instruction could result in personalinjury or death.
WARNING: When your vehicle isstationary, keep the brake pedal fullypressed when shifting gears. Failure tofollow this instruction could result inpersonal injury, death or propertydamage.
WARNING: Do not apply the brakepedal and accelerator pedalsimultaneously. Applying both pedalssimultaneously for more than a fewseconds will limit engine performance,which may result in difficulty maintainingspeed in traffic and could lead to seriousinjury.
AUTOMATIC TRANSMISSION
POSITIONS
PARK (P)
WARNING: Shift into park (P) onlywhen your vehicle is stationary.
In park (P) power is not transmitted to thedriven wheels.
Note:A tone sounds if you attempt to exityour vehicle without the vehicle in park (P).
Note:Your vehicle may not shift out of park(P) if the 12 V battery has run out of charge.
Note:Your vehicle may not shift out of park(P) if a fuse is blown.
Note:Your vehicle may not shift out of park(P) unless the key or remote control is insideyour vehicle.
Note:The electronic parking brake couldapply when you power your vehicle on withthe selector in park (P).
Note:The electronic parking brake couldapply if you shift to park (P) without fullypressing the brake pedal.
Note:The electronic parking brake couldapply if you shift to park (P) on a slope.
Note:Do not manually release the parkingbrake when the selector is in park (P). SeeAutomatically Releasing the ElectricParking Brake (page 254).
REVERSE (R)
WARNING: Shift into reverse (R)only when your vehicle is stationary.
In reverse (R) power is transmitted to thedriven wheels.
NEUTRAL (N)
WARNING: In neutral (N) yourvehicle is free to roll.
In neutral (N) power is not transmitted tothe driven wheels.
DRIVE (D)
In drive (D) power is transmitted to thedriven wheels.
234
2023 Super Duty (TFH) Canada/United States of America, enUSA, Edition date: 202211, DOMAutomatic Transmission
Page 239 of 738
MANUAL (M)
In manual (M) you can select a specificgear. See Manually Shifting Gears (page235).
Note:We recommend using this mode fordriving on hilly or mountainous roads orwhen towing a trailer. See Towing a Trailer(page 365).
SHIFTING YOUR VEHICLE INTO
GEAR
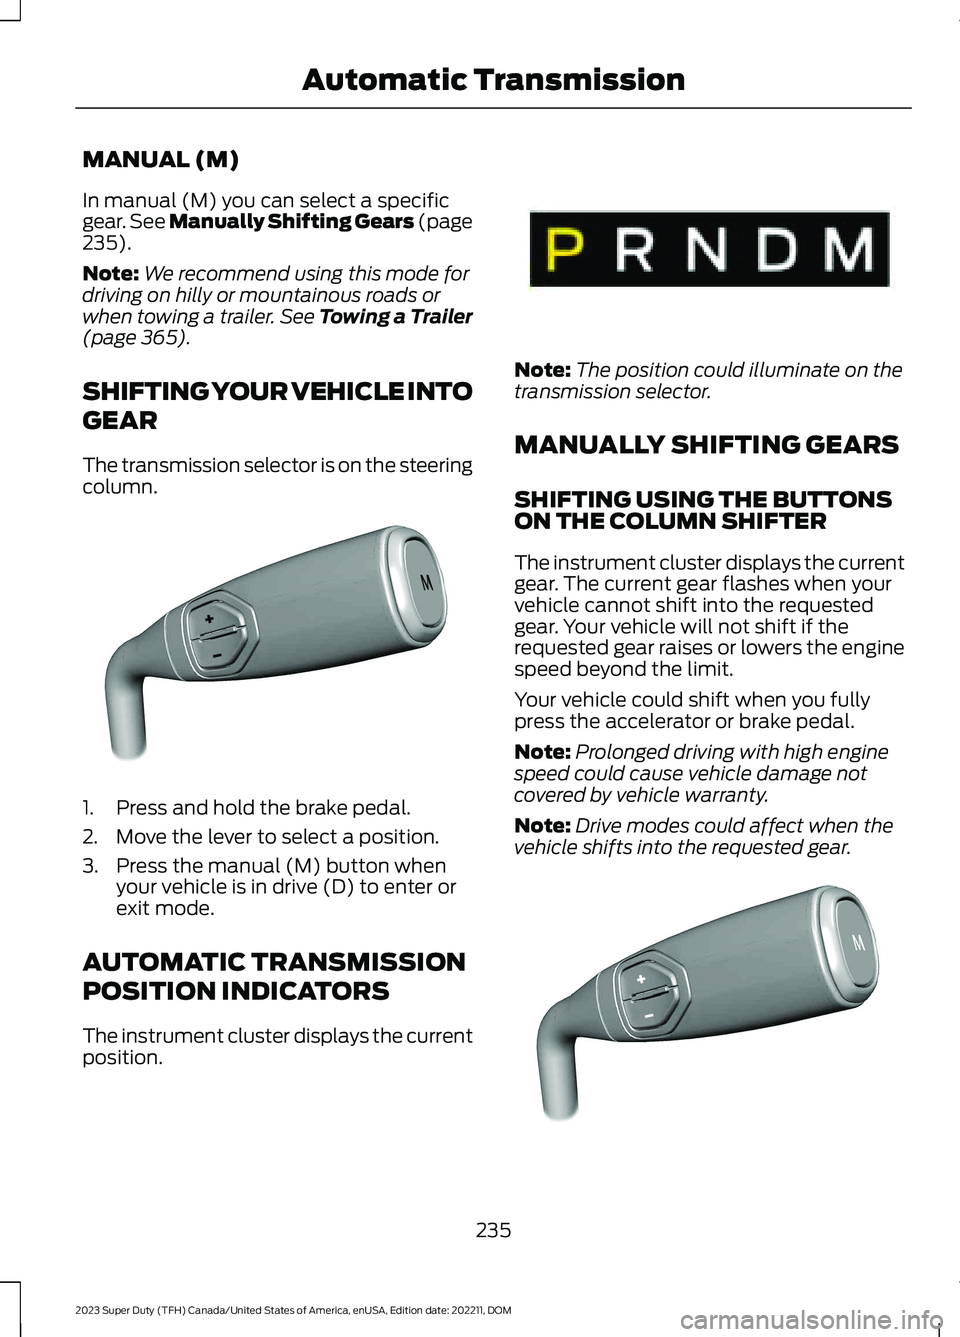
The transmission selector is on the steeringcolumn.
1.Press and hold the brake pedal.
2.Move the lever to select a position.
3.Press the manual (M) button whenyour vehicle is in drive (D) to enter orexit mode.
AUTOMATIC TRANSMISSION
POSITION INDICATORS
The instrument cluster displays the currentposition.
Note:The position could illuminate on thetransmission selector.
MANUALLY SHIFTING GEARS
SHIFTING USING THE BUTTONSON THE COLUMN SHIFTER
The instrument cluster displays the currentgear. The current gear flashes when yourvehicle cannot shift into the requestedgear. Your vehicle will not shift if therequested gear raises or lowers the enginespeed beyond the limit.
Your vehicle could shift when you fullypress the accelerator or brake pedal.
Note:Prolonged driving with high enginespeed could cause vehicle damage notcovered by vehicle warranty.
Note:Drive modes could affect when thevehicle shifts into the requested gear.
235
2023 Super Duty (TFH) Canada/United States of America, enUSA, Edition date: 202211, DOMAutomatic TransmissionE371381 E341776 E372904
Page 240 of 738
Manually Shifting Gears in Manual(M)
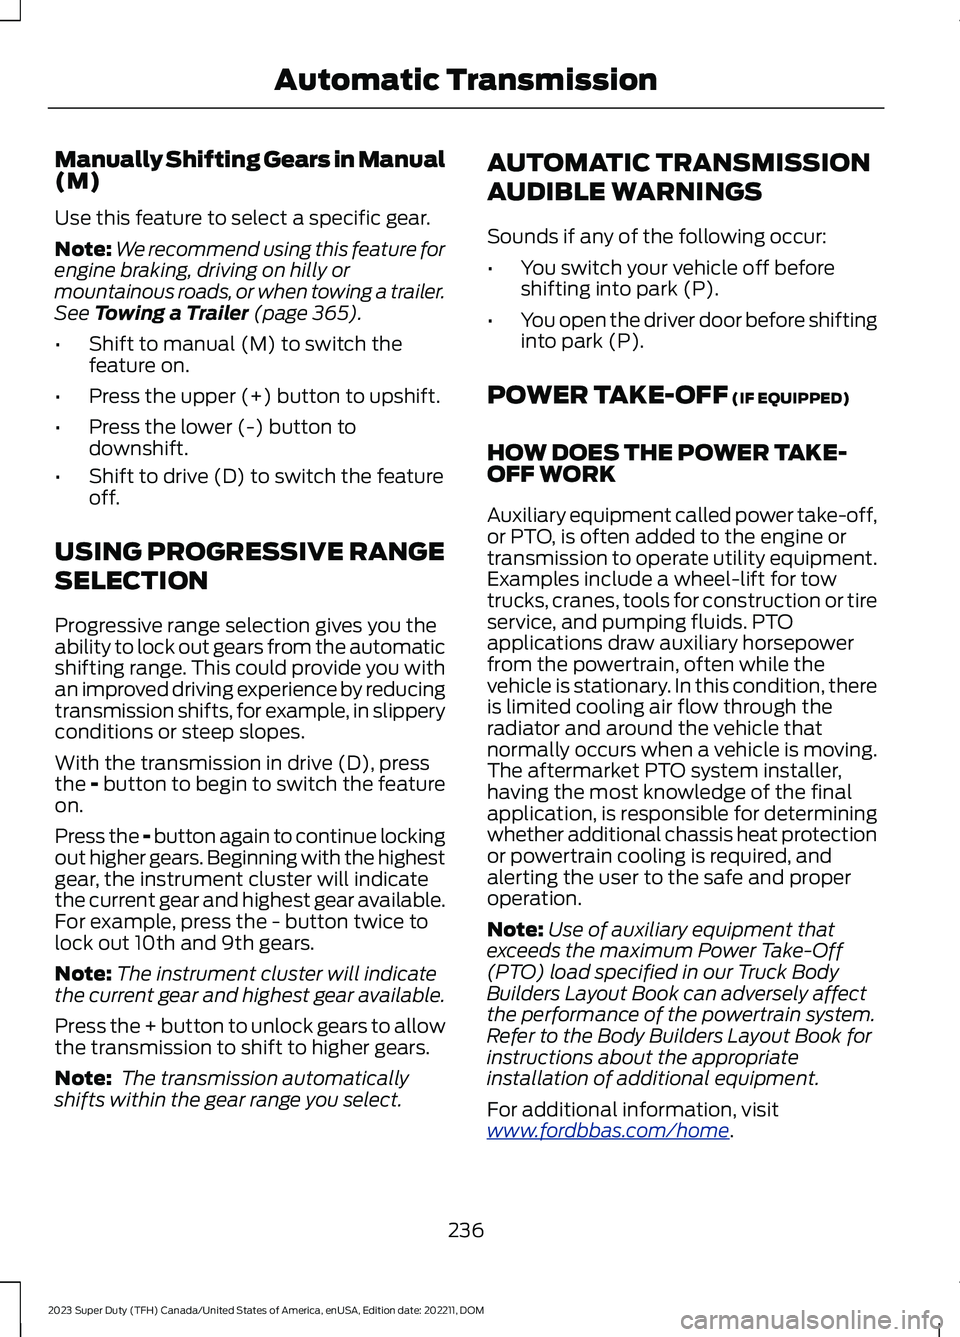
Use this feature to select a specific gear.
Note:We recommend using this feature forengine braking, driving on hilly ormountainous roads, or when towing a trailer.See Towing a Trailer (page 365).
•Shift to manual (M) to switch thefeature on.
•Press the upper (+) button to upshift.
•Press the lower (-) button todownshift.
•Shift to drive (D) to switch the featureoff.
USING PROGRESSIVE RANGE
SELECTION
Progressive range selection gives you theability to lock out gears from the automaticshifting range. This could provide you withan improved driving experience by reducingtransmission shifts, for example, in slipperyconditions or steep slopes.
With the transmission in drive (D), pressthe - button to begin to switch the featureon.
Press the - button again to continue lockingout higher gears. Beginning with the highestgear, the instrument cluster will indicatethe current gear and highest gear available.For example, press the - button twice tolock out 10th and 9th gears.
Note:The instrument cluster will indicatethe current gear and highest gear available.
Press the + button to unlock gears to allowthe transmission to shift to higher gears.
Note: The transmission automaticallyshifts within the gear range you select.
AUTOMATIC TRANSMISSION
AUDIBLE WARNINGS
Sounds if any of the following occur:
•You switch your vehicle off beforeshifting into park (P).
•You open the driver door before shiftinginto park (P).
POWER TAKE-OFF (IF EQUIPPED)
HOW DOES THE POWER TAKE-OFF WORK
Auxiliary equipment called power take-off,or PTO, is often added to the engine ortransmission to operate utility equipment.Examples include a wheel-lift for towtrucks, cranes, tools for construction or tireservice, and pumping fluids. PTOapplications draw auxiliary horsepowerfrom the powertrain, often while thevehicle is stationary. In this condition, thereis limited cooling air flow through theradiator and around the vehicle thatnormally occurs when a vehicle is moving.The aftermarket PTO system installer,having the most knowledge of the finalapplication, is responsible for determiningwhether additional chassis heat protectionor powertrain cooling is required, andalerting the user to the safe and properoperation.
Note:Use of auxiliary equipment thatexceeds the maximum Power Take-Off(PTO) load specified in our Truck BodyBuilders Layout Book can adversely affectthe performance of the powertrain system.Refer to the Body Builders Layout Book forinstructions about the appropriateinstallation of additional equipment.
For additional information, visitwww.fordbbas.com/home.
236
2023 Super Duty (TFH) Canada/United States of America, enUSA, Edition date: 202211, DOMAutomatic Transmission
Page 244 of 738
damage drive components. Whentransitioning from consistently loose orslippery surfaces, be sure the four-wheeldrive system is not mechanically blockedonce on dry, hard surface roads intwo-wheel drive high.
Operating Four-Wheel Drive witha Spare or Worn Tires
Your four-wheel drive system is notintended to provide full function with tiresthat have different levels of wear or witha dissimilar spare tire. Incorrect use offour-wheel drive with such tires can causesystem damage.
If there is a difference in the level of wearamong tires on the vehicle or if you installa dissimilar spare tire on the vehicle, do notuse 4WD High or 4WD Low (if equipped)other than to get your vehicle unstuck.After getting your vehicle unstuck, shift to2H by performing the following steps:
1.Come to a stop on a flat, horizontalsurface
2.Shift the transmission to park (P) forautomatic transmissions and neutral(N) for manual transmissions.
3.Switch to two-wheel drive mode.
4.Shift the transmission to reverse (R).
5.Shift the transmission to drive (D) forautomatic transmissions and to firstgear for manual transmissions. Thisensures the transfer case system is nottrapped in place.
Mechanical Shift Blocking
On four-wheel drive vehicles with amechanically locked four-wheel drive highmode, the transfer case distributes torqueto the front wheels by mechanicallyinterlocking the front and rear driveshaftstogether. Various external factors affectshifting performance of this type of systemincluding, but not limited to:
•Vehicle acceleration.
•Dissimilar tire sizes.
•Steering input.
If the system detects a mechanical shiftblockage at speed after you selecttwo-wheel drive high, the message "4x4Unable to Disengage See Manual", coulddisplay momentarily. If this messagedisplays, one or more of the followingactions can relieve the mechanical shiftblock:
•Momentary acceleration.
•Momentary braking.
•Bringing the vehicle to a stop.
•Shifting the transmission to neutral andback to drive.
•Shifting the transmission to reverseand back to drive.
•Driving the vehicle around a tight turnat a slow speed.
SWITCHING FOUR-WHEEL
DRIVE ON AND OFF
A vehicle that comes with four-wheel drive,when selected, has the ability to use allfour wheels to power itself. This increasestraction, which may enable you to safelydrive over terrain and road conditions thata conventional two-wheel drive vehiclecannot.
On some four-wheel drive models, theinitial shift from two-wheel drive tofour-wheel drive while the vehicle ismoving can cause a momentary clunk andratcheting sound. These sounds are normalas the front drivetrain comes up to speedand are not cause for concern.
240
2023 Super Duty (TFH) Canada/United States of America, enUSA, Edition date: 202211, DOMFour-Wheel Drive (If Equipped)
Page 260 of 738
DIESEL ENGINE EXHAUST
BRAKE – PRECAUTIONS
WARNING: Do not use tow/haulwhen the road surface is slippery. Failureto follow this instruction could result inthe loss of control of your vehicle.
WARNING: Do not use dieselengine exhaust braking when the roadsurface is slippery. Failure to follow thisinstruction could result in the loss ofcontrol of your vehicle.
USING THE DIESEL ENGINE
EXHAUST BRAKE
This feature increases engine braking athigher engine speeds to provide bettergrade descent control with less brake andtransmission wear and tear.
Note:Use this when driving downhill andcarrying heavy loads or trailering.
Benefits of engine braking are:
•Lower brake temperature.
•Reduced brake fade.
•Longer brake life.
•Improved driving and trailering control.
Press the button on the switchbank next to the audio unit toswitch the system on or off.
There are two engine brake modes, manualand automatic.
The following conditions must be met touse exhaust brake:
•Your vehicle is in a forward gear.
•The engine speed is above 1300 RPM.
•Your foot is off the accelerator.
You can use this feature with tow/haul orprogressive range selection to providefurther increased engine braking. Thetransmission upshifts to prevent the enginefrom entering the red zone on thetachometer.
Manual Engine Braking
1.Press the button to switch on manualengine braking.
2.Release the accelerator pedal tomaximize engine braking.
3.Apply the brakes. The transmissiondownshifts to lower gears.
Note:The engine braking feature onlyfunctions when you release the accelerator.
Note:You can shift the transmission tolower gears with progressive range selectionor manual shifting independent of pressingthe brakes.
Note:You can also use manual enginebraking with cruise control to improve gradedescent control.
Note:If your vehicle has adaptive cruisecontrol, the speed control system uses theselected engine brake mode, transmissiongears, and brakes to maintain the set speedand distance to the vehicle being followed.
Automatic Engine Braking
1.Press the button twice to switch onautomatic engine braking.
2.Release the accelerator or brake pedal.The system remembers your vehiclespeed.
256
2023 Super Duty (TFH) Canada/United States of America, enUSA, Edition date: 202211, DOMDiesel Engine Exhaust BrakeE171217
Page 292 of 738
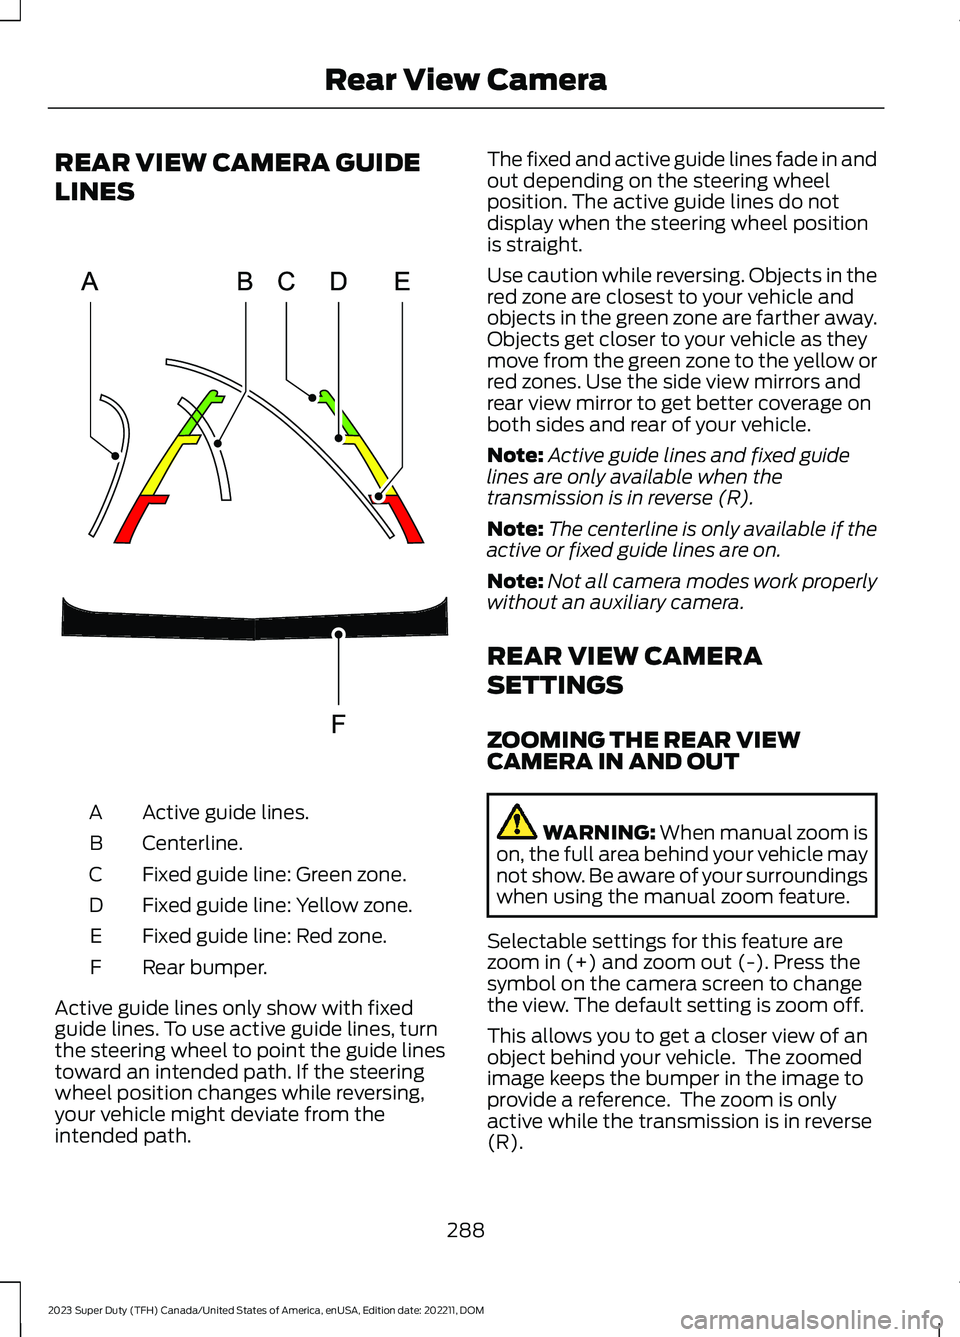
REAR VIEW CAMERA GUIDE
LINES
Active guide lines.A
Centerline.B
Fixed guide line: Green zone.C
Fixed guide line: Yellow zone.D
Fixed guide line: Red zone.E
Rear bumper.F
Active guide lines only show with fixedguide lines. To use active guide lines, turnthe steering wheel to point the guide linestoward an intended path. If the steeringwheel position changes while reversing,your vehicle might deviate from theintended path.
The fixed and active guide lines fade in andout depending on the steering wheelposition. The active guide lines do notdisplay when the steering wheel positionis straight.
Use caution while reversing. Objects in thered zone are closest to your vehicle andobjects in the green zone are farther away.Objects get closer to your vehicle as theymove from the green zone to the yellow orred zones. Use the side view mirrors andrear view mirror to get better coverage onboth sides and rear of your vehicle.
Note:Active guide lines and fixed guidelines are only available when thetransmission is in reverse (R).
Note:The centerline is only available if theactive or fixed guide lines are on.
Note:Not all camera modes work properlywithout an auxiliary camera.
REAR VIEW CAMERA
SETTINGS
ZOOMING THE REAR VIEWCAMERA IN AND OUT
WARNING: When manual zoom ison, the full area behind your vehicle maynot show. Be aware of your surroundingswhen using the manual zoom feature.
Selectable settings for this feature arezoom in (+) and zoom out (-). Press thesymbol on the camera screen to changethe view. The default setting is zoom off.
This allows you to get a closer view of anobject behind your vehicle. The zoomedimage keeps the bumper in the image toprovide a reference. The zoom is onlyactive while the transmission is in reverse(R).
288
2023 Super Duty (TFH) Canada/United States of America, enUSA, Edition date: 202211, DOMRear View CameraE306774
Page 293 of 738
Note:Zooming in also engages park holdwhich applies the electric park brake whenyou shift to park (P). When you press thezoom button, the electronic park holdbutton illuminates on the touchscreen. SeeConnecting a Trailer (page 359).
Note:Manual zoom is only available whenthe transmission is in reverse (R).
Note:Only the centerline shows when youenable manual zoom.
SWITCHING REAR VIEW CAMERADELAY ON AND OFF
1.Press Features on the touchscreen.
2.Press Driver Assistance.
3.Press Rear View Camera.
4.Switch Rear View Camera Delay on oroff.
When shifting the transmission out ofreverse (R) and into any gear other thanpark (P), the camera image remains in thedisplay until:
•Your vehicle speed reachesapproximately 5 mph (8 km/h).
•You shift your vehicle into park (P).
REAR VIEW CAMERA VIDEOS
Dynamic Hitch Assist Video Link
289
2023 Super Duty (TFH) Canada/United States of America, enUSA, Edition date: 202211, DOMRear View Camera