tow FORD TAURUS 2014 6.G User Guide
[x] Cancel search | Manufacturer: FORD, Model Year: 2014, Model line: TAURUS, Model: FORD TAURUS 2014 6.GPages: 550, PDF Size: 7.21 MB
Page 88 of 550

WINDSHIELD WIPERS
Note:Fully defrost the windshield before switching on the windshield
wipers.
Note:Make sure the windshield wipers are switched off before entering
a car wash.
Note:Clean the windshield and wiper blades if they begin to leave
streaks or smears. If that does not resolve the issue, install new wiper
blades.
Note:Do not operate the wipers on a dry windshield. This may scratch
the glass, damage the wiper blades or cause the wiper motor to burn out.
Always use the windshield washers before wiping a dry windshield.
Rotate the end of the control away
from you to increase the speed of
the wipers. Rotate toward you to
decrease the speed of the wipers.
RAIN-SENSING WIPERS (IF EQUIPPED)
Note:Wet road conditions may result in inconsistent or unexpected
wiping or smearing. Lower the sensitivity, switch to normal or high-speed
wiping or turn the wipers off to reduce smearing.
Note:Turn off the wipers before entering a car wash.
Use the rotary control to adjust the
sensitivity to one of the interval
moisture settings. The wipers will
not cycle until moisture is detected
on the windshield. The wiper speed
will vary based on the amount of
moisture detected on the windshield
and the sensitivity setting. The
wipers will continue to wipe as long as moisture is detected.
Keep the outside of the windshield clean, especially the area around the
interior mirror where the sensor is located, or sensor performance may
be affected.
Wipers and Washers87
2014 Taurus
Owners Guide gf, 1st Printing, April 2013
USA(fus)
Page 90 of 550

LIGHTING CONTROL
A. Off
B. Parking lamps, instrument panel
lamps, license plate lamps and tail
lamps
C. Headlamps
High Beams
•Push the lever toward the
instrument panel to activate.
•Push the lever toward the
instrument panel again or pull
the lever towards you to
deactivate.
Headlamp Flasher
•Pull toward you slightly to activate
and release to deactivate.
Lighting89
2014 Taurus
Owners Guide gf, 1st Printing, April 2013
USA(fus)
Page 99 of 550

EXTERIOR MIRRORS
Power Exterior Mirrors
WARNING:Do not adjust the mirror while your vehicle is in
motion.
A. Left mirror
B. Adjustment control
C. Right mirror
To adjust your mirrors:
1. Press the button to select the mirror you want to adjust. An indicator
light on the button will illuminate.
2. Use the adjustment control to adjust the position of the mirror.
3. Press the mirror button again to deselect the mirror. The indicator
light will turn off.
Fold-Away Exterior Mirrors
Push the mirror toward the door window glass. Make sure that you fully
engage the mirror in its support when returning it to its original position.
Heated Exterior Mirror (If Equipped)
The heated exterior mirrors switch on with the heated rear window.
SeeHeated Windows and Mirrorsin theClimate Controlchapter.
Memory Mirrors (If Equipped)
You can save and recall the mirror positions through the memory
function. SeeMemory functionin theSeatschapter.
Auto-Dimming Feature (If Equipped)
The driver’s side exterior mirror will automatically dim when the interior
auto-dimming mirror is activated.
98Windows and Mirrors
2014 Taurus
Owners Guide gf, 1st Printing, April 2013
USA(fus)
Page 101 of 550

INTERIOR MIRROR
WARNING:Do not adjust the mirror when your vehicle is
moving.
Note:Do not clean the housing or glass of any mirror with harsh
abrasives, fuel or other petroleum or ammonia based cleaning products.
You can adjust the interior mirror to your preference. Some mirrors also
have a second pivot point. This lets you move the mirror head up or
down and from side to side.
Pull the tab below the mirror toward you to reduce glare at night.
Auto-Dimming Mirror (If Equipped)
Note:Do not block the sensors on the front and back of the mirror.
Mirror performance may be affected. A rear center passenger or raised
rear center head restraint may also block light from reaching the sensor.
The mirror will dim automatically to reduce glare when bright lights are
detected from behind your vehicle. It will automatically return to normal
reflection when you select reverse gear to make sure you have a clear
view when backing up.
SUN VISORS
Slide-On-Rod
Rotate the visor toward the side
window and extend it rearward for
extra sunlight coverage.
Retract the visor before moving it
back toward the windshield and
storing it.
100Windows and Mirrors
2014 Taurus
Owners Guide gf, 1st Printing, April 2013
USA(fus)
Page 103 of 550

MOONROOF (IF EQUIPPED)
WARNING:Do not let children play with the moonroof or leave
children unattended in the vehicle. They may seriously hurt
themselves.
WARNING:When closing the moonroof, you should verify that it
is free of obstructions and ensure that children and/or pets are
not in the proximity of the moonroof opening.
You can manually open or close the sliding shade when the moonroof is
closed. Pull the shade toward the front of the vehicle to close it.
The moonroof controls are located on the overhead console.
The moonroof has a one-touch open and close feature. To stop its motion
during one-touch operation, press the control a second time.
Opening and Closing the Moonroof
Press and release theSLIDE
control to open the moonroof.
Pull and release theSLIDEcontrol to close the moonroof.
Bounce-Back
The moonroof automatically stops closing and reverses if it detects an
obstacle while closing.
Pull and hold theSLIDEcontrol within two seconds of a bounce-back
event to override the function. The closing force begins to increase each
of the next three times the moonroof close s, with bounce-back active.
Venting the Moonroof
Press and release theTILTcontrol to vent the moonroof. Pull and
release theTILTcontrol to close the moonroof.
SLIDE TILT
102Windows and Mirrors
2014 Taurus
Owners Guide gf, 1st Printing, April 2013
USA(fus)
Page 114 of 550
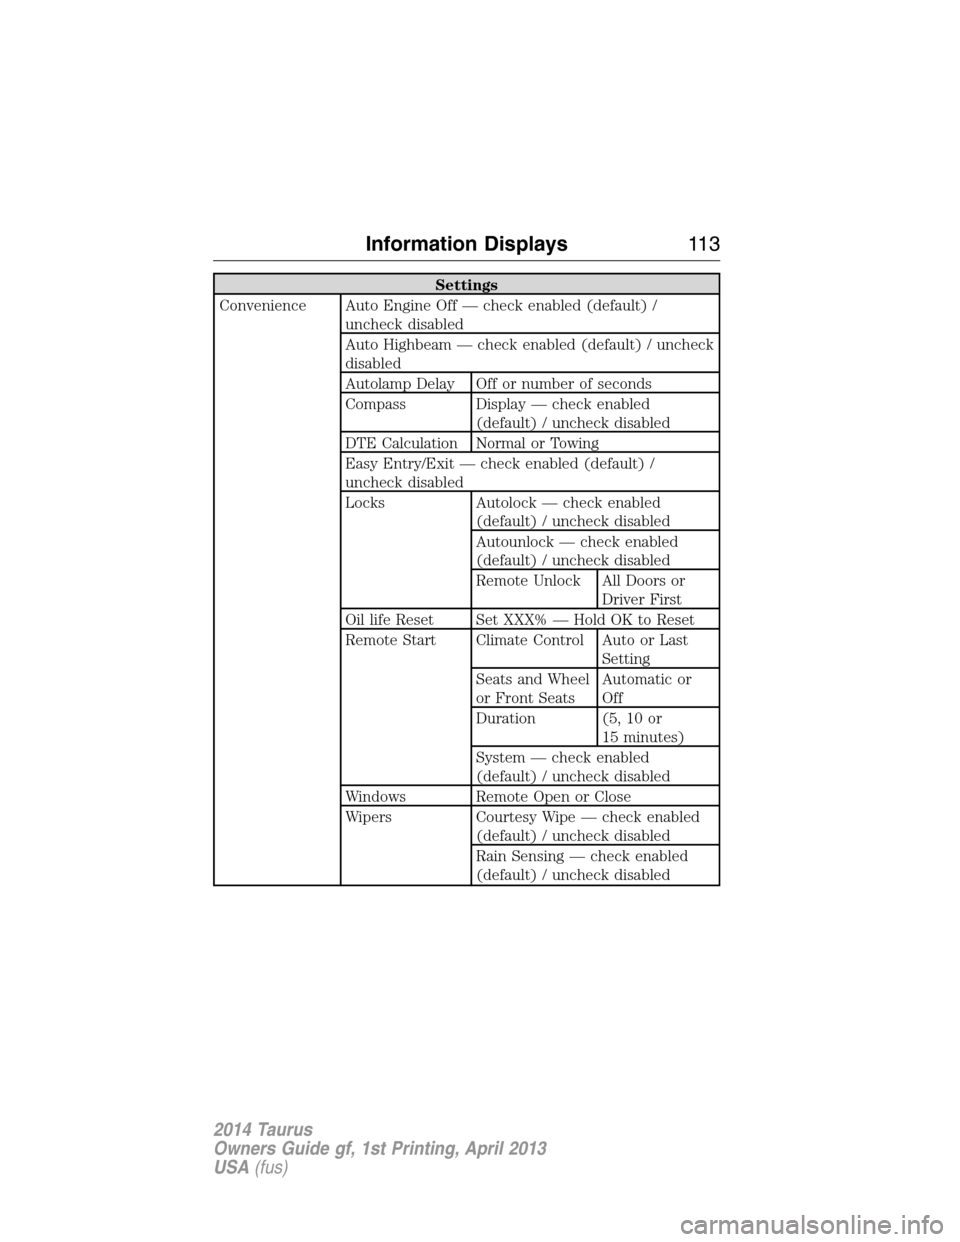
Settings
Convenience Auto Engine Off — check enabled (default) /
uncheck disabled
Auto Highbeam — check enabled (default) / uncheck
disabled
Autolamp Delay Off or number of seconds
Compass Display — check enabled
(default) / uncheck disabled
DTE Calculation Normal or Towing
Easy Entry/Exit — check enabled (default) /
uncheck disabled
Locks Autolock — check enabled
(default) / uncheck disabled
Autounlock — check enabled
(default) / uncheck disabled
Remote Unlock All Doors or
Driver First
Oil life Reset Set XXX% — Hold OK to Reset
Remote Start Climate Control Auto or Last
Setting
Seats and Wheel
or Front SeatsAutomatic or
Off
Duration (5, 10 or
15 minutes)
System — check enabled
(default) / uncheck disabled
Windows Remote Open or Close
Wipers Courtesy Wipe — check enabled
(default) / uncheck disabled
Rain Sensing — check enabled
(default) / uncheck disabled
Information Displays11 3
2014 Taurus
Owners Guide gf, 1st Printing, April 2013
USA(fus)
Page 120 of 550
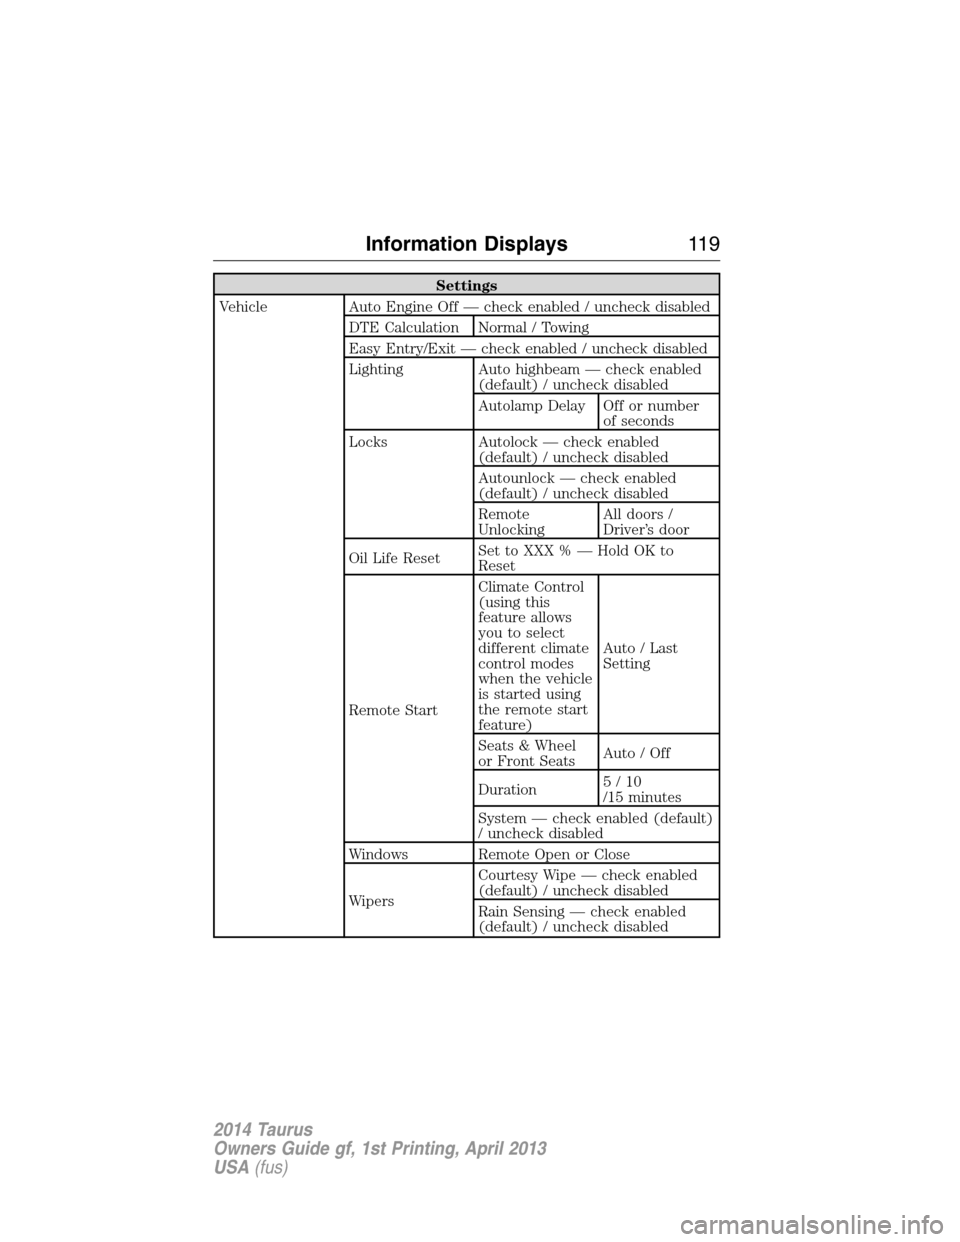
Settings
Vehicle Auto Engine Off — check enabled / uncheck disabled
DTE Calculation Normal / Towing
Easy Entry/Exit — check enabled / uncheck disabled
Lighting Auto highbeam — check enabled
(default) / uncheck disabled
Autolamp Delay Off or number
of seconds
Locks Autolock — check enabled
(default) / uncheck disabled
Autounlock — check enabled
(default) / uncheck disabled
Remote
UnlockingAll doors /
Driver’s door
Oil Life ResetSet to XXX % — Hold OK to
Reset
Remote StartClimate Control
(using this
feature allows
you to select
different climate
control modes
when the vehicle
is started using
the remote start
feature)Auto / Last
Setting
Seats & Wheel
or Front SeatsAuto / Off
Duration5/10
/15 minutes
System — check enabled (default)
/ uncheck disabled
Windows Remote Open or Close
WipersCourtesy Wipe — check enabled
(default) / uncheck disabled
Rain Sensing — check enabled
(default) / uncheck disabled
Information Displays11 9
2014 Taurus
Owners Guide gf, 1st Printing, April 2013
USA(fus)
Page 138 of 550
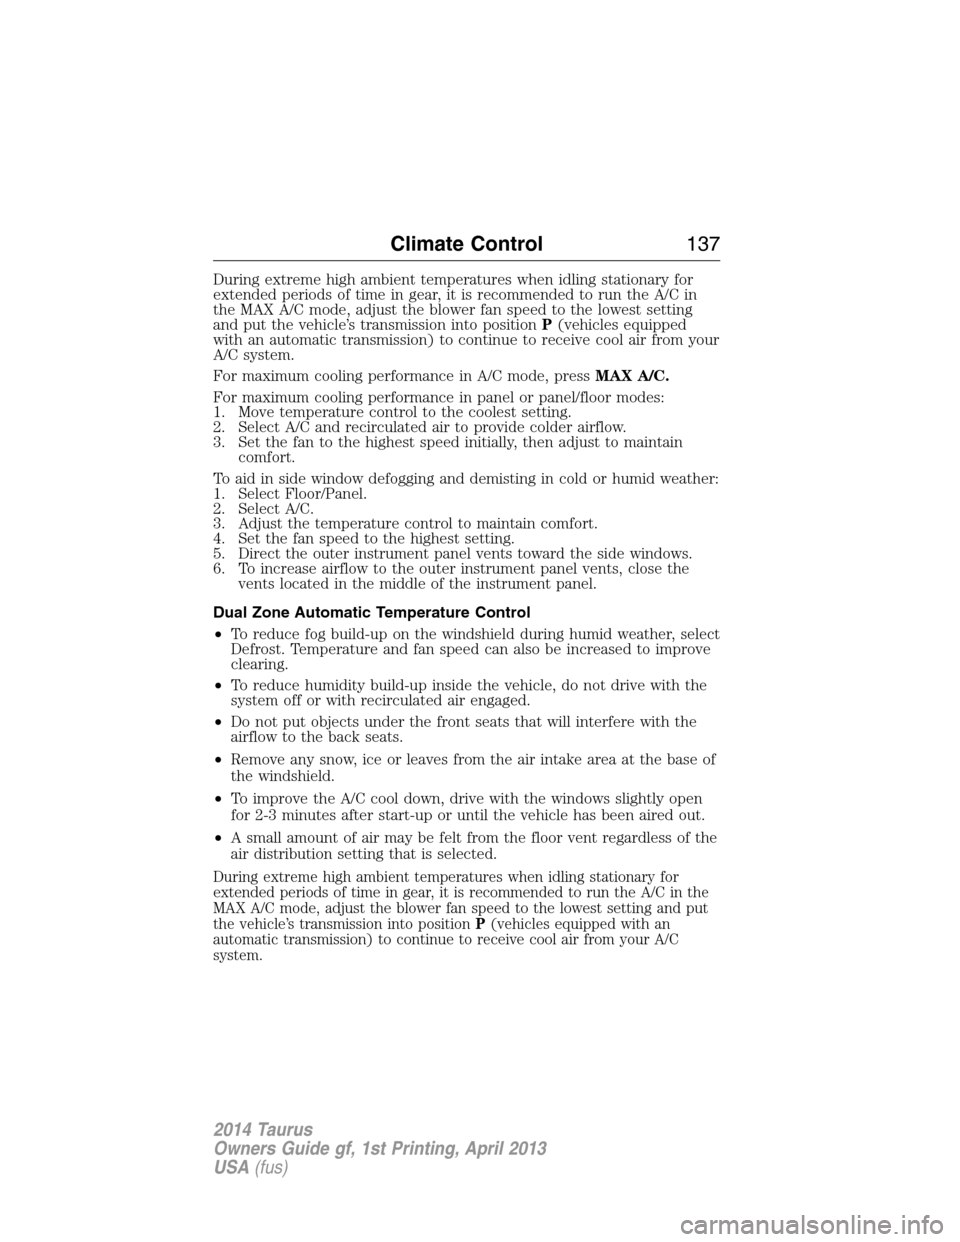
During extreme high ambient temperatures when idling stationary for
extended periods of time in gear, it is recommended to run the A/C in
the MAX A/C mode, adjust the blower fan speed to the lowest setting
and put the vehicle’s transmission into positionP(vehicles equipped
with an automatic transmission) to continue to receive cool air from your
A/C system.
For maximum cooling performance in A/C mode, pressMAX A/C.
For maximum cooling performance in panel or panel/floor modes:
1. Move temperature control to the coolest setting.
2. Select A/C and recirculated air to provide colder airflow.
3. Set the fan to the highest speed initially, then adjust to maintain
comfort.
To aid in side window defogging and demisting in cold or humid weather:
1. Select Floor/Panel.
2. Select A/C.
3. Adjust the temperature control to maintain comfort.
4. Set the fan speed to the highest setting.
5. Direct the outer instrument panel vents toward the side windows.
6. To increase airflow to the outer instrument panel vents, close the
vents located in the middle of the instrument panel.
Dual Zone Automatic Temperature Control
•To reduce fog build-up on the windshield during humid weather, select
Defrost. Temperature and fan speed can also be increased to improve
clearing.
•To reduce humidity build-up inside the vehicle, do not drive with the
system off or with recirculated air engaged.
•Do not put objects under the front seats that will interfere with the
airflow to the back seats.
•Remove any snow, ice or leaves from the air intake area at the base of
the windshield.
•To improve the A/C cool down, drive with the windows slightly open
for 2-3 minutes after start-up or until the vehicle has been aired out.
•A small amount of air may be felt from the floor vent regardless of the
air distribution setting that is selected.
During extreme high ambient temperatures when idling stationary for
extended periods of time in gear, it is recommended to run the A/C in the
MAX A/C mode, adjust the blower fan speed to the lowest setting and put
the vehicle’s transmission into positionP(vehicles equipped with an
automatic transmission) to continue to receive cool air from your A/C
system.
Climate Control137
2014 Taurus
Owners Guide gf, 1st Printing, April 2013
USA(fus)
Page 139 of 550
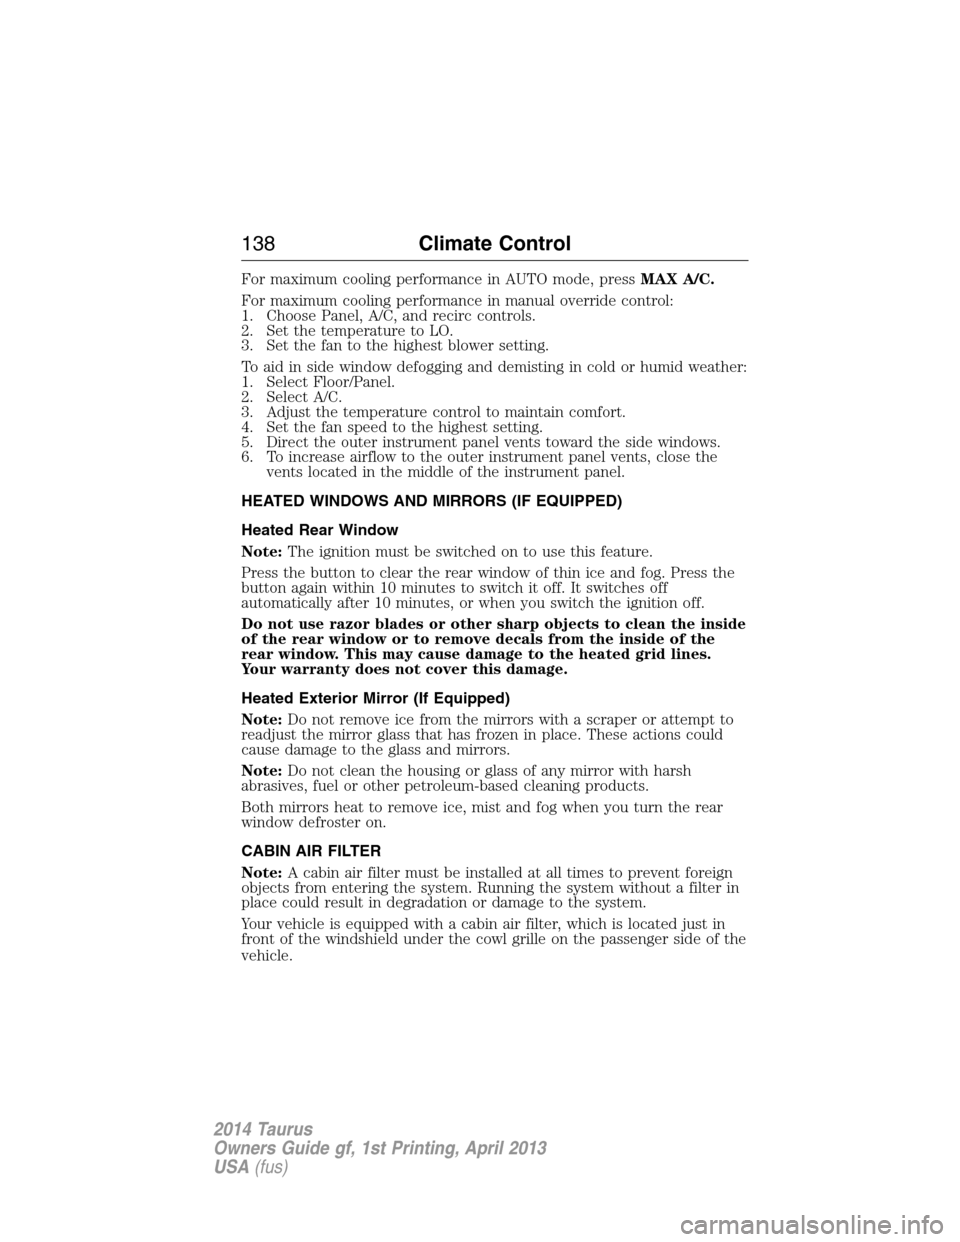
For maximum cooling performance in AUTO mode, pressMAX A/C.
For maximum cooling performance in manual override control:
1. Choose Panel, A/C, and recirc controls.
2. Set the temperature to LO.
3. Set the fan to the highest blower setting.
To aid in side window defogging and demisting in cold or humid weather:
1. Select Floor/Panel.
2. Select A/C.
3. Adjust the temperature control to maintain comfort.
4. Set the fan speed to the highest setting.
5. Direct the outer instrument panel vents toward the side windows.
6. To increase airflow to the outer instrument panel vents, close the
vents located in the middle of the instrument panel.
HEATED WINDOWS AND MIRRORS (IF EQUIPPED)
Heated Rear Window
Note:The ignition must be switched on to use this feature.
Press the button to clear the rear window of thin ice and fog. Press the
button again within 10 minutes to switch it off. It switches off
automatically after 10 minutes, or when you switch the ignition off.
Do not use razor blades or other sharp objects to clean the inside
of the rear window or to remove decals from the inside of the
rear window. This may cause damage to the heated grid lines.
Your warranty does not cover this damage.
Heated Exterior Mirror (If Equipped)
Note:Do not remove ice from the mirrors with a scraper or attempt to
readjust the mirror glass that has frozen in place. These actions could
cause damage to the glass and mirrors.
Note:Do not clean the housing or glass of any mirror with harsh
abrasives, fuel or other petroleum-based cleaning products.
Both mirrors heat to remove ice, mist and fog when you turn the rear
window defroster on.
CABIN AIR FILTER
Note:A cabin air filter must be installed at all times to prevent foreign
objects from entering the system. Running the system without a filter in
place could result in degradation or damage to the system.
Your vehicle is equipped with a cabin air filter, which is located just in
front of the windshield under the cowl grille on the passenger side of the
vehicle.
138Climate Control
2014 Taurus
Owners Guide gf, 1st Printing, April 2013
USA(fus)
Page 162 of 550
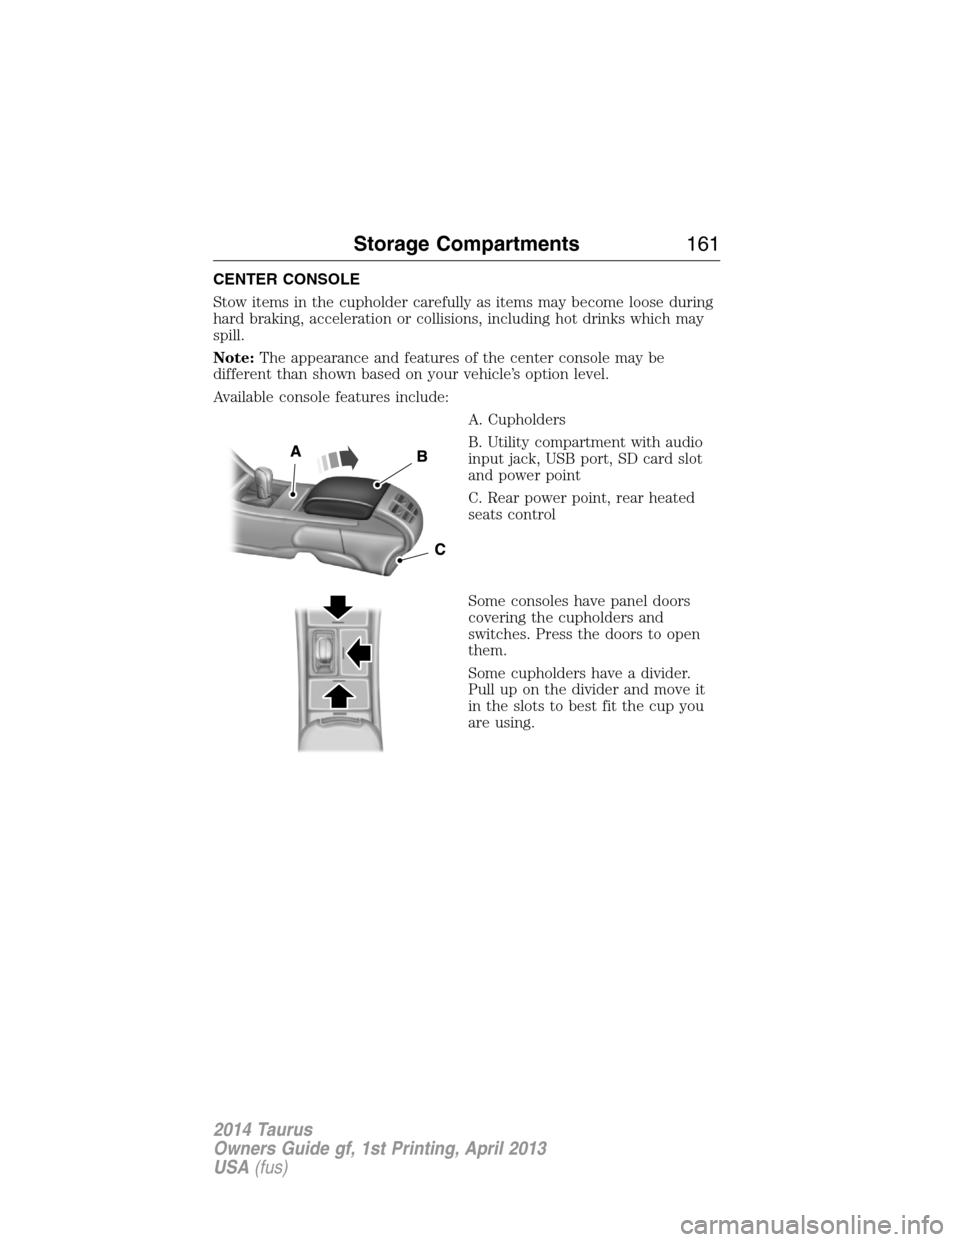
CENTER CONSOLE
Stow items in the cupholder carefully as items may become loose during
hard braking, acceleration or collisions, including hot drinks which may
spill.
Note:The appearance and features of the center console may be
different than shown based on your vehicle’s option level.
Available console features include:
A. Cupholders
B. Utility compartment with audio
input jack, USB port, SD card slot
and power point
C. Rear power point, rear heated
seats control
Some consoles have panel doors
covering the cupholders and
switches. Press the doors to open
them.
Some cupholders have a divider.
Pull up on the divider and move it
in the slots to best fit the cup you
are using.
Storage Compartments161
2014 Taurus
Owners Guide gf, 1st Printing, April 2013
USA(fus)