ECO mode FORD TAURUS 2014 6.G Quick Reference Guide
[x] Cancel search | Manufacturer: FORD, Model Year: 2014, Model line: TAURUS, Model: FORD TAURUS 2014 6.GPages: 8, PDF Size: 0.83 MB
Page 3 of 8

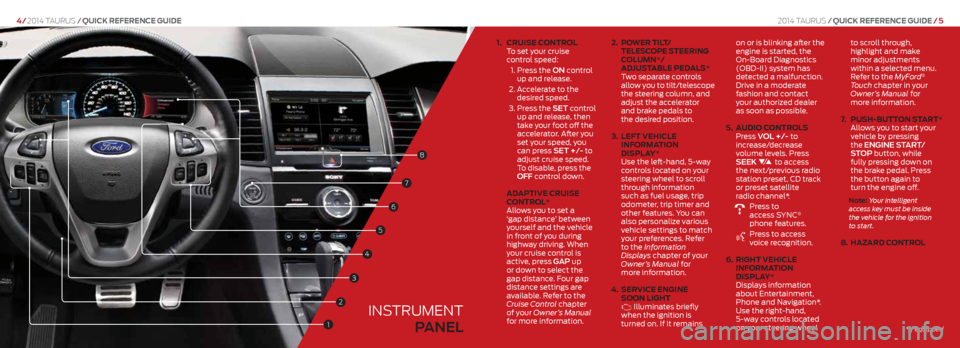
1. cR uise c ontRol
To set your cruise
control speed:
1. Press the ON control
up and release.
2. Accelerate to the
desired speed.
3. Press the SET control
up and release, then
take your foot off the
accelerator. After you
set your speed, you
can press SET +/- to
adjust cruise speed.
To disable, press the
OFF control down.
Ad Aptive cR uise
contR ol*
Allows you to set a
‘gap distance’ between
yourself and the vehicle
in front of you during
highway driving. When
your cruise control is
active, press ga P up
or down to select the
gap distance. Four gap
distance settings are
available. Refer to the
Cruise Control chapter
of your Owner’s Manual
for more information. 2.
p oweR tilt/
t elescope s teeRinG
c olumn*/
Adjust Able ped Als*
Two separate controls
allow you to tilt/telescope
the steering column, and
adjust the accelerator
and brake pedals to
the desired position.
3. left vehicle
infoRmA tion
displA y*
Use the left-hand, 5-way
controls located on your
steering wheel to scroll
through information
such as fuel usage, trip
odometer, trip timer and
other features. You can
also personalize various
vehicle settings to match
your preferences. Refer
to the Information
Displays chapter of your
Owner’s Manual for
more information.
4. seR vice enGine
soon liGht
Illuminates briefly
when the ignition is
turned on. If it remains on or is blinking after the
engine is started, the
On-Board Diagnostics
(OBD-II) system has
detected a malfunction.
Drive in a moderate
fashion and contact
your authorized dealer
as soon as possible.
5. Audio contR ols
Press VOl +/- to
increase/decrease
volume levels. Press
SEEK
to access
the next/previous radio
station preset, CD track
or preset satellite
radio channel*.
Press to
access SYNC®
phone features.
Press to access
voice recognition.
6. RiGht vehicle
infoRmA tion
displA y*
Displays information
about Entertainment,
Phone and Navigation*.
Use the right-hand,
5-way controls located
on your steering wheel to scroll through,
highlight and make
minor adjustments
within a selected menu.
Refer to the
MyFord
®
Touch chapter in your
Owner’s Manual for
more information.
7. p ush-button st ARt*
Allows you to start your
vehicle by pressing
the ENgiNE ST arT/
STOP button, while
fully pressing down on
the brake pedal. Press
the button again to
turn the engine off.
Note: Your intelligent
access key must be inside
the vehicle for the ignition
to start.
8. hA zARd contR ol
INSTRUMENT
PaNEl
2
3
7
4
6
2014 Taurus /Quick RefeRence Guide /5
4/ 2014 Taurus /Quick RefeRence Guide
*if equipped
5
1
8
Page 4 of 8

GETTING STARTEd WiTh Y Our SYNC® S YSTEm
SYNC is a hands-free, voice recognition system used
for entertainment, information and communication.
SYNC. S aY ThE WOrd .
befoRe you Get st ARted
1) Set up your owner account at SyncMyRide.com (U.S.)
or SyncMyRide.ca (Canada). Register by following the
on-screen instructions. After registering, you can see what
services you are eligible for.
2) SYNC uses a wireless connection called
Bluetooth®
to communicate with your phone. Turn Bluetooth mode
on in your phone’s menu options. This lets your phone
find SYNC. If you need more details on setting up your
phone to work with SYNC, visit SyncMyRide.com (U.S.)
or SyncMyRide.ca (Canada) or your phone
manufacturer’s website.
w hy do i need a sync owner Account?
A SYNC owner account is required for Vehicle Health Report
activation and the ability to view your reports online. You’ll
also be able to take advantage of all of SYNC’s Services and
personalization features, such as saving your Favorites and
Points of Interest (POI). You’ll receive the latest software
updates that add new places, directions and information;
and if you have questions, you’ll get free customer support.
For additional support, refer to your Owner’s Manual, visit
the website or call the toll-free number. See the inside front
cover of this guide for details.
pAiRinG y ouR phone with sync In order to use many of the features of SYNC, such as making
a phone call, receiving a text or using SYNC services, you
must first connect or pair your phone with SYNC.
t o p air y our phone for the first t ime
1) Make sure that your vehicle is in P (Park) and turn your
ignition and radio on.
2) Press the phone button
. When the display indicates
no phone is paired, press OK.
3) When Find SYNC appears in the display, press OK.
4) Put your phone into Bluetooth discovery mode. See your
phone’s user guide if necessary.
5) When prompted on your phone’s display, enter the PIN
provided by SYNC into your phone.
6) The display will indicate when the pairing is successful.
t he s ystem may p rompt you to
•
Set your phone as primary/favorite (the primary phone will
receive messages and voice mails).
• Download your phone book (this is required to use the full
set of voice commands).
• Turn on 911 Assist
®.
2014 Taurus /Quick RefeRence Guide /7
6/ 2014 Taurus /Quick RefeRence Guide
GETTING S TARTEd WiTh Y Our SYNC® S YSTEm
tips
•
Make sure you accept SYNC’s request to access your phone.
•
To pair subsequent phones, please refer to Pairing Subsequent
Phones in the SYNC chapter of your Owner’s Manual.
•
If you are experiencing pairing problems, try performing a
clean pairing by deleting your services from SYNC, deleting
the SYNC connection from your phone, and then repeating
the Pairing Your Phone with SYNC process.
u sinG my phone with sync
Note: Enter your phone book contacts with both first and last
names to increase SYNC’s ability to select the correct contact.
Remember to say the contact name exactly as it is listed in your
phone book.
making a phone c all
Use SYNC to make a phone call to anyone in your phone
book by pressing the voice button
and when prompted,
give a voice command. For a list of voice commands, say
“What can I say?”
For example, you could say “Call Jake Smith at home”.
SYNC repeats the command back to you and dials the number.
Note: You can also make phone calls by giving say voice command
“dial”, then verbally say the phone number.
Answering incoming c alls
Whenever you have an incoming call, you will be able to see
the name and number of the person calling in your display.
Press the phone button
to answer an incoming call. You
can hang up at any time by pressing and holding the phone
button
. do not disturb mode
This feature blocks incoming calls and text messages and
saves them for later.
You still have access to outgoing calls
when this feature is active. Say the voice command, “Do not
disturb on” to enable and “Do not disturb off” to disable.
u sinG sync to Access diGit Al mediA SYNC has a media hub with multiple inputs allowing you to
access personal media from your digital devices.
using voice commands to p lay music
1) Plug your media player into your USB port.
2) Press the voice button
When prompted say “uSB”, then
follow-up by saying a voice command. For a list of voice
commands, say “What can I say?”
3) You will hear the command repeated back to you and the
selected item will play.
do more
Create your account at SyncMyRide.com (U.S.) or
SyncMyRide.ca (Canada) and then use SYNC Services
to get the most out of your SYNC experience. This includes
voice-activated, turn-by-turn directions, traffic reports,
business searches, sports scores, stock market reports
and more. Say the voice command “Services” and SYNC
will guide you through to the available services. More
features may be available. Visit the website or call the
toll-free number. See the inside front cover of this guide
for more details.
Page 8 of 8

COmFOr T
heAted And cooled
fR ont seA ts*
To access, press the Climate
corner on the touchscreen.
For heated front seats,
press
repeatedly to
cycle through the various
heat modes and off. For
cooled front seats, press
repeatedly to cycle through
the various cooling modes
and off. If your vehicle
is not equipped with a
touchscreen, use the hard
button controls (indicated
by the same symbols) to
cycle through the various
heated or cooled modes
and off.
heA
ted
s teeRinG wheel*
Your vehicle may be
equipped with a heated
steering wheel. To access,
press the Climate corner of
the touchscreen. Press
to turn on and off.
Note: The wood trim will
not heat between the 10
and 2 o’clock positions.
heA ted ReAR seA ts* The controls are on the
back of the center console.
Press heated seat button
to cycle through the
various heat settings and
off. Warmer settings are
indicated by more
indicator lights.
memoR y function* Use the memory controls
located on the side seat
panel to program and then
recall memory positions.
Move the features to
the desired positions. To
Program position 1, press
and hold until you hear
a tone. To set a second
position, press
and hold
until the same tone sounds.
You can now use these
controls to recall the
set positions.
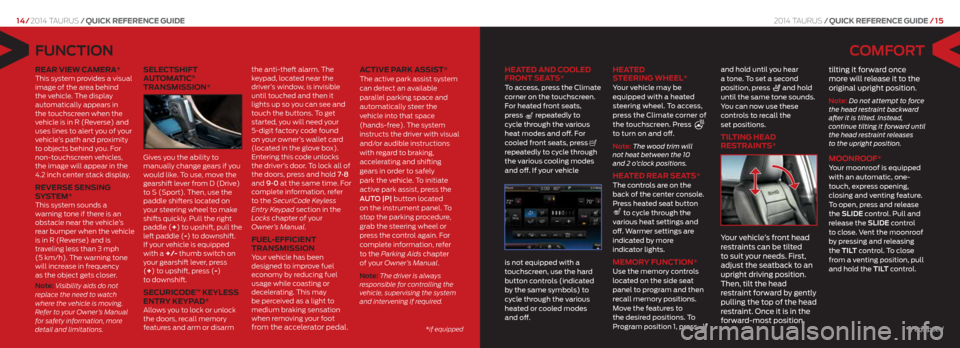
tiltinG heAd
RestRAints*
Y our vehicle’s front head
restraints can be tilted
to suit your needs. First,
adjust the seatback to an
upright driving position.
Then, tilt the head
restraint forward by gently
pulling the top of the head
restraint. Once it is in the
forward-most position, tilting it forward once
more will release it to the
original upright position.
Note: Do not attempt to force
the head restraint backward
after it is tilted. Instead,
continue tilting it forward until
the head restraint releases
to the upright position.
moonR oof* Your moonroof is equipped
with an automatic, one-
touch, express opening,
closing and venting feature.
To open, press and release
the SlidE control. Pull and
release the SlidE control
to close. Vent the moonroof
by pressing and releasing
the TilT control. To close
from a venting position, pull
and hold the Til T control.
FuNCTiON
ReAR view cAmeRA* This system provides a visual
image of the area behind
the vehicle. The display
automatically appears in
the touchscreen when the
vehicle is in R (Reverse) and
uses lines to alert you of your
vehicle’s path and proximity
to objects behind you. For
non-touchscreen vehicles,
the image will appear in the
4.2 inch center stack display.
ReveR se sensinG
system*
This system sounds a
warning tone if there is an
obstacle near the vehicle’s
rear bumper when the vehicle
is in R (Reverse) and is
traveling less than 3 mph
(5 km/h). The warning tone
will increase in frequency
as the object gets closer.
Note: Visibility aids do not
replace the need to watch
where the vehicle is moving.
Refer to your Owner’s Manual
for safety information, more
detail and limitations.
selectshift
AutomA tic®
tRAnsmission*
Gives you the ability to
manually change gears if you
would like. To use, move the
gearshift lever from D (Drive)
to S (Sport). Then, use the
paddle shifters located on
your steering wheel to make
shifts quickly. Pull the right
paddle (+) to upshift, pull the
left paddle (-) to downshift.
If your vehicle is equipped
with a +/- thumb switch on
your gearshift lever, press
(+) to upshift, press (-)
to downshift.
secuRic ode™ keyless
entR y keyp Ad*
Allows you to lock or unlock
the doors, recall memory
features and arm or disarm the anti-theft alarm.
The
keypad, located near the
driver’s window, is invisible
until touched and then it
lights up so you can see and
touch the buttons. To get
started, you will need your
5-digit factory code found
on your owner’s wallet card
(located in the glove box).
Entering this code unlocks
the driver’s door. To lock all of
the doors, press and hold 7•8
and 9•0 at the same time. For
complete information, refer
to the SecuriCode Keyless
Entry Key pad section in the
Locks chapter of your
Owner’s Manual.
fuel-efficient
tRAnsmission
Your vehicle has been
designed to improve fuel
economy by reducing fuel
usage while coasting or
decelerating. This may
be perceived as a light to
medium braking sensation
when removing your foot
from the accelerator pedal. Active pARk Assist*
The active park assist system
can detect an available
parallel parking space and
automatically steer the
vehicle into that space
(hands-free).
The system
instructs the driver with visual
and/or audible instructions
with regard to braking,
accelerating and shifting
gears in order to safely
park the vehicle. To initiate
active park assist, press the
AUTO |P| button located
on the instrument panel. To
stop the parking procedure,
grab the steering wheel or
press the control again. For
complete information, refer
to the Parking Aids chapter
of your Owner’s Manual.
Note: The driver is always
responsible for controlling the
vehicle, supervising the system
and intervening if required.
2014 Taurus /Quick RefeRence Guide / 15
14/ 2014 Taurus /Quick RefeRence Guide
*if equipped
*if equipped