buttons FORD TAURUS 2014 6.G Quick Reference Guide
[x] Cancel search | Manufacturer: FORD, Model Year: 2014, Model line: TAURUS, Model: FORD TAURUS 2014 6.GPages: 8, PDF Size: 0.83 MB
Page 5 of 8

SyNc® wITh mYF Ord TOuCh®*
8/ 2014 Taurus /Quick RefeRence Guide
SyNc® wITh mYF Ord TOuCh®*
2014 Taurus /Quick RefeRence Guide /9
phone
Voice-control your phone for hands-
free calling with your phone securely
put away. With SYNC, you won’t even
need to know the phone number.
Just say the name of the person
you want from your contacts.
Your phone connects you with many
other features and SYNC Services
*:
• Connect to SYNC Services
*
for traffic, directions, business
searches and information favorites.
• Connect to Operator Assist to help
locate a listing or destination.
• Call for a Vehicle Health Report.
• Automatically connect to a
911 Operator in the event of
an accident (feature must be
turned on prior to the event).
• Transfer calls seamlessly from
SYNC to phone as you get in or
out of your vehicle.
Refer to the SYNC chapter of your
Owner’s Manual for complete details.
nAviGAtion*
Get started with your navigation
system by pressing the upper-right,
green corner. The available, voice-
activated navigation system includes:
» SiriusXM Traffic
» SiriusXM Travel Link
» GPS (Global Positioning System)
technology
» 3-D mapping
» Turn-by-turn navigation
Some features require activation. Refer
to the MyFord Touch chapter of your
Owner’s Manual for complete details. Set a destination
Set a destination on your touchscreen
by using a street address,
a city center,
a place on the map or a Point of Interest
(POI). The easiest way, however, is
by voice.
1) Press the voice button
, then
when prompted say “Destination
street address”.
2) The system will ask you to say the
full address and will display
an example on-screen.
3) You can then speak the address
naturally, such as: “One two
three Main Street, Anytown”.
You can also use the touchscreen to
enter a destination and narrow your
choices by city or street as you type.
You can choose from up to three
different types of routes:
• Fastest: Uses the fastest
moving roads possible.
• Shortest: Uses the shortest
distance possible.
• Eco (EcoRoute): Uses the most
fuel-efficient route.
*if equipped
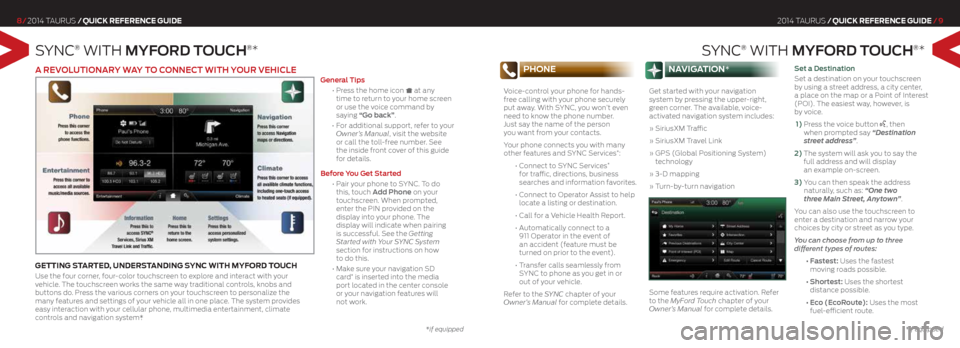
a rEVOluTiONar Y WaY TO CONNECT WiTh YO ur VEhiClE
GettinG stARted, undeR stAndinG sync with myf oRd touch
Use the four corner, four-color touchscreen to explore and interact with your
vehicle. The touchscreen works the same way traditional controls, knobs and
buttons do. Press the various corners on your touchscreen to personalize the
many features and settings of your vehicle all in one place. The system provides
easy interaction with your cellular phone, multimedia entertainment, climate
controls and navigation system*. g
eneral Tips
• Press the home icon at any
time to return to your home screen
or use the voice command by
saying “g o back”.
• For additional support, refer to your
Owner’s Manual, visit the website
or call the toll-free number. See
the inside front cover of this guide
for details.
Before You g et Started
• Pair your phone to SYNC. To do
this, touch a dd Phone on your
touchscreen. When prompted,
enter the PIN provided on the
display into your phone. The
display will indicate when pairing
is successful. See the Getting
Started with Your SYNC System
section for instructions on how
to do this.
• Make sure your navigation SD
card
* is inserted into the media
port located in the center console
or your navigation features will
not work.
*if equipped
Page 6 of 8

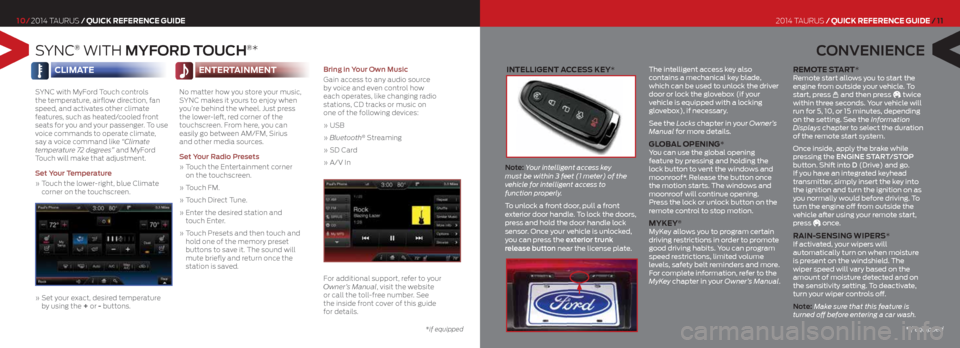
intelliGent Access key*
Note: Your intelligent access key
must be within 3 feet (1 meter) of the
vehicle for intelligent access to
function properly.
To unlock a front door, pull a front
exterior door handle. To lock the doors,
press and hold the door handle lock
sensor. Once your vehicle is unlocked,
you can press the exterior trunk
release button near the license plate. The intelligent access key also
contains a mechanical key blade,
which can be used to unlock the driver
door or lock the glovebox (if your
vehicle is equipped with a locking
glovebox), if necessary.
See the Locks chapter in your Owner’s
Manual for more details.
Glob
Al openinG*
You can use the global opening
feature by pressing and holding the
lock button to vent the windows and
moonroof*. Release the button once
the motion starts. The windows and
moonroof will continue opening.
Press the lock or unlock button on the
remote control to stop motion.
mykey® MyKey allows you to program certain
driving restrictions in order to promote
good driving habits. You can program
speed restrictions, limited volume
levels, safety belt reminders and more.
For complete information, refer to the
MyKey chapter in your Owner’s Manual.
Remote s tAR t* Remote start allows you to start the
engine from outside your vehicle. To
start, press
and then press twice
within three seconds. Your vehicle will
run for 5, 10, or 15 minutes, depending
on the setting. See the Information
Displays chapter to select the duration
of the remote start system.
Once inside, apply the brake while
pressing the ENgiNE ST arT/STOP
button. Shift into d (Drive) and go.
If you have an integrated keyhead
transmitter, simply insert the key into
the ignition and turn the ignition on as
you normally would before driving. To
turn the engine off from outside the
vehicle after using your remote start,
press
once.
R Ain-sensinG wipeR s*
If activated, your wipers will
automatically turn on when moisture
is present on the windshield. The
wiper speed will vary based on the
amount of moisture detected and on
the sensitivity setting. To deactivate,
turn your wiper controls off.
Note: Make sure that this feature is
turned off before entering a car wash.
S yNc® wITh mYF Ord TOuCh®*
7/ 2014 Taurus /Quick RefeRence Guide
10/ 2014 Taurus /Quick RefeRence Guide
C ONVENiENCE
2014 Taurus /Quick RefeRence Guide / 11
climA te
SYNC with MyFord Touch controls
the temperature, airflow direction, fan
speed, and activates other climate
features, such as heated/cooled front
seats for you and your passenger. To use
voice commands to operate climate,
say a voice command like “Climate
temperature 72 degrees” and MyFord
Touch will make that adjustment.
Set Your Temperature
» Touch the lower-right, blue Climate
corner on the touchscreen.
» Set your exact, desired temperature
by using the + or - buttons.
enteR tAinment
No matter how you store your music,
SYNC makes it yours to enjoy when
you’re behind the wheel. Just press
the lower-left, red corner of the
touchscreen. From here, you can
easily go between AM/FM, Sirius
and other media sources.
Set Your r adio Presets
» Touch the Entertainment corner
on the touchscreen.
» Touch FM.
» Touch Direct Tune.
» Enter the desired station and
touch Enter.
» Touch Presets and then touch and
hold one of the memory preset
buttons to save it. The sound will
mute briefly and return once the
station is saved.
Bring in Your Own music
Gain access to any audio source
by voice and even control how
each operates,
like changing radio
stations, CD tracks or music on
one of the following devices:
» USB
» Bluetooth
® Streaming
» SD Card
» A/V In
For additional support, refer to your
Owner’s Manual, visit the website
or call the toll-free number. See
the inside front cover of this guide
for details.
*if equipped*if equipped
Page 8 of 8

COmFOr T
heAted And cooled
fR ont seA ts*
To access, press the Climate
corner on the touchscreen.
For heated front seats,
press
repeatedly to
cycle through the various
heat modes and off. For
cooled front seats, press
repeatedly to cycle through
the various cooling modes
and off. If your vehicle
is not equipped with a
touchscreen, use the hard
button controls (indicated
by the same symbols) to
cycle through the various
heated or cooled modes
and off.
heA
ted
s teeRinG wheel*
Your vehicle may be
equipped with a heated
steering wheel. To access,
press the Climate corner of
the touchscreen. Press
to turn on and off.
Note: The wood trim will
not heat between the 10
and 2 o’clock positions.
heA ted ReAR seA ts* The controls are on the
back of the center console.
Press heated seat button
to cycle through the
various heat settings and
off. Warmer settings are
indicated by more
indicator lights.
memoR y function* Use the memory controls
located on the side seat
panel to program and then
recall memory positions.
Move the features to
the desired positions. To
Program position 1, press
and hold until you hear
a tone. To set a second
position, press
and hold
until the same tone sounds.
You can now use these
controls to recall the
set positions.
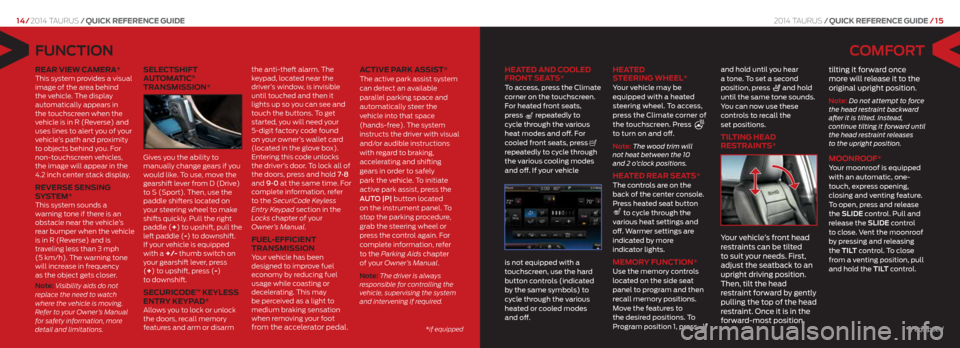
tiltinG heAd
RestRAints*
Y our vehicle’s front head
restraints can be tilted
to suit your needs. First,
adjust the seatback to an
upright driving position.
Then, tilt the head
restraint forward by gently
pulling the top of the head
restraint. Once it is in the
forward-most position, tilting it forward once
more will release it to the
original upright position.
Note: Do not attempt to force
the head restraint backward
after it is tilted. Instead,
continue tilting it forward until
the head restraint releases
to the upright position.
moonR oof* Your moonroof is equipped
with an automatic, one-
touch, express opening,
closing and venting feature.
To open, press and release
the SlidE control. Pull and
release the SlidE control
to close. Vent the moonroof
by pressing and releasing
the TilT control. To close
from a venting position, pull
and hold the Til T control.
FuNCTiON
ReAR view cAmeRA* This system provides a visual
image of the area behind
the vehicle. The display
automatically appears in
the touchscreen when the
vehicle is in R (Reverse) and
uses lines to alert you of your
vehicle’s path and proximity
to objects behind you. For
non-touchscreen vehicles,
the image will appear in the
4.2 inch center stack display.
ReveR se sensinG
system*
This system sounds a
warning tone if there is an
obstacle near the vehicle’s
rear bumper when the vehicle
is in R (Reverse) and is
traveling less than 3 mph
(5 km/h). The warning tone
will increase in frequency
as the object gets closer.
Note: Visibility aids do not
replace the need to watch
where the vehicle is moving.
Refer to your Owner’s Manual
for safety information, more
detail and limitations.
selectshift
AutomA tic®
tRAnsmission*
Gives you the ability to
manually change gears if you
would like. To use, move the
gearshift lever from D (Drive)
to S (Sport). Then, use the
paddle shifters located on
your steering wheel to make
shifts quickly. Pull the right
paddle (+) to upshift, pull the
left paddle (-) to downshift.
If your vehicle is equipped
with a +/- thumb switch on
your gearshift lever, press
(+) to upshift, press (-)
to downshift.
secuRic ode™ keyless
entR y keyp Ad*
Allows you to lock or unlock
the doors, recall memory
features and arm or disarm the anti-theft alarm.
The
keypad, located near the
driver’s window, is invisible
until touched and then it
lights up so you can see and
touch the buttons. To get
started, you will need your
5-digit factory code found
on your owner’s wallet card
(located in the glove box).
Entering this code unlocks
the driver’s door. To lock all of
the doors, press and hold 7•8
and 9•0 at the same time. For
complete information, refer
to the SecuriCode Keyless
Entry Key pad section in the
Locks chapter of your
Owner’s Manual.
fuel-efficient
tRAnsmission
Your vehicle has been
designed to improve fuel
economy by reducing fuel
usage while coasting or
decelerating. This may
be perceived as a light to
medium braking sensation
when removing your foot
from the accelerator pedal. Active pARk Assist*
The active park assist system
can detect an available
parallel parking space and
automatically steer the
vehicle into that space
(hands-free).
The system
instructs the driver with visual
and/or audible instructions
with regard to braking,
accelerating and shifting
gears in order to safely
park the vehicle. To initiate
active park assist, press the
AUTO |P| button located
on the instrument panel. To
stop the parking procedure,
grab the steering wheel or
press the control again. For
complete information, refer
to the Parking Aids chapter
of your Owner’s Manual.
Note: The driver is always
responsible for controlling the
vehicle, supervising the system
and intervening if required.
2014 Taurus /Quick RefeRence Guide / 15
14/ 2014 Taurus /Quick RefeRence Guide
*if equipped
*if equipped