ECU FORD TAURUS 2017 Owners Manual
[x] Cancel search | Manufacturer: FORD, Model Year: 2017, Model line: TAURUS, Model: FORD TAURUS 2017Pages: 504, PDF Size: 5.84 MB
Page 4 of 504
Introduction
About This Manual...........................................7
Symbols Glossary.............................................7
Data Recording..................................................9
California Proposition 65..............................11
Perchlorate.........................................................11
Ford Credit..........................................................11
Replacement PartsRecommendation.......................................12
Special Notices................................................12
Mobile CommunicationsEquipment.....................................................13
Export Unique Options..................................13
Environment
Protecting the Environment........................15
At a Glance
Instrument Panel Overview........................16
Child Safety
General Information.......................................18
Installing Child Restraints............................19
Booster Seats..................................................25
Child Restraint Positioning..........................27
Child Safety Locks.........................................28
Seatbelts
Principle of Operation..................................30
Fastening the Seatbelts................................31
Seatbelt Height Adjustment......................33
Seatbelt Warning Lamp and IndicatorChime.............................................................33
Seatbelt Reminder........................................34
Child Restraint and SeatbeltMaintenance................................................35
Seatbelt Extension........................................36
Personal Safety System™
Personal Safety System™..........................37
Supplementary RestraintsSystem
Principle of Operation..................................38
Driver and Passenger Airbags...................39
Front Passenger Sensing System............40
Side Airbags.....................................................42
Safety Canopy™............................................43
Crash Sensors and Airbag Indicator.......44
Airbag Disposal...............................................45
Keys and Remote Controls
General Information on RadioFrequencies.................................................46
Remote Control..............................................46
Replacing a Lost Key or RemoteControl...........................................................50
MyKey™
Principle of Operation...................................51
Creating a MyKey............................................52
Clearing All MyKeys.......................................53
Checking MyKey System Status...............54
Using MyKey With Remote StartSystems.........................................................55
MyKey Troubleshooting...............................55
Doors and Locks
Locking and Unlocking.................................57
Keyless Entry...................................................60
Interior Luggage CompartmentRelease..........................................................62
Security
Passive Anti-Theft System........................64
Anti-Theft Alarm............................................65
Steering Wheel
Adjusting the Steering Wheel - VehiclesWith: Manual Adjustable SteeringColumn..........................................................66
1
Taurus (CPH) Canada/United States of America, enUSA, First Printing
Table of Contents
Page 16 of 504
On Board Diagnostics Data LinkConnector
WARNING
Do not connect wireless plug-indevices to the data link connector.Unauthorized third parties could gainaccess to vehicle data and impair theperformance of safety related systems.Only allow repair facilities that follow ourservice and repair instructions to connecttheir equipment to the data link connector.
Your vehicle has an OBD Data LinkConnector (DLC) that is used inconjunction with a diagnostic scan tool forvehicle diagnostics, repairs andreprogramming services. Installing anaftermarket device that uses the DLCduring normal driving for purposes such asremote insurance company monitoring,transmission of vehicle data to otherdevices or entities, or altering theperformance of the vehicle, may causeinterference with or even damage tovehicle systems. We do not recommendor endorse the use of aftermarket plug-indevices unless approved by Ford. Thevehicle Warranty will not cover damagecaused by an aftermarket plug-in device.
MOBILE COMMUNICATIONS
EQUIPMENT
WARNING
Driving while distracted can result inloss of vehicle control, crash andinjury. We strongly recommend thatyou use extreme caution when using anydevice that may take your focus off theroad. Your primary responsibility is the safeoperation of your vehicle. We recommendagainst the use of any hand-held devicewhile driving and encourage the use ofvoice-operated systems when possible.Make sure you are aware of all applicablelocal laws that may affect the use ofelectronic devices while driving.
Using mobile communications equipmentis becoming increasingly important in theconduct of business and personal affairs.However, you must not compromise yourown or others’ safety when using suchequipment. Mobile communications canenhance personal safety and security whenappropriately used, particularly inemergency situations. Safety must beparamount when using mobilecommunications equipment to avoidnegating these benefits. Mobilecommunication equipment includes, butis not limited to, cellular phones, pagers,portable email devices, text messagingdevices and portable two-way radios.
EXPORT UNIQUE OPTIONS
For your particular global region, yourvehicle may be equipped with features andoptions that are different from the featuresand options that are described in thisOwner’s Manual. A market uniquesupplement may be supplied thatcomplements this book. By referring to themarket unique supplement, if provided,you can properly identify those features,
13
Taurus (CPH) Canada/United States of America, enUSA, First Printing
Introduction
Page 21 of 504
GENERAL INFORMATION
See the following sections for directionson how to properly use safety restraintsfor children.
WARNINGS
Always make sure your child issecured properly in a device that isappropriate for their height, age andweight. Child safety restraints must bebought separately from your vehicle.Failure to follow these instructions andguidelines may result in an increased riskof serious injury or death to your child.
All children are shaped differently.The National Highway Traffic SafetyAdministration and other safetyorganizations, base their recommendationsfor child restraints on probable child height,age and weight thresholds, or on theminimum requirements of the law. Werecommend that you check with a NHTSACertified Child Passenger Safety
WARNINGS
Technician (CPST) to make sure that youproperly install the child restraint in yourvehicle and that you consult yourpediatrician to make sure you have a childrestraint appropriate for your child. Tolocate a child restraint fitting station andCPST, contact NHTSA toll free at1-888-327-4236 or go towww.nhtsa.dot.gov. In Canada, contactTransport Canada toll free at1-800-333-0371 or go to www.tc.gc.ca tofind a Child Car Seat Clinic in your area.Failure to properly restrain children in childrestraints made especially for their height,age and weight, may result in an increasedrisk of serious injury or death to your child.
On hot days, the temperature insidethe vehicle can rise very quickly.Exposure of people or animals tothese high temperatures for even a shorttime can cause death or serious heatrelated injuries, including brain damage.Small children are particularly at risk.
18
Taurus (CPH) Canada/United States of America, enUSA, First Printing
Child Safety
Page 23 of 504
Use a child safety seat (sometimes calledan infant carrier, convertible seat, ortoddler seat) for infants, toddlers, orchildren weighing 40 lb (18 kg) or less(generally age four or younger).
Using Lap and Shoulder Belts
WARNINGS
Airbags can kill or injure a child in achild restraint. Never place arear-facing child restraint in front ofan active airbag. If you must use aforward-facing child restraint in the frontseat, move the seat upon which the childrestraint is installed all the way back.
Airbags can kill or injure a child in achild restraint. Properly restrainchildren 12 and under in the rear seatwhenever possible.
Depending on where you secure achild restraint, and depending on thechild restraint design, you may blockaccess to certain seatbelt buckleassemblies and LATCH lower anchors,rendering those features potentiallyunusable. To avoid risk of injury, make sureoccupants only use seating positionswhere they are able to be properlyrestrained.
When installing a child safety seat withcombination lap and shoulder belts:
•Use the correct seatbelt buckle for thatseating position.
•Insert the belt tongue into the properbuckle until you hear a click and feel itlatch. Make sure the tongue is securelyfastened in the buckle.
•Keep the buckle release buttonpointing up and away from the safetyseat, with the tongue between the childrestraint and the release button, toprevent accidental unbuckling.
•Place the vehicle seat upon which thechild restraint will be installed in theupright position.
•Put the seatbelt in the automaticlocking mode. See Step 5. This vehicledoes not require the use of a lockingclip.
Perform the following steps wheninstalling the child restraint withcombination lap and shoulder belts:
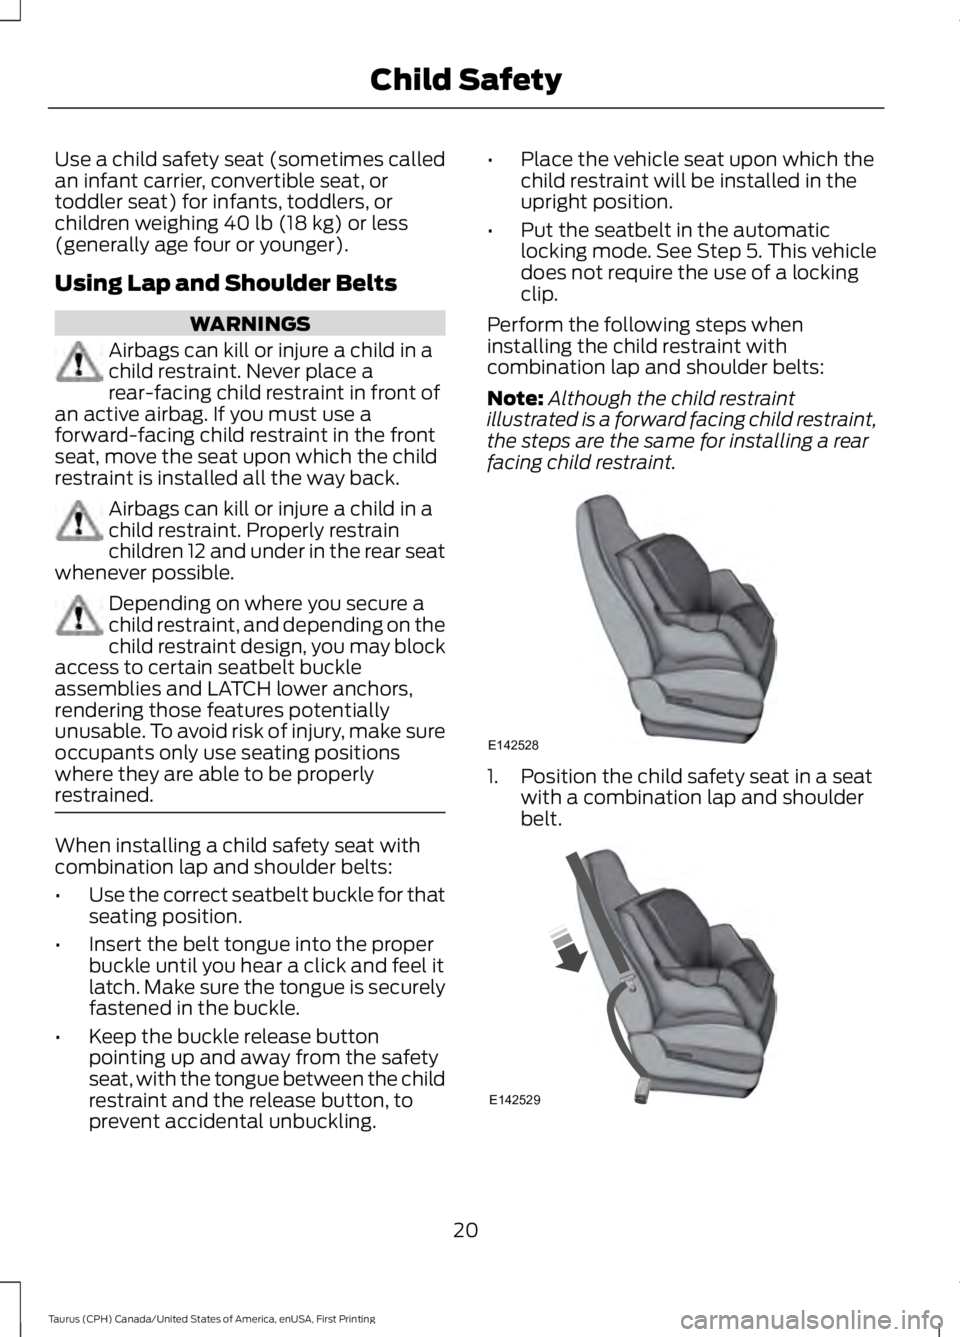
Note:Although the child restraintillustrated is a forward facing child restraint,the steps are the same for installing a rearfacing child restraint.
1. Position the child safety seat in a seatwith a combination lap and shoulderbelt.
20
Taurus (CPH) Canada/United States of America, enUSA, First Printing
Child SafetyE142528 E142529
Page 24 of 504
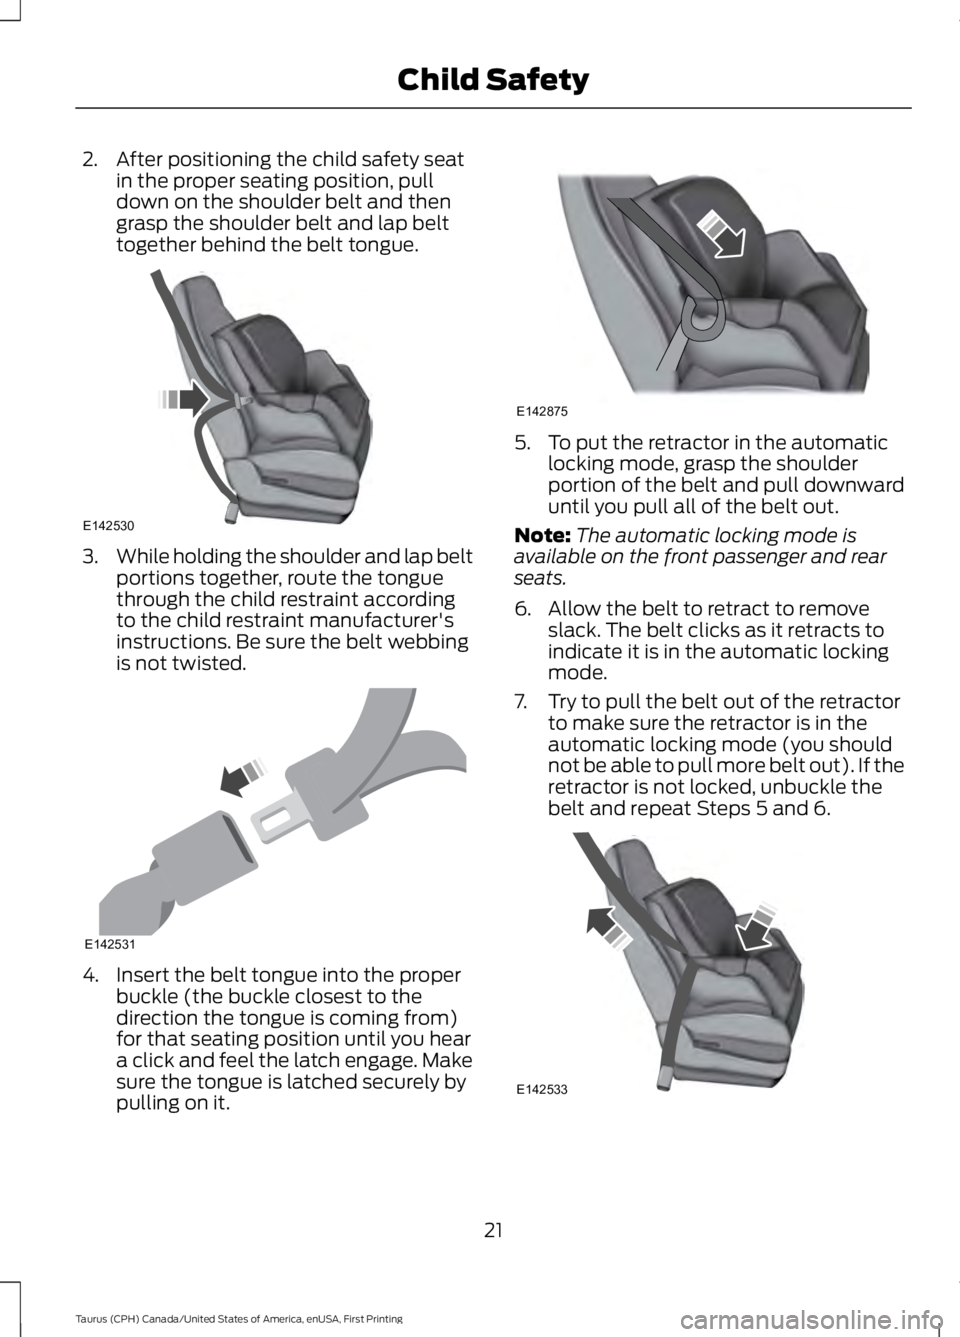
2. After positioning the child safety seatin the proper seating position, pulldown on the shoulder belt and thengrasp the shoulder belt and lap belttogether behind the belt tongue.
3.While holding the shoulder and lap beltportions together, route the tonguethrough the child restraint accordingto the child restraint manufacturer'sinstructions. Be sure the belt webbingis not twisted.
4. Insert the belt tongue into the properbuckle (the buckle closest to thedirection the tongue is coming from)for that seating position until you heara click and feel the latch engage. Makesure the tongue is latched securely bypulling on it.
5. To put the retractor in the automaticlocking mode, grasp the shoulderportion of the belt and pull downwarduntil you pull all of the belt out.
Note:The automatic locking mode isavailable on the front passenger and rearseats.
6. Allow the belt to retract to removeslack. The belt clicks as it retracts toindicate it is in the automatic lockingmode.
7. Try to pull the belt out of the retractorto make sure the retractor is in theautomatic locking mode (you shouldnot be able to pull more belt out). If theretractor is not locked, unbuckle thebelt and repeat Steps 5 and 6.
21
Taurus (CPH) Canada/United States of America, enUSA, First Printing
Child SafetyE142530 E142531 E142875 E142533
Page 25 of 504
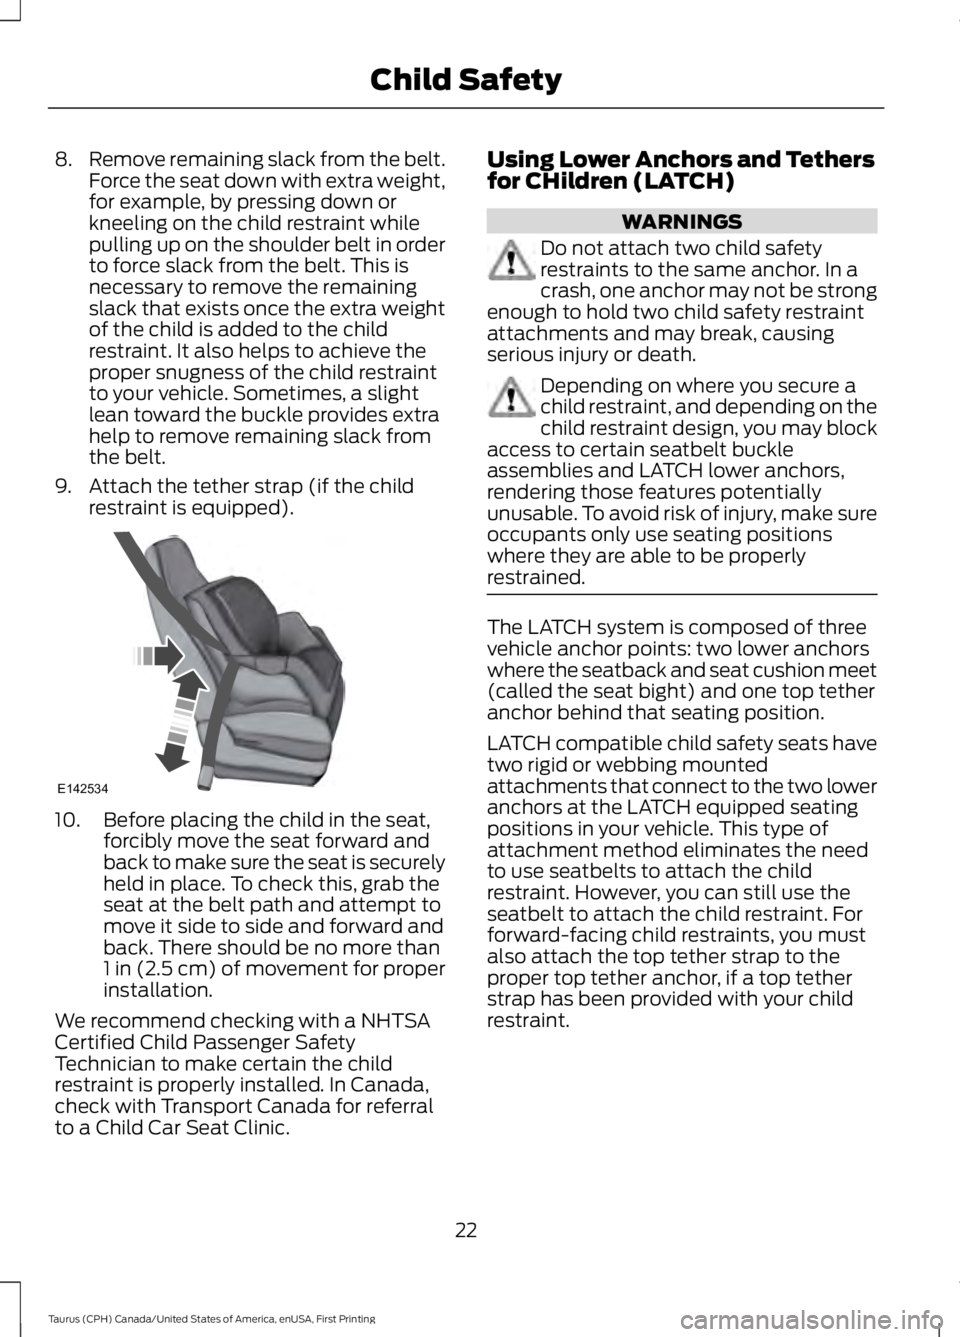
8.Remove remaining slack from the belt.Force the seat down with extra weight,for example, by pressing down orkneeling on the child restraint whilepulling up on the shoulder belt in orderto force slack from the belt. This isnecessary to remove the remainingslack that exists once the extra weightof the child is added to the childrestraint. It also helps to achieve theproper snugness of the child restraintto your vehicle. Sometimes, a slightlean toward the buckle provides extrahelp to remove remaining slack fromthe belt.
9. Attach the tether strap (if the childrestraint is equipped).
10. Before placing the child in the seat,forcibly move the seat forward andback to make sure the seat is securelyheld in place. To check this, grab theseat at the belt path and attempt tomove it side to side and forward andback. There should be no more than1 in (2.5 cm) of movement for properinstallation.
We recommend checking with a NHTSACertified Child Passenger SafetyTechnician to make certain the childrestraint is properly installed. In Canada,check with Transport Canada for referralto a Child Car Seat Clinic.
Using Lower Anchors and Tethersfor CHildren (LATCH)
WARNINGS
Do not attach two child safetyrestraints to the same anchor. In acrash, one anchor may not be strongenough to hold two child safety restraintattachments and may break, causingserious injury or death.
Depending on where you secure achild restraint, and depending on thechild restraint design, you may blockaccess to certain seatbelt buckleassemblies and LATCH lower anchors,rendering those features potentiallyunusable. To avoid risk of injury, make sureoccupants only use seating positionswhere they are able to be properlyrestrained.
The LATCH system is composed of threevehicle anchor points: two lower anchorswhere the seatback and seat cushion meet(called the seat bight) and one top tetheranchor behind that seating position.
LATCH compatible child safety seats havetwo rigid or webbing mountedattachments that connect to the two loweranchors at the LATCH equipped seatingpositions in your vehicle. This type ofattachment method eliminates the needto use seatbelts to attach the childrestraint. However, you can still use theseatbelt to attach the child restraint. Forforward-facing child restraints, you mustalso attach the top tether strap to theproper top tether anchor, if a top tetherstrap has been provided with your childrestraint.
22
Taurus (CPH) Canada/United States of America, enUSA, First Printing
Child SafetyE142534
Page 34 of 504
The seatbelt pretensioners at the frontseating positions are designed to tightenthe seatbelts when activated. In frontaland near-frontal crashes, the seatbeltpretensioners may be activated alone or,if the crash is of sufficient severity, togetherwith the front airbags. The pretensionersmay also activate when the Safety Canopyis deployed.
FASTENING THE SEATBELTS
The front outboard and rear safetyrestraints in the vehicle are combinationlap and shoulder belts.
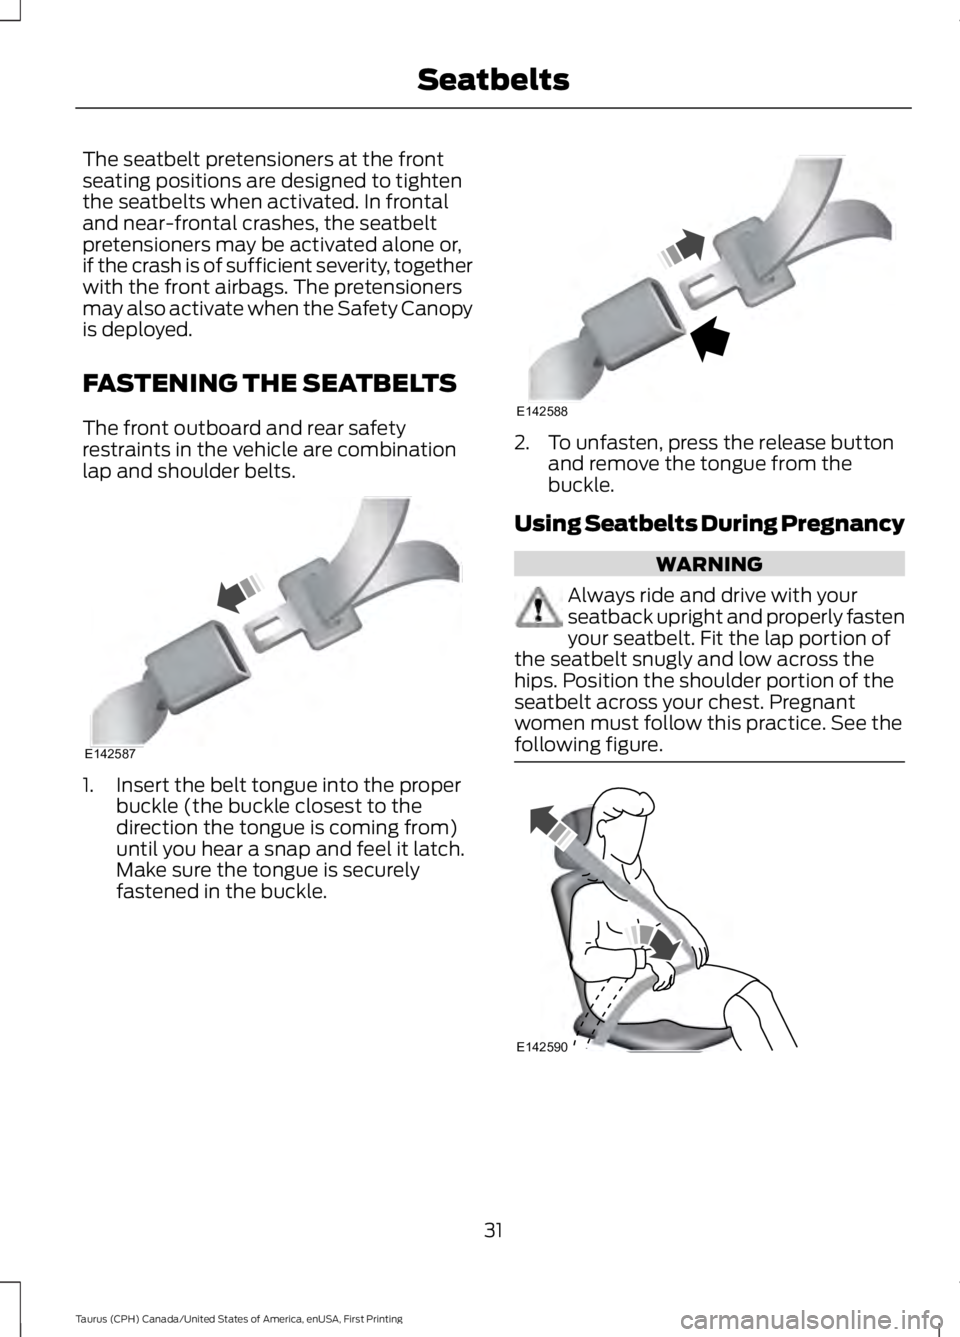
1. Insert the belt tongue into the properbuckle (the buckle closest to thedirection the tongue is coming from)until you hear a snap and feel it latch.Make sure the tongue is securelyfastened in the buckle.
2. To unfasten, press the release buttonand remove the tongue from thebuckle.
Using Seatbelts During Pregnancy
WARNING
Always ride and drive with yourseatback upright and properly fastenyour seatbelt. Fit the lap portion ofthe seatbelt snugly and low across thehips. Position the shoulder portion of theseatbelt across your chest. Pregnantwomen must follow this practice. See thefollowing figure.
31
Taurus (CPH) Canada/United States of America, enUSA, First Printing
SeatbeltsE142587 E142588 E142590
Page 50 of 504
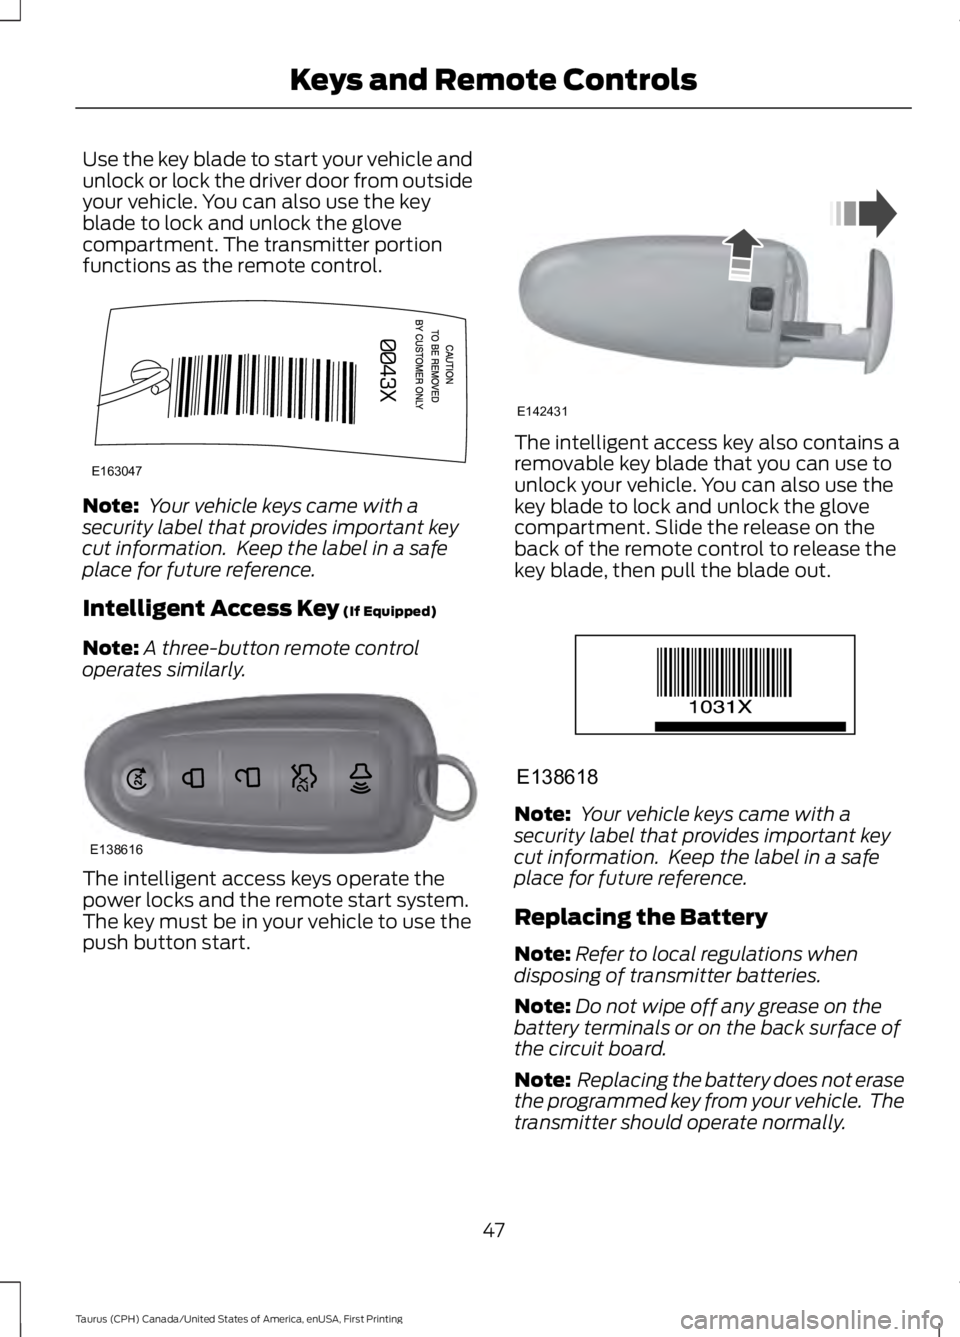
Use the key blade to start your vehicle andunlock or lock the driver door from outsideyour vehicle. You can also use the keyblade to lock and unlock the glovecompartment. The transmitter portionfunctions as the remote control.
Note: Your vehicle keys came with asecurity label that provides important keycut information. Keep the label in a safeplace for future reference.
Intelligent Access Key (If Equipped)
Note:A three-button remote controloperates similarly.
The intelligent access keys operate thepower locks and the remote start system.The key must be in your vehicle to use thepush button start.
The intelligent access key also contains aremovable key blade that you can use tounlock your vehicle. You can also use thekey blade to lock and unlock the glovecompartment. Slide the release on theback of the remote control to release thekey blade, then pull the blade out.
Note: Your vehicle keys came with asecurity label that provides important keycut information. Keep the label in a safeplace for future reference.
Replacing the Battery
Note:Refer to local regulations whendisposing of transmitter batteries.
Note:Do not wipe off any grease on thebattery terminals or on the back surface ofthe circuit board.
Note: Replacing the battery does not erasethe programmed key from your vehicle. Thetransmitter should operate normally.
47
Taurus (CPH) Canada/United States of America, enUSA, First Printing
Keys and Remote ControlsE163047 E138616 E142431 E138618
Page 58 of 504
USING MYKEY WITH REMOTE
START SYSTEMS
MyKey is not compatible with non
Ford-approved, aftermarket remote startsystems. If you choose to install a remotestart system, see an authorized dealer fora Ford-approved remote start system.
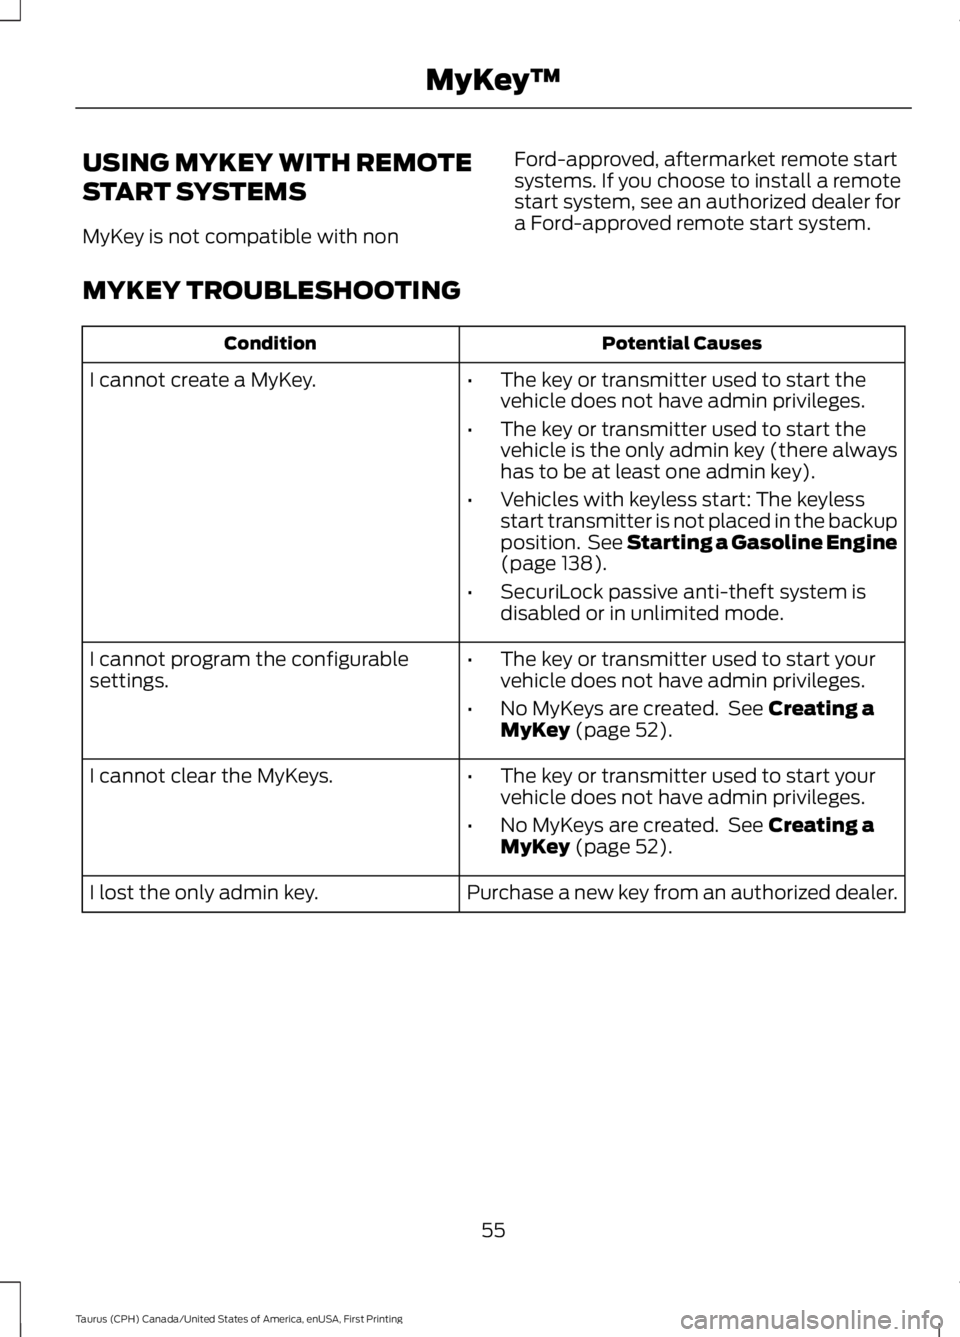
MYKEY TROUBLESHOOTING
Potential CausesCondition
I cannot create a MyKey.•The key or transmitter used to start thevehicle does not have admin privileges.
•The key or transmitter used to start thevehicle is the only admin key (there alwayshas to be at least one admin key).
•Vehicles with keyless start: The keylessstart transmitter is not placed in the backupposition. See Starting a Gasoline Engine(page 138).
•SecuriLock passive anti-theft system isdisabled or in unlimited mode.
•The key or transmitter used to start yourvehicle does not have admin privileges.
•No MyKeys are created. See Creating aMyKey (page 52).
I cannot program the configurablesettings.
•The key or transmitter used to start yourvehicle does not have admin privileges.
•No MyKeys are created. See Creating aMyKey (page 52).
I cannot clear the MyKeys.
Purchase a new key from an authorized dealer.I lost the only admin key.
55
Taurus (CPH) Canada/United States of America, enUSA, First Printing
MyKey™
Page 63 of 504
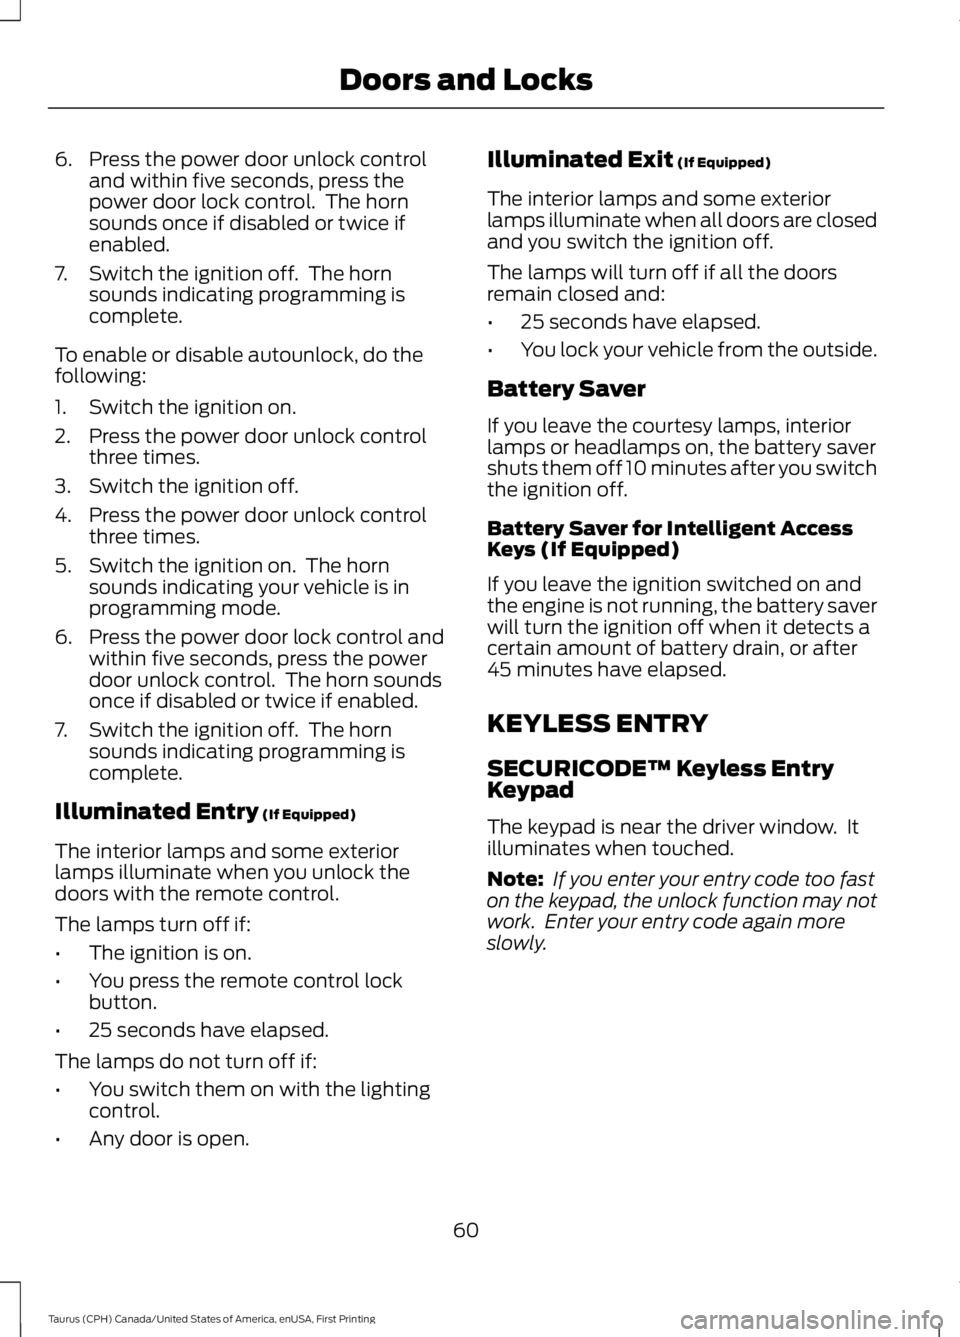
6. Press the power door unlock controland within five seconds, press thepower door lock control. The hornsounds once if disabled or twice ifenabled.
7. Switch the ignition off. The hornsounds indicating programming iscomplete.
To enable or disable autounlock, do thefollowing:
1. Switch the ignition on.
2. Press the power door unlock controlthree times.
3. Switch the ignition off.
4. Press the power door unlock controlthree times.
5. Switch the ignition on. The hornsounds indicating your vehicle is inprogramming mode.
6. Press the power door lock control andwithin five seconds, press the powerdoor unlock control. The horn soundsonce if disabled or twice if enabled.
7. Switch the ignition off. The hornsounds indicating programming iscomplete.
Illuminated Entry (If Equipped)
The interior lamps and some exteriorlamps illuminate when you unlock thedoors with the remote control.
The lamps turn off if:
•The ignition is on.
•You press the remote control lockbutton.
•25 seconds have elapsed.
The lamps do not turn off if:
•You switch them on with the lightingcontrol.
•Any door is open.
Illuminated Exit (If Equipped)
The interior lamps and some exteriorlamps illuminate when all doors are closedand you switch the ignition off.
The lamps will turn off if all the doorsremain closed and:
•25 seconds have elapsed.
•You lock your vehicle from the outside.
Battery Saver
If you leave the courtesy lamps, interiorlamps or headlamps on, the battery savershuts them off 10 minutes after you switchthe ignition off.
Battery Saver for Intelligent AccessKeys (If Equipped)
If you leave the ignition switched on andthe engine is not running, the battery saverwill turn the ignition off when it detects acertain amount of battery drain, or after45 minutes have elapsed.
KEYLESS ENTRY
SECURICODE™ Keyless EntryKeypad
The keypad is near the driver window. Itilluminates when touched.
Note: If you enter your entry code too faston the keypad, the unlock function may notwork. Enter your entry code again moreslowly.
60
Taurus (CPH) Canada/United States of America, enUSA, First Printing
Doors and Locks