change time FORD TRANSIT 2018 Owners Manual
[x] Cancel search | Manufacturer: FORD, Model Year: 2018, Model line: TRANSIT, Model: FORD TRANSIT 2018Pages: 521, PDF Size: 8.65 MB
Page 2 of 521
The information contained in this publication was correct at the time of going to print. In the interest of
continuous development, we reserve the right to change specifications, design or equipment at any time
without notice or obligation. No part of this publication may be reproduced, transmitted, stored in a
retrieval system or translated into any language in any form by any means without our written permission.
Errors and omissions excepted.
© Ford Motor Company 2018
All rights reserved.
Part Number: JK3J 19A321 AA 201705 20180412151133
California Proposition 65
WARNING: Operating, servicing and
maintaining a passenger vehicle or off-highway
motor vehicle can expose you to chemicals
including engine exhaust, carbon monoxide,
phthalates, and lead, which are known to the State
of California to cause cancer and birth defects or
other reproductive harm. To minimize exposure,
avoid breathing exhaust, do not idle the engine
except as necessary, service your vehicle in a
well-ventilated area and wear gloves or wash your
hands frequently when servicing your vehicle. For
more information go to
www.P65Warnings.ca.gov/passenger-vehicle. WARNING:
Battery posts, terminals and
related accessories contain lead and lead
compounds, chemicals known to the State of
California to cause cancer and reproductive harm.
Wash your hands after handling
.
Page 67 of 521
PRINCIPLE OF OPERATION
MyKey allows you to program keys with
restricted driving modes to promote good
driving habits. You can only program up to
two keys with the restrictions. Any keys
that you did not program are administrator
keys or admin keys.
You can use admin keys to:
•
Create a MyKey with certain vehicle
restrictions.
• Program certain MyKey settings.
• Clear all MyKey restrictions.
After you program a MyKey, you can view
the following information through the
information display:
• The total number of admin keys and
MyKeys for your vehicle.
• The total distance a MyKey driver
traveled with your vehicle.
Note: Every MyKey receives the same
restrictions and settings. You cannot
program them individually.
Note: For vehicles equipped with a
push-button start switch: When both a
MyKey and an admin key are present when
you start your vehicle, the system recognizes
the admin key only. Standard Settings
Not every vehicle includes the features
listed below. If your vehicle has this
equipment, then you cannot change the
following settings when using a MyKey:
•
Seatbelt reminder or Belt-Minder™.
MyKey mutes the audio system until
drivers, and in some instances,
passengers, fasten their seatbelts.
Note: If your vehicle includes an
AM/FM radio or a very basic audio
system, then the radio may not mute.
• Earlier low-fuel warning. The low-fuel
warning activates earlier for MyKey
drivers, giving them more time to refuel.
• Certain driver alerts, stability systems
or parking aids turn on automatically
when you use the MyKey system. For
example, Blind Spot Information
System (BLIS), cross traffic alert, lane
departure warning or forward collision
warning. Note:
MyKey drivers may be
able to turn the lane departure warning
feature off, but this feature turns back
on automatically with every new key
cycle.
• Restricted touchscreen operation in
some markets. For example, MyKey
may prevent manual navigation
destination input while the vehicle is in
any gear other than park (P) or when
the vehicle reaches a certain rate of
speed.
• Satellite radio adult content
restrictions, if this feature is available
in your market.
Optional Settings
You can configure certain vehicle feature
settings when you first create a MyKey. You
can also change the settings afterward
with an admin key.
64
2018 Transit (TTH) Canada/United States of America, JK3J 19A321 AA enUSA, Edition date: 201705, Third-Printing- MyKey
™
(If Equipped)
Page 69 of 521
3. Access the main menu in the
information display and then scroll
through the menus to change the
settings of your MyKey. From the
MyKey menu select the option Create
MyKey. See Information Displays
(page 99).
4. When prompted, hold the
OK button
until you see a message informing you
to label this key as a MyKey. The
programmed restrictions apply when
you key off, open and close the driver
door and restart your vehicle with the
programmed key or transmitter.
MyKey is successfully created. Make sure
you label it so you can distinguish it from
the admin keys.
You can also program configurable
settings for the key(s). See
Programming/Changing Configurable
Settings
.
Programming/Changing
Configurable Settings
Use the information display to access your
configurable MyKey settings.
1. Switch the ignition on using the key or the transmitter you want to program.
2. Access the main menu in the information display and then scroll
through the menus to change the
settings of your MyKey. See
Information Displays
(page 99).
3. Follow the instructions in the display. Note:
You can clear or change your MyKey
settings at any time during the same key
cycle as you created the MyKey. Once you
have switched the vehicle off, however, you
will need an admin key to change or clear
your MyKey settings.
CLEARING ALL MYKEYS
When you clear your MyKeys, you remove
all restrictions and return all MyKeys to
their original admin key status at once. To
clear all MyKeys of all MyKey settings, use
the information display.
1. Switch the ignition on using an admin key.
2. Access the main menu in the information display and then scroll
through the menus to begin clearing
your MyKey programming. See
Information Displays
(page 99).
3. Follow the instructions in the display.
4. A confirmation message appears in the
display after you finish clearing your
MyKeys.
Note: When you clear your MyKeys, you
remove all restrictions and return all MyKeys
to their original admin key status. You
cannot remove the MyKey restrictions
individually.
CHECKING MYKEY SYSTEM
STATUS
You can find information on programmed
MyKey(s) using the information display
control on the steering wheel. See
Information Displays
(page 99).
66
2018 Transit (TTH) Canada/United States of America, JK3J 19A321 AA enUSA, Edition date: 201705, Third-Printing- MyKey
™
(If Equipped)
Page 88 of 521
GENERAL INFORMATION
Condensation in the Exterior Front
Lamps and Rear Lamps
Exterior front lamps and rear lamps have
vents to accommodate normal changes
in air pressure.
Condensation can be a natural by-product
of this design. When moist air enters the
lamp assembly through the vents, there is
a possibility that condensation can occur
when the temperature is cold. When
normal condensation occurs, a fine mist
can form on the interior of the lens. The
fine mist eventually clears and exits
through the vents during normal operation.
Clearing time may take as long as 48 hours
under dry weather conditions.
Examples of acceptable condensation are:
•
The presence of a fine mist (no streaks,
drip marks or large droplets).
• A fine mist covers less than 50% of the
lens.
Examples of unacceptable condensation
are:
• A water puddle inside the lamp.
• Streaks, drip marks or large droplets
present on the interior of the lens.
If you see any unacceptable condensation,
have your vehicle checked by an authorized
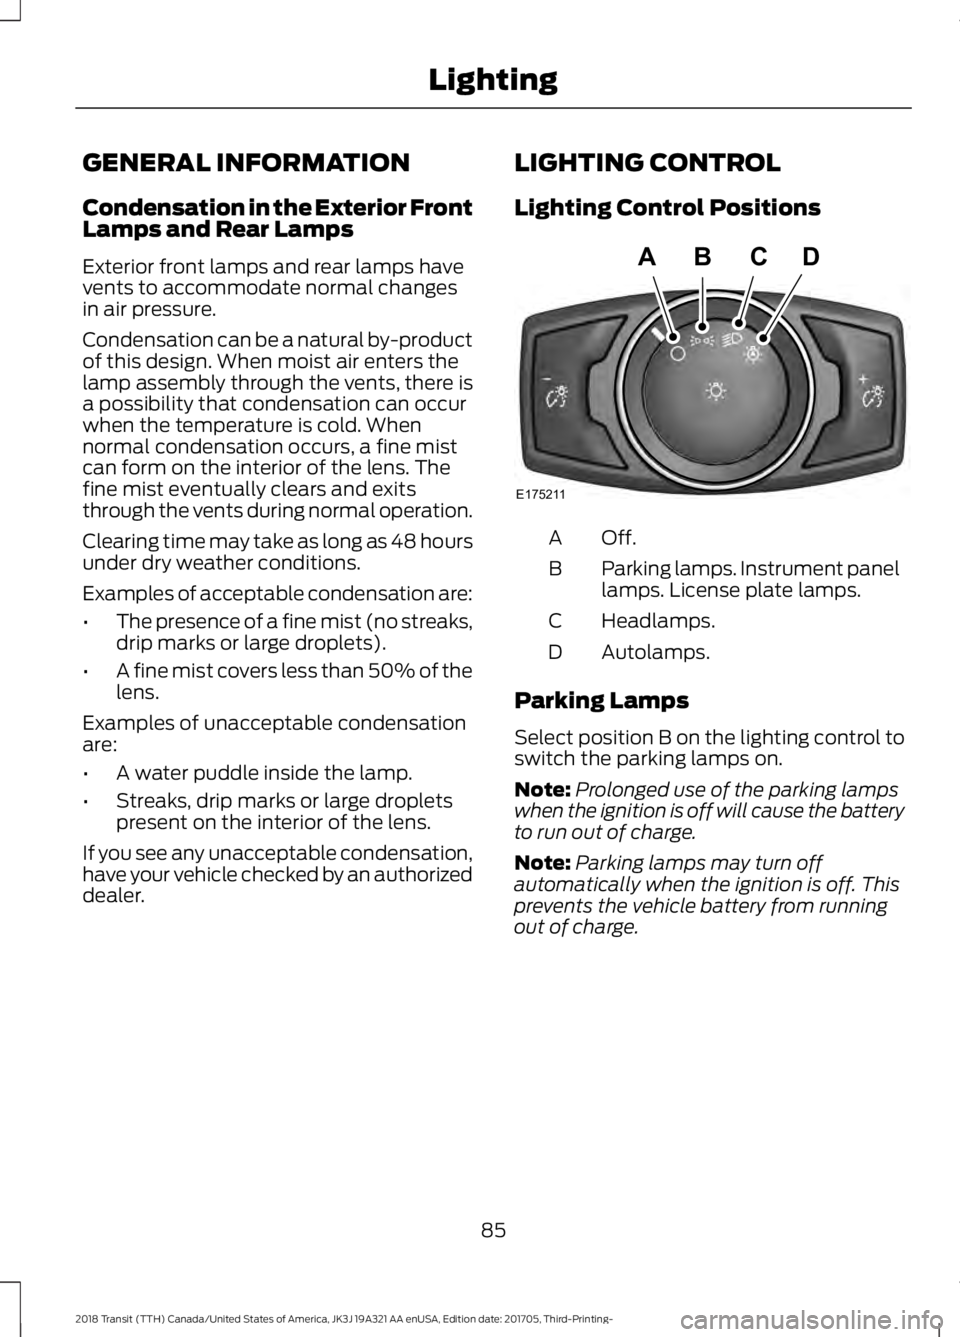
dealer. LIGHTING CONTROL
Lighting Control Positions Off.A
Parking lamps. Instrument panel
lamps. License plate lamps.
B
Headlamps.
C
Autolamps.
D
Parking Lamps
Select position B on the lighting control to
switch the parking lamps on.
Note: Prolonged use of the parking lamps
when the ignition is off will cause the battery
to run out of charge.
Note: Parking lamps may turn off
automatically when the ignition is off. This
prevents the vehicle battery from running
out of charge.
85
2018 Transit (TTH) Canada/United States of America, JK3J 19A321 AA enUSA, Edition date: 201705, Third-Printing- LightingE175211
ABCD
Page 90 of 521
Note:
If you switch autolamps and
autowipers on, the headlamps will
automatically turn on when the windshield
wipers continuously operate.
INSTRUMENT LIGHTING
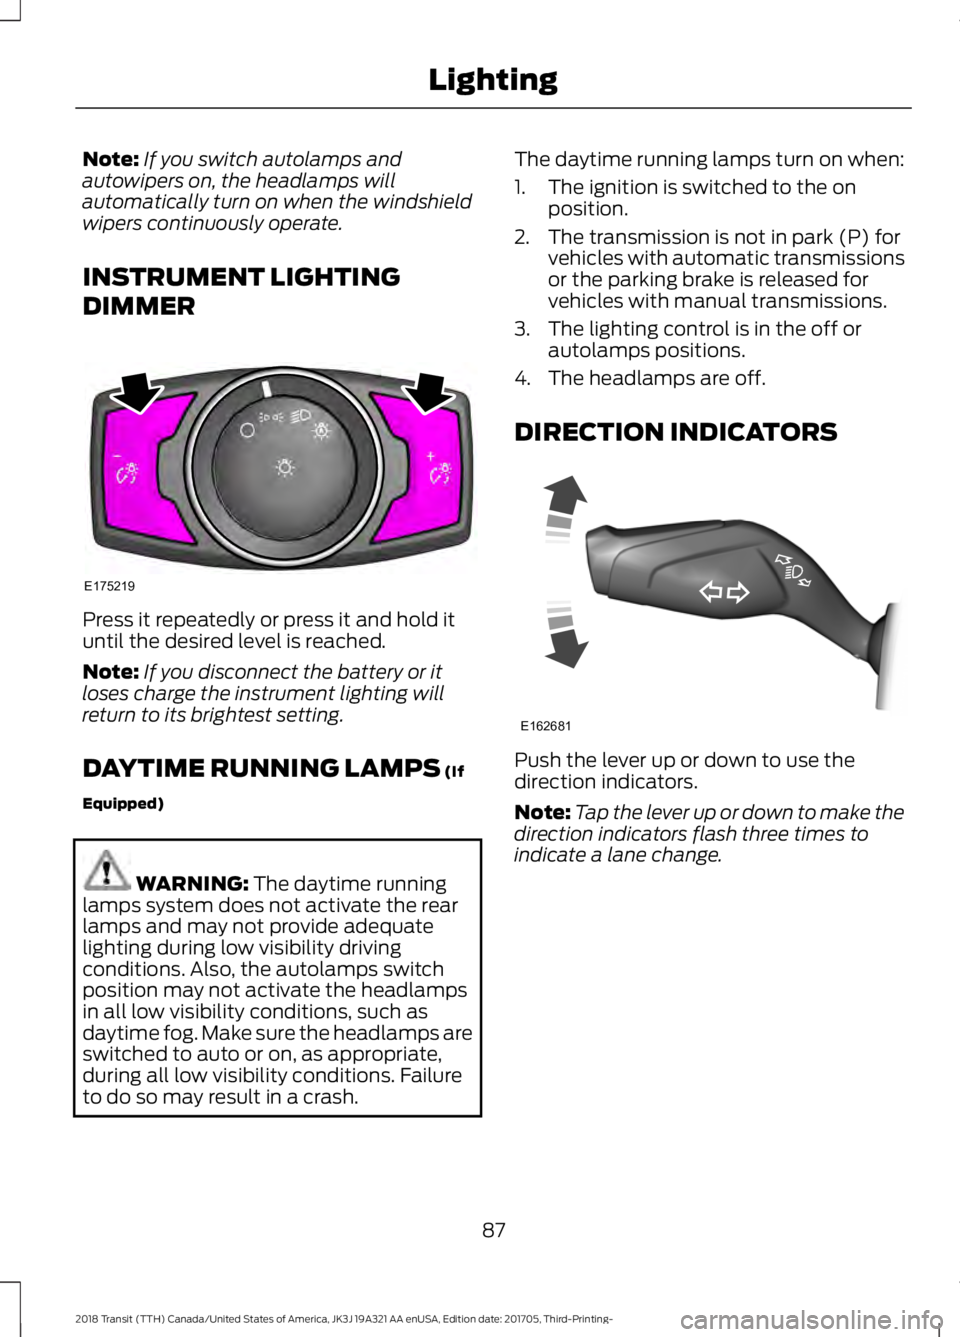
DIMMER Press it repeatedly or press it and hold it
until the desired level is reached.
Note:
If you disconnect the battery or it
loses charge the instrument lighting will
return to its brightest setting.
DAYTIME RUNNING LAMPS (If
Equipped) WARNING:
The daytime running
lamps system does not activate the rear
lamps and may not provide adequate
lighting during low visibility driving
conditions. Also, the autolamps switch
position may not activate the headlamps
in all low visibility conditions, such as
daytime fog. Make sure the headlamps are
switched to auto or on, as appropriate,
during all low visibility conditions. Failure
to do so may result in a crash. The daytime running lamps turn on when:
1. The ignition is switched to the on
position.
2. The transmission is not in park (P) for vehicles with automatic transmissions
or the parking brake is released for
vehicles with manual transmissions.
3. The lighting control is in the off or autolamps positions.
4. The headlamps are off.
DIRECTION INDICATORS Push the lever up or down to use the
direction indicators.
Note:
Tap the lever up or down to make the
direction indicators flash three times to
indicate a lane change.
87
2018 Transit (TTH) Canada/United States of America, JK3J 19A321 AA enUSA, Edition date: 201705, Third-Printing- LightingE175219 E162681
Page 97 of 521
If the needle enters the red section, the
engine is overheating. Stop your vehicle as
soon as it is safe to do so and switch the
engine off. Determine the cause once the
engine has cooled down. See Engine
Coolant Check (page 236).
Note: Do not restart the engine until the
cause of overheating has been determined
and resolved.
Tripmeter Reset and Distance to
Empty
(If Equipped)
Press the button to change between the
tripmeter and distance to empty
information. Press and hold the button to
reset the tripmeter.
Fuel Gauge
Note: The fuel gauge may vary slightly
when your vehicle is moving or on a gradient.
Switch the ignition on. The fuel gauge will
indicate approximately how much fuel is
in the fuel tank. The arrow adjacent to the
fuel pump symbol indicates on which side
of your vehicle the fuel filler door is located. The needle should move toward F when
you refuel your vehicle. If the needle points
to E after adding fuel, this indicates your
vehicle needs service soon.
After refueling some variability in needle
position is normal:
•
It may take a short time for the needle
to reach F after leaving the gas station.
This is normal and depends upon the
slope of pavement at the gas station.
• The fuel amount dispensed into the
tank is a little less or more than the
gauge indicated. This is normal and
depends upon the slope of pavement
at the gas station.
• If the gas station nozzle shuts off
before the tank is full, try a different
gas pump nozzle.
Low Fuel Reminder
A low fuel reminder triggers when the fuel
gauge needle is at 1/16th.
Variations: Distance-to-empty
Fuel gauge position
Driving type (fuel economy
conditions)
35 miles to 80 miles (56 kmto 129 km)
1/16th
Highway driving
35 miles (56km)
1/16th
Severe duty driving (trailer
towing, extended idle)
94
2018 Transit (TTH) Canada/United States of America, JK3J 19A321 AA enUSA, Edition date: 201705, Third-Printing- Instrument Cluster
Page 105 of 521
Settings
Off
Volume Limiter Clear MyKey
Clear MyKeys
System Check
All active warnings will display first if
applicable. The system check menu may
appear different based upon equipment
options and current vehicle status. Use the
up and down arrow buttons to scroll
through the list. See Information
Messages (page 103).
TRIP COMPUTER
Resetting the Trip Computer
Press and hold
OK on the current screen
to reset the respective trip, distance, time
and average fuel consumption information.
All Values
Indicates all the respective trip, distance,
time and average fuel consumption
information.
Average Fuel Consumption
Indicates the average fuel consumption
since the function was last reset. Distance to Empty
Indicates the approximate distance your
vehicle will travel on the fuel remaining in
the tank. Changes in driving pattern may
cause the value to vary.
Outside Air Temperature
Shows the outside air temperature.
Trip Odometer
Registers the distance traveled of
individual journeys.
Trip Timer
Registers the elapsed time of individual
journeys or the total time since the function
was last reset.
Digital Speedometer
Provides a digital display of the current
vehicle speed.
PERSONALIZED SETTINGS
Measure Units
You can choose personalized settings
using the information display control on
the steering wheel.
See Information
Displays (page 99).
102
2018 Transit (TTH) Canada/United States of America, JK3J 19A321 AA enUSA, Edition date: 201705, Third-Printing- Information Displays
Page 139 of 521
Do not use:
•
Diesel fuel.
• Fuels containing kerosene or paraffin.
• Fuels containing more than 85%
ethanol or E100 fuel.
• Fuels containing methanol.
• Fuels containing metallic-based
additives, including manganese-based
compounds.
• Fuels containing the octane booster
additive, methylcyclopentadienyl
manganese tricarbonyl (MMT).
• Leaded fuel, using leaded fuel is
prohibited by law.
The use of fuels with metallic compounds
such as methylcyclopentadienyl
manganese tricarbonyl (commonly known
as MMT), which is a manganese-based
fuel additive, will impair engine
performance and affect the emission
control system.
Switching Between E85 and
Gasoline
We do not recommend repeatedly
alternating between E85 and gasoline. If
you switch from using E85 to gasoline, or
from gasoline to E85, add as much fuel as
possible, at least half a tank. Drive your
vehicle immediately for a minimum of 5 mi
(8 km) to allow it to adapt to the change
in ethanol concentration. If you use E85
exclusively, we recommend that you fill
the fuel tank with regular unleaded
gasoline at each scheduled oil change.
FUEL FILLER FUNNEL
LOCATION
The fuel filler funnel is in the glove
compartment or in the front right-hand
side stepwell storage compartment. RUNNING OUT OF FUEL
Running out of fuel can cause damage not
covered by the vehicle Warranty.
If your vehicle runs out of fuel:
•
Add a minimum of
1.3 gal (5 L) of fuel
to restart the engine.
• You may need to switch the ignition
from off to on several times after
refueling to allow the fuel system to
pump the fuel from the tank to the
engine. When restarting, cranking time
takes a few seconds longer than
normal.
Note: If your vehicle is on a steep slope,
more fuel may be required.
Filling a Portable Fuel Container WARNING:
Flow of fuel through a
fuel pump nozzle can produce static
electricity. This can cause a fire if you are
filling an ungrounded fuel container.
Use the following guidelines to avoid
electrostatic charge build-up, which can
produce a spark, when filling an
ungrounded fuel container:
• Only use an approved fuel container to
transfer fuel to your vehicle. Place the
container on the ground when filling it.
• Do not fill a fuel container when it is
inside your vehicle (including the cargo
area).
• Keep the fuel pump nozzle in contact
with the fuel container when filling it.
• Do not use a device that holds the fuel
pump nozzle lever in the fill position.
136
2018 Transit (TTH) Canada/United States of America, JK3J 19A321 AA enUSA, Edition date: 201705, Third-Printing- Fuel and Refueling
Page 153 of 521
When you start manual regeneration the
engine speed rises to approximately
2000–
2500 rpm and the cooling fan
speed increases. A change in engine noise
due to the cooling fan and engine speed
increase may be heard during the
regeneration process.
Depending on the amount of soot
collected by the diesel particulate filter,
the regeneration process varies depending
on the outside air temperature and
altitude. Manual regeneration may last up
to 40 minutes.
When manual regeneration is complete
the cooling fan and engine speed return to
normal idling. The exhaust system remains
very hot for several minutes after
regeneration is complete. Do not reposition
the vehicle over dry leaves, dry grass or
other combustible materials until the
exhaust system has had sufficient time to
cool.
Interrupt or Cancel Manual Regeneration
You can interrupt or cancel manual
regeneration by switching the engine off.
It may be possible to interrupt or cancel
manual regeneration by pressing any
pedal. Note:
To protect the exhaust system you
may not be able to restart the engine for 10
minutes.
Depending on the amount of time allowed
for manual regeneration to operate, soot
may not have had sufficient time to be
eliminated. The exhaust system may still
be very hot for several minutes after
regeneration.
If you switch the engine off during manual
regeneration, turbo charger flutter occurs.
This is a consequence of switching a diesel
engine off during turbo charger boost
operation, which is normal.
Manual Regeneration with Automatic
Regeneration Control
Where vehicle use has significant engine
idle operation, frequent vehicle speed less
than 25 mph (40 km/h), or driving short
distances where the engine does not fully
warm up, automatic regeneration could
not sufficiently clean the diesel particulate
filter. You can switch automatic
regeneration off until you can drive your
vehicle in a manner to allow effective
cleaning, for example at a steady vehicle
speed of
30 mph (48 km/h) or above for
approximately 20 minutes. You can then
switch automatic regeneration back on to
clean the diesel particulate filter.
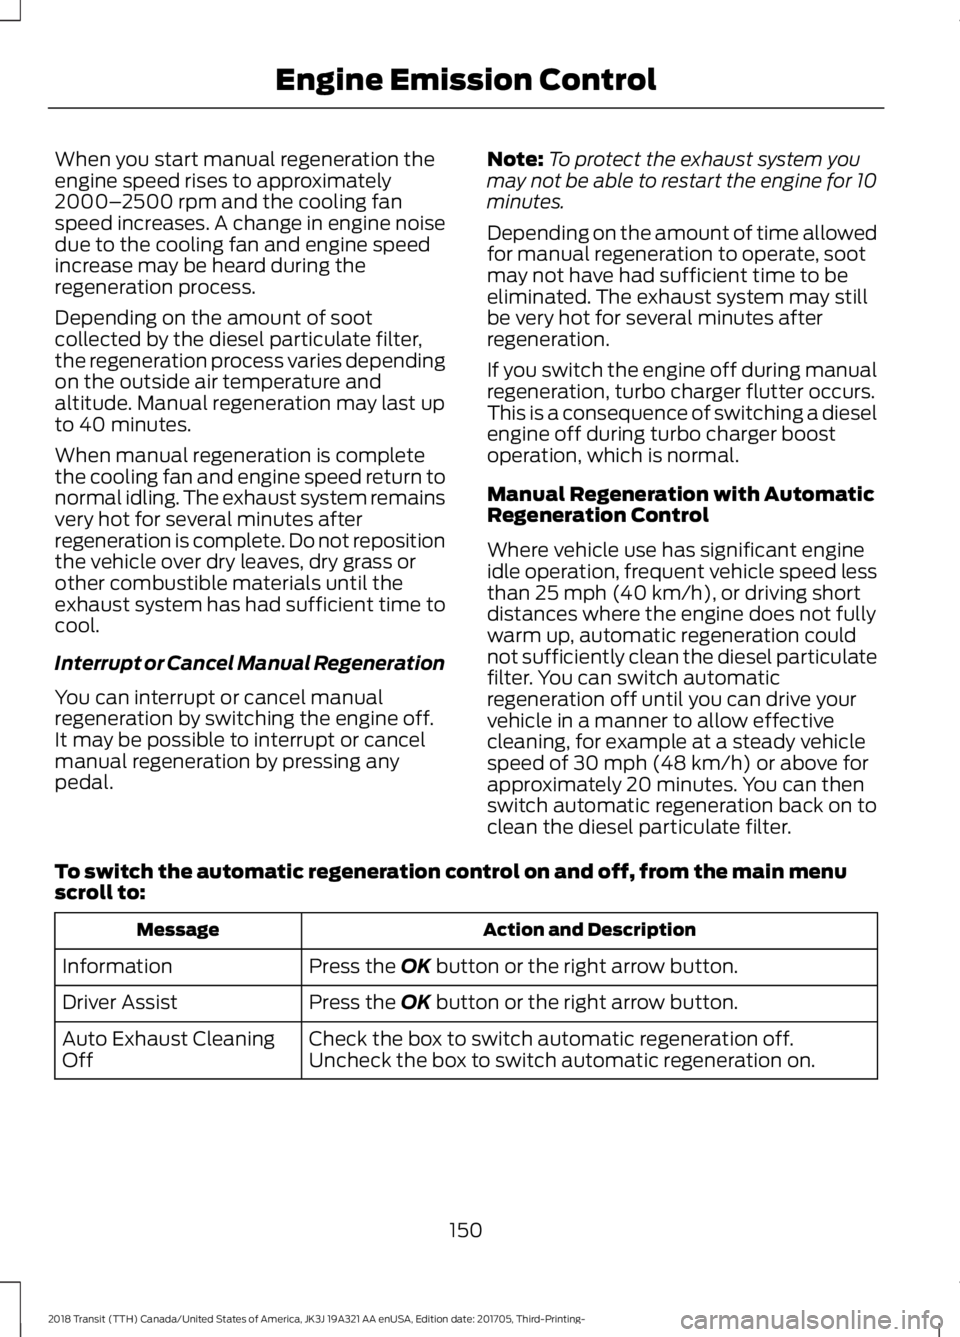
To switch the automatic regeneration control on and off, from the main menu
scroll to: Action and Description
Message
Press the
OK button or the right arrow button.
Information
Press the
OK button or the right arrow button.
Driver Assist
Check the box to switch automatic regeneration off.
Auto Exhaust Cleaning
Off Uncheck the box to switch automatic regeneration on.
150
2018 Transit (TTH) Canada/United States of America, JK3J 19A321 AA enUSA, Edition date: 201705, Third-Printing- Engine Emission Control
Page 155 of 521
To return to normal drive (D) position,
move the shift lever back from manual (M)
to drive (D).
SelectShift Automatic
™
Transmission (If Equipped)
Your vehicle is equipped with a SelectShift
Automatic transmission gearshift lever.
The SelectShift Automatic transmission
gives you the ability to change gears up or
down (without a clutch) as desired.
In order to prevent the engine from running
at too low an RPM, which may cause it to
stall, SelectShift still automatically makes
some downshifts if it has determined that
you have not downshifted in time.
Although SelectShift makes some
downshifts for you, it still allows you to
downshift at any time as long as the
SelectShift determines that damage will
not be caused to the engine from
over-revving.
Note: Engine damage may occur if you
maintain excessive engine revving without
shifting.
SelectShift does not automatically upshift,
even if the engine is approaching the RPM
limit. It must be shifted manually by
pressing the + button. •
Press the (+) button to upshift.
• Press the (-) button to downshift. The system determines when temporary
manual control is no longer in use and
returns to automatic control. The
instrument cluster displays your currently
selected gear.
Note:
The system stays in manual control
until you make another shift selection (for
example, drive [D]).
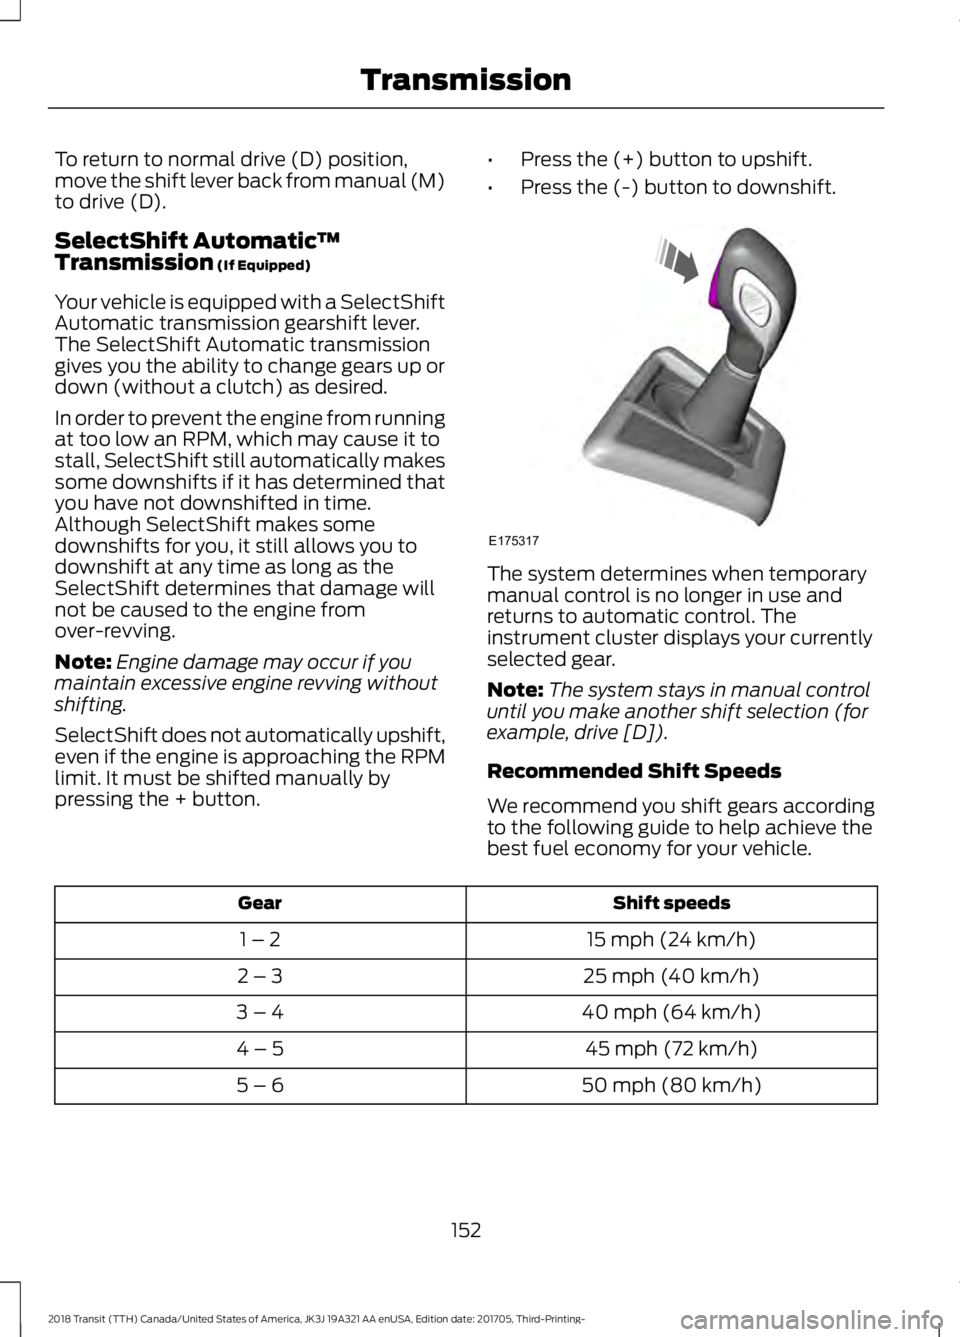
Recommended Shift Speeds
We recommend you shift gears according
to the following guide to help achieve the
best fuel economy for your vehicle. Shift speeds
Gear
15 mph (24 km/h)
1 – 2
25 mph (40 km/h)
2 – 3
40 mph (64 km/h)
3 – 4
45 mph (72 km/h)
4 – 5
50 mph (80 km/h)
5 – 6
152
2018 Transit (TTH) Canada/United States of America, JK3J 19A321 AA enUSA, Edition date: 201705, Third-Printing- TransmissionE175317