clock FORD TRANSIT 2020 User Guide
[x] Cancel search | Manufacturer: FORD, Model Year: 2020, Model line: TRANSIT, Model: FORD TRANSIT 2020Pages: 529, PDF Size: 8.3 MB
Page 309 of 529
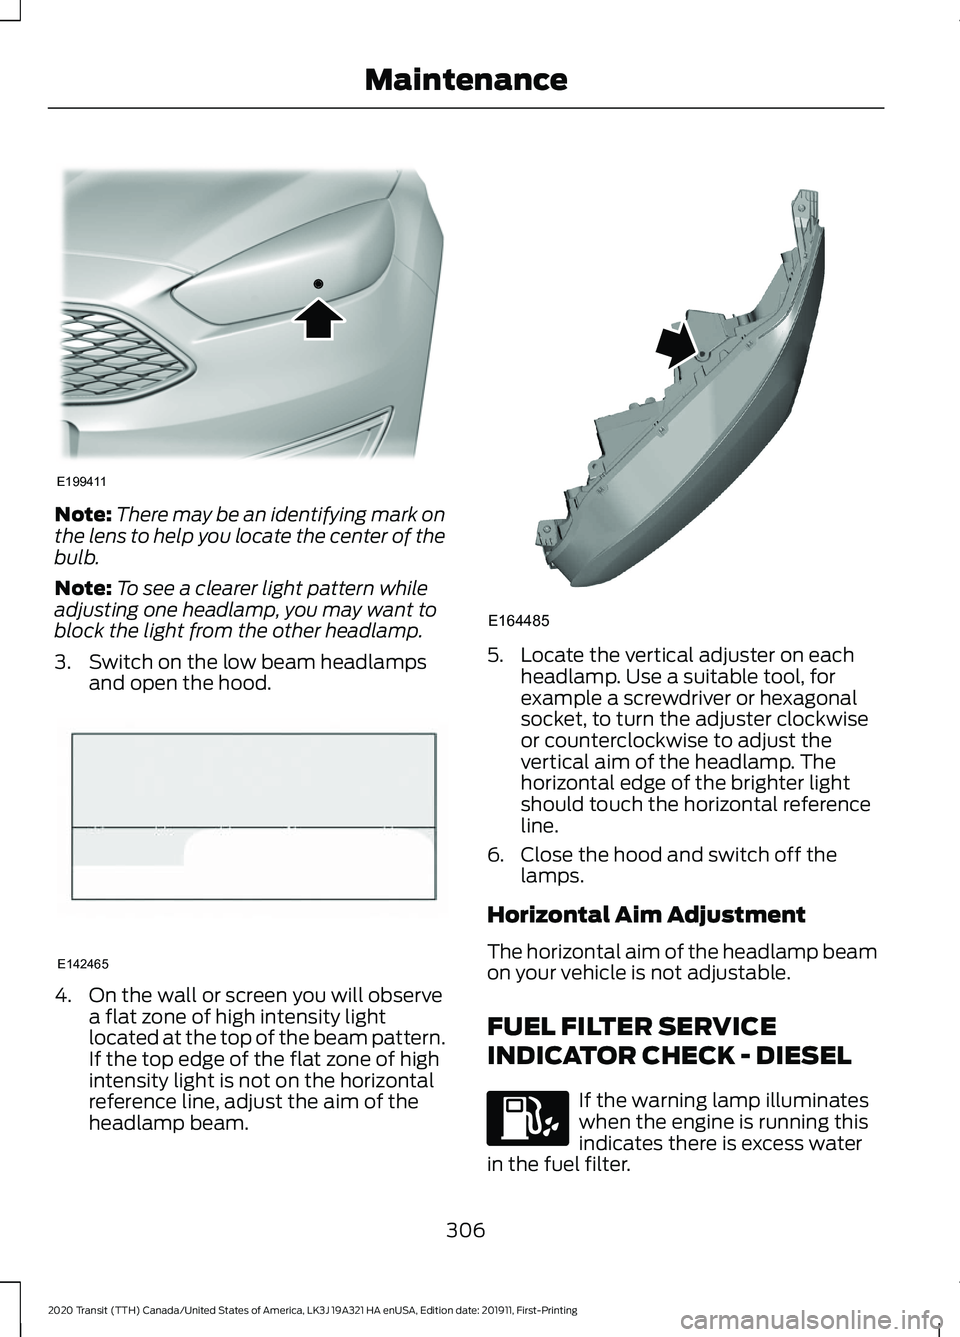
Note:
There may be an identifying mark on
the lens to help you locate the center of the
bulb.
Note: To see a clearer light pattern while
adjusting one headlamp, you may want to
block the light from the other headlamp.
3. Switch on the low beam headlamps and open the hood. 4. On the wall or screen you will observe
a flat zone of high intensity light
located at the top of the beam pattern.
If the top edge of the flat zone of high
intensity light is not on the horizontal
reference line, adjust the aim of the
headlamp beam. 5. Locate the vertical adjuster on each
headlamp. Use a suitable tool, for
example a screwdriver or hexagonal
socket, to turn the adjuster clockwise
or counterclockwise to adjust the
vertical aim of the headlamp. The
horizontal edge of the brighter light
should touch the horizontal reference
line.
6. Close the hood and switch off the lamps.
Horizontal Aim Adjustment
The horizontal aim of the headlamp beam
on your vehicle is not adjustable.
FUEL FILTER SERVICE
INDICATOR CHECK - DIESEL If the warning lamp illuminates
when the engine is running this
indicates there is excess water
in the fuel filter.
306
2020 Transit (TTH) Canada/United States of America, LK3J 19A321 HA enUSA, Edition date: 201911, First-Printing MaintenanceE199411 E142465 E164485
Page 312 of 529
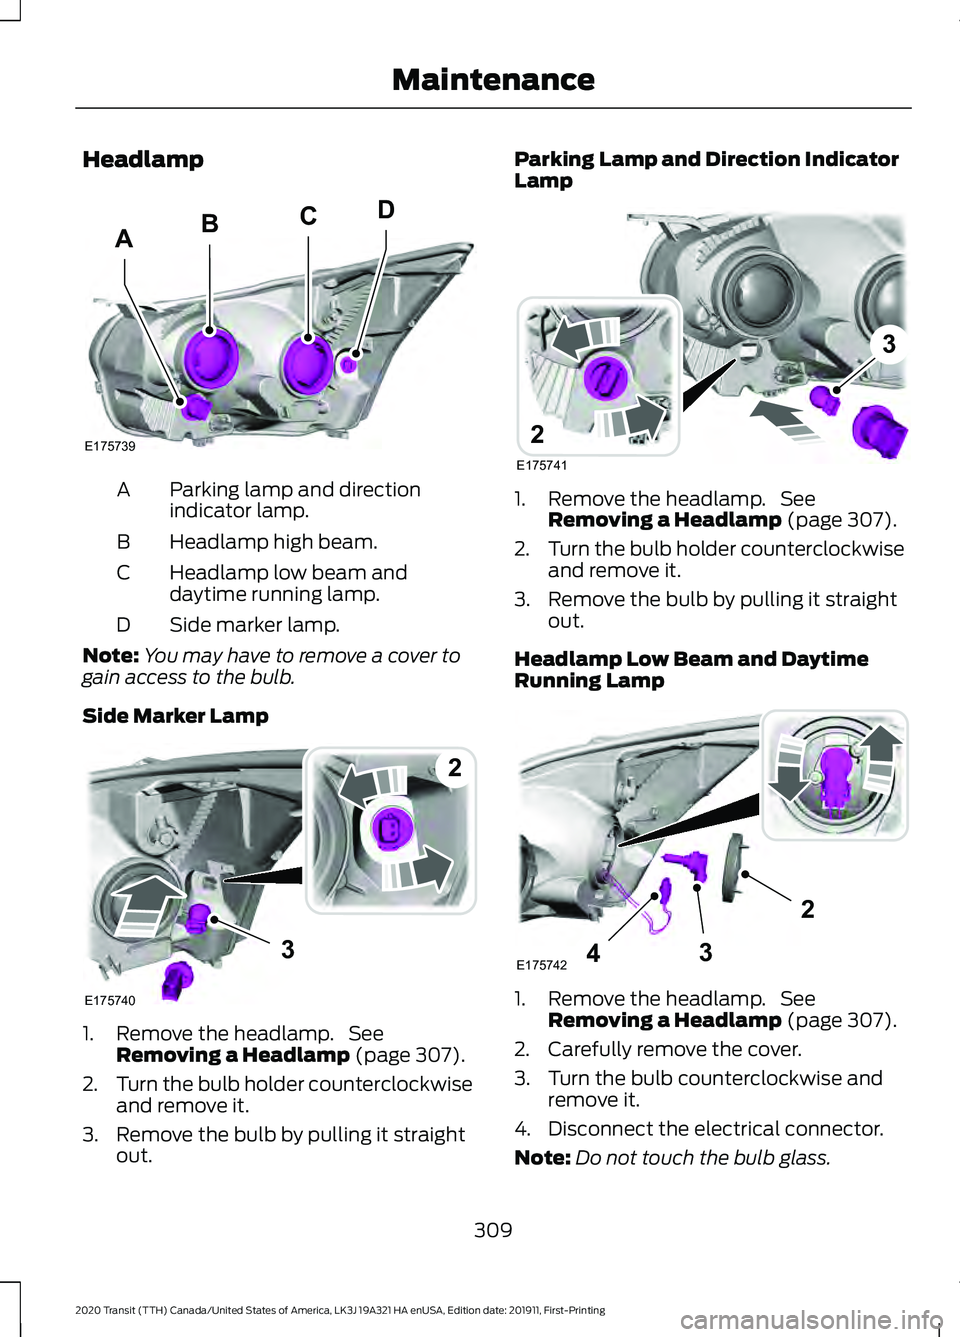
Headlamp
Parking lamp and direction
indicator lamp.
A
Headlamp high beam.
B
Headlamp low beam and
daytime running lamp.
C
Side marker lamp.
D
Note: You may have to remove a cover to
gain access to the bulb.
Side Marker Lamp 1. Remove the headlamp. See
Removing a Headlamp (page 307).
2. Turn the bulb holder counterclockwise
and remove it.
3. Remove the bulb by pulling it straight out. Parking Lamp and Direction Indicator
Lamp
1. Remove the headlamp. See
Removing a Headlamp
(page 307).
2. Turn the bulb holder counterclockwise
and remove it.
3. Remove the bulb by pulling it straight out.
Headlamp Low Beam and Daytime
Running Lamp 1. Remove the headlamp. See
Removing a Headlamp
(page 307).
2. Carefully remove the cover.
3. Turn the bulb counterclockwise and remove it.
4. Disconnect the electrical connector.
Note: Do not touch the bulb glass.
309
2020 Transit (TTH) Canada/United States of America, LK3J 19A321 HA enUSA, Edition date: 201911, First-Printing MaintenanceE175739
BCD
A 3
E175740
2 3
E175741
2 43
2
E175742
Page 313 of 529
Note:
You cannot separate the bulb from
the bulb holder.
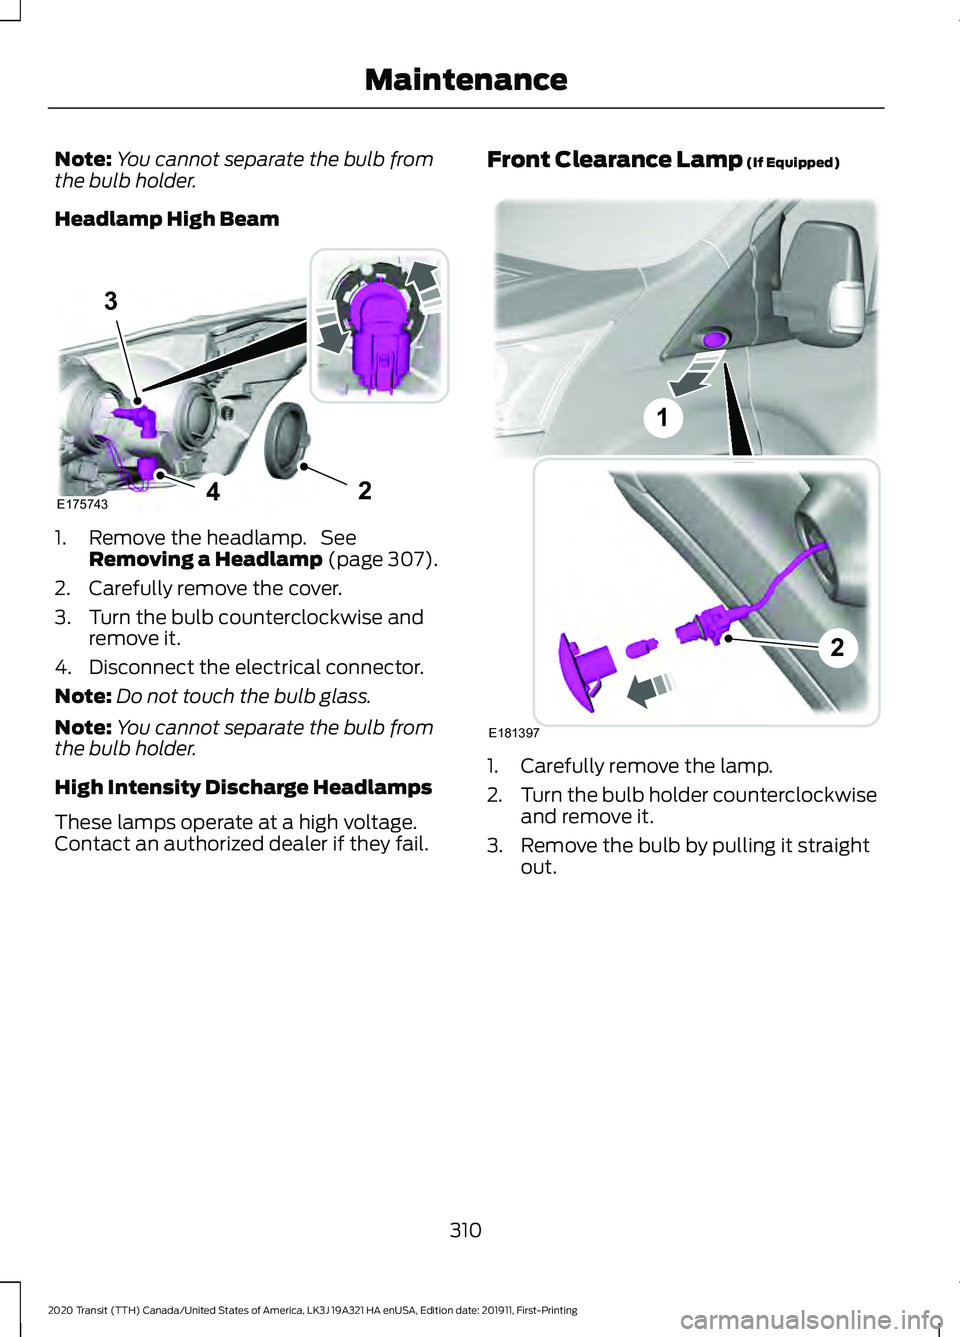
Headlamp High Beam 1. Remove the headlamp. See
Removing a Headlamp (page 307).
2. Carefully remove the cover.
3. Turn the bulb counterclockwise and remove it.
4. Disconnect the electrical connector.
Note: Do not touch the bulb glass.
Note: You cannot separate the bulb from
the bulb holder.
High Intensity Discharge Headlamps
These lamps operate at a high voltage.
Contact an authorized dealer if they fail. Front Clearance Lamp
(If Equipped)
1. Carefully remove the lamp.
2.
Turn the bulb holder counterclockwise
and remove it.
3. Remove the bulb by pulling it straight out.
310
2020 Transit (TTH) Canada/United States of America, LK3J 19A321 HA enUSA, Edition date: 201911, First-Printing Maintenance4
3
2E175743 E181397
2
1
Page 314 of 529
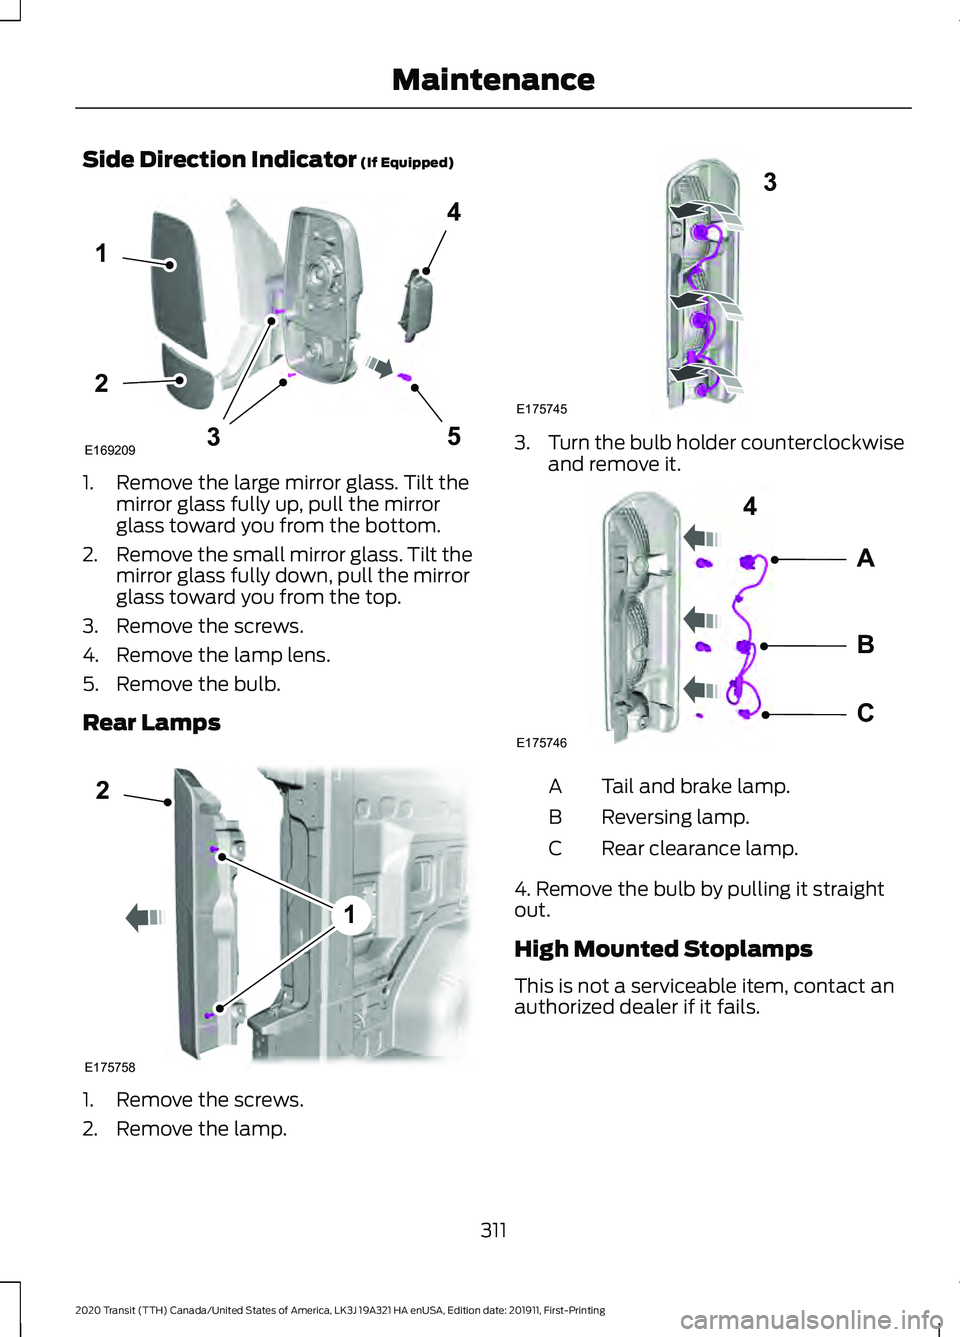
Side Direction Indicator (If Equipped)
1. Remove the large mirror glass. Tilt the
mirror glass fully up, pull the mirror
glass toward you from the bottom.
2. Remove the small mirror glass. Tilt the
mirror glass fully down, pull the mirror
glass toward you from the top.
3. Remove the screws.
4. Remove the lamp lens.
5. Remove the bulb.
Rear Lamps 1. Remove the screws.
2. Remove the lamp. 3.
Turn the bulb holder counterclockwise
and remove it. Tail and brake lamp.
A
Reversing lamp.
B
Rear clearance lamp.
C
4. Remove the bulb by pulling it straight
out.
High Mounted Stoplamps
This is not a serviceable item, contact an
authorized dealer if it fails.
311
2020 Transit (TTH) Canada/United States of America, LK3J 19A321 HA enUSA, Edition date: 201911, First-Printing MaintenanceE1692093
1
4
5
2 E175758
2
1 3
E175745 A
B
C
4
E175746
Page 315 of 529
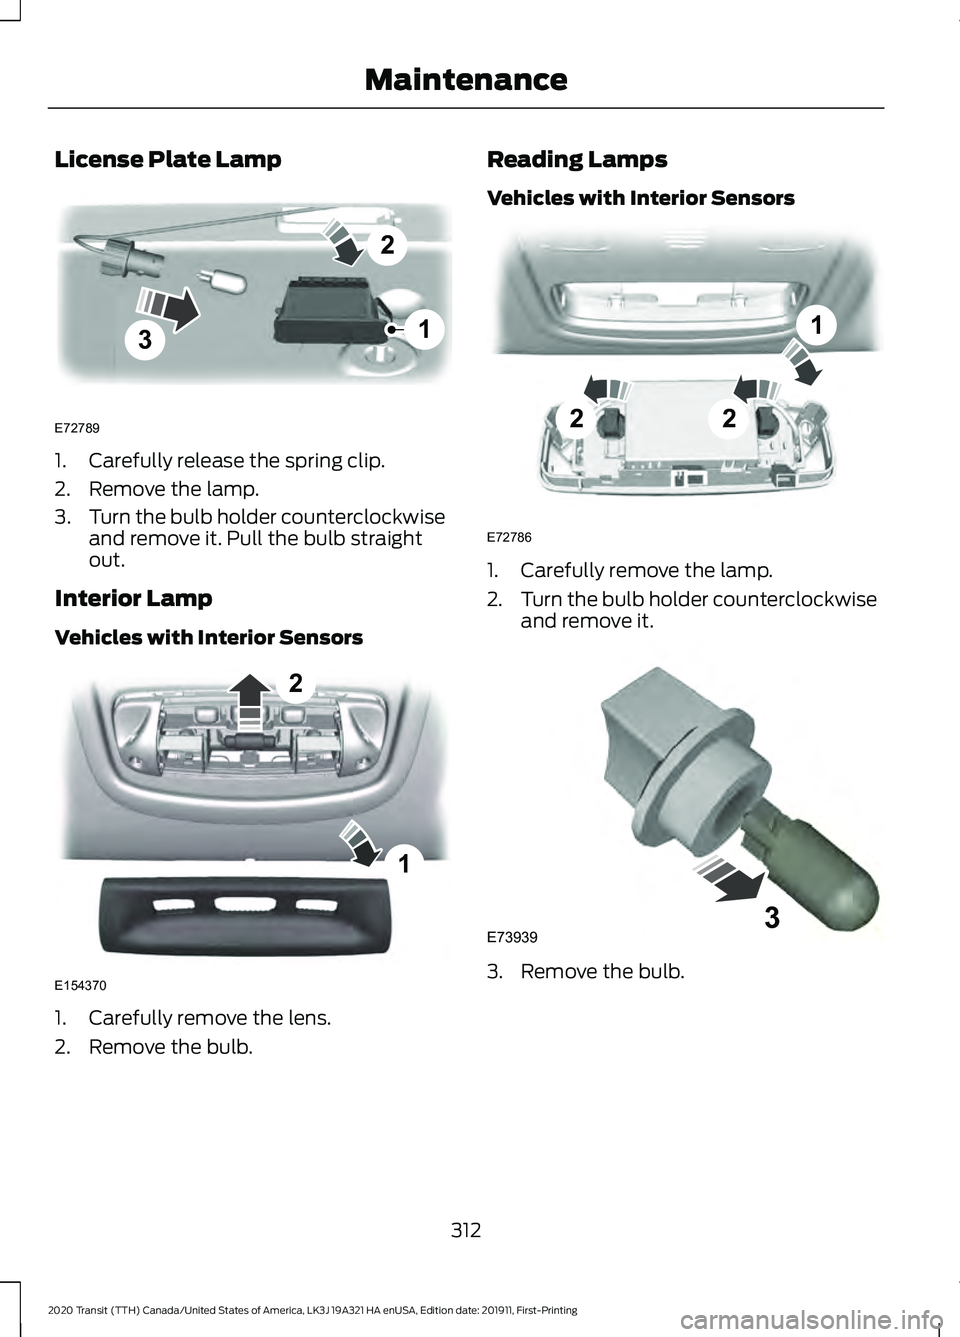
License Plate Lamp
1. Carefully release the spring clip.
2. Remove the lamp.
3.
Turn the bulb holder counterclockwise
and remove it. Pull the bulb straight
out.
Interior Lamp
Vehicles with Interior Sensors 1. Carefully remove the lens.
2. Remove the bulb. Reading Lamps
Vehicles with Interior Sensors
1. Carefully remove the lamp.
2.
Turn the bulb holder counterclockwise
and remove it. 3. Remove the bulb.
312
2020 Transit (TTH) Canada/United States of America, LK3J 19A321 HA enUSA, Edition date: 201911, First-Printing Maintenance3
2
1
E72789 1
2
E154370 22
1
E72786 E739393
Page 316 of 529
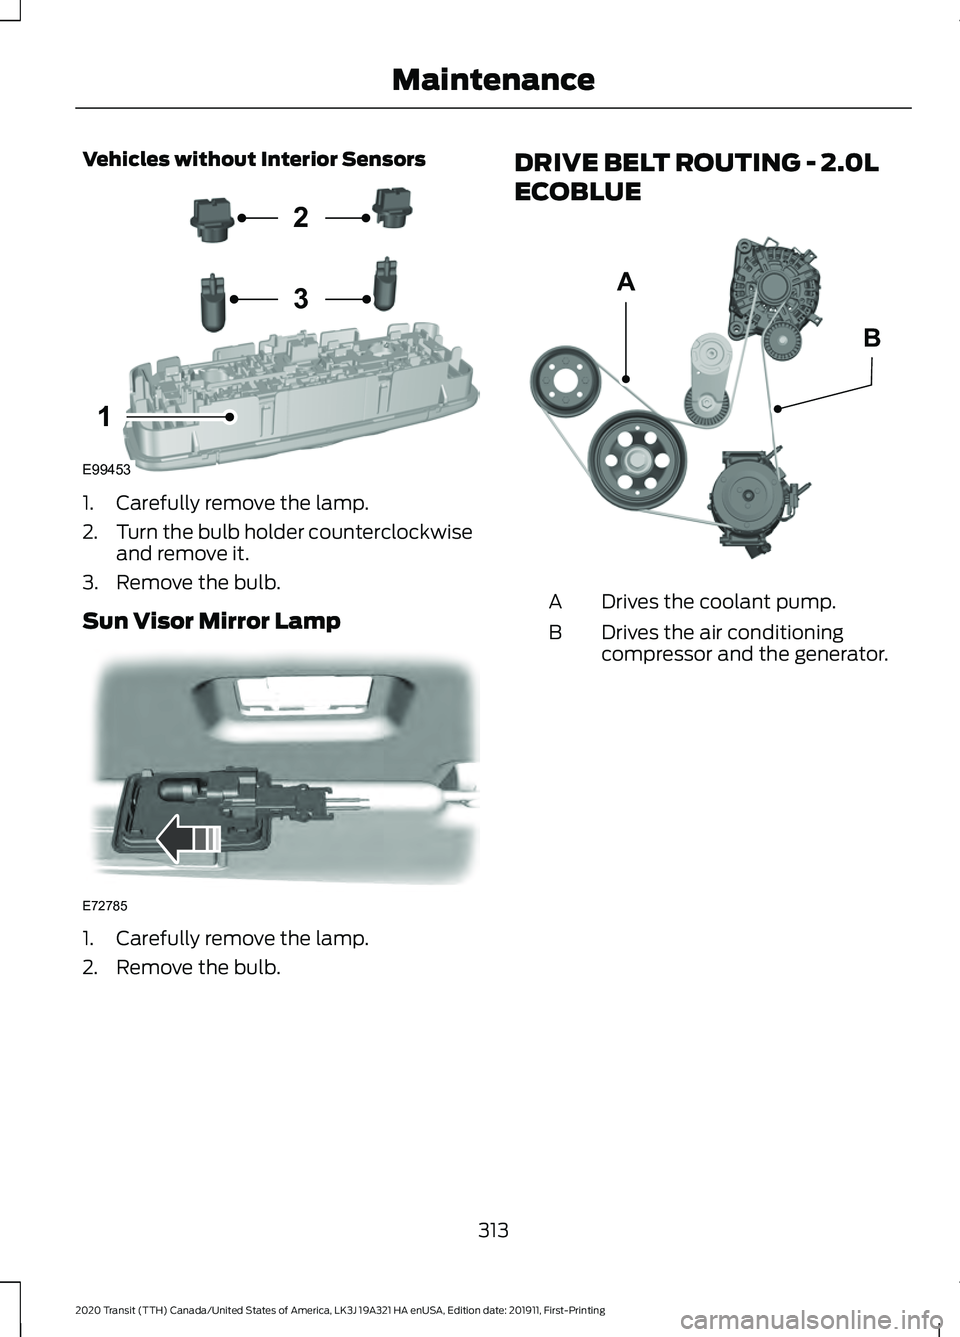
Vehicles without Interior Sensors
1. Carefully remove the lamp.
2.
Turn the bulb holder counterclockwise
and remove it.
3. Remove the bulb.
Sun Visor Mirror Lamp 1. Carefully remove the lamp.
2. Remove the bulb. DRIVE BELT ROUTING - 2.0L
ECOBLUE
Drives the coolant pump.
A
Drives the air conditioning
compressor and the generator.
B
313
2020 Transit (TTH) Canada/United States of America, LK3J 19A321 HA enUSA, Edition date: 201911, First-Printing MaintenanceE99453
2
3
1 E72785 A
BE309422
Page 355 of 529
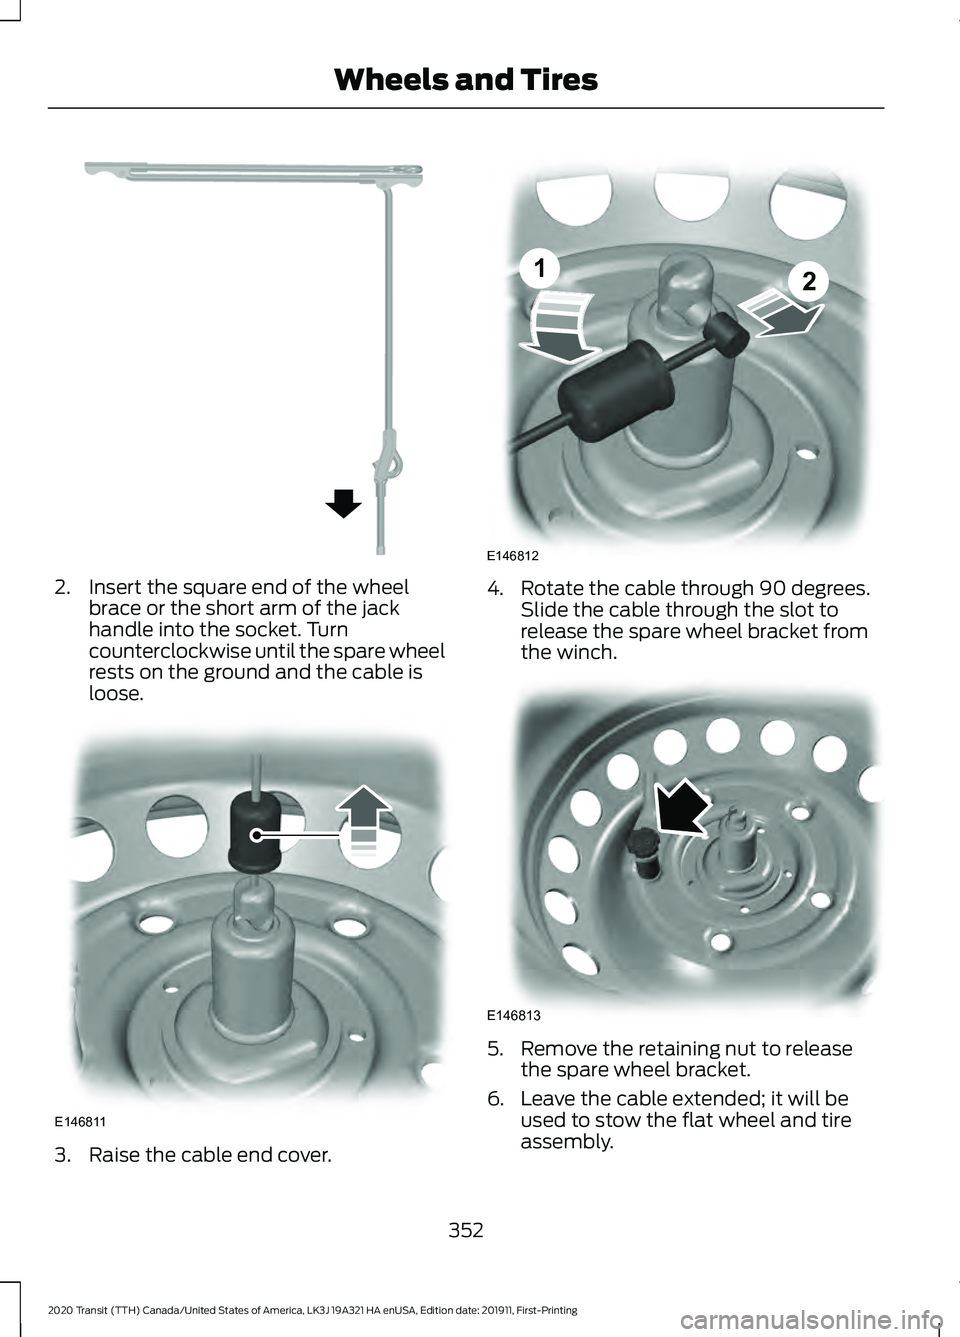
2. Insert the square end of the wheel
brace or the short arm of the jack
handle into the socket. Turn
counterclockwise until the spare wheel
rests on the ground and the cable is
loose. 3. Raise the cable end cover. 4. Rotate the cable through 90 degrees.
Slide the cable through the slot to
release the spare wheel bracket from
the winch. 5. Remove the retaining nut to release
the spare wheel bracket.
6. Leave the cable extended; it will be used to stow the flat wheel and tire
assembly.
352
2020 Transit (TTH) Canada/United States of America, LK3J 19A321 HA enUSA, Edition date: 201911, First-Printing Wheels and TiresE298323 E146811 E146812
12 E146813
Page 356 of 529
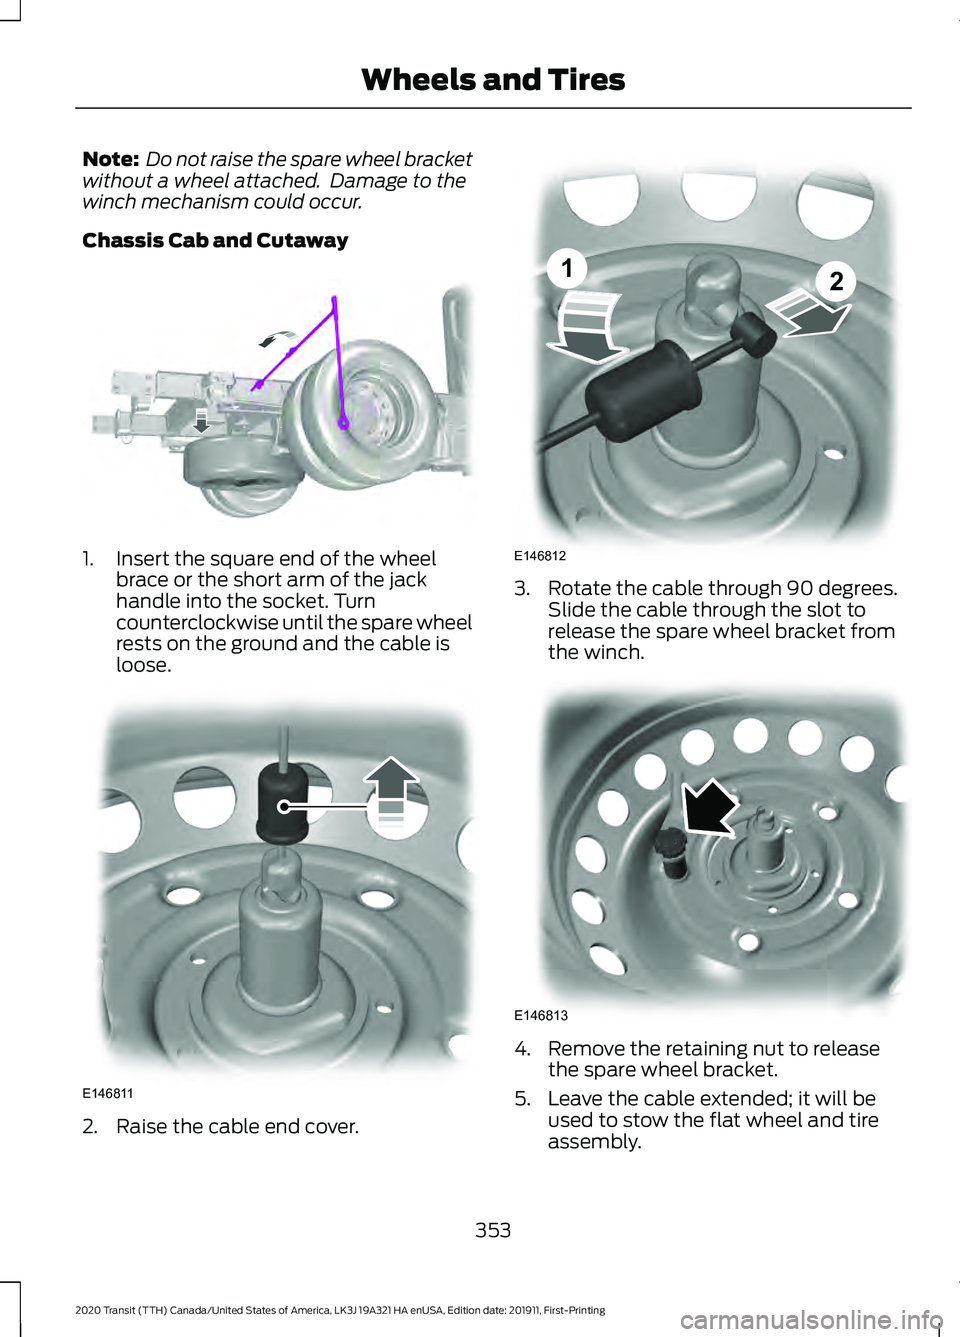
Note:
Do not raise the spare wheel bracket
without a wheel attached. Damage to the
winch mechanism could occur.
Chassis Cab and Cutaway 1. Insert the square end of the wheel
brace or the short arm of the jack
handle into the socket. Turn
counterclockwise until the spare wheel
rests on the ground and the cable is
loose. 2. Raise the cable end cover. 3. Rotate the cable through 90 degrees.
Slide the cable through the slot to
release the spare wheel bracket from
the winch. 4. Remove the retaining nut to release
the spare wheel bracket.
5. Leave the cable extended; it will be used to stow the flat wheel and tire
assembly.
353
2020 Transit (TTH) Canada/United States of America, LK3J 19A321 HA enUSA, Edition date: 201911, First-Printing Wheels and TiresE310689 E146811 E146812
12 E146813
Page 358 of 529
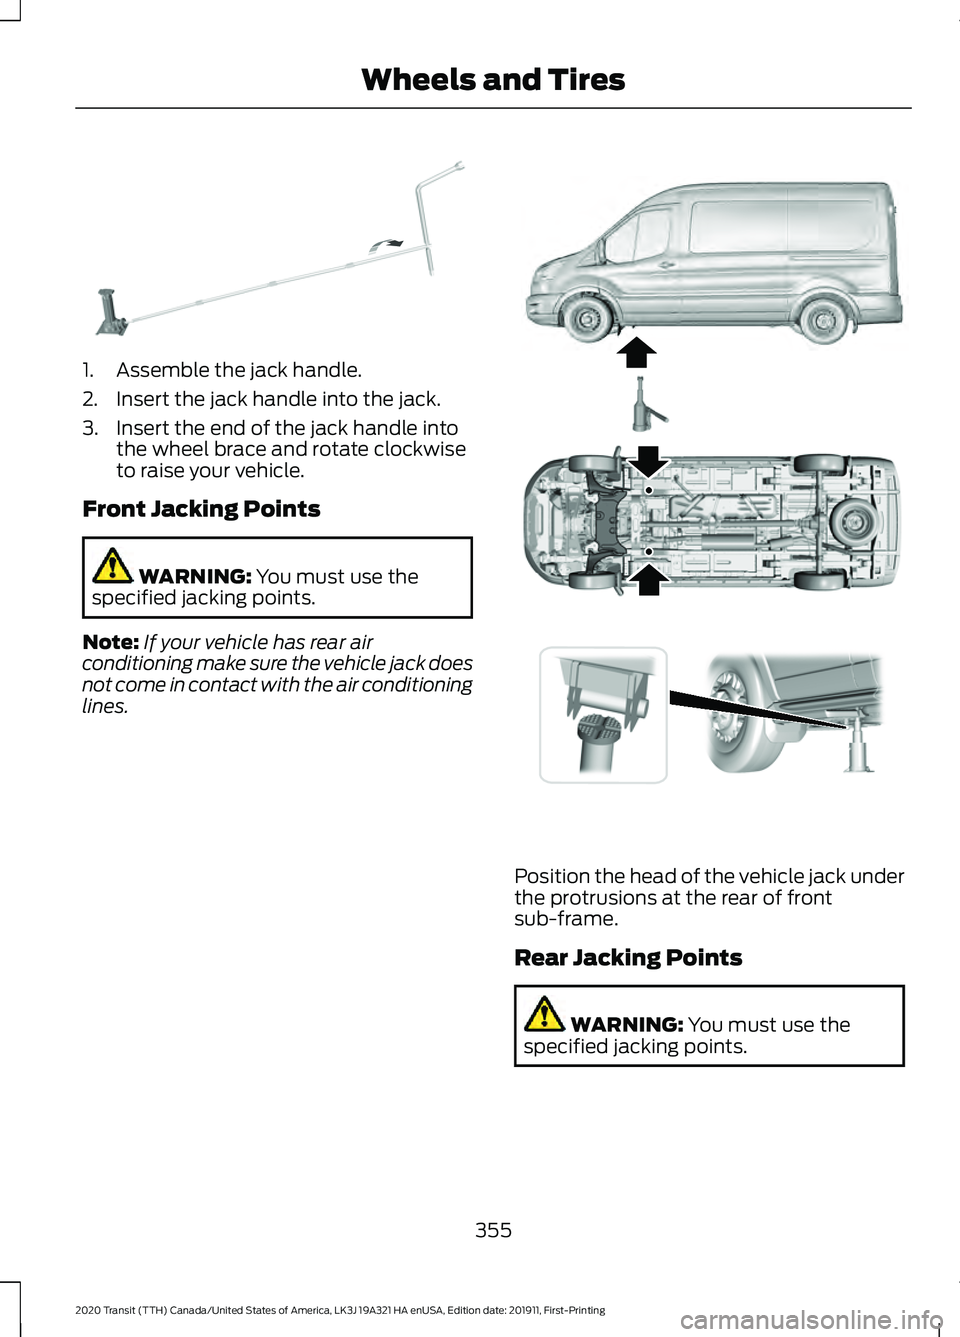
1. Assemble the jack handle.
2. Insert the jack handle into the jack.
3. Insert the end of the jack handle into
the wheel brace and rotate clockwise
to raise your vehicle.
Front Jacking Points WARNING: You must use the
specified jacking points.
Note: If your vehicle has rear air
conditioning make sure the vehicle jack does
not come in contact with the air conditioning
lines. Position the head of the vehicle jack under
the protrusions at the rear of front
sub-frame.
Rear Jacking Points
WARNING:
You must use the
specified jacking points.
355
2020 Transit (TTH) Canada/United States of America, LK3J 19A321 HA enUSA, Edition date: 201911, First-Printing Wheels and TiresE297495 E171405
Page 363 of 529
Note:
Check the lug nuts for correct
tightness and check the tire pressure as
soon as possible. Note:
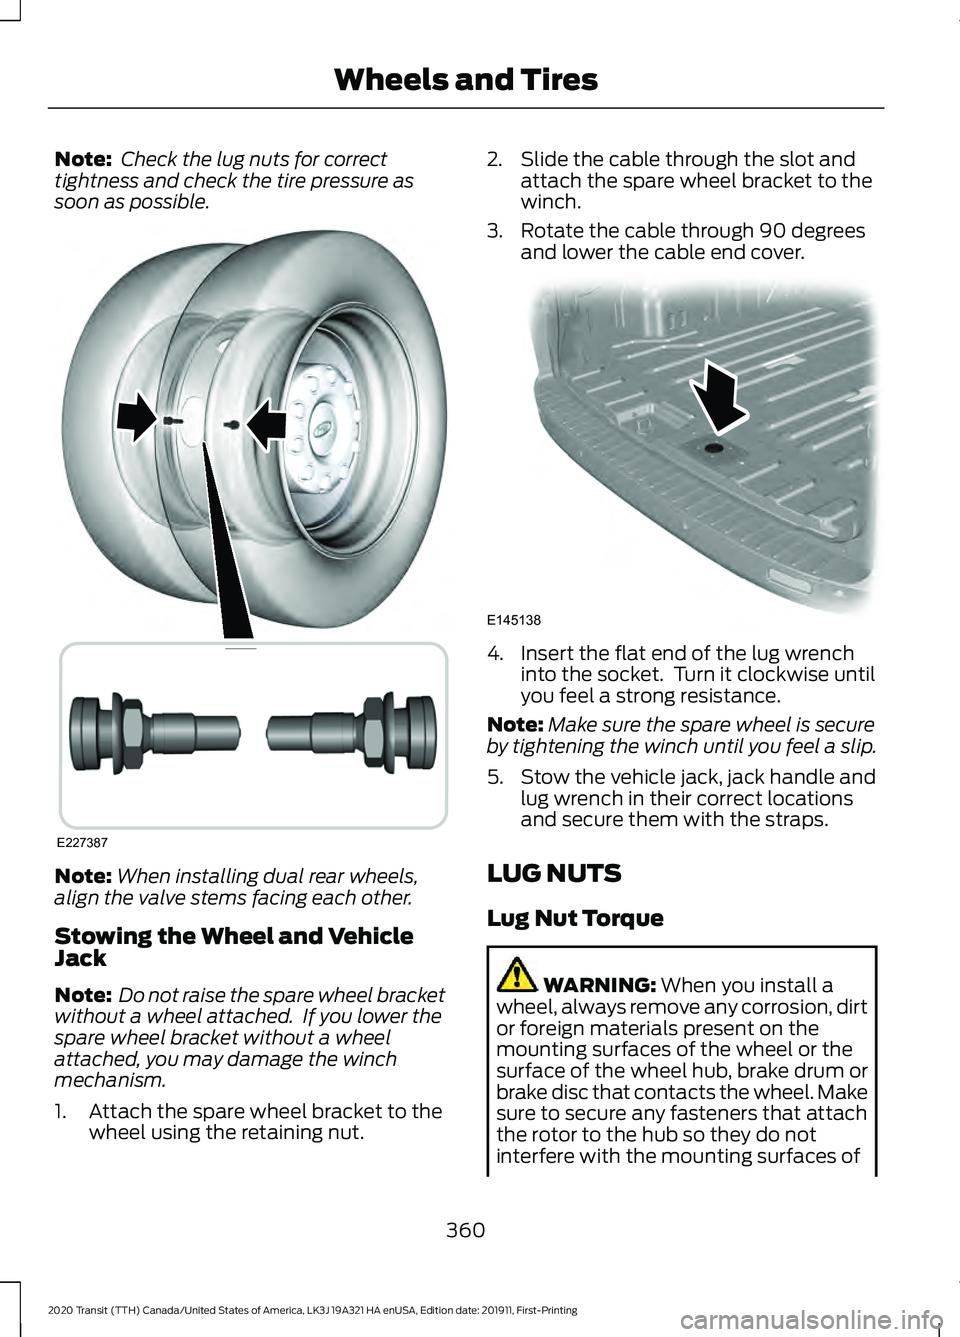
When installing dual rear wheels,
align the valve stems facing each other.
Stowing the Wheel and Vehicle
Jack
Note: Do not raise the spare wheel bracket
without a wheel attached. If you lower the
spare wheel bracket without a wheel
attached, you may damage the winch
mechanism.
1. Attach the spare wheel bracket to the wheel using the retaining nut. 2. Slide the cable through the slot and
attach the spare wheel bracket to the
winch.
3. Rotate the cable through 90 degrees and lower the cable end cover. 4. Insert the flat end of the lug wrench
into the socket. Turn it clockwise until
you feel a strong resistance.
Note: Make sure the spare wheel is secure
by tightening the winch until you feel a slip.
5. Stow the vehicle jack, jack handle and lug wrench in their correct locations
and secure them with the straps.
LUG NUTS
Lug Nut Torque WARNING: When you install a
wheel, always remove any corrosion, dirt
or foreign materials present on the
mounting surfaces of the wheel or the
surface of the wheel hub, brake drum or
brake disc that contacts the wheel. Make
sure to secure any fasteners that attach
the rotor to the hub so they do not
interfere with the mounting surfaces of
360
2020 Transit (TTH) Canada/United States of America, LK3J 19A321 HA enUSA, Edition date: 201911, First-Printing Wheels and TiresE227387 E145138