display FORD TRANSIT 2020 User Guide
[x] Cancel search | Manufacturer: FORD, Model Year: 2020, Model line: TRANSIT, Model: FORD TRANSIT 2020Pages: 529, PDF Size: 8.3 MB
Page 82 of 529

3.
Pull the release lever to open the other
door.
Rear Emergency Exit
Wagon and Bus 1. Lift the locking button up. 2. Pull the interior handle up to open the
door in an emergency.
Autolock (If Equipped)
Autolock locks all the doors when all of the
following occur:
• All doors are closed.
• The ignition is on.
• You shift into any gear putting your
vehicle in motion.
• Your vehicle reaches a speed greater
than
5 mph (8 km/h).
Use the interior door unlock button or
switch the ignition off and use the key or
remote control to unlock the rear or sliding
door.
Autounlock
Autounlock unlocks all doors within 10
minutes of the end of a drive cycle, when
the driver door is opened and the ignition
is off.
Switching Autounlock On and Off
1. Using the information display controls on the steering wheel, select Settings.
2. Select
Vehicle Settings.
79
2020 Transit (TTH) Canada/United States of America, LK3J 19A321 HA enUSA, Edition date: 201911, First-Printing Doors and LocksE148806 E236264 E179501
Page 83 of 529
3. Select Locks.
4. Switch
Autounlock on and off.
One-Stage Unlocking
You can switch on this function using the
information display.
If you have switched on this function, you
unlock all doors including the rear doors
and the sliding door.
You unlock all of the doors when you:
• Press the unlock button on the remote
control once.
• Press the interior unlock button once.
Two-Stage Unlocking
You unlock the front doors when you:
• Press the unlock button on the remote
control once.
• Press the interior unlock button once.
You unlock the front doors and cargo area
when you:
• Press the unlock button on the remote
control once.
• Press the unlock button on the remote
control twice within three seconds.
Zone Re-Locking
(If Equipped)
If you enable zone re-locking and open one
door, all other doors remain locked. See an
authorized dealer for further information.
The locks on van, bus or wagon have two
zones, cabin and cargo. For van, the cargo
area includes the rear doors and the sliding
door. For bus or wagon, the cargo area
includes the rear doors.
• Exit your vehicle and press the lock
button.
• Press the unlock button or the cargo
area unlock button once to open the
respective zone. If you now open a door within the unlocked
zone, the other doors in that zone
automatically lock.
Configurable Unlocking
Configurable unlocking is set when you
purchase your vehicle. It allows you to
select which doors unlock when you press,
once or twice, the unlock button or the
cargo area unlock button on your remote
control. You cannot switch this feature
back on if you had it switched off. See an
authorized dealer for further information.
80
2020 Transit (TTH) Canada/United States of America, LK3J 19A321 HA enUSA, Edition date: 201911, First-Printing Doors and Locks
Page 91 of 529
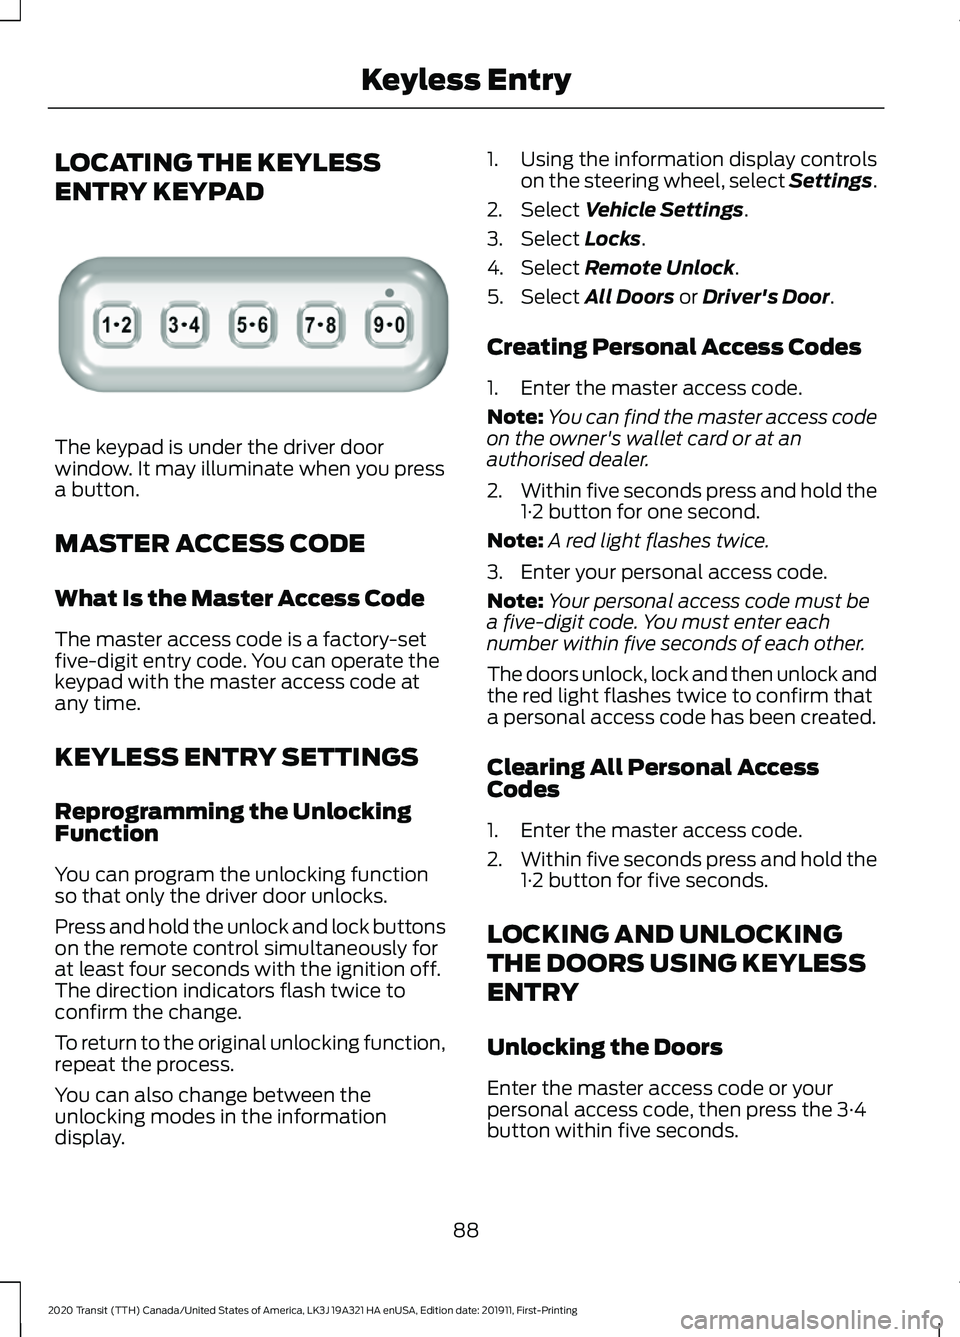
LOCATING THE KEYLESS
ENTRY KEYPAD
The keypad is under the driver door
window. It may illuminate when you press
a button.
MASTER ACCESS CODE
What Is the Master Access Code
The master access code is a factory-set
five-digit entry code. You can operate the
keypad with the master access code at
any time.
KEYLESS ENTRY SETTINGS
Reprogramming the Unlocking
Function
You can program the unlocking function
so that only the driver door unlocks.
Press and hold the unlock and lock buttons
on the remote control simultaneously for
at least four seconds with the ignition off.
The direction indicators flash twice to
confirm the change.
To return to the original unlocking function,
repeat the process.
You can also change between the
unlocking modes in the information
display. 1. Using the information display controls
on the steering wheel, select Settings.
2. Select Vehicle Settings.
3. Select
Locks.
4. Select
Remote Unlock.
5. Select
All Doors or Driver's Door.
Creating Personal Access Codes
1. Enter the master access code.
Note: You can find the master access code
on the owner's wallet card or at an
authorised dealer.
2. Within five seconds press and hold the
1·2 button for one second.
Note: A red light flashes twice.
3. Enter your personal access code.
Note: Your personal access code must be
a five-digit code. You must enter each
number within five seconds of each other.
The doors unlock, lock and then unlock and
the red light flashes twice to confirm that
a personal access code has been created.
Clearing All Personal Access
Codes
1. Enter the master access code.
2. Within five seconds press and hold the
1·2 button for five seconds.
LOCKING AND UNLOCKING
THE DOORS USING KEYLESS
ENTRY
Unlocking the Doors
Enter the master access code or your
personal access code, then press the 3·4
button within five seconds.
88
2020 Transit (TTH) Canada/United States of America, LK3J 19A321 HA enUSA, Edition date: 201911, First-Printing Keyless EntryE307685
Page 93 of 529
PASSIVE ANTI-THEFT
SYSTEM - VEHICLES WITH:
PASSIVE ANTI-THEFT
SYSTEM (PATS)
Note:
The system is not compatible with
non-Ford aftermarket remote start systems.
Use of these systems may result in vehicle
starting problems and a loss of security
protection.
Note: Metallic objects, electronic devices
or a second coded key on the same key
chain may cause vehicle starting problems
if they are too close to the key when starting
the engine. Prevent these objects from
touching the coded key while starting the
engine. Switch the ignition off, move all
objects on the key chain away from the
coded key and restart the engine if a
problem occurs.
Note: Do not leave a duplicate coded key
in the vehicle. Always take your keys and
lock all doors when leaving the vehicle.
SecuriLock®
The system is an engine immobilization
system. It is designed to help prevent the
engine from being started unless a
correctly coded key for your vehicle is used.
Using an incorrectly coded key may
prevent the engine from starting. A
message may appear in the information
display.
If you are unable to start the engine with a
correctly coded key, a malfunction has
happened and a message may appear in
the information display.
Automatic Arming
The engine immobilization system arms
immediately after you switch the ignition
off. Automatic Disarming
Switching the ignition on with a correctly
coded key disarms the engine
immobilization system.
Replacement Keys
The integrated keyhead transmitter
functions as a programmed ignition key
that operates all the locks and starts your
vehicle, as well as a remote control.
If your keys are lost or stolen and you do
not have a spare correctly coded key, you
will need to have your vehicle towed to an
authorized dealer. You need to erase the
coded keys from your vehicle and program
new coded keys.
Store an extra correctly coded key away
from the vehicle in a safe place to help
prevent any inconveniences. See an
authorized dealer to purchase additional
spare or replacement keys.
Programming a Spare Integrated
Keyhead Transmitter
You can program your own integrated
keyhead transmitter or standard
SecuriLock coded keys to your vehicle. This
procedure will program both the engine
immobilizer keycode and the remote entry
portion of the remote control to your
vehicle
Only use integrated keyhead transmitters
or standard SecuriLock keys.
You must have two previously
programmed correctly coded keys and the
new unprogrammed key readily accessible.
See an authorized dealer to have the spare
key programmed if two previously
programmed correctly coded keys are not
available.
Read and understand the entire procedure
before you begin.
1.
Insert the first previously programmed
correctly coded key into the ignition.
90
2020 Transit (TTH) Canada/United States of America, LK3J 19A321 HA enUSA, Edition date: 201911, First-Printing Security
Page 96 of 529
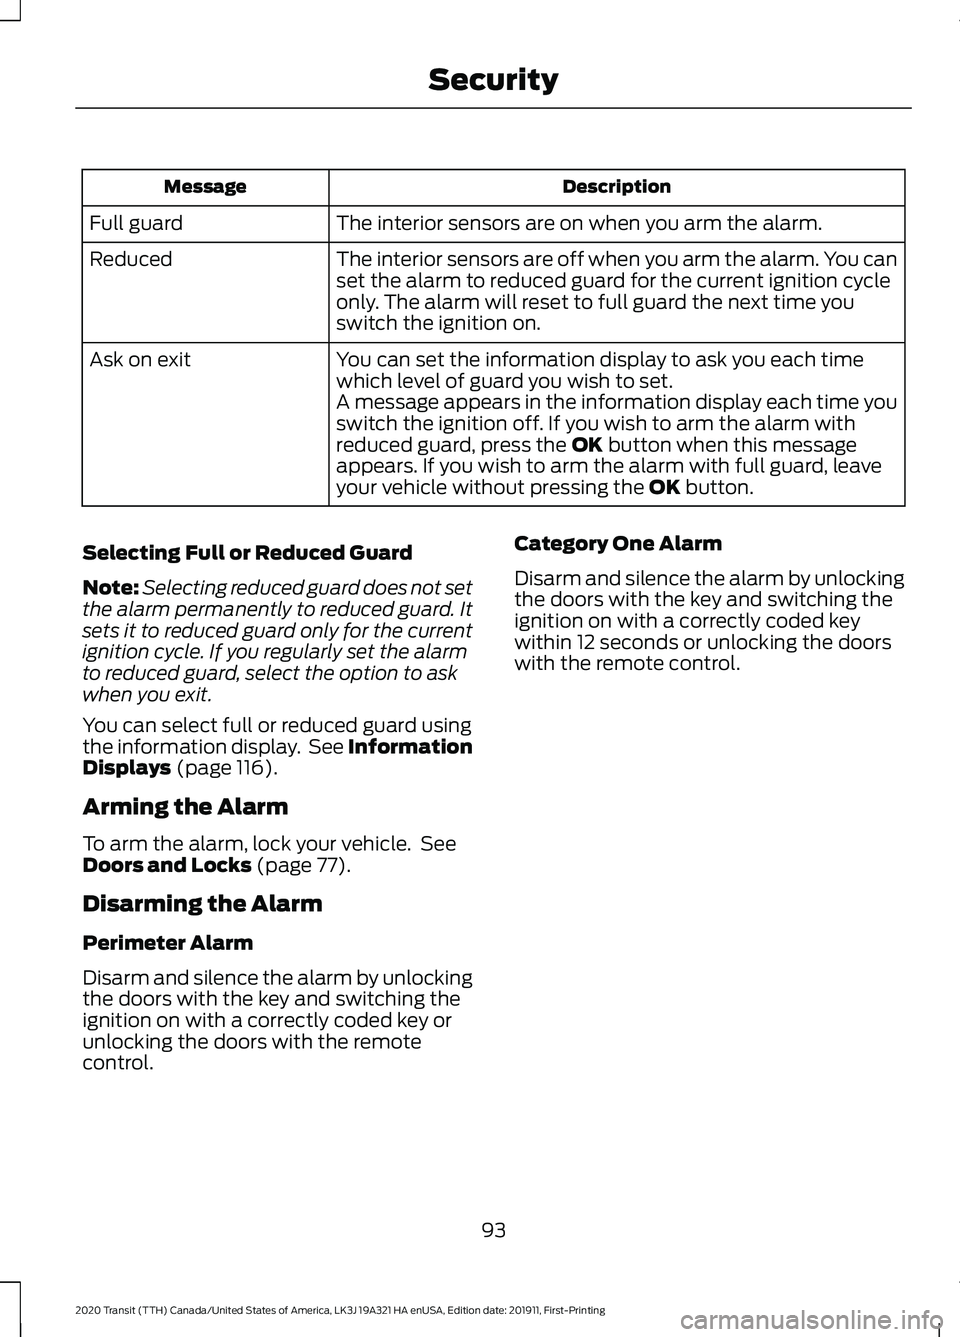
Description
Message
The interior sensors are on when you arm the alarm.
Full guard
The interior sensors are off when you arm the alarm. You can
set the alarm to reduced guard for the current ignition cycle
only. The alarm will reset to full guard the next time you
switch the ignition on.
Reduced
You can set the information display to ask you each time
which level of guard you wish to set.
Ask on exit
A message appears in the information display each time you
switch the ignition off. If you wish to arm the alarm with
reduced guard, press the OK button when this message
appears. If you wish to arm the alarm with full guard, leave
your vehicle without pressing the
OK button.
Selecting Full or Reduced Guard
Note: Selecting reduced guard does not set
the alarm permanently to reduced guard. It
sets it to reduced guard only for the current
ignition cycle. If you regularly set the alarm
to reduced guard, select the option to ask
when you exit.
You can select full or reduced guard using
the information display. See Information
Displays
(page 116).
Arming the Alarm
To arm the alarm, lock your vehicle. See
Doors and Locks
(page 77).
Disarming the Alarm
Perimeter Alarm
Disarm and silence the alarm by unlocking
the doors with the key and switching the
ignition on with a correctly coded key or
unlocking the doors with the remote
control. Category One Alarm
Disarm and silence the alarm by unlocking
the doors with the key and switching the
ignition on with a correctly coded key
within 12 seconds or unlocking the doors
with the remote control.
93
2020 Transit (TTH) Canada/United States of America, LK3J 19A321 HA enUSA, Edition date: 201911, First-Printing Security
Page 98 of 529
Manual Power Deploy
To set the power running boards to the deployed position, use the information
display controls on the steering wheel to select the following:
Action
Message
Press the menu button.
Settings
Press the OK button.
Vehicle Settings
Press the
OK button.
Power Steps
Press the
OK button.
Out
Enabling and Disabling
To enable or disable the power running board feature, use the information display
controls on the steering wheel to select the following: Action and Description
Message
Press the menu button.
Settings
Press the
OK button.
Vehicle Settings
Press the
OK button.
Power Steps
Select one of the following:
Press the
OK button. When disabled the power running
boards move to the stowed position regardless of the door
position.
Off
Press the
OK button. When enabled the power running
boards move to the correct position based on the door posi-
tion.
Auto
When you switch the ignition on, the
system turns on.
Bounce-back
The running board will reverse direction
and move to the end of travel if it
encounters an object while moving. Manual Operation
If the power running board does not return
to the stowed position, you can manually
stow it.
95
2020 Transit (TTH) Canada/United States of America, LK3J 19A321 HA enUSA, Edition date: 201911, First-Printing Power Running Boards
Page 101 of 529
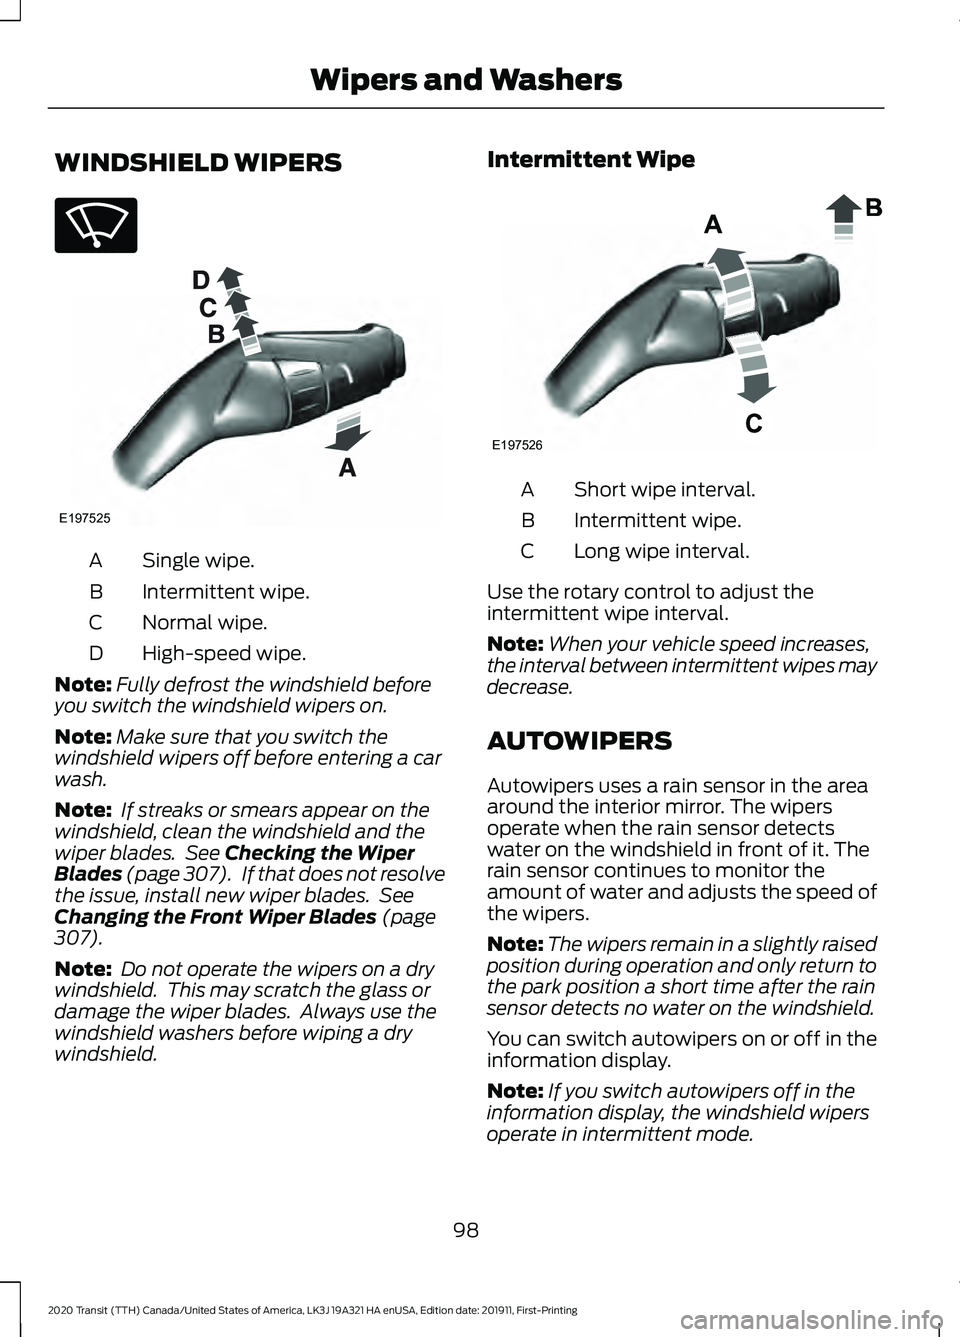
WINDSHIELD WIPERS
Single wipe.
A
Intermittent wipe.
B
Normal wipe.
C
High-speed wipe.
D
Note: Fully defrost the windshield before
you switch the windshield wipers on.
Note: Make sure that you switch the
windshield wipers off before entering a car
wash.
Note: If streaks or smears appear on the
windshield, clean the windshield and the
wiper blades. See Checking the Wiper
Blades (page 307). If that does not resolve
the issue, install new wiper blades. See
Changing the Front Wiper Blades
(page
307).
Note: Do not operate the wipers on a dry
windshield. This may scratch the glass or
damage the wiper blades. Always use the
windshield washers before wiping a dry
windshield. Intermittent Wipe
Short wipe interval.
A
Intermittent wipe.
B
Long wipe interval.
C
Use the rotary control to adjust the
intermittent wipe interval.
Note: When your vehicle speed increases,
the interval between intermittent wipes may
decrease.
AUTOWIPERS
Autowipers uses a rain sensor in the area
around the interior mirror. The wipers
operate when the rain sensor detects
water on the windshield in front of it. The
rain sensor continues to monitor the
amount of water and adjusts the speed of
the wipers.
Note: The wipers remain in a slightly raised
position during operation and only return to
the park position a short time after the rain
sensor detects no water on the windshield.
You can switch autowipers on or off in the
information display.
Note: If you switch autowipers off in the
information display, the windshield wipers
operate in intermittent mode.
98
2020 Transit (TTH) Canada/United States of America, LK3J 19A321 HA enUSA, Edition date: 201911, First-Printing Wipers and WashersE270969 E197525 E197526
Page 102 of 529

High sensitivity.
A
Autowipers on.
B
Low sensitivity.
C
Move the wiper lever upward to the first
position to switch autowipers on.
Use the rotary control to adjust the
sensitivity of the autowipers. When you
select low sensitivity, the wipers operate
when the sensor detects a large amount
of water on the windshield. When you
select high sensitivity, the wipers operate
when the sensor detects a small amount
of water on the windshield.
Note: Keep the outside of the windshield
clean. The rain sensor is very sensitive and
the wipers may operate if dirt, mist or
insects hit the windshield. If you leave autowipers on, it may not
operate when you switch the ignition on
during freezing temperatures. This is
because the system has deactivated the
rain sensor to prevent damage to the
windshield wipers. Defrost the windshield
before reactivating the rain sensor. You
can reactivate the rain sensor by moving
the rotary control or switching autowipers
off and on.
Note:
Fully defrost the windshield before
you switch the windshield wipers on.
Note: Make sure that you switch the
windshield wipers off before entering a car
wash.
Wet or winter weather conditions could
cause unexpected wiping or smearing.
To keep the windshield clear:
• Lower the sensitivity of the autowipers
to reduce the amount of smearing on
the windshield.
• Switch autowipers off.
Note: If streaks or smears appear on the
windshield, clean the windshield and the
wiper blades. See Checking the Wiper
Blades (page 307). If that does not resolve
the issue, install new wiper blades. See
Changing the Front Wiper Blades
(page
307).
Settings
To switch autowipers on or off, use the information display controls on the steering
wheel to select the following: Action
Menu Item
Press the menu button.
Settings
Press the
OK button.
Vehicle Settings
Press the
OK button.
Wipers
Press the
OK button.
Rain Sensing
99
2020 Transit (TTH) Canada/United States of America, LK3J 19A321 HA enUSA, Edition date: 201911, First-Printing Wipers and WashersE197526
Page 103 of 529
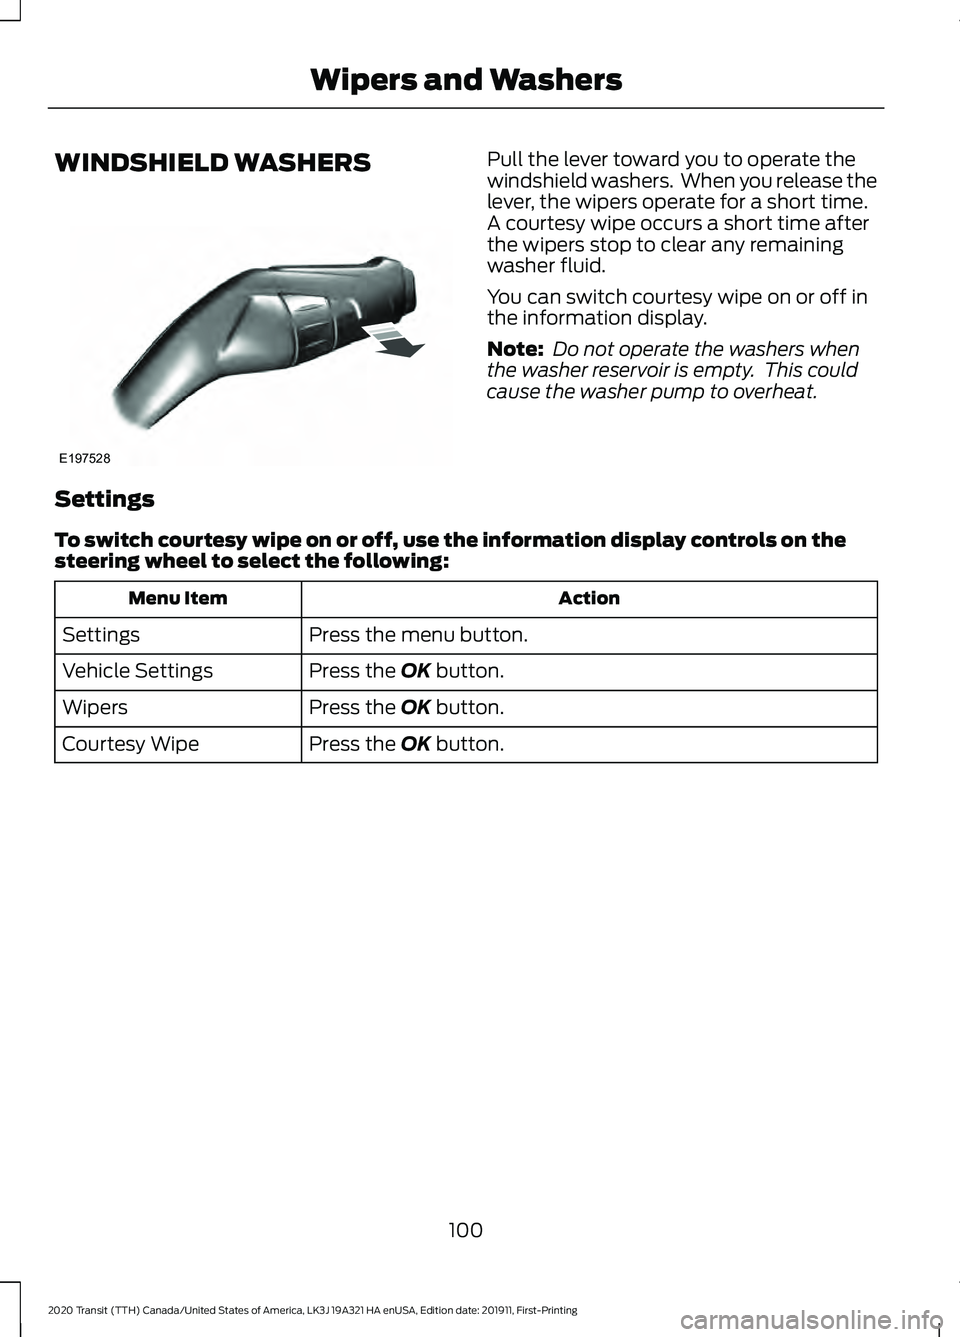
WINDSHIELD WASHERS Pull the lever toward you to operate the
windshield washers. When you release the
lever, the wipers operate for a short time.
A courtesy wipe occurs a short time after
the wipers stop to clear any remaining
washer fluid.
You can switch courtesy wipe on or off in
the information display.
Note:
Do not operate the washers when
the washer reservoir is empty. This could
cause the washer pump to overheat.
Settings
To switch courtesy wipe on or off, use the information display controls on the
steering wheel to select the following: Action
Menu Item
Press the menu button.
Settings
Press the OK button.
Vehicle Settings
Press the
OK button.
Wipers
Press the
OK button.
Courtesy Wipe
100
2020 Transit (TTH) Canada/United States of America, LK3J 19A321 HA enUSA, Edition date: 201911, First-Printing Wipers and WashersE197528
Page 106 of 529
The headlamps remain on for a period of
time after you switch the ignition off. Use
the information display controls to adjust
the period of time that the headlamps
remain on.
Adjusting the Period of Time That
the Headlamps Remain On
1. Using the information display controls
on the steering wheel, select Settings.
2. Select Vehicle Settings.
3. Select
Lighting.
4. Select
Autolamp Delay.
5. Select a setting.
6. Press the
OK button.
INSTRUMENT LIGHTING
DIMMER
The instrument lighting dimmer buttons
are on the lighting control. Repeatedly press one of the
buttons to adjust the brightness.
DAYTIME RUNNING LAMPS
(IF
EQUIPPED) WARNING:
The daytime running
lamps system does not activate the rear
lamps and may not provide adequate
lighting during low visibility driving
conditions. Also, the autolamps switch
position may not activate the headlamps in all low visibility conditions, such as
daytime fog. Make sure the headlamps
are switched to auto or on, as
appropriate, during all low visibility
conditions. Failure to do so may result in
a crash.
Type 1 - Conventional (Non-
Configurable)
The daytime running lamps turn on when:
1. The ignition is switched to the on position.
2. The lighting control is in the off, parking
lamp or autolamps positions.
3. The headlamps are off.
Type 2 - Configurable
Switch the daytime running lamps on or
off using the information display controls.
See
Information Displays (page 116).
The daytime running lamps turn on when:
1. They are switched on in the information
display. See
Information Displays
(page 116).
2. The ignition is switched to the on position.
3. The lighting control is in the autolamps
position.
4. The headlamps are off.
The other lighting control switch positions
do not activate the daytime running lamps,
and you can use them to temporarily
override autolamp control.
When switched off in the information
display, the daytime running lamps are off
in all lighting control switch positions.
103
2020 Transit (TTH) Canada/United States of America, LK3J 19A321 HA enUSA, Edition date: 201911, First-Printing LightingE291299 E291298