ECO mode FORD TRANSIT CONNECT 2015 2.G User Guide
[x] Cancel search | Manufacturer: FORD, Model Year: 2015, Model line: TRANSIT CONNECT, Model: FORD TRANSIT CONNECT 2015 2.GPages: 428, PDF Size: 6.27 MB
Page 101 of 428
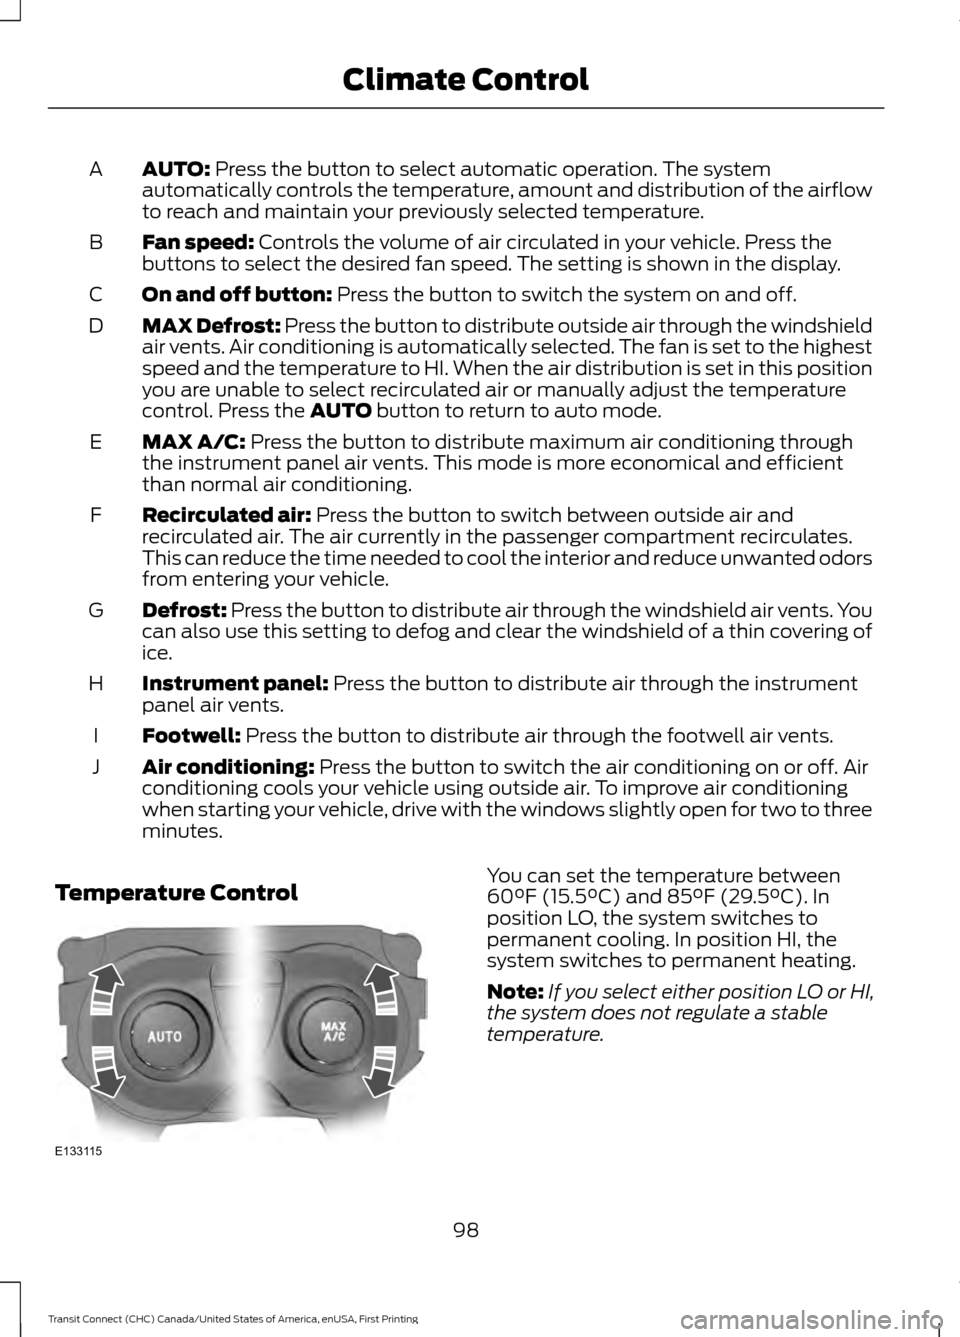
AUTO: Press the button to select automatic operation. The system
automatically controls the temperature, amount and distribution of the airflow
to reach and maintain your previously selected temperature.
A
Fan speed:
Controls the volume of air circulated in your vehicle. Press the
buttons to select the desired fan speed. The setting is shown in the display.
B
On and off button:
Press the button to switch the system on and off.
C
MAX Defrost:
Press the button to distribute outside air through the windshield
air vents. Air conditioning is automatically selected. The fan is set to the highest
speed and the temperature to HI. When the air distribution is set in this position
you are unable to select recirculated air or manually adjust the temperature
control. Press the
AUTO button to return to auto mode.
D
MAX A/C:
Press the button to distribute maximum air conditioning through
the instrument panel air vents. This mode is more economical and efficient
than normal air conditioning.
E
Recirculated air:
Press the button to switch between outside air and
recirculated air. The air currently in the passenger compartment recirculates.
This can reduce the time needed to cool the interior and reduce unwanted odors
from entering your vehicle.
F
Defrost:
Press the button to distribute air through the windshield air vents. You
can also use this setting to defog and clear the windshield of a thin covering of
ice.
G
Instrument panel:
Press the button to distribute air through the instrument
panel air vents.
H
Footwell:
Press the button to distribute air through the footwell air vents.
I
Air conditioning:
Press the button to switch the air conditioning on or off. Air
conditioning cools your vehicle using outside air. To improve air conditioning
when starting your vehicle, drive with the windows slightly open for two to three
minutes.
J
Temperature Control You can set the temperature between
60°F (15.5°C) and 85°F (29.5°C). In
position LO, the system switches to
permanent cooling. In position HI, the
system switches to permanent heating.
Note:
If you select either position LO or HI,
the system does not regulate a stable
temperature.
98
Transit Connect (CHC) Canada/United States of America, enUSA, First Printing Climate ControlE133115
Page 102 of 428
Mono Mode
In this mode, the temperature settings for
both the driver side and passenger side are
linked. If you adjust the setting using the
rotary control on the driver side, the system
adjusts the temperature to the same
setting on the passenger side.
Switching Mono Mode Off
Select a temperature for the passenger
side using the rotary control on the
passenger side. Mono mode automatically
switches off. The temperature on the driver
side remains unchanged. You can now
adjust the driver side and passenger side
temperatures independently. The
temperature settings for each side are
shown in the display.
Switching Mono Mode Back On
Press and hold the AUTO button. The
passenger side temperature is adjusted to
the driver side temperature setting.
HINTS ON CONTROLLING THE
INTERIOR CLIMATE
General Hints
Note: Prolonged use of recirculated air may
cause the windows to fog up.
Note: A small amount of air may be felt
from the footwell air vents regardless of the
air distribution setting.
Note: To reduce humidity build-up inside
your vehicle, do not drive with the system
switched off or with recirculated air always
switched on.
Note: Do not place objects under the front
seats as this may interfere with the airflow
to the rear seats. Note:
Keep the air intakes in front of the
windshield free from obstruction (such as
snow or leaves) to allow the climate control
system to function effectively.
Note: To reduce fogging of the windshield
during humid weather, adjust the air
distribution control to the windshield air
vents position. Increase the temperature
and fan speed and press the A/C button to
improve clearing, if required.
Heating the Interior Quickly
• Adjust the fan speed to the highest
speed setting.
• Adjust the temperature control to the
highest setting.
• Adjust the air distribution control to the
footwell air vents position.
Recommended Settings for
Heating
• Adjust the fan speed to the second
speed setting.
• Adjust the temperature control to the
midway point of the hot settings.
• Adjust the air distribution control to the
footwell and windshield air vents
position.
Cooling the Interior Quickly
• Adjust the fan speed to the highest
speed setting.
• Adjust the temperature control to the
MAX A/C
position.
• Adjust the air distribution control to the
instrument panel air vents position.
99
Transit Connect (CHC) Canada/United States of America, enUSA, First Printing Climate Control
Page 130 of 428
To use SelectShift, move the gearshift
lever into S (Sport). Use the +/- buttons
on the side of your gearshift lever to
manually change gears.
•
Press the (+) button to upshift.
• Press the (-) button to downshift.
Note: After you have assumed manual
control with SelectShift your vehicle will
remain in this mode until you return the
gearshift lever from (S) Sport, back to (D)
Drive.
Upshift to the recommended shift speeds
according to the following chart: Upshifts when accelerating (recom-
mended for best fuel economy)
Shift from:15 mph (24 km/h)
1 - 2
25 mph (40 km/h)
2 - 3
40 mph (64 km/h)
3 - 4
45 mph (72 km/h)
4 - 5
50 mph (80 km/h)
5 - 6
The instrument cluster will display the
selected gear that you are currently in and
a shift indicator arrow to assist in
optimizing shifting.
SelectShift will automatically make some
shifts for you in the event that your engine
speed is running at too high, or to low an
RPM.
Note: Engine damage may occur if
excessive engine revving is held without
shifting.
Brake-Shift Interlock WARNINGS
Do not drive your vehicle until you
verify that the brake lamps are
working. WARNINGS
When doing this procedure, you will
be taking the vehicle out of park
which means the vehicle can roll
freely. To avoid unwanted vehicle
movement, always fully set the parking
brake prior to doing this procedure. Use
wheel chocks if appropriate. If the parking brake is fully released,
but the brake warning lamp remains
illuminated, the brakes may not be
working properly. See your authorized
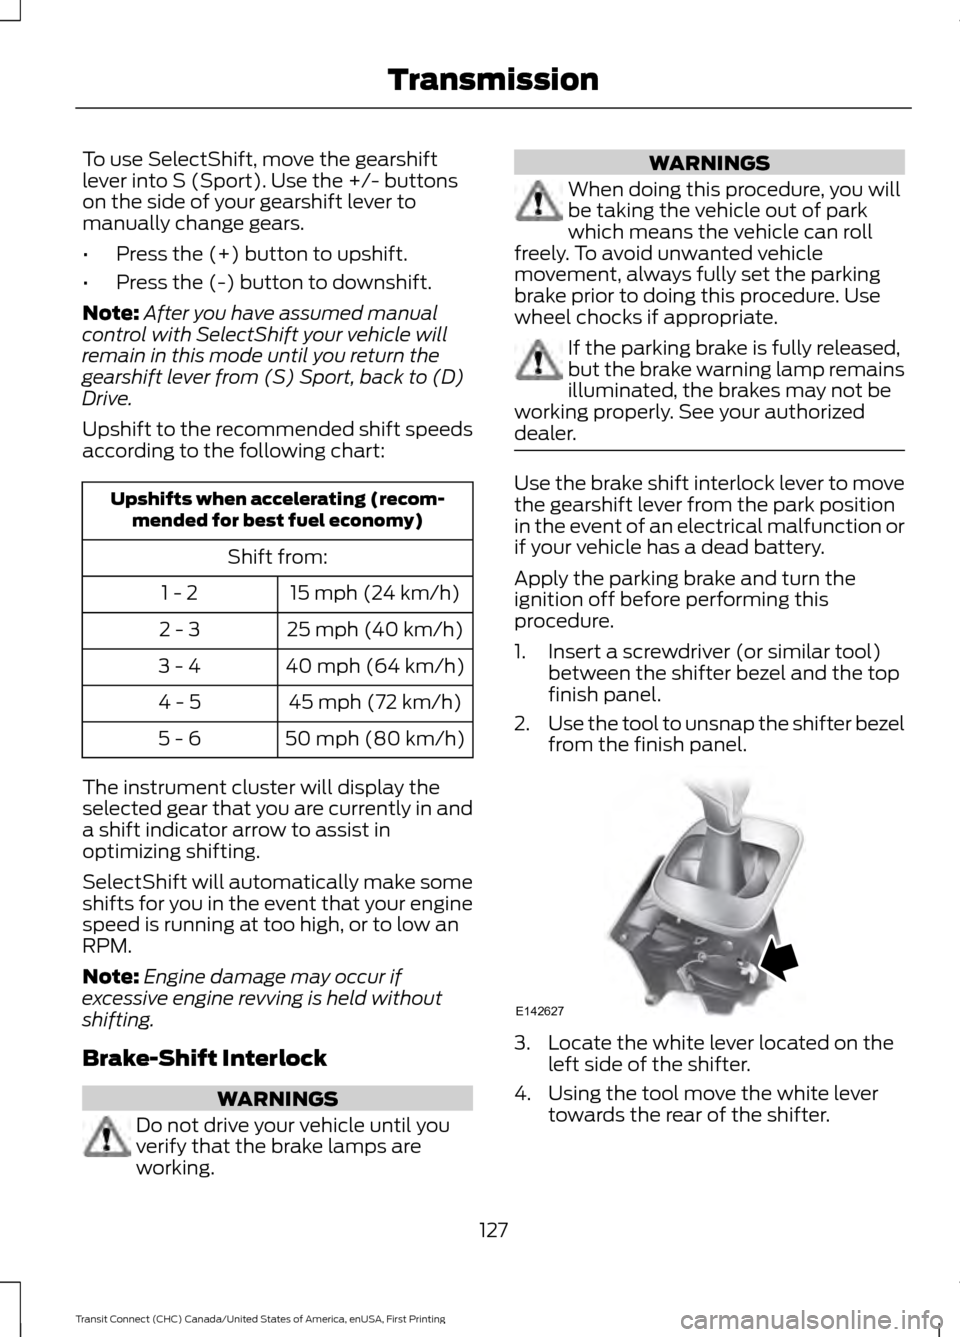
dealer. Use the brake shift interlock lever to move
the gearshift lever from the park position
in the event of an electrical malfunction or
if your vehicle has a dead battery.
Apply the parking brake and turn the
ignition off before performing this
procedure.
1. Insert a screwdriver (or similar tool)
between the shifter bezel and the top
finish panel.
2. Use the tool to unsnap the shifter bezel
from the finish panel. 3. Locate the white lever located on the
left side of the shifter.
4. Using the tool move the white lever towards the rear of the shifter.
127
Transit Connect (CHC) Canada/United States of America, enUSA, First Printing TransmissionE142627
Page 162 of 428
You can tow your vehicle from the front
with wheel lift equipment to raise the front
wheels off the ground. We recommend
that you place the rear wheels on a dolly
to prevent damage to the rear of your
vehicle.
You can tow your vehicle from the rear with
wheel lift equipment.
Note:
You must place the front wheels on
a dolly to prevent damage to the
transmission.
TOWING THE VEHICLE ON
FOUR WHEELS
Emergency Towing WARNING
If your vehicle has a steering wheel
lock make sure the ignition is in the
accessory or on position when being
towed. If your vehicle is disabled and you have no
access to a tow dolly, car-hauling trailer or
a flatbed transport vehicle, it can only be
flat-towed with all wheels on the ground
under the following conditions:
•
Your vehicle is facing forward so that
it is towed in a forward direction.
• The transmission selector lever is
placed in position N. If the transmission
gear shift lever cannot be moved to
position
N, it may need to be
overridden. See Automatic
Transmission (page 126).
• Maximum speed is 35 mph (56 km/h).
• Maximum distance is
50 mi (80 km).
Drive off slowly and smoothly without
jerking the vehicle you are towing.
You must only use the towing eye that was
delivered with your vehicle. See
Towing
Points (page 157). Tow ropes or rigid towing bars must be
placed on the same side. For example; right
hand rear towing point to right hand front
towing point.
You must use a tow rope or rigid towing
bar that is of the correct strength for the
weight of the towing vehicle and the
vehicle that is being towed.
Note:
Using a rigid towing bar is the safest
way to tow a vehicle.
The weight of the vehicle that is being
towed must not exceed the weight of the
towing vehicle.
Recreational Vehicle Towing
Note: Put your climate control system in
recirculated air mode to prevent exhaust
fumes from entering the vehicle. See
Climate Control
(page 95).
Follow these guidelines if you have a need
for recreational (RV) towing. An example
of recreational towing would be towing
your vehicle behind a motorhome. We
designed these guidelines to prevent
damage to your transmission.
Front-wheel drive vehicles
CANNOT be
flat-towed (all wheels on the ground), as
transmission damage may occur. You can
tow your vehicle with the front wheels off
the ground by using a tow dolly. If you are
using a tow dolly, follow the instructions
specified by the equipment provider.
159
Transit Connect (CHC) Canada/United States of America, enUSA, First Printing Towing
Page 163 of 428
BREAKING-IN
You need to break in new tires for
approximately 300 miles (480
kilometers). During this time, your vehicle
may exhibit some unusual driving
characteristics.
Avoid driving too fast during the first 1000
miles (1600 kilometers). Vary your speed
frequently and change up through the
gears early. Do not labor the engine.
Do not tow during the first 1000 miles
(1600 kilometers).
REDUCED ENGINE
PERFORMANCE
WARNING
Continued operation will increase the
engine temperature and cause the
engine to shut down completely.
If the engine coolant temperature gauge
needle moves to the upper limit position,
the engine is overheating. See Gauges
(page 79).
You must only drive your vehicle for a short
distance if the engine overheats. The
distance you can travel depends on
ambient temperature, vehicle load and
terrain. The engine will continue to operate
with limited power for a short time.
If the engine temperature continues to rise,
the fuel supply to the engine will reduce.
The air conditioning will switch off and the
engine cooling fan will operate continually.
1. Reduce your speed gradually and stop
your vehicle as soon as it is safe to do
so.
2. Switch the engine off immediately to prevent severe engine damage.
3. Wait for the engine to cool down. 4. Check the coolant level. See
Engine
Coolant Check (page 190).
5. Have your vehicle checked by an authorized dealer as soon as possible.
ECONOMICAL DRIVING
Fuel economy is affected by several things
such as how you drive, the conditions you
drive under and how you maintain your
vehicle.
There are some things to keep in mind that
may improve your fuel economy:
• Accelerate and slow down in a smooth,
moderate fashion.
• Drive at steady speeds.
• Anticipate stops; slowing down may
eliminate the need to stop.
• Combine errands and minimize
stop-and-go driving.
•When running errands, go to the
furthest destination first and then
work your way back home.
• Close the windows for high-speed
driving.
• Drive at reasonable speeds. (Traveling
at 65 mph/105 kph uses about 15%
less fuel than traveling at 75 mph/121
kph).
• Keep the tires properly inflated and use
only the recommended size.
• Use the recommended engine oil.
• Perform all regularly scheduled
maintenance.
There are also some things you may want
to avoid doing because they reduce your
fuel economy:
• Avoid sudden or hard accelerations.
• Avoid revving the engine before turning
off the car.
• Avoid long idle periods.
160
Transit Connect (CHC) Canada/United States of America, enUSA, First Printing Driving Hints
Page 167 of 428
Canadian roadside coverage and benefits
may differ from the U.S. coverage. If you
require more information, please refer to
the coverage section of your warranty
guide, call us in Canada at
1-800-665-2006, or visit our website at
www.ford.ca.
Sykes Assistance Services Corporation
administers the Roadside Assistance
program. You must receive covered
services in Canada or the continental
United States. Coverage extends to
vehicles that use public, non-seasonal,
annually traveled roadways. Roadside
Assistance coverage does not extend to
vehicles involved in cross-country driving,
logging, autocross and any other form of
off-road use. Well maintained roads and
surfaces help ensure safe travel for the
supplier, and allow their representatives
to perform service as per the standard
operating procedures.
In Remote Locations
If our supplier cannot take your vehicle by
road to the nearest authorized dealership,
transportation by rail or water may be
necessary. The program covers a tow to
the dock or rail terminal and also to the
dealership at the end of the trip.
For rail or water transportation, however,
contact your authorized dealer to confirm
if you are eligible for additional coverage
before you authorize or pay for the service.
Call the Ford Roadside Assistance at
1-800-665-2006 for additional
information.
HAZARD WARNING FLASHERS
Note:
If used when the vehicle is not
running, the battery will lose charge. There
may be insufficient power to restart your
vehicle. The hazard warning button is
located on the instrument panel.
Use it when your vehicle is
creating a safety hazard for other
motorists.
• Press the button to turn on the hazard
warning function, and the front and
rear direction indicators will flash.
• Press the button again to turn them
off.
FUEL SHUTOFF WARNING
Failure to inspect and, if necessary,
repair fuel leaks after a collision may
increase the risk of fire and serious
injury. Ford Motor Company recommends
that the fuel system be inspected by an
authorized dealer after any collision. In the event of a moderate to severe
collision, this vehicle is equipped with a
fuel pump shut-off feature that stops the
flow of fuel to the engine. Not every impact
will cause a shut-off.
Should your vehicle shut off after a
collision, you may restart your vehicle by
doing the following:
1. Turn the ignition off.
2. Turn the ignition to crank.
3. Turn the ignition off.
4.
Turn the ignition on again to re-enable
the fuel pump.
JUMP STARTING THE VEHICLE WARNINGS
The gases around the battery can
explode if exposed to flames, sparks
or lit cigarettes. An explosion could
result in personal injury or vehicle damage.
164
Transit Connect (CHC) Canada/United States of America, enUSA, First Printing Roadside Emergencies
Page 169 of 428
WARNING
Do not connect the end of the
second cable to the negative (-)
terminal of the battery to be jumped.
A spark may cause an explosion of the
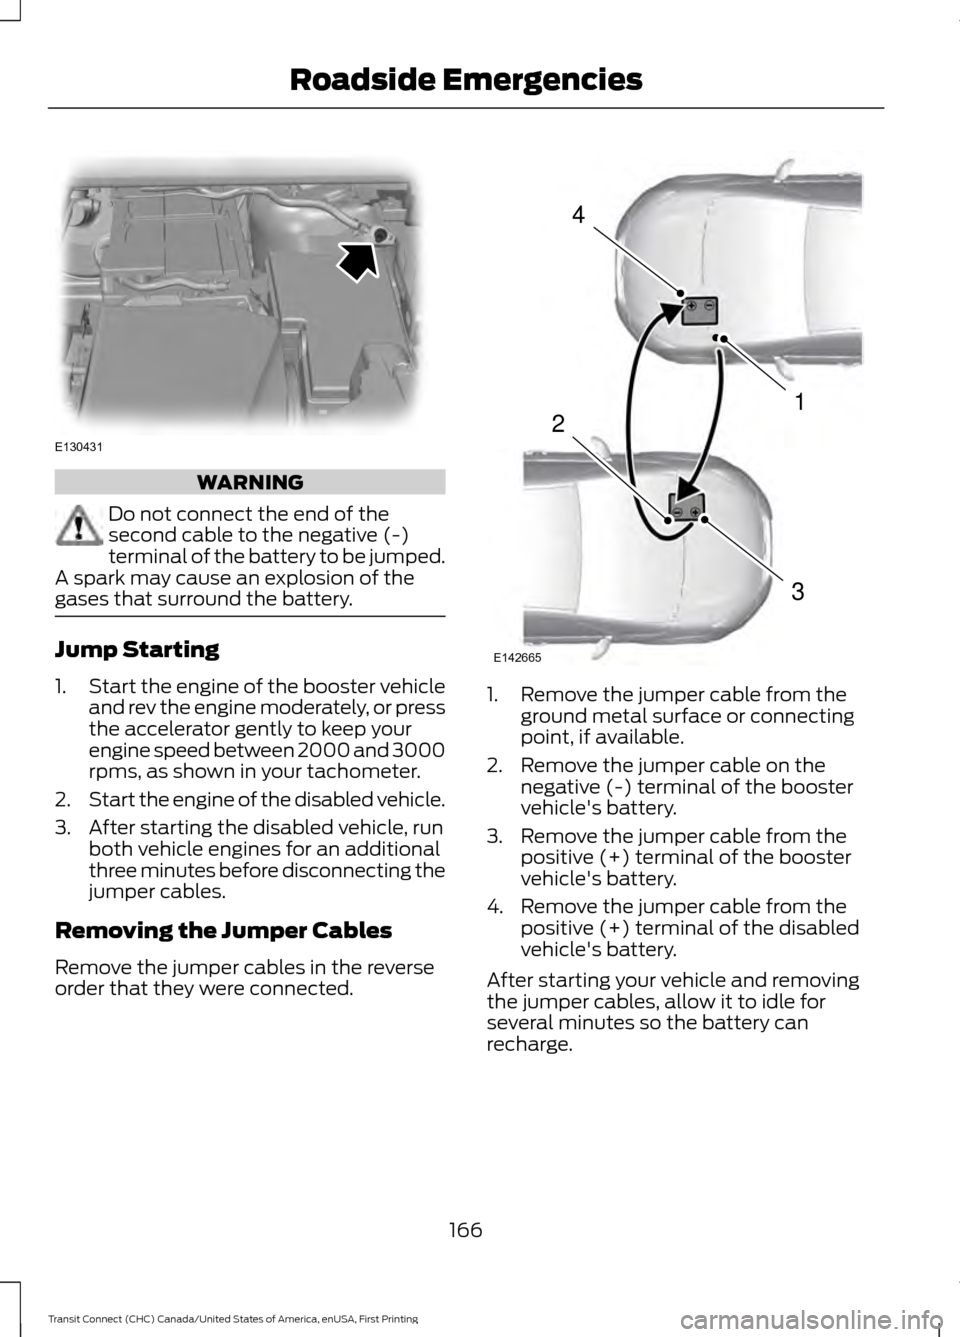
gases that surround the battery. Jump Starting
1.
Start the engine of the booster vehicle
and rev the engine moderately, or press
the accelerator gently to keep your
engine speed between 2000 and 3000
rpms, as shown in your tachometer.
2. Start the engine of the disabled vehicle.
3. After starting the disabled vehicle, run both vehicle engines for an additional
three minutes before disconnecting the
jumper cables.
Removing the Jumper Cables
Remove the jumper cables in the reverse
order that they were connected. 1. Remove the jumper cable from the
ground metal surface or connecting
point, if available.
2. Remove the jumper cable on the negative (-) terminal of the booster
vehicle's battery.
3. Remove the jumper cable from the positive (+) terminal of the booster
vehicle's battery.
4. Remove the jumper cable from the positive (+) terminal of the disabled
vehicle's battery.
After starting your vehicle and removing
the jumper cables, allow it to idle for
several minutes so the battery can
recharge.
166
Transit Connect (CHC) Canada/United States of America, enUSA, First Printing Roadside EmergenciesE130431 4
1
3
2
E142665
Page 242 of 428
Carrying Out the System Reset
Procedure
Read the entire procedure before carrying
out a system reset.
1. Drive your vehicle above 20 mph (32
km/h) for at least two minutes and
then park in a safe location where you
can easily get to all four tires and have
access to a tire inflation pump.
2. Switch the ignition off.
3. Switch the ignition on with the engine off.
4. Turn the hazard flashers on then off three times, this must be completed
within 10 seconds. If the reset mode
has been entered successfully, the horn
will chirp once and the system indicator
will flash. If this does not occur, repeat
the procedure from step 2. If after
repeated attempts to enter the reset
mode, the horn does not chirp and the
system indicator does not flash, have
your vehicle checked by an authorized
dealer as soon as possible.
5. Train the system sensors in the tires using the following reset sequence
starting with the left front tire and
following a clockwise order: Left front,
right front, right rear, left rear.
6. Remove the valve cap from the valve stem on the left front tire. Decrease the
air pressure until the horn chirps.
Note: The single horn chirp confirms that
the sensor identification code has been
learned by your vehicle for this position. If a
double horn chirp is heard, the reset
procedure was unsuccessful and must be
repeated.
7. Remove the valve cap from the valve stem on the right front tire. Decrease
the air pressure until the horn chirps.
8. Remove the valve cap from the valve stem on the right rear tire. Decrease the
air pressure until the horn chirps. 9. Remove the valve cap from the valve
stem on the left rear tire. Decrease the
air pressure until the horn chirps.
Training is complete when the horn
chirps after the last system sensor (left
rear) has been trained and the system
indicator stops flashing.
10. Switch the ignition off. If two short horn chirps are heard, the reset
procedure was unsuccessful and
must be repeated.
Note: If after repeating the procedure two
short horn chirps are heard again, have your
vehicle checked by an authorized dealer as
soon as possible.
11. Set all four tires to the correct pressure See Maintenance (page
185). or the tire inflation pressure label
(located on the edge of driver door or
the B-Pillar).
CHANGING A ROAD WHEEL WARNINGS
The use of tire sealants may damage
your tire pressure monitoring system
and should only be used in roadside
emergencies. If you must use a sealant, the
Ford Tire Mobility Kit sealant should be
used. The tire pressure monitoring system
sensor and valve stem on the wheel must
be replaced by an authorized dealer after
use of the sealant. If the tire pressure monitor sensor
becomes damaged, it will no longer
function.
See Tire Pressure
Monitoring System (page 235). Note:
The tire pressure monitoring system
indicator light will illuminate when the spare
tire is in use. To restore the full function of
the monitoring system, all road wheels
equipped with tire pressure monitoring
sensors must be mounted on the vehicle.
239
Transit Connect (CHC) Canada/United States of America, enUSA, First Printing Wheels and Tires
Page 254 of 428
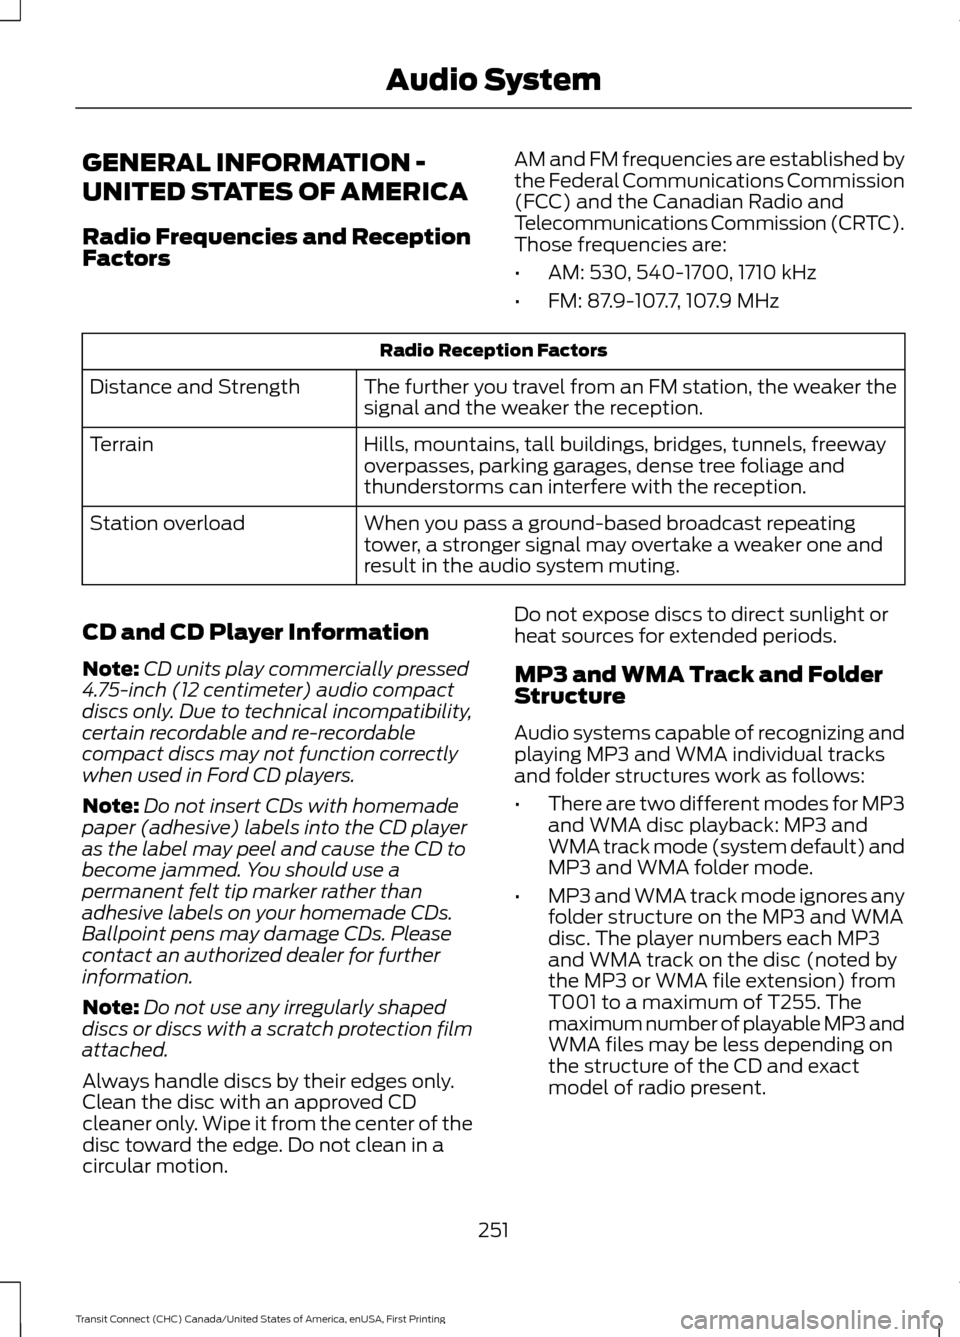
GENERAL INFORMATION -
UNITED STATES OF AMERICA
Radio Frequencies and Reception
Factors
AM and FM frequencies are established by
the Federal Communications Commission
(FCC) and the Canadian Radio and
Telecommunications Commission (CRTC).
Those frequencies are:
•
AM: 530, 540-1700, 1710 kHz
• FM: 87.9-107.7, 107.9 MHz Radio Reception Factors
The further you travel from an FM station, the weaker the
signal and the weaker the reception.
Distance and Strength
Hills, mountains, tall buildings, bridges, tunnels, freeway
overpasses, parking garages, dense tree foliage and
thunderstorms can interfere with the reception.
Terrain
When you pass a ground-based broadcast repeating
tower, a stronger signal may overtake a weaker one and
result in the audio system muting.
Station overload
CD and CD Player Information
Note: CD units play commercially pressed
4.75-inch (12 centimeter) audio compact
discs only. Due to technical incompatibility,
certain recordable and re-recordable
compact discs may not function correctly
when used in Ford CD players.
Note: Do not insert CDs with homemade
paper (adhesive) labels into the CD player
as the label may peel and cause the CD to
become jammed. You should use a
permanent felt tip marker rather than
adhesive labels on your homemade CDs.
Ballpoint pens may damage CDs. Please
contact an authorized dealer for further
information.
Note: Do not use any irregularly shaped
discs or discs with a scratch protection film
attached.
Always handle discs by their edges only.
Clean the disc with an approved CD
cleaner only. Wipe it from the center of the
disc toward the edge. Do not clean in a
circular motion. Do not expose discs to direct sunlight or
heat sources for extended periods.
MP3 and WMA Track and Folder
Structure
Audio systems capable of recognizing and
playing MP3 and WMA individual tracks
and folder structures work as follows:
•
There are two different modes for MP3
and WMA disc playback: MP3 and
WMA track mode (system default) and
MP3 and WMA folder mode.
• MP3 and WMA track mode ignores any
folder structure on the MP3 and WMA
disc. The player numbers each MP3
and WMA track on the disc (noted by
the MP3 or WMA file extension) from
T001 to a maximum of T255. The
maximum number of playable MP3 and
WMA files may be less depending on
the structure of the CD and exact
model of radio present.
251
Transit Connect (CHC) Canada/United States of America, enUSA, First Printing Audio System
Page 255 of 428
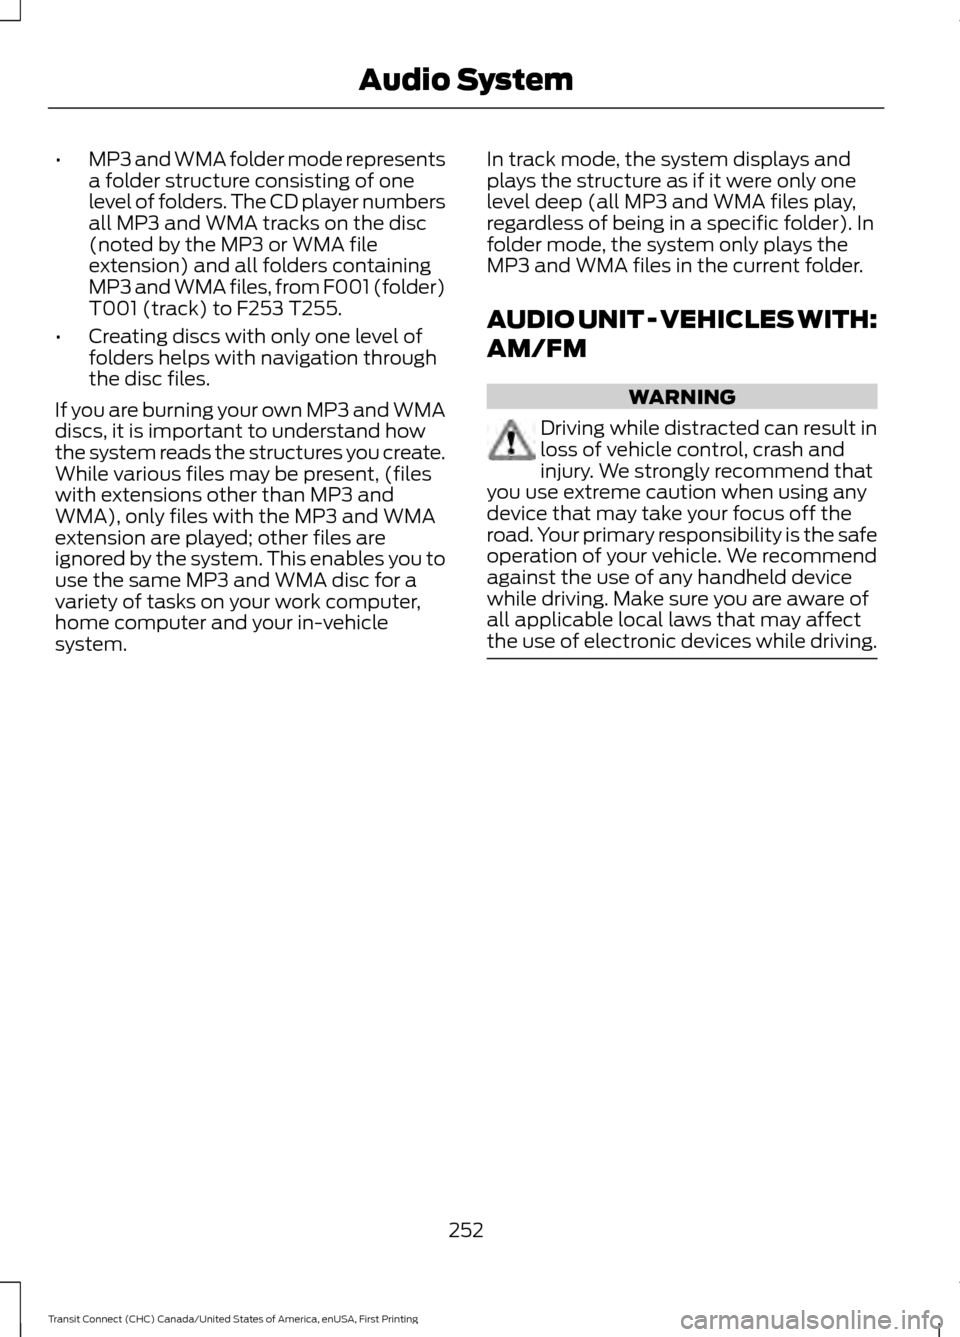
•
MP3 and WMA folder mode represents
a folder structure consisting of one
level of folders. The CD player numbers
all MP3 and WMA tracks on the disc
(noted by the MP3 or WMA file
extension) and all folders containing
MP3 and WMA files, from F001 (folder)
T001 (track) to F253 T255.
• Creating discs with only one level of
folders helps with navigation through
the disc files.
If you are burning your own MP3 and WMA
discs, it is important to understand how
the system reads the structures you create.
While various files may be present, (files
with extensions other than MP3 and
WMA), only files with the MP3 and WMA
extension are played; other files are
ignored by the system. This enables you to
use the same MP3 and WMA disc for a
variety of tasks on your work computer,
home computer and your in-vehicle
system. In track mode, the system displays and
plays the structure as if it were only one
level deep (all MP3 and WMA files play,
regardless of being in a specific folder). In
folder mode, the system only plays the
MP3 and WMA files in the current folder.
AUDIO UNIT - VEHICLES WITH:
AM/FM WARNING
Driving while distracted can result in
loss of vehicle control, crash and
injury. We strongly recommend that
you use extreme caution when using any
device that may take your focus off the
road. Your primary responsibility is the safe
operation of your vehicle. We recommend
against the use of any handheld device
while driving. Make sure you are aware of
all applicable local laws that may affect
the use of electronic devices while driving. 252
Transit Connect (CHC) Canada/United States of America, enUSA, First Printing Audio System