buttons FORD TRANSIT CONNECT 2015 2.G User Guide
[x] Cancel search | Manufacturer: FORD, Model Year: 2015, Model line: TRANSIT CONNECT, Model: FORD TRANSIT CONNECT 2015 2.GPages: 428, PDF Size: 6.27 MB
Page 257 of 428
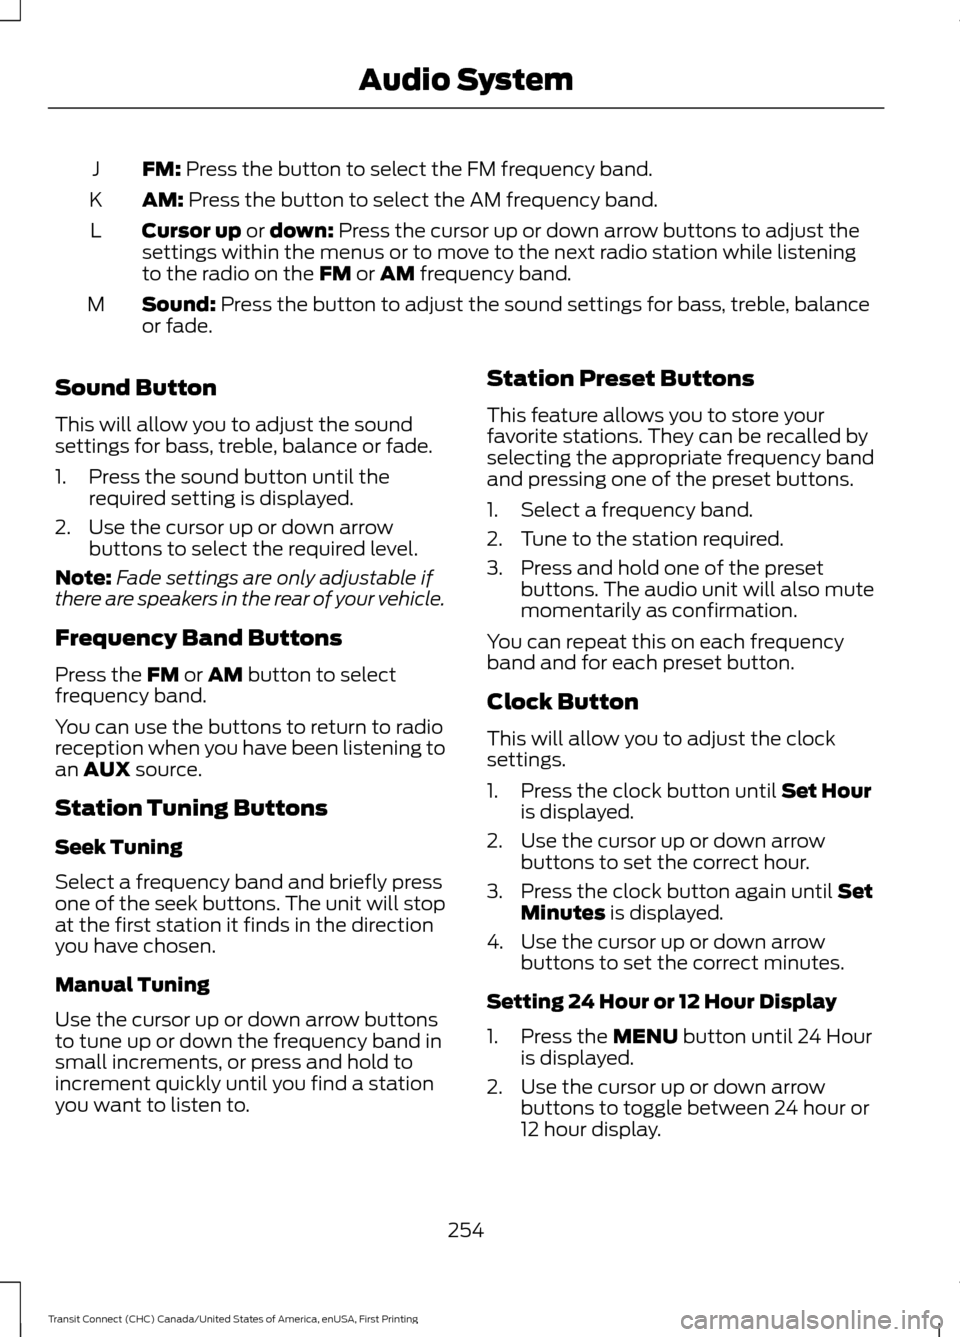
FM: Press the button to select the FM frequency band.
J
AM:
Press the button to select the AM frequency band.
K
Cursor up
or down: Press the cursor up or down arrow buttons to adjust the
settings within the menus or to move to the next radio station while listening
to the radio on the
FM or AM frequency band.
L
Sound:
Press the button to adjust the sound settings for bass, treble, balance
or fade.
M
Sound Button
This will allow you to adjust the sound
settings for bass, treble, balance or fade.
1. Press the sound button until the required setting is displayed.
2. Use the cursor up or down arrow buttons to select the required level.
Note: Fade settings are only adjustable if
there are speakers in the rear of your vehicle.
Frequency Band Buttons
Press the
FM or AM button to select
frequency band.
You can use the buttons to return to radio
reception when you have been listening to
an
AUX source.
Station Tuning Buttons
Seek Tuning
Select a frequency band and briefly press
one of the seek buttons. The unit will stop
at the first station it finds in the direction
you have chosen.
Manual Tuning
Use the cursor up or down arrow buttons
to tune up or down the frequency band in
small increments, or press and hold to
increment quickly until you find a station
you want to listen to. Station Preset Buttons
This feature allows you to store your
favorite stations. They can be recalled by
selecting the appropriate frequency band
and pressing one of the preset buttons.
1. Select a frequency band.
2. Tune to the station required.
3. Press and hold one of the preset
buttons. The audio unit will also mute
momentarily as confirmation.
You can repeat this on each frequency
band and for each preset button.
Clock Button
This will allow you to adjust the clock
settings.
1. Press the clock button until Set Hour
is displayed.
2. Use the cursor up or down arrow buttons to set the correct hour.
3. Press the clock button again until
Set
Minutes is displayed.
4. Use the cursor up or down arrow buttons to set the correct minutes.
Setting 24 Hour or 12 Hour Display
1. Press the
MENU button until 24 Hour
is displayed.
2. Use the cursor up or down arrow buttons to toggle between 24 hour or
12 hour display.
254
Transit Connect (CHC) Canada/United States of America, enUSA, First Printing Audio System
Page 258 of 428
Menu Button
This will allow you to adjust all of the audio
system settings. Press the button
repeatedly until the required setting is
displayed. Use the cursor up or down arrow
buttons to adjust the following settings:
•
Clock hour
• Clock minutes
• 24 hour, 12 hour
• Bass
• Treble
• Balance
• Fade
• RDS
AUX Button
Connect your media device to the audio
unit. See Media Hub (page 265).
Select your media device as the audio
source by pressing the
AUX button. After
connecting your media device, the first
track will start to play automatically. AUDIO UNIT - VEHICLES WITH:
PREMIUM AM/FM/CD WARNING
Driving while distracted can result in
loss of vehicle control, crash and
injury. We strongly recommend that
you use extreme caution when using any
device that may take your focus off the
road. Your primary responsibility is the safe
operation of your vehicle. We recommend
against the use of any hand-held device
while driving and encourage the use of
voice-operated systems when possible.
Make sure you are aware of all applicable
local laws that may affect the use of
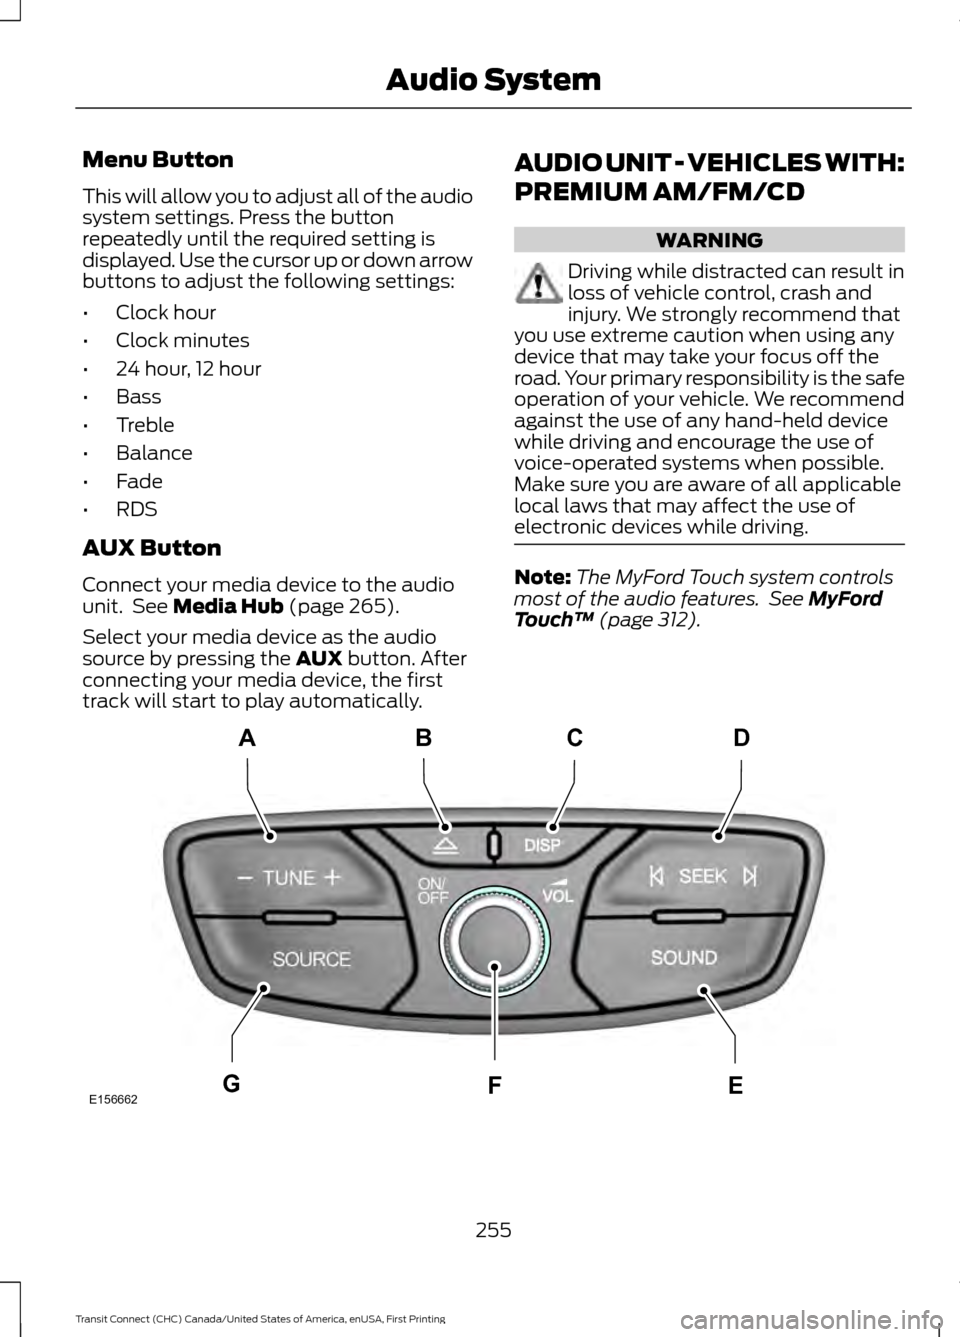
electronic devices while driving. Note:
The MyFord Touch system controls
most of the audio features. See
MyFord
Touch ™ (page 312). 255
Transit Connect (CHC) Canada/United States of America, enUSA, First Printing Audio SystemE156662
CD
GEF
B
A
Page 260 of 428
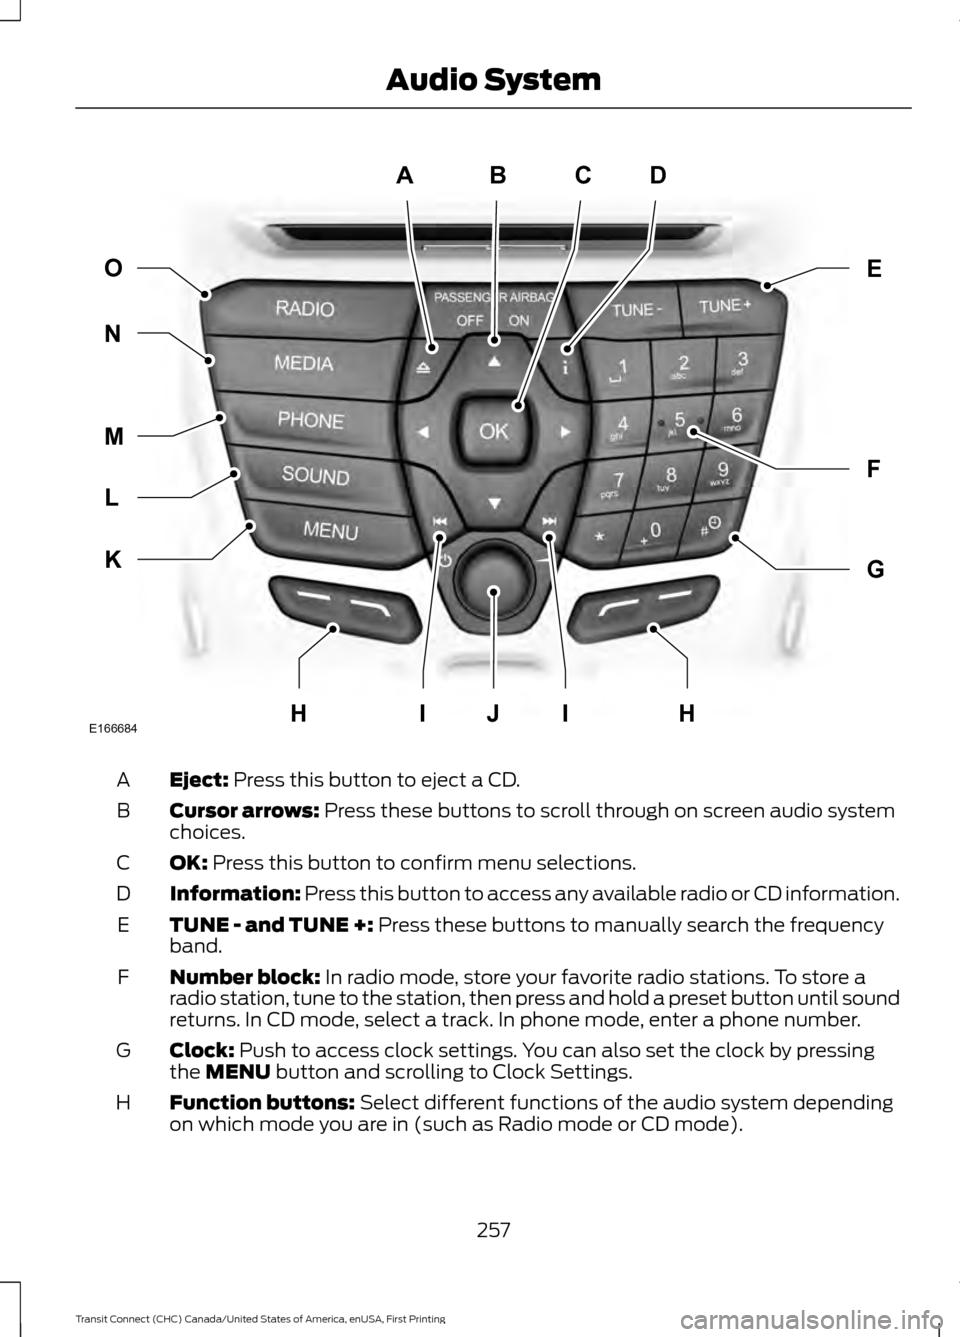
Eject: Press this button to eject a CD.
A
Cursor arrows:
Press these buttons to scroll through on screen audio system
choices.
B
OK:
Press this button to confirm menu selections.
C
Information:
Press this button to access any available radio or CD information.
D
TUNE - and TUNE +:
Press these buttons to manually search the frequency
band.
E
Number block:
In radio mode, store your favorite radio stations. To store a
radio station, tune to the station, then press and hold a preset button until sound
returns. In CD mode, select a track. In phone mode, enter a phone number.
F
Clock:
Push to access clock settings. You can also set the clock by pressing
the MENU button and scrolling to Clock Settings.
G
Function buttons:
Select different functions of the audio system depending
on which mode you are in (such as Radio mode or CD mode).
H
257
Transit Connect (CHC) Canada/United States of America, enUSA, First Printing Audio SystemABCD
F
G
E
K
L
M
N O
IIJE166684HH
Page 261 of 428
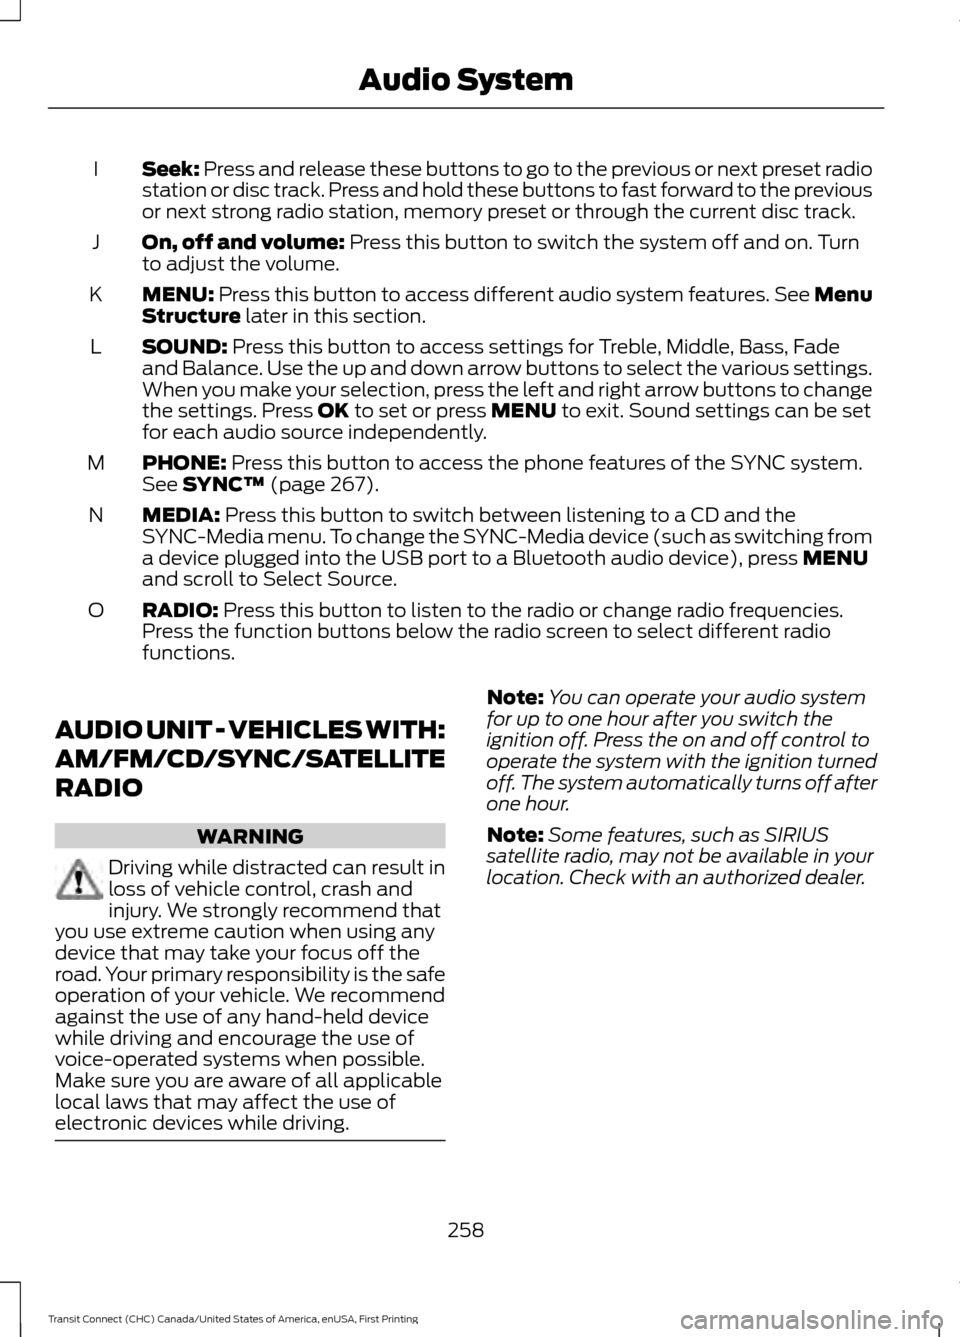
Seek: Press and release these buttons to go to the previous or next preset radio
station or disc track. Press and hold these buttons to fast forward to the previous
or next strong radio station, memory preset or through the current disc track.
I
On, off and volume:
Press this button to switch the system off and on. Turn
to adjust the volume.
J
MENU:
Press this button to access different audio system features. See Menu
Structure later in this section.
K
SOUND:
Press this button to access settings for Treble, Middle, Bass, Fade
and Balance. Use the up and down arrow buttons to select the various settings.
When you make your selection, press the left and right arrow buttons to change
the settings. Press
OK to set or press MENU to exit. Sound settings can be set
for each audio source independently.
L
PHONE:
Press this button to access the phone features of the SYNC system.
See SYNC™ (page 267).
M
MEDIA:
Press this button to switch between listening to a CD and the
SYNC-Media menu. To change the SYNC-Media device (such as switching from
a device plugged into the USB port to a Bluetooth audio device), press
MENU
and scroll to Select Source.
N
RADIO:
Press this button to listen to the radio or change radio frequencies.
Press the function buttons below the radio screen to select different radio
functions.
O
AUDIO UNIT - VEHICLES WITH:
AM/FM/CD/SYNC/SATELLITE
RADIO WARNING
Driving while distracted can result in
loss of vehicle control, crash and
injury. We strongly recommend that
you use extreme caution when using any
device that may take your focus off the
road. Your primary responsibility is the safe
operation of your vehicle. We recommend
against the use of any hand-held device
while driving and encourage the use of
voice-operated systems when possible.
Make sure you are aware of all applicable
local laws that may affect the use of
electronic devices while driving. Note:
You can operate your audio system
for up to one hour after you switch the
ignition off. Press the on and off control to
operate the system with the ignition turned
off. The system automatically turns off after
one hour.
Note: Some features, such as SIRIUS
satellite radio, may not be available in your
location. Check with an authorized dealer.
258
Transit Connect (CHC) Canada/United States of America, enUSA, First Printing Audio System
Page 262 of 428
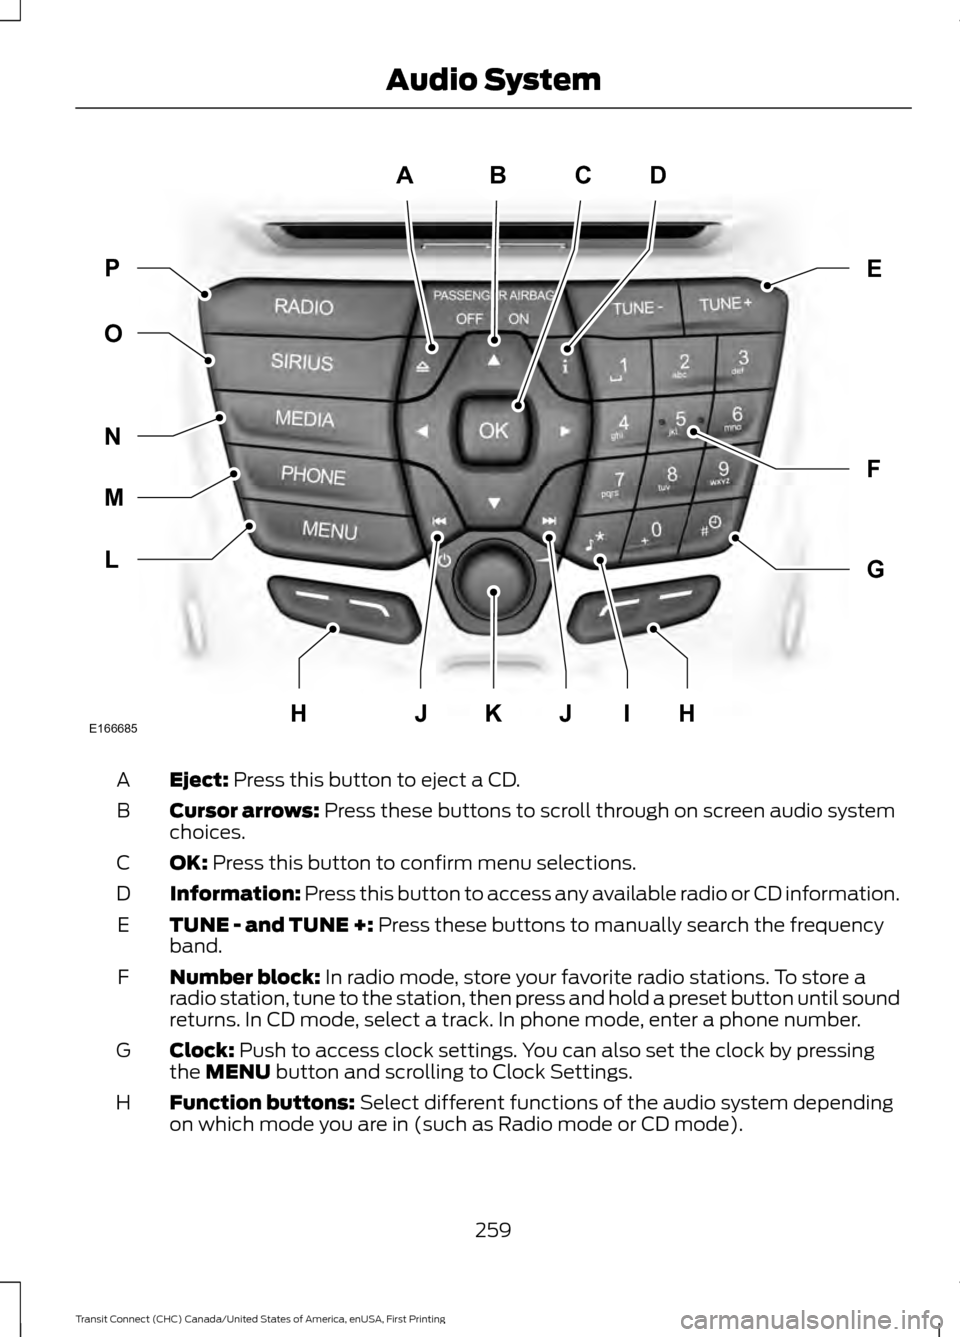
Eject: Press this button to eject a CD.
A
Cursor arrows:
Press these buttons to scroll through on screen audio system
choices.
B
OK:
Press this button to confirm menu selections.
C
Information:
Press this button to access any available radio or CD information.
D
TUNE - and TUNE +:
Press these buttons to manually search the frequency
band.
E
Number block:
In radio mode, store your favorite radio stations. To store a
radio station, tune to the station, then press and hold a preset button until sound
returns. In CD mode, select a track. In phone mode, enter a phone number.
F
Clock:
Push to access clock settings. You can also set the clock by pressing
the MENU button and scrolling to Clock Settings.
G
Function buttons:
Select different functions of the audio system depending
on which mode you are in (such as Radio mode or CD mode).
H
259
Transit Connect (CHC) Canada/United States of America, enUSA, First Printing Audio SystemABCD
F
G
E
L
M
N
O P
JIJKE166685HH
Page 263 of 428
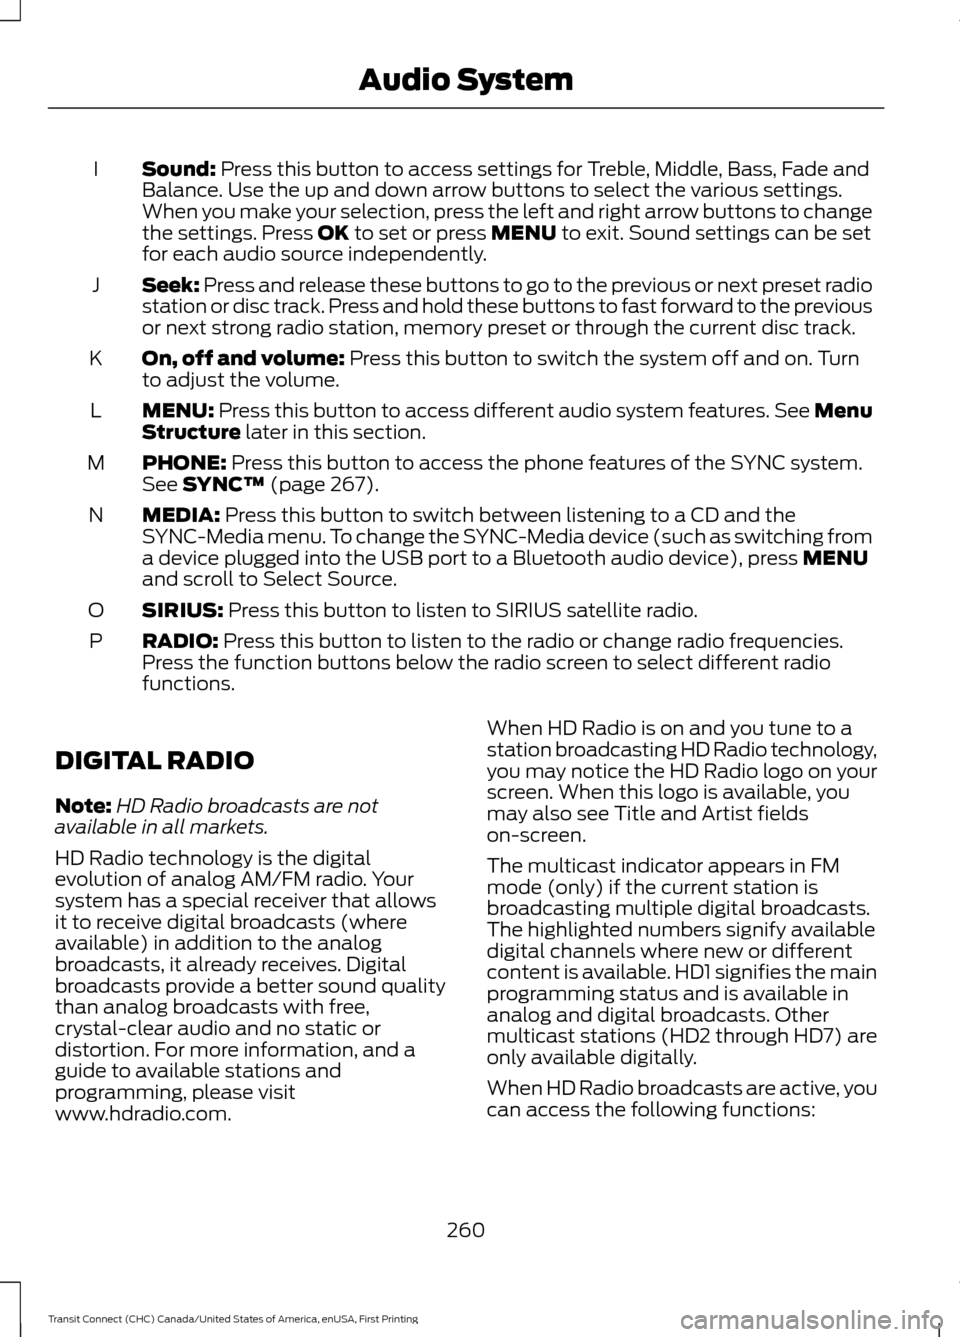
Sound: Press this button to access settings for Treble, Middle, Bass, Fade and
Balance. Use the up and down arrow buttons to select the various settings.
When you make your selection, press the left and right arrow buttons to change
the settings. Press
OK to set or press MENU to exit. Sound settings can be set
for each audio source independently.
I
Seek:
Press and release these buttons to go to the previous or next preset radio
station or disc track. Press and hold these buttons to fast forward to the previous
or next strong radio station, memory preset or through the current disc track.
J
On, off and volume:
Press this button to switch the system off and on. Turn
to adjust the volume.
K
MENU:
Press this button to access different audio system features. See Menu
Structure later in this section.
L
PHONE:
Press this button to access the phone features of the SYNC system.
See SYNC™ (page 267).
M
MEDIA:
Press this button to switch between listening to a CD and the
SYNC-Media menu. To change the SYNC-Media device (such as switching from
a device plugged into the USB port to a Bluetooth audio device), press
MENU
and scroll to Select Source.
N
SIRIUS:
Press this button to listen to SIRIUS satellite radio.
O
RADIO:
Press this button to listen to the radio or change radio frequencies.
Press the function buttons below the radio screen to select different radio
functions.
P
DIGITAL RADIO
Note: HD Radio broadcasts are not
available in all markets.
HD Radio technology is the digital
evolution of analog AM/FM radio. Your
system has a special receiver that allows
it to receive digital broadcasts (where
available) in addition to the analog
broadcasts, it already receives. Digital
broadcasts provide a better sound quality
than analog broadcasts with free,
crystal-clear audio and no static or
distortion. For more information, and a
guide to available stations and
programming, please visit
www.hdradio.com. When HD Radio is on and you tune to a
station broadcasting HD Radio technology,
you may notice the HD Radio logo on your
screen. When this logo is available, you
may also see Title and Artist fields
on-screen.
The multicast indicator appears in FM
mode (only) if the current station is
broadcasting multiple digital broadcasts.
The highlighted numbers signify available
digital channels where new or different
content is available. HD1 signifies the main
programming status and is available in
analog and digital broadcasts. Other
multicast stations (HD2 through HD7) are
only available digitally.
When HD Radio broadcasts are active, you
can access the following functions:
260
Transit Connect (CHC) Canada/United States of America, enUSA, First Printing Audio System
Page 279 of 428
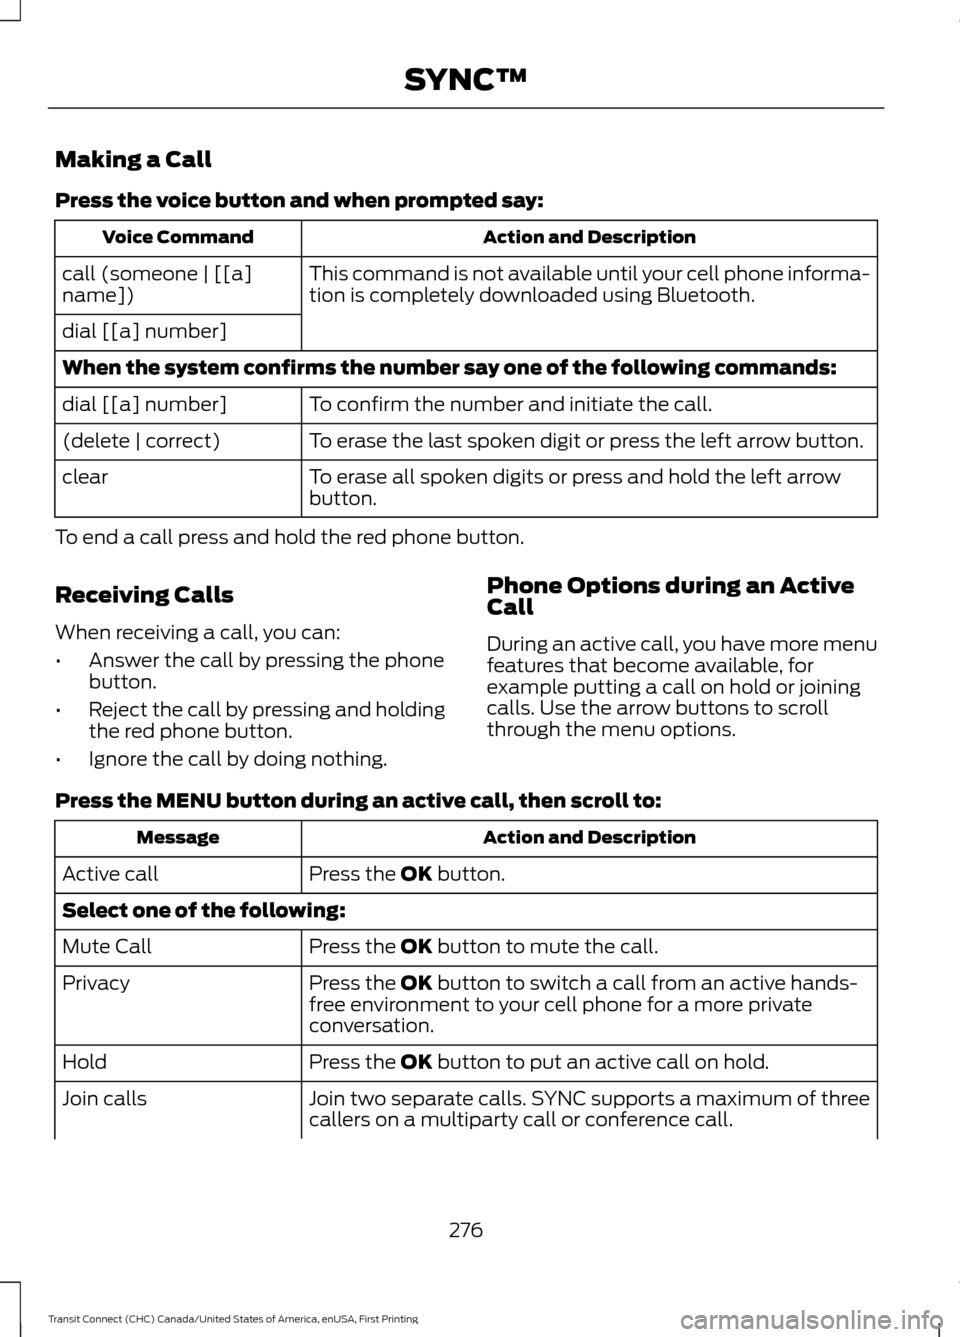
Making a Call
Press the voice button and when prompted say:
Action and Description
Voice Command
This command is not available until your cell phone informa-
tion is completely downloaded using Bluetooth.
call (someone | [[a]
name])
dial [[a] number]
When the system confirms the number say one of the following commands:
To confirm the number and initiate the call.
dial [[a] number]
To erase the last spoken digit or press the left arrow button.
(delete | correct)
To erase all spoken digits or press and hold the left arrow
button.
clear
To end a call press and hold the red phone button.
Receiving Calls
When receiving a call, you can:
• Answer the call by pressing the phone
button.
• Reject the call by pressing and holding
the red phone button.
• Ignore the call by doing nothing. Phone Options during an Active
Call
During an active call, you have more menu
features that become available, for
example putting a call on hold or joining
calls. Use the arrow buttons to scroll
through the menu options.
Press the MENU button during an active call, then scroll to: Action and Description
Message
Press the
OK button.
Active call
Select one of the following:
Press the
OK button to mute the call.
Mute Call
Press the
OK button to switch a call from an active hands-
free environment to your cell phone for a more private
conversation.
Privacy
Press the
OK button to put an active call on hold.
Hold
Join two separate calls. SYNC supports a maximum of three
callers on a multiparty call or conference call.
Join calls
276
Transit Connect (CHC) Canada/United States of America, enUSA, First Printing SYNC™
Page 286 of 428
Action and Description
Message
Automatically download your phonebook each time your cell
phone connects to SYNC. *
Auto-download
Exit the current menu.
Return
* Downloading times are cell phone-dependent and quantity-dependent.
** When Auto Download is on, it automatically deletes any changes, additions or deletions
saved since your last download.
System Settings
This menu provides access to your
Bluetooth Devices and Advanced menu
features. Use the arrow buttons to scroll
through the menu options. Bluetooth Devices
The Bluetooth Devices menu allows you
to add, connect and delete devices, set a
cell phone as primary as well as turn your
Bluetooth feature on and off.
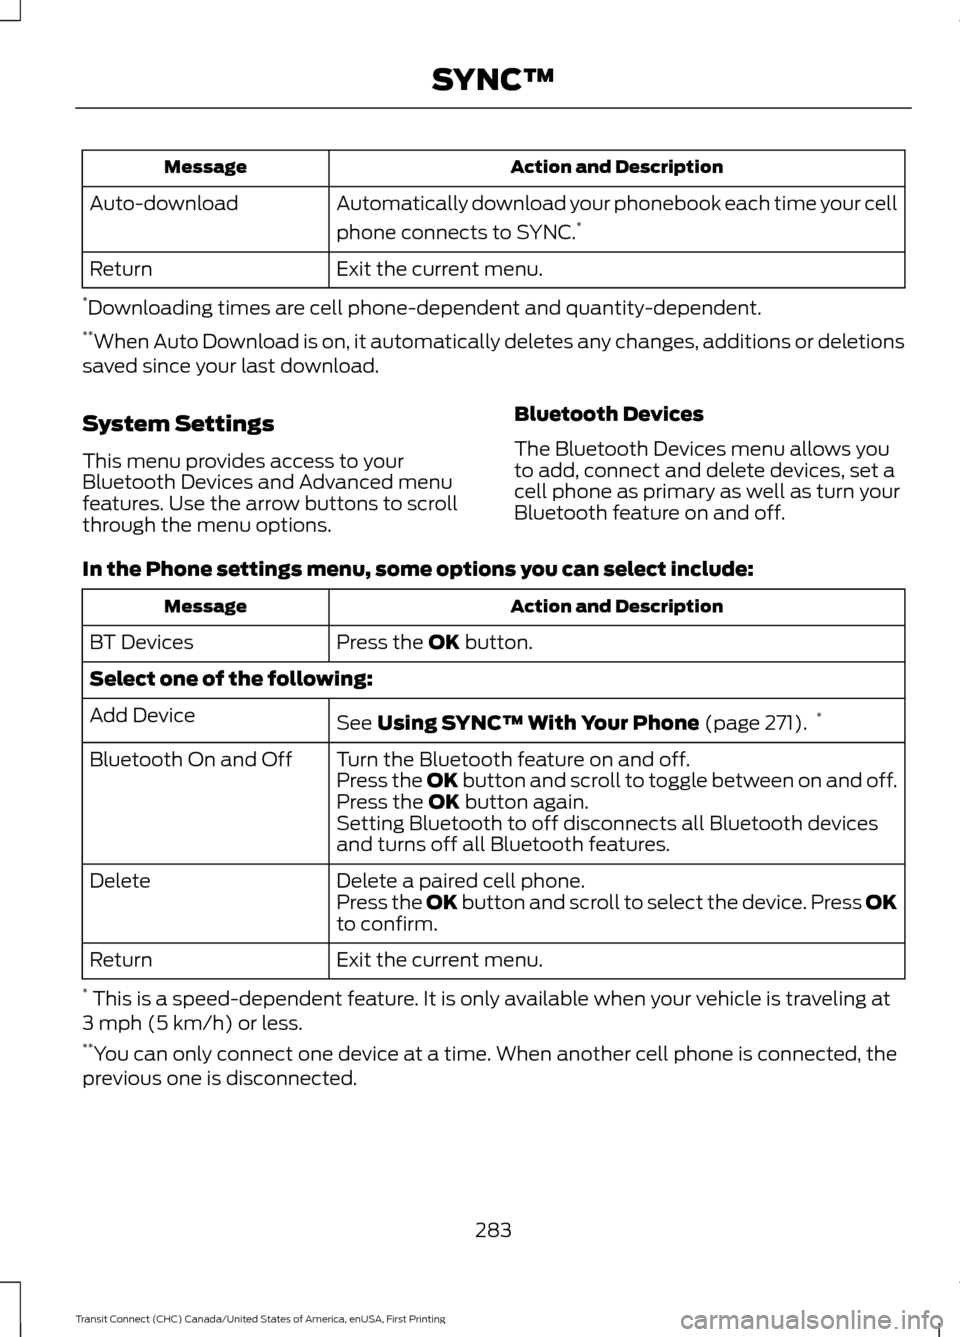
In the Phone settings menu, some options you can select include: Action and Description
Message
Press the OK button.
BT Devices
Select one of the following:
See
Using SYNC™ With Your Phone (page 271).*
Add Device
Turn the Bluetooth feature on and off.
Bluetooth On and Off
Press the OK button and scroll to toggle between on and off.
Press the
OK button again.
Setting Bluetooth to off disconnects all Bluetooth devices
and turns off all Bluetooth features.
Delete a paired cell phone.
Delete
Press the OK button and scroll to select the device. Press OK
to confirm.
Exit the current menu.
Return
* This is a speed-dependent feature. It is only available when your vehicle is traveling at
3 mph (5 km/h) or less.
** You can only connect one device at a time. When another cell phone is connected, the
previous one is disconnected.
283
Transit Connect (CHC) Canada/United States of America, enUSA, First Printing SYNC™
Page 314 of 428
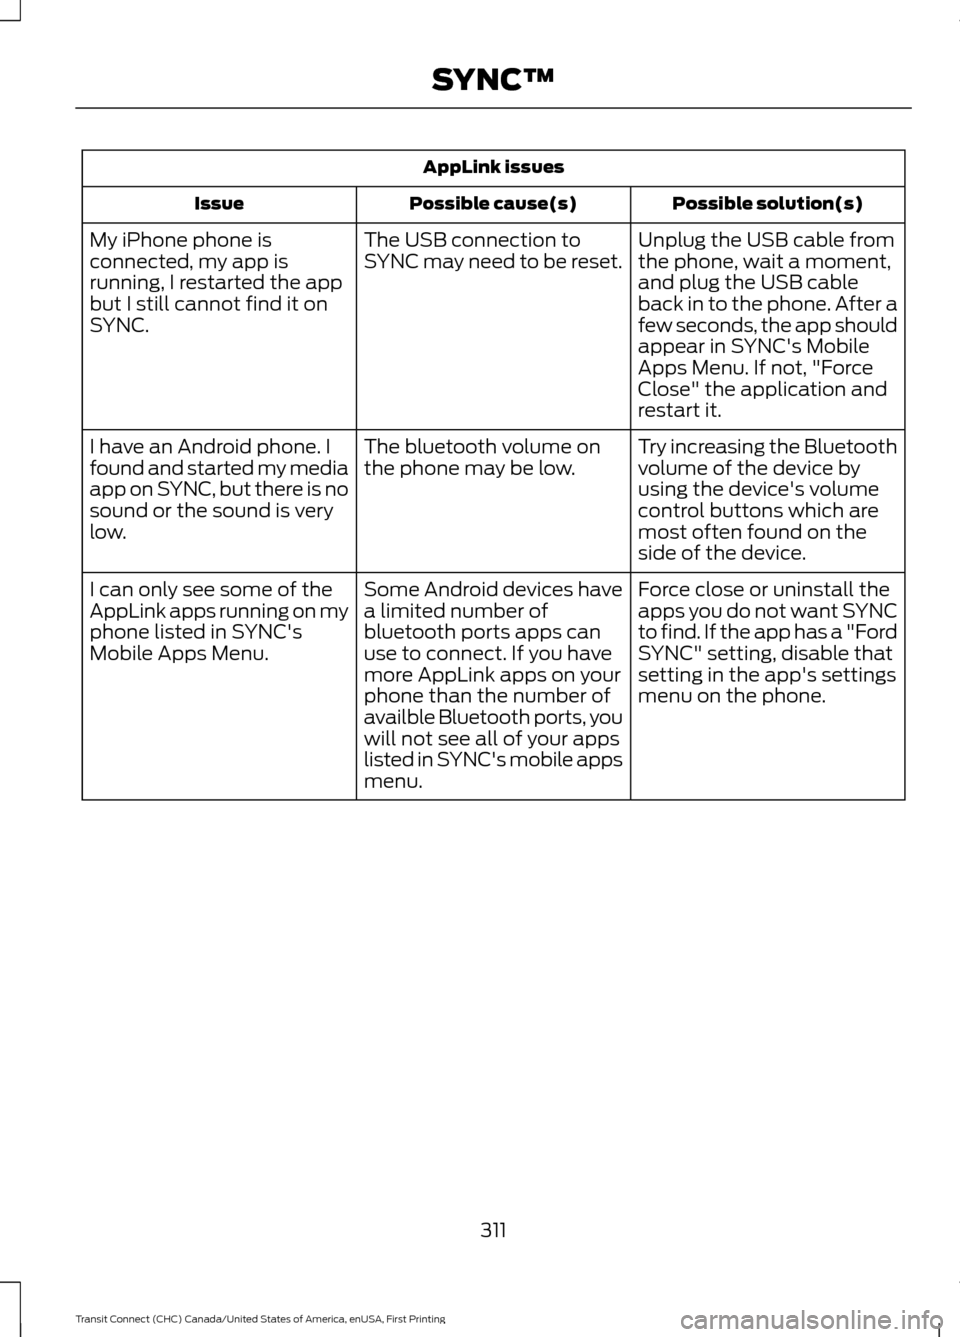
AppLink issues
Possible solution(s)
Possible cause(s)
Issue
Unplug the USB cable from
the phone, wait a moment,
and plug the USB cable
back in to the phone. After a
few seconds, the app should
appear in SYNC's Mobile
Apps Menu. If not, "Force
Close" the application and
restart it.
The USB connection to
SYNC may need to be reset.
My iPhone phone is
connected, my app is
running, I restarted the app
but I still cannot find it on
SYNC.
Try increasing the Bluetooth
volume of the device by
using the device's volume
control buttons which are
most often found on the
side of the device.
The bluetooth volume on
the phone may be low.
I have an Android phone. I
found and started my media
app on SYNC, but there is no
sound or the sound is very
low.
Force close or uninstall the
apps you do not want SYNC
to find. If the app has a "Ford
SYNC" setting, disable that
setting in the app's settings
menu on the phone.
Some Android devices have
a limited number of
bluetooth ports apps can
use to connect. If you have
more AppLink apps on your
phone than the number of
availble Bluetooth ports, you
will not see all of your apps
listed in SYNC's mobile apps
menu.
I can only see some of the
AppLink apps running on my
phone listed in SYNC's
Mobile Apps Menu.
311
Transit Connect (CHC) Canada/United States of America, enUSA, First Printing SYNC™
Page 335 of 428
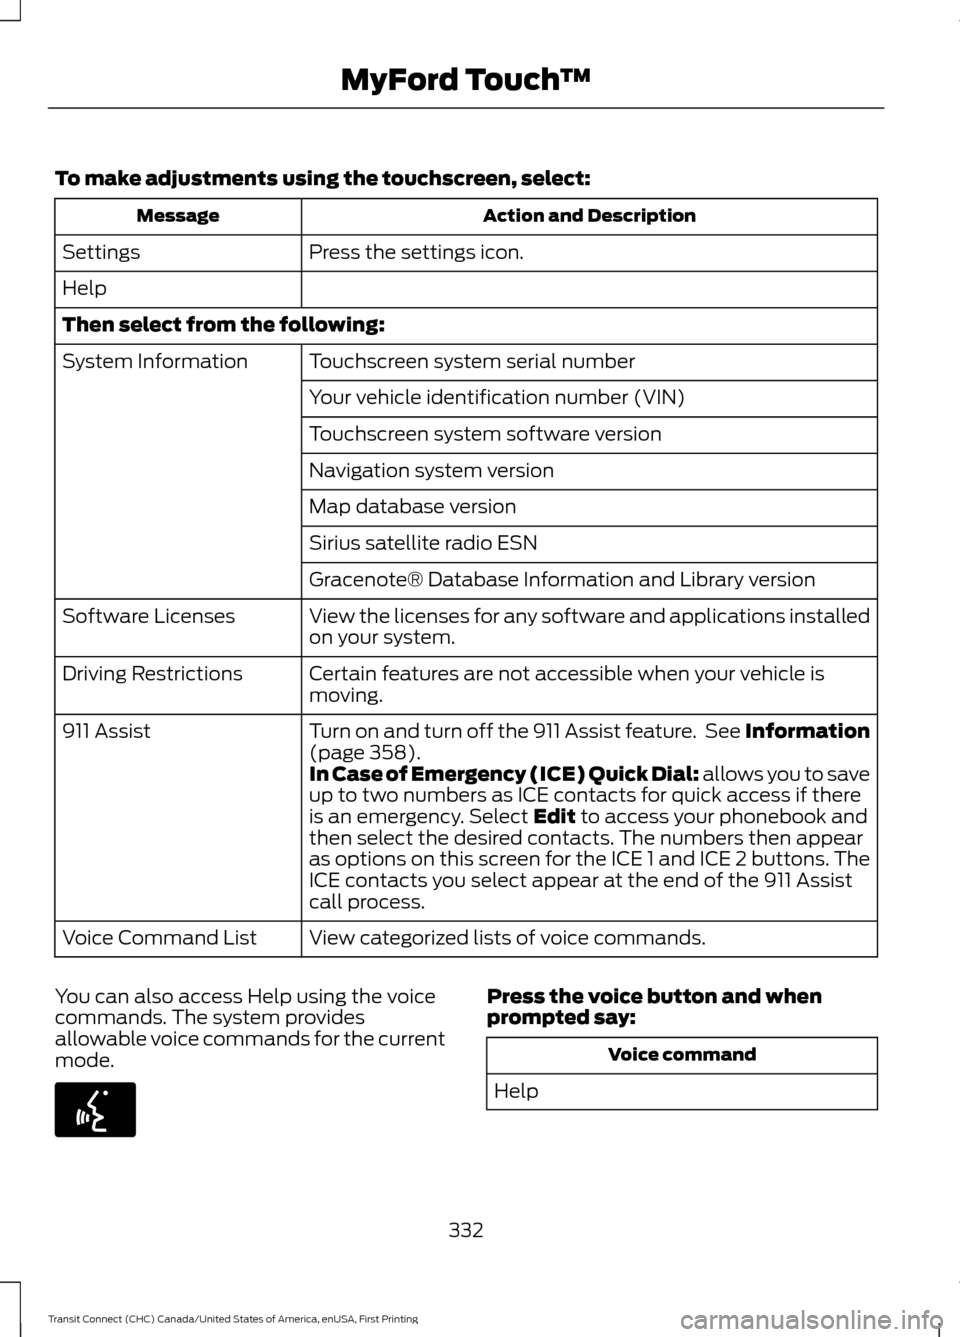
To make adjustments using the touchscreen, select:
Action and Description
Message
Press the settings icon.
Settings
Help
Then select from the following:
Touchscreen system serial number
System Information
Your vehicle identification number (VIN)
Touchscreen system software version
Navigation system version
Map database version
Sirius satellite radio ESN
Gracenote® Database Information and Library version
View the licenses for any software and applications installed
on your system.
Software Licenses
Certain features are not accessible when your vehicle is
moving.
Driving Restrictions
Turn on and turn off the 911 Assist feature. See Information
(page 358).
911 Assist
In Case of Emergency (ICE) Quick Dial: allows you to save
up to two numbers as ICE contacts for quick access if there
is an emergency. Select
Edit to access your phonebook and
then select the desired contacts. The numbers then appear
as options on this screen for the ICE 1 and ICE 2 buttons. The
ICE contacts you select appear at the end of the 911 Assist
call process.
View categorized lists of voice commands.
Voice Command List
You can also access Help using the voice
commands. The system provides
allowable voice commands for the current
mode. Press the voice button and when
prompted say:
Voice command
Help
332
Transit Connect (CHC) Canada/United States of America, enUSA, First Printing MyFord Touch
™E142599