FORD TRANSIT CONNECT 2015 2.G Repair Manual
Manufacturer: FORD, Model Year: 2015, Model line: TRANSIT CONNECT, Model: FORD TRANSIT CONNECT 2015 2.GPages: 428, PDF Size: 6.27 MB
Page 61 of 428
MANUAL LIFTGATE
WARNINGS
It is extremely dangerous to ride in a
cargo area, inside or outside of your
vehicle. In a crash, people riding in
these areas are more likely to be seriously
injured or killed. Do not allow people to ride
in any area of your vehicle that is not
equipped with seats and safety belts. Make
sure everyone in your vehicle is in a seat
and properly using a safety belt. Failure to
follow this warning could result in serious
personal injury or death. Make sure to close and latch the
liftgate to prevent drawing exhaust
fumes into your vehicle. This will also
prevent passengers and cargo from falling
out. If you must drive with the liftgate open,
keep the vents or windows open so outside
air comes into your vehicle. Failure to
follow this warning could result in serious
personal injury. Note:
Be careful when opening or closing
the liftgate in a garage or other enclosed
area to avoid damaging the liftgate.
Note: Do not hang anything from the
spoiler, rear window or liftgate, for example
a bike rack. This could damage the liftgate
and its components.
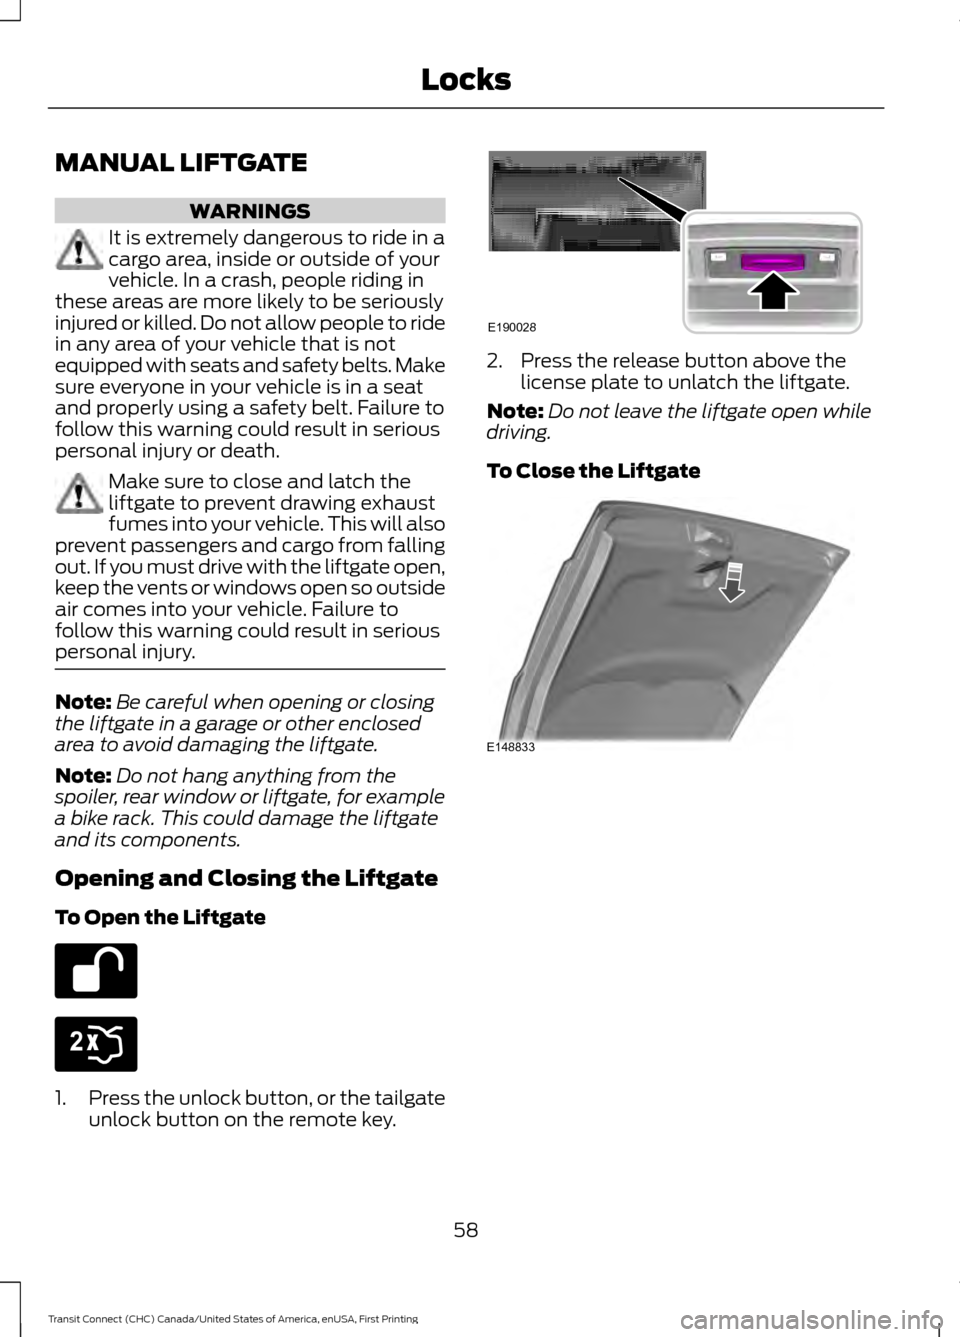
Opening and Closing the Liftgate
To Open the Liftgate 1.
Press the unlock button, or the tailgate
unlock button on the remote key. 2. Press the release button above the
license plate to unlatch the liftgate.
Note: Do not leave the liftgate open while
driving.
To Close the Liftgate 58
Transit Connect (CHC) Canada/United States of America, enUSA, First Printing Locks E190028 E148833
Page 62 of 428
PASSIVE ANTI-THEFT
SYSTEM
Note:
The system is not compatible with
non-Ford aftermarket remote start systems.
Use of these systems may result in vehicle
starting problems and a loss of security
protection.
Note: Metallic objects, electronic devices
or a second coded key on the same key
chain may cause vehicle starting problems
if they are too close to the key when starting
the engine. Prevent these objects from
touching the coded key while starting the
engine. Switch the ignition off, move all
objects on the key chain away from the
coded key and restart the engine if a
problem occurs.
Note: Do not leave a duplicate coded key
in the vehicle. Always take your keys and
lock all doors when leaving the vehicle.
SecuriLock®
The system is an engine immobilization
system. It is designed to help prevent the
engine from being started unless a
correctly coded key for your vehicle is used.
Using an incorrectly coded key may
prevent the engine from starting. A
message may appear in the information
display.
If you are unable to start the engine with a
correctly coded key, a malfunction has
happened and a message may appear in
the information display.
Automatic Arming
The engine immobilization system arms
immediately after you switch the ignition
off. Automatic Disarming
Switching the ignition on with a correctly
coded key disarms the engine
immobilization system.
Replacement Keys
The integrated keyhead transmitter
functions as a programmed ignition key
that operates all the locks and starts your
vehicle, as well as a remote control.
If your keys are lost or stolen and you do
not have a spare correctly coded key, you
will need to have your vehicle towed to an
authorized dealer. You need to erase the
coded keys from your vehicle and program
new coded keys.
Store an extra correctly coded key away
from the vehicle in a safe place to help
prevent any inconveniences. See an
authorized dealer to purchase additional
spare or replacement keys.
Note:
Your vehicle comes with two
integrated keyhead transmitters.
Programming a Spare Integrated
Keyhead Transmitter
You can program your own integrated
keyhead transmitter or standard
SecuriLock coded keys to your vehicle. This
procedure will program both the engine
immobilizer keycode and the remote entry
portion of the remote control to your
vehicle
Only use integrated keyhead transmitters
or standard SecuriLock keys.
You must have two previously
programmed correctly coded keys and the
new unprogrammed key readily accessible.
See an authorized dealer to have the spare
key programmed if two previously
programmed correctly coded keys are not
available.
Read and understand the entire procedure
before you begin.
59
Transit Connect (CHC) Canada/United States of America, enUSA, First Printing Security
Page 63 of 428
1.
Insert the first previously programmed
correctly coded key into the ignition.
2. Switch the ignition from off to on. Keep
the ignition on for at least three
seconds, but no more than 10 seconds.
3. Switch the ignition off and remove the
first correctly coded key from the
ignition.
4. After three seconds but within 10 seconds of switching the ignition off,
insert the second previously correctly
coded key into the ignition.
5. Switch the ignition from off to on. Keep
the ignition on for at least three
seconds, but no more than 10 seconds.
6. Switch the ignition off and remove the
second previously programmed
correctly coded key from the ignition.
7. After three seconds but within 10 seconds of switching the ignition off
and removing the previously
programmed correctly coded key,
insert the new unprogrammed key into
the ignition.
8. Switch the ignition from off to on. Keep
the ignition on for at least six seconds.
9. Remove the newly programmed correctly coded key from the ignition.
If the key has been successfully
programmed it will start the engine and
operate the remote entry system (if the
new key is an integrated keyhead
transmitter).
If the key was not successfully
programmed, wait 10 seconds and repeat
Steps 1 through 8. If you are still
unsuccessful, take your vehicle to an
authorized dealer.
Note: You can program a maximum of eight
coded keys to your vehicle. All eight can be
integrated keyhead transmitters.
60
Transit Connect (CHC) Canada/United States of America, enUSA, First Printing Security
Page 64 of 428
ADJUSTING THE STEERING
WHEEL
WARNING
Do not adjust the steering wheel
when your vehicle is moving.
Note:
Make sure that you are sitting in the
correct position. See Sitting in the Correct
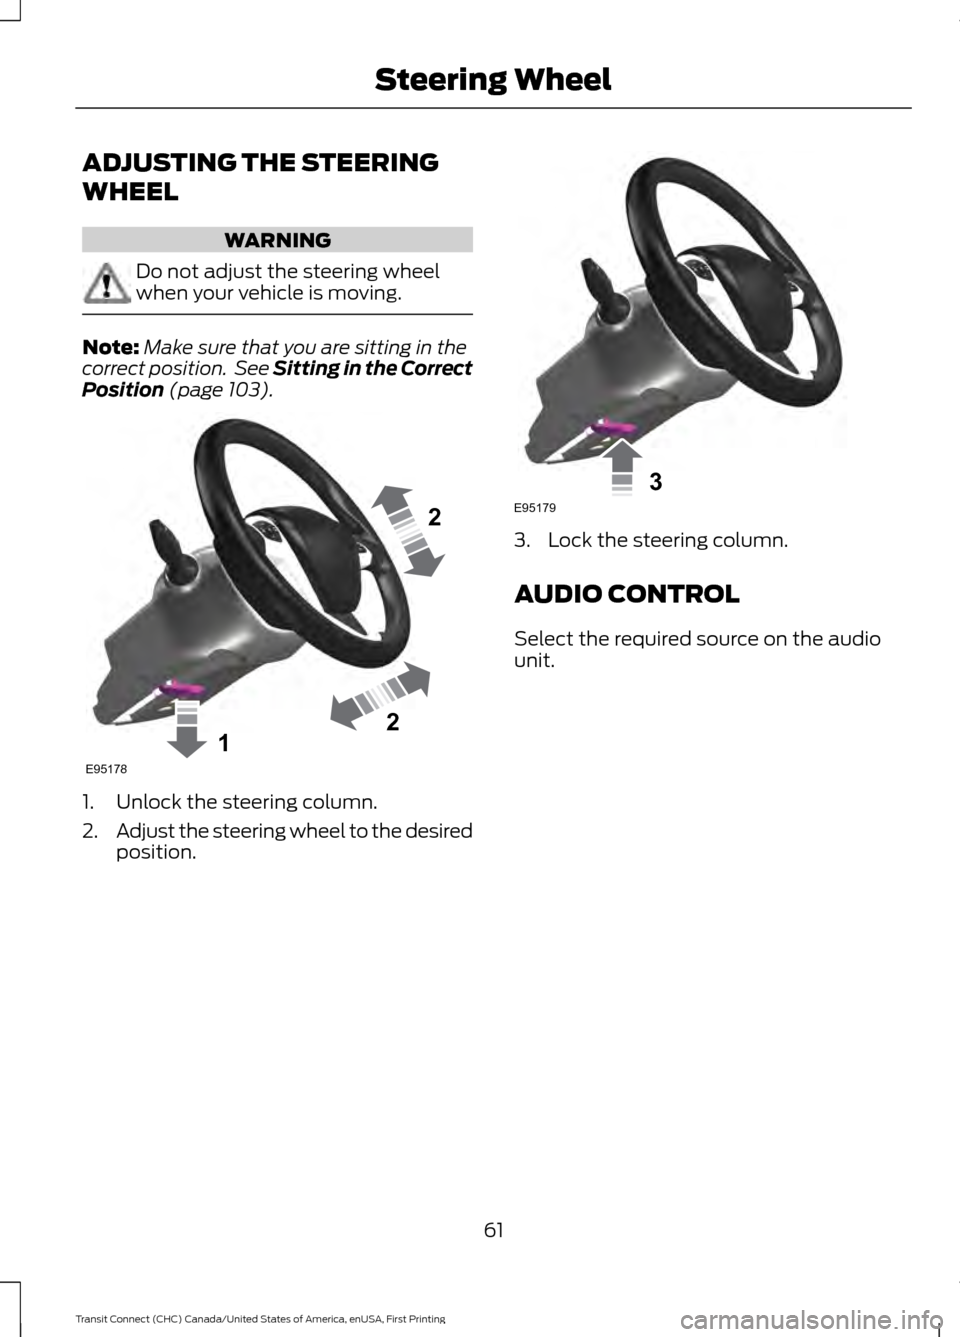
Position (page 103). 1. Unlock the steering column.
2.
Adjust the steering wheel to the desired
position. 3. Lock the steering column.
AUDIO CONTROL
Select the required source on the audio
unit.
61
Transit Connect (CHC) Canada/United States of America, enUSA, First Printing Steering Wheel122E95178 3E95179
Page 65 of 428
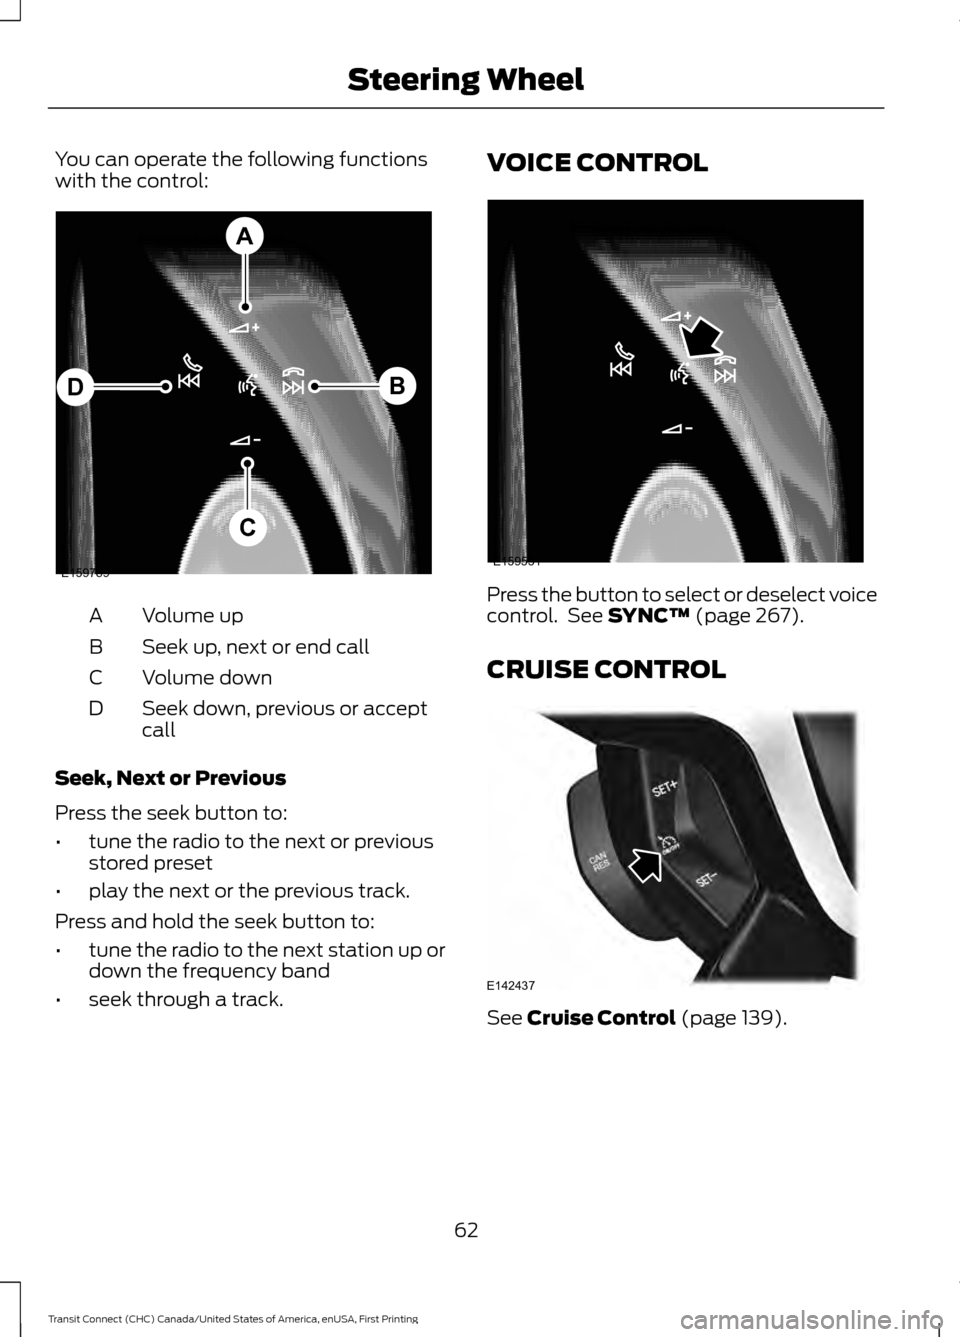
You can operate the following functions
with the control:
Volume up
A
Seek up, next or end call
B
Volume down
C
Seek down, previous or accept
call
D
Seek, Next or Previous
Press the seek button to:
• tune the radio to the next or previous
stored preset
• play the next or the previous track.
Press and hold the seek button to:
• tune the radio to the next station up or
down the frequency band
• seek through a track. VOICE CONTROL
Press the button to select or deselect voice
control. See SYNC™ (page 267).
CRUISE CONTROL See
Cruise Control (page 139).
62
Transit Connect (CHC) Canada/United States of America, enUSA, First Printing Steering WheelE159789
A
B
C
D E159531 E142437
Page 66 of 428
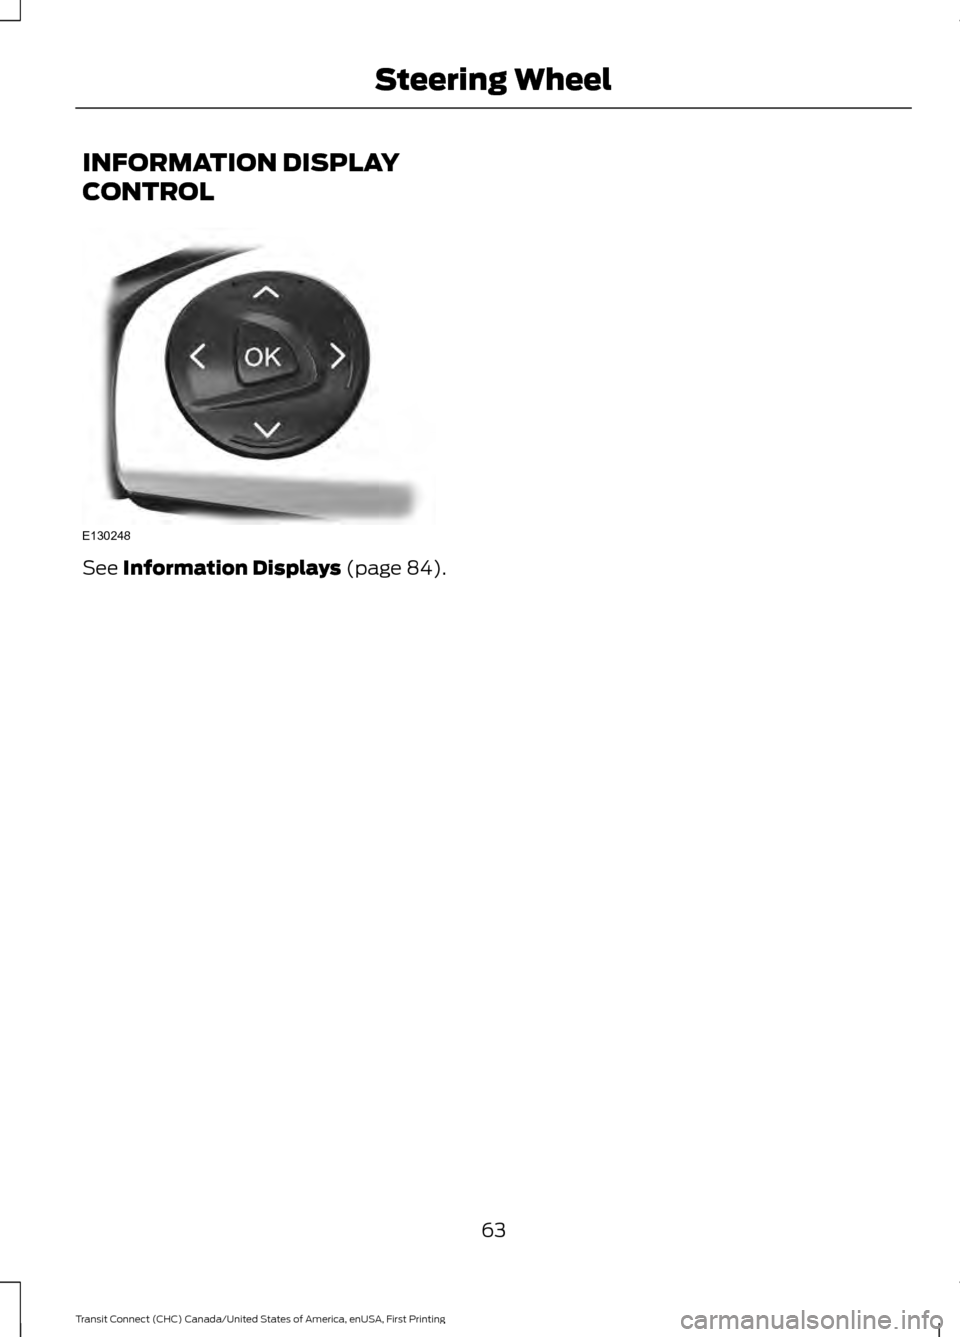
INFORMATION DISPLAY
CONTROL
See Information Displays (page 84).
63
Transit Connect (CHC) Canada/United States of America, enUSA, First Printing Steering WheelE130248
Page 67 of 428
WINDSHIELD WIPERS
Note:
Fully defrost the windshield before
you switch the windshield wipers on.
Note: Make sure you switch the windshield
wipers and vehicle power off before using
an automatic car wash.
Note: If streaks or smears appear on the
windshield, clean the windshield and the
wiper blades. See Checking the Wiper
Blades (page 194). If that does not resolve
the issue, install new wiper blades. See
Changing the Wiper Blades
(page 194).
Note: Do not operate the wipers on a dry
windshield. This may scratch the glass,
damage the wiper blades or cause the wiper
motor to burn out. Always use the
windshield washers before wiping a dry
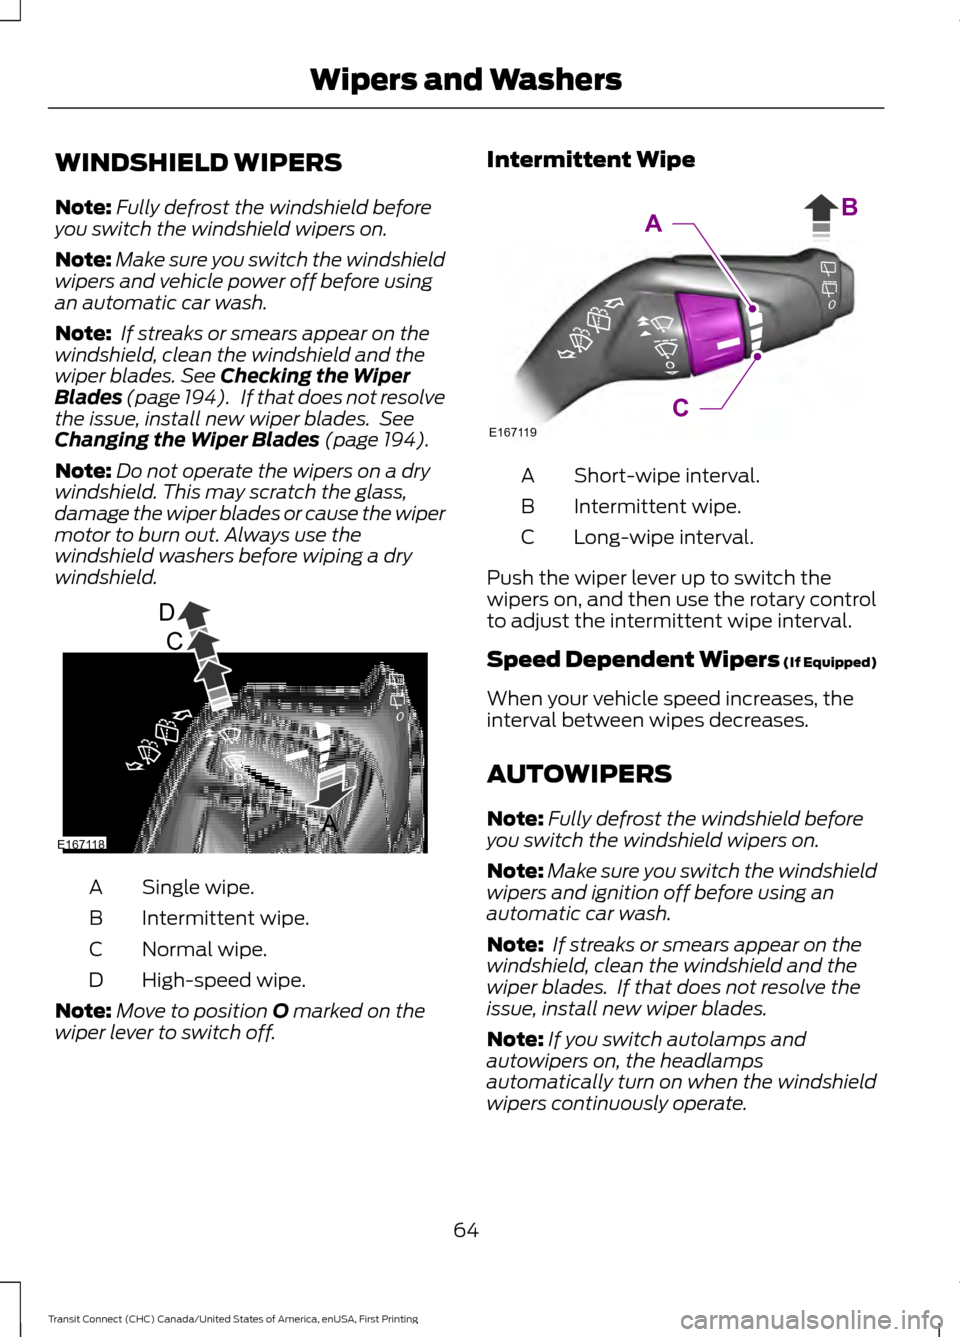
windshield. Single wipe.
A
Intermittent wipe.
B
Normal wipe.
C
High-speed wipe.
D
Note: Move to position
O marked on the
wiper lever to switch off. Intermittent Wipe
Short-wipe interval.
A
Intermittent wipe.
B
Long-wipe interval.
C
Push the wiper lever up to switch the
wipers on, and then use the rotary control
to adjust the intermittent wipe interval.
Speed Dependent Wipers (If Equipped)
When your vehicle speed increases, the
interval between wipes decreases.
AUTOWIPERS
Note: Fully defrost the windshield before
you switch the windshield wipers on.
Note: Make sure you switch the windshield
wipers and ignition off before using an
automatic car wash.
Note: If streaks or smears appear on the
windshield, clean the windshield and the
wiper blades. If that does not resolve the
issue, install new wiper blades.
Note: If you switch autolamps and
autowipers on, the headlamps
automatically turn on when the windshield
wipers continuously operate.
64
Transit Connect (CHC) Canada/United States of America, enUSA, First Printing Wipers and WashersD
C
A
BE167118 E167119C
AB
Page 68 of 428
Note:
During wet or winter driving
conditions with ice, snow or a salty road
mist, inconsistent or unexpected wiping or
smearing may occur.
In these conditions, you can do the
following:
• Lower the sensitivity of the autowipers
to reduce the amount of smearing on
the windshield.
• Switch to normal or high-speed wipe.
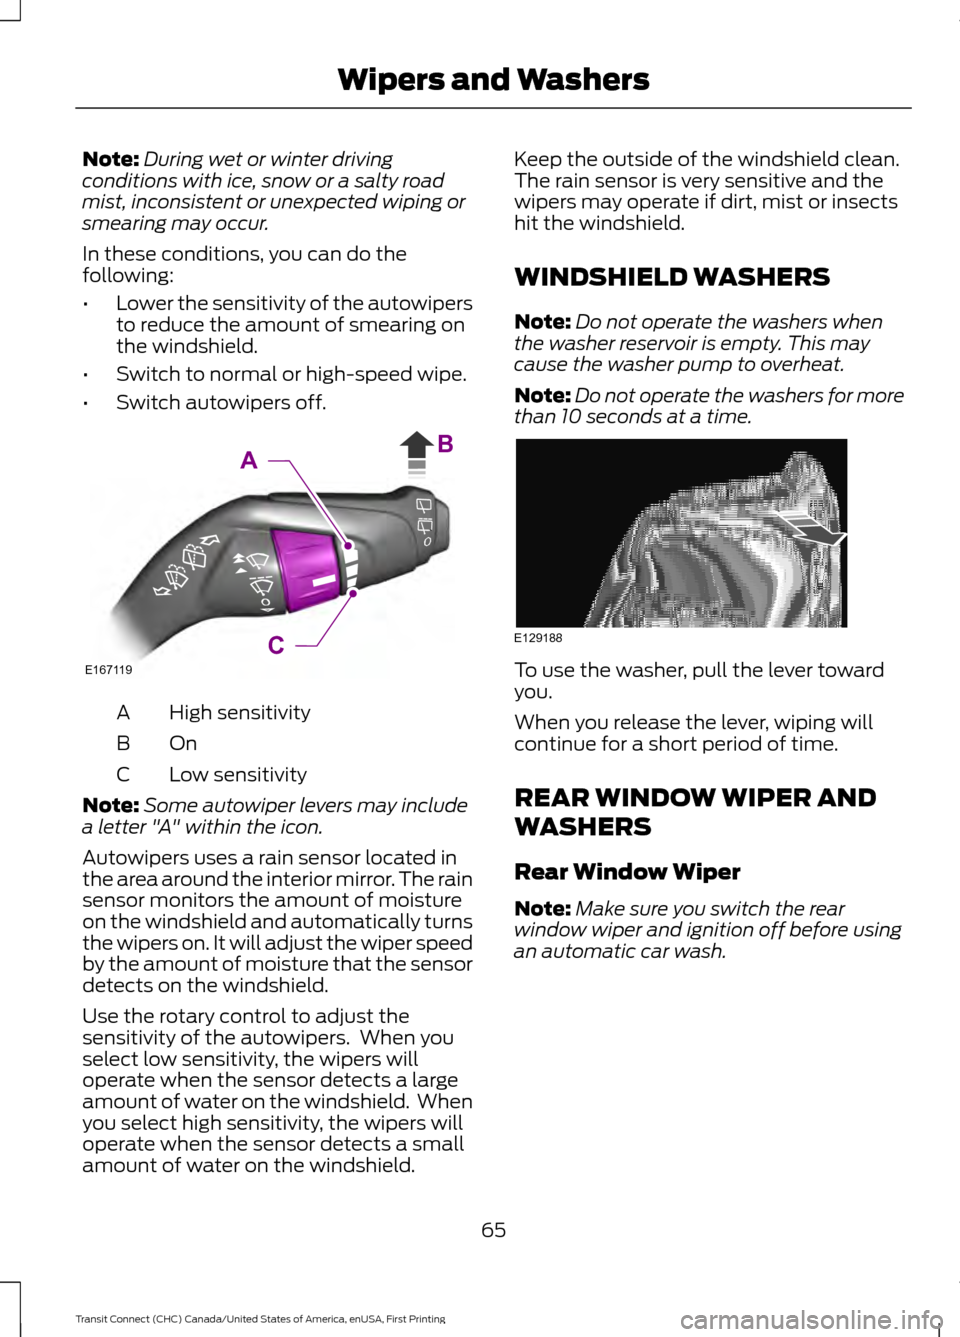
• Switch autowipers off. High sensitivity
A
OnB
Low sensitivity
C
Note: Some autowiper levers may include
a letter "A" within the icon.
Autowipers uses a rain sensor located in
the area around the interior mirror. The rain
sensor monitors the amount of moisture
on the windshield and automatically turns
the wipers on. It will adjust the wiper speed
by the amount of moisture that the sensor
detects on the windshield.
Use the rotary control to adjust the
sensitivity of the autowipers. When you
select low sensitivity, the wipers will
operate when the sensor detects a large
amount of water on the windshield. When
you select high sensitivity, the wipers will
operate when the sensor detects a small
amount of water on the windshield. Keep the outside of the windshield clean.
The rain sensor is very sensitive and the
wipers may operate if dirt, mist or insects
hit the windshield.
WINDSHIELD WASHERS
Note:
Do not operate the washers when
the washer reservoir is empty. This may
cause the washer pump to overheat.
Note: Do not operate the washers for more
than 10 seconds at a time. To use the washer, pull the lever toward
you.
When you release the lever, wiping will
continue for a short period of time.
REAR WINDOW WIPER AND
WASHERS
Rear Window Wiper
Note:
Make sure you switch the rear
window wiper and ignition off before using
an automatic car wash.
65
Transit Connect (CHC) Canada/United States of America, enUSA, First Printing Wipers and WashersE167119C
AB E129188
Page 69 of 428
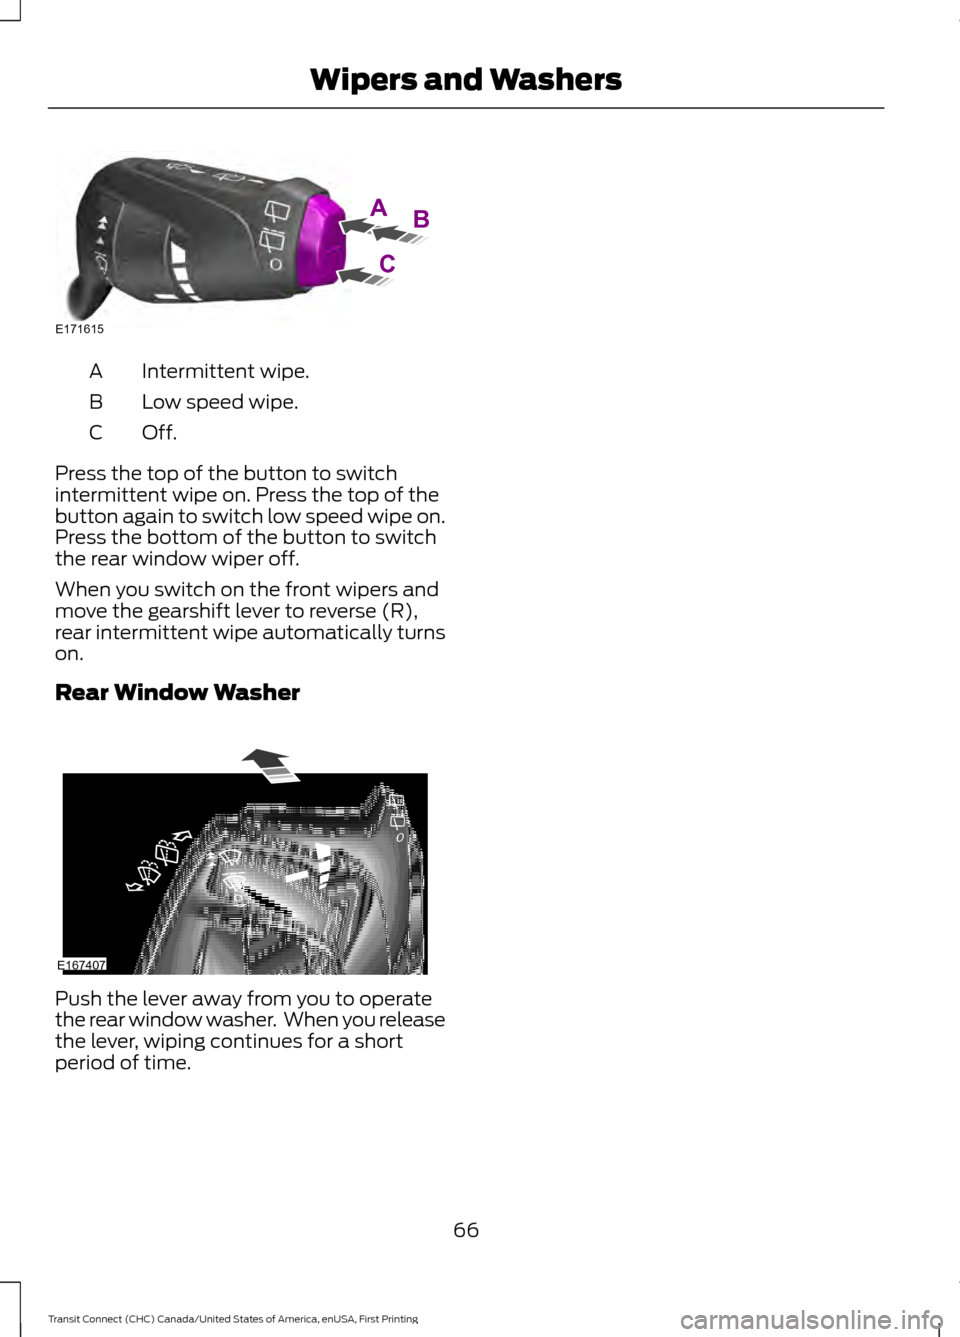
Intermittent wipe.
A
Low speed wipe.
B
Off.C
Press the top of the button to switch
intermittent wipe on. Press the top of the
button again to switch low speed wipe on.
Press the bottom of the button to switch
the rear window wiper off.
When you switch on the front wipers and
move the gearshift lever to reverse (R),
rear intermittent wipe automatically turns
on.
Rear Window Washer Push the lever away from you to operate
the rear window washer. When you release
the lever, wiping continues for a short
period of time.
66
Transit Connect (CHC) Canada/United States of America, enUSA, First Printing Wipers and WashersAB
C
E171615 E167407
Page 70 of 428
GENERAL INFORMATION
Condensation in Lamp Assemblies
Exterior lamps have vents to
accommodate normal changes in air
pressure.
Condensation can be a natural by-product
of this design. When moist air enters the
lamp assembly through the vents, there is
a possibility that condensation can occur
when the temperature is cold. When
normal condensation occurs, a fine mist
can form on the interior of the lens. The
fine mist eventually clears and exits
through the vents during normal operation.
Clearing time may take as long as 48 hours
under dry weather conditions.
Examples of acceptable condensation are:
•
The presence of a fine mist (no streaks,
drip marks or large droplets).
• A fine mist covers less than 50% of the
lens.
Examples of unacceptable condensation
are:
• A water puddle inside the lamp.
• Streaks, drip marks or large droplets
present on the interior of the lens.
If you see any unacceptable condensation,
have your vehicle checked by an authorized
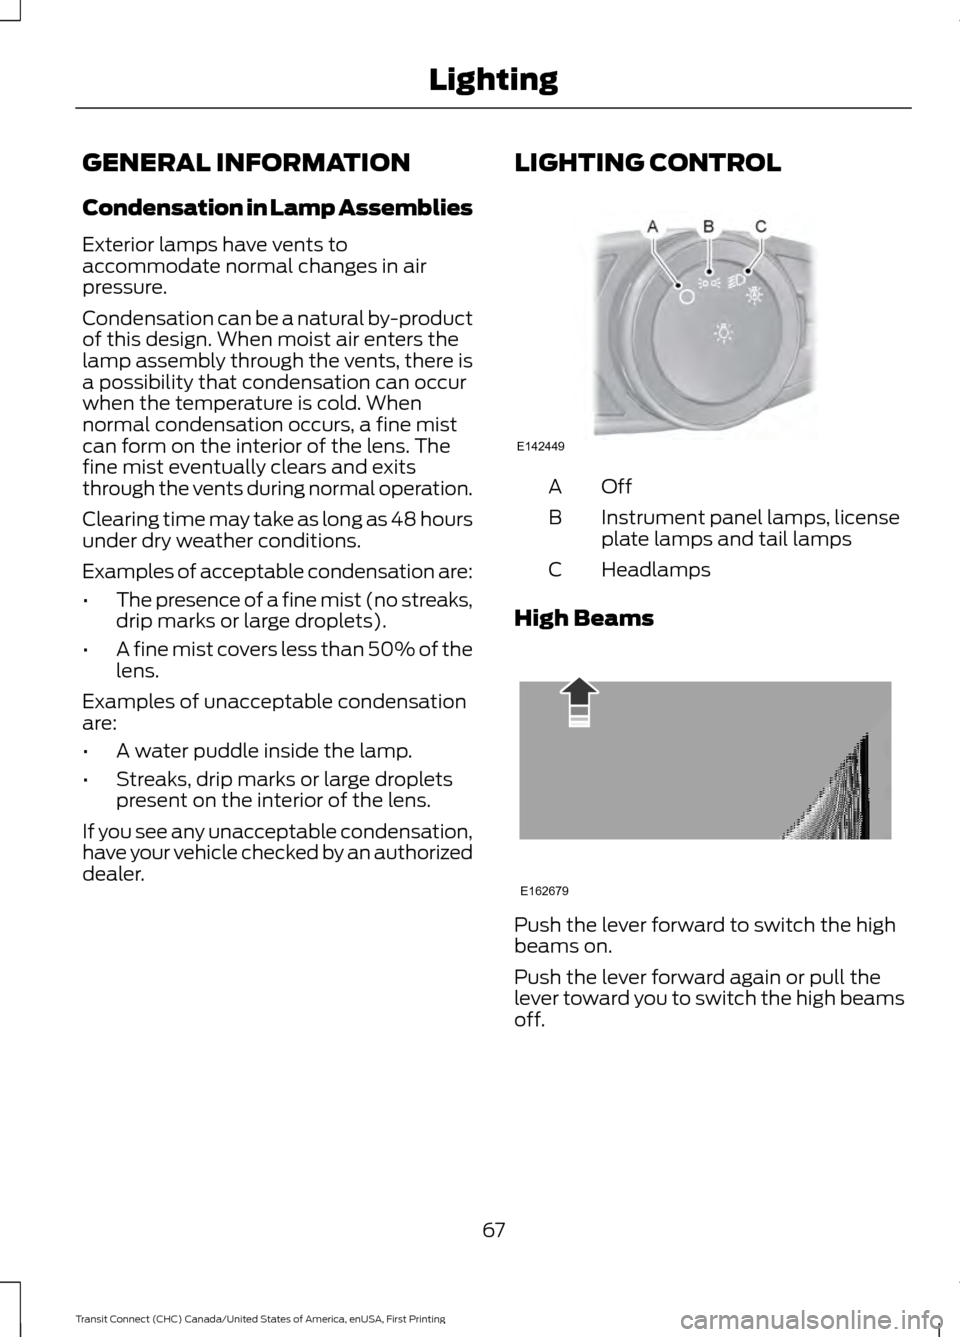
dealer. LIGHTING CONTROL OffA
Instrument panel lamps, license
plate lamps and tail lamps
B
Headlamps
C
High Beams Push the lever forward to switch the high
beams on.
Push the lever forward again or pull the
lever toward you to switch the high beams
off.
67
Transit Connect (CHC) Canada/United States of America, enUSA, First Printing LightingE142449 E162679