buttons FORD TRANSIT CONNECT 2018 Owners Manual
[x] Cancel search | Manufacturer: FORD, Model Year: 2018, Model line: TRANSIT CONNECT, Model: FORD TRANSIT CONNECT 2018Pages: 449, PDF Size: 6.73 MB
Page 52 of 449
•
Various vehicle speed minders can be
set. Once you select a speed, it will be
shown in the display, followed by an
audible tone when the preselected
vehicle speed is exceeded.
• Audio system maximum volume of
45%. A message will be shown in the
display when you attempt to exceed
the limited volume. Also, the
speed-sensitive or compensated
automatic volume control will be
disabled.
• Always on setting. When this is
selected, you will not be able to turn off AdvanceTrac or traction control,
E911 or Emergency Assist, or the Do Not
Disturb feature (if your vehicle is
equipped with these features).
CREATING A MYKEY
You can program a MyKey using the
information display control on the steering
wheel. See Information Displays (page
84).
Insert the key you want to program into the
ignition and switch the ignition on.
Press the left arrow button to access the main menu and scroll to: Action and Description
Message
Press the
OK button.
Settings
Press the
OK button.
MyKey
When prompted, hold the OK button until you see a message
informing you to label this key as a MyKey. The key will be
restricted at your vehicle's next start.
Create MyKey
Make sure you label the key so you can distinguish it from the
admin keys.
You can also program configurable settings for the key(s).
Refer to the following Programming/Changing Configur-
able Settings
.
Programming/Changing
Configurable Settings
Switch the ignition on using an admin key
or fob.
Use the information display to access the configurable MyKey settings, scroll to: Action and Description
Message
Press the
OK button.
Settings
Use the up and down arrow buttons to scroll to a configurable
feature.
MyKey
Press the
OK or right arrow button to make a selection.
49
2018 Transit Connect (CHC) Canada/United States of America, CG3709en enUSA, Edition date: 201704, First Printing MyKey
™
Page 56 of 449
LOCKING AND UNLOCKING
Remote Control
You can use the remote control at any
time.
Unlocking the Doors
The position lamps illuminate when you
unlock the doors. When you switch the
ignition on, they automatically turn off.
Note:
You can unlock the driver door with
the key. Use the key when the remote
control is not functioning.
Note: When you leave your vehicle
unattended for several weeks, the remote
control turns off. Your vehicle must be
unlocked and the engine started using the
key. Unlocking and starting your vehicle
once enables the remote control.
One-Stage Unlocking Press the button to unlock all
doors. The direction indicators
will flash.
Two-Stage Unlocking Press the button to unlock the
front doors. Press the button
again within three seconds to
unlock all doors. The direction indicators
will flash.
Reprogramming the Unlocking
Function
When you press the unlock button only the
driver and passenger doors unlock.
Pressing the unlock button again unlocks
all doors.
You can reprogram the unlocking function
so that all doors unlock when you press
the unlock button once.
1. Switch the ignition off. 2. Press and hold both the lock and
unlock buttons on the remote control
until the direction indicators flash twice
to confirm the change.
To return to the original unlocking function,
repeat the process.
Locking the Doors Press the button to lock all
doors. The direction indicators
will flash.
Press the button again within three
seconds to confirm that all the doors are
closed. The doors will lock again, the horn
will sound and the direction indicators will
flash if all the doors and the liftgate are
closed.
Note: If any door or the liftgate is open, or
if the hood is open on vehicles with an
anti-theft alarm or remote start, the horn
does not sound.
Locking and Unlocking the Doors
From Inside
The power door lock control is on the driver
and front passenger door panels. Press the button to lock or
unlock all the doors. The lamp
illuminates with the doors
locked.
Opening the Double Rear Doors
Note: If there is a ladder fitted to the rear
cargo door, do not open the door fully if the
side-loading door is open.
53
2018 Transit Connect (CHC) Canada/United States of America, CG3709en enUSA, Edition date: 201704, First Printing Doors and Locks E102566
Page 87 of 449
GENERAL INFORMATION
WARNING
Driving while distracted can result in
loss of vehicle control, crash and
injury. We strongly recommend that
you use extreme caution when using any
device that may take your focus off the
road. Your primary responsibility is the safe
operation of your vehicle. We recommend
against the use of any hand-held device
while driving and encourage the use of
voice-operated systems when possible.
Make sure you are aware of all applicable
local laws that may affect the use of
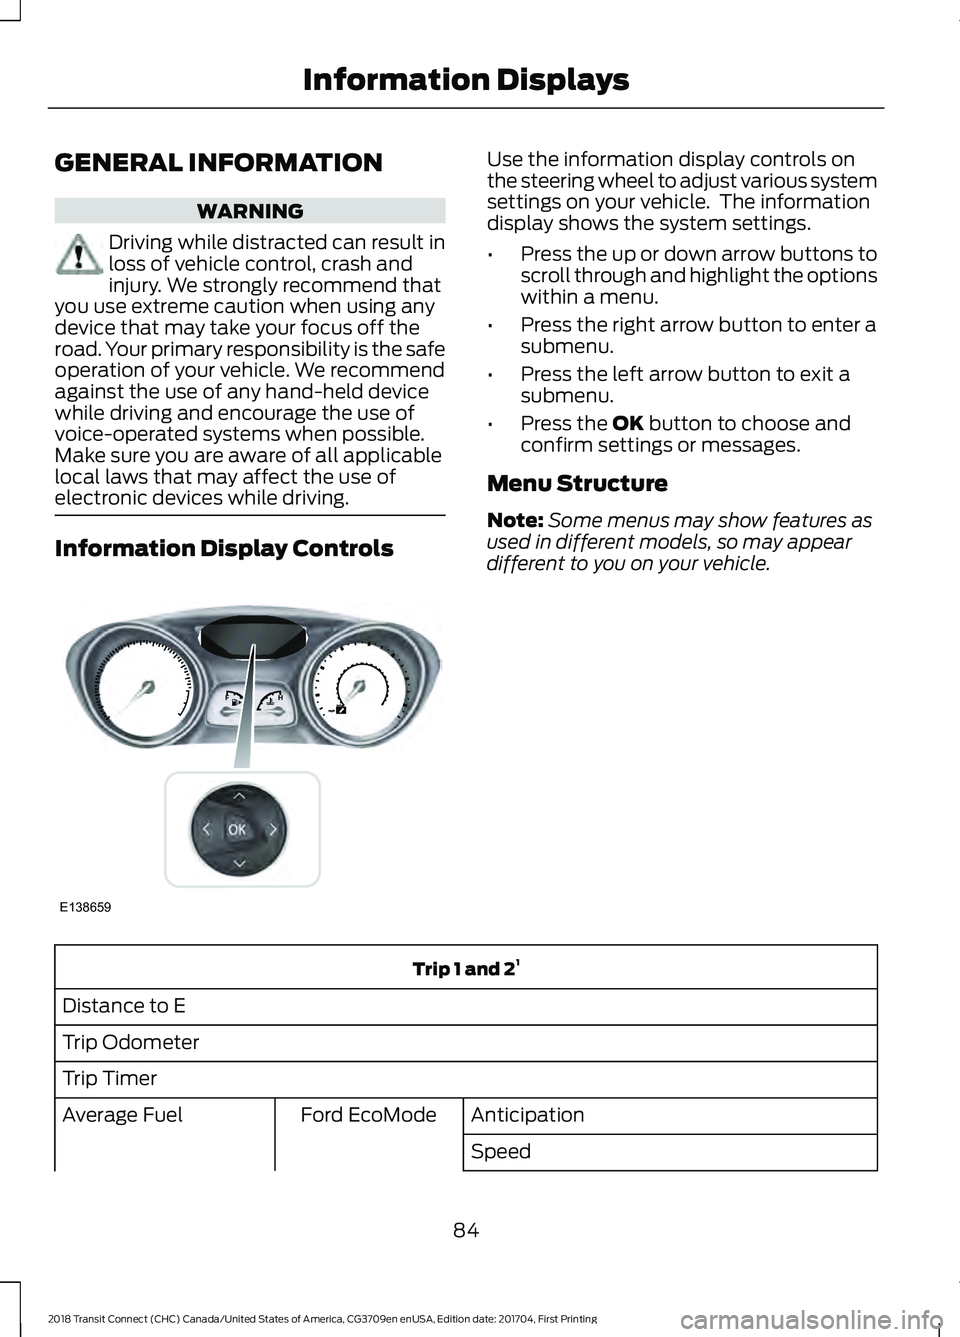
electronic devices while driving. Information Display Controls Use the information display controls on
the steering wheel to adjust various system
settings on your vehicle. The information
display shows the system settings.
•
Press the up or down arrow buttons to
scroll through and highlight the options
within a menu.
• Press the right arrow button to enter a
submenu.
• Press the left arrow button to exit a
submenu.
• Press the OK button to choose and
confirm settings or messages.
Menu Structure
Note: Some menus may show features as
used in different models, so may appear
different to you on your vehicle. Trip 1 and 2
1
Distance to E
Trip Odometer
Trip Timer Anticipation
Ford EcoMode
Average Fuel
Speed
84
2018 Transit Connect (CHC) Canada/United States of America, CG3709en enUSA, Edition date: 201704, First Printing Information DisplaysE138659
Page 89 of 449
Settings
Warning Display
Compass
Convenience
Calibrate
Set Zone
Create MyKey
Create MyKey
MyKey
Always On
Traction Ctrl
User selectable
Always On
911 Assist
User selectable
Choose your applicable setting.
Max Speed
Choose your applicable setting.
Speed Warning
Volume Limiter
Always On
Do Not Disturb
User selectable
Clear MyKey
Clear MyKeys
CLOCK
Type 1
To adjust the clock, switch the ignition on
and press buttons H or M on the
information and entertainment display as
necessary.
Type 2
Note: Use the information display to adjust
the clock. See General Information (page
84). TRIP COMPUTER
Resetting the Trip Computer
Press and hold
OK on the current screen
to reset the respective trip, distance, time
and average fuel information.
Trip Odometer
Registers the distance traveled of
individual journeys.
Distance to Empty
Indicates the approximate distance your
vehicle will travel on the fuel remaining in
the tank. Changes in driving pattern may
cause the value to vary.
86
2018 Transit Connect (CHC) Canada/United States of America, CG3709en enUSA, Edition date: 201704, First Printing Information Displays
Page 103 of 449
•
Adjust the temperature control to the
MAX A/C position.
• Adjust the fan speed to the lowest
speed setting.
Side Window Defogging in Cold
Weather
• Adjust the air distribution control to the
instrument panel and windshield air
vents positions.
• Press the
A/C button.
• Adjust the temperature control to the
desired setting.
• Adjust the fan speed to the highest
setting. •
Direct the instrument panel side air
vents toward the side windows.
• Close the instrument panel vents.
Maximum Cooling Performance in
Instrument Panel or Instrument
Panel and Footwell Positions
• Adjust the temperature control to the
lowest setting.
• Press the A/C and recirculated air
buttons.
• Adjust the fan speed to the highest
setting initially and then adjust it to suit
the desired comfort level.
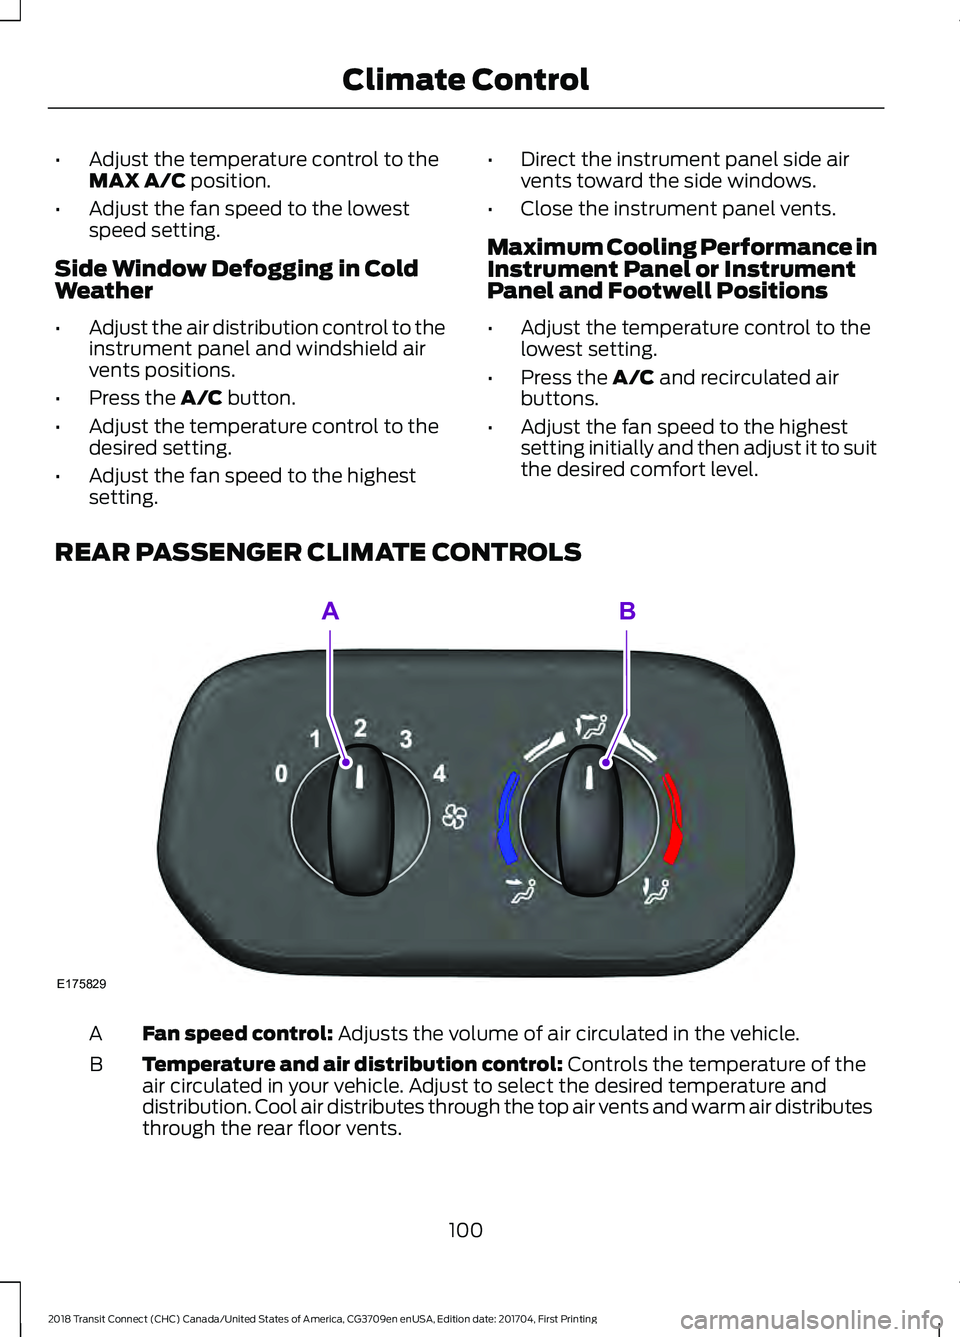
REAR PASSENGER CLIMATE CONTROLS Fan speed control:
Adjusts the volume of air circulated in the vehicle.
A
Temperature and air distribution control:
Controls the temperature of the
air circulated in your vehicle. Adjust to select the desired temperature and
distribution. Cool air distributes through the top air vents and warm air distributes
through the rear floor vents.
B
100
2018 Transit Connect (CHC) Canada/United States of America, CG3709en enUSA, Edition date: 201704, First Printing Climate ControlE175829
AB
Page 107 of 449
Note:
Adjust the seat backrest to an upright
driving position before adjusting the head
restraint. Adjust the head restraint so that
the top of it is level with the top of your head
and as far forward as possible. Make sure
that you remain comfortable. If you are
extremely tall, adjust the head restraint to
its highest position.
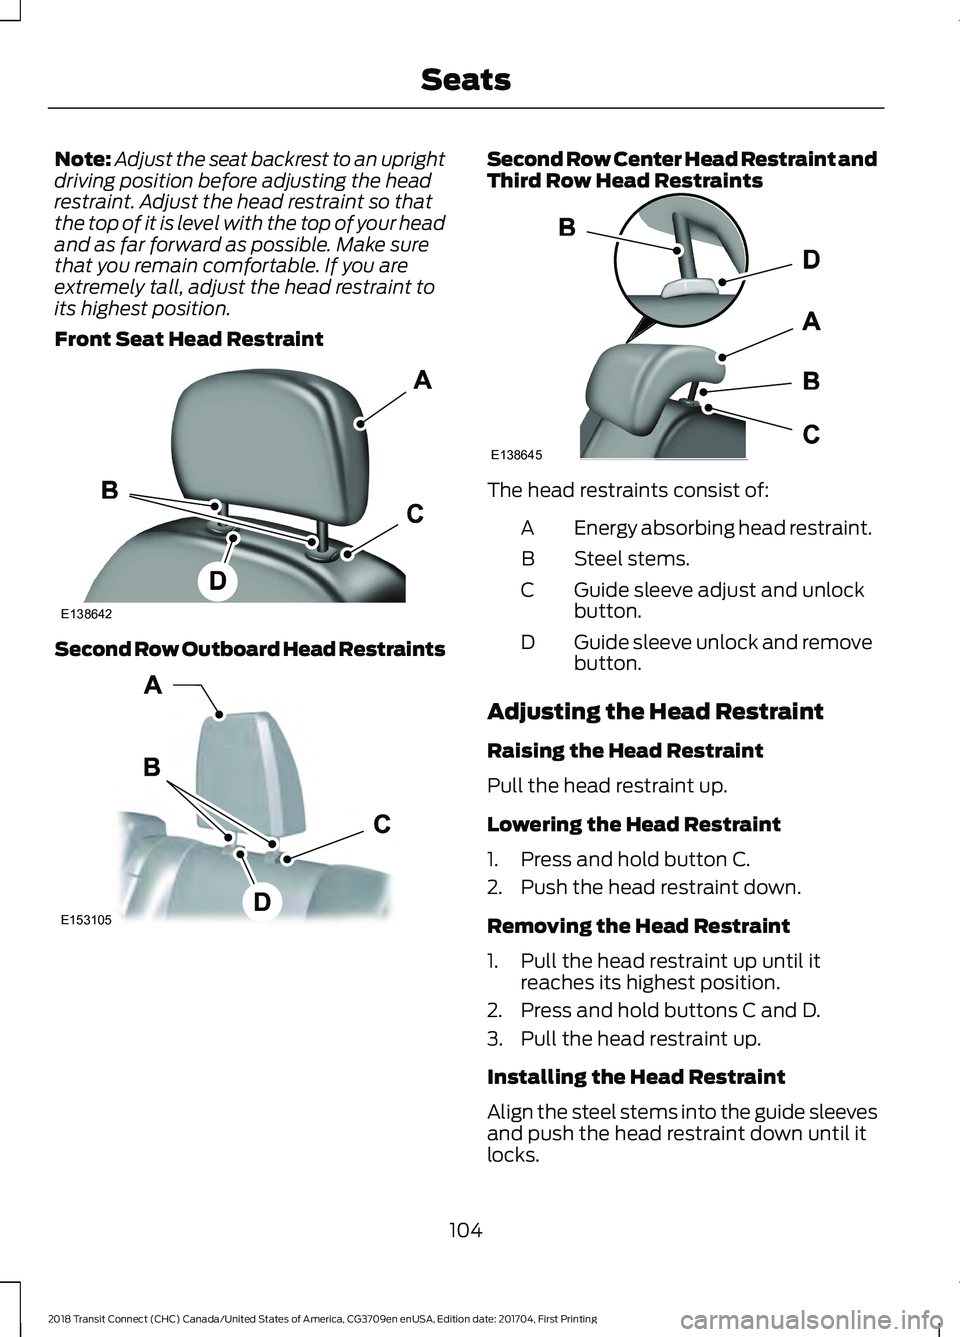
Front Seat Head Restraint Second Row Outboard Head Restraints Second Row Center Head Restraint and
Third Row Head Restraints
The head restraints consist of:
Energy absorbing head restraint.
A
Steel stems.
B
Guide sleeve adjust and unlock
button.
C
Guide sleeve unlock and remove
button.
D
Adjusting the Head Restraint
Raising the Head Restraint
Pull the head restraint up.
Lowering the Head Restraint
1. Press and hold button C.
2. Push the head restraint down.
Removing the Head Restraint
1. Pull the head restraint up until it reaches its highest position.
2. Press and hold buttons C and D.
3. Pull the head restraint up.
Installing the Head Restraint
Align the steel stems into the guide sleeves
and push the head restraint down until it
locks.
104
2018 Transit Connect (CHC) Canada/United States of America, CG3709en enUSA, Edition date: 201704, First Printing SeatsE138642 E153105 E138645
Page 135 of 449
To use SelectShift, move the gearshift
lever into S (Sport). Use the +/- buttons
on the side of your gearshift lever to
manually change gears.
•
Press the (+) button to upshift.
• Press the (-) button to downshift.
Note: After you have assumed manual
control with SelectShift your vehicle will
remain in this mode until you return the
gearshift lever from S (Sport), back to D
(Drive).
Upshift to the recommended shift speeds
according to the following chart: Upshifts when accelerating (recom-
mended for best fuel economy)
Shift from:15 mph (24 km/h)
1 - 2
25 mph (40 km/h)
2 - 3
40 mph (64 km/h)
3 - 4
45 mph (72 km/h)
4 - 5
50 mph (80 km/h)
5 - 6
The instrument cluster will display the
selected gear that you are currently in and
a shift indicator arrow to assist in
optimizing shifting.
SelectShift will automatically make some
shifts for you in the event that your engine
speed is running at too high, or too low an
RPM.
Note: Engine damage may occur if
excessive engine revving is held without
shifting.
Brake-Shift Interlock WARNINGS
Do not drive your vehicle until you
verify that the brake lamps are
working. WARNINGS
When doing this procedure, you will
be taking the vehicle out of park
which means the vehicle can roll
freely. To avoid unwanted vehicle
movement, always fully set the parking
brake prior to doing this procedure. Use
wheel chocks if appropriate. If the parking brake is fully released,
but the brake warning lamp remains
illuminated, the brakes may not be
working properly. See your authorized
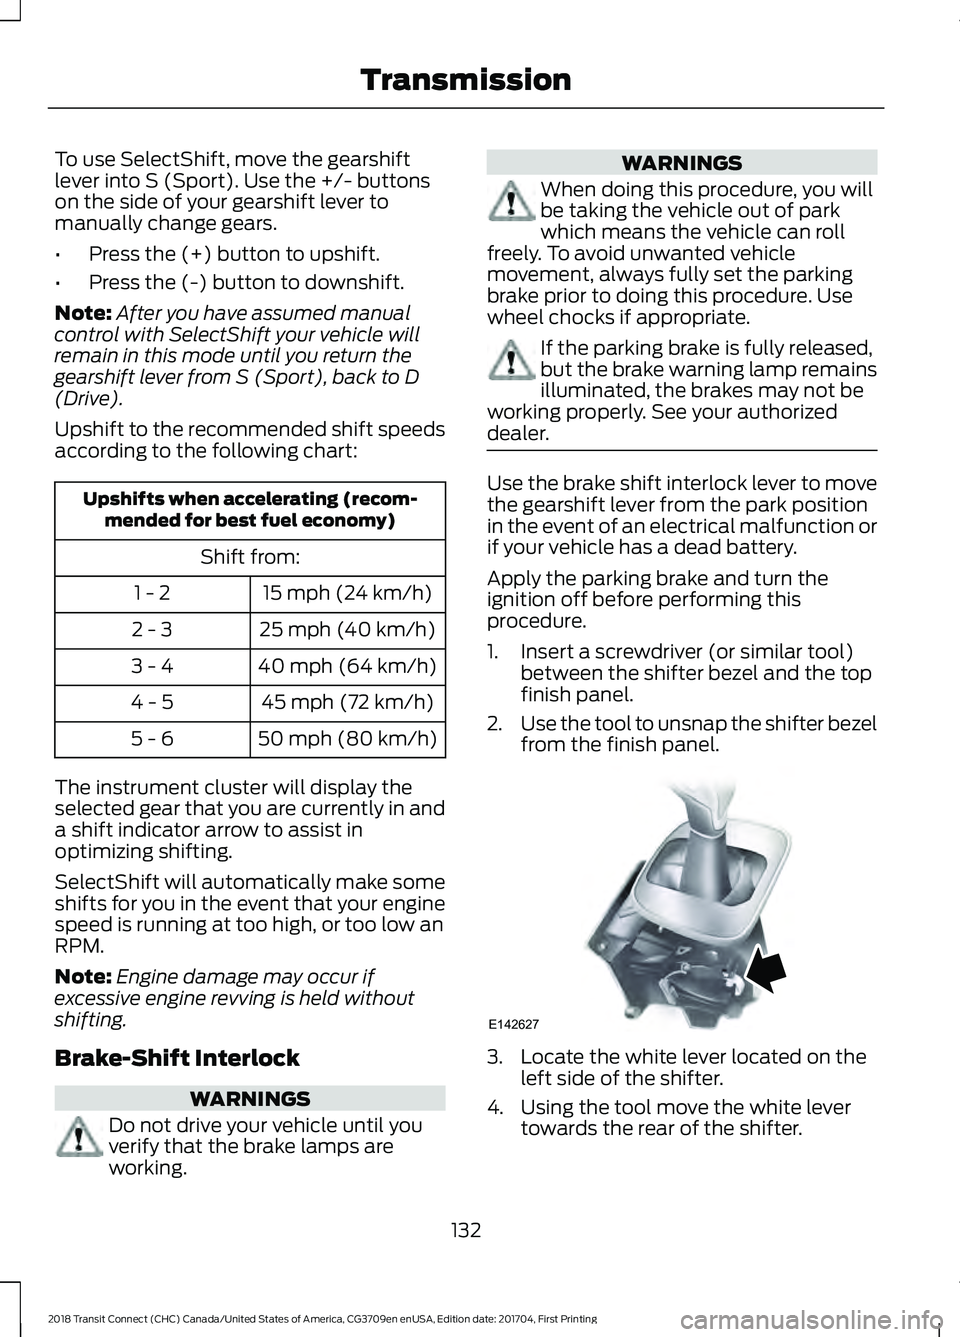
dealer. Use the brake shift interlock lever to move
the gearshift lever from the park position
in the event of an electrical malfunction or
if your vehicle has a dead battery.
Apply the parking brake and turn the
ignition off before performing this
procedure.
1. Insert a screwdriver (or similar tool)
between the shifter bezel and the top
finish panel.
2. Use the tool to unsnap the shifter bezel
from the finish panel. 3. Locate the white lever located on the
left side of the shifter.
4. Using the tool move the white lever towards the rear of the shifter.
132
2018 Transit Connect (CHC) Canada/United States of America, CG3709en enUSA, Edition date: 201704, First Printing TransmissionE142627
Page 212 of 449
Set the windshield wipers in the service
position to change the wiper blades. The
windshield wipers return to the starting
position when you switch the ignition on.
Note:
You cannot move the wiper arms to
the service position manually when you
switch the ignition on.
Note: You can use the service position to
provide easier access to the wiper blades
for freeing them from snow and ice.
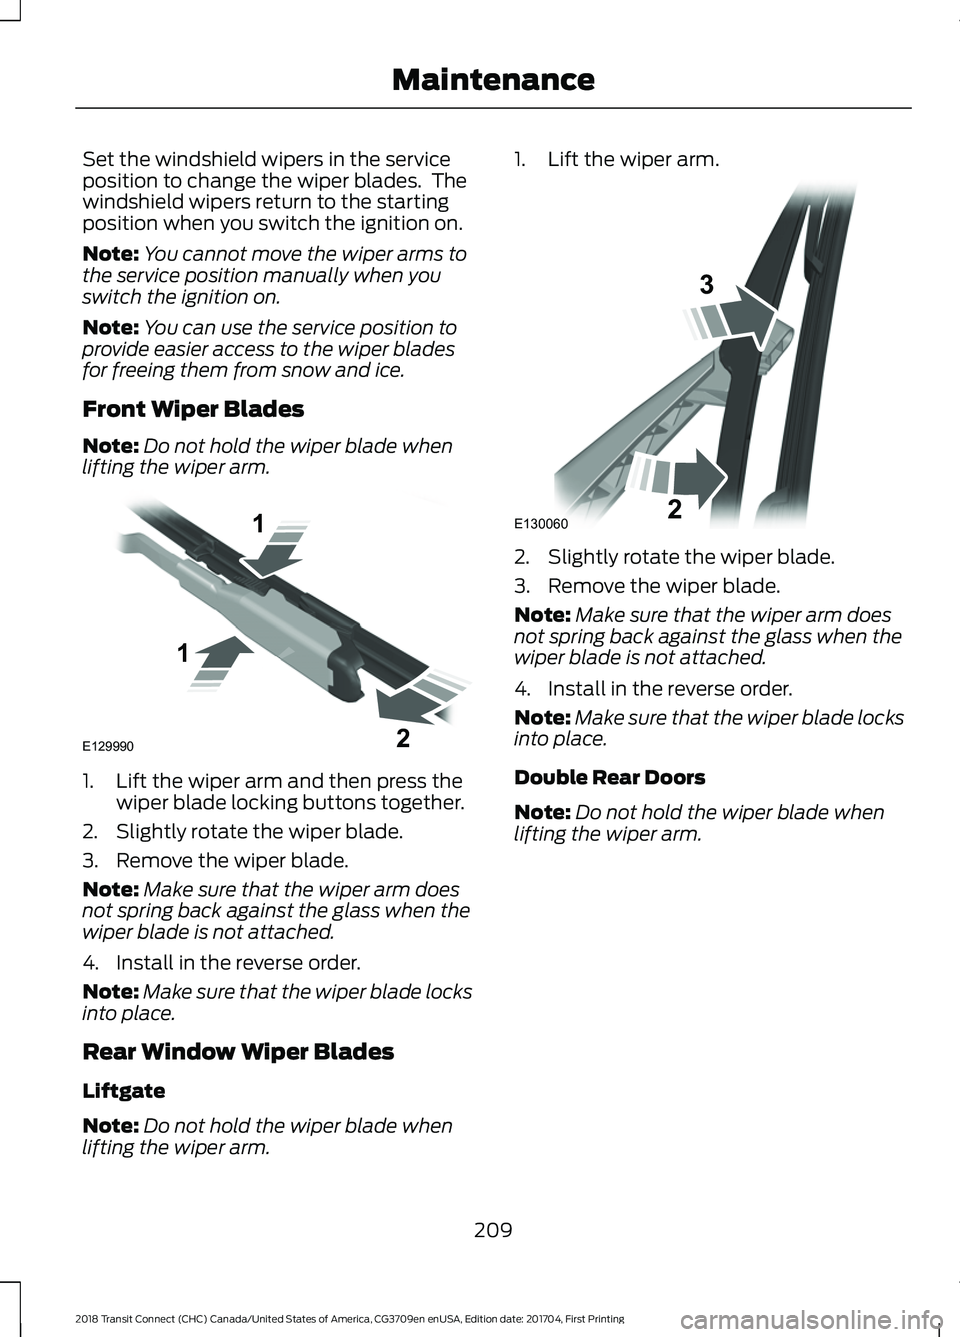
Front Wiper Blades
Note: Do not hold the wiper blade when
lifting the wiper arm. 1. Lift the wiper arm and then press the
wiper blade locking buttons together.
2. Slightly rotate the wiper blade.
3. Remove the wiper blade.
Note: Make sure that the wiper arm does
not spring back against the glass when the
wiper blade is not attached.
4. Install in the reverse order.
Note: Make sure that the wiper blade locks
into place.
Rear Window Wiper Blades
Liftgate
Note: Do not hold the wiper blade when
lifting the wiper arm. 1. Lift the wiper arm.
2. Slightly rotate the wiper blade.
3. Remove the wiper blade.
Note:
Make sure that the wiper arm does
not spring back against the glass when the
wiper blade is not attached.
4. Install in the reverse order.
Note: Make sure that the wiper blade locks
into place.
Double Rear Doors
Note: Do not hold the wiper blade when
lifting the wiper arm.
209
2018 Transit Connect (CHC) Canada/United States of America, CG3709en enUSA, Edition date: 201704, First Printing MaintenanceE129990
1
1 2 E130060
3
2
Page 267 of 449
FM: Press the button to select the FM frequency band.
J
AM:
Press the button to select the AM frequency band.
K
Cursor up
or down: Press the cursor up or down arrow buttons to adjust the
settings within the menus or to move to the next radio station while listening
to the radio on the
FM or AM frequency band.
L
Sound:
Press the button to adjust the sound settings for bass, treble, balance
or fade.
M
Sound Button
This will allow you to adjust the sound
settings for bass, treble, balance or fade.
1. Press the sound button until the required setting is displayed.
2. Use the cursor up or down arrow buttons to select the required level.
Note: Fade settings are only adjustable if
there are speakers in the rear of your vehicle.
Frequency Band Buttons
Press the
FM or AM button to select
frequency band.
You can use the buttons to return to radio
reception when you have been listening to
an
AUX source.
Station Tuning Buttons
Seek Tuning
Select a frequency band and briefly press
one of the seek buttons. The unit will stop
at the first station it finds in the direction
you have chosen.
Manual Tuning
Use the cursor up or down arrow buttons
to tune up or down the frequency band in
small increments, or press and hold to
increment quickly until you find a station
you want to listen to. Station Preset Buttons
This feature allows you to store your
favorite stations. They can be recalled by
selecting the appropriate frequency band
and pressing one of the preset buttons.
1. Select a frequency band.
2. Tune to the station required.
3. Press and hold one of the preset
buttons. The audio unit will also mute
momentarily as confirmation.
You can repeat this on each frequency
band and for each preset button.
Clock Button
This will allow you to adjust the clock
settings.
1. Press the clock button until Set Hour
is displayed.
2. Use the cursor up or down arrow buttons to set the correct hour.
3. Press the clock button again until
Set
Minutes is displayed.
4. Use the cursor up or down arrow buttons to set the correct minutes.
Setting 24 Hour or 12 Hour Display
1. Press the
MENU button until 24 Hour
is displayed.
2. Use the cursor up or down arrow buttons to toggle between 24 hour or
12 hour display.
264
2018 Transit Connect (CHC) Canada/United States of America, CG3709en enUSA, Edition date: 201704, First Printing Audio System
Page 268 of 449
Menu Button
This will allow you to adjust all of the audio
system settings. Press the button
repeatedly until the required setting is
displayed. Use the cursor up or down arrow
buttons to adjust the following settings:
•
Clock hour
• Clock minutes
• 24 hour, 12 hour
• Bass
• Treble
• Balance
• Fade
• RDS
AUX Button
Connect your media device to the audio
unit. See Media Hub (page 276).
Select your media device as the audio
source by pressing the
AUX button. After
connecting your media device, the first
track will start to play automatically. AUDIO UNIT - VEHICLES WITH:
AM/FM/CD/SYNC WARNING
Driving while distracted can result in
loss of vehicle control, crash and
injury. We strongly recommend that
you use extreme caution when using any
device that may take your focus off the
road. Your primary responsibility is the safe
operation of your vehicle. We recommend
against the use of any hand-held device
while driving and encourage the use of
voice-operated systems when possible.
Make sure you are aware of all applicable
local laws that may affect the use of
electronic devices while driving. Note:
You can operate your audio system
for up to one hour after you switch the
ignition off. Press the on and off control to
operate the system with the ignition turned
off. The system automatically turns off after
one hour.
265
2018 Transit Connect (CHC) Canada/United States of America, CG3709en enUSA, Edition date: 201704, First Printing Audio System