stop start FORD TRANSIT CONNECT 2019 Owner's Guide
[x] Cancel search | Manufacturer: FORD, Model Year: 2019, Model line: TRANSIT CONNECT, Model: FORD TRANSIT CONNECT 2019Pages: 493, PDF Size: 7.43 MB
Page 173 of 493
AUTOMATIC TRANSMISSION
- 6-SPEED AUTOMATIC
TRANSMISSION
WARNING: Do not apply the brake
pedal and accelerator pedal
simultaneously. Applying both pedals
simultaneously for more than a few
seconds will limit engine performance,
which may result in difficulty maintaining
speed in traffic and could lead to serious
injury.
Selector Lever Positions
The instrument cluster displays the current
gear.
Park (P)
In park (P), power is not transmitted to the
driven wheels and the transmission is
locked. You can start the engine with the
transmission in this position.
Shift into park (P) only when your vehicle
is stationary.
Reverse (R)
Shift into reverse (R) only when your
vehicle is stationary and the engine is at
idle speed.
Neutral (N)
In neutral (N), power is not transmitted to
the driven wheels but the transmission is
not locked. You can start the engine with
the transmission in this position.
Drive (D)
Drive (D) is the normal position for driving.
Sport (S)
In sport (S), the transmission selects the
optimum gear for best performance. SelectShift™
(If Equipped)
About SelectShift™
Use this feature to upshift or downshift
using the buttons on the selector lever.
Using SelectShift™
Shift into sport (S). Press the
+ button to
switch the feature on.
• Press the
+ button to upshift.
• Press the
– button to downshift.
Shift into another gear to switch the
feature off.
Brake Shift Interlock
About Brake Shift Interlock
Brake shift interlock prevents you from
shifting out of park (P) when you have
switched the ignition on and not pressed
the brake pedal.
Shifting Out of Park (P) WARNING: Do not drive your vehicle
until you verify that the stoplamps are
working. WARNING:
If the parking brake is
fully released, but the brake warning lamp
remains illuminated, the brakes may not
be working properly. Have your vehicle
checked as soon as possible.
Use the brake shift interlock lever to move
the selector lever out of park (P) if you
cannot start the engine.
In the event of an electrical malfunction,
it is possible that a fuse has blown or the
stoplamps are not working. See
Fuse
Specification Chart (page 254).
169
2019 Transit Connect (CHC) Canada/United States of America, CG3739en enUSA, Edition date: 201804, First-Printing Transmission
Page 175 of 493
AUTOMATIC TRANSMISSION
- 8-SPEED AUTOMATIC
TRANSMISSION
WARNING: Do not apply the brake
pedal and accelerator pedal
simultaneously. Applying both pedals
simultaneously for more than a few
seconds will limit engine performance,
which may result in difficulty maintaining
speed in traffic and could lead to serious
injury.
Selector Lever Positions
The instrument cluster displays the current
gear.
Park (P)
In park (P), power is not transmitted to the
driven wheels and the transmission is
locked. You can start the engine with the
transmission in this position.
Shift into park (P) only when your vehicle
is stationary.
Reverse (R)
Shift into reverse (R) only when your
vehicle is stationary and the engine is at
idle speed.
Neutral (N)
In neutral (N), power is not transmitted to
the driven wheels but the transmission is
not locked. You can start the engine with
the transmission in this position.
Drive (D)
Drive (D) is the normal position for driving. Manual (M)
In manual (M), you can upshift or
downshift using the buttons on the
selector lever.
SelectShift™
About SelectShift™
Use this feature to upshift or downshift
using the buttons on the selector lever.
Using SelectShift™
Shift into manual (M) to switch the feature
on.
•
Press the
+ button to upshift.
• Press the
– button to downshift.
Shift into another gear to switch the
feature off.
Brake Shift Interlock
About Brake Shift Interlock
Brake shift interlock prevents you from
shifting out of park (P) when you have
switched the ignition on and not pressed
the brake pedal.
Shifting Out of Park (P) WARNING: Do not drive your vehicle
until you verify that the stoplamps are
working. WARNING:
If the parking brake is
fully released, but the brake warning lamp
remains illuminated, the brakes may not
be working properly. Have your vehicle
checked as soon as possible.
Use the brake shift interlock lever to move
the selector lever out of park (P) if you
cannot start the engine.
171
2019 Transit Connect (CHC) Canada/United States of America, CG3739en enUSA, Edition date: 201804, First-Printing Transmission
Page 176 of 493
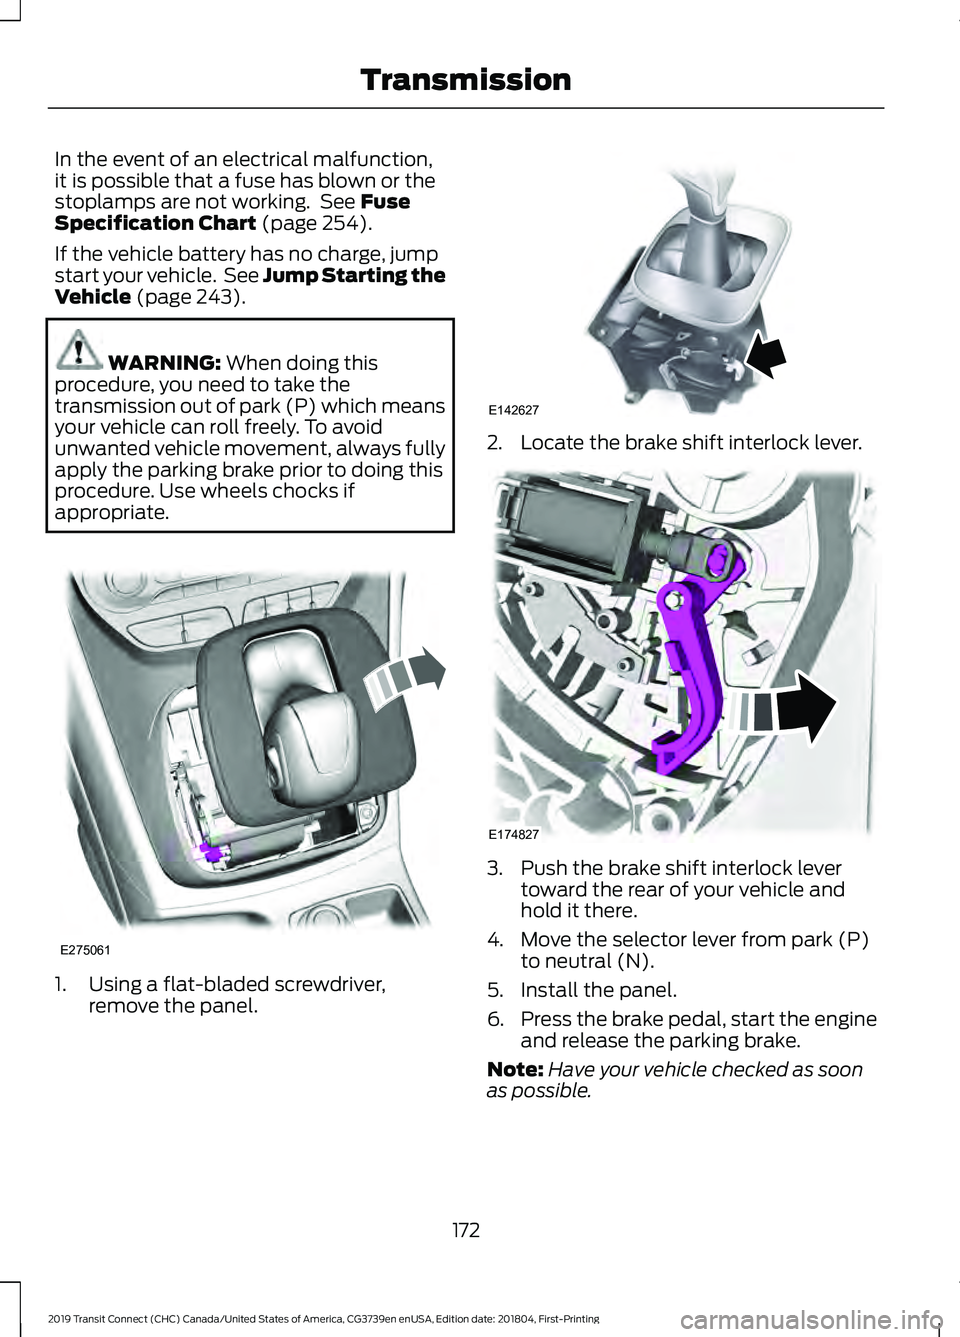
In the event of an electrical malfunction,
it is possible that a fuse has blown or the
stoplamps are not working. See Fuse
Specification Chart (page 254).
If the vehicle battery has no charge, jump
start your vehicle. See Jump Starting the
Vehicle
(page 243). WARNING:
When doing this
procedure, you need to take the
transmission out of park (P) which means
your vehicle can roll freely. To avoid
unwanted vehicle movement, always fully
apply the parking brake prior to doing this
procedure. Use wheels chocks if
appropriate. 1. Using a flat-bladed screwdriver,
remove the panel. 2. Locate the brake shift interlock lever.
3. Push the brake shift interlock lever
toward the rear of your vehicle and
hold it there.
4. Move the selector lever from park (P) to neutral (N).
5. Install the panel.
6. Press the brake pedal, start the engine
and release the parking brake.
Note: Have your vehicle checked as soon
as possible.
172
2019 Transit Connect (CHC) Canada/United States of America, CG3739en enUSA, Edition date: 201804, First-Printing TransmissionE275061 E142627 E174827
Page 235 of 493
RV & Trailer Towing Guide Online
http://www.fleet.ford.com/towing-guides/
Website
TRAILER SWAY CONTROL
If the trailer begins to sway the stability
control warning lamp flashes in the
information display. The system applies
the brakes to the individual wheels and
reduces engine torque to aid vehicle
stability.
Stop your vehicle as soon as it is safe to
do so. Check the vertical weight on the tow
ball and trailer load distribution. See
Capacities and Specifications (page
327). See Load Carrying (page 221).
Note: This feature does not prevent trailer
sway, but reduces it once it begins.
Note: This feature cannot stop all trailers
from swaying.
Note: In some cases, if your vehicle speed
is too high, the system may turn on multiple
times, gradually reducing your vehicle speed.
RECOMMENDED TOWING
WEIGHTS
Your vehicle may tow a trailer. The
maximum loaded trailer weight
must be less than or equal to the
maximum loaded trailer weight
listed for your vehicle
configuration on the following
chart.
Do not exceed the maximum
loaded trailer weight for your
vehicle configuration listed in the
chart below. Note:
Make sure you take the
trailer frontal area into
consideration, do not exceed 20
feet² (1.86 meters²). Towing a
trailer that exceeds this frontal area
reduces the performance and fuel
economy of your vehicle when
towing. Select a trailer that has a
rounded front and an aerodynamic
design.
Note: For high altitude operation,
reduce the gross combined weight
by 2% per 1,000 ft (300 m)
starting at the 1,000 ft (300 m)
elevation point.
Note: Certain states require
electric trailer brakes for trailers
over a specified weight. Be sure to
check state regulations for this
specified weight. The maximum
loaded trailer weights listed may
be limited to this specified weight,
as the vehicle ’s electrical system
may not include the wiring
connector needed to activate
electric trailer brakes.
231
2019 Transit Connect (CHC) Canada/United States of America, CG3739en enUSA, Edition date: 201804, First-Printing Towing
Page 239 of 493
Electric brakes and manual, automatic or
surge-type trailer brakes are safe if you
install them correctly and adjust them to
the manufacturer's specifications. The
trailer brakes must meet local and federal
regulations.
The rating for the tow vehicle's braking
system operation is at the gross vehicle
weight rating, not the gross combined
weight rating.
Separate functioning brake systems are
required for safe control of towed vehicles
and trailers weighing more than 1500
pounds (680 kilograms) when loaded.
Trailer Lamps
WARNING: Never connect any trailer
lamp wiring to the vehicle's tail lamp
wiring; this may damage the electrical
system resulting in fire. Contact an
authorized dealer as soon as possible for
assistance in correct trailer tow wiring
installation. Additional electrical
equipment may be required.
Trailer lamps are required on most towed
vehicles. Make sure all running lights, brake
lights, turn signals and hazard warning
flashers are working.
Before Towing a Trailer
Practice turning, stopping and backing up
to get the feel of your vehicle-trailer
combination before starting on a trip.
When turning, make wider turns so the
trailer wheels clear curbs and other
obstacles.
When Towing a Trailer
• Do not drive faster than 70 mph (113
km/h) during the first 500 miles (800
kilometers).
• Do not make full-throttle starts. •
Check the trailer hitch, electrical
connections and trailer wheel lug nuts
thoroughly after you have traveled 50
miles (80 kilometers).
• When stopped in congested or heavy
traffic during hot weather, place the
transmission selector lever in position
P to aid engine and transmission
cooling and to help A/C performance.
• Turn off the speed control with heavy
loads or in hilly terrain. The speed
control may turn off automatically
when you are towing on long, steep
grades.
• When driving down a long or steep hill,
if your vehicle is fitted with a
SelectShift Automatic® Transmission,
use a low gear, See
Automatic
Transmission (page 169). Do not
apply the brakes continuously, as they
may overheat and become less
effective.
• If the transmission is fitted with Grade
Assist or a Towing feature, use this
feature when towing. This provides
engine braking and helps eliminate
excessive transmission shifting for
optimum fuel economy and
transmission cooling.
• If your vehicle has AdvanceTrac with
RSC and a heavily loaded trailer is on
tow, the system may turn on while
taking corners. This is normal. Taking
corners at slower speeds can reduce
this tendency.
235
2019 Transit Connect (CHC) Canada/United States of America, CG3739en enUSA, Edition date: 201804, First-Printing Towing
Page 246 of 493
Vehicles Sold in Canada: Getting
Roadside Assistance
To fully assist you should you have a
vehicle concern, Ford Motor Company of
Canada, Limited offers a complimentary
roadside assistance program. This
program is eligible within Canada or the
continental United States.
This program is separate from the New
Vehicle Limited Warranty, but the coverage
is concurrent with the powertrain coverage
period of your vehicle.
Canadian customers who require roadside
assistance, call 1-800-665-2006.
Vehicles Sold in Canada: Using
Roadside Assistance
Complete the roadside assistance
identification card and place it in your
wallet for quick reference.
In Canada, this card is found in the
Warranty Guide in the glove compartment
of your vehicle.
Vehicles Sold in Canada: Roadside
Assistance Program Coverage
The service is available 24 hours a day,
seven days a week.
Canadian roadside coverage and benefits
may differ from the U.S. coverage.
If you require more information, please
refer to the coverage section of your
warranty guide, call us in Canada at
1-800-665-2006, or visit our website at
www.ford.ca.
HAZARD FLASHERS
Note:
If used when the vehicle is not
running, the battery will lose charge. There
may be insufficient power to restart your
vehicle. The hazard warning button is
located on the instrument panel.
Use it when your vehicle is
creating a safety hazard for other
motorists.
• Press the button to turn on the hazard
warning function, and the front and
rear direction indicators will flash.
• Press the button again to turn them
off.
FUEL SHUTOFF WARNING: Failure to inspect and if
necessary repair fuel leaks after a crash
may increase the risk of fire and serious
injury. We recommend that the fuel system
be inspected by an authorized dealer after
any crash.
In the event of a moderate to severe crash,
your vehicle is fitted with a fuel pump
shut-off feature that stops the flow of fuel
to the engine. Not every impact will cause
a shut-off.
Should the engine turn off after a crash,
you may restart the engine by carrying out
the following.
Ignition Switch
1. Switch the ignition off.
2. Switch the ignition to position
III.
3. Switch the ignition off.
4. Switch the ignition on again to re-enable the fuel pump.
Note: Various system checks are
automatically carried out before the vehicle
will restart. if your vehicle fails to restart
after the third attempt, the system has
detected a fault that requires service. We
recommend you contact an authorized
dealer.
242
2019 Transit Connect (CHC) Canada/United States of America, CG3739en enUSA, Edition date: 201804, First-Printing Roadside Emergencies
Page 275 of 493
When Fail-Safe Mode Is Activated
WARNING: Fail-safe mode is for use
during emergencies only. Operate your
vehicle in fail-safe mode only as long as
necessary to bring your vehicle to rest in a
safe location and seek immediate repairs.
When in fail-safe mode, your vehicle will
have limited power, will not be able to
maintain high-speed operation, and may
completely shut down without warning,
potentially losing engine power, power
steering assist, and power brake assist,
which may increase the possibility of a
crash resulting in serious injury. WARNING:
Do not remove the
coolant reservoir cap when the cooling
system is hot. Wait 10 minutes for the
cooling system to cool down. Cover the
coolant reservoir cap with a thick cloth to
prevent the possibility of scalding and
slowly remove the cap. Failure to follow
this instruction could result in personal
injury.
Your vehicle has limited engine power
when in the fail-safe mode, drive your
vehicle with caution. Your vehicle does not
maintain high-speed operation and the
engine may operate poorly.
Remember that the engine is capable of
automatically shutting down to prevent
engine damage. In this situation:
1. Pull off the road as soon as safely possible and switch the engine off.
2. If you are a member of a roadside assistance program, we recommend
that you contact your roadside
assistance service provider.
3. If this is not possible, wait a short period for the engine to cool. 4. Check the coolant level. If the coolant
level is at or below the minimum mark,
add prediluted coolant immediately.
5. When the engine temperature cools, you can re-start the engine. Have your
vehicle checked as soon as possible to
minimize engine damage.
Note: Driving your vehicle without repair
increases the chance of engine damage.
Engine Coolant Temperature
Management
(If Equipped) WARNING:
To reduce the risk of
crash and injury, be prepared that the
vehicle speed may reduce and the vehicle
may not be able to accelerate with full
power until the coolant temperature
reduces.
If you tow a trailer with your vehicle, the
engine may temporarily reach a higher
temperature during severe operating
conditions, for example ascending a long
or steep grade in high ambient
temperatures.
At this time, you may notice the coolant
temperature gauge moves toward the red
zone and a message may appear in the
information display.
You may notice a reduction in vehicle
speed caused by reduced engine power in
order to manage the engine coolant
temperature. Your vehicle may enter this
mode if certain high-temperature and
high-load conditions take place. The
amount of speed reduction depends on
vehicle loading, grade and ambient
temperature. If this occurs, there is no
need to stop your vehicle. You can
continue to drive.
271
2019 Transit Connect (CHC) Canada/United States of America, CG3739en enUSA, Edition date: 201804, First-Printing Maintenance
Page 276 of 493
The air conditioning may automatically
turn on and off during severe operating
conditions to protect the engine from
overheating. When the coolant
temperature decreases to the normal
operating temperature, the air conditioning
turns on.
If the coolant temperature gauge moves
fully into the red zone, or if the coolant
temperature warning or service engine
soon messages appear in your information
display, do the following:
1. Stop your vehicle as soon as it is safe
to do so. Fully apply the parking brake,
shift into park (P) or neutral (N).
2. Leave the engine running until the coolant temperature gauge needle
returns to the normal position. After
several minutes, if the temperature
does not drop, follow the remaining
steps.
3. Switch the engine off and wait for it to
cool. Check the coolant level.
4. If the coolant level is at or below the minimum mark, add prediluted coolant
immediately.
5. If the coolant level is normal, restart the engine and continue.
AUTOMATIC TRANSMISSION
FLUID CHECK
The automatic transmission does not have
a transmission fluid dipstick.
Have an authorized dealer check and
change the transmission fluid at the
correct service interval. See Scheduled
Maintenance (page 416). Your
transmission does not consume fluid.
However, if the transmission slips, shifts
slowly or if you notice a sign of leaking
fluid, contact an authorized dealer. Do not use supplemental transmission
fluid additives, treatments or cleaning
agents. The use of these materials may
affect transmission operation and result
in damage to internal transmission
components.
BRAKE FLUID CHECK
WARNING:
Do not use any fluid
other than the recommended brake fluid
as this will reduce brake efficiency. Use of
incorrect fluid could result in the loss of
vehicle control, serious personal injury or
death. WARNING: Only use brake fluid from
a sealed container. Contamination with
dirt, water, petroleum products or other
materials may result in brake system
damage or failure. Failure to adhere to this
warning could result in the loss of vehicle
control, serious personal injury or death. WARNING: Do not allow the fluid to
touch your skin or eyes. If this happens,
rinse the affected areas immediately with
plenty of water and contact your physician. WARNING: A fluid level between the
MAX
and MIN lines is within the normal
operating range and there is no need to
add fluid. A fluid level not in the normal
operating range could compromise the
performance of the system. Have your
vehicle checked immediately.
272
2019 Transit Connect (CHC) Canada/United States of America, CG3739en enUSA, Edition date: 201804, First-Printing Maintenance
Page 278 of 493
Note:
See an authorized dealer for low
voltage battery access, testing, or
replacement.
When a low voltage battery replacement
is necessary, see an authorized dealer to
replace the low voltage battery with a Ford
recommended replacement low voltage
battery that matches the electrical
requirements of the vehicle.
To ensure proper operation of the battery
management system (BMS), do not allow
a technician to connect any electrical
device ground connection directly to the
low voltage battery negative post. A
connection at the low voltage battery
negative post can cause inaccurate
measurements of the battery condition
and potential incorrect system operation.
Note: If a person adds electrical or
electronic accessories or components to the
vehicle, the accessories or components may
adversely affect the low voltage battery
performance and durability and may also
affect the performance of other electrical
systems in the vehicle.
For longer, trouble-free operation, keep the
top of the battery clean and dry. Also,
make certain the battery cables are always
tightly fastened to the battery terminals.
If you see any corrosion on the battery or
terminals, remove the cables from the
terminals and clean with a wire brush. You
can neutralize the acid with a solution of
baking soda and water.
When a battery replacement is required,
the battery should only be replaced with
a Ford recommended replacement battery
that matches the electrical requirements
of the vehicle.
Because your vehicle ’s engine is
electronically-controlled by a computer,
some engine control settings are
maintained by power from the low voltage
battery. Some engine computer settings,
like the idle trim and fuel trim strategy, optimize the driveability and performance
of the engine. Some other computer
settings, like the clock and radio station
presets, are also maintained in memory by
power from the low voltage battery. When
a technician disconnects and connects the
low voltage battery, these settings are
erased. Complete the following procedure
in order to restore the settings:
1. With the vehicle at a complete stop,
set the parking brake.
2. Shift the transmission into park (P).
3. Switch off all accessories.
4. Fully press the brake pedal and start the vehicle.
5. Run the engine until it reaches normal operating temperature. While the
engine is warming up, complete the
following: Reset the clock. See Audio
System (page 352). Reset the power
windows bounce-back feature. See
Windows and Mirrors
(page 83).
Reset the radio station presets. See
Audio System
(page 352).
6. Allow the engine to idle for at least one
minute. If the engine turns off, press
the accelerator pedal to start the
engine.
7. While the engine is running, press the brake pedal and shift into neutral (N).
8. Allow the engine to run for at least one
minute by pressing on the accelerator
pedal.
9. Drive the vehicle at least 12 mi (20 km)
to completely relearn the idle and fuel
trim strategy.
Note: If you do not allow the engine to
relearn the idle and fuel trim strategy, the
idle quality of your vehicle may be adversely
affected until the engine computer
eventually relearns the idle trim and fuel
trim strategy.
274
2019 Transit Connect (CHC) Canada/United States of America, CG3739en enUSA, Edition date: 201804, First-Printing Maintenance
Page 317 of 493
When inflating the tire for
mounting pressures up to 20 psi
(1.38 bar) greater than the
maximum pressure on the tire
sidewall, the following
precautions must be taken to
protect the person mounting the
tire:
1. Make sure that you have the
correct tire and wheel size.
2. Lubricate the tire bead and
wheel bead seat area again.
3. Stand at a minimum of 12 ft
(3.66 m) away from the wheel
and tire assembly.
4. Use both eye and ear
protection.
For a mounting pressure more
than 20 psi (1.38 bar) greater than
the maximum pressure, a Ford
dealer or other tire service
professional should do the
mounting.
Always inflate steel carcass tires
with a remote air fill with the
person inflating standing at a
minimum of 12 ft (3.66 m) away
from the wheel and tire assembly.
Important: Remember to replace
the wheel valve stems when the
road tires are replaced on your
vehicle.
It is recommended that the two
front tires or two rear tires
generally be replaced as a pair.
The tire pressure sensors mounted
in the wheels (originally installed
on your vehicle) are not designed
to be used in aftermarket wheels.
The use of wheels or tires not
recommended by Ford Motor
Company may affect the
operation of your tire pressure
monitoring system.
If the tire pressure monitoring
system indicator is flashing, your
tire pressure monitoring system is
malfunctioning. Your replacement
tire might be incompatible with
your TPMS, or some component
of the TPMS may be damaged.
Safety Practices
WARNING: If your vehicle is
stuck in snow, mud, sand, etc., do
not rapidly spin the tires. Spinning
the tires can tear the tire and
cause an explosion. A tire can
explode in as little as three to five
seconds. WARNING:
Do not spin the
wheels at over 35 mph (56 km/h).
The tires may fail and injure a
passenger or bystander.
Driving habits have a great deal
to do with your tire mileage and
safety.
*Observe posted speed limits.
*Avoid fast starts, stops and turns.
*Avoid potholes and objects on
the road.
*Do not run over curbs or hit the
tire against a curb when parking.
313
2019 Transit Connect (CHC) Canada/United States of America, CG3739en enUSA, Edition date: 201804, First-Printing Wheels and Tires