lock FORD TRANSIT CONNECT 2020 Owners Manual
[x] Cancel search | Manufacturer: FORD, Model Year: 2020, Model line: TRANSIT CONNECT, Model: FORD TRANSIT CONNECT 2020Pages: 509, PDF Size: 7.73 MB
Page 295 of 509

2.
Hold the bulb holder and turn the lamp
counterclockwise and remove it.
3. Remove the bulb by pulling it straight out.
Front Fog Lamps 1. Disconnect the electrical connector.
2.
Turn the bulb holder counterclockwise
and remove it.
Note: Do not touch the glass of the bulb.
Note: You cannot separate the bulb from
the bulb holder. Rear Lamps
1. Remove the screws.
2.
Turn the bulb holders counterclockwise
to remove them.
3. Remove the bulbs by pulling them straight out.
291
2020 Transit Connect (CHC) Canada/United States of America, CG3739en enUSA, Edition date: 201903, First-Printing MaintenanceE165496
2
3 E71062
1
2 1
E165484 23
E165485
Page 296 of 509
Central High Mounted Brake Lamp
These are not serviceable items, see an
authorized dealer if they fail.
License Plate Lamp
These are not serviceable items, see an
authorized dealer if they fail.
Interior Lamps
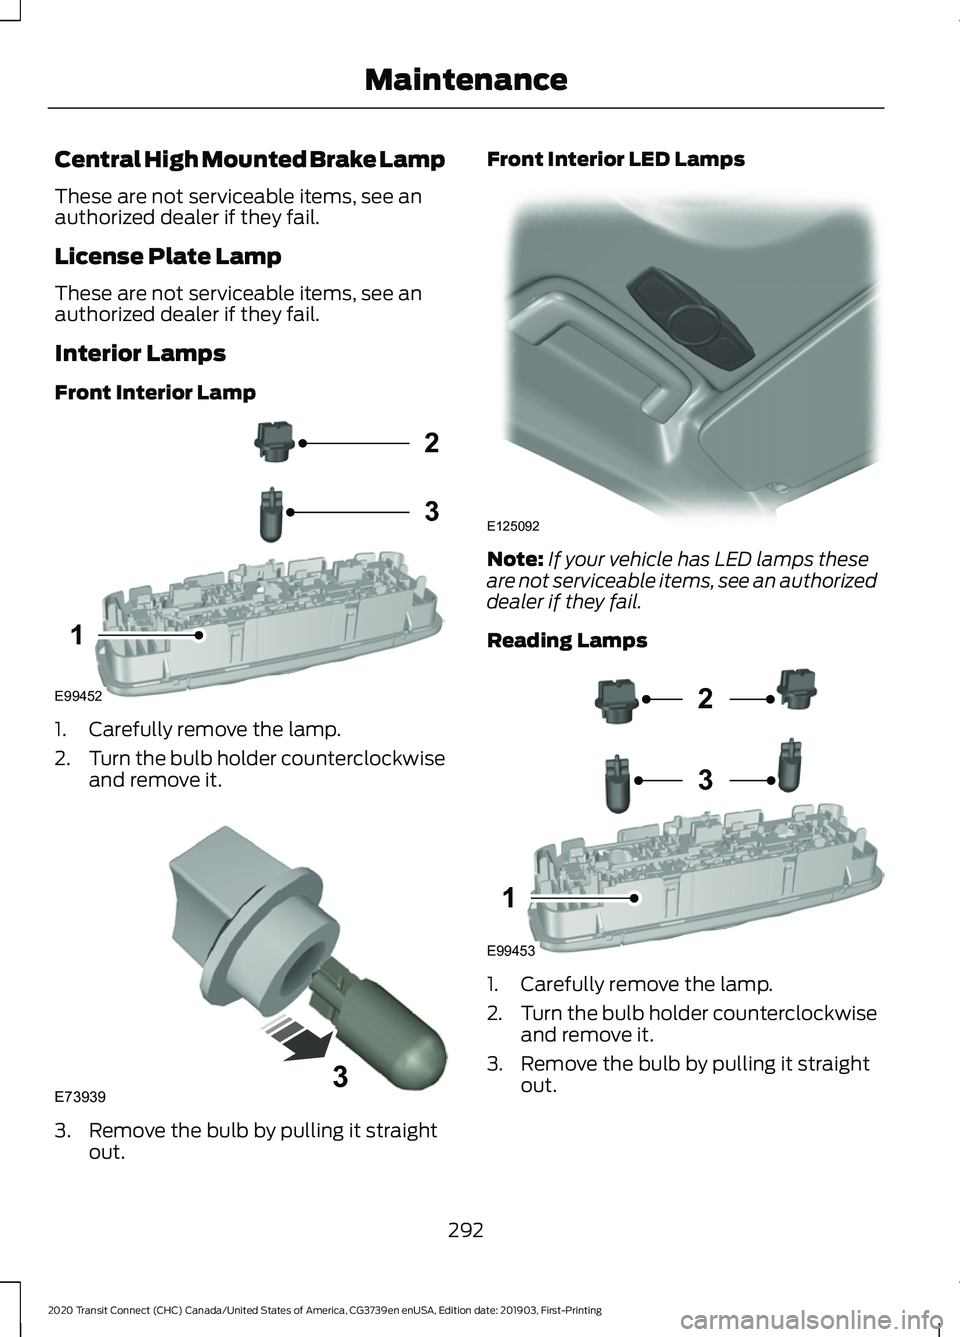
Front Interior Lamp
1. Carefully remove the lamp.
2.
Turn the bulb holder counterclockwise
and remove it. 3. Remove the bulb by pulling it straight
out. Front Interior LED Lamps
Note:
If your vehicle has LED lamps these
are not serviceable items, see an authorized
dealer if they fail.
Reading Lamps 1. Carefully remove the lamp.
2.
Turn the bulb holder counterclockwise
and remove it.
3. Remove the bulb by pulling it straight out.
292
2020 Transit Connect (CHC) Canada/United States of America, CG3739en enUSA, Edition date: 201903, First-Printing MaintenanceE99452
2
3
1 E739393 E125092 E99453
2
3
1
Page 312 of 509
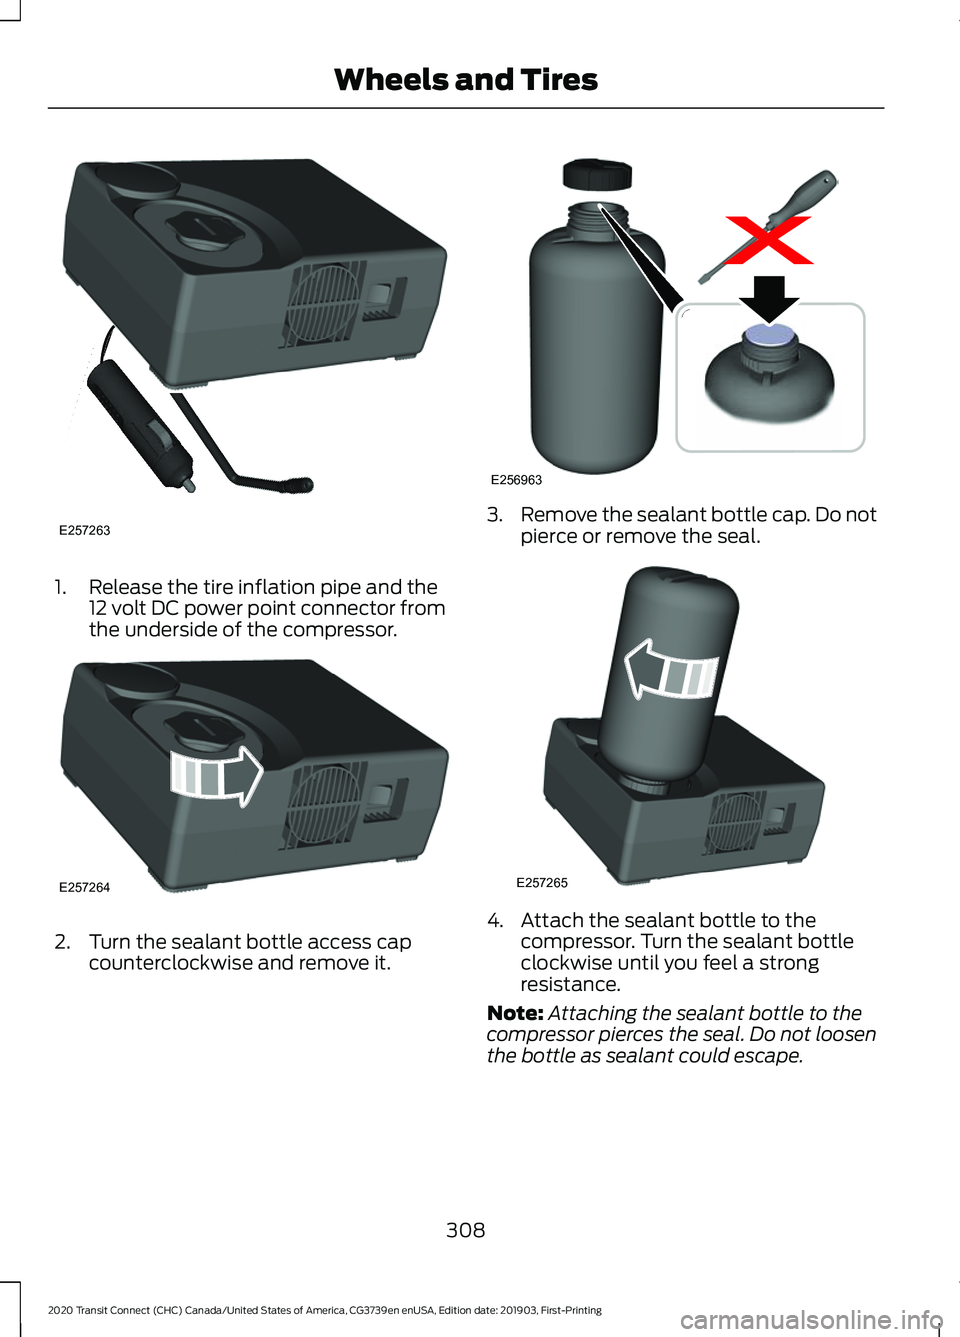
1. Release the tire inflation pipe and the
12 volt DC power point connector from
the underside of the compressor. 2. Turn the sealant bottle access cap
counterclockwise and remove it. 3.
Remove the sealant bottle cap. Do not
pierce or remove the seal. 4. Attach the sealant bottle to the
compressor. Turn the sealant bottle
clockwise until you feel a strong
resistance.
Note: Attaching the sealant bottle to the
compressor pierces the seal. Do not loosen
the bottle as sealant could escape.
308
2020 Transit Connect (CHC) Canada/United States of America, CG3739en enUSA, Edition date: 201903, First-Printing Wheels and TiresE257263 E257264 x
E256963 E257265
Page 330 of 509
Vehicles with Stability Control
When stability control is on, your vehicle
may exhibit some unusual driving
characteristics. To reduce this, switch
traction control off. See Stability Control
(page 185).
Note: The anti-lock brake system continues
to correctly operate.
TIRE PRESSURE MONITORING
SYSTEM WARNING:
The tire pressure
monitoring system is not a substitute for
manually checking tire pressures. You
should periodically check tire pressures
using a pressure gauge. Failure to
correctly maintain tire pressures could
increase the risk of tire failure, loss of
control, vehicle rollover and personal
injury.
Note: You should only use tire sealants in
roadside emergencies as they may cause
damage to the tire pressure monitoring
system sensor.
Note: If the tire pressure monitoring system
sensor becomes damaged, it may not
function. Each tire, including the spare (if
provided), should be checked
monthly when cold and inflated
to the inflation pressure recommended by
the vehicle manufacturer on the vehicle
placard or tire inflation pressure label. (If
your vehicle has tires of a different size
than the size indicated on the vehicle
placard or tire inflation pressure label, you
should determine the proper tire inflation
pressure for those tires). As an added safety feature, your vehicle
has been equipped with a Tire Pressure
Monitoring System (TPMS) that
illuminates a low tire pressure telltale
when one or more of your tires is
significantly under-inflated. Accordingly,
when the low tire pressure telltale
illuminates, you should stop and check
your tires as soon as possible, and inflate
them to the proper pressure. Driving on a
significantly under-inflated tire causes the
tire to overheat and can lead to tire failure.
Under-inflation also reduces fuel efficiency
and tire tread life, and may affect the
vehicle
’s handling and stopping ability.
Please note that the TPMS is not a
substitute for proper tire maintenance, and
it is the driver ’s responsibility to maintain
correct tire pressure, even if under-inflation
has not reached the level to trigger
illumination of the TPMS low tire pressure
telltale.
Your vehicle has also been equipped with
a TPMS malfunction indicator to indicate
when the system is not operating properly.
The TPMS malfunction indicator is
combined with the low tire pressure
telltale. When the system detects a
malfunction, the telltale will flash for
approximately one minute and then remain
continuously illuminated. This sequence
will continue upon subsequent vehicle
start-ups as long as the malfunction exists.
When the malfunction indicator is
illuminated, the system may not be able
to detect or signal low tire pressure as
intended. TPMS malfunctions may occur
for a variety of reasons, including the
installation of replacement or alternate
tires or wheels on the vehicle that prevent
the TPMS from functioning properly.
Always check the TPMS malfunction
telltale after replacing one or more tires or
wheels on your vehicle to ensure that the
replacement or alternate tires and wheels
allow the TPMS to continue to function
properly.
326
2020 Transit Connect (CHC) Canada/United States of America, CG3739en enUSA, Edition date: 201903, First-Printing Wheels and Tires
Page 335 of 509
•
Use commercial car washing
equipment.
• Try to repair the dissimilar spare tire.
Use of one of the dissimilar spare tires
listed above at any one wheel location can
lead to impairment of the following:
• Handling, stability and braking
performance.
• Comfort and noise.
• Ground clearance and parking at curbs.
• Winter weather driving capability.
• Wet weather driving capability.
• All-wheel driving capability (if
applicable).
3. Full-size dissimilar spare without
label on wheel
When driving with the full-size dissimilar
spare wheel and tire assembly, do not:
• Exceed 70 mph (113 km/h).
• Use more than one dissimilar spare
wheel and tire assembly at a time.
• Use commercial car washing
equipment.
• Use snow chains on the end of the
vehicle with the dissimilar spare wheel
and tire assembly.
The usage of a full-size dissimilar spare
wheel and tire assembly can lead to
impairment of the following:
• Handling, stability and braking
performance.
• Comfort and noise.
• Ground clearance and parking at curbs.
• Winter weather driving capability.
• Wet weather driving capability.
• All-wheel driving capability. When driving with the full-size dissimilar
spare wheel and tire assembly additional
caution should be given to:
•
Towing a trailer.
• Driving vehicles equipped with a
camper body.
• Driving vehicles with a load on the
cargo rack.
Drive cautiously when using a full-size
dissimilar spare wheel and tire assembly
and seek service as soon as possible.
Changing a Road Wheel WARNING: When one of the front
wheels is off the ground, the
transmission alone will not prevent the
vehicle from moving or slipping off the
jack, even if the transmission selector
lever is in park (P). WARNING:
To help prevent your
vehicle from moving when you change
a tire, be sure to place the transmission
selector lever in park (P), set the parking
brake and block (in both directions) the
wheel that is diagonally opposite (other
side and end of the vehicle) to the tire
being changed. WARNING:
Never get underneath
a vehicle that is supported only by a jack.
If your vehicle slips off the jack, you or
someone else could be seriously injured. WARNING:
Do not attempt to
change a tire on the side of the vehicle
close to moving traffic. Pull far enough
off the road to avoid the danger of being
hit when operating the jack or changing
the wheel.
331
2020 Transit Connect (CHC) Canada/United States of America, CG3739en enUSA, Edition date: 201903, First-Printing Wheels and Tires
Page 336 of 509
WARNING: Always use the jack
provided as original equipment with your
vehicle. If using a jack other than the one
provided as original equipment with your
vehicle, make sure the jack capacity is
adequate for the vehicle weight,
including any vehicle cargo or
modifications.
Note: The jack and tools are located behind
a cover in the sidewall at the left rear of the
cargo area. Remove the retention straps and
wing nut before removing the jack.
The jack and tools are located behind a
cover in the left rear of the cargo area.
Remove the wing nut to remove the jack.
Remove the lug nut wrench from the clips
by pulling straight out.
1. Park on a level surface, set the parking
brake and activate the hazard flashers.
2. Move the transmission selector lever to the park (P) position and switch the
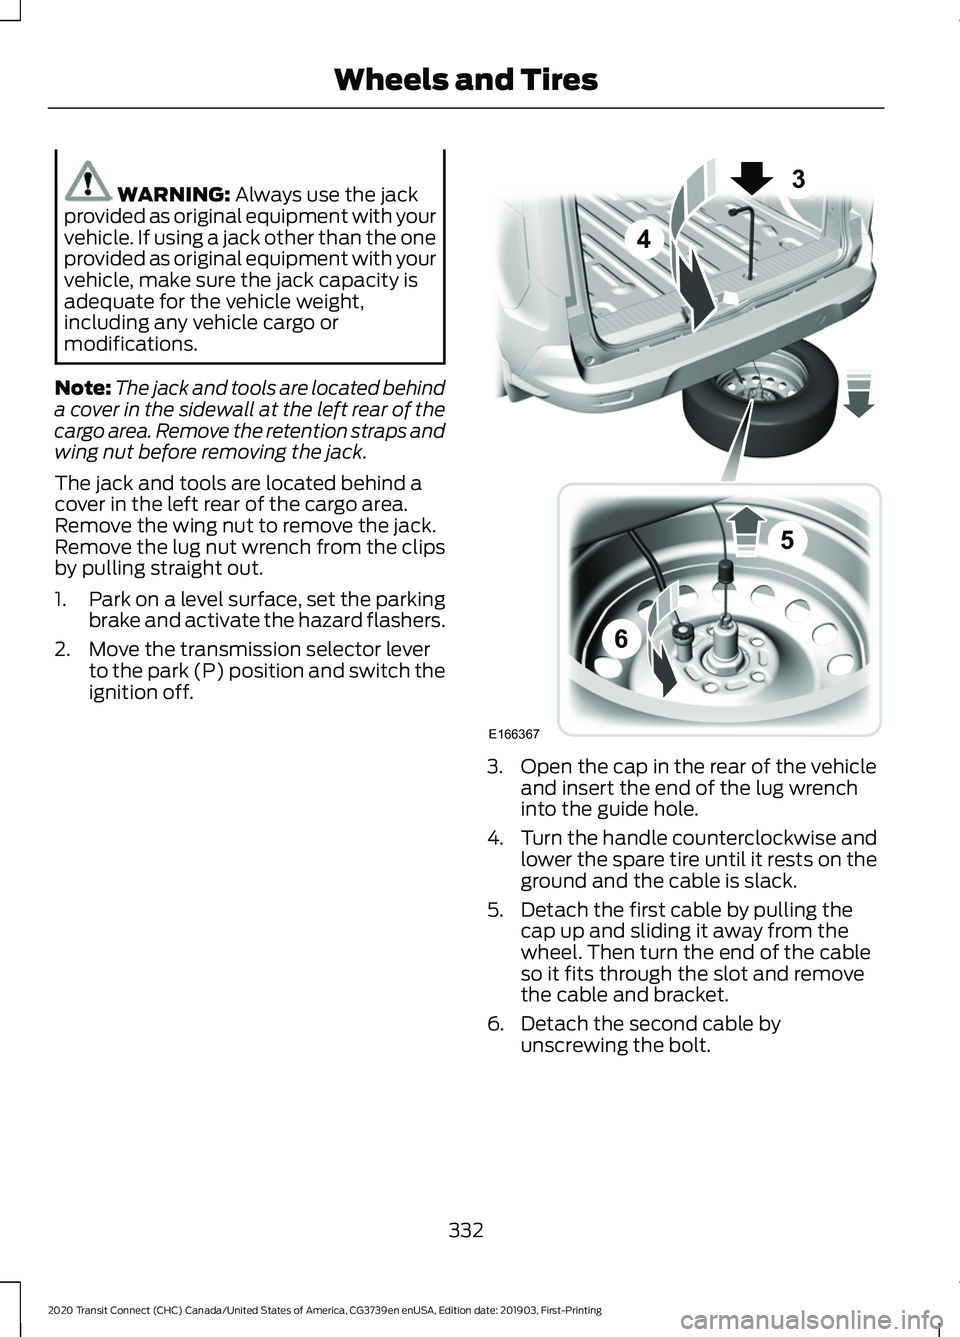
ignition off. 3. Open the cap in the rear of the vehicle
and insert the end of the lug wrench
into the guide hole.
4. Turn the handle counterclockwise and
lower the spare tire until it rests on the
ground and the cable is slack.
5. Detach the first cable by pulling the cap up and sliding it away from the
wheel. Then turn the end of the cable
so it fits through the slot and remove
the cable and bracket.
6. Detach the second cable by unscrewing the bolt.
332
2020 Transit Connect (CHC) Canada/United States of America, CG3739en enUSA, Edition date: 201903, First-Printing Wheels and TiresE166367
3
4
5
6
Page 337 of 509
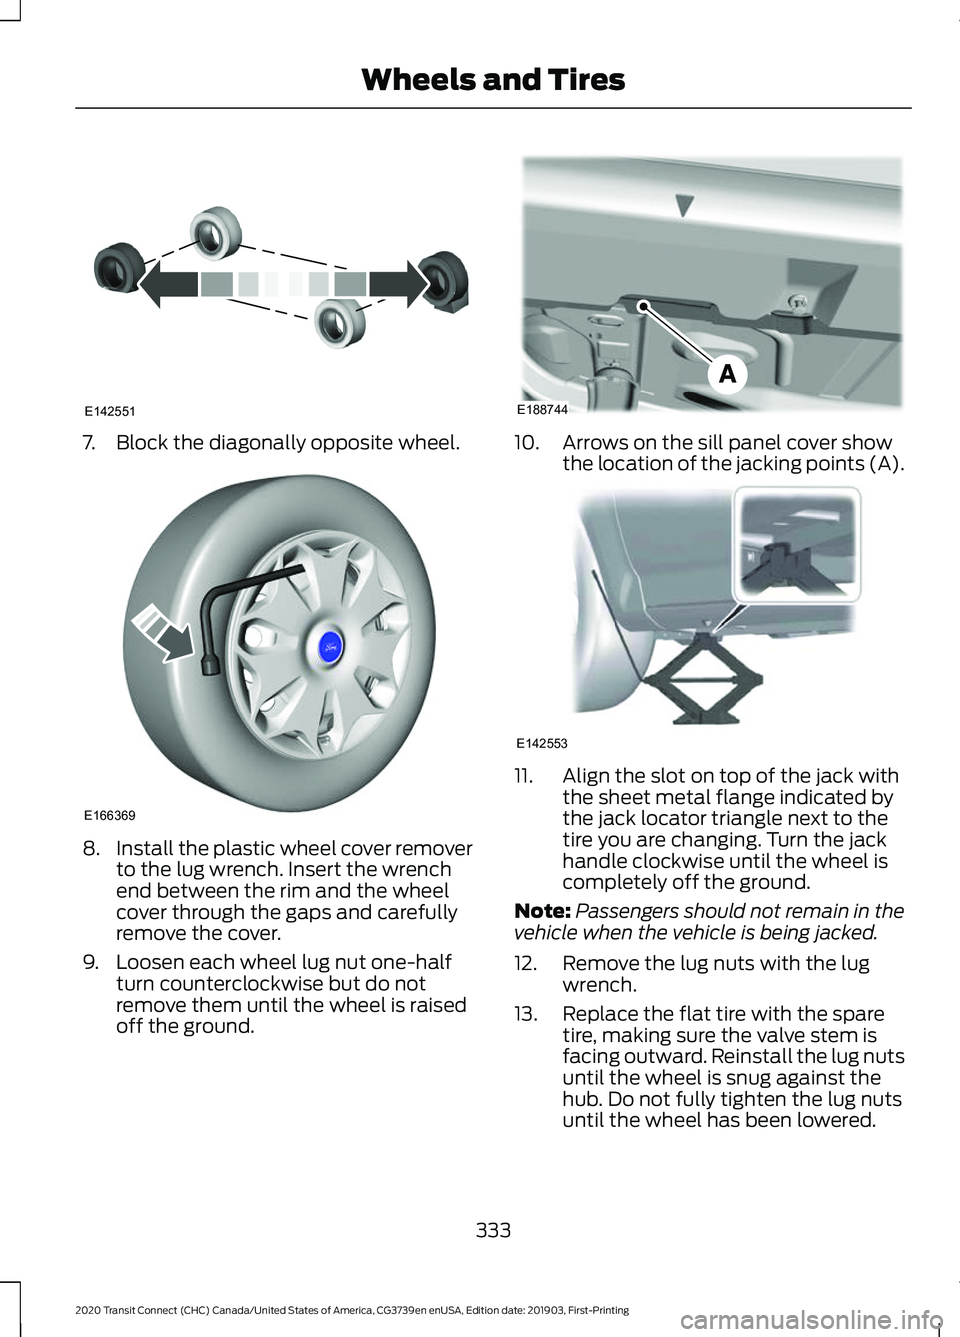
7. Block the diagonally opposite wheel.
8.
Install the plastic wheel cover remover
to the lug wrench. Insert the wrench
end between the rim and the wheel
cover through the gaps and carefully
remove the cover.
9. Loosen each wheel lug nut one-half turn counterclockwise but do not
remove them until the wheel is raised
off the ground. 10. Arrows on the sill panel cover show
the location of the jacking points (A). 11. Align the slot on top of the jack with
the sheet metal flange indicated by
the jack locator triangle next to the
tire you are changing. Turn the jack
handle clockwise until the wheel is
completely off the ground.
Note: Passengers should not remain in the
vehicle when the vehicle is being jacked.
12. Remove the lug nuts with the lug wrench.
13. Replace the flat tire with the spare tire, making sure the valve stem is
facing outward. Reinstall the lug nuts
until the wheel is snug against the
hub. Do not fully tighten the lug nuts
until the wheel has been lowered.
333
2020 Transit Connect (CHC) Canada/United States of America, CG3739en enUSA, Edition date: 201903, First-Printing Wheels and TiresE142551 E166369 E188744 E142553
Page 338 of 509
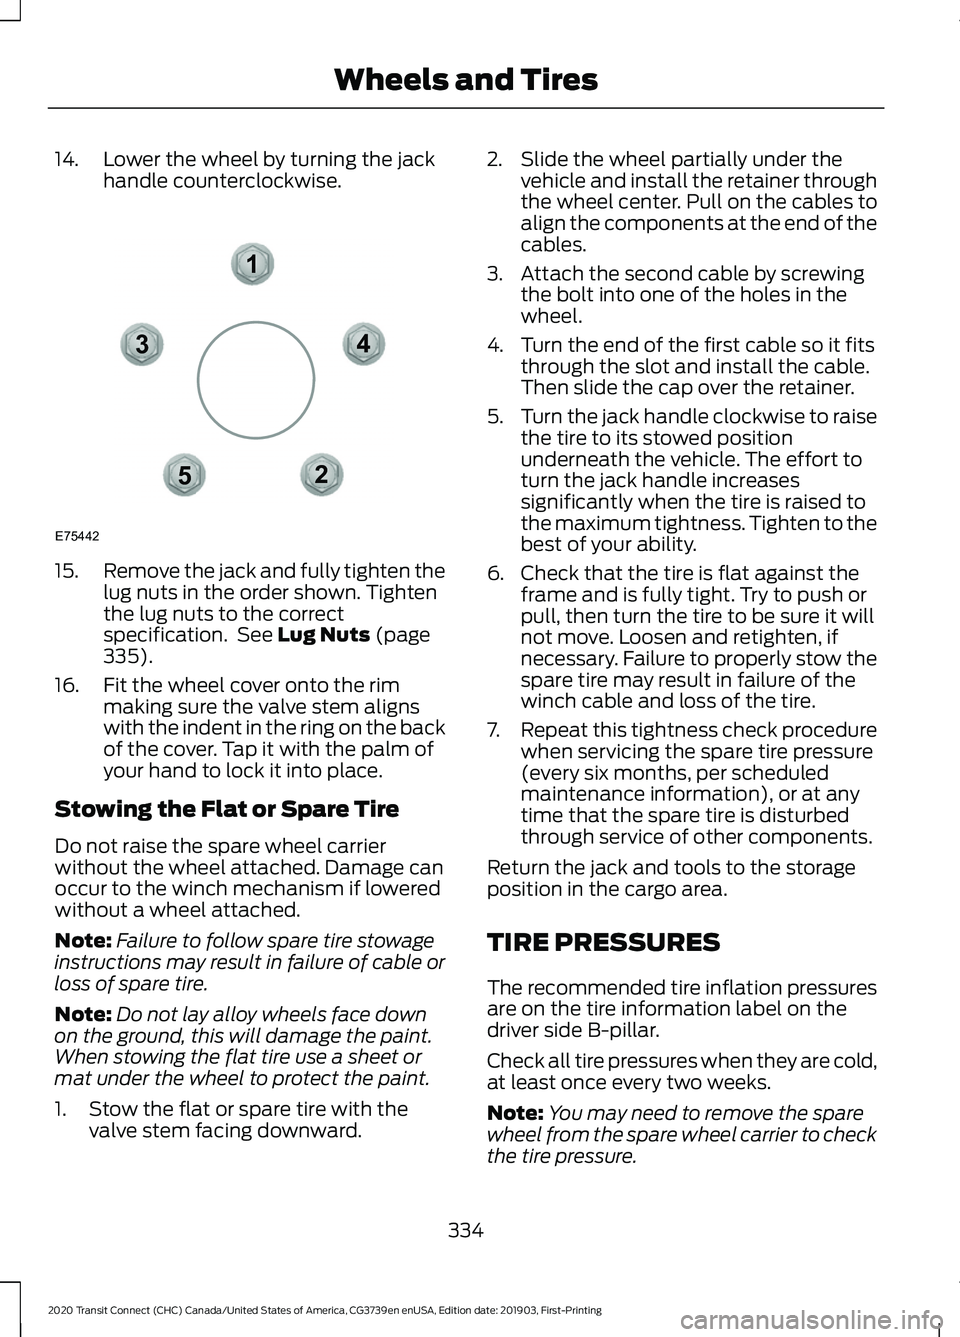
14. Lower the wheel by turning the jack
handle counterclockwise.15.
Remove the jack and fully tighten the
lug nuts in the order shown. Tighten
the lug nuts to the correct
specification. See Lug Nuts (page
335).
16. Fit the wheel cover onto the rim making sure the valve stem aligns
with the indent in the ring on the back
of the cover. Tap it with the palm of
your hand to lock it into place.
Stowing the Flat or Spare Tire
Do not raise the spare wheel carrier
without the wheel attached. Damage can
occur to the winch mechanism if lowered
without a wheel attached.
Note: Failure to follow spare tire stowage
instructions may result in failure of cable or
loss of spare tire.
Note: Do not lay alloy wheels face down
on the ground, this will damage the paint.
When stowing the flat tire use a sheet or
mat under the wheel to protect the paint.
1. Stow the flat or spare tire with the valve stem facing downward. 2. Slide the wheel partially under the
vehicle and install the retainer through
the wheel center. Pull on the cables to
align the components at the end of the
cables.
3. Attach the second cable by screwing the bolt into one of the holes in the
wheel.
4. Turn the end of the first cable so it fits through the slot and install the cable.
Then slide the cap over the retainer.
5. Turn the jack handle clockwise to raise
the tire to its stowed position
underneath the vehicle. The effort to
turn the jack handle increases
significantly when the tire is raised to
the maximum tightness. Tighten to the
best of your ability.
6. Check that the tire is flat against the frame and is fully tight. Try to push or
pull, then turn the tire to be sure it will
not move. Loosen and retighten, if
necessary. Failure to properly stow the
spare tire may result in failure of the
winch cable and loss of the tire.
7. Repeat this tightness check procedure
when servicing the spare tire pressure
(every six months, per scheduled
maintenance information), or at any
time that the spare tire is disturbed
through service of other components.
Return the jack and tools to the storage
position in the cargo area.
TIRE PRESSURES
The recommended tire inflation pressures
are on the tire information label on the
driver side B-pillar.
Check all tire pressures when they are cold,
at least once every two weeks.
Note: You may need to remove the spare
wheel from the spare wheel carrier to check
the tire pressure.
334
2020 Transit Connect (CHC) Canada/United States of America, CG3739en enUSA, Edition date: 201903, First-Printing Wheels and Tires12
3
4
5
E75442
Page 354 of 509
Materials
Specification
Name
WSS-M2C949-AMERCON® ULV
Motorcraft® MERCON® ULV Automatic Transmis-
sion Fluid (U.S.)
Motorcraft® MERCON® ULV Automatic Transmis-
sion Fluid / MERCON® ULV huile pour boîtes auto-
matique Motorcraft® (Canada)
XT-12-QULV (U.S. & Canada)
Locks
Materials Specification
Name
-
Motorcraft® Penetrating and Lock Lubricant (U.S.)
Motorcraft® Penetrating Fluid / Liquide dégrippant
Motorcraft® (Canada)
XL-1 (U.S.)
CXC-51-A (Canada)
Grease
Materials Specification
Name
ESB-M1C93-B
Motorcraft® Multi-Purpose Grease Spray (U.S.)
Motorcraft® Multi-Purpose Grease Spray / Graisse
tout usage en aérosol Motorcraft® (Canada)
XL-5-A (U.S. & Canada)
CAPACITIES AND
SPECIFICATIONS - 2.0L
DURATEC-HE (MI4)/2.0L FLEX
FUEL
Use oil and fluid that meets the defined
specification and viscosity grade. If you do not use oil and fluid that meets
the defined specification and viscosity
grade, it could result in:
•
Component damage not covered by
the vehicle Warranty.
• Longer engine cranking periods.
• Increased emission levels.
• Reduced engine performance.
• Reduced fuel economy.
• Reduced brake performance.
350
2020 Transit Connect (CHC) Canada/United States of America, CG3739en enUSA, Edition date: 201903, First-Printing Capacities and Specifications
Page 358 of 509
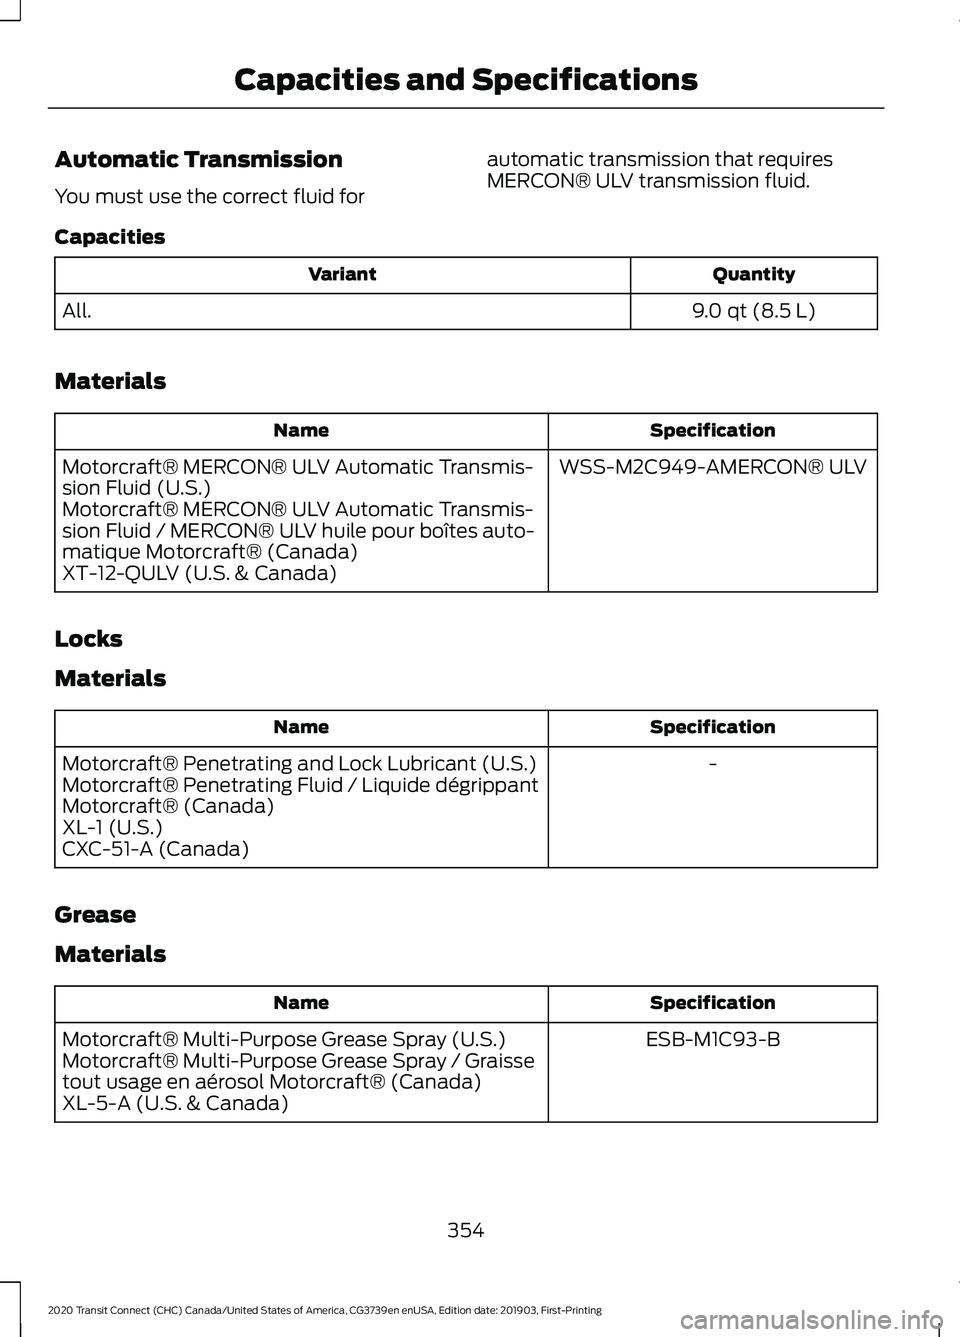
Automatic Transmission
You must use the correct fluid for
automatic transmission that requires
MERCON® ULV transmission fluid.
Capacities Quantity
Variant
9.0 qt (8.5 L)
All.
Materials Specification
Name
WSS-M2C949-AMERCON® ULV
Motorcraft® MERCON® ULV Automatic Transmis-
sion Fluid (U.S.)
Motorcraft® MERCON® ULV Automatic Transmis-
sion Fluid / MERCON® ULV huile pour boîtes auto-
matique Motorcraft® (Canada)
XT-12-QULV (U.S. & Canada)
Locks
Materials Specification
Name
-
Motorcraft® Penetrating and Lock Lubricant (U.S.)
Motorcraft® Penetrating Fluid / Liquide dégrippant
Motorcraft® (Canada)
XL-1 (U.S.)
CXC-51-A (Canada)
Grease
Materials Specification
Name
ESB-M1C93-B
Motorcraft® Multi-Purpose Grease Spray (U.S.)
Motorcraft® Multi-Purpose Grease Spray / Graisse
tout usage en aérosol Motorcraft® (Canada)
XL-5-A (U.S. & Canada)
354
2020 Transit Connect (CHC) Canada/United States of America, CG3739en enUSA, Edition date: 201903, First-Printing Capacities and Specifications