set clock FORD TRANSIT CONNECT 2020 Owners Manual
[x] Cancel search | Manufacturer: FORD, Model Year: 2020, Model line: TRANSIT CONNECT, Model: FORD TRANSIT CONNECT 2020Pages: 509, PDF Size: 7.73 MB
Page 10 of 509
Wi-Fi Hotspot
Creating a Wi-Fi Hotspot - Vehicles
Without: SYNC 3 .....................................365
Creating a Wi-Fi Hotspot - Vehicles With: SYNC 3 .......................................................
365
Changing the Wi-Fi Hotspot Name or Password - Vehicles Without: SYNC 3
.......................................................................
366
Changing the Wi-Fi Hotspot Name or Password - Vehicles With: SYNC 3
.......................................................................
366
Audio System
General Information ..................................
367
Audio Unit - Vehicles Without: SYNC 3 .......................................................................
368
Audio Unit - Vehicles With: SYNC 3 ......
371
AM/FM Radio - Vehicles Without: SYNC 3.....................................................................
372
Audio Unit Clock and Date Displays - Vehicles Without: SYNC 3 ...................
373
Connecting a Bluetooth Device - Vehicles Without: SYNC 3 ...................
373
Satellite Radio ..............................................
373
Streaming Bluetooth Audio - Vehicles Without: SYNC 3 .....................................
375
Playing Media From a USB Device - Vehicles Without: SYNC 3 ...................
375
USB Port .........................................................
376
Using Voice Recognition ..........................
376
SYNC™ 3
General Information ...................................
377
Home Screen ...............................................
384
Using Voice Recognition ..........................
384
Entertainment .............................................
390
Phone ..............................................................
392
Navigation .....................................................
393
Apps .................................................................
397
Settings ..........................................................
398
SYNC™ 3 Troubleshooting ......................
412Accessories
Accessories
...................................................
425
Ford Protect
Ford Protect ..................................................
426
Scheduled Maintenance
General Maintenance Information ......
428
Normal Scheduled Maintenance ..........
431
Special Operating Conditions Scheduled Maintenance ............................................
434
Scheduled Maintenance Record ..........
436
Appendices
Electromagnetic Compatibility .............
446
End User License Agreement ................
448
Declaration of Conformity - Vehicles Without: SYNC 3 .....................................
473
Declaration of Conformity - Vehicles With: SYNC 3 ............................................
474
Declaration of Conformity - Vehicles With: Wireless Accessory Charging
........................................................................\
474
Type Approvals ............................................
476
6
2020 Transit Connect (CHC) Canada/United States of America, CG3739en enUSA, Edition date: 201903, First-Printing Table of Contents
Page 38 of 509
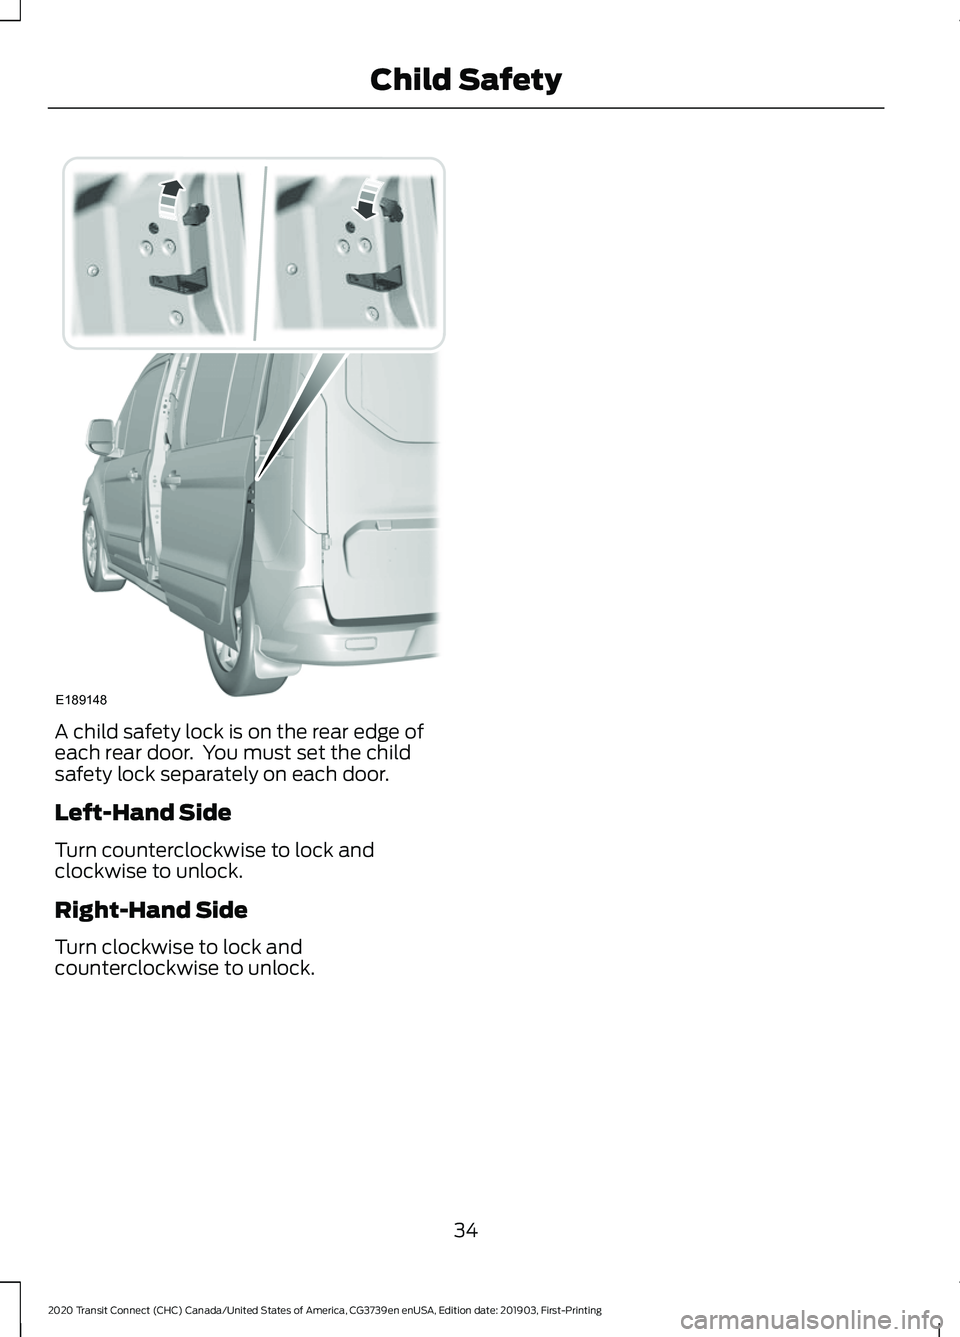
A child safety lock is on the rear edge of
each rear door. You must set the child
safety lock separately on each door.
Left-Hand Side
Turn counterclockwise to lock and
clockwise to unlock.
Right-Hand Side
Turn clockwise to lock and
counterclockwise to unlock.
34
2020 Transit Connect (CHC) Canada/United States of America, CG3739en enUSA, Edition date: 201903, First-Printing Child SafetyE189148
Page 118 of 509
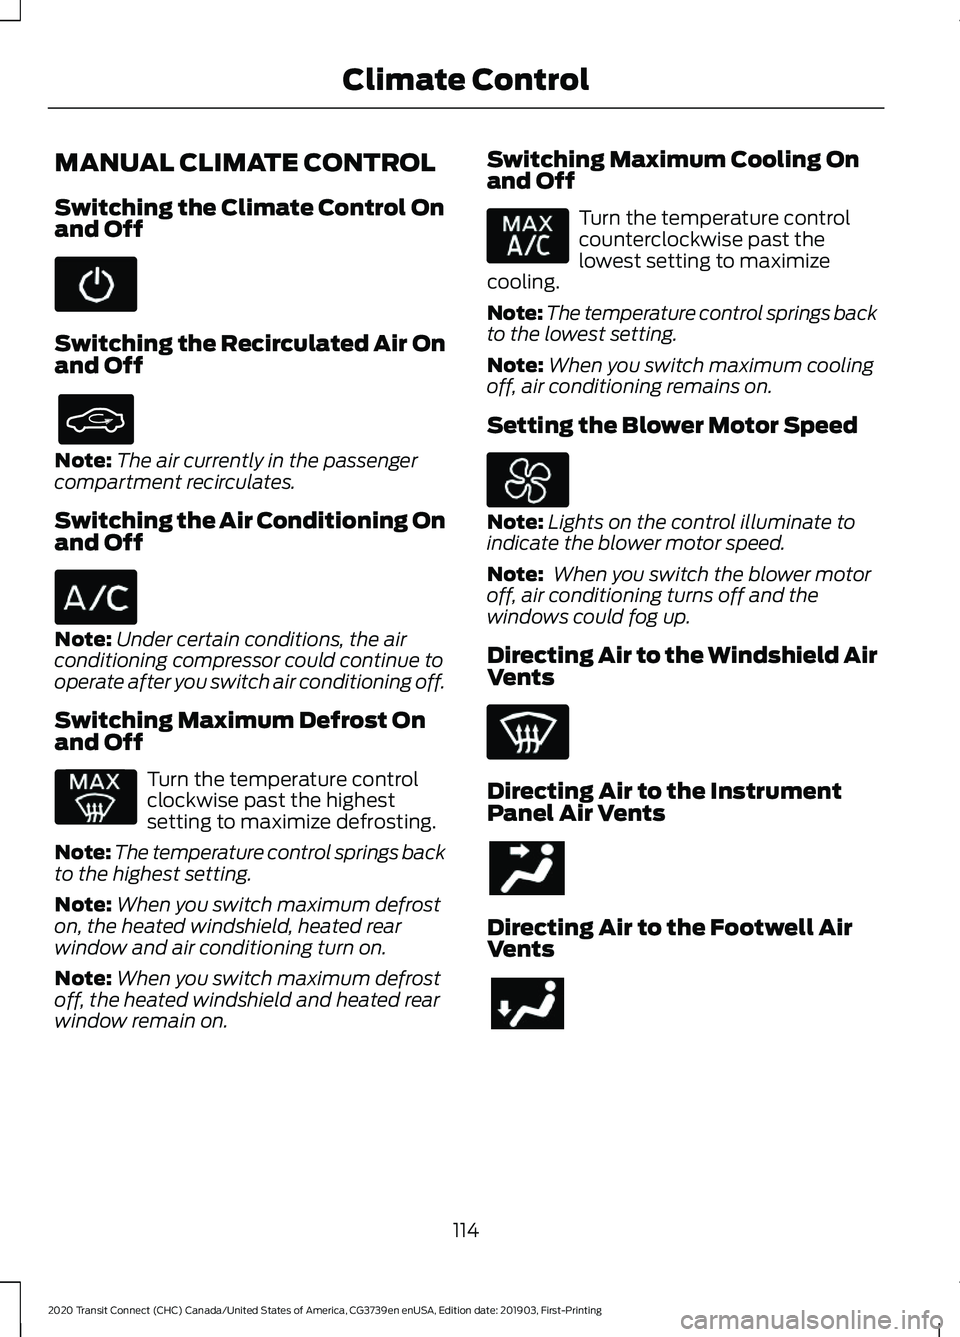
MANUAL CLIMATE CONTROL
Switching the Climate Control On
and Off
Switching the Recirculated Air On
and Off
Note:
The air currently in the passenger
compartment recirculates.
Switching the Air Conditioning On
and Off Note:
Under certain conditions, the air
conditioning compressor could continue to
operate after you switch air conditioning off.
Switching Maximum Defrost On
and Off Turn the temperature control
clockwise past the highest
setting to maximize defrosting.
Note: The temperature control springs back
to the highest setting.
Note: When you switch maximum defrost
on, the heated windshield, heated rear
window and air conditioning turn on.
Note: When you switch maximum defrost
off, the heated windshield and heated rear
window remain on. Switching Maximum Cooling On
and Off Turn the temperature control
counterclockwise past the
lowest setting to maximize
cooling.
Note: The temperature control springs back
to the lowest setting.
Note: When you switch maximum cooling
off, air conditioning remains on.
Setting the Blower Motor Speed Note:
Lights on the control illuminate to
indicate the blower motor speed.
Note: When you switch the blower motor
off, air conditioning turns off and the
windows could fog up.
Directing Air to the Windshield Air
Vents Directing Air to the Instrument
Panel Air Vents
Directing Air to the Footwell Air
Vents
114
2020 Transit Connect (CHC) Canada/United States of America, CG3739en enUSA, Edition date: 201903, First-Printing Climate Control
Page 119 of 509
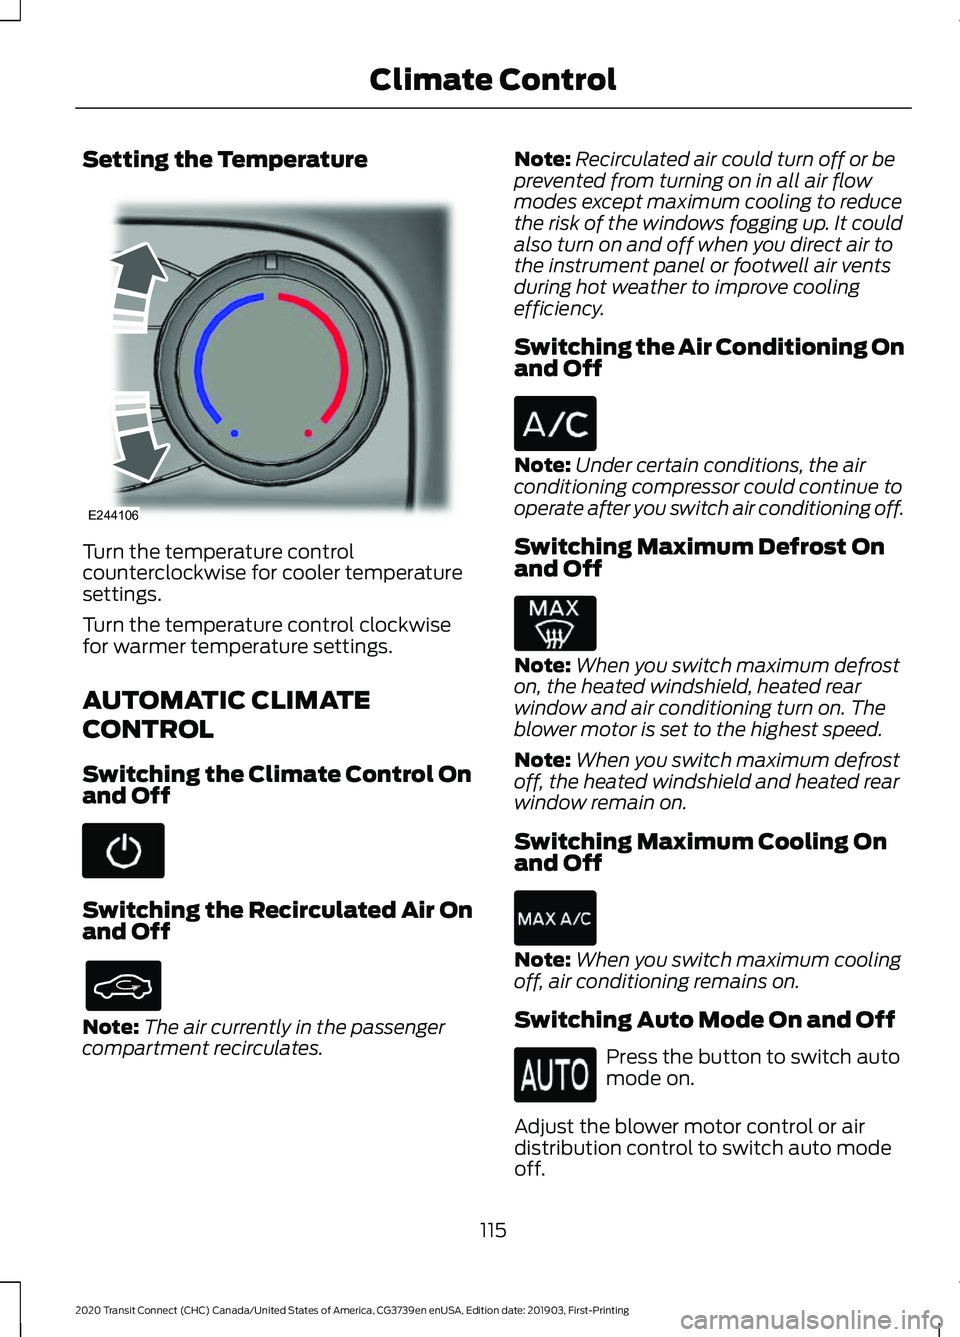
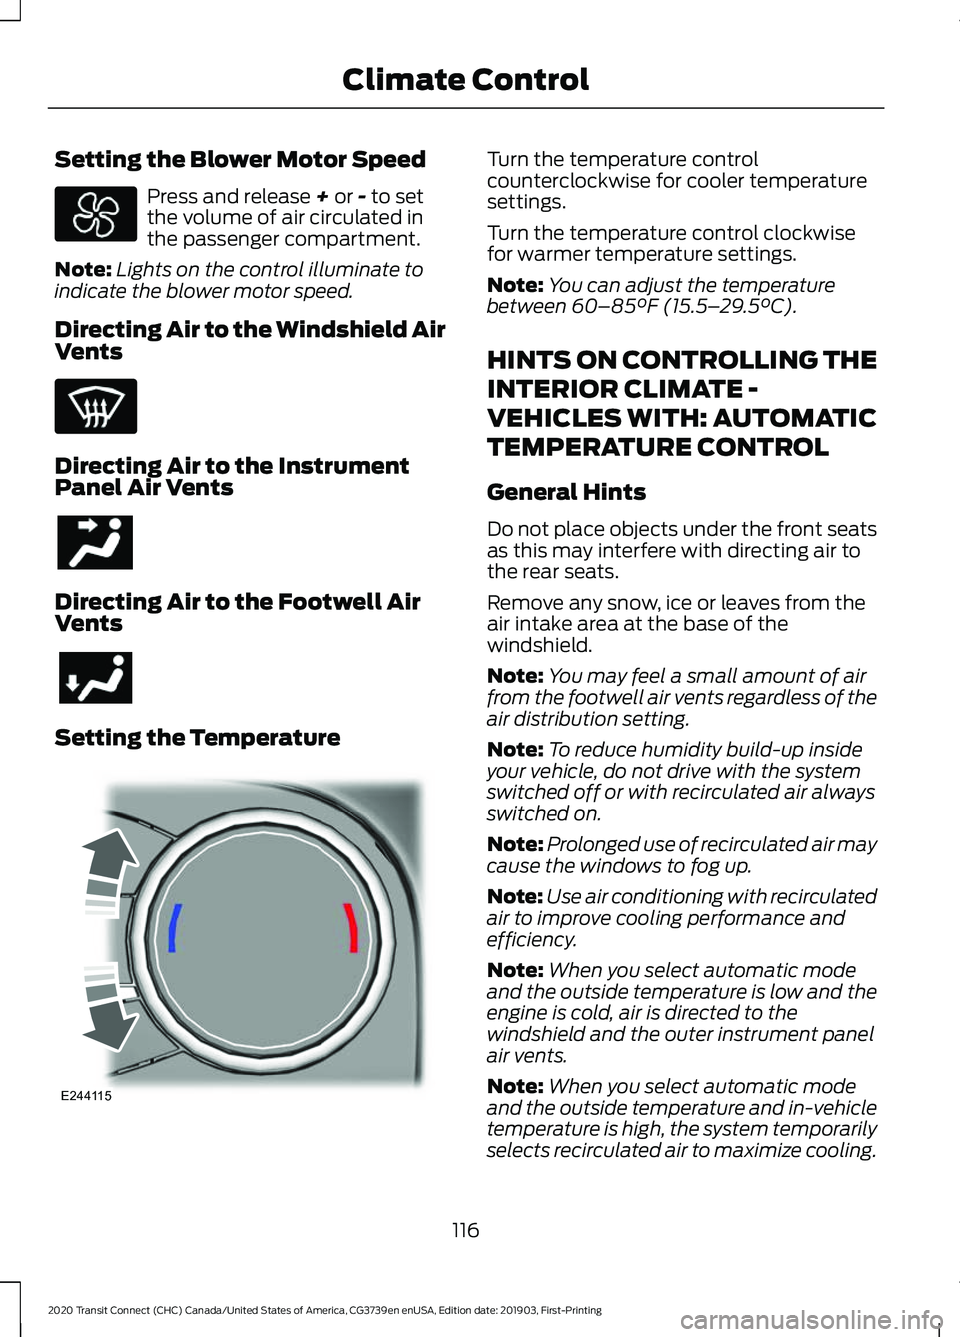
Setting the Temperature
Turn the temperature control
counterclockwise for cooler temperature
settings.
Turn the temperature control clockwise
for warmer temperature settings.
AUTOMATIC CLIMATE
CONTROL
Switching the Climate Control On
and Off
Switching the Recirculated Air On
and Off
Note:
The air currently in the passenger
compartment recirculates. Note:
Recirculated air could turn off or be
prevented from turning on in all air flow
modes except maximum cooling to reduce
the risk of the windows fogging up. It could
also turn on and off when you direct air to
the instrument panel or footwell air vents
during hot weather to improve cooling
efficiency.
Switching the Air Conditioning On
and Off Note:
Under certain conditions, the air
conditioning compressor could continue to
operate after you switch air conditioning off.
Switching Maximum Defrost On
and Off Note:
When you switch maximum defrost
on, the heated windshield, heated rear
window and air conditioning turn on. The
blower motor is set to the highest speed.
Note: When you switch maximum defrost
off, the heated windshield and heated rear
window remain on.
Switching Maximum Cooling On
and Off Note:
When you switch maximum cooling
off, air conditioning remains on.
Switching Auto Mode On and Off Press the button to switch auto
mode on.
Adjust the blower motor control or air
distribution control to switch auto mode
off.
115
2020 Transit Connect (CHC) Canada/United States of America, CG3739en enUSA, Edition date: 201903, First-Printing Climate ControlE244106
Page 120 of 509
Setting the Blower Motor Speed
Press and release + or - to set
the volume of air circulated in
the passenger compartment.
Note: Lights on the control illuminate to
indicate the blower motor speed.
Directing Air to the Windshield Air
Vents Directing Air to the Instrument
Panel Air Vents
Directing Air to the Footwell Air
Vents
Setting the Temperature Turn the temperature control
counterclockwise for cooler temperature
settings.
Turn the temperature control clockwise
for warmer temperature settings.
Note:
You can adjust the temperature
between
60–85°F (15.5– 29.5°C).
HINTS ON CONTROLLING THE
INTERIOR CLIMATE -
VEHICLES WITH: AUTOMATIC
TEMPERATURE CONTROL
General Hints
Do not place objects under the front seats
as this may interfere with directing air to
the rear seats.
Remove any snow, ice or leaves from the
air intake area at the base of the
windshield.
Note: You may feel a small amount of air
from the footwell air vents regardless of the
air distribution setting.
Note: To reduce humidity build-up inside
your vehicle, do not drive with the system
switched off or with recirculated air always
switched on.
Note: Prolonged use of recirculated air may
cause the windows to fog up.
Note: Use air conditioning with recirculated
air to improve cooling performance and
efficiency.
Note: When you select automatic mode
and the outside temperature is low and the
engine is cold, air is directed to the
windshield and the outer instrument panel
air vents.
Note: When you select automatic mode
and the outside temperature and in-vehicle
temperature is high, the system temporarily
selects recirculated air to maximize cooling.
116
2020 Transit Connect (CHC) Canada/United States of America, CG3739en enUSA, Edition date: 201903, First-Printing Climate Control E244115
Page 281 of 509
Note:
The oil consumption of new engines
reaches its normal level after approximately
3,000 mi (5,000 km).
Adding Engine Oil WARNING:
Do not add engine oil
when the engine is hot. Failure to follow
this instruction could result in personal
injury. WARNING:
Do not remove the
filler cap when the engine is running.
Do not use supplemental engine oil
additives because they are unnecessary
and could lead to engine damage that may
not be covered by the vehicle Warranty. Only use oils certified for gasoline engines
by the American Petroleum Institute (API).
An oil with this trademark symbol
conforms to the current engine and
emission system protection standards and
fuel economy requirements of the
International Lubricants Specification
Advisory Committee (ILSAC).
To top up the engine oil level do the
following:
1. Clean the area surrounding the engine
oil filler cap before you remove it. 2. Remove the engine oil filler cap. See
Under Hood Overview
(page 272).
Turn it counterclockwise and remove
it.
3. Add engine oil that meets our specifications.
See Capacities and
Specifications (page 345). You may
have to use a funnel to pour the engine
oil into the opening.
4. Recheck the oil level.
5. If the oil level is correct, replace the dipstick and make sure it is fully seated.
6. Replace the engine oil filler cap. Turn it clockwise until you feel a strong
resistance.
Note: Do not add oil further than the
maximum mark. Oil levels above the
maximum mark may cause engine damage.
Note: Make sure you install the oil filler cap
correctly.
Note: Soak up any spillage with an
absorbent cloth immediately.
OIL CHANGE INDICATOR
RESET
Only reset the system after changing the
engine oil and oil filter.
Resetting the Oil Life Monitoring
System
1. Switch the ignition on. Do not start the
engine.
2. Fully press the accelerator and brake pedals at the same time.
3. Keep the accelerator and brake pedals
fully pressed.
4. After three seconds, a message appears confirming that the reset is in
progress.
5. After 25 seconds, a message appears confirming that the reset is complete.
277
2020 Transit Connect (CHC) Canada/United States of America, CG3739en enUSA, Edition date: 201903, First-Printing MaintenanceE142732
Page 289 of 509
Because your vehicle
’s engine is
electronically-controlled by a computer,
some engine control settings are
maintained by power from the low voltage
battery. Some engine computer settings,
like the idle trim and fuel trim strategy,
optimize the driveability and performance
of the engine. Some other computer
settings, like the clock and radio station
presets, are also maintained in memory by
power from the low voltage battery. When
a technician disconnects and connects the
low voltage battery, these settings are
erased. Complete the following procedure
in order to restore the settings:
1. With the vehicle at a complete stop, set the parking brake.
2. Shift the transmission into park (P).
3. Switch off all accessories.
4. Fully press the brake pedal and start the vehicle.
5. Run the engine until it reaches normal operating temperature. While the
engine is warming up, complete the
following: Reset the clock. See Audio
System (page 367). Reset the power
windows bounce-back feature. See
Windows and Mirrors
(page 89).
Reset the radio station presets. See
Audio System
(page 367).
6. Allow the engine to idle for at least one
minute. If the engine turns off, press
the accelerator pedal to start the
engine.
7. While the engine is running, press the brake pedal and shift into neutral (N).
8. Allow the engine to run for at least one
minute by pressing on the accelerator
pedal.
9. Drive the vehicle at least 12 mi (20 km)
to completely relearn the idle and fuel
trim strategy. Note:
If you do not allow the engine to
relearn the idle and fuel trim strategy, the
idle quality of your vehicle may be adversely
affected until the engine computer
eventually relearns the idle trim and fuel
trim strategy.
Make sure that you dispose of old batteries
in an environmentally friendly way. Seek
advice from your local authority about
recycling old batteries.
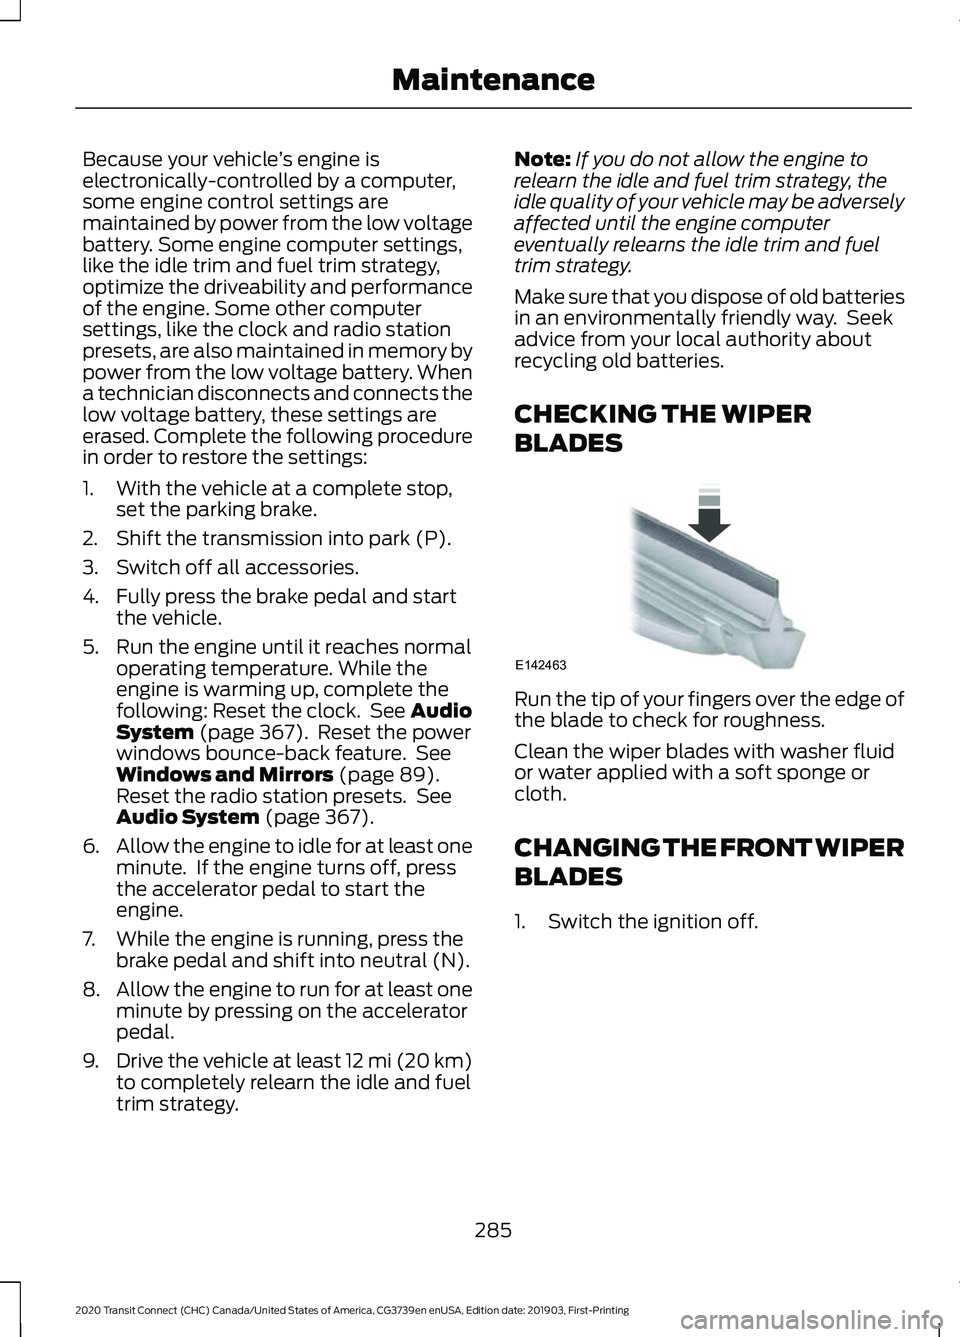
CHECKING THE WIPER
BLADES Run the tip of your fingers over the edge of
the blade to check for roughness.
Clean the wiper blades with washer fluid
or water applied with a soft sponge or
cloth.
CHANGING THE FRONT WIPER
BLADES
1. Switch the ignition off.
285
2020 Transit Connect (CHC) Canada/United States of America, CG3739en enUSA, Edition date: 201903, First-Printing MaintenanceE142463
Page 336 of 509
WARNING: Always use the jack
provided as original equipment with your
vehicle. If using a jack other than the one
provided as original equipment with your
vehicle, make sure the jack capacity is
adequate for the vehicle weight,
including any vehicle cargo or
modifications.
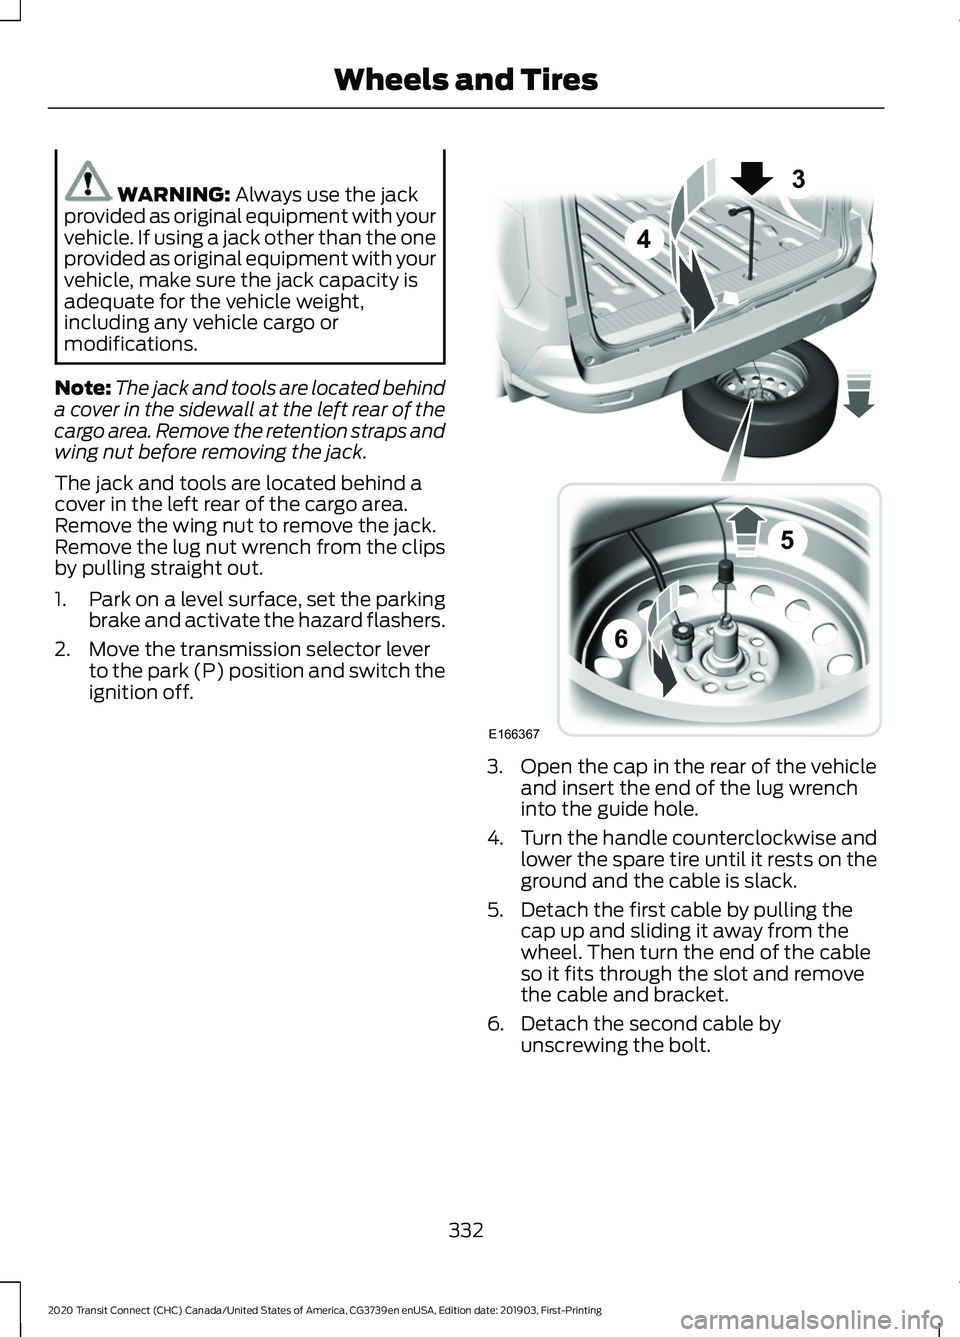
Note: The jack and tools are located behind
a cover in the sidewall at the left rear of the
cargo area. Remove the retention straps and
wing nut before removing the jack.
The jack and tools are located behind a
cover in the left rear of the cargo area.
Remove the wing nut to remove the jack.
Remove the lug nut wrench from the clips
by pulling straight out.
1. Park on a level surface, set the parking
brake and activate the hazard flashers.
2. Move the transmission selector lever to the park (P) position and switch the
ignition off. 3. Open the cap in the rear of the vehicle
and insert the end of the lug wrench
into the guide hole.
4. Turn the handle counterclockwise and
lower the spare tire until it rests on the
ground and the cable is slack.
5. Detach the first cable by pulling the cap up and sliding it away from the
wheel. Then turn the end of the cable
so it fits through the slot and remove
the cable and bracket.
6. Detach the second cable by unscrewing the bolt.
332
2020 Transit Connect (CHC) Canada/United States of America, CG3739en enUSA, Edition date: 201903, First-Printing Wheels and TiresE166367
3
4
5
6
Page 377 of 509
Selecting a Station from the List
Press the OK button to view available
stations.
AUDIO UNIT CLOCK AND DATE
DISPLAYS - VEHICLES
WITHOUT: SYNC 3
Adjusting the Clock Press the button.
Select the clock and follow the instructions
on the screen.
CONNECTING A BLUETOOTH
DEVICE - VEHICLES WITHOUT:
SYNC 3
Pairing a Device Press the button.
Select Bluetooth and follow the
instructions on the screen.
Note:
When pairing a new device, you can
choose to download contacts, set this as
the primary device and enable Emergency
Assistance.
SATELLITE RADIO
SiriusXM® Satellite Radio broadcasts a
variety of music, news, sports, weather,
traffic and entertainment satellite radio
channels. For more information and a
complete list of SiriusXM satellite radio
channels, visit www.siriusxm.com in the
United States, www.siriusxm.ca in Canada,
or call SiriusXM at 1-888-539-7474.
Note: This receiver includes the eCos
real-time operating system. eCos is
published under the eCos License.
Satellite Radio Reception Factors Potential satellite radio reception issues
For optimal reception performance, keep the antenna
clear of snow and ice build-up and keep luggage and other
material as far away from the antenna as possible.
Antenna obstructions
Hills, mountains, tall buildings, bridges, tunnels, freeway
overpasses, parking garages, dense tree foliage and
thunderstorms can interfere with your reception.
Terrain
When you pass a ground-based broadcast-repeating
tower, a stronger signal may overtake a weaker one and
the audio system may mute.
Station overload
Your display may show ACQUIRING . . . to indicate the
interference and the audio system may mute.
Satellite radio signal interfer-
ence
373
2020 Transit Connect (CHC) Canada/United States of America, CG3739en enUSA, Edition date: 201903, First-Printing Audio SystemE142607 E142607
Page 381 of 509
GENERAL INFORMATION
WARNING: Driving while
distracted can result in loss of vehicle
control, crash and injury. We strongly
recommend that you use extreme
caution when using any device that may
take your focus off the road. Your
primary responsibility is the safe
operation of your vehicle. We
recommend against the use of any
hand-held device while driving and
encourage the use of voice-operated
systems when possible. Make sure you
are aware of all applicable local laws
that may affect the use of electronic
devices while driving.
Getting to Know Your System
The SYNC 3 system allows you to interact
with a variety of features using the
touchscreen and voice commands. By
integrating with your Bluetooth-enabled
phone, the touchscreen provides easy
interaction with audio, multimedia, climate
control, navigation, and your phone's SYNC
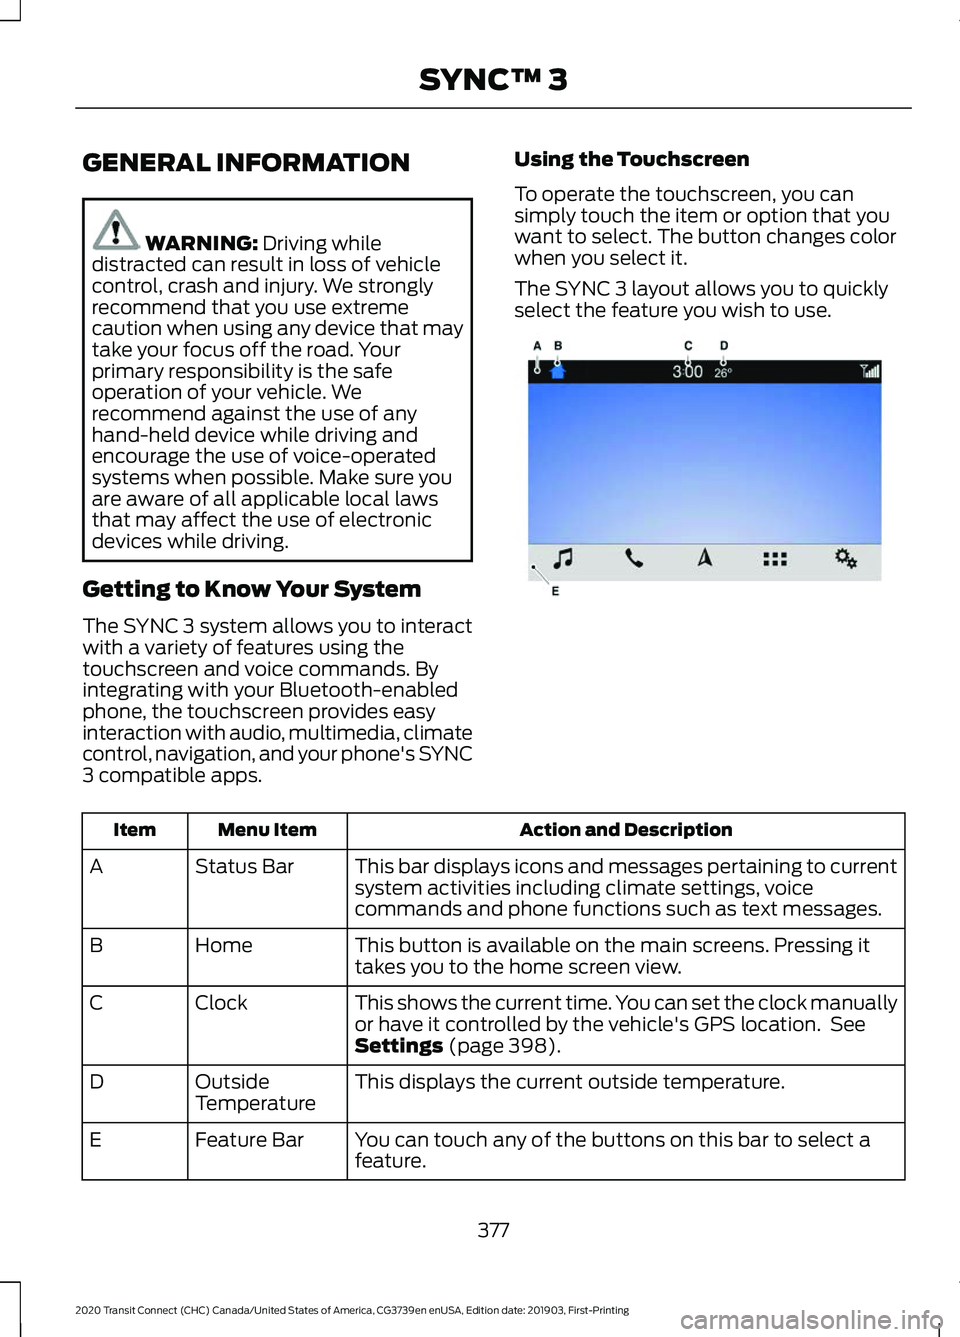
3 compatible apps. Using the Touchscreen
To operate the touchscreen, you can
simply touch the item or option that you
want to select. The button changes color
when you select it.
The SYNC 3 layout allows you to quickly
select the feature you wish to use.
Action and Description
Menu Item
Item
This bar displays icons and messages pertaining to current
system activities including climate settings, voice
commands and phone functions such as text messages.
Status Bar
A
This button is available on the main screens. Pressing it
takes you to the home screen view.
Home
B
This shows the current time. You can set the clock manually
or have it controlled by the vehicle's GPS location. See
Settings
(page 398).
Clock
C
This displays the current outside temperature.
Outside
Temperature
D
You can touch any of the buttons on this bar to select a
feature.
Feature Bar
E
377
2020 Transit Connect (CHC) Canada/United States of America, CG3739en enUSA, Edition date: 201903, First-Printing SYNC™ 3E270673