roof GEELY MK 2008 User Guide
[x] Cancel search | Manufacturer: GEELY, Model Year: 2008, Model line: MK, Model: GEELY MK 2008Pages: 416, PDF Size: 25.19 MB
Page 345 of 416

Chapter 6 WindshieldI. Component ViewRight front bady
pillar upper trim
Front windscreen seal-
ing strip
Left front body pillar
upper trim
Vent cover seal
Left vent cover assy.Left front wiper rocker arm assy.
Right vent cover assy. Right front wiper
rocker arm Assy.Polyurethane adhesive sealantFront windscreen stopInside rearview mirrorLeft Sun Visor assy. Right Sun Visor assy.
Sun Visor holder Sun Visor holderCeiling trim Roof handle assy.6-16Glasses box assembly
(without moonroof)Interior & Exterior Trim and Accessory -Windshield
Page 349 of 416

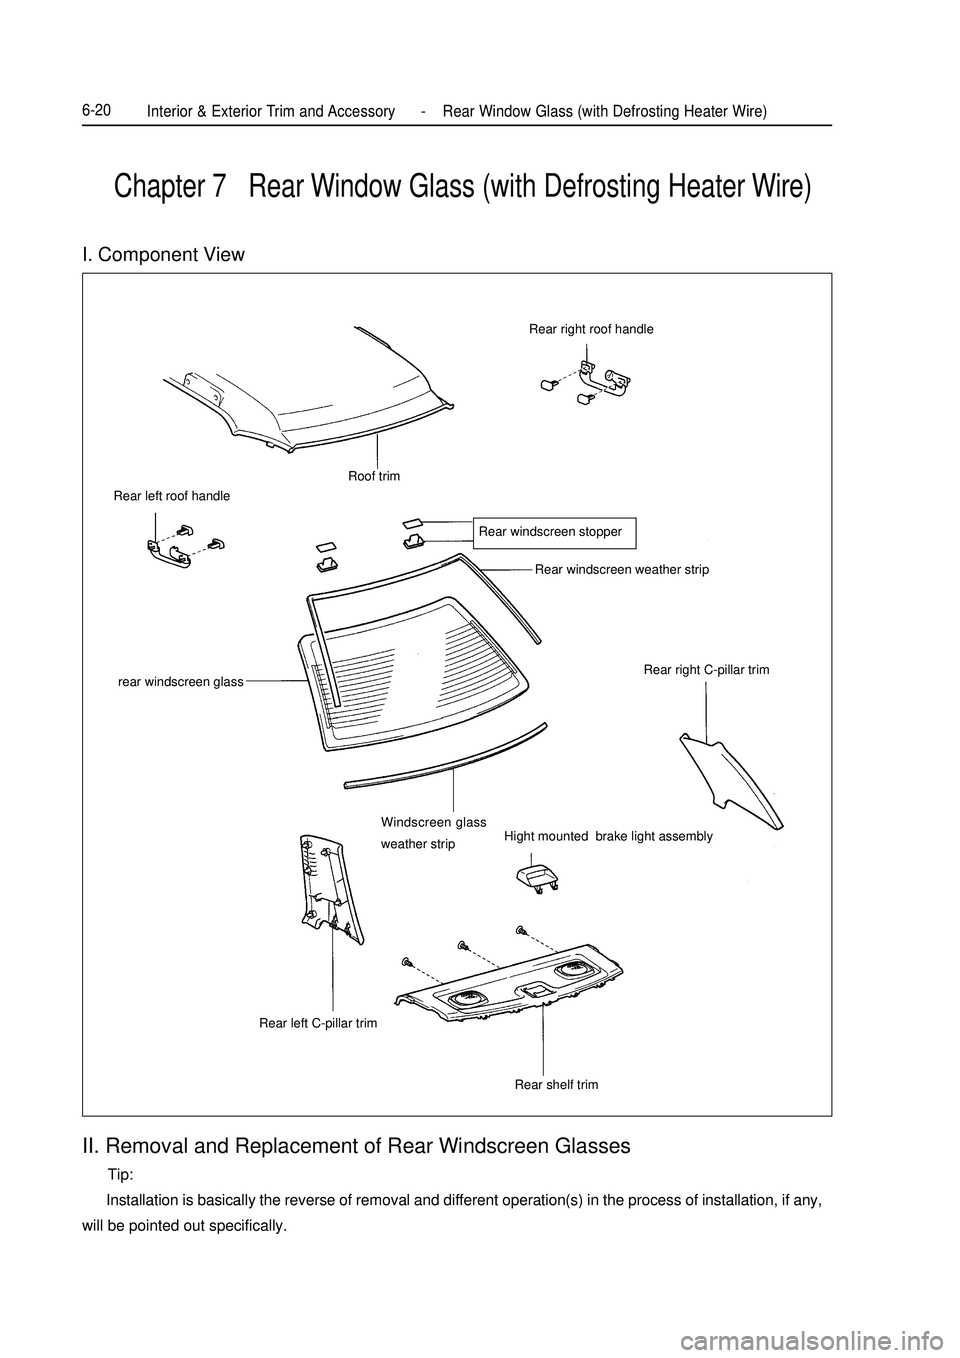
Chapter 7 Rear Window Glass (with Defrosting Heater Wire)II. Removal and Replacement of Rear Windscreen Glasses Tip:
Installation is basically the reverse of removal and different operation(s) in the process of installation, if any,
will be pointed out specifically.I. Component ViewRear right roof handleRoof trim
Rear windscreen stopperRear windscreen weather strip
Rear right C-pillar trim
Windscreen glass
weather stripHight mounted brake light assembly
Rear shelf trim Rear left C-pillar trim rear windscreen glass Rear left roof handleInterior & Exterior Trim and Accessory -Rear Window Glass (with Defrosting Heater Wire)6-20
Page 350 of 416

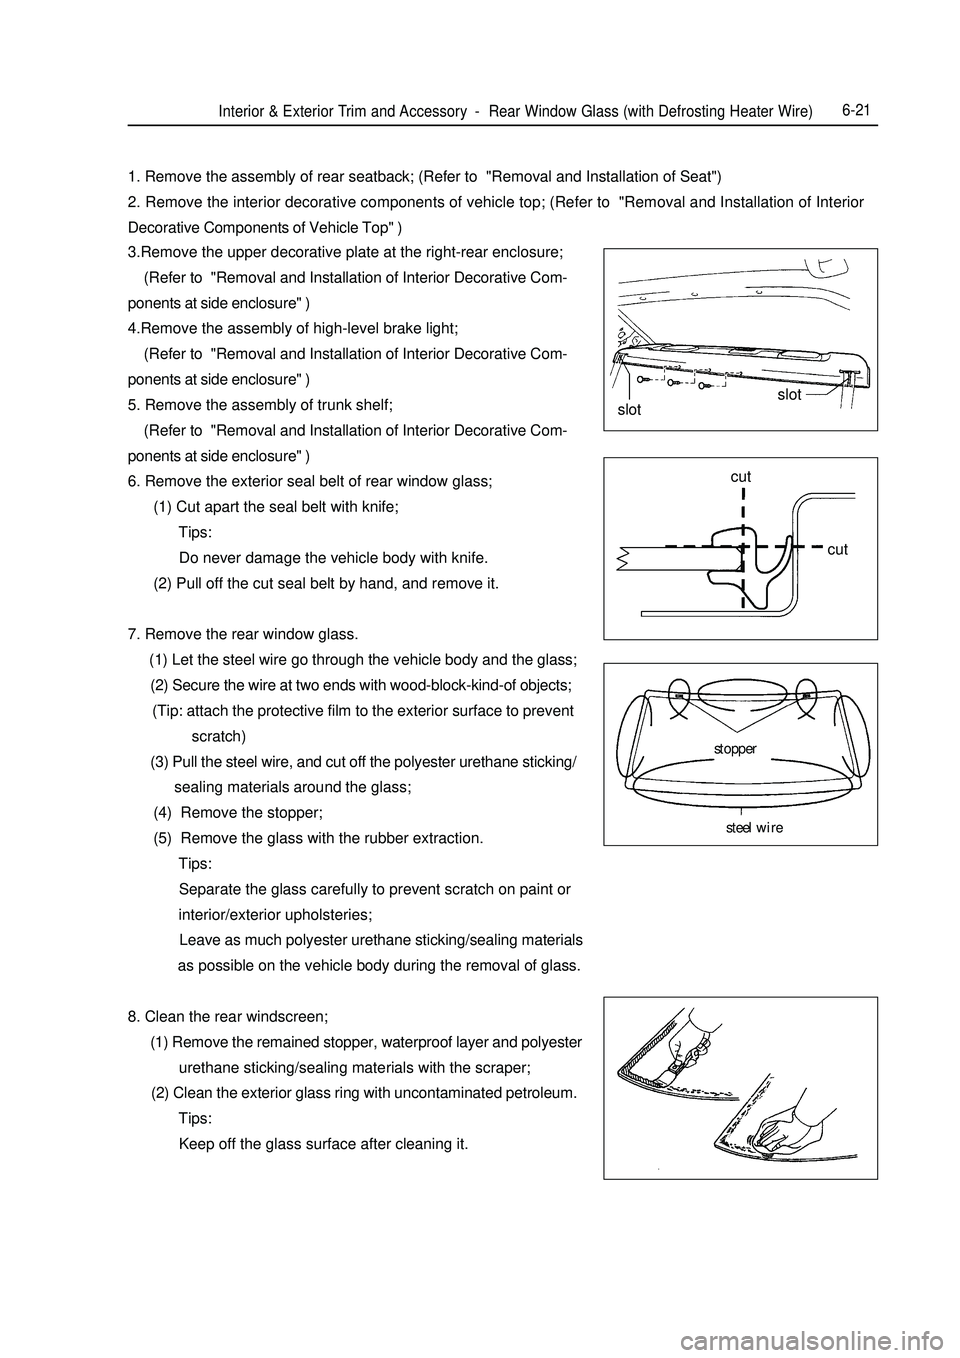
Interior & Exterior Trim and Accessory -Rear Window Glass (with Defrosting Heater Wire)6-211. Remove the assembly of rear seatback; (Refer to "Removal and Installation of Seat")
2. Remove the interior decorative components of vehicle top; (Refer to "Removal and Installation of Interior
Decorative Components of Vehicle Top" )
3.Remove the upper decorative plate at the right-rear enclosure;
(Refer to "Removal and Installation of Interior Decorative Com-
ponents at side enclosure" )
4.Remove the assembly of high-level brake light;
(Refer to "Removal and Installation of Interior Decorative Com-
ponents at side enclosure" )
5. Remove the assembly of trunk shelf;
(Refer to "Removal and Installation of Interior Decorative Com-
ponents at side enclosure" )
6. Remove the exterior seal belt of rear window glass;
(1) Cut apart the seal belt with knife;
Tips:
Do never damage the vehicle body with knife.
(2) Pull off the cut seal belt by hand, and remove it.
7. Remove the rear window glass.
(1) Let the steel wire go through the vehicle body and the glass;
(2) Secure the wire at two ends with wood-block-kind-of objects;
(Tip: attach the protective film to the exterior surface to prevent
scratch)
(3) Pull the steel wire, and cut off the polyester urethane sticking/
sealing materials around the glass;
(4) Remove the stopper;
(5) Remove the glass with the rubber extraction.
Tips:
Separate the glass carefully to prevent scratch on paint or
interior/exterior upholsteries;
Leave as much polyester urethane sticking/sealing materials
as possible on the vehicle body during the removal of glass.
8. Clean the rear windscreen;
(1) Remove the remained stopper, waterproof layer and polyester
urethane sticking/sealing materials with the scraper;
(2) Clean the exterior glass ring with uncontaminated petroleum.
Tips:
Keep off the glass surface after cleaning it.slotslot
cut
cut
stopper
steel wire
Page 354 of 416

Chapter 9 Roof TrimI.Component View
II. Removal and Installation Roof Trim Assy. Tips:
Installation is basically the reverse of removal and different operation(s) in the process of installation, if any,
will be pointed out specifically.
Follow the same steps as you do with left side parts when installing the right side parts.
1. Remove side quarter trim assy.
2. Remove the right sun visor assy.;
Unfasten 2 screws;
3. Remove the sun visor assy..
Remove the left sun visor assy.;Right sun visor assy.
Sun visor holderLeft sun visor
assy.
Roof lamp
Lamp shadeInterior & Exterior Trim and Accessory -Roof Trim6-25Glasses box assembly
(without moonroof) Roof trim
Front roof handle assy.Rear roof handle assy.
Right roof handle assy.
Page 355 of 416

Interior & Exterior Trim and Accessory -Roof Trim6-264. Remove the indoor roof lamp assy.
a. Use screwdriver to unfix the 4 buckles and remove the
lampshade;
Tips:
Wrap the sharp end of screwdriver up with adhesive tape before
operation.
b. Unfix 2 screws and the roof lamp assy.
5. Remove the handle assy.
a. Pull down the handle and take out 2 rubber plugs from the holes where two bolts are positioned;
b. Unfasten 2 screws and remove the handle assy.
6. Detach the sun visor tightener.
(Take down anti-clockwise the sun visor fastener.)
7. Remove the top trim
Use a special tool to remove 3 clips and remove the roof trim assy.
8. Installation is basically the reverse of removal.clip
Page 358 of 416

Interior & Exterior Trim and Accessory -Front Door Interior Trim6-295. Remove the left front door inside handle
Loosen 2 hooks, unfasten the left front door inside handle and
then disconnect 2 wires from the handle.
6. Peel off the rainproof film
7. Remove the speaker assembly
8. Remove the left front door glass and the left front door glass guide
Tips:
Protect the glass from scratch by inserting a cloth in the LF door
inner panel.
a. Unfix 2 bolts retaining the glass in place;
b. Remove the left front door glass;
c. Take out the glass guide.
9. Remove the left front door muffler
Unfix 2 bolts, 2 liners and the left front door muffler.
10. Remove the left front door glass regulator assembly
a. Disconnect the connector;
b. Unfix 6 bolts and left front door glass regulator assembly.
Caution
Be careful to prevent the glass regulator assembly from damage
when it is not supported by the bolts.
Notes:
Remove the left front door glass regulator assembly through the
service hatch.Hook
Hook
Page 360 of 416

6-31II. Removal and Installation of the Rear Door Interior trim Tip:
Installation is basically the reverse of removal and different operation(s) in the process of installation, if any,
will be pointed out specifically.
The removal and installation at the right side are the same as those at the left side.
1. Remove the interior decorative plate handle of left rear door;
Remove a screw with the cross-head screwdriver, and then take
off the interior decorative plate handle of left-rear door.
Tip:
Wrap the head of screwdriver with belt before using it.
2. Remove the assembly of electric-driven window regulator switch;
a. Release the grips with the straight screwdriver, and then re
move the regulator switch off the decorative plate.
b. Disconnect the switch connector.
3. Remove the interior decorative plate of left rear door;
a. Remove the screws and buckles;
b. Release the 6 buckles with the straight screwdriver, and hold
upwards the interior decorative plate of rear-left door to re
move it.
Tip:
Wrap the head of screwdriver with belt before using it.
4. Remove the interior handle of left-rear door;
Release the 2 hooks, remove the interior handle of left-rear door,
and disconnect the 2 wires off the interior handle of left-rear door.
5. Remove off the rain-proof film on the door;clip
HookHookgripsInterior & Exterior Trim and Accessory -Rear Door Interior Trim
Page 369 of 416

Chapter 17 Moonroof Assembly (Optional)Component ViewII. Inspection of sunroof Troubleshooting formSunshade sub-assy Sunroof motorBracket sub-assy.Sunroof frameSunroof glass bracketSunroof glass sealSunroof glassInterior & Exterior Trim and Accessory -Moonroof Assembly (Optional)6-40Possible causes
1. Power relay
2. Instrument fuse
3. Sunroof switch
4. Sunroof lock switch
5. Sunroof motor
6. Sunroof guide rail
7. Wire harness
1. Sunroof lock switch
2. Sunroof motor
3. Sunroof guide rail
4. Wire harnessSymptom
Sliding sunroof system doesn't work.
Sling sunroof system gets stuck (e.g.
foreign matter like gravel caught in motor)
Page 370 of 416

Interior & Exterior Trim and Accessory -Moonroof Assembly (Optional)6-41III. Removal and installation of sliding sunroof1. Remove the roof panel trim
(For more information, see "removal and installation of roof panel trim".)
2. Remove the ceiling lamp
(For more information, see "removal and installation of roof panel trim".)
3. Remove the sunroof glass sub-assembly
a. Unfix the screw by use of a box spanner;
b. Pull the glass upward and then take it out.
4. Remove the sunroof motor
Caution
Make sure the sunroof is completely closed before removing the sunroof motor.
a. Disconnect the connector;
b. Unfix the bolt and then remove the sunroof motor.
5. Remove the sunroof bracket sub-assembly
a. Detach water pipe;
b. Unfasten the retaining bolts around the sunroof bracket sub-assembly;
c. Take out the sunroof bracket sub-assembly.
6. Remove the sunshade sub-assembly
Slide the sunshade backward and then take it out.
7. Remove the sunroof drive cable and the sunroof guide rail;
8. Install in reverse order of removal.
Caution
Check if the sunroof is waterproof after installation.
If a water leak is detected, readjust the sunroof.
For more information on the electrical part of sunroof, see the chapter on electrical part of this manual.
Page 373 of 416

Part VII BodyChapter 1 SurveySection 1 Body StructureThe body is made up of main structure, movable plate work, interior/exterior trim parts, and body accessories.I. Main StructureAs shown in Fig.5-1, the main structure is made up of various assemblies and parts including engine compartment
assembly & front wall parts, floor assembly, left/right wall assembly, rear wall assembly, roof assembly and
luggage compartment main cover assembly etc.Fig. 5-1 Main Structure
1 Engine compartment assembly & front wall parts 2. Left/right wall assembly
3. Luggage compartment main cover assembly 4. Rear wall assembly 5. Floor assembly
6. Roof assembly 7. Front cross beam assembly(1) Engine Compartment Assembly & Front Wall Parts The main function of the engine compartment assembly and front wall parts is to form an engine compartment
and absorb most energy generated when the vehicle is collided from the front. The compartment provides a hood
for the engine and its accessories, which can prevent the front wheel from throwing mud. In the appearance, it
represents the body's design requirements. As shown in Fig.5-2, the engine compartment assembly and front wall
parts include front cross beam assembly, left/right longitudinal beam assembly, radiator cross beam assembly,Body -Survey7-1
123456
7