GEELY MK 2008 Manual Online
Manufacturer: GEELY, Model Year: 2008, Model line: MK, Model: GEELY MK 2008Pages: 416, PDF Size: 25.19 MB
Page 81 of 416

8. Install the control cables assembly of the transmission.
(1) Install the retainer on the control cables.
(2) Push the control cables into the floor.
(3) Install the control cables assembly with two bolts.
Torque: 5.0N.m
(4) Connect the control cables assembly and fix the control cable
with bolts.
Torque: 5.0N.m
(5) Connect the ends of the two control cables, and then install
two washers and two new spring clips.
(6) Install two new spring clips on the cable bracket.
(7) Connect the control cables to gear shift lever.
Note:
Make sure the claws engage firmly.
(8) Connect the ends of the control cables to the gear shift lever
selectively, and then install the cotter pin.
Note:
When connecting the control cables, the dents of their ends
hall be made upwards.
The cotter pins are inserted in a direction as shown in the
figure.
(9) Connect the ends of the gear shift cables to the gear shift lever
assembly.
9. Install the middle console body.
10. Install the parking brake cover.
11. Install the handle of the gear shift lever.
12. Install the cup-holder.
13. Install the lower cover in dashboard panel.
14. Install the upper cover in dashboard panel.Transmission ControlCable Type Transmission Control4-4 -
Page 82 of 416

Section 3 Manual Transmission Shift MechanismReplacement1. Remove the upper cover in dashboard panel.
2. Remove the lower cover in dashboard panel.
3. Remove the cup-holder in the middle console.
4. Loosen transmission control cover.
5. Remove the handle of the gear shift lever.
6. Remove the middle console body.
7. Remove the control cables assembly of the transmission.
(1) Remove the two cotter pins and unfix the head of the control
cables of the transmission
(2) Remove the spring clips and separate the control cables from
the bracket.
8. Remove the four bolts and floor gear shift lever assembly.
9. Install the floor gear shift lever assembly.
Install the floor gear shift lever assembly with four bolts.
Torque: 12N.mTransmission ControlManual Transmission Shift Mechanism4-5 -
Page 83 of 416

Transmission ControlManual Transmission Shift Mechanism4-610. Connect the control cables assembly.
(1) Connect the control cables to floor gear shift lever assembly.
Note:
Make sure the spring clips engage firmly.
(2) Connect the ends of the control cables to the floor gear shift
lever assembly, and then install the cotter pins.
Note:
When connecting the ends, the dents shall be made upwards.
The cotter pins are inserted in a direction as shown in the figure.
(3) Connect the ends of the gear shift cables to the floor gear shift
lever assembly.
11. Install the middle console body.
12. Install the parking brake cover.
13. Install the handle of the gear shift lever.
14. Install the cup-holder.
15. Install the lower cover in dashboard panel.
16. Install the upper cover in dashboard panel.Sawcat part -
Page 84 of 416

Transmission ControlAutomatic Transmission Shift Mechanism4-7Section 4 Automatic Transmission Shift MechanismComponent ViewConsole Panel Upper
Cover Assembly E Clip
Console Panel Lower
Cover Assembly
Cup Holder
Park Brake Cover Plate
E Clip
Console Assembly
Automatic Shifter Assembly121212 Shift Cable Key Retaining Cable E Clip
Specified Torque -
Page 85 of 416

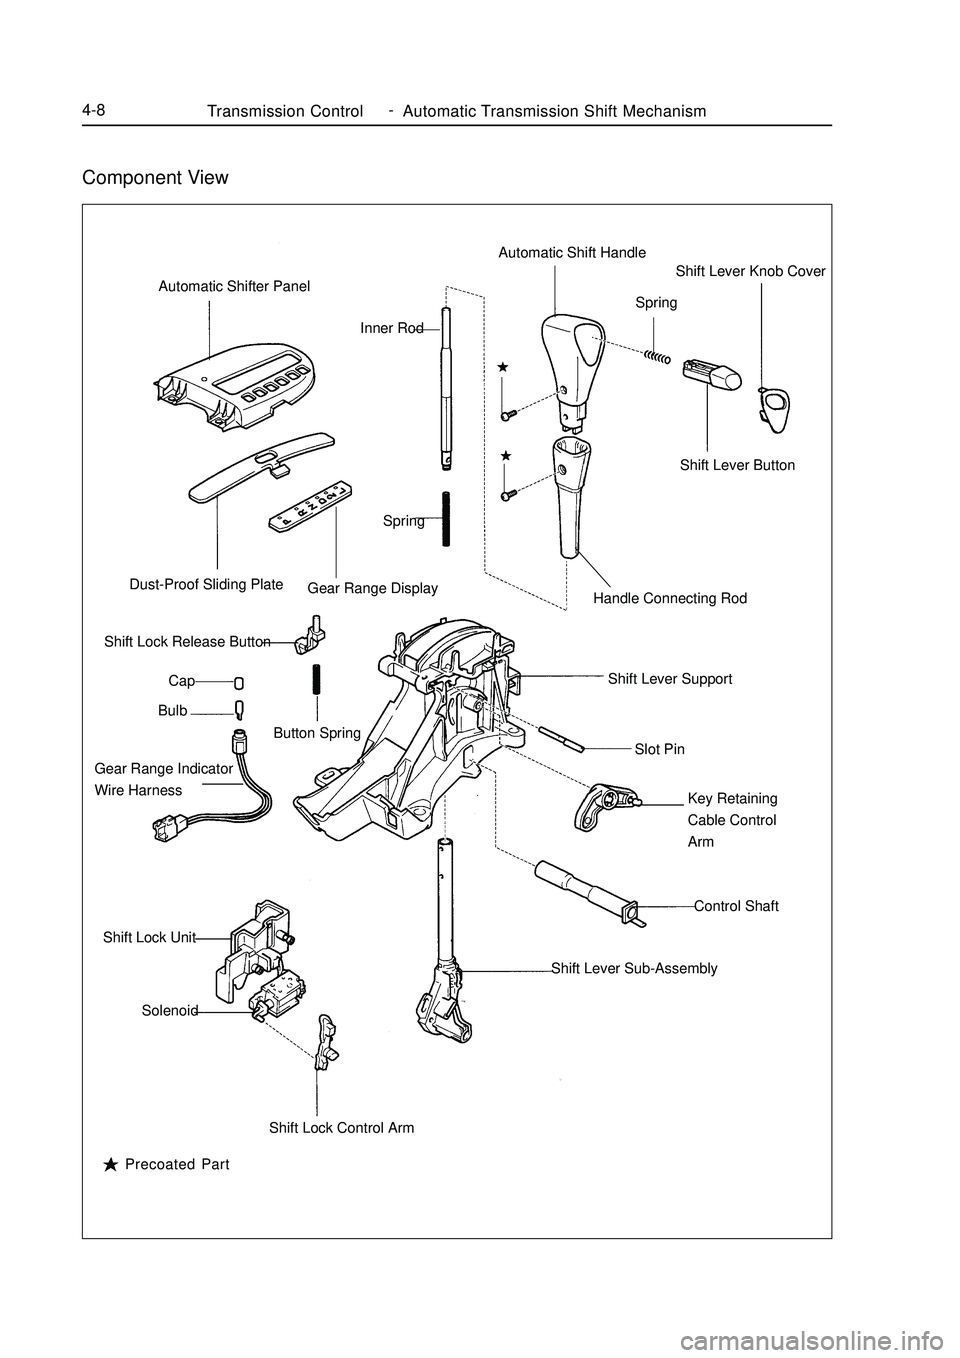
Transmission ControlAutomatic Transmission Shift Mechanism4-8Component ViewAutomatic Shifter Panel
Dust-Proof Sliding Plate
Gear Range Display
Shift Lock Release Button
Cap
Bulb
Button Spring
Gear Range Indicator
Wire Harness
Shift Lock Unit
Solenoid
Shift Lock Control ArmShift Lever Sub-AssemblyControl Shaft Key Retaining
Cable Control
Arm Slot Pin Shift Lever SupportHandle Connecting RodShift Lever Button Shift Lever Knob Cover
Spring Automatic Shift Handle
Spring Inner Rod
Precoated Part -
Page 86 of 416

Transmission ControlAutomatic Transmission Shift Mechanism4-9Replacement1. Remove CD cover
2. Remove console panel lower cover assembly
3. Remove cup holder
4. Remove console assembly
5. Remove key retaining cable.
(1) loosen the adjustment locking cap.
Tip:
Face the vehicle front and turn rotate it clockwise by 90°.
(2) Use screwdriver to remove the key retaining cable
6. Disconnect shift cable assembly
(1) Remove the nut, disconnect the shift cable from the shifter
assembly
(2) Use screwdriver to disconnect the shift cable from the shift
lever tray.
7. Remove automatic shifter assembly
(1) Remove the four bolts.
(2) Disconnect the two connectors.
(3) Remove the shifter assembly. -
Page 87 of 416

4-108. Install the automatic shifter assembly
Install it in place in the reverse order of removal.
9. Check and adjust the shift lever position
(1) Check that the starter works only when the shift lever is in P position, but doesn't work in other positions.
(2) Move the shift lever, check whether the display of the gear range indicator is consistent with the actual gear
range.
(3) Check that the key can be pulled out in P position.
(4) Except the P position, the ignition key can not be turned to LOCK position with the shift lever in other
positions.
(5) Check that when shift release button is pressed down, the shift lever can be transferred to other positions
from the P position.
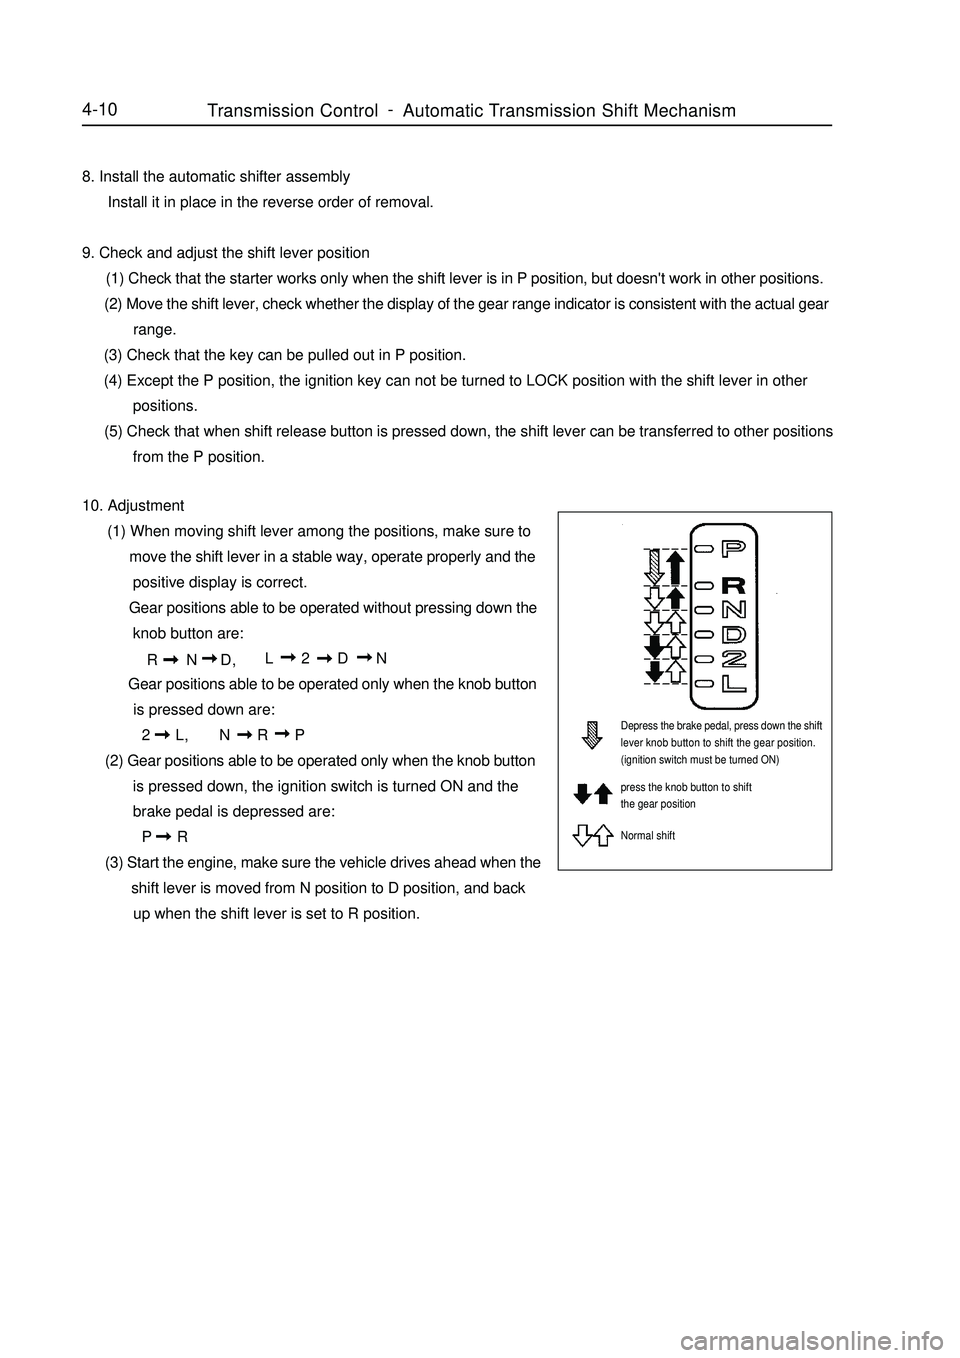
10. Adjustment
(1) When moving shift lever among the positions, make sure to
move the shift lever in a stable way, operate properly and the
positive display is correct.
Gear positions able to be operated without pressing down the
knob button are:
R N D,L 2 D N
Gear positions able to be operated only when the knob button
is pressed down are:
2 L,N R P
(2) Gear positions able to be operated only when the knob button
is pressed down, the ignition switch is turned ON and the
brake pedal is depressed are:
P R
(3) Start the engine, make sure the vehicle drives ahead when the
shift lever is moved from N position to D position, and back
up when the shift lever is set to R position.Depress the brake pedal, press down the shift
lever knob button to shift the gear position.
(ignition switch must be turned ON)
press the knob button to shift
the gear position
Normal shiftTransmission ControlAutomatic Transmission Shift Mechanism -
Page 88 of 416

Chapter 2 Accelerator Pedal DeviceSection 1 Introduction of Accelerator PedalComponent View
Replacement1. Disconnect the accelerator cables.
Loosen the accelerator cables and the bolts on the accelerator cable frame of the engine, and then disconnect
the accelerator cables from the rocker of the motor restrictor.
2. Remove the accelerator pedal.
(1)Remove the two bolts that connect the accelerator pedal and the body.
(2)Disconnect the accelerator cables.
3. Remove the accelerator cables.Accderator
Pedal Rotation
AssemloyAccelerator pedal
bracket assemblyLubrication
bushingSpeaial
Spring ClipAccelerator cable assemblyHex. flange nut22~29N .mAccelerator cableAccelerator Pedal DeviceIntroduction of Accelerator Pedal4-114. Install the accelerator cables and accelerator pedal assembly in a reverse order.
Note:
(1)The torque of the bolt is 20~25N.m.
(2)Adjust the position of the accelerator cables properly to obtain a proper tension.
(3)Check that the acceleration runs freely and reliably. -
Page 89 of 416

Chapter 3 Clutch Control SystemSection 1 Introduction of Clutch CentrolI. Description A hydraulic clutch control system is equipped which can be used in cars with various displacements (including
1.3L, 1.5L and1.6L).II. Symptom Table The table below lists the common symptoms and possible causes of the failures. The number means the
possible sequence of the causes. Check the parts, and replace the corresponding parts if necessary.
Suspected area
1. Engine fixture is loosened.
2. Clutch disc shakes seriously.
3. Clutch disc is contaminated by oil or wore down.
4. Torque spring of the clutch disc is damaged.
5. Clutch disc is hardened.
6. Diaphragm spring is not aligned on the top.
1. There is air in the clutch oil pipe.
2. Cup of the master cylinder is damaged.
3. Cup of the wheel cylinder is damaged.
1. Clutch release bearing is worn out, contaminated or damaged.
2. Torque spring of the clutch disc is damaged.
1. Clutch pedal has maladjusted free stroke.
2. Clutch disc is contaminated by oil.
3. Clutch disc is worn.
4. Diaphragm spring is damaged.
5. Platen is deformed.
6. Flywheel is deformed.
1. Clutch pedal has maladjusted free stroke.
2. There is air in the clutch oil pipe.
3. Cup of the master cylinder is damaged.
4. Cup of the wheel cylinder is damaged.
5. Clutch disc id deformed or wiggled.
6. Clutch disc is worn out.
7. Clutch disc is contaminated or burned out.
8. Clutch disc is contaminated by oil.
9. Clutch disc has no lube on its spline. Symptom
Clutch is trapped or shaken.
Clutch pedal is loosened.
Abnormal noise occurs.
Clutch skids.
Clutch can not be separated.Clutch Control SystemIntroduction of Clutch Centrol4-12 -
Page 90 of 416

Component ViewSection 2 Clutch PedalAdjustment1. Check and adjust the clutch pedal.
(1) Lift the carpet on the floor.
(2) Check the pedal’s height is proper.
Pedal's height from oil felt: 134.3-144.3mm
(3) Adjust the pedal's height.
Loosen the lock nut, and turn the bolt till the correct pedal's
height is reached, and then tighten the lock nut.
Torque: 16N.m
(4) Check whether the pedal's free travel and push bar travel are
proper.
a. Step the pedal down till a resistance appears.
Pedal's free stroke: 5-15mm
b. Step the pedal down lightly till the resistance increase a
little.
Push bar (on the pedals top) travel: 1.0-5.0mm
(5) Adjust the pedal's free travel and push bar travel.
a. Loosen the lock nut, and turn the push bar till the pedal's
free travel and push bar travel are proper.Clutch pedal bracket
Hex. flange nut37
Clutch pedal spring
Clutch pedal
bushing
Absorber
Clutch pedal cover Clutch pedal
Transimissin RodClutch master cylinder cone
U-connector bushingClutch pedal bushing Clutch Peader AxisClip12
Master cylinder
outtet pipesetSted Band ClampMaster cylinder
Inlet hoseHydranlic clutch hose
ÒLÓ Clip
Clutch hose Bracket
BoltClutch Control SystemClutch Pedal4-13Non-reusable parts
Multi-function lubeNm :Specified torquePedal height
adjustmentClutch
pedal Travel
Push travel &
free travel adjustment
pointPedal heightPedal free travel -