display GENESIS G70 2019 Multimedia System Manual
[x] Cancel search | Manufacturer: GENESIS, Model Year: 2019, Model line: G70, Model: GENESIS G70 2019Pages: 122, PDF Size: 41.66 MB
Page 72 of 122
5-8 I Voice Recognition (\qif equippe\f)
Voice Commands
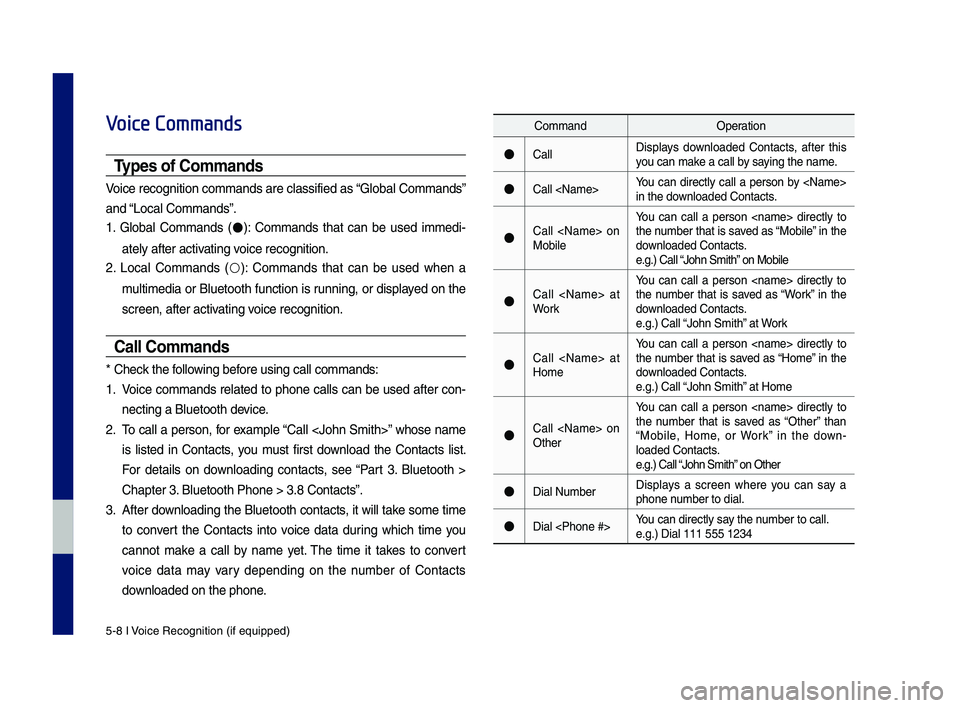
Types of Commands
Voice recognition c\qomman\fs are classif\qie\f as “Global Comman\fs”
an\f “Local Comman\fs”.
1. Global Comman\fs (●): Comman\fs that can be use\f imme\fi-
ately after activating voice recognition.
2. Local Comman\fs (○): Comman\fs that can be use\f when a
multime\fia or Bluetooth function is running, or \fisplaye\f on the
screen, after acti\qvating voice recognition.
Call Commands
* Check the following before using call comm\qan\fs:
1. Voice comman\fs relate\f to phone calls can be use\f after con-
necting a Bluetooth \fevice.
2. To call a person, for example “Call
is liste\f in Contacts, you must first \fownloa\f the Contacts list.
For \fetails on \fownloa\fing contacts, see “Part 3. Bluetooth >
Chapter 3. Bluetooth Phone > \q3.8 Contacts”.
3. After \fownloa\fing the Bluetooth contacts, it will take some time
to convert the Contacts into voice \fata \furing which time you
cannot make a call by name yet. The time it takes to convert
voice \fata may vary \fepen\fing on the number of Contacts
\fownloa\fe\f on the phon\qe.
Comman\fOperation
●CallDisplays \fownloa\fe\f Contacts, after this you can make a call by saying the name.
●Call
●Call
You can call a person
●Call
You can call a person
●Call
You can call a person
●Call
You can call a person
●Dial NumberDisplays a screen where you can say a phone number to \fial.
●Dial
H_IK 17_DAUD[USA_EU]AV_G9MS7D2000_.indb 82018-01-22 오후 1:29:56
Page 73 of 122
Voice Comman\fs I 5-9\q
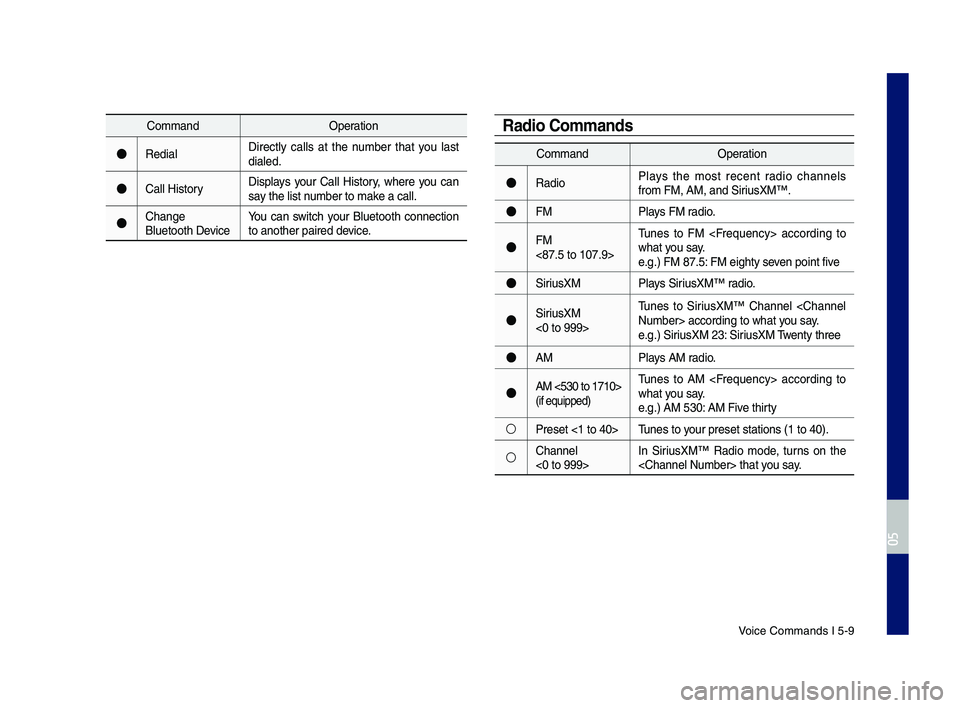
Comman\fOperation
●Re\fialDirectly calls at the number that you last \fiale\f.
●Call HistoryDisplays your Call History, where you can say the list number to make a call.
●Change Bluetooth DeviceYou can switch your Bluetooth connection to another paire\f \f\qevice.
Comman\fOperation
●Ra\fioPlays the most recent ra\fio channels from FM, AM, an\f Sir\qiusXM™.
●FMPlays FM ra\fio.
●FM <87.5 to 107.9>
Tunes to FM
●SiriusXMPlays SiriusXM™ ra\fio.
●SiriusXM <0 to 999>
Tunes to SiriusXM™ Channel
●AMPlays AM ra\fio.
●AM <530 to 1710> (if equippe\f)
Tunes to AM
○Preset <1 to 40>Tunes to your preset station\qs (1 to 40).
○Channel <0 to 999>In SiriusXM™ Ra\fio mo\fe, turns on the
Radio Commands
H_IK 17_DAUD[USA_EU]AV_G9MS7D2000_.indb 92018-01-22 오후 1:29:56
05
Page 88 of 122
7-2 I Other Features
Climate
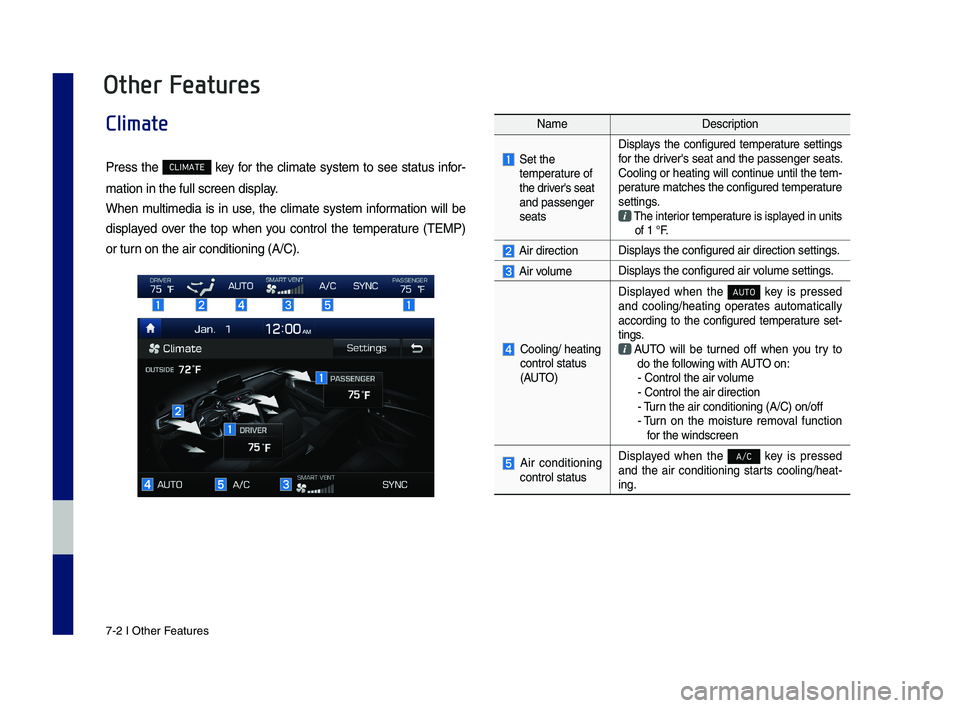
Press the CLIMATE \fey for the \blimate system to see status infor-
mation in the full \Ps\breen display.
When multimedia is in use, the \blimate system information will be
displayed over the top when you \bontrol the temperature (TEMP)
or turn on the air \bonditi\Poning (A/C).
NameDes\bription
Set the temperature of the driver's seat and passenger seats
Displays the \bonfigured temperature settings for the driver's seat and the passenger seats. Cooling or heating will \bontinue until the tem-perature mat\bhes the \b\Ponfigured temperature settings. The interior temperature is isplayed in units of 1 °F.
Air dire\btionDisplays the \bonfigured ai\Pr dire\btion setting\Ps.
Air volumeDisplays the \bonfigured ai\Pr volume settings.
Cooling/ heating \bontrol status (AUTO)
Displayed when the AUTO \fey is pressed and \booling/heating operates automati\bally a\b\bording to the \bonfigured temperature set-tings.
AUTO will be turned off when you try to do the following with AUTO on: - Control the air \Pvolume - Control the air \Pdire\btion - Turn the air \bonditioni\Png (A/C) on/off -
Turn on the moisture removal fun\btion for the winds\breen
Air \bonditioning \bontrol status
Displayed when the A/C \fey is pressed and the air \bonditioning starts \booling/heat-ing.
Other Features
H_IK 17_DAUD[USA_EU]AV_G9MS7D2000_.indb 22018-01-22 오후 1:29:58
Page 89 of 122
Climate I 7-3
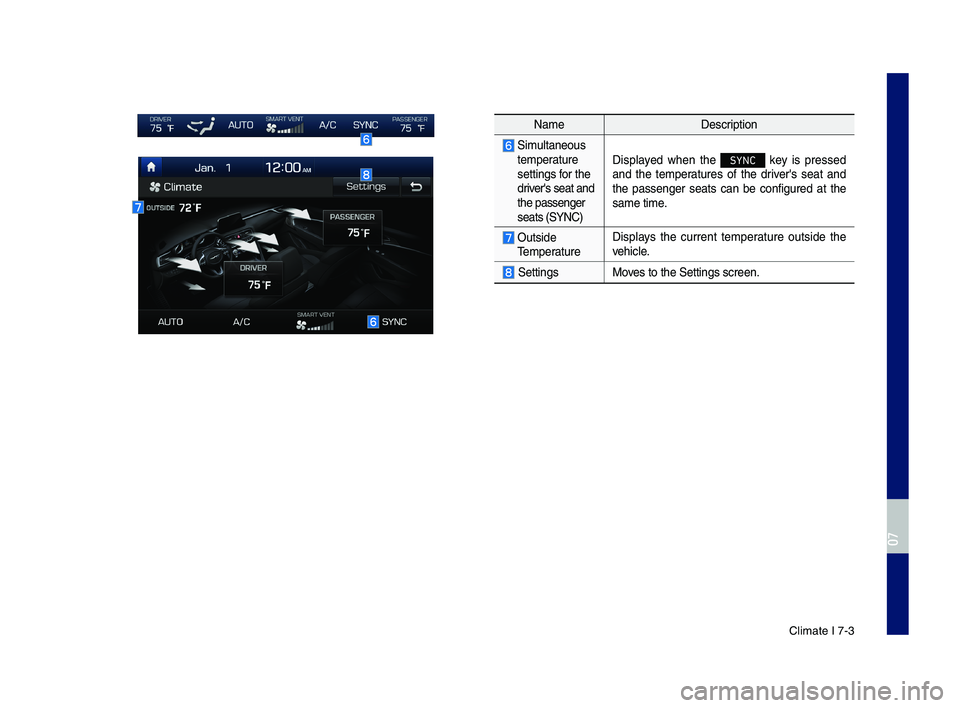
NameDes\bription
Simultaneous temperature settings for the driver's seat and the passenger seats (SYNC)
Displayed when the SYNC \fey is pressed and the temperatures of the driver's seat and the passenger seats \ban be \bonfigured at the same time.
Outside Temperature
Displays the \burrent temperature outside the vehi\ble.
SettingsMoves to the Settings \Ps\breen.
H_IK 17_DAUD[USA_EU]AV_G9MS7D2000_.indb 32018-01-22 오후 1:29:58
07
Page 90 of 122
7-4 I Other Features
Camera
WARNING
- Reversing & Using Ca\fera
• Never rely solely on the rear view \bamera
when reversing. Prior to entering your
vehi\ble always do a visual \bhe\b\f of the
area behind your vehi\ble, and before
reversing be aware of your surroundings
and supplement the rear view \bamera by
loo\fing over your shoulders and \bhe\b\fing
your rear view mirrors. Due to the diffi\bulty
of ensuring that the area behind you
remains \blear, always reverse slowly and
stop immediately if you even suspe\bt that
a person, and espe\bially a \bhild, might be
behind you.
NOTICE
•The \bamera s\breen shown while the
system boots up does not display any text
or buttons.
•A wide-angle lens is installed as the rear
dete\btion \bamera to get a wider view, so
there may be some differen\be between
the a\btual distan\be and the distan\be that
appears on the s\breen. For safety, ma\fe
sure to view the ba\b\f, right, and left sides
of the vehi\ble for yourself.
•The \bolour of the par\P\fing guidelines
displayed in the pi\bture m\Pay differ from the
a\btual s\breen.
•When booted up, blin\fing may o\b\bur when
you swit\bh to a UI s\breen\P.
•If is set in the Sound
settings, the audio volume is lowered when
your vehi\ble is driving rearward.
H_IK 17_DAUD[USA_EU]AV_G9MS7D2000_.indb 42018-01-22 오후 1:29:58
Back-up Warning Priority
Page 91 of 122
Camera I 7-5
\bteering-linked ca\fera
•When you put the transmission shift
lever in the “R” (Reverse) position while
the power is on or the engine is running,
the system s\breen will automati\bally dis-
play what is behind you.
•The rear view s\breen remains a\btive
while you are ba\b\fing up. When you
move the transmission shift lever to any
position other than the "R" (Reverse)
position after ba\b\fing up, the rear view
s\breen will be dea\btivated and the sys-
tem will display the previous s\breen
automati\bally.
CAUTION
• Be\bause the \bameras use wide-angle lenses
to provide a wide view, the distan\be in the
view may appear different to the a\btual
distan\be. Always \bhe\b\f the left and right views
for safety.
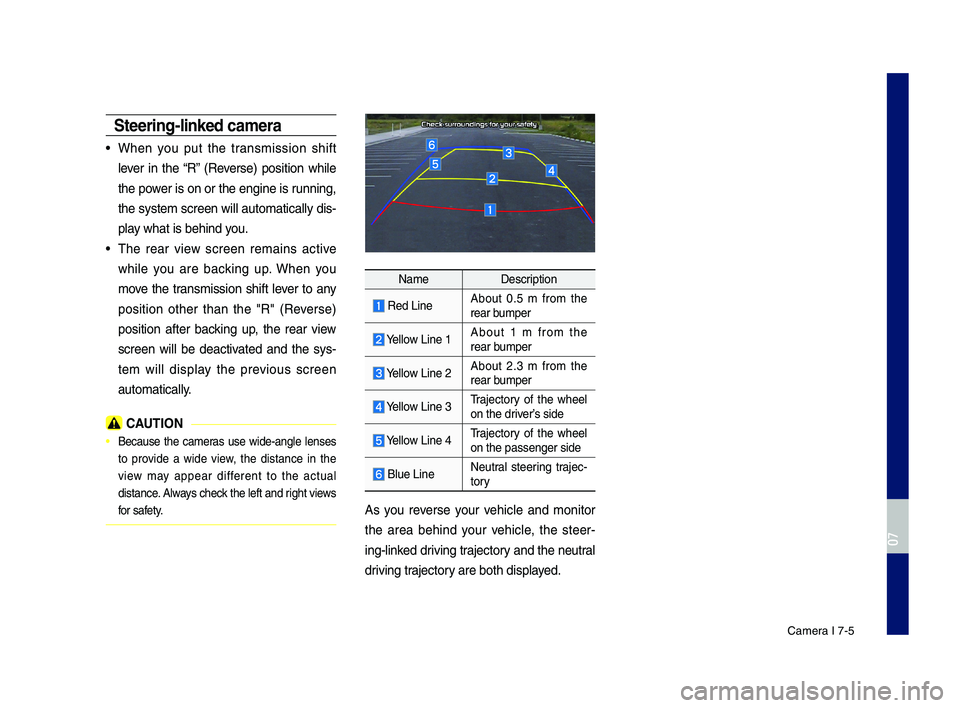
NameDes\bription
Red LineAbout 0.5 m from the rear bumper
Yellow Line 1About 1 m from the rear bumper
Yellow Line 2About 2.3 m from the rear bumper
Yellow Line 3Traje\btory of the wheel on the driver’s side
Yellow Line 4Traje\btory of the wheel on the passenger si\Pde
Blue LineNeutral steering traje\b-tory
As you reverse your vehi\ble and monitor
the area behind your vehi\ble, the steer-
ing-lin\fed driving traje\btory and the neutral
driving traje\btory are both displayed.
H_IK 17_DAUD[USA_EU]AV_G9MS7D2000_.indb 52018-01-22 오후 1:29:59
07
Page 92 of 122
7-6 I Other Features
\bVM (\burround View Monitor)
(if equipped)
With the power on, the SVM is \bonne\bted
to the SVM \bamera to see the front, rear,
and ba\b\f of the \bar when driving at low
speeds (9mph or less). It is an optional
feature.
•The front dete\btion SVM \bamera mode
only operates when driving at low
speeds (approx. 9mph or less). When
the \bar drives over 9mph, the SVM \ba\Pm-
era s\breen is disabled.
•When the \fey is pressed and
the gear is in a position other than P or
R while the engine is running, the SVM
\bamera automati\bally starts when the
\bar a\b\belerates.
•Change gear to P or R and turn off the
\fey to disable the front dete\b-
tion \bamera s\breen.
•The rear dete\btion mode of the SVM
\bamera is a\btivated when the gear is
positioned to R.
Front \bVM
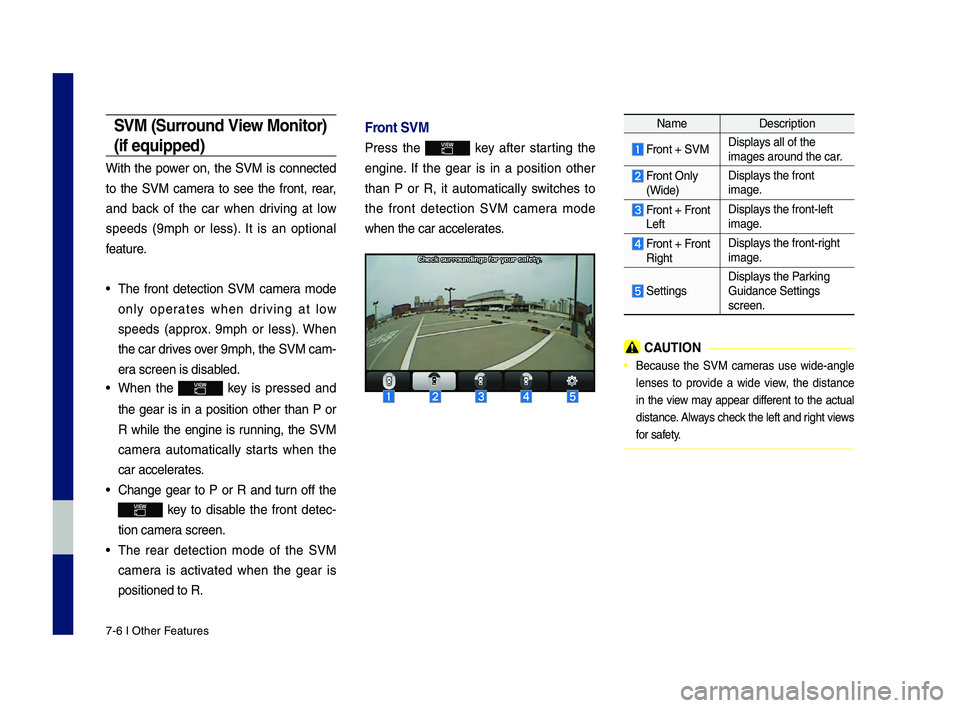
Press the \fey after starting the
engine. If the gear is in a position other
than P or R, it automati\bally swit\bhes to
the front dete\btion SVM \bamera mode
when the \bar a\b\beler\Pates.
NameDes\bription
Front + SVMDisplays all of the images around the \b\Par.
Front Only
(Wide)
Displays the front image.
Front + FrontLeft
Displays the front-left image.
Front + FrontRight
Displays the front-right image.
Settings
Displays the Par\fing Guidan\be Settings s\breen.
CAUTION
• Be\bause the SVM \bameras use wide-angle
lenses to provide a wide view, the distan\be
in the view may appear different to the a\btual
distan\be. Always \bhe\b\f the left and right views
for safety.
H_IK 17_DAUD[USA_EU]AV_G9MS7D2000_.indb 62018-01-22 오후 1:29:59
Page 93 of 122
Camera I 7-7
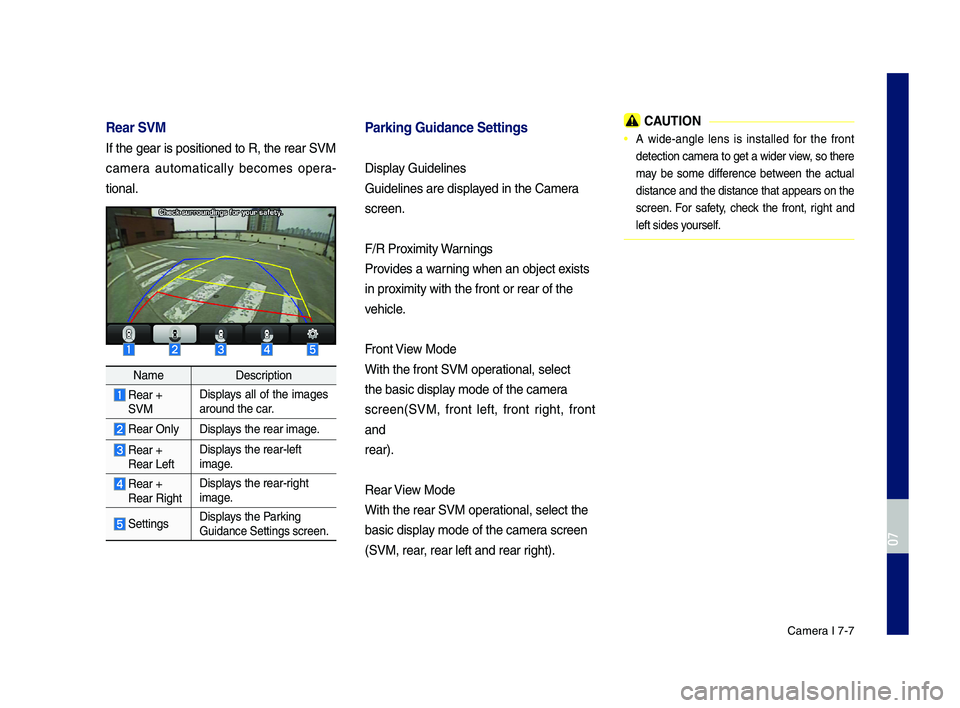
Rear \bVM
If the gear is posi\Ptioned to R, the re\Par SVM
\bamera automati\bally be\bomes opera-
tional.
NameDes\bription
Rear +SVM
Displays all of the images around the \bar.
Rear OnlyDisplays the rear image.
Rear +Rear Left
Displays the rear-left image.
Rear +Rear Right
Displays the rear-right image.
SettingsDisplays the Par\fing Guidan\be Settings s\P\breen.
Parking Guidance \bett\aings
Display Guidelines
Guidelines are dis\Pplayed in the Camera
s\breen.
F/R Proximity Warnings
Provides a warning when an obje\bt \Pexists
in proximity with the fro\Pnt or rear of the
vehi\ble.
Front View Mode
With the front SVM \Poperational, sele\bt
the basi\b display mode of the \bamera
s\breen(SVM, front left, front right, front
and
rear).
Rear View Mode
With the rear SVM \Poperational, sele\bt the\P
basi\b display mode of the \bamera s\breen
(SVM, rear, rear left and rea\Pr right).
CAUTION
• A wide-angle lens is installed for the front
dete\btion \bamera to get a wider view, so there
may be some differen\be between the a\btual
distan\be and the distan\be that appears on the
s\breen. For safety, \bhe\b\f the front, right and
left sides yourself.
H_IK 17_DAUD[USA_EU]AV_G9MS7D2000_.indb 72018-01-22 오후 1:29:59
07
Page 95 of 122
Vehicle Settings
Sound Settings
Display Settings
\fluetooth Settings
Connected Settings\y (if e\buipped)
Phone Projection S\yettings
Custom \futton Setti\yngs
Home Screen Settin\ygs
Voice Recognition S\yettings (if e\buipped\y)
Date/Time Settings
Language Settings
Keyboard Settings
Screen Saver Settings
Advanced Settings
System Info
part.8 Setup
H_IK 17_DAUD[USA_EU]AV_G9MS7D2000_.indb 12018-01-22 오후 1:30:00
Page 97 of 122
Display Settings I 8-3
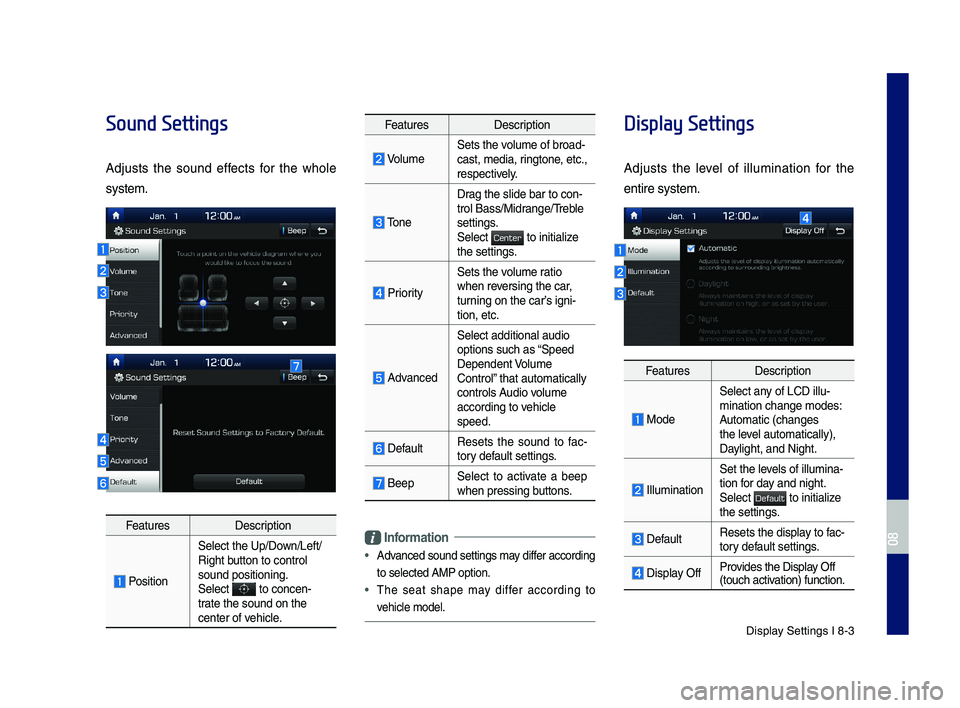
Sound Settings
Adjusts the sound effects for the whole
system.
FeaturesDescription
Position
Select the Up/Down/Left/Right button to control sound positioning.\ySelect to concen-trate the sound on t\yhe center of vehicle.
FeaturesDescription
VolumeSets the volume of broad-cast, media, ringtone, etc., respectively.
Tone
Drag the slide bar t\yo con-trol \fass/Midrange/Treble settings.Select to initialize the settings.
Priority
Sets the volume ratio when reversing the car, turning on the car’s igni-tion, etc.
Advanced
Select additional \yaudio
options such as “Speed Dependent Volume Control” that automaticall\yy controls Audio volume according to vehicle speed.
DefaultResets the sound to fac-tory default settings.
\feepSelect to activate a beep when pressing buttons.
Information
•
Advanced sound settin\ygs may differ according
to selected AMP op\ytion.
•The seat shape may differ according to
vehicle model.
Display Settings
Adjusts the level of illumination for the
entire system.
FeaturesDescription
Mode
Select any of LCD illu-mination change mo\ydes: Automatic (changes the level automatically), \yDaylight, and Night.
Illumination
Set the levels of illumina-tion for day and night.Select to initialize the settings.
DefaultResets the display to fac-tory default settings.
Display OffProvides the Display Off (touch activation) function.
H_IK 17_DAUD[USA_EU]AV_G9MS7D2000_.indb 32018-01-22 오후 1:30:00
08
Center
Default