set GENESIS G70 2021 Owner's Manual
[x] Cancel search | Manufacturer: GENESIS, Model Year: 2021, Model line: G70, Model: GENESIS G70 2021Pages: 516, PDF Size: 12.84 MB
Page 415 of 516

6-22
The Tire Mobility Kit is not designed
or intended as a permanent tire
repair method and is to be used for
one tire only.
This instruction shows you step by
step how to temporarily seal the
puncture simply and reliably.
Read the section "Notes on the safe
use of the Tire Mobility Kit".
Notes on the safe use of the
Tire Mobility Kit
• Park your car at the side of the
road so that you can work with the
Tire Mobility Kit away from moving
traffic.
• To be sure your vehicle will not
move, even when you’re on fairly
level ground, always set your park-
ing brake.
• Only use the Tire Mobility Kit for
sealing/inflation passenger car
tires. Only punctured areas located
within the tread region of the tire
can be sealed using the tire mobil-
ity kit.
• Do not use on motorcycles, bicy-
cles or any other type of tires.• When the tire and wheel are dam-
aged, do not use Tire Mobility Kit
for your safety.
• Use of the Tire Mobility Kit may not
be effective for tire damage larger
than approximately 0.24 inch (6
mm).
Please contact the nearest author-
ized retailer of Genesis Branded
products if the tire cannot be made
roadworthy with the Tire Mobility
Kit.
• Do not use the Tire Mobility Kit, if a
flat tire or an under-inflated tire is
further severely damaged by being
continuously driven.
• Do not remove any foreign objects
such as nails or screws that have
penetrated the tire.
• Provided the car is outdoors, leave
the engine running. Otherwise
operating the compressor may
eventually drain the car battery.
• Never leave the Tire Mobility Kit
unattended while it is being used.
• Do not leave the compressor run-
ning for more than 10 minutes at a
time or it may overheat.• Do not use the Tire Mobility Kit if
the ambient temperature is below
-22°F (-30°C).
• In case of skin contact with the
sealant, wash the area thoroughly
with plenty of water. If the irritation
persists, seek medical attention.
• In case of eye contact with the
sealant, flush your eyes for at least
15 minutes. If the irritation persists,
seek medical attention.
• In case of swallowing the sealant,
rinse the mouth and drink plenty of
water. However, never give any-
thing to an unconscious person
and seek medical attention imme-
diately.
• Long time exposure to the sealant
may cause damage to bodily tissue
such as kidney, etc.
What to do in an emergency
Page 419 of 516

6-26
Checking the tire inflation pres-
sure
1. After driving approximately 4~6
miles (7~10 km or about
10 minutes), stop at a safe loca-
tion.
2. Connect the filling hose (3) direct-
ly into the compressor.3. Connect the other end of the filling
hose (3) directly into the tire valve.
4. Plug the compressor power cord
(4) into the vehicle power outlet.5. Adjust the tire inflation pressure to
the recommended tire inflation.
With the ignition switched on, pro-
ceed as follows.
- To increase the inflation pres-
sure:
Switch on the compressor. To
check the current inflation pres-
sure setting, briefly switch off the
compressor.
- To reduce the inflation pres-
sure:
Press the button (9) on the com-
pressor.
Information
The pressure gage may show higher
than actual reading when the com-
pressor is running. To get an accurate
tire pressure, the compressor needs to
be turned off.
i
What to do in an emergency
OAEPH067042
OIK069039
Page 425 of 516
7
Maintenance
7
Maintenance
Engine Compartment .............................................7-3
Maintenance Services ...........................................7-4
Owner's Responsibility .....................................................7-4
Owner Maintenance Precautions..................................7-4
Owner Maintenance ..............................................7-5
Owner Maintenance Schedule .......................................7-6
Scheduled Maintenance Services........................7-7
Normal Maintenance Schedule ......................................7-8
Maintenance Under Severe Usage Conditions ........7-12
Explanation of Scheduled Maintenance Items...7-14
Engine Oil ..............................................................7-17
Checking the Engine Oil Level .....................................7-17
Checking the Engine Oil and Filter .............................7-18
Engine Coolant .....................................................7-19
Checking the Engine Coolant Level ............................7-19
Changing Engine Coolant ..............................................7-22
Brake/Clutch Fluid ...............................................7-22
Checking the Brake/Clutch Fluid Level .....................7-22
Washer Fluid .........................................................7-23
Checking the Washer Fluid Level................................7-23
Parking Brake .......................................................7-24
Checking the Parking Brake .........................................7-24
Air Cleaner ............................................................7-25
Filter Replacement ..........................................................7-25
Climate Control Air Filter ....................................7-26
Filter Inspection ...............................................................7-26
Wiper Blades.........................................................7-27
Blade Inspection ..............................................................7-27
Blade Replacement .........................................................7-27
Battery...................................................................7-29
Battery Usage Recommendations...............................7-30
Battery Replacement......................................................7-30
Battery Recharging ........................................................7-31
Reset Features.................................................................7-32
Tires and Wheels .................................................7-33
Tire Care ............................................................................7-33
Recommended Cold Tire Inflation Pressures ...........7-34
Check Tire Inflation Pressure ......................................7-35
Tire Rotation.....................................................................7-35
7
Page 441 of 516

7-17
7
Maintenance
ENGINE OIL
Checking the Engine Oil Level
1. Follow all of the oil manufacturer's
precautions.
2. Be sure the vehicle is on the level
ground in P (Park) with the park-
ing brake set. If possible, block the
wheels.
3. Turn the engine on and allow the
engine to reach normal operating
temperature.
4. Turn the engine off and wait about
five minutes for the oil to return to
the oil pan.
5. Pull the dipstick out, wipe it clean,
and re-insert it fully.
6. Pull the dipstick out again and
check the level. The level should
be between F and L.7. If it is near or at L, add enough oil
to bring the level to F.
Use only the specified engine oil
(refer to "Recommended Lubricants
and Capacities" in chapter 8).
OIK077002
■2.0 T-GDI
OIK077003
■3.3 T-GDI
OIK077004
■2.0 T-GDI
OIK077005
■3.3 T-GDI
Page 456 of 516
7-32
Maintenance
By jump starting
After a jump start from a good bat-
tery, drive the vehicle for at least 30
minutes or operate at idle for at least
60 minutes before it is shutoff.
Alternatively you may visit a dealer
for charge and battery test. The vehi-
cle may not restart if you shut it off
before the battery had a chance to
adequately recharge. See "Jump
Starting" in chapter 6 for more infor-
mation on jump starting procedures.
Information
An inappropriately disposed
battery can be harmful to
the environment and human
health. Dispose of the bat-
tery according to your local
law(s) or regulations.
Reset Features
The following items may need to be
reset after the battery has been dis-
charged or the battery has been dis-
connected. See chapter 3 or 4 for:
• Power Windows
• Trip Computer
• Climate Control System
• Clock
• Audio System
• Sunroof
• Driver position memory system
i
Page 460 of 516

7-36
Maintenance
Disc brake pads should be inspected
for wear whenever tires are rotated.
Information
Tires that are asymmetrical or direc-
tional can only be installed on the
wheel in one direction. The outside
and inside of an asymmetrical tire is
not easily distinguishable. Pay careful
attention to the markings on the side-
walls of the tires, noting the "outside"
marking and also the rotating direc-
tion before installing them on the
vehicle.
Wheel Alignment and Tire
Balance
The wheels on your vehicle were
aligned and balanced carefully at the
factory to give you the longest tire life
and best overall performance.
In most cases, you will not need to
have your wheels aligned again.
However, if you notice unusual tire
wear or your vehicle pulling one way
or the other, the alignment may need
to be reset.
If you notice your vehicle vibrating
when driving on a smooth road, your
wheels may need to be rebalanced.
Improper wheel weights can dam-
age your vehicle's aluminum
wheels. Use only approved wheel
weights.
NOTICE
i
•Do not use the compact spare
tire for tire rotation.
•Do not mix bias ply and radial
ply tires under any circum-
stances. This may cause
unusual handling characteris-
tics that may cause loss of
vehicle control resulting in an
accident.
WARNING
ODH073802
■18inch tire
ODH073803
■19inch tire
Page 462 of 516

7-38
Maintenance
Compact spare tire replacement
(if equipped)
A compact spare tire has a shorter
tread life than a regular size tire.
Replace it when you can see the
tread wear indicator bars on the tire.
The replacement compact spare tire
should be the same size and design
tire as the one provided with your
new vehicle and should be mounted
on the same compact spare tire
wheel. The compact spare tire is not
designed to be mounted on a regular
size wheel, and the compact spare
tire wheel is not designed for mount-
ing a regular size tire.
Wheel Replacement
When replacing the metal wheels for
any reason, make sure the new
wheels are equivalent to the original
factory units in diameter, rim width
and offset.
Tire Traction
Tire traction can be reduced if you
drive on worn tires, tires that are
improperly inflated or on slippery
road surfaces. Tires should be
replaced when the tread depth is at
least 2/32 inch (1.6 mm). To reduce
the possibility of losing control, slow
down whenever there is rain, snow or
ice on the road.
The original tire should be
repaired or replaced as soon as
possible to avoid failure of the
spare and loss of vehicle con-
trol resulting in an accident. The
compact spare tire is for emer-
gency use only. Do not operate
your vehicle over 50 mph (80
km/h) when using the compact
spare tire.
WARNING
•Tires degrade over time, even
when they are not being used.
Regardless of the remaining
tread, Genesis Branded
Vehicle recommends that
tires be replaced after six (6)
years of normal service.
•When replacing tires (or
wheels), it is recommended to
replace the two front or two
rear tires (or wheels) as a pair.
Replacing just one tire can
seriously affect your vehicle's
handling. If only replacing one
pair of tires, it is recommend-
ed to install the pair of new
tires on the rear axle.
•Heat caused by hot climates
or frequent high loading con-
ditions can accelerate the
aging process. Failure to fol-
low this warning may cause
sudden tire failure, which
could lead to a loss of vehicle
control resulting in an acci-
dent.
Page 470 of 516
7-46
Maintenance
All Season Tires
Genesis Branded Vehicle specifies
all season tires on some models to
provide good performance for use all
year round, including snowy and icy
road conditions. All season tires are
identified by ALL SEASON and/or
M+S (Mud and Snow) on the tire
sidewall. Snow tires have better
snow traction than all season tires
and may be more appropriate in
some areas.
Summer Tires
Genesis Branded Vehicle specifies
summer tires on some models to
provide superior performance on dry
roads. Summer tire performance is
substantially reduced in snow and
ice. Summer tires do not have the tire
traction rating M+S (Mud and Snow)
on the tire side wall. If you plan to
operate your vehicle in snowy or icy
conditions, Genesis Branded Vehicle
recommends the use of snow tires or
all season tires on all four wheels.
Snow Tires
If you equip your car with snow tires,
they should be the same size and
have the same load capacity as the
original tires. Snow tires should be
installed on all four wheels; other-
wise, poor handling may result. Snow
tires should carry 4 psi (28 kPa)
more air pressure than the pressure
recommended for the standard tires
on the tire label on the driver’s side of
the center pillar, or up to the maxi-
mum pressure shown on the tire
sidewall, whichever is less. Do not
drive faster than 75 mph (120 km/h)
when your vehicle is equipped with
snow tires.
Radial-Ply Tires
Radial-ply tires provide improved
tread life, road hazard resistance and
smoother high speed ride. The radi-
al-ply tires used on this vehicle are of
belted construction, and are selected
to complement the ride and handling
characteristics of your vehicle.Radial-ply tires have the same load
carrying capacity, as bias-ply or bias
belted tires of the same size, and use
the same recommended inflation
pressure. Mixing of radial-ply tires
with bias-ply or bias belted tires is
not recommended. Any combina-
tions of radial-ply and bias-ply or bias
belted tires when used on the same
vehicle will seriously deteriorate
vehicle handling. The best rule to fol-
low is: Identical pairs of radial-ply
tires should always be used as a set
for the front tires and a set for the
rear tires.
Longer wearing tires can be more
susceptible to irregular tread wear. It
is very important to follow the tire
rotation interval in this chapter to
achieve the tread life potential of
these tires. Cuts and punctures in
radial-ply tires are repairable only in
the tread area, because of sidewall
flexing. Consult your tire dealer for
radial-ply tire repairs.
Page 474 of 516
7-50
Maintenance
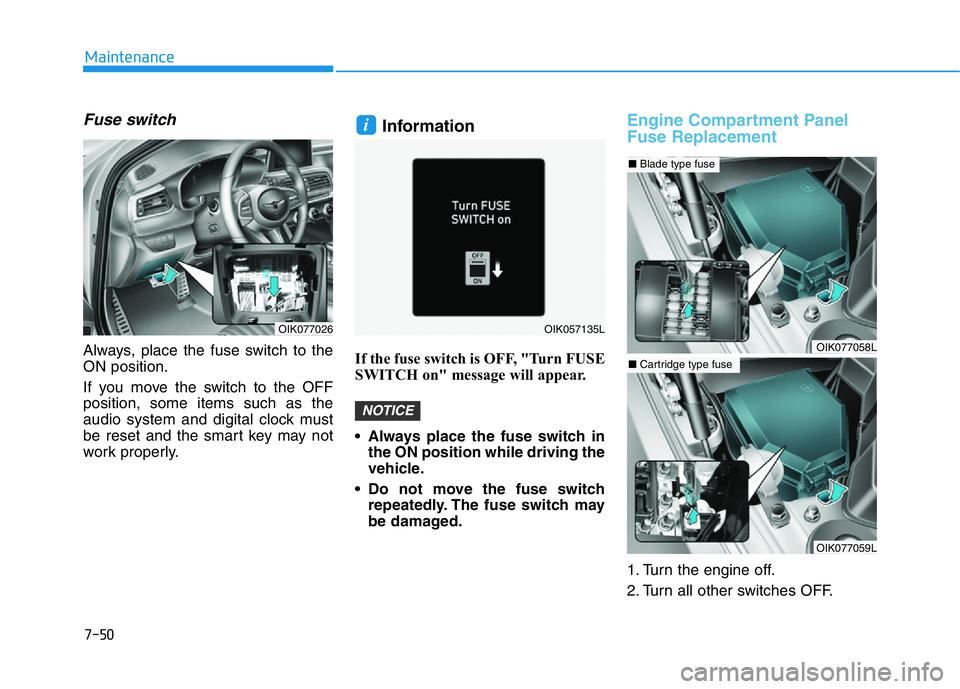
Fuse switch
Always, place the fuse switch to the
ON position.
If you move the switch to the OFF
position, some items such as the
audio system and digital clock must
be reset and the smart key may not
work properly.
Information
If the fuse switch is OFF, "Turn FUSE
SWITCH on" message will appear.
• Always place the fuse switch in
the ON position while driving the
vehicle.
• Do not move the fuse switch
repeatedly. The fuse switch may
be damaged.
Engine Compartment Panel
Fuse Replacement
1. Turn the engine off.
2. Turn all other switches OFF.
NOTICE
i
OIK077058L
■Blade type fuse
OIK077059L
■Cartridge type fuse
OIK077026OIK057135L
Page 515 of 516

8-12
Specifications, Consumer information and Reporting safety defects
Eastern Region:
Connecticut, Delaware,
Maine, Massachusetts, New
Hampshire, New Jersey, New York,
Pennsylvania, Rhode Island, Vermont.
Eastern Region
1122 Cranbury South River Road
Jamesburg, NJ 08831
844-340-9741
Southern Region:
Florida, Georgia, Maryland, North
Carolina, South Carolina, Virginia,
West Virginia.
Southern Region
3025 Chastain Meadows Parkway
Suite 100 Marietta, GA 30066
844-340-9741South Central Region:
Alabama, Arkansas, Louisiana,
Mississippi, New Mexico, Oklahoma,
Tennessee, Texas.
South Central Region
1421 South Beltline Road, Suite 400
Coppell, TX 75019
844-340-9741
Central Region:
Illinois, Indiana, lowa, Kentucky,
Michigan, Minnesota, Nebraska,
North Dakota, South Dakota, Ohio,
Wisconsin, Kansas, Missouri.
Central Region
2 Trans Am Plaza Dr #500 Oakbrook
Terrace, IL 60181
844-340-9741Western Region:
Alaska, Hawaii, Arizona, California,
Colorado, Idaho, Montana, Nevada,
Oregon, Utah, Washington,
Wyoming.
Western Region
10550 Talbert Avenue P.O.Box
20850 Fountain Valley, California
92728-0850
844-340-9741
CONSUMER INFORMATION
This consumer information has been prepared in accordance with regulations issued by the National Highway Traffic
Safety Administration of the U.S. Department of Transportation. Your retailer of Genesis Branded products will help answer
any questions you may have as you read this information.
Genesis Branded Vehicles are designed and manufactured to meet or exceed all applicable safety standards.
For your safety, however, we strongly urge you to read and follow all directions in this Owner's Manual, particularly the
information under the headings "NOTICE", "CAUTION" and "WARNING".
If, after reading this manual, you have any questions regarding the operation of your vehicle, please contact your nearest
Genesis Customer Care Regional Office as listed in the following: