clock GENESIS G80 2017 User Guide
[x] Cancel search | Manufacturer: GENESIS, Model Year: 2017, Model line: G80, Model: GENESIS G80 2017Pages: 496, PDF Size: 12.82 MB
Page 370 of 496

6-18
What to do in an emergency
9.Insert the jack handle into the jack and turn it clockwise, raising the
vehicle until the tire clears the
ground. Make sure the vehicle is
stable on the jack. 10. Loosen the lug nuts with the
wheel lug nut wrench and
remove them with your fingers.
Remove the wheel from the
studs and lay it flat on the ground
out of the way. Remove any dirt
or debris from the studs, mount-
ing surfaces, and wheel.
11. Install the spare tire onto the studs of the hub.
12. Tighten the lug nuts with your fin- gers onto the studs with the
smaller end of the lug nuts clos-
est to the wheel.
13. Lower the vehicle to the ground by turning the jack handle coun-
terclockwise. 14. Use the wheel lug nut wrench to
tighten the lug nuts in the order
shown. Double-check each lug
nut until they are tight. After
changing tires, we recommend
that an authorized HYUNDAI
dealer tighten the lug nuts to their
proper torque as soon as possi-
ble. The wheel lug nut should
be tightened to 65~79 lb.ft
(9~11 kg.m).
ODH063013ODH063014
Page 376 of 496

6-24
What to do in an emergency
3.Install the towing hook by turning it clockwise into the hole until it is
fully secured.
4.Remove the towing hook and install the cover after use.
Emergency towing
(if equipped)
If towing is necessary, we recom-
mend you to have it done by an
authorized HYUNDAI dealer or a
commercial tow truck service. If towing service is not available in an
emergency, your vehicle may be
temporarily towed using a cable or
chain secured to the emergency tow-
ing hook at the front (or rear) of the
vehicle.
Use extreme caution when towing
the vehicle with a cable or chain. A
driver must be in the vehicle to steer
it and operate the brakes.
Towing in this manner may be done
only on hard-surfaced roads for a
short distance and at low speeds.
Also, the wheels, axles, power train,
steering and brakes must all be in
good condition.
ODH063017
ODH063018
■Front
■Rear
Page 406 of 496

7-29
7
Maintenance
E
EN
N G
GI
IN
N E
E
C
C O
O O
OL
LA
A N
N T
T
The high-pressure cooling system
has a reservoir filled with year-round
antifreeze coolant. The reservoir is
filled at the factory.
Check the antifreeze protection and
coolant level at least once a year, at
the beginning of the winter season
and before traveling to a colder cli-
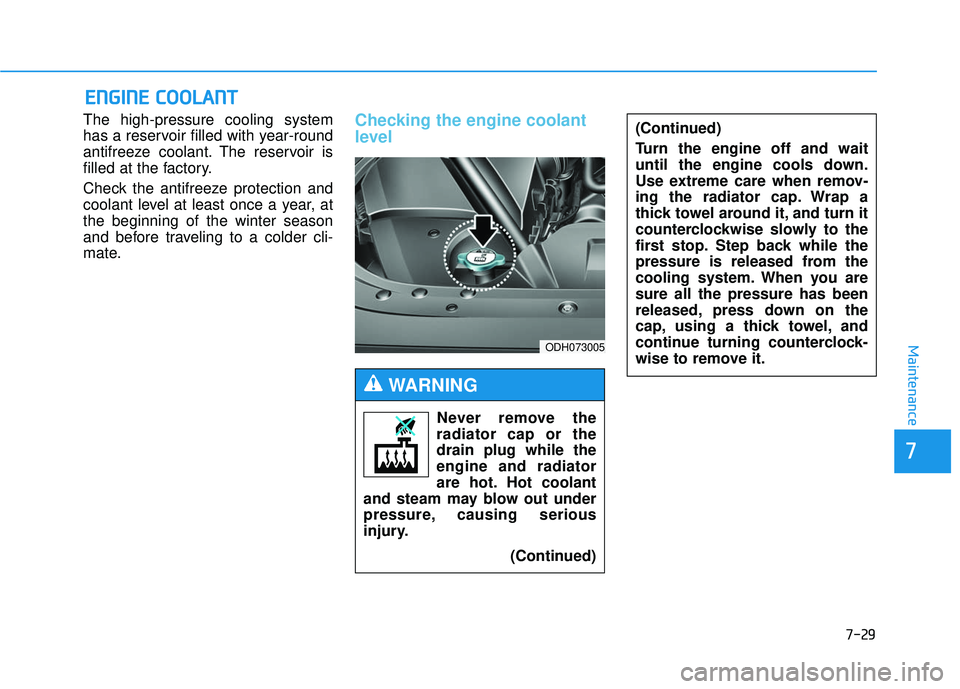
mate.Checking the engine coolant
level
Never remove the
radiator cap or the
drain plug while the
engine and radiator
are hot. Hot coolant
and steam may blow out under
pressure, causing serious
injury.
(Continued)
WARNING
(Continued)
Turn the engine off and wait
until the engine cools down.
Use extreme care when remov-
ing the radiator cap. Wrap a
thick towel around it, and turn it
counterclockwise slowly to the
first stop. Step back while the
pressure is released from the
cooling system. When you are
sure all the pressure has been
released, press down on the
cap, using a thick towel, and
continue turning counterclock-
wise to remove it.
ODH073005
Page 440 of 496

7-63
7
Maintenance
In an emergency, if you do not have
a spare fuse, use a fuse of the same
rating from a circuit you may not
need for operating the vehicle, such
as the cigarette lighter fuse.
If the headlamps or other electrical
components do not work and the
fuses are OK, check the fuse panel
in the engine compartment. If a fuse
is blown, it must be replaced with the
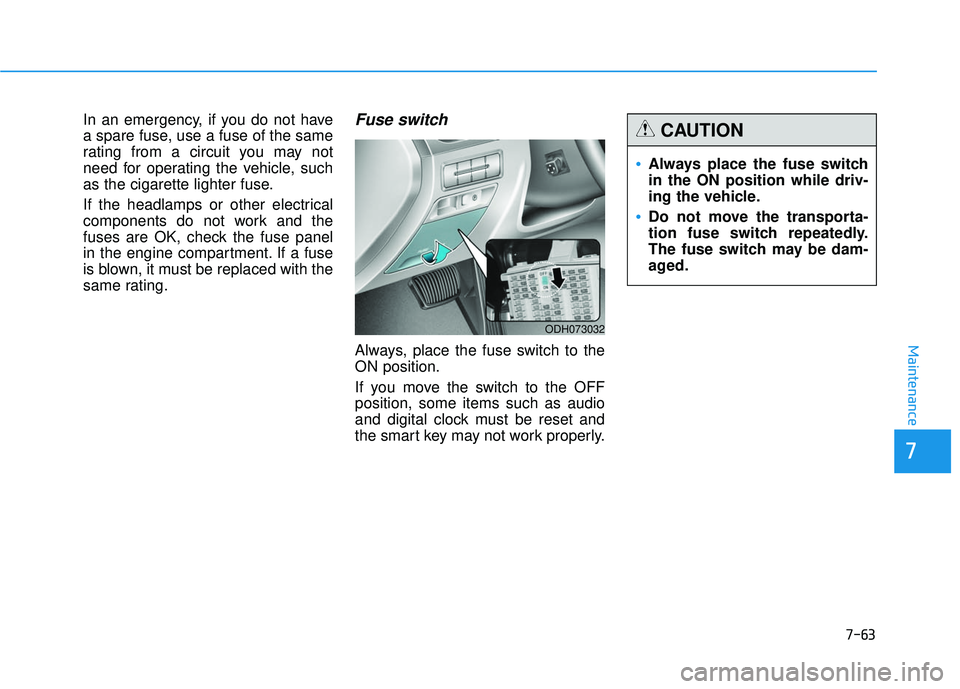
same rating.Fuse switch
Always, place the fuse switch to the
ON position.
If you move the switch to the OFF
position, some items such as audio
and digital clock must be reset and
the smart key may not work properly.
ODH073032
Always place the fuse switch
in the ON position while driv-
ing the vehicle.
Do not move the transporta-
tion fuse switch repeatedly.
The fuse switch may be dam-
aged.
CAUTION
Page 445 of 496

7-68
Maintenance
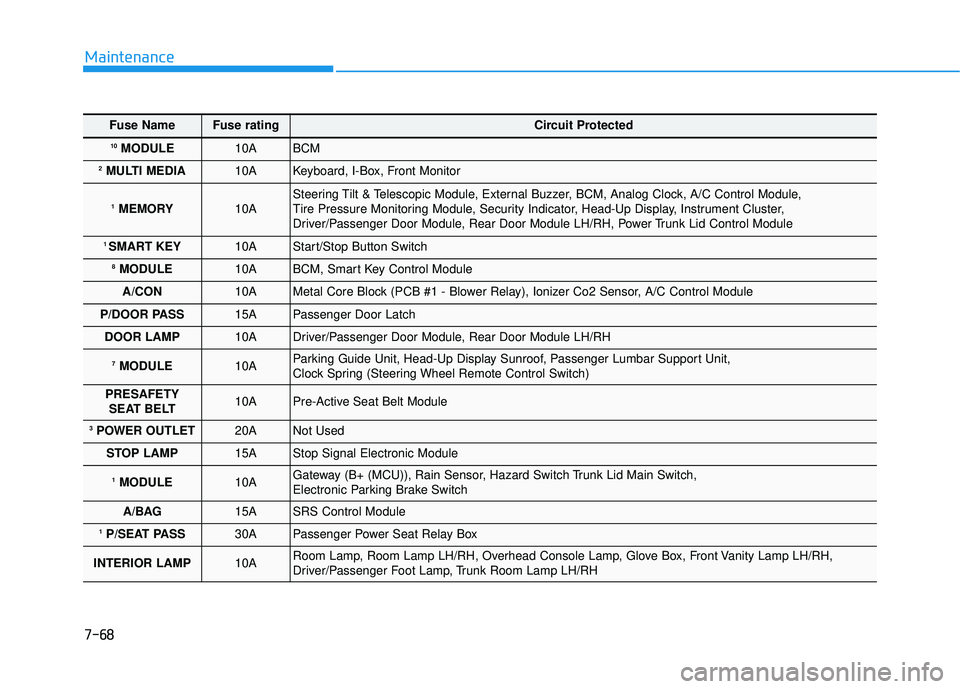
Fuse NameFuse ratingCircuit Protected
10MODULE10A BCM
2MULTI MEDIA 10A Keyboard, I-Box, Front Monitor
1MEMORY10A Steering Tilt & Telescopic Module, External Buzzer, BCM, Analog Clock, A/C Control Module,
Tire Pressure Monitoring Module, Security Indicator, Head-Up Display, Instrument Cluster,
Driver/Passenger Door Module, Rear Door Module LH/RH, Power Trunk Lid Control Module
1 SMART KEY10A Start/Stop Button Switch
8MODULE10A BCM, Smart Key Control Module
A/CON 10A Metal Core Block (PCB #1 - Blower Relay), Ionizer Co2 Sensor, A/C Control Module
P/DOOR PASS 15A Passenger Door Latch
DOOR LAMP 10A Driver/Passenger Door Module, Rear Door Module LH/RH
7MODULE 10A Parking Guide Unit, Head-Up Display Sunroof, Passenger Lumbar Support Unit,
Clock Spring (Steering Wheel Remote Control Switch)
PRESAFETY SEAT BELT 10A Pre-Active Seat Belt Module
3POWER OUTLET 20A Not Used
STOP LAMP 15A Stop Signal Electronic Module
1MODULE10A Gateway (B+ (MCU)), Rain Sensor, Hazard Switch Trunk Lid Main Switch,
Electronic Parking Brake Switch
A/BAG 15A SRS Control Module
1P/SEAT PASS 30A Passenger Power Seat Relay Box
INTERIOR LAMP 10A Room Lamp, Room Lamp LH/RH, Overhead Console Lamp, Glove Box, Front Vanity Lamp LH/RH,
Driver/Passenger Foot Lamp, Trunk Room Lamp LH/RH
Page 446 of 496

7-69
7
Maintenance
Fuse NameFuse ratingCircuit Protected
2SMART KEY15A Smart Key Control Module
1 POWER OUTLET 20A Front Power Outlet & Cigarette Lighter
6MODULE 15A Head Lamp LH/RH, Auto Hold & Drive Mode Switch, Auto Head Lamp Leveling Device Module, A/T Shift
Lever IND.
P/WDW LH 30A Driver Power Window Module, Rear Door Module LH, Rear Power Window Module LH
SUNROOF 25A Sunroof Motor
BRAKE SWITCH 10A Stop Lamp Switch, Smart Key Control Module
2POWER OUTLET 20A Front Power Outlet & Cigarette Lighter
HTD STRG 15A Clock Spring (Steering Wheel Heated Module)
1P/SEAT DRV 30A Driver IMS Control Module, Driver Power Seat Relay Box
P/DOOR DRV 15A Driver Door Latch
2MODULE10A BCM, Smart Key Control Module, Overhead Console Lamp, Analog Clock, A/V & Navigation Head Unit,
Keyboard, I-Box, Front Monitor, Parking Guide Unit
Page 458 of 496

7-81
7
Maintenance
✽
✽NOTICE
We recommend that the headlamp
aiming be adjusted after an accident
or after the headlamp assembly is
reinstalled at an authorized retailer
of Genesis Branded products.
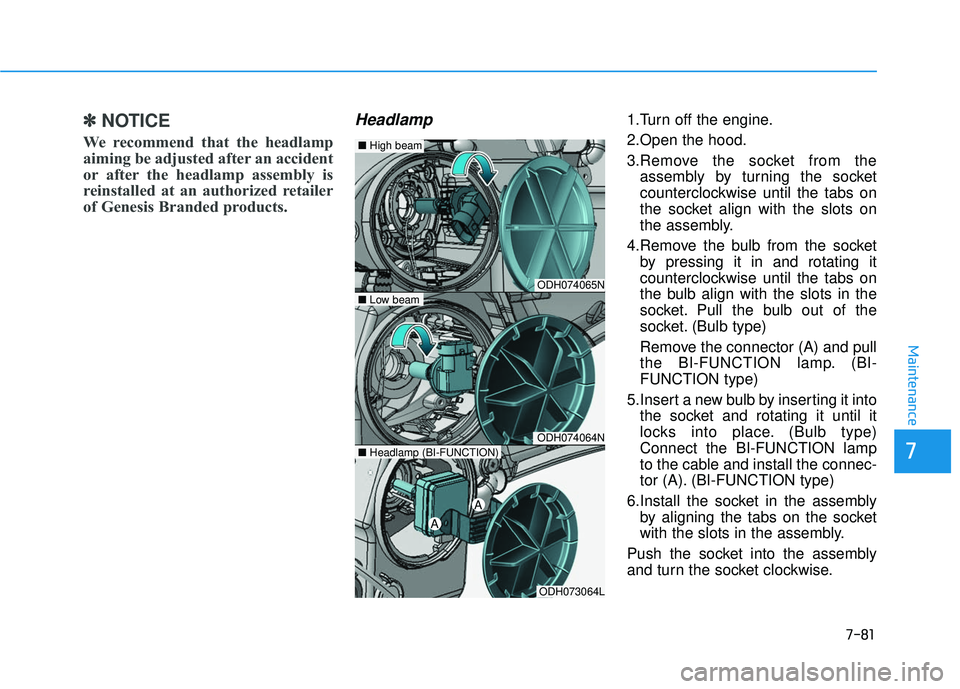
Headlamp 1.Turn off the engine.
2.Open the hood.
3.Remove the socket from the
assembly by turning the socket
counterclockwise until the tabs on
the socket align with the slots on
the assembly.
4.Remove the bulb from the socket by pressing it in and rotating it
counterclockwise until the tabs on
the bulb align with the slots in the
socket. Pull the bulb out of the
socket. (Bulb type)
Remove the connector (A) and pull
the BI-FUNCTION lamp. (BI-
FUNCTION type)
5.Insert a new bulb by inserting it into the socket and rotating it until it
locks into place. (Bulb type)
Connect the BI-FUNCTION lamp
to the cable and install the connec-
tor (A). (BI-FUNCTION type)
6.Install the socket in the assembly by aligning the tabs on the socket
with the slots in the assembly.
Push the socket into the assembly
and turn the socket clockwise.
ODH074065N
ODH074064N
ODH073064L
■ Low beam
■High beam
■Headlamp (BI-FUNCTION)
A
A
Page 459 of 496

7-82
Maintenance
Turn signal light
1.Turn off the engine.
2.Open the hood.
3.Remove the socket from theassembly by turning the socket
counterclockwise until the tabs on
the socket align with the slots on
the assembly.
4.Remove the bulb from the socket by pressing it in and rotating it
counterclockwise until the tabs on
the bulb align with the slots in the
socket. Pull the bulb out of the
socket. 5.Insert a new bulb by inserting it into
the socket and rotating it until it
locks into place.
6.Install the socket in the assembly by aligning the tabs on the socket
with the slots in the assembly.
7.Push the socket into the assembly and turn the socket clockwise.
If the turn signal light (LED) does not
operate, have the vehicle checked by
an authorized retailer of Genesis
Branded products.
Position and front fog lamp/ bulbs
If the LED lamp does not operate,
have the vehicle checked by an
authorized retailer of Genesis
Branded products.
ODH073066L
■
Bulb type
Page 461 of 496

7-84
Maintenance
Rear turn signal lamp
Type A
1.Open the trunk lid.
2.Open the service cover.
3.Remove the socket from theassembly by turning the socket
counterclockwise until the tabs on
the socket align with the slots on
the assembly.
4.Remove the bulb from the socket by pressing it in and rotating it
counterclockwise until the tabs on
the bulb align with the slots in the
socket. Pull the bulb out of the
socket. 5.Insert a new bulb by inserting it into
the socket and rotating it until it
locks into place.
6.Install the socket in the assembly by aligning the tabs on the socket
with the slots in the assembly.
Push the socket into the assembly
and turn the socket clockwise.
7.Install the service cover by putting it into the service hole.
Type B
If the LED lamp does not operate,
have the vehicle checked by an
authorized retailer of Genesis
Branded products.
Back up lamp
Type A
1.Open the trunk.
2.Loosen the retaining screw of thetrunk lid cover and then remove the
cover.
3.Remove the socket from the assembly by turning the socket
counter clockwise until the tabs on
the socket align with the slots on
the assembly.
4.Remove the bulb by pulling it straight out.
5.Insert a new bulb by inserting it into the socket and rotating it until it
locks into place.
ODH073067LODH073068L
Page 462 of 496

7-85
7
Maintenance
6.Install the socket into the assemblyby aligning the tabs on the socket
with the slots in the assembly.
Push the socket into the assembly
and turn the socket clockwise.
7.Reinstall the trunk lid cover by pushing in the screw.
Type B
If the LED lamp does not operate,
have the vehicle checked by an
authorized retailer of Genesis
Branded products.
Stop and tail lamp
If the lamp does not operate, have
the vehicle checked by an authorized
retailer of Genesis Branded prod-
ucts.
High mounted stop lamp
If the LED lamp does not operate,
have the vehicle checked by an
authorized retailer of Genesis
Branded products.
ODH073042