GENESIS G80 2017 Quick Reference Guide
Manufacturer: GENESIS, Model Year: 2017, Model line: G80, Model: GENESIS G80 2017Pages: 23, PDF Size: 9.52 MB
Page 1 of 23
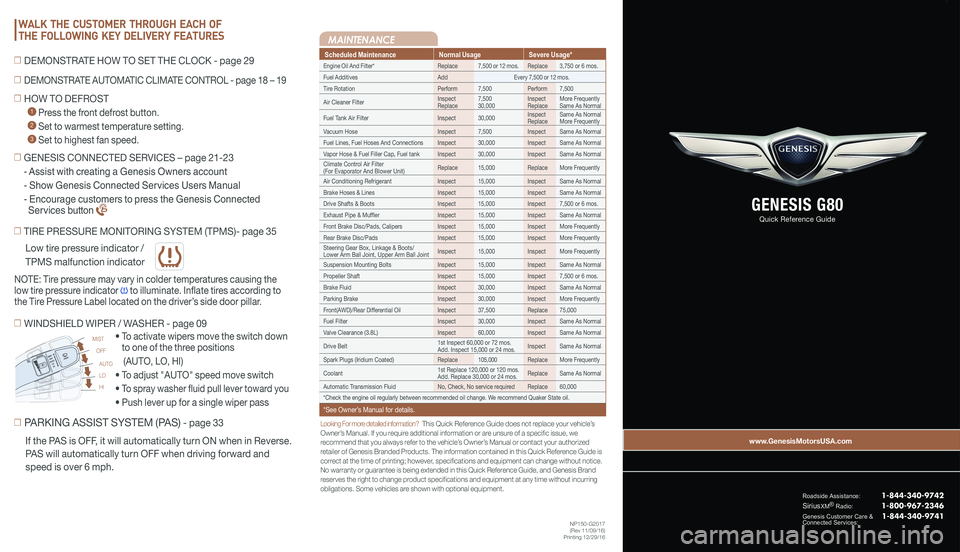
Looking For more detailed information? This Quick Reference Guide does not replace your vehicle’sOwner’s Manual. If you require additional information or are unsure of a specific issue, we recommend that you always refer to the vehicle’s Owner’s Manual or contact your authorized retailer of Genesis Branded Products. The information contained in this Quick Reference Guide is correct at the time of printing; however, specifications and equipment can change without notice. No warranty or guarantee is being extended in this Quick Reference Guide, and Genesis Brand reserves the right to change product specifications and equipment at any time without incurring obligations. Some vehicles are shown with optional equipment.
MAINTENANCE
Low tire pressure indicator /
TPMS malfunction indicator
Scheduled MaintenanceNormal UsageSevere Usage*
Engine Oil And Filter*Replace7,500 or 12 mos.Replace3,750 or 6 mos.
Fuel AdditivesAddEvery 7,500 or 12 mos.
Tire RotationPerform7,500Perform7,500
Air Cleaner FilterInspectReplace7,50030,000InspectReplaceMore FrequentlySame As Normal
Fuel Tank Air FilterInspect30,000InspectReplaceSame As NormalMore Frequently
Vacuum HoseInspect7,500InspectSame As Normal
Fuel Lines, Fuel Hoses And ConnectionsInspect30,000InspectSame As Normal
Vapor Hose & Fuel Filler Cap, Fuel tankInspect30,000InspectSame As Normal
Climate Control Air Filter (For Evaporator And Blower Unit)Replace15,000ReplaceMore Frequently
Air Conditioning RefrigerantInspect15,000InspectSame As Normal
Brake Hoses & LinesInspect15,000InspectSame As Normal
Drive Shafts & BootsInspect15,000Inspect7,500 or 6 mos.
Exhaust Pipe & MufflerInspect15,000InspectSame As Normal
Front Brake Disc/Pads, CalipersInspect15,000InspectMore Frequently
Rear Brake Disc/Pads Inspect15,000InspectMore Frequently
Steering Gear Box, Linkage & Boots/Lower Arm Ball Joint, Upper Arm Ball JointInspect15,000InspectMore Frequently
Suspension Mounting BoltsInspect15,000InspectSame As Normal
Propeller ShaftInspect15,000Inspect7,500 or 6 mos.
Brake FluidInspect30,000InspectSame As Normal
Parking BrakeInspect30,000InspectMore Frequently
Front(AWD)/Rear Differential OilInspect37,500Replace75,000
Fuel FilterInspect30,000InspectSame As Normal
Valve Clearance (3.8L)Inspect60,000InspectSame As Normal
Drive Belt1st Inspect 60,000 or 72 mos.Add. Inspect 15,000 or 24 mos.InspectSame As Normal
Spark Plugs (Iridium Coated)Replace105,000ReplaceMore Frequently
Coolant1st Replace 120,000 or 120 mos. Add. Replace 30,000 or 24 mos.ReplaceSame As Normal
Automatic Transmission FluidNo, Check, No service requiredReplace60,000
*Check the engine oil regularly between recommended oil change. We recommend Quaker State oil.
*See Owner’s Manual for details.
☐ TIRE PRESSURE MONITORING SYSTEM (TPMS)- page 35
☐ PARKING ASSIST SYSTEM (PAS) - page 33
• To activate wipers move the switch down
to one of the three positions
(AUTO, LO, HI)
• To adjust "AUTO" speed move switch
• To spray washer fluid pull lever toward you
• Push lever up for a single wiper pass
☐ WINDSHIELD WIPER / WASHER - page 09
AUTO
LO
HI
MIST
OFF
NOTE: Tire pressure may vary in colder temperatures causing the
low tire pressure indicator to illuminate. Inflate tires according to
the Tire Pressure Label located on the driver’s side door pillar.
If the PAS is OFF, it will automatically turn ON when in Reverse.
PAS will automatically turn OFF when driving forward and
speed is over 6 mph.
☐ HOW TO DEFROST
1 Press the front defrost button.
2 Set to warmest temperature setting.
3 Set to highest fan speed.
WALK THE CUSTOMER THROUGH EACH OF
THE FOLLOWING KEY DELIVERY FEATURES
☐ DEMONSTRATE AUTOMATIC CLIMATE CONTROL - page 18 – 19
☐ DEMONSTRATE HOW TO SET THE CLOCK - page 29
NP150-G2017(Rev 11/09/16)Printing 12/29/16
☐ GENESIS CONNECTED SERVICES – page 21-23
- Assist with creating a Genesis Owners account
- Show Genesis Connected Services Users Manual
- Encourage customers to press the Genesis Connected
Services button
Roadside Assistance: 1-844-340-9742
SiriusXM®Radio: 1-800-967-2346
Genesis Customer Care &Connected Services:
GENESIS G80
Quick Reference Guide
1-844-340-9741
www.GenesisMotorsUSA.com
Page 2 of 23
Page 3 of 23
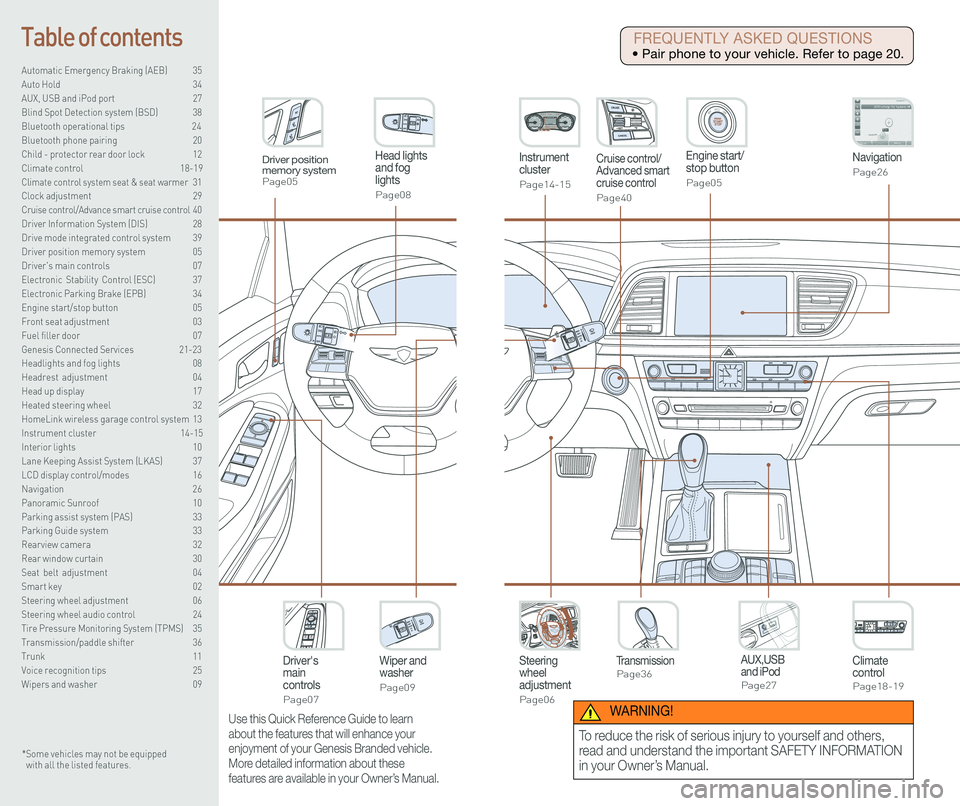
Steering wheel adjustment
Page06
Instrument cluster
Page14-15
Navigation
Page26
Head lights and fog lights
Page08
Climate controlPage18-19
Driver's main controls
Page07
Wiper and washer
Page09
TransmissionPage36
Table of contents
Automatic Emergency Braking (AEB) 35
Auto Hold 34
AUX, USB and iPod port 27
Blind Spot Detection system (BSD) 38
Bluetooth operational tips 24
Bluetooth phone pairing 20
Child - protector rear door lock 12
Climate control 18-19\
Climate control system seat & seat warmer 31
Clock adjustment 29
Cruise control/Advance smart cruise control 40
Driver Information System (DIS) 28
Drive mode integrated control system 39
Driver position memory system 05
Driver's main controls 07
Electronic Stability Control (ESC) 37
Electronic Parking Brake (EPB) 34
Engine start/stop button 05
Front seat adjustment 03
Fuel filler door 07
Genesis Connected Services 21-23
Headlights and fog lights 08
Headrest adjustment 04
Head up display 17
Heated steering wheel 32
HomeLink wireless garage control system 13
Instrument cluster 14-15
Interior lights 10
Lane Keeping Assist System (LKAS) 37
LCD display control/modes 16
Navigation 26
Panoramic Sunroof 10
Parking assist system (PAS) 33
Parking Guide system 33
Rearview camera 32
Rear window curtain 30
Seat belt adjustment 04
Smart key 02
Steering wheel adjustment 06
Steering wheel audio control 24
Tire Pressure Monitoring System (TPMS) 35
Transmission/paddle shifter 36
Trunk 11
Voice recognition tips 25
Wipers and washer 09
Engine start/stop button
Page05
Cruise control/Advanced smart cruise control
Page40
AUX,USB and iPodPage27
Driver position memory systemPage05
* Some vehicles may not be equipped with all the listed features.
Use this Quick Reference Guide to learn
about the features that will enhance your
enjoyment of your Genesis Branded vehicle.
More detailed information about these
features are available in your Owner’s Manual.
FREQUENTLY ASKED QUESTIONS
• Pair phone to your vehicle. Refer to page 20.
WARNING!
To reduce the risk of serious injury to yourself and others,
read and understand the important SAFETY INFORMATION
in your Owner’s Manual.
Page 4 of 23
GETTING STARTED
Quick Reference Guide I 0302 I Quick Reference Guide
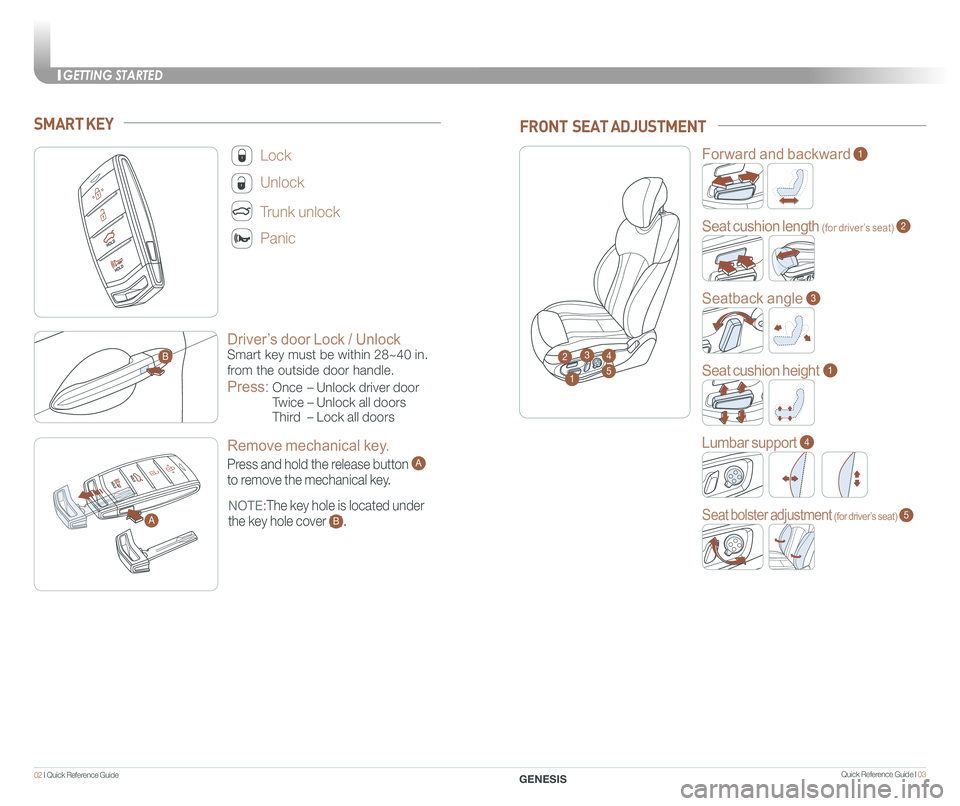
Driver’s door Lock / Unlock
Smart key must be within 28~40 in.
from the outside door handle.
Press:
Once – Unlock driver door
Twice – Unlock all doors
Third – Lock all doors
Lock
Unlock
Trunk unlock
Panic
NOTE:The key hole is located under
the key hole cover B.
SMART KEY
A
B
Remove mechanical key.
Press and hold the release button A
to remove the mechanical key.
GENESIS
FRONT SEAT ADJUSTMENT
2
Forward and backward1
Seat cushion length (for driver’s seat)2
Seatback angle3
Seat cushion height1
Lumbar support4
Seat bolster adjustment (for driver’s seat)5
1
34
5
A
Page 5 of 23
GETTING STARTED
Quick Reference Guide I 0504 I Quick Reference Guide
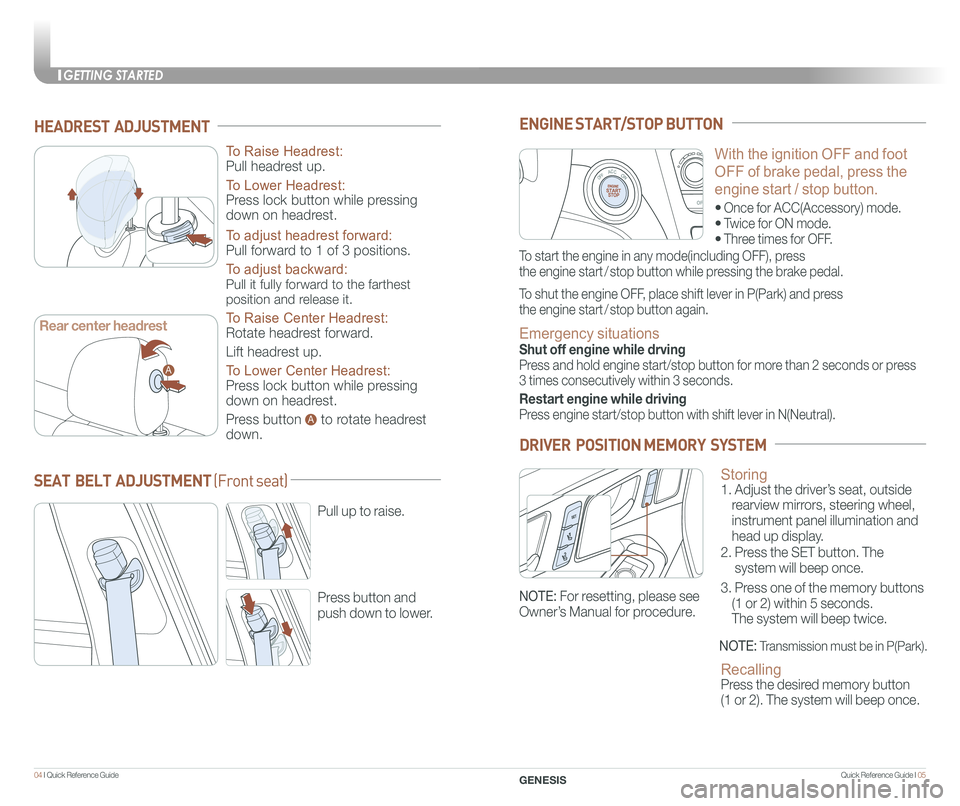
HEADREST ADJUSTMENT
To Raise Headrest:
Pull headrest up.
To Lower Headrest:
Press lock button while pressing
down on headrest.
To adjust headrest forward:
Pull forward to 1 of 3 positions.
To adjust backward:
Pull it fully forward to the farthest
position and release it.
To Raise Center Headrest:
Rotate headrest forward.
Lift headrest up.
To Lower Center Headrest:
Press lock button while pressing
down on headrest.
Press button to rotate headrest
down.
GENESIS
With the ignition OFF and foot
OFF of brake pedal, press the
engine start / stop button.
• Once for ACC(Accessory) mode.
• Twice for ON mode.
• Three times for OFF.
ENGINE START/STOP BUTTON
To start the engine in any mode(including OFF), press
the engine start / stop button while pressing the brake pedal.
To shut the engine OFF, place shift lever in P(Park) and press
the engine start / stop button again.
Emergency situations
Shut off engine while drving
Press and hold engine start/stop button for more than 2 seconds or press
3 times consecutively within 3 seconds.
Restart engine while driving
Press engine start/stop button with shift lever in N(Neutral).
Storing 1. Adjust the driver’s seat, outside
rearview mirrors, steering wheel,
instrument panel illumination and
head up display.
2. Press the SET button. The
system will beep once.
3. Press one of the memory buttons
(1 or 2) within 5 seconds.
The system will beep twice.
Recalling Press the desired memory button
(1 or 2). The system will beep once.
DRIVER POSITION MEMORY SYSTEM
NOTE: Transmission must be in P(Park).
SEAT BELT ADJUSTMENT (Front seat)
Pull up to raise.
Press button and
push down to lower.
A
A
Rear center headrest
NOTE: For resetting, please see
Owner’s Manual for procedure.
Page 6 of 23
FEATURES AND CONTROLS
Quick Reference Guide I 0706 I Quick Reference Guide
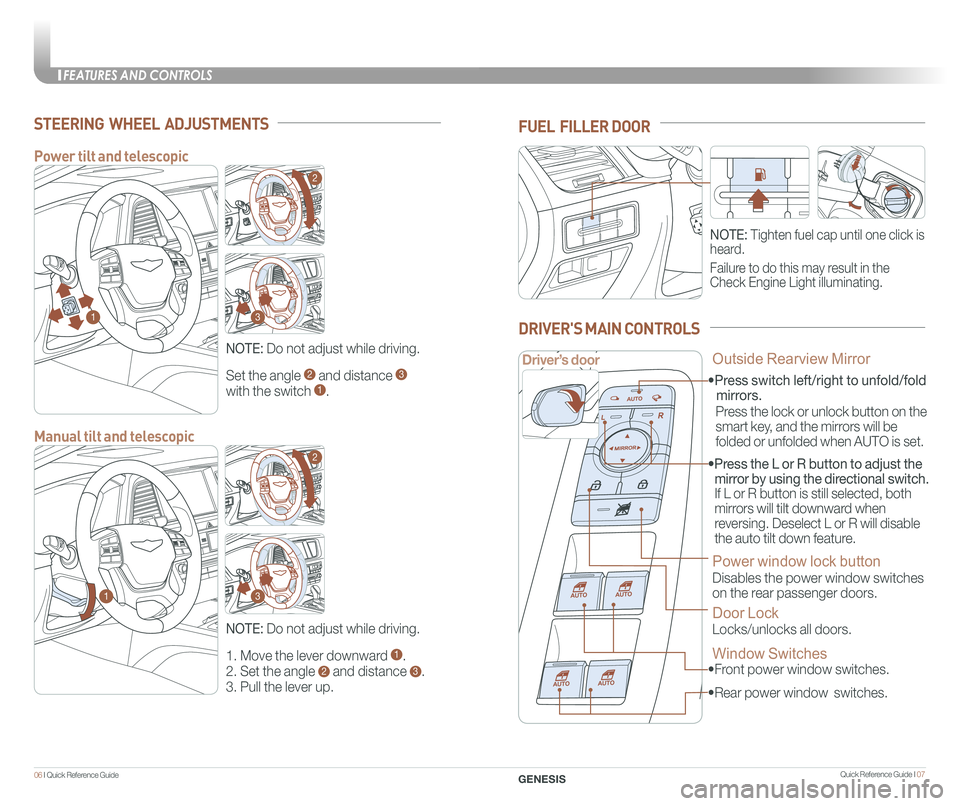
Set the angle 2 and distance 3
with the switch 1.
STEERING WHEEL ADJUSTMENTS
NOTE: Do not adjust while driving.
1. Move the lever downward 1.
2. Set the angle 2 and distance 3.
3. Pull the lever up.
NOTE: Do not adjust while driving.
Power tilt and telescopic
Manual tilt and telescopic
NOTE: Tighten fuel cap until one click is
heard.
Failure to do this may result in the
Check Engine Light illuminating.
FUEL FILLER DOOR
• Front power window switches.
•Press switch left/right to unfold/fold
mirrors.
• Rear power window switches.
• Press the L or R button to adjust the
mirror by using the directional switch.
If L or R button is still selected, both
mirrors will tilt downward when
reversing. Deselect L or R will disable
the auto tilt down feature.
Driver’s door
DRIVER'S MAIN CONTROLS
Outside Rearview Mirror
Press the lock or unlock button on the
smart key, and the mirrors will be
folded or unfolded when AUTO is set.
Power window lock button
Disables the power window switches
on the rear passenger doors.
Door Lock
Locks/unlocks all doors.
Window Switches
GENESIS
1
1
2
2
3
3
Page 7 of 23
Quick Reference Guide I 09
FEATURES AND CONTROLS
08 I Quick Reference Guide
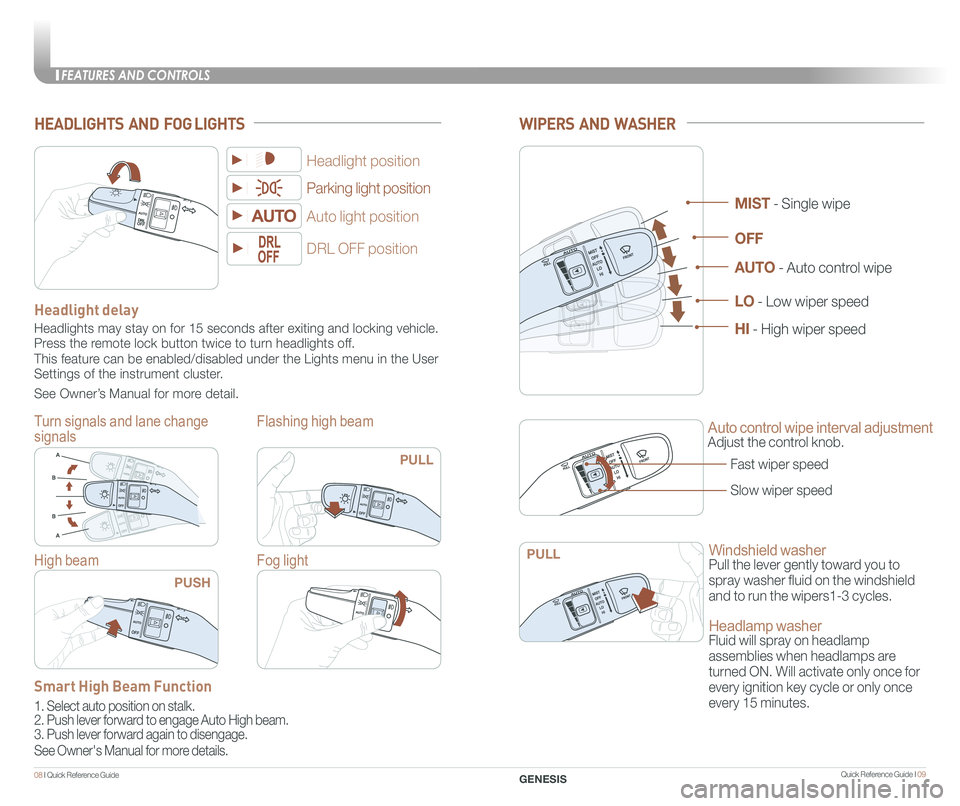
WIPERS AND WASHER
Auto control wipe interval adjustment
Adjust the control knob.
Windshield washer
Pull the lever gently toward you to
spray washer fluid on the windshield
and to run the wipers1-3 cycles.
Headlamp washer
Fluid will spray on headlamp
assemblies when headlamps are
turned ON. Will activate only once for
every ignition key cycle or only once
every 15 minutes.
Fast wiper speed
Slow wiper speed
MIST - Single wipe
AUTO - Auto control wipe
LO - Low wiper speed
HI - High wiper speed
OFF
HEADLIGHTS AND FOG LIGHTS
Parking light position
Flashing high beam
DRL OFF position
Auto light position
Flashing high beam
Headlight position
Flashing high beam
Headlight delay
Headlights may stay on for 15 seconds after exiting and locking vehicle.\
Press the remote lock button twice to turn headlights off.
This feature can be enabled/disabled under the Lights menu in the User
Settings of the instrument cluster.
See Owner’s Manual for more detail.
Fog light
Turn signals and lane change
signals
Flashing high beam
PULL
PULLHigh beam
PUSH
GENESIS
Smart High Beam Function
1. Select auto position on stalk.
2. Push lever forward to engage Auto High beam.
3. Push lever forward again to disengage.
See Owner's Manual for more details.
Page 8 of 23
Quick Reference Guide I 11
FEATURES AND CONTROLS
10 I Quick Reference Guide
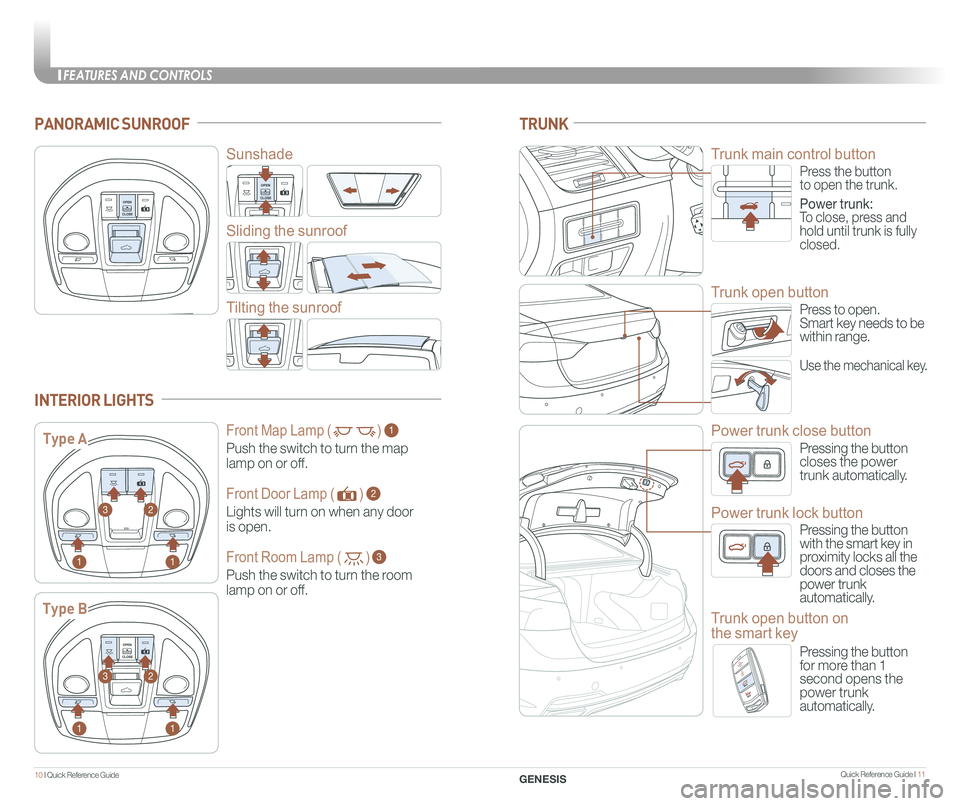
PANORAMIC SUNROOF
Sunshade
Sliding the sunroof
Tilting the sunroof
INTERIOR LIGHTS
Type A
Type B
1
1
1
1
2
2
3
3
Press the buttonto open the trunk.
Power trunk:To close, press and hold until trunk is fully closed.
TRUNK
Trunk main control button
Press to open.Smart key needs to bewithin range.
Use the mechanical key.
Trunk open button
Pressing the buttoncloses the power trunk automatically.
Power trunk close button
Pressing the button with the smart key in proximity locks all the doors and closes the power trunk automatically.
Power trunk lock button
Pressing the buttonfor more than 1second opens thepower trunkautomatically.
Trunk open button on
the smart key
GENESIS
Front Map Lamp ( )
Push the switch to turn the map
lamp on or off.
1
Front Door Lamp ( )
Lights will turn on when any door
is open.
2
Front Room Lamp ( )
Push the switch to turn the room
lamp on or off.
3
Page 9 of 23
Quick Reference Guide I 13
FEATURES AND CONTROLS
12 I Quick Reference Guide
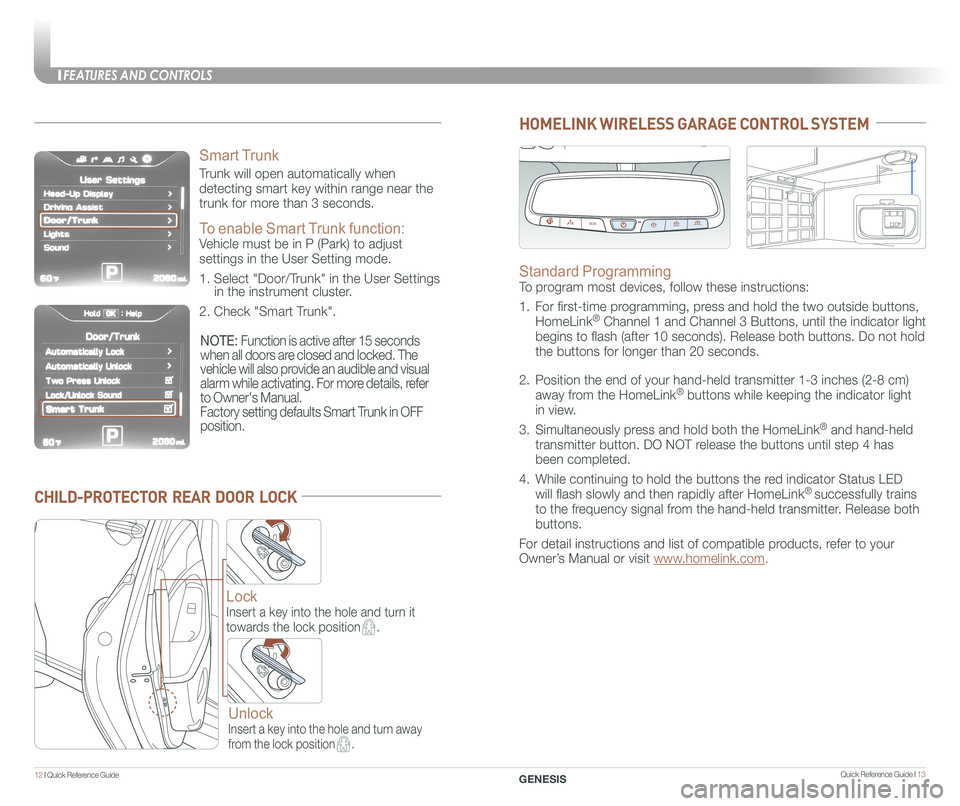
CHILD-PROTECTOR REAR DOOR LOCK
Lock
Insert a key into the hole and turn it
towards the lock position.
Unlock
Insert a key into the hole and turn away
from the lock position.
HOMELINK WIRELESS GARAGE CONTROL SYSTEM
Standard Programming
To program most devices, follow these instructions:
1. For first-time programming, press and hold the two outside buttons,
HomeLink® Channel 1 and Channel 3 Buttons, until the indicator light
begins to flash (after 10 seconds). Release both buttons. Do not hol\
d
the buttons for longer than 20 seconds.
2. Position the end of your hand-held transmitter 1-3 inches (2-8 cm)
away from the HomeLink® buttons while keeping the indicator light
in view.
3. Simultaneously press and hold both the HomeLink® and hand-held
transmitter button. DO NOT release the buttons until step 4 has
been completed.
4. While continuing to hold the buttons the red indicator Status LED
will flash slowly and then rapidly after HomeLink® successfully trains
to the frequency signal from the hand-held transmitter. Release both
buttons.
For detail instructions and list of compatible products, refer to your
Owner’s Manual or visit www.homelink.com.
GENESIS
Smart Trunk
Trunk will open automatically when
detecting smart key within range near the
trunk for more than 3 seconds.
To enable Smart Trunk function:
Vehicle must be in P (Park) to adjust
settings in the User Setting mode.
1. Select "Door/Trunk" in the User Settings in the instrument cluster.
2. Check "Smart Trunk".
NOTE: Function is active after 15 seconds
when all doors are closed and locked. The
vehicle will also provide an audible and visual
alarm while activating. For more details, refer
to Owner's Manual.
Factory setting defaults Smart Trunk in OFF
position.
Page 10 of 23
Quick Reference Guide I 15
INSTRUMENT CLUSTER
14 I Quick Reference Guide GENESIS
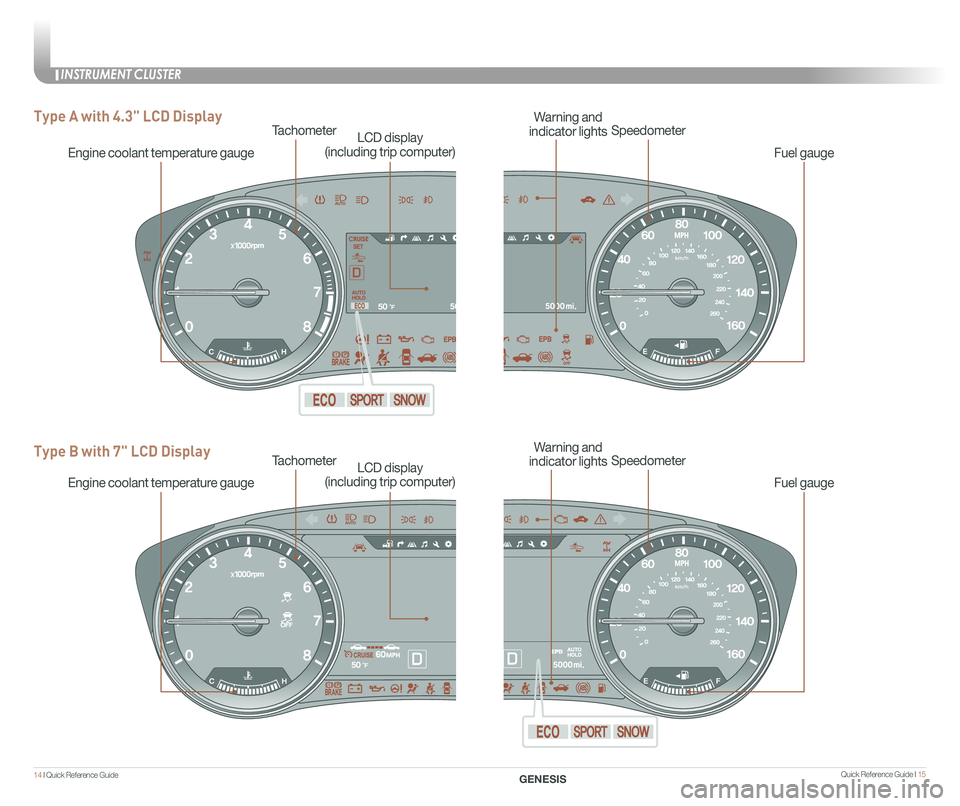
Fuel gauge
TachometerSpeedometer
Engine coolant temperature gauge
Warning and
indicator lightsLCD display
(including trip computer)
Type A with 4.3" LCD Display
Type B with 7" LCD Display
Fuel gauge
TachometerSpeedometer
Engine coolant temperature gauge
Warning and
indicator lightsLCD display
(including trip computer)