REG GENESIS G80 2017 Owner's Manual
[x] Cancel search | Manufacturer: GENESIS, Model Year: 2017, Model line: G80, Model: GENESIS G80 2017Pages: 496, PDF Size: 12.82 MB
Page 4 of 496
F2
Your Genesis Branded Vehicle should not be mod-
ified in any way. Such modifications may adversely
affect the performance, safety or durability of your
Genesis Branded Vehicle and may, in addition, vio-
late conditions of the limited warranties covering
the vehicle. Certain modifications may also be in
violation of regulations established by the U.S.
Department of Transportation and other federal or
state agencies.
Your vehicle is equipped with electronic fuel injec-
tion and other electronic components. It is possible
for an improperly installed/adjusted two-way radio
or cellular telephone to adversely affect electronic
systems. For this reason, we recommend that you
carefully follow the radio manufacturer's instructions
or consult your authorized retailer of Genesis
Branded products for precautionary measures or
special instructions if you choose to install one of
these devices.
CAUTION: MODIFICATIONS TO YOURGENESIS BRANDED VEHICLE
TWO-WAY RADIO OR CELLULARTELEPHONE INSTALLATION
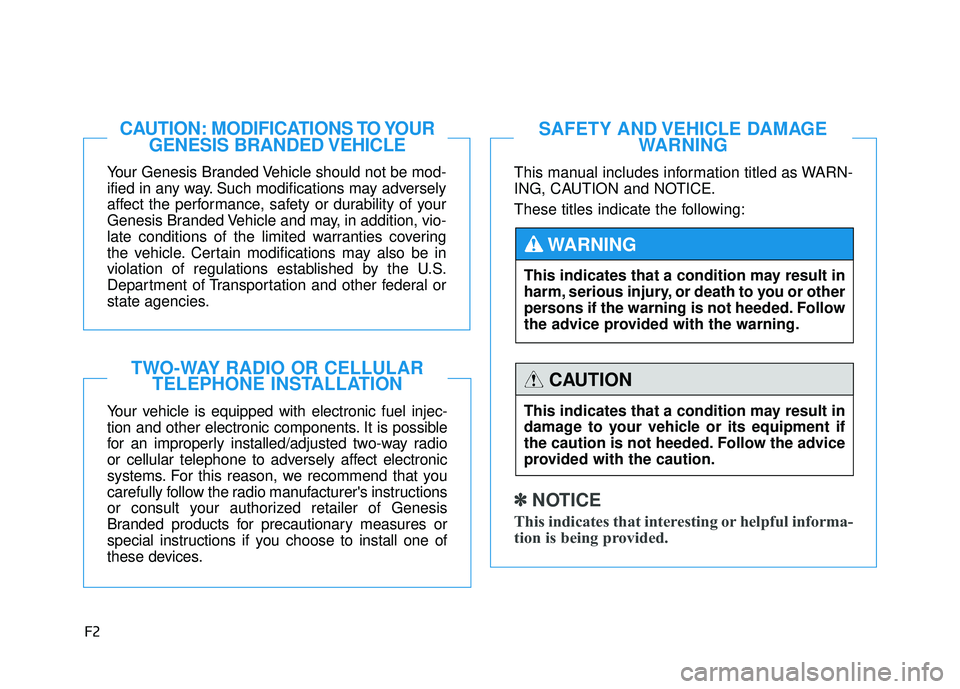
This manual includes information titled as WARN-
ING, CAUTION and NOTICE.
These titles indicate the following:
✽ ✽NOTICE
This indicates that interesting or helpful informa-
tion is being provided.
SAFETY AND VEHICLE DAMAGE
WARNING
This indicates that a condition may result in
harm, serious injury, or death to you or other
persons if the warning is not heeded. Follow
the advice provided with the warning.
WARNING
This indicates that a condition may result in
damage to your vehicle or its equipment if
the caution is not heeded. Follow the advice
provided with the caution.
CAUTION
Page 11 of 496

F9
Introduction
These gasolines will help the engine
run cleaner and enhance performance
of the Emission Control System. For
more information on TOP TIER
Detergent Gasoline, please go to the
website (www
.toptiergas.com).
For customers who do not use TOP
Tier Detergent Gasoline regularly,
and have problems starting or the
engine does not run smoothly, addi-
tives that you can buy separately
may be added to the gasoline. If TOP
TIER Detergent Gasoline is not avail-
able, one bottle of additive added to
the fuel tank at every 7,500 miles or
every engine oil change is recom-
mended. Additives are available from
your authorized retailer of Genesis
Branded products along with infor-
mation on how to use them. Do not
mix other additives.
Operation in foreign countries
If you are going to drive your vehicle
in another country, be sure to:
Observe all regulations regarding registration and insurance.
Determine that acceptable fuel is available. No special break-in period is need-
ed. By following a few simple precau-
tions for the first 600 miles (1,000
km) you may add to the perform-
ance, economy and life of your vehi-
cle.
Do not race the engine.
While driving, keep your engine
speed (rpm, or revolutions per
minute) between 2,000 rpm and
4,000 rpm.
Do not maintain a single speed for long periods of time, either fast or
slow. Varying engine speed is
needed to properly break-in the
engine.
Avoid hard stops, except in emer- gencies, to allow the brakes to seat
properly.
V VE
EH
H I
IC
C L
LE
E
B
B R
RE
EA
A K
K-
-I
IN
N
P
P R
R O
O C
CE
E S
SS
S
Items contained in motor vehi-
cles or emitted from them are
known to the State of California
to cause cancer and birth
defects or reproductive harm.
These include:
Gasoline and its vapors
Engine exhaust
Used engine oil
Interior passenger compart-
ment components and materi-
als
Component parts which are
subject to heat and wear
In addition, battery posts, termi-
nals and related accessories
contain lead, lead compounds
and other chemicals known to
the State of California to cause
cancer and reproductive harm.
CALIFORNIA PROPOSI-
TION 65 WARNING
Page 23 of 496
2-3
Safety system of your vehicle
NEVER let the use of a mobiledevice distract you from driving.
You have a responsibility to your
passengers and others on the road
to always drive safely, with your
hands on the wheel as well as your
eyes and attention on the road.
Control your speed
Excessive speed is a major factor in
crash injuries and deaths. Generally,
the higher the speed, the greater the
risk, but serious injuries can also
occur at lower speeds. Never drive
faster than is safe for current condi-
tions, regardless of the maximum
speed posted.
Keep your vehicle in safe condi-
tion
Having a tire blowout or a mechani-
cal failure can be extremely haz-
ardous. To reduce the possibility of
such problems, check your tire pres-
sures and condition frequently, and
perform all regularly scheduled
maintenance.
2
Page 51 of 496

2-31
Safety system of your vehicle
2
The pre-active seat belt warning will
turn on if there is a problem with your
pre-active seat belt.
Have the system checked by an
authorized retailer of Genesis
Branded products if :
The warning message comes on
while the vehicle is in motion. if the
PSB warning message disappeared,
the warning indicator (master symbol)
turns on.In order to maximize the safety of the
passenger, the pre-active seat belt
system operates as below.
The seat belt is tightened when:
- Emergency braking situationoccurs
- Losing control of the vehicle
- The vehicle senses the collision situation by sensor (If equipped)
Dynamic support - Slippery frozen road
- The passenger leans to one sideby sudden braking or rapid turning.
Slack removal Other functions are tightening a
loose seat belt after vehicle speed
is over 15 km/h (9.3 mph) and
winding a loose seat belt after
unfastening the seat belt.
When releasing the seat belt, if the
seat belt loosens, the motor will
wind up a loose seat belt to tight.
Additional seat belt safety pre-
cautions
Seat belt use during pregnancy
The seat belt should always be used
during pregnancy. The best way to
protect your unborn child is to protect
yourself by always wearing the seat
belt.
Pregnant women should always wear
a lap-shoulder seat belt. Place the
shoulder belt across your chest, rout-
ed between your breasts and away
from your neck. Place the lap belt
below the belt line so that it fits snugly
and as low as possible across the
hips, not across the abdomen.
ODH043254L
To reduce the risk of serious
injury or death to an unborn
child during an accident, preg-
nant women should NEVER
place the lap portion of the seat
belt above or over the area of
the abdomen where the unborn
child is located.
WARNING
Page 58 of 496

2-38
Safety system of your vehicle
Forward-facing child restraints
A forward-facing child seat provides
restraint for the child’s body with a
harness. Keep children in a forward-
facing child seat with a harness until
they reach the top height or weight
limit allowed by your child restraint’s
manufacturer.
Once your child outgrows the forward-
facing child restraint, your child is
ready for a booster seat.
Booster seats
A booster seat is a restraint designed
to improve the fit of the vehicle’s seat
belt system. A booster seat positions
the seat belt so that it fits properly
over the lap of your child. Keep your
child in a booster seat until they are
big enough to sit in the seat without a
booster and still have the seat belt fit
properly.
For a seat belt to fit properly, the lap
belt must lie snugly across the upper
thighs, not the stomach. The shoulder
belt should lie snug across the shoul-
der and chest and not across the neck
or face. Children under age 13 must
always ride in the rear seats and must
always be properly restrained to mini-
mize the risk of injury.
Installing a Child Restraint
System (CRS)
Before installing your child
restraint system always:
Read and follow the instruc-
tions provided by the manu-
facturer of the child restraint.
Read and follow the instruc-
tions regarding child restraint
systems in this manual.
Failure to follow all warnings
and instructions could increase
the risk of the SERIOUS INJURY
or DEATH if an accident occurs.
WARNING
If the vehicle headrest prevents
proper installation of a child
seat (as described in the child
seat system manual), the head-
rest of the respective seating
position shall be readjusted or
entirely removed.
WARNING
ODH033062
Page 94 of 496
3-6
Start-up
You can start the engine without
inserting the key.
For more information, refer to the
Engine Start/Stop button in chap-
ter 5.
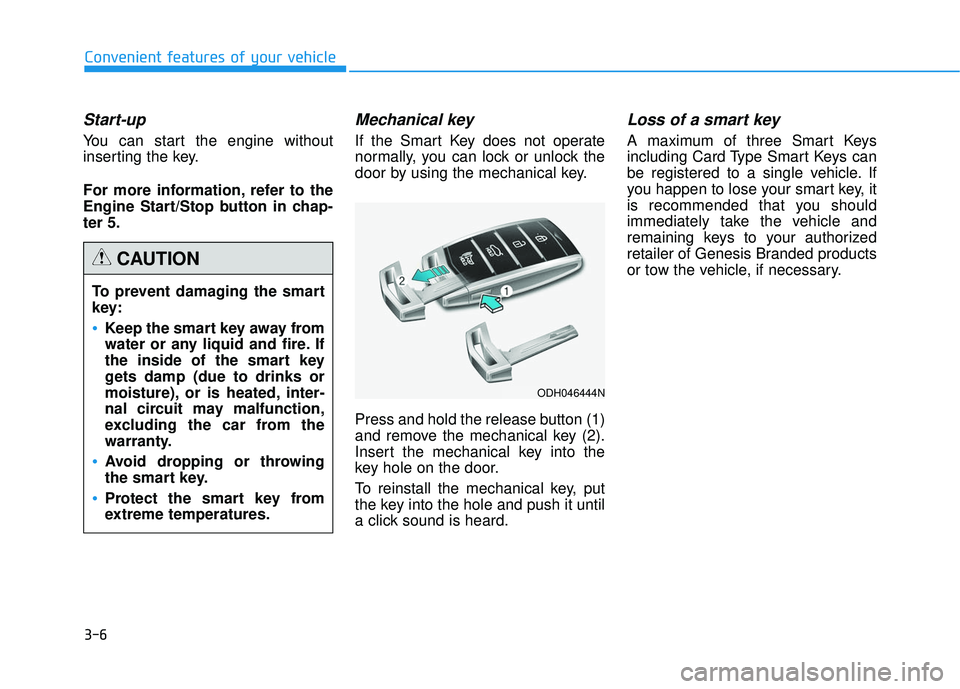
Mechanical key
If the Smart Key does not operate
normally, you can lock or unlock the
door by using the mechanical key.
Press and hold the release button (1)
and remove the mechanical key (2).
Insert the mechanical key into the
key hole on the door.
To reinstall the mechanical key, put
the key into the hole and push it until
a click sound is heard.
Loss of a smart key
A maximum of three Smart Keys
including Card Type Smart Keys can
be registered to a single vehicle. If
you happen to lose your smart key, it
is recommended that you should
immediately take the vehicle and
remaining keys to your authorized
retailer of Genesis Branded products
or tow the vehicle, if necessary.
Convenient features of your vehicleTo prevent damaging the smart
key:
•Keep the smart key away from
water or any liquid and fire. If
the inside of the smart key
gets damp (due to drinks or
moisture), or is heated, inter-
nal circuit may malfunction,
excluding the car from the
warranty.
Avoid dropping or throwing
the smart key.
Protect the smart key from
extreme temperatures.
CAUTION
ODH046444N
Page 97 of 496
3-9
Convenient features of your vehicle
Battery replacement
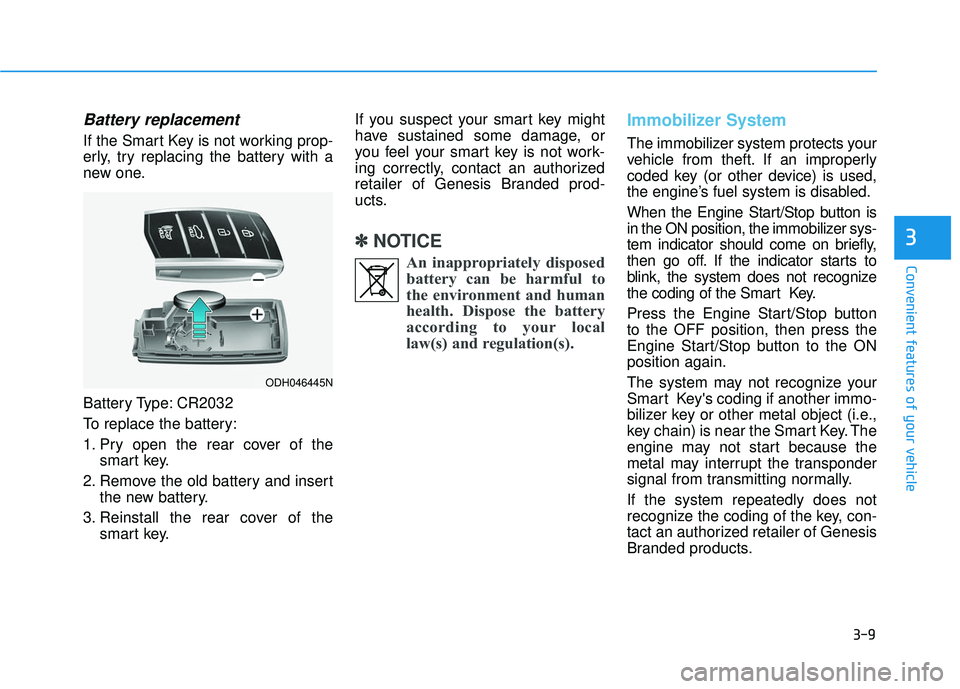
If the Smart Key is not working prop-
erly, try replacing the battery with a
new one.
Battery Type: CR2032
To replace the battery:
1. Pry open the rear cover of thesmart key.
2. Remove the old battery and insert the new battery.
3. Reinstall the rear cover of the smart key. If you suspect your smart key might
have sustained some damage, or
you feel your smart key is not work-
ing correctly, contact an authorized
retailer of Genesis Branded prod-
ucts.
✽ ✽
NOTICE
An inappropriately disposed
battery can be harmful to
the environment and human
health. Dispose the battery
according to your local
law(s) and regulation(s).
Immobilizer System
The immobilizer system protects your
vehicle from theft. If an improperly
coded key (or other device) is used,
the engine’s fuel system is disabled.
When the Engine Start/Stop button is
in the ON position, the immobilizer sys-
tem indicator should come on briefly,
then go off. If the indicator starts to
blink, the system does not recognize
the coding of the Smart Key.
Press the Engine Start/Stop button
to the OFF position, then press the
Engine Start/Stop button to the ON
position again.
The system may not recognize your
Smart Key's coding if another immo-
bilizer key or other metal object (i.e.,
key chain) is near the Smart Key. The
engine may not start because the
metal may interrupt the transponder
signal from transmitting normally.
If the system repeatedly does not
recognize the coding of the key, con-
tact an authorized retailer of Genesis
Branded products.
3
ODH046445N
Page 111 of 496
3-23
Convenient features of your vehicle
3
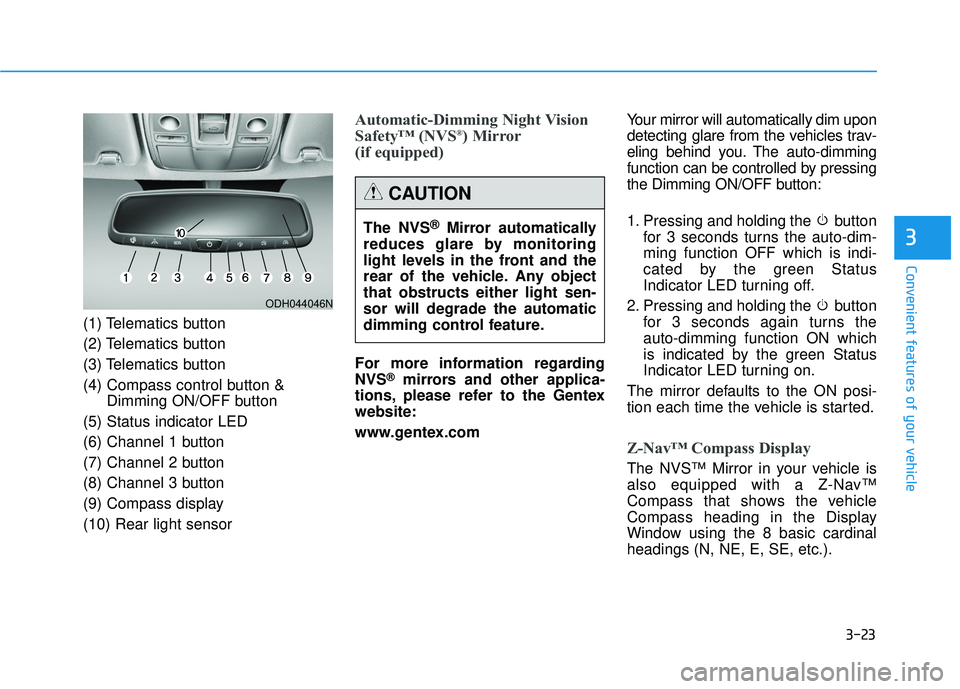
(1) Telematics button
(2) Telematics button
(3) Telematics button
(4) Compass control button &Dimming ON/OFF button
(5) Status indicator LED
(6) Channel 1 button
(7) Channel 2 button
(8) Channel 3 button
(9) Compass display
(10) Rear light sensor
Automatic-Dimming Night Vision
Safety™ (NVS®) Mirror
(if equipped)
For more information regarding
NVS®mirrors and other applica-
tions, please refer to the Gentex
website:
www.gentex.com Your mirror will automatically dim upon
detecting glare from the vehicles trav-
eling behind you. The auto-dimming
function can be controlled by pressing
the Dimming ON/OFF button:
1. Pressing and holding the button
for 3 seconds turns the auto-dim-
ming function OFF which is indi-
cated by the green Status
Indicator LED turning off.
2. Pressing and holding the button for 3 seconds again turns the
auto-dimming function ON which
is indicated by the green Status
Indicator LED turning on.
The mirror defaults to the ON posi-
tion each time the vehicle is started.
Z-Nav™ Compass Display
The NVS™ Mirror in your vehicle is
also equipped with a Z-Nav™
Compass that shows the vehicle
Compass heading in the Display
Window using the 8 basic cardinal
headings (N, NE, E, SE, etc.).
ODH044046N
The NVS®Mirror automatically
reduces glare by monitoring
light levels in the front and the
rear of the vehicle. Any object
that obstructs either light sen-
sor will degrade the automatic
dimming control feature.
CAUTION
Page 116 of 496
3-28
Convenient features of your vehicle
Gate operator & Canadian program-ming
During programming, your handheld
transmitter may automatically stop
transmitting. Continue to press the
Integrated HomeLink
®Wireless
Control System button (note steps 2
through 3 in the Programming portion
of this document) while you press
and re-press ("cycle") your handheld
transmitter every two seconds until
the frequency signal has been
learned. The indicator light will flash
slowly and then rapidly after several
seconds upon successful training.
Operating HomeLink®
To operate, simply press and release
the programmed HomeLink®button.
Activation will now occur for the
trained device (i.e. garage door
opener, gate operator, security sys-
tem, entry door lock, home/office
lighting, etc.). For convenience, the
hand-held transmitter of the device
may also be used at any time.
Reprogramming a single HomeLink®
button
To program a device to HomeLink®
using a HomeLink®button previously
trained, follow these steps:
1.Press and hold the desired HomeLink
®button. DO NOT
release the button.
2.The indicator light will begin to flash after 20 seconds. Without releasing
the HomeLink
®button, proceed
with "Programming" step 2.
For questions or comments, contact
HomeLink
®at www.homelink.comor
1-800-355-3515.
Erasing HomeLink®buttons
Individual buttons cannot be erased.
However, to erase all three pro-
grammed buttons:
1. Press and hold the two outer HomeLink
®buttons until the indi-
cator light begins to flash after 10
seconds.
2. Release both buttons. Do not hold for longer than 20 seconds.
The Integrated HomeLink
®Wireless
Control System is now in the training
(learn) mode and can be pro-
grammed at any time following the
appropriate steps in the
Programming chapters above.
NVS
®is a registered trademark and
Z-Nav™ is a trademark of the
Gentex Corporation, Zeeland,
Michigan. HomeLink
®is a registered
trademark owned by Johnson
Controls, Incorporated, Milwaukee,
Wisconsin.
Page 118 of 496
3-30
Convenient features of your vehicle
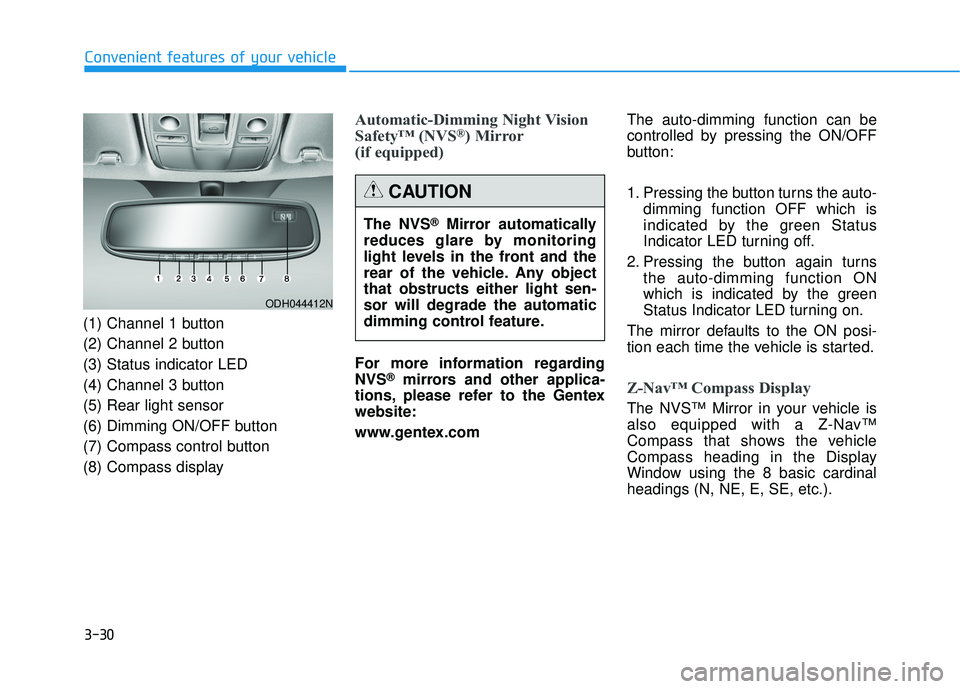
(1) Channel 1 button
(2) Channel 2 button
(3) Status indicator LED
(4) Channel 3 button
(5) Rear light sensor
(6) Dimming ON/OFF button
(7) Compass control button
(8) Compass display
Automatic-Dimming Night Vision
Safety™ (NVS®) Mirror
(if equipped)
For more information regarding
NVS®mirrors and other applica-
tions, please refer to the Gentex
website:
www.gentex.com The auto-dimming function can be
controlled by pressing the ON/OFF
button:
1. Pressing the button turns the auto-
dimming function OFF which is
indicated by the green Status
Indicator LED turning off.
2. Pressing the button again turns the auto-dimming function ON
which is indicated by the green
Status Indicator LED turning on.
The mirror defaults to the ON posi-
tion each time the vehicle is started.Z-Nav™ Compass Display
The NVS™ Mirror in your vehicle is
also equipped with a Z-Nav™
Compass that shows the vehicle
Compass heading in the Display
Window using the 8 basic cardinal
headings (N, NE, E, SE, etc.).
The NVS
®Mirror automatically
reduces glare by monitoring
light levels in the front and the
rear of the vehicle. Any object
that obstructs either light sen-
sor will degrade the automatic
dimming control feature.
CAUTION
ODH044412N