lock GENESIS G80 2017 Owner's Manual
[x] Cancel search | Manufacturer: GENESIS, Model Year: 2017, Model line: G80, Model: GENESIS G80 2017Pages: 496, PDF Size: 12.82 MB
Page 17 of 496
1-4
Your vehicle at a glance
I
IN
N T
TE
ER
R I
IO
O R
R
O
O V
VE
ER
R V
V I
IE
E W
W
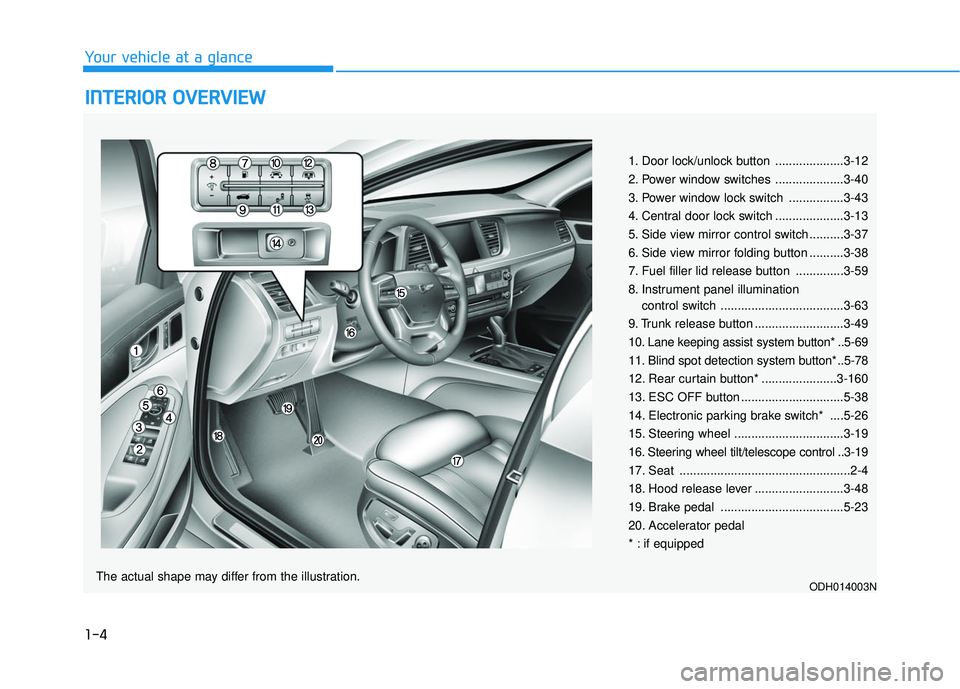
1. Door lock/unlock button ....................3-12
2. Power window switches ....................3-40
3. Power window lock switch ................3-43
4. Central door lock switch ....................3-13
5. Side view mirror control switch ..........3-37
6. Side view mirror folding button ..........3-38
7. Fuel filler lid release button ..............3-59
8. Instrument panel illumination
control switch ....................................3-63
9. Trunk release button ..........................3-49
10. Lane keeping assist system button* ..5-69
11. Blind spot detection system button* ..5-78
12. Rear curtain button* ......................3-160
13. ESC OFF button ..............................5-38
14. Electronic parking brake switch* ....5-26
15. Steering wheel ................................3-19
16. Steering wheel tilt/telescope control ..3-19
17. Seat ..................................................2-4
18. Hood release lever ..........................3-48
19. Brake pedal ....................................5-23
20. Accelerator pedal
* : if equipped
ODH014003NThe actual shape may differ from the illustration.
Page 25 of 496

Safety precautions
Adjusting the seats so that you are sit-
ting in a safe, comfortable position
plays an important role in driver and
passenger safety together with the
seat belts and air bags in an accident.
Air bags
You can take steps to reduce the risk
of being injured by an inflating air
bag. Sitting too close to an air bag
greatly increases the risk of injury in
the event the air bag inflates.The National Highway Traffic Safety
Administration (NHTSA) recommends
that drivers allow at least 10 inches
(25 cm) between the center of the
steering wheel and their chest.
Seat belts
Always fasten your seat belt before
starting any trip.
At all times, passengers should sit
upright and be properly restrained.
Infants and small children must be
restrained in appropriate child restraint
systems. Children who have outgrown
a booster seat and adults must be
restrained using the seat belts.
Do not use a cushion that
reduces friction between the seat
and the passenger. The passen-
ger's hips may slide under the
lap portion of the seat belt during
an accident or a sudden stop.
Serious or fatal internal injuries
could result because the seat
belt cannot operate properly.
WARNING To reduce the risk of serious
injury or death from an inflating
air bag, take the following pre-
cautions:
Adjust the driver's seat as far to
the rear as possible while main-
taining the ability to maintain
full control of the vehicle.
Adjust the front passenger seat
as far to the rear as possible.
Hold the steering wheel by the
rim with hands at the 9 o'clock
and 3 o'clock positions to mini-
mize the risk of injuries to your
hands and arms.
NEVER place anything or any-
one between the steering wheel
and the air bag.
Do not allow the front passen-
ger to place feet or legs on the
dashboard to minimize the risk
of leg injuries.
WARNING
2-5
Safety system of your vehicle
2
Page 26 of 496

2-6
Safety system of your vehicle
Front seats
Take the following precautions
when adjusting your seat belt:
NEVER use one seat belt for
more than one occupant.
Always position the seatback
upright with the lap portion of
the seat belt snug and low
across the hips.
NEVER allow children or small
infants to ride in a passenger’s
lap.
Do not route the seat belt
across your neck, across sharp
edges, or reroute the shoulder
strap away from your body.
Do not allow the seat belt to
become caught or jammed.
WARNING
Take the following precautions
when adjusting your seat:
NEVER attempt to adjust the
seat while the vehicle is mov-
ing. The seat could respond
with unexpected movement
and may cause loss of vehicle
control resulting in an acci-
dent.
Do not place anything under
the front seats. Loose objects
in the driver's foot area could
interfere with the operation of
the foot pedals, causing an
accident.
Do not allow anything to inter-
fere with the normal position
and proper locking of the seat-
back.
Do not place a cigarette lighter
on the floor or seat. When you
operate the seat, gas may exit
out of the lighter causing a fire.(Continued)
WARNING
To prevent injury:
Do not adjust your seat while
wearing your seat belt.
Moving the seat cushion for-
ward may cause strong pres-
sure on your abdomen.
Do not allow your hands or
fingers to get caught in the
seat mechanisms while the
seat is moving.
(Continued)
Use extreme caution when
picking small objects trapped
under the seats or between the
seat and the center console.
Your hands might be cut or
injured by the sharp edges of
the seat mechanism.
WARNING
Page 34 of 496
2-14
Headrest
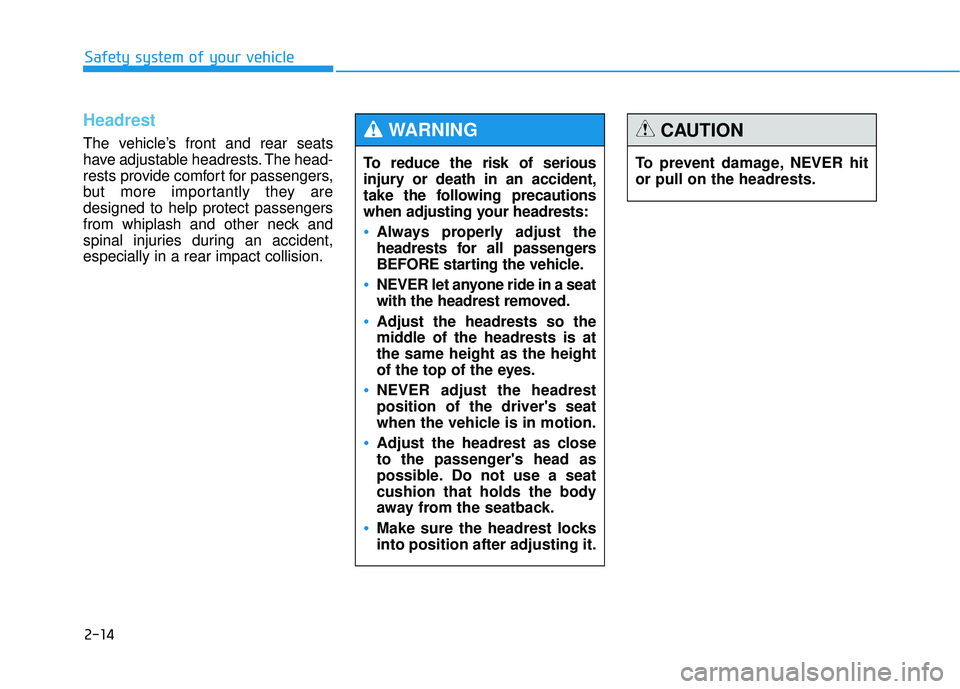
The vehicle’s front and rear seats
have adjustable headrests. The head-
rests provide comfort for passengers,
but more importantly they are
designed to help protect passengers
from whiplash and other neck and
spinal injuries during an accident,
especially in a rear impact collision.
Safety system of your vehicleTo reduce the risk of serious
injury or death in an accident,
take the following precautions
when adjusting your headrests:
Always properly adjust the
headrests for all passengers
BEFORE starting the vehicle.
NEVER let anyone ride in a seat
with the headrest removed.
Adjust the headrests so the
middle of the headrests is at
the same height as the height
of the top of the eyes.
NEVER adjust the headrest
position of the driver's seat
when the vehicle is in motion.
Adjust the headrest as close
to the passenger's head as
possible. Do not use a seat
cushion that holds the body
away from the seatback.
Make sure the headrest locks
into position after adjusting it.
WARNING
To prevent damage, NEVER hit
or pull on the headrests.
CAUTION
Page 36 of 496
2-16
Safety system of your vehicle
Removal/Reinstall
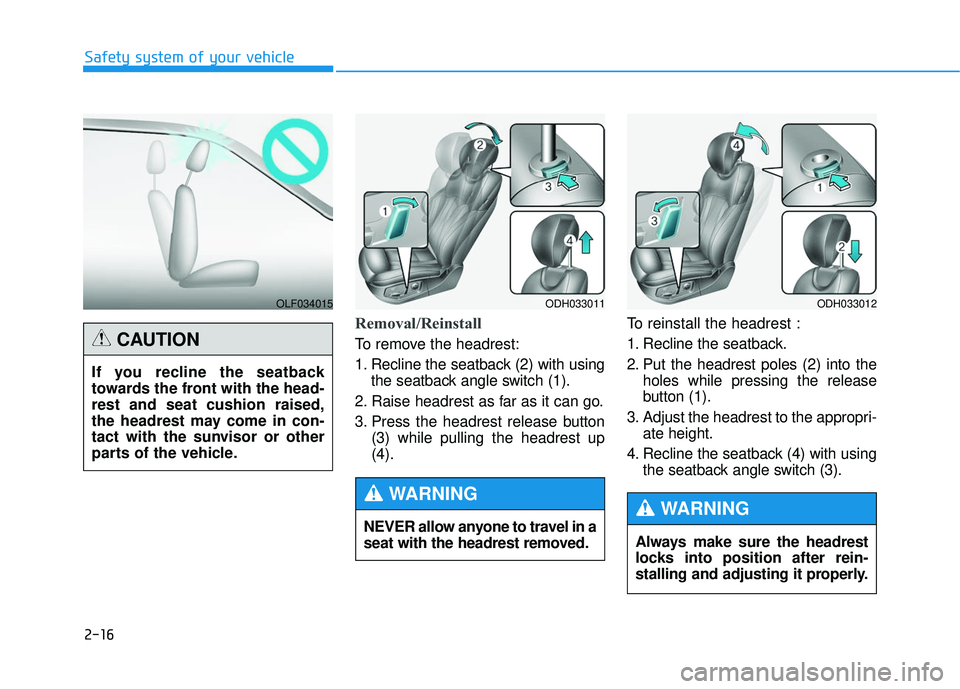
To remove the headrest:
1. Recline the seatback (2) with usingthe seatback angle switch (1).
2. Raise headrest as far as it can go.
3. Press the headrest release button (3) while pulling the headrest up
(4). To reinstall the headrest :
1. Recline the seatback.
2. Put the headrest poles (2) into the
holes while pressing the release
button (1).
3. Adjust the headrest to the appropri- ate height.
4. Recline the seatback (4) with using the seatback angle switch (3).
NEVER allow anyone to travel in a
seat with the headrest removed.
WARNING
ODH033011ODH033012
Always make sure the headrest
locks into position after rein-
stalling and adjusting it properly.
WARNING
OLF034015
If you recline the seatback
towards the front with the head-
rest and seat cushion raised,
the headrest may come in con-
tact with the sunvisor or other
parts of the vehicle.
CAUTION
Page 41 of 496

2-21
Safety system of your vehicle
2
(Continued)
Do not place materials such as
plastic bags or newspapers
under the seats. They may
block the air intake causing
the air vents to not work prop-
erly.
Do not change the seat cov-
ers. It may damage the seat
warmer or cooler.
If the air vents do not operate,
restart the vehicle. If there is
no change, we recommend
that you have your vehicle
inspected by an authorized
retailer of Genesis Branded
products.
To prevent damage to the seat
warmer, seat cooler and seats:
Use the seat warmer and cool-
er ONLY when the climate
control system is on. Using
the seat warmer and cooler
for prolonged periods of time
with the climate control sys-
tem off could cause the seat
warmer and cooler to mal-
function.
Never use a solvent such as
paint thinner, benzene, alco-
hol or gasoline to clean the
seats.
Avoid spilling liquids on the
surface of the front seats and
seatbacks; this may cause the
air vent holes to become
blocked and not work proper-
ly.(Continued)
CAUTION
Page 45 of 496
2-25
Safety system of your vehicle
2
Seat belt restraint system
Seat Belt-Driver’s 3-point sys-tem with emergency lockingretractor
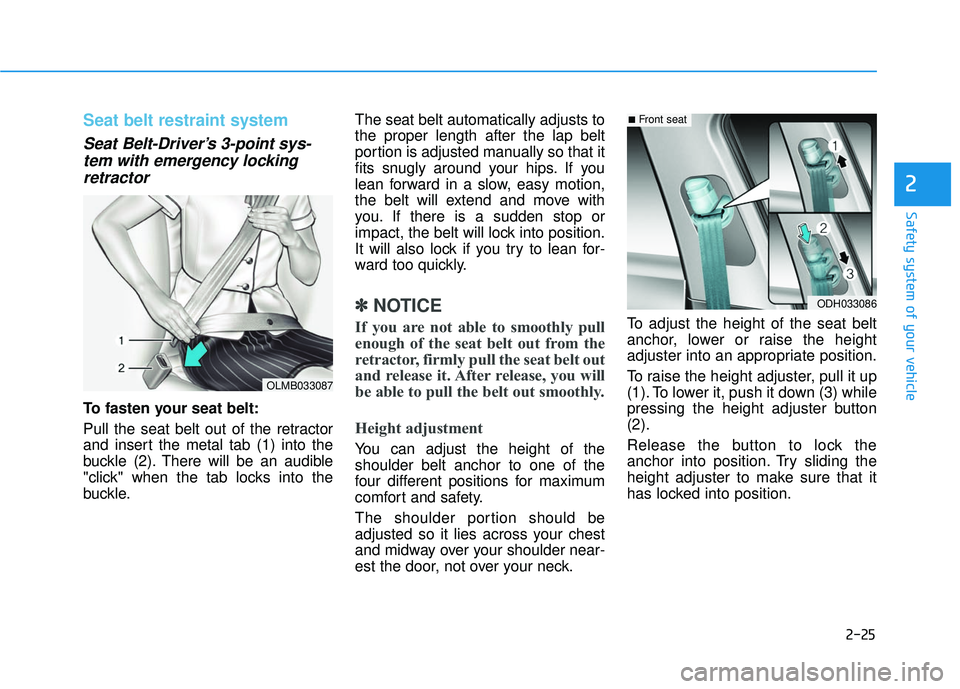
To fasten your seat belt:
Pull the seat belt out of the retractor
and insert the metal tab (1) into the
buckle (2). There will be an audible
"click" when the tab locks into the
buckle. The seat belt automatically adjusts to
the proper length after the lap belt
portion is adjusted manually so that it
fits snugly around your hips. If you
lean forward in a slow, easy motion,
the belt will extend and move with
you. If there is a sudden stop or
impact, the belt will lock into position.
It will also lock if you try to lean for-
ward too quickly.
✽ ✽
NOTICE
If you are not able to smoothly pull
enough of the seat belt out from the
retractor, firmly pull the seat belt out
and release it. After release, you will
be able to pull the belt out smoothly.
Height adjustment
You can adjust the height of the
shoulder belt anchor to one of the
four different positions for maximum
comfort and safety.
The shoulder portion should be
adjusted so it lies across your chest
and midway over your shoulder near-
est the door, not over your neck. To adjust the height of the seat belt
anchor, lower or raise the height
adjuster into an appropriate position.
To raise the height adjuster, pull it up
(1). To lower it, push it down (3) while
pressing the height adjuster button
(2).
Release the button to lock the
anchor into position. Try sliding the
height adjuster to make sure that it
has locked into position.
OLMB033087
ODH033086
■Front seat
Page 46 of 496
2-26
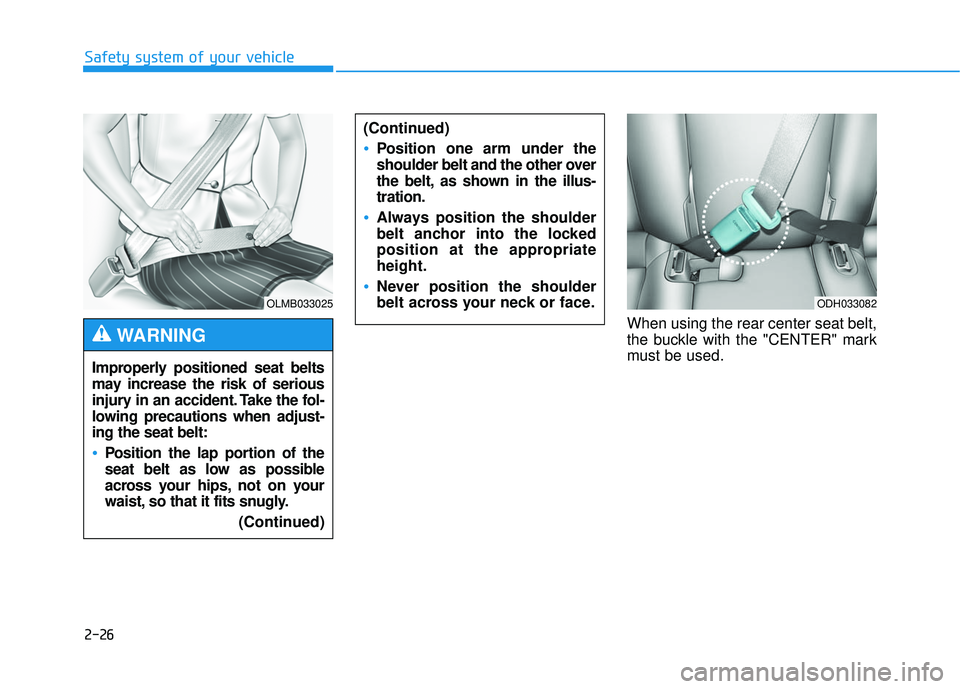
Safety system of your vehicleWhen using the rear center seat belt,
the buckle with the "CENTER" mark
must be used.
(Continued)
Position one arm under the
shoulder belt and the other over
the belt, as shown in the illus-
tration.
Always position the shoulder
belt anchor into the locked
position at the appropriate
height.
Never position the shoulder
belt across your neck or face.
OLMB033025
Improperly positioned seat belts
may increase the risk of serious
injury in an accident. Take the fol-
lowing precautions when adjust-
ing the seat belt:
Position the lap portion of the
seat belt as low as possible
across your hips, not on your
waist, so that it fits snugly.
(Continued)
WARNING
ODH033082
Page 47 of 496

2-27
Safety system of your vehicle
2
Seat Belt – Passenger’s 3-pointsystem with convertible lockingretractor
This type of seat belt combines the
features of both an emergency lock-
ing retractor seat belt and an auto-
matic locking retractor seat belt.
Convertible retractor type seat belts
are installed in the rear seat positions
to help accommodate the installation
of child restraint systems. Although a
convertible retractor is also installed in
the front passenger seat position,
NEVER place any infant/child
restraint system in the front seat of
the vehicle.
To fasten your seat belt:
Pull the seat belt out of the retractor
and insert the metal tab into the buck-
le. There will be an audible "click"
when the tab locks into the buckle.
When not securing a child restraint,
the seat belt operates in the same way
as the driver's seat belt (Emergency
Locking Retractor Type). It automati-
cally adjusts to the proper length only
after the lap belt portion of the seat
belt is adjusted manually so that it fits
snugly across your hips. When the seat belt is fully extended
from the retractor to allow the instal-
lation of a child restraint system, the
seat belt operation changes to allow
the belt to retract, but not to extend
(Automatic Locking Retractor Type).
Refer to "Using a Child Restraint
System" in this chapter.
✽ ✽
NOTICE
Although the seat belt retractor pro-
vides the same level of protection for
seated passengers in either emer-
gency or automatic locking modes,
the emergency locking mode allows
seated passengers to move freely in
their seat while keeping some tension
on the belt. During a collision or sud-
den stop, the retractor automatically
locks the belt to help restrain your
body. To deactivate the automatic
locking mode, allow the unbuckled
seat belt to fully retract. To release your seat belt:
Press the release button (1) in the
locking buckle.
When it is released, the belt should
automatically draw back into the
retractor. If this does not happen,
check the belt to be sure it is not twist-
ed, then try again.
ODH033057
Page 48 of 496
2-28
Safety system of your vehicle
Pre-tensioner seat belt (Driver and front passenger)
Retractor pre-tensioner
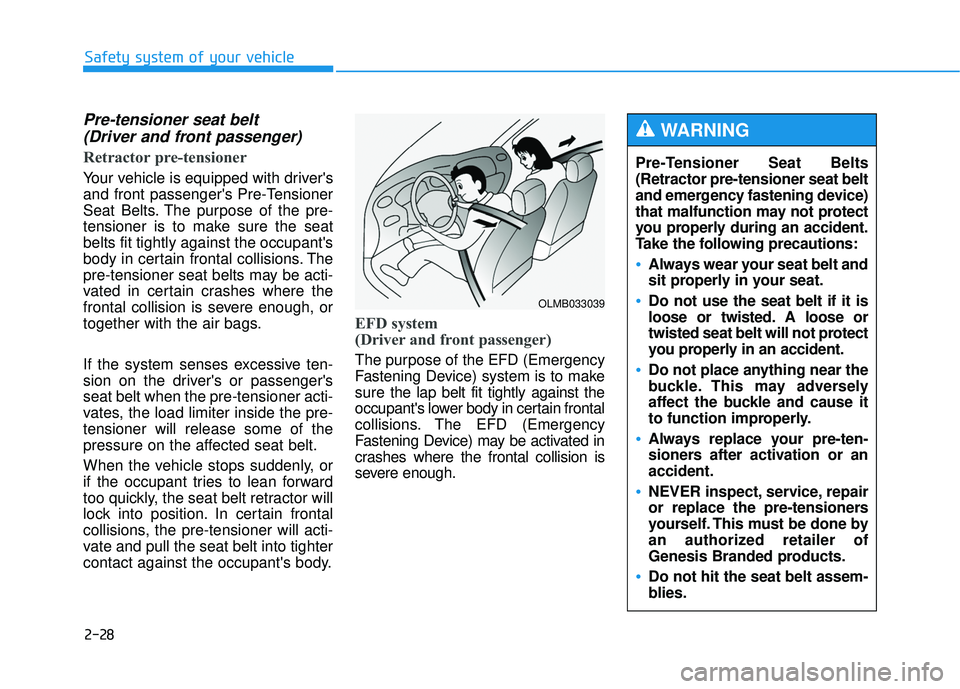
Your vehicle is equipped with driver's
and front passenger's Pre-Tensioner
Seat Belts. The purpose of the pre-
tensioner is to make sure the seat
belts fit tightly against the occupant's
body in certain frontal collisions. The
pre-tensioner seat belts may be acti-
vated in certain crashes where the
frontal collision is severe enough, or
together with the air bags.
If the system senses excessive ten-
sion on the driver's or passenger's
seat belt when the pre-tensioner acti-
vates, the load limiter inside the pre-
tensioner will release some of the
pressure on the affected seat belt.
When the vehicle stops suddenly, or
if the occupant tries to lean forward
too quickly, the seat belt retractor will
lock into position. In certain frontal
collisions, the pre-tensioner will acti-
vate and pull the seat belt into tighter
contact against the occupant's body.
EFD system
(Driver and front passenger)
The purpose of the EFD (Emergency
Fastening Device) system is to make
sure the lap belt fit tightly against the
occupant's lower body in certain frontal
collisions. The EFD (Emergency
Fastening Device) may be activated in
crashes where the frontal collision is
severe enough.
OLMB033039
Pre-Tensioner Seat Belts
(Retractor pre-tensioner seat belt
and emergency fastening device)
that malfunction may not protect
you properly during an accident.
Take the following precautions:
Always wear your seat belt and
sit properly in your seat.
Do not use the seat belt if it is
loose or twisted. A loose or
twisted seat belt will not protect
you properly in an accident.
Do not place anything near the
buckle. This may adversely
affect the buckle and cause it
to function improperly.
Always replace your pre-ten-
sioners after activation or an
accident.
NEVER inspect, service, repair
or replace the pre-tensioners
yourself. This must be done by
an authorized retailer of
Genesis Branded products.
Do not hit the seat belt assem-
blies.
WARNING